Suppose you visit my website quite often as a GIS Specialist or similar. In that case, you probably know my texts about transferring the AutoCAD LT data to ArcGIS Online using the QGIS application. This way is free, although it features some unpleasant limitations i.e. lack of attributes, which can be painful for further data manipulation in a GIS environment.
In this article I show you the same exercise, but with using the ArcGIS Pro. In the end, you can see the basic rundown of using these two applications and compare all the pros and cons possible.
1. Loading data from AutoCAD LT to ArcGIS pro is completely different, than in the case of QGIS. However, before I explain to you how to do it, mentioning one thing is necessary. Namely, unlike the situation in QGIS, the geolocation of our AutoCAD Project is mandatory for the ArcGIS Pro environment. Doing it for QGIS is still beneficial, but not the same necessary as for ArcGIS Pro. Because my examples were based on the British National Grid coordinate system, the default AutoCAD LT project coordinates matched the OSGB36 CRS in QGIS. It doesn’t need to happen in other coordinates, therefore I wouldn’t say, that geolocation of our AutoCAD LT project isn’t required as the first. Even if you want to use QGIS for transferring your data to ArcGIS Online, I would advise you to check your target coordinate system and geolocate the project in AutoCAD when possible.
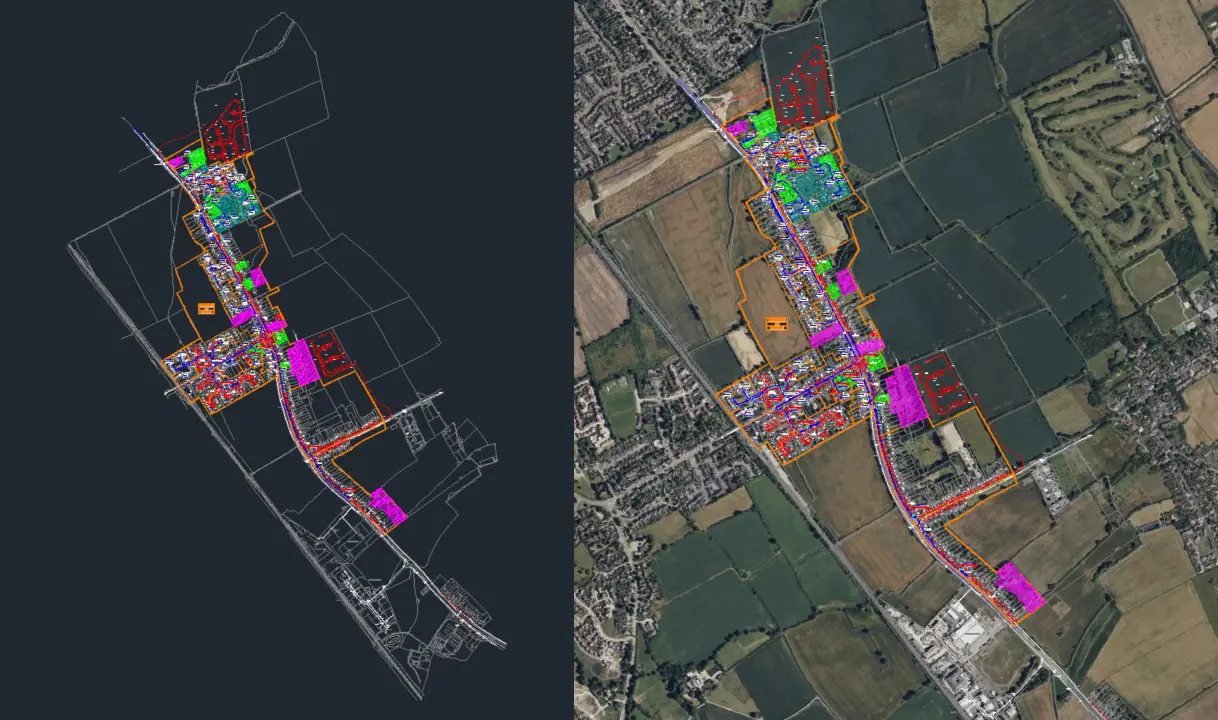
The geolocation process has been exactly explained in this article. The most important thing is, that ArcGIS Pro “remembers” the coordinate system chosen in AutoCAD LT, so there is no need to worry about the geolocation anymore. If you don’t geolocate your project in AutoCAD it will eventually be placed “in the middle of nowhere” away from the main map. In the best case, the location will be at LatLon 0,0 for the WGS84 system, which corresponds to Guinea Bay in Africa. Situations such as this are sufficiently good to georeference your AutoCAD Project by using the ArcGIS Pro tool, although it might take appreciably longer.
2. Among a few options for adding your AutoCAD project to the ArcGIS Pro project the quickest seems to be just Drag-Dropping your file to the ArcGIS Pro map (Pic. 2).
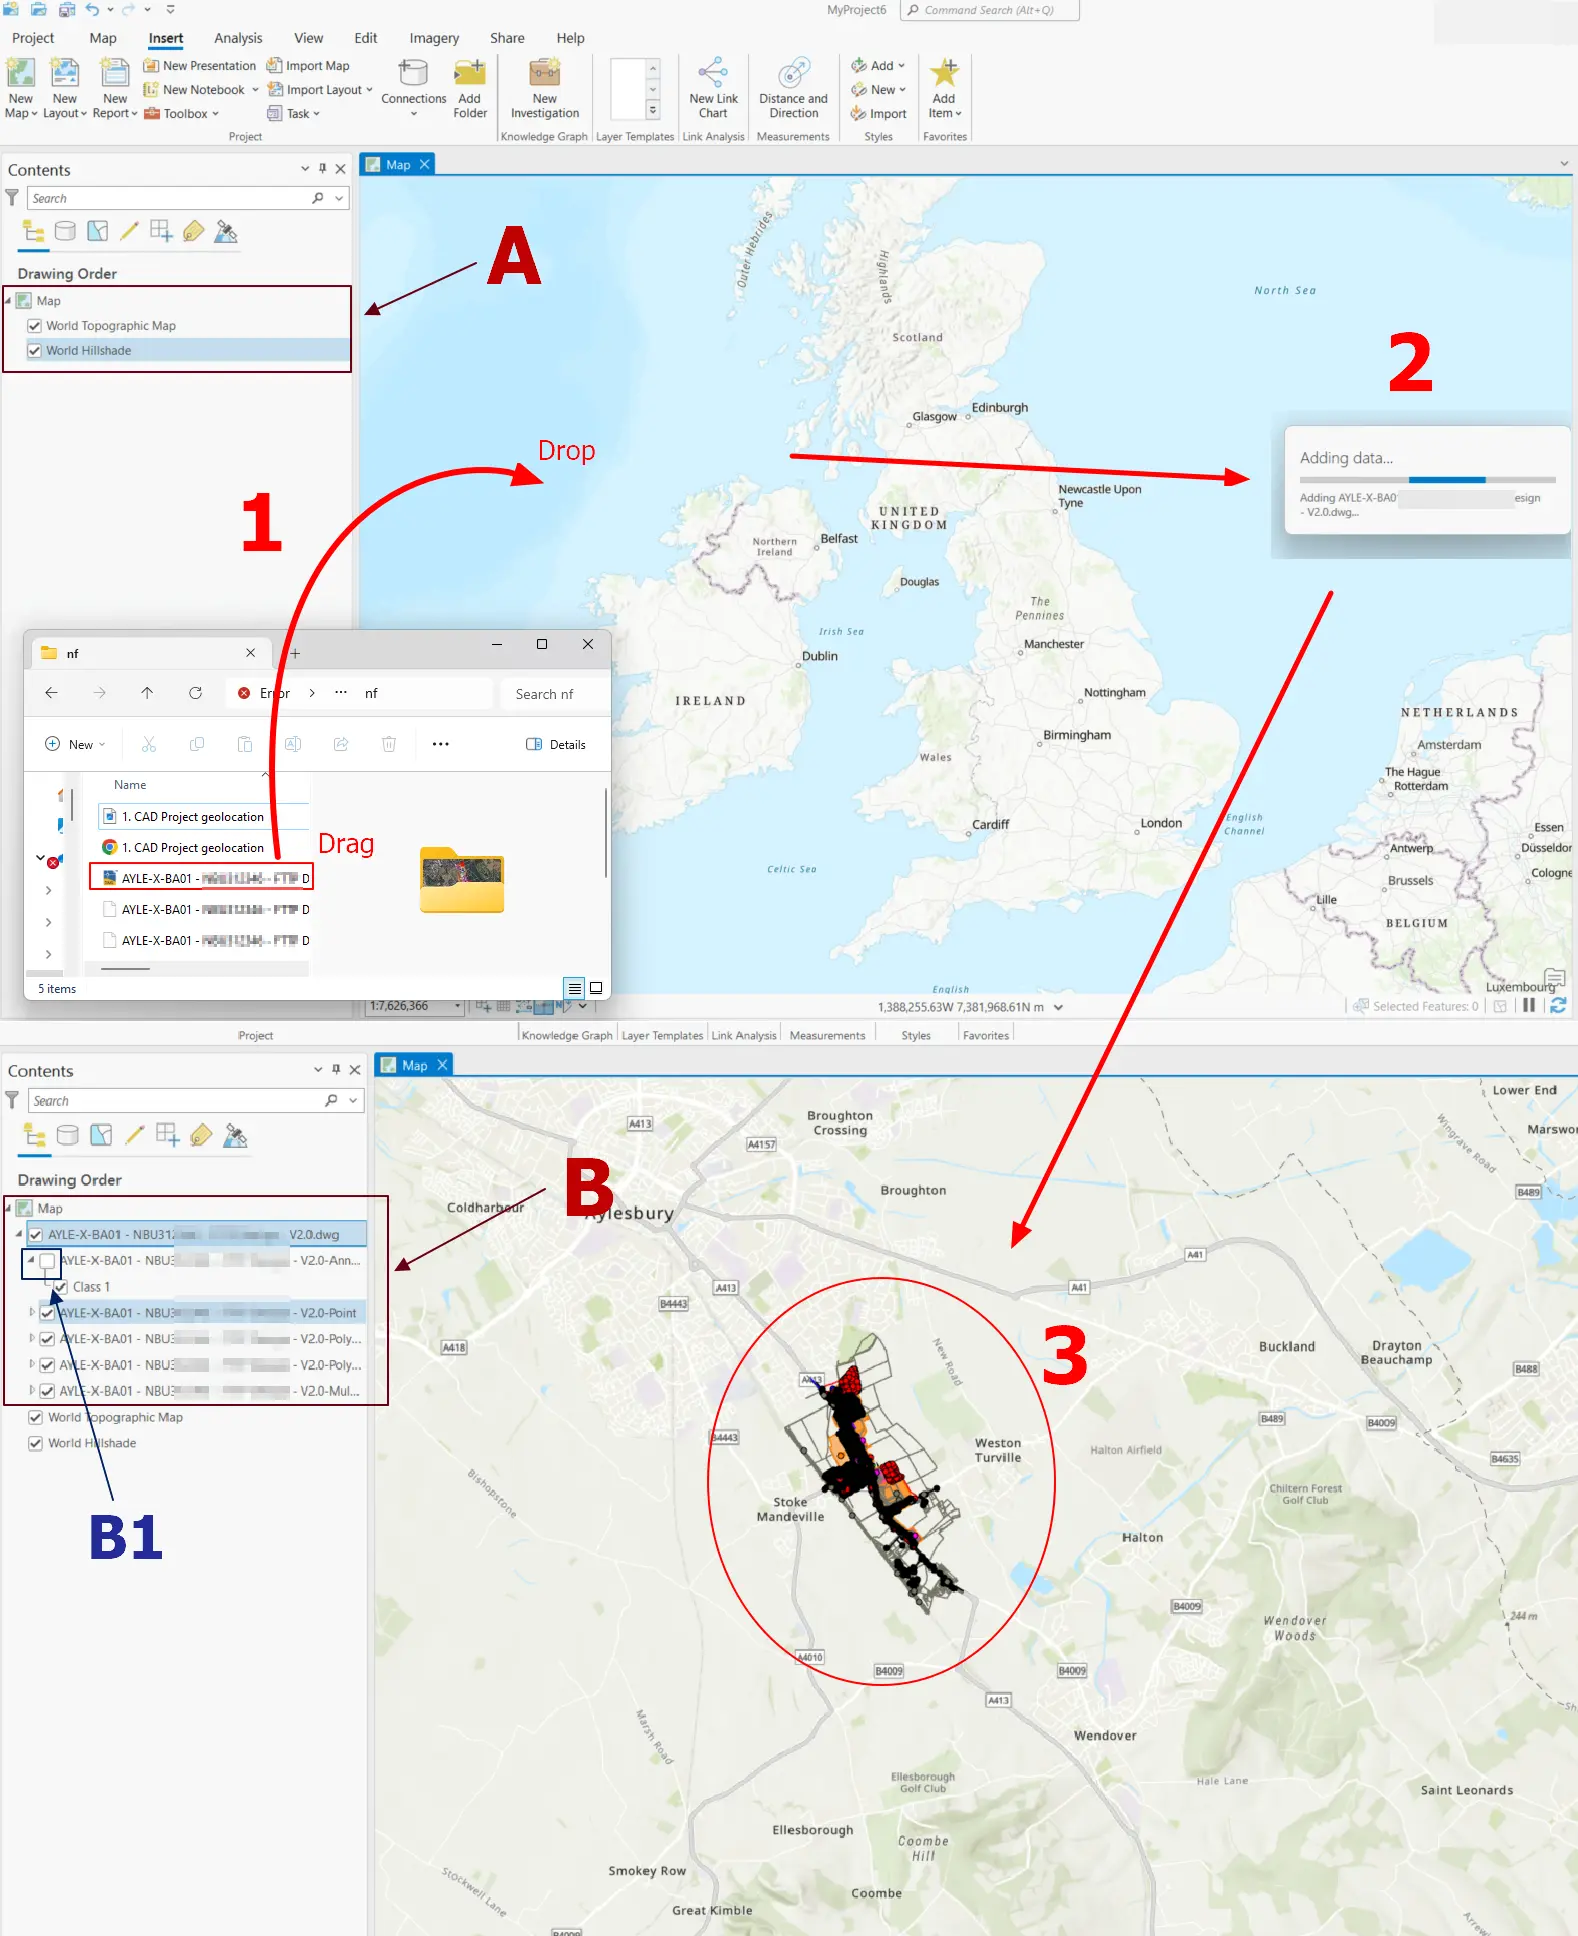
The process is really quick, and the file can be loaded within seconds. Everything depends on two things – your computer strength and the overall weight of your file. Right after dropping your file to the map you will see the Adding Data box with the name of your file listed in (2). Once added, it should appear immediately in your Contents panel right above the base map (B). ArcGIS Pro zooms to the project extends automatically, although because of the annotation elements presence it can’t be readable at first glance. Therefore (at least) switching them off (B1) is rather necessary.
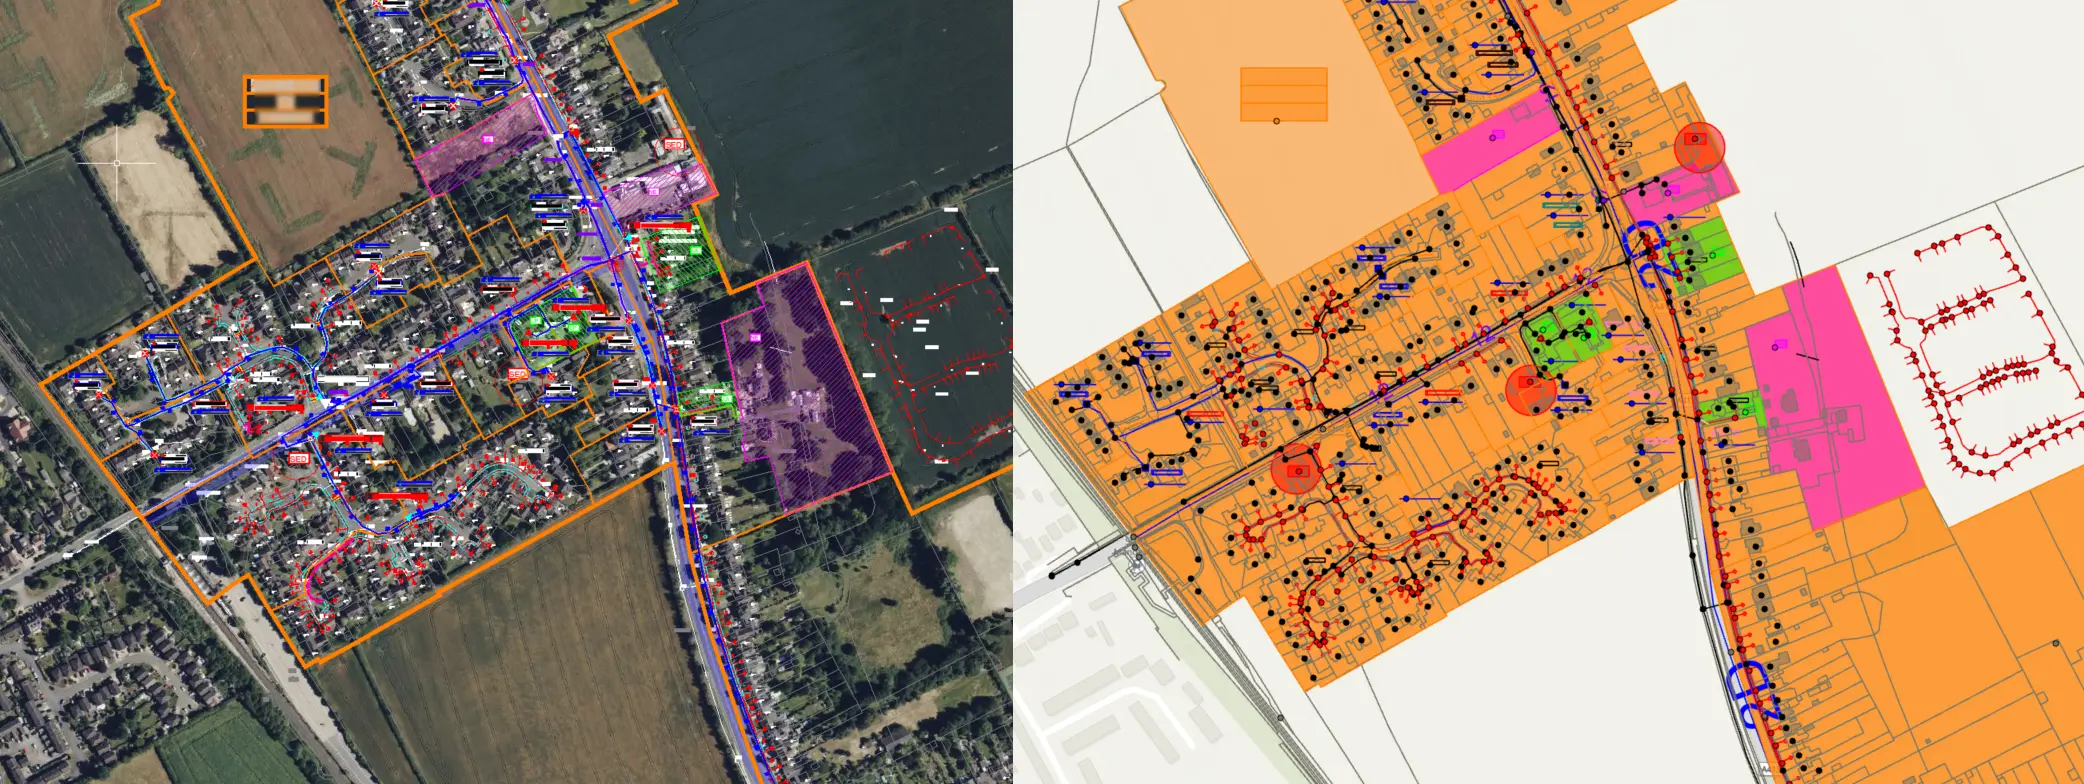
Finally, the ArcGIS Pro project resembles the one from AutoCAD LT at the first moment, which is quite impressive because of the extremely short time spent transferring it. All the layers are crude and require further styling, although it won’t be the subject of this text.
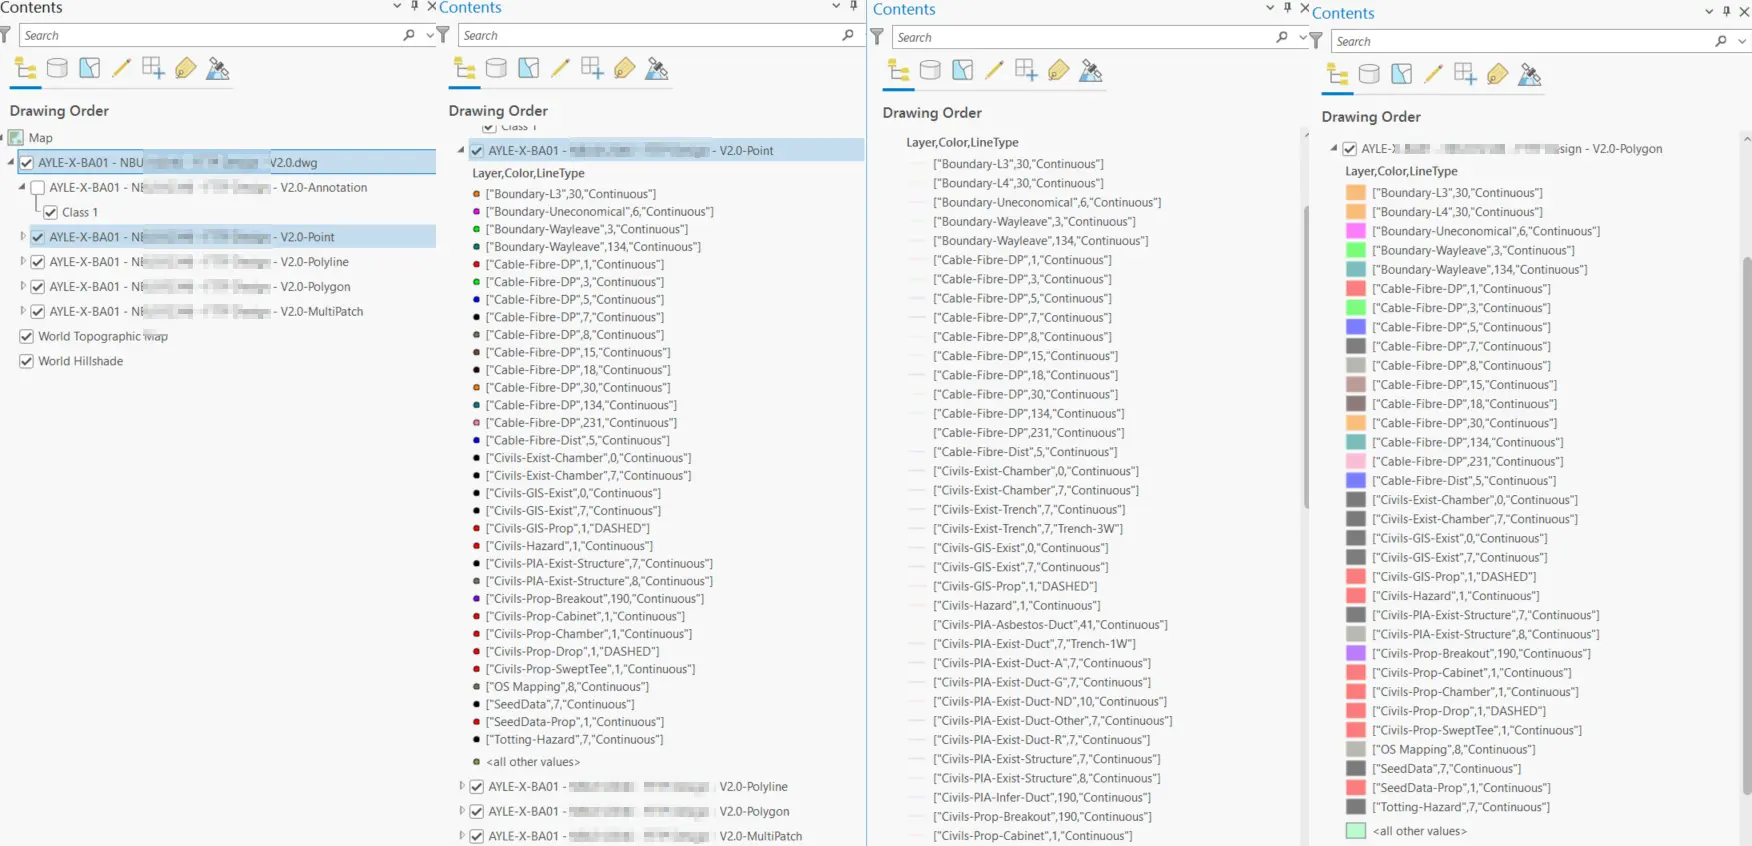
Another important thing is the content of our AutoCAD LT project, which is divided into the major layer geometry types in the ArcGIS Pro Contents panel. In QGIS, when the dxf file was imported usually this breakdown is seen in the layer group. Here is somewhat analogically, but finding the proper layer can be troublesome, as the given layer can be assigned to all types of geometry.
3. Before we start extracting anything it’s good to have a look at the attribute table and investigate which column corresponds to the individual layer, which used to be included in our AutoCAD LT project.
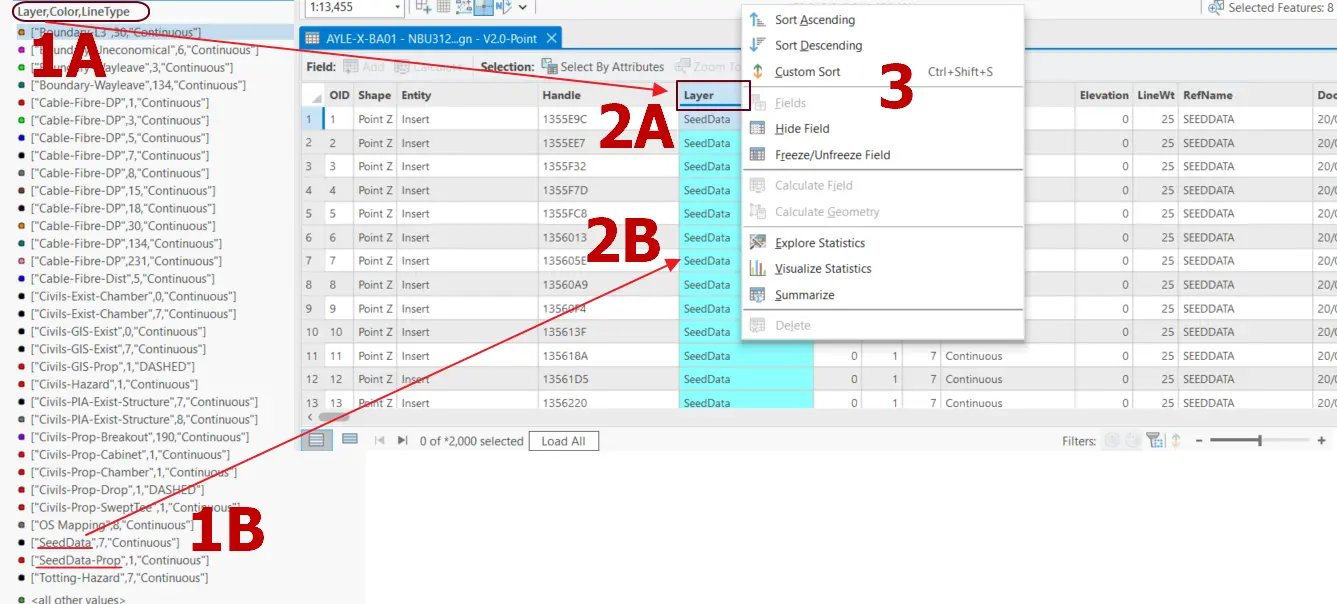
It’s fairly easy, as displayed above (Pic. 4). After the dropdown of the geometry group details we can investigate all the layers (or at least some of their elements), which have been recognized as the points. The ArcGIS Pro uses the following order [“Layer”, “Color”, “Linetype”] (1A). Color is expressed with numbers by the way, the name of the layer can be found on the very left-hand side (1B).
By opening the attribute table, which can be done by right-clicking on the given group -> Attribute Table, we can see all the columns. It can be about even 100 columns, as the ArcGIS Pro collects them in this place from all the layers. Despite this troublesome situation, the column, which includes the layer values can be rather found easily (2A). Next, you can browse across the values to make sure, that the layer you are after can be found there (2B), alternatively, you can use the Sort Ascending & Sort Descending options (3).
4. Since we are aware of which column contains the data about our layers, we can extract the layers we exactly need by creating queries for it. Just a digression, you can’t load a whole geometry group to the ArcGIS Online straight away, because the Selected layer does not contain a required layer type for a web feature layer error. On a different note, the crude AutoCAD LT layer isn’t editable anyway, so for any kind of analyses and alterations it must be exported first. In some operations, you might also see the Layer’s data source is not supported error. Concluding, exporting the layer from this mother layer should resolve most situations like this.
Our export can look like this: Right-click on the layer group -> Data -> Export Features and next the following dialog window opens (Pic. 6), in which we can use effectively 2 ways of extraction.
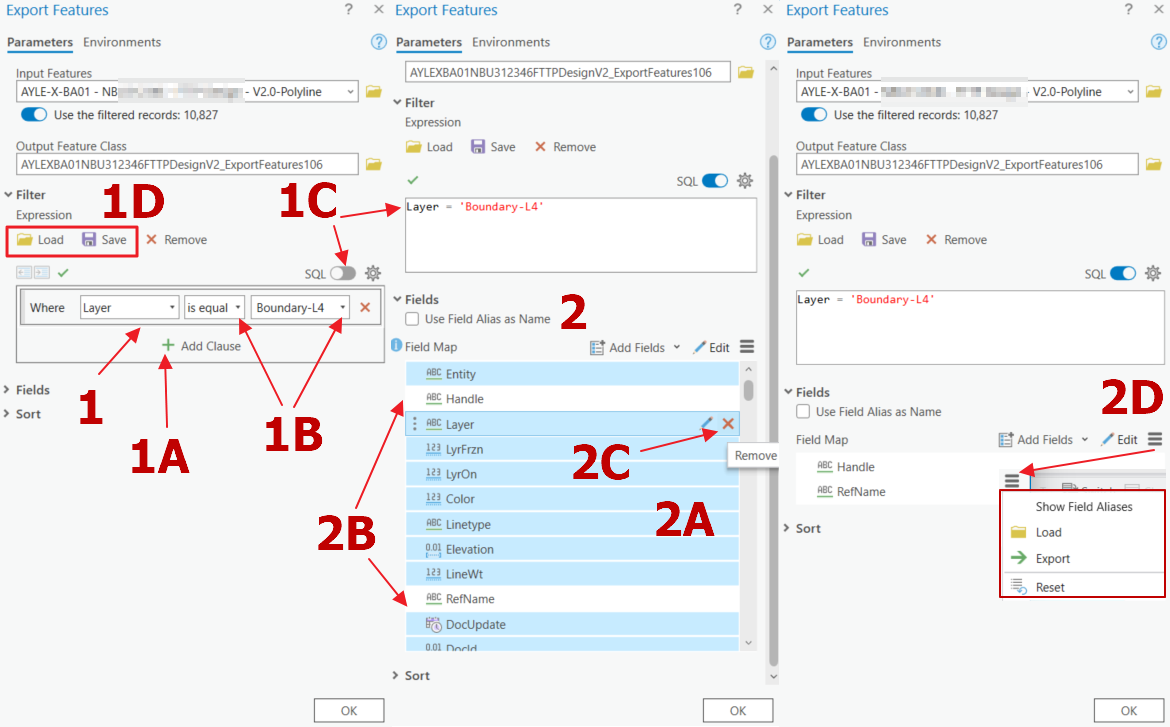
The first way is simply creating the new query (1), which is based on our columns and values from the attribute table. Each query starts from Where and next we choose the name of the column, on which we want to base our criteria. In our case, it will be Layer. The column name must beet the criteria against the values included. In the case of Latyer, the values will be simply the names of layers created yet in AutoCAD. So we can type the name of our value (layer) or better use dropdown (1B) for choosing the correct one. Bear in mind, that their names won’t be fully visible in the box, although ArcGIS will highlight them just next to when hovering. The dropdown applies also to the query combinations. The column must equal the value, but you can find there many other ones like is null, is not null, begins with, etc. Once everything is completed, you can use the SQL option preferably (1C), which can produce your query in a faster way. By pasting the code into the box, the query considered earlier (1,1A) will come out automatically. The last thing is the migration (1D). When you tend to use this query a lot of times, you can Save it to the .exp file (Pic. 7) and then Load it again when necessary. This is the second way how your query can be executed.
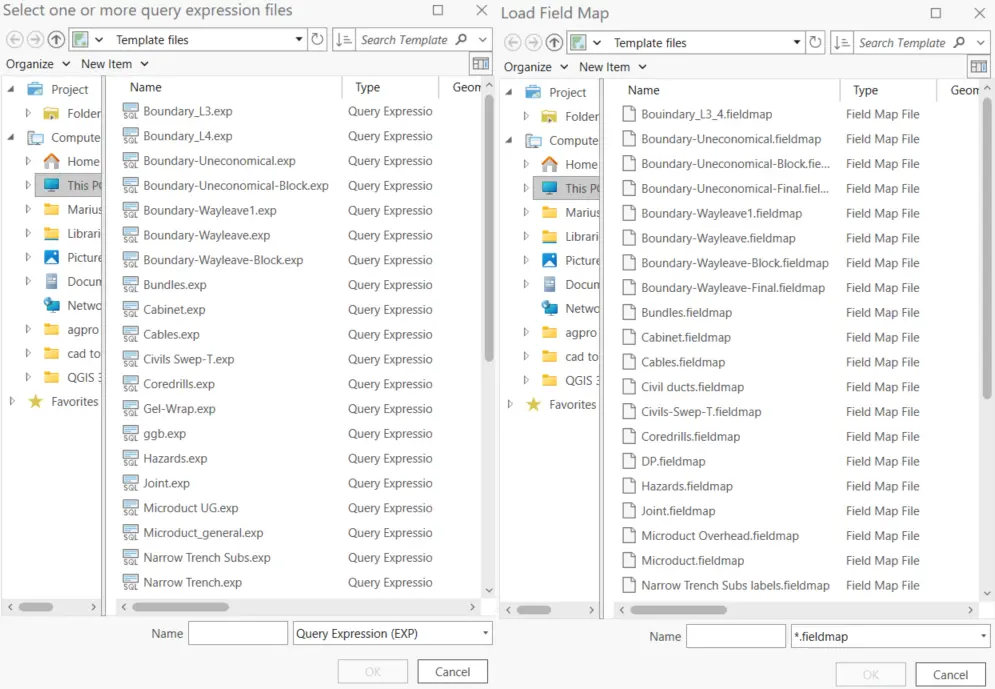
When you are happy with the query, you can go to fields (2) and select only those, which are adequate for a given layer. The quickest way here is to select them all by Ctrl+A hotkey (2A) and deselect the ones we need (2B). Next, all remaining can be deleted by pressing the red cross sign on the right (2C). Finally, you should see only these fields, which have been deselected from removal (2D). Same as previously, your settings can be exported to the .fieldmap file (Pic. 7) and used over and over again for this specific type of layer when necessary.
There is an alternative to the query selection, although with all fields exported. You can make a selection of your layer in the attribute table and then create the layer from this selection (Pic. 8,9).
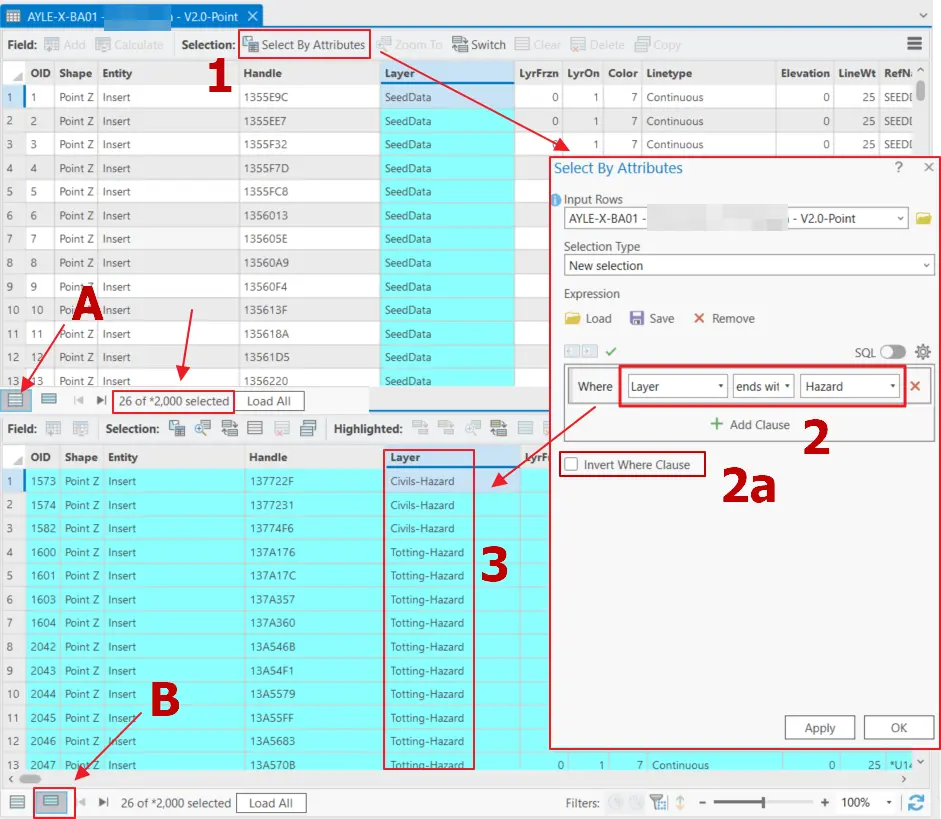
You can use the Select By Attributes from the top (1), which opens the dialog box. In the box, you can form the selection query on the same basis as by the export (2). As a result, the .exp files are also applicable here. Your selection results will come out at the bottom, where you will see the number of items selected right of the Only Selected Features visible icon (B). By toggling these 2 icons in the bottom-left corner you can switch between all features and select by yourself. Worth attention is also the Invert Where Clause option, where you can invert your selection.
The next step is right-clicking on your geometry layer again and choosing Selection -> Make Layer From Selected Features option as shown below (Pic. 8).
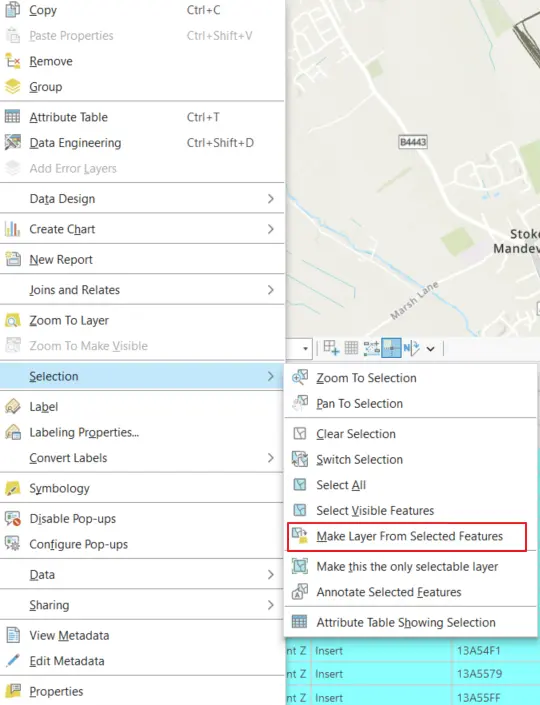
However, this extraction still required filtering the relevant fields, so it can be treated only as an alternative way of getting the new layer. We can approach it on a different side. First, you can make a selection in the attribute table. Next, you can go to Data -> Export features and only take care of the fields whilst the Filter isn’t needed anymore (Pic. 9).
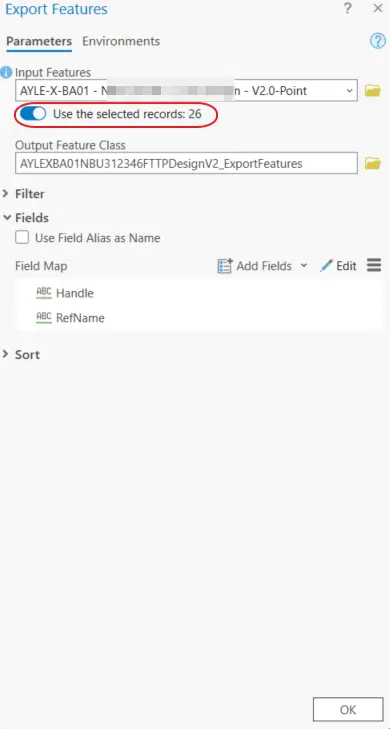
In this case, we can see that our selected features are included just above unless this option is turned off.
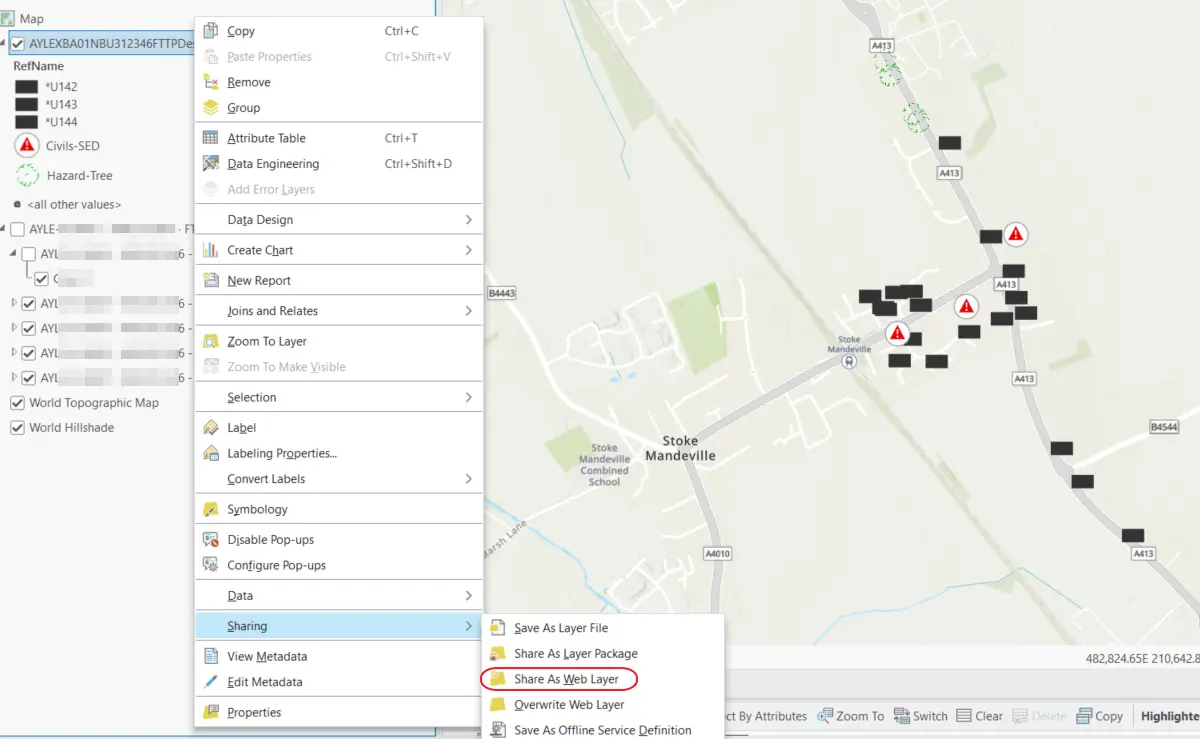
5. Our effective last step is publishing the layer in the ArcGIS Online platform. ArcGIS Pro has a nice option for sharing the layer. We will use Share As Web Layer, but besides it, we can share our work as Layer File, where all the styles are stored. Other options are Layer Package and Offline Service Definitions, which aren’t important right now.
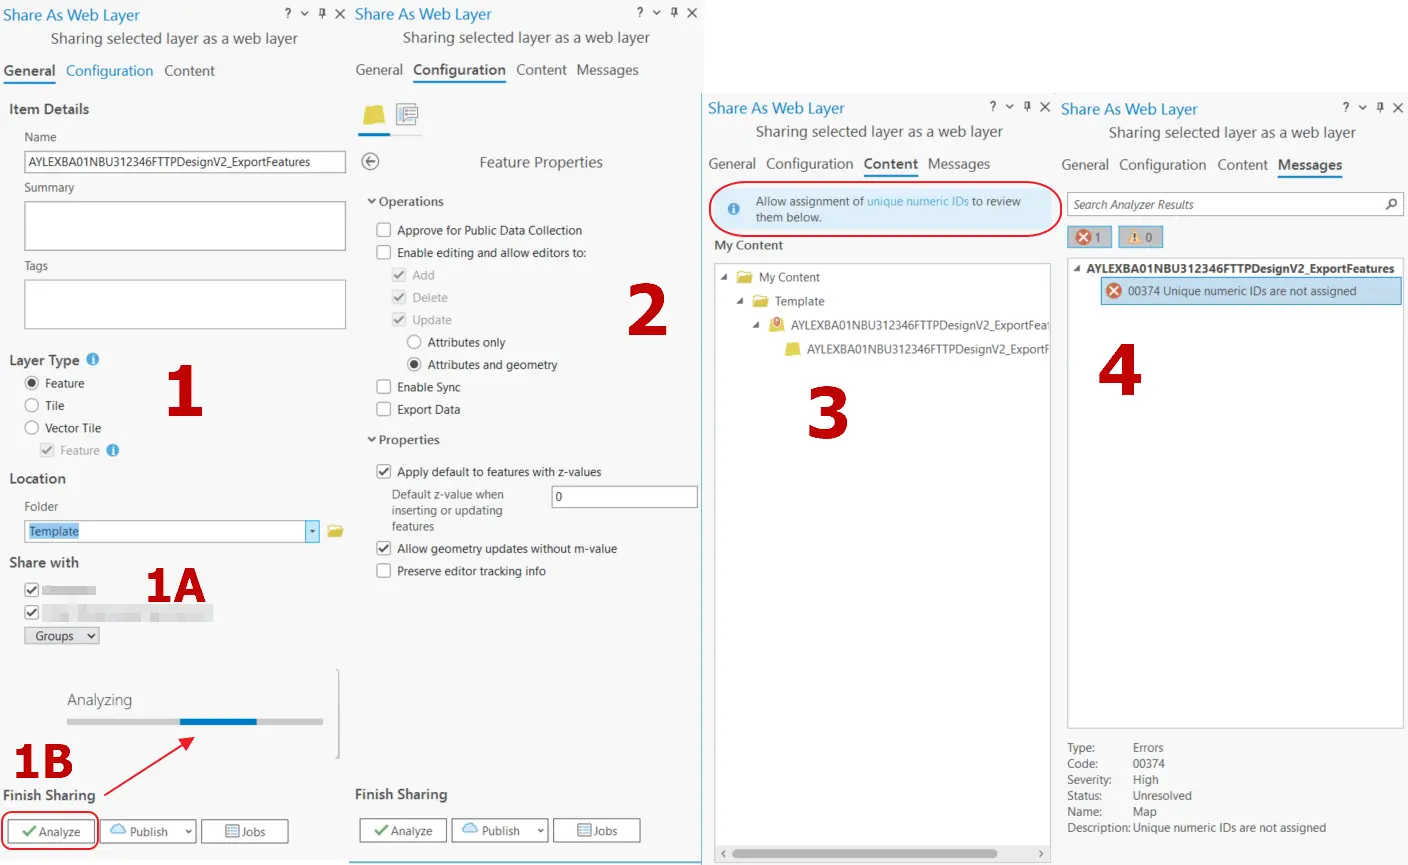
By clicking on Share as Web Layer we have the new docked window, which emerges mostly in the right side panel. The dock shows the General options (1), although we can toggle also between Configuration (2), which can be changed later in ArcGIS Online, Content (3) – shared layer definition, and Messages (4), where we can learn about the errors. The common error at the very beginning of using this option in ArcGIS Pro is the lack of unique number assignment. As you remember, in QGIS this thing had to be done manually for every single layer. In the case of ArcGIS Pro, we have to do it only once, as they’re valid for the entire map!

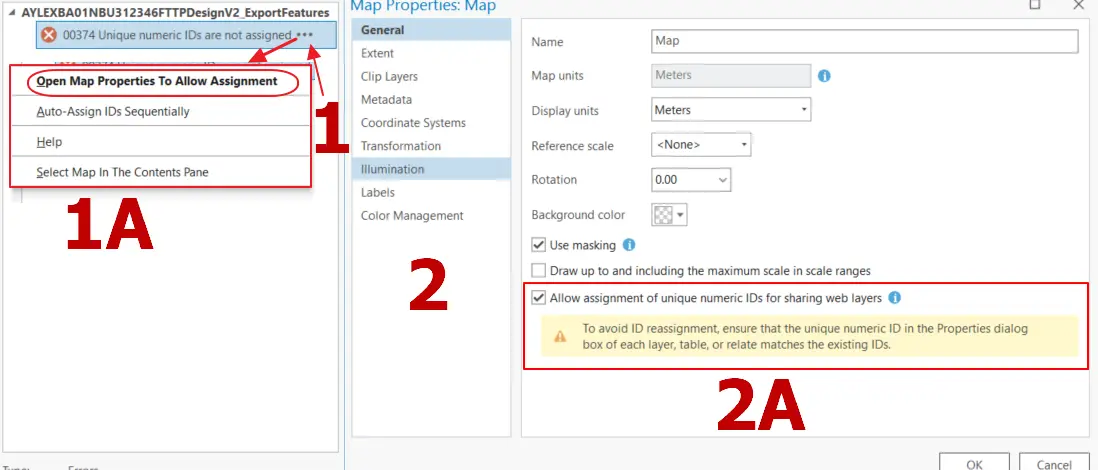
When you see this error in the Messages panel, you should hover it. At the moment, when your mouse cursor is above the error text, the three dots (1) appear with the options (1A), in which the most important for the specific error is emboldened. In this particular case, you should click on the Open Map Properties to Allow Assignment, which opens the Map Properties (2) straight away. There is the “Allow assignment of unique numeric IDs for sharing web layers option” which must be selected (2A). After that, click OK, and your layer is ready to go!
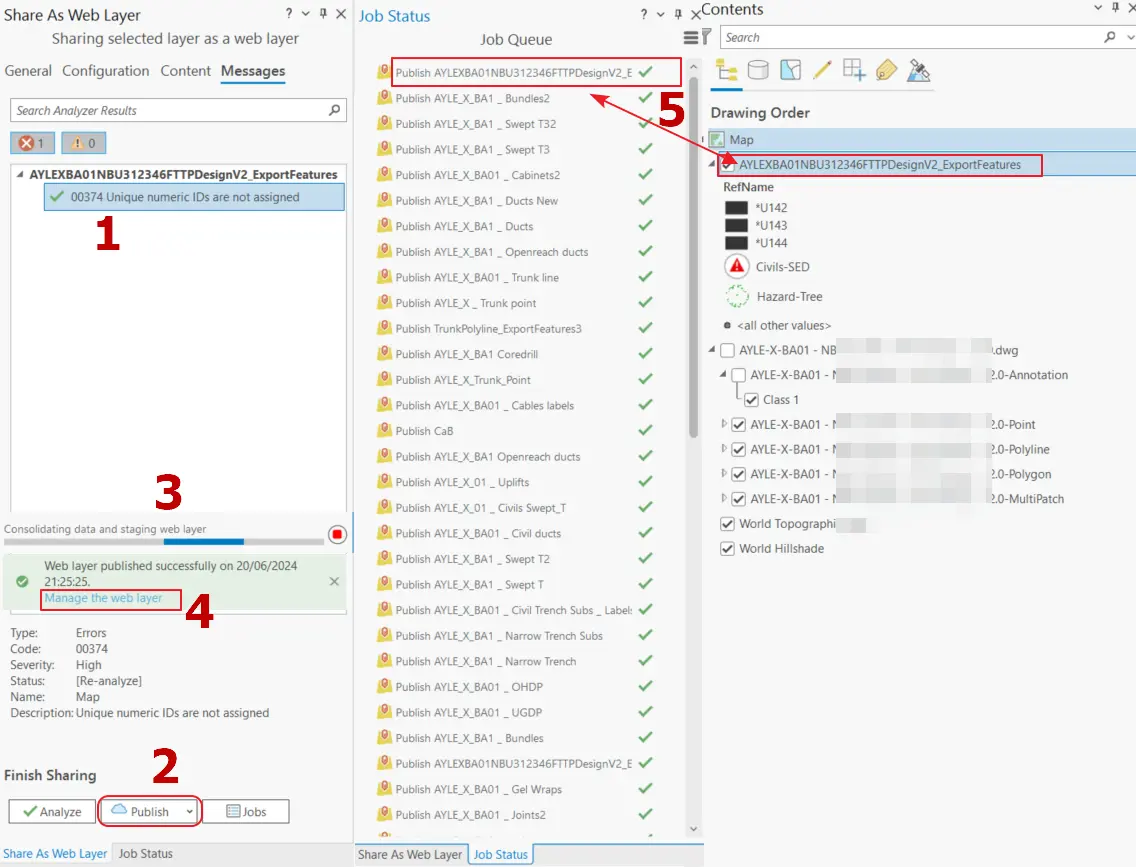
Once the unique IDs are assigned in the Messages panel you will see the green thick just next to the former error (1). It means, that everything has been fixed and the layer is ready for publishing (2). When the Publish button is clicked, the ArcGIS Pro prepares our layer (3), which unfortunately takes a while regardless of its size. After that, the green box appears at the very bottom, that the layer has been published successfully and we can click the link to manage it (4). By the way, we can check our layer in the Job Status, where it will come out always as the topmost if you have more (5). Moreover, you can understand why defining the layer name (by double-clicking in the Contents panel) is so crucial. This name appears everywhere, so it’s good to have it sorted before we start doing anything.
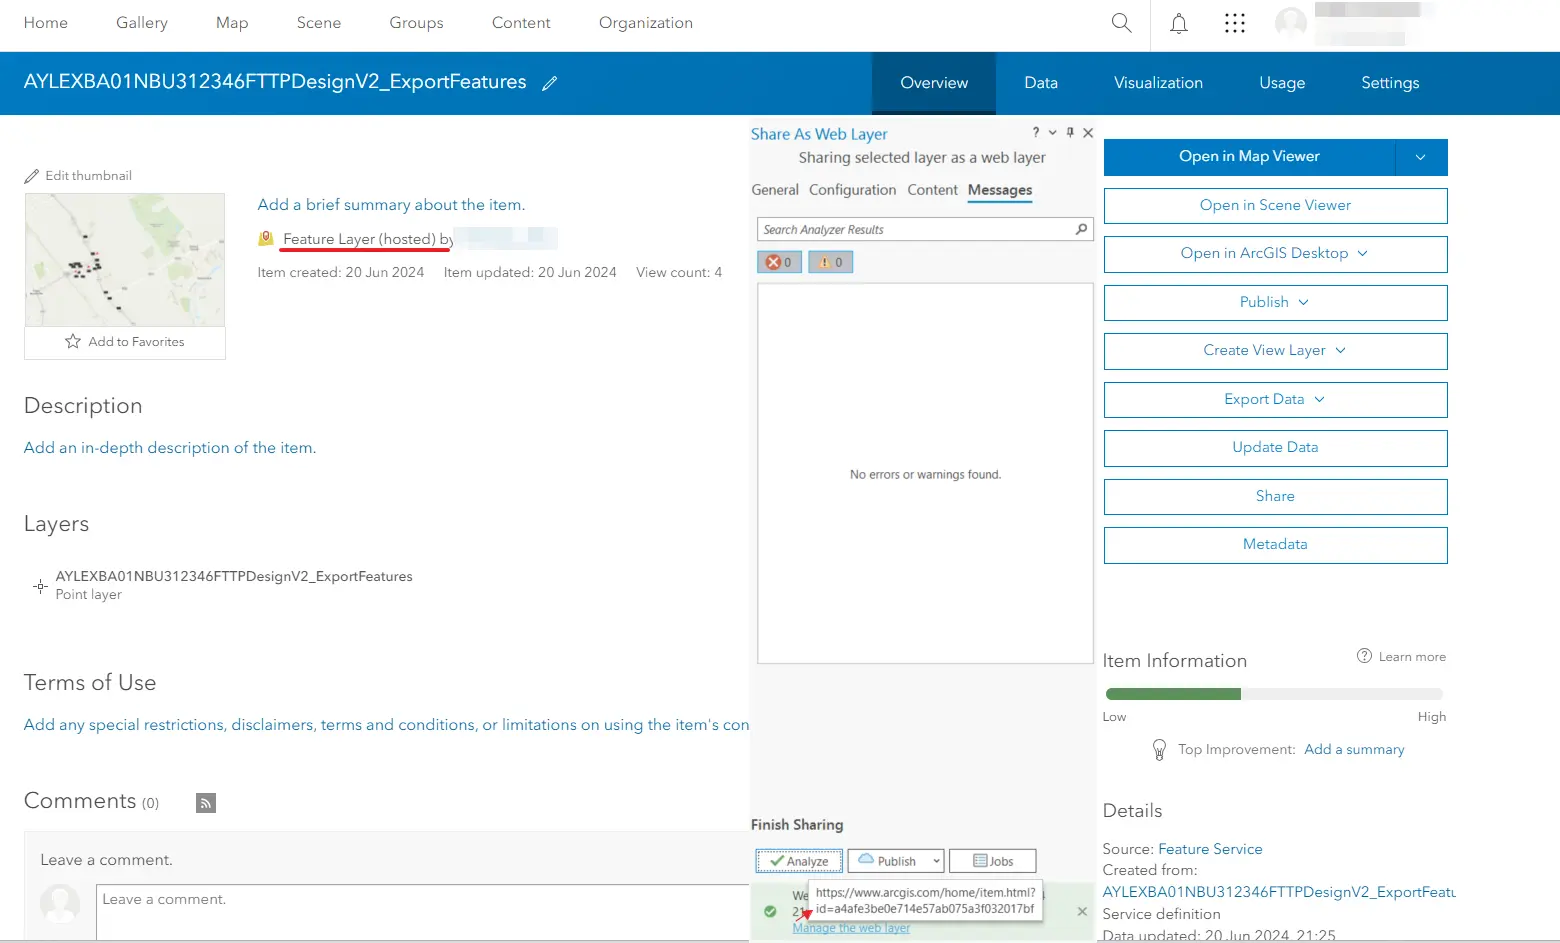
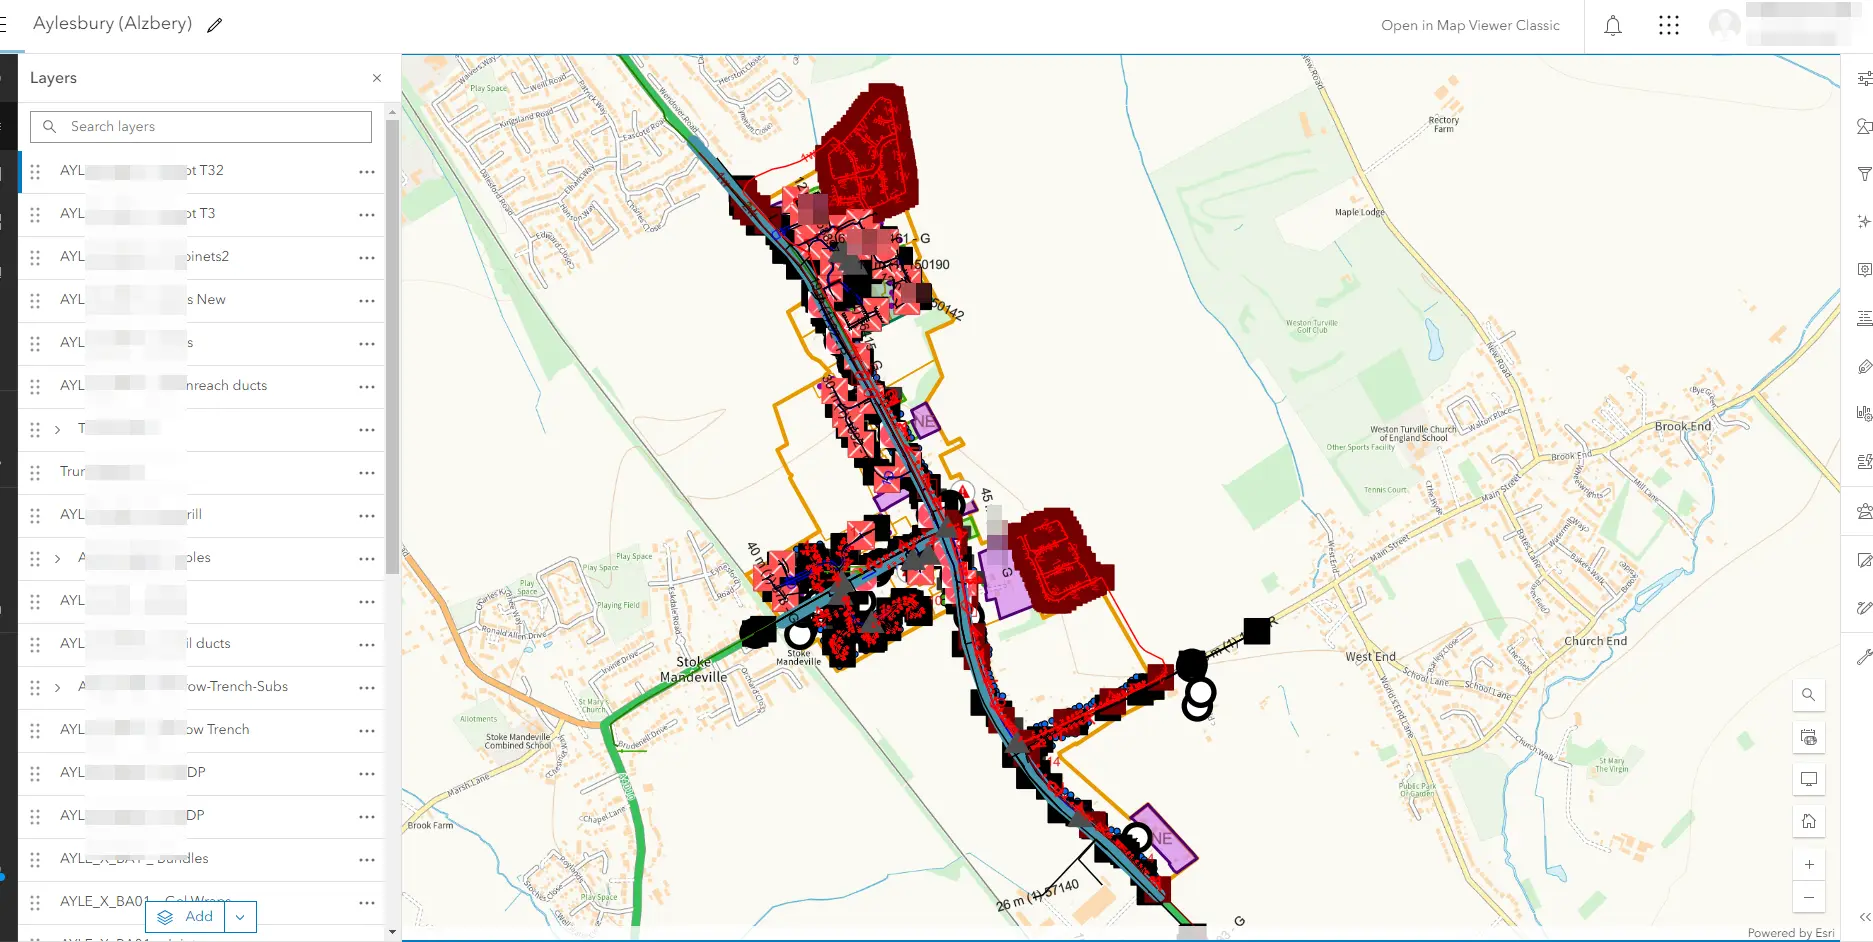
When hovering at the “Manage the web layer” hyperlink you can see the full path of the layer published to ArcGIS Online. Of course, it can’t happen if your ArcGIS Pro isn’t linked with your ArcGIS Online account! The layer comes up as the feature-hosted layer and from this moment can be used for visualization in the ArcGIS Online platform. By using the very top of – the Open in Map Viewer option we can see our ArcGIS Pro layer in ArcGIS Online, with the styling retrieved accurately! (Pic. 16).
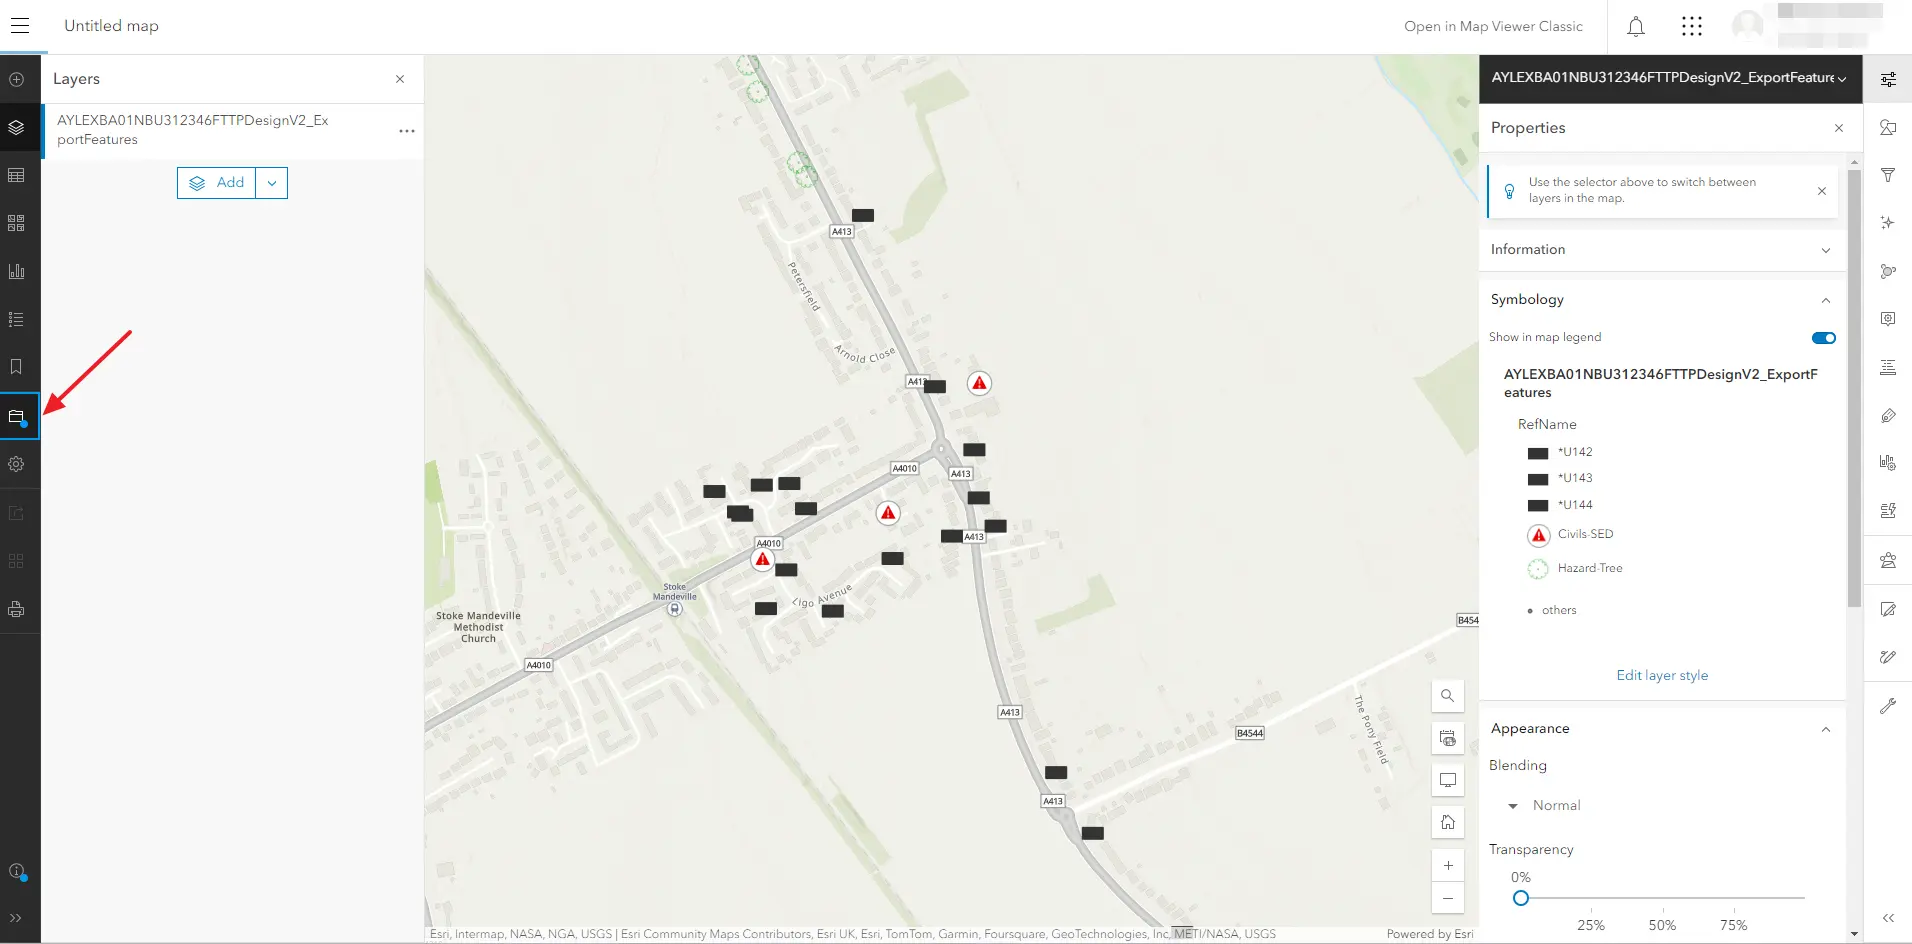
The Open in Map Viewer option shows the layer in the map, which can be saved.
Now, you can do the same for other layers included in your AutoCAD LT project.
In the end, let’s see what the whole AutoCAD project looks like in ArcGIS Pro and finally, in ArcGIS Online.

Mariusz Krukar
Links:
- https://support.tygron.com/wiki/How_to_import_a_DWG_file_in_ArcGIS_Pro
- https://pro.arcgis.com/en/pro-app/latest/help/data/cad/cad-data-in-arcgis-pro.htm
- https://support.esri.com/en-us/knowledge-base/convert-autocad-dwg-files-to-a-gis-compatible-file-geod-000028983
- https://support.esri.com/en-us/knowledge-base/how-to-convert-cad-data-to-gis-data-in-arcgis-pro-000026432
Forums:
- https://community.esri.com/t5/arcgis-pro-questions/importing-autocad-dwg-files-to-arcgis-pro/td-p/1354627
- https://gis.stackexchange.com/questions/434261/using-cad-drawing-in-arcgis-pro
Youtube:


