
Light is omnipresent in the Universe and the environment. This is electromagnetic radiation, that can be detected by the human eye. I have written more about the light and the ways of measurement in this article. Now I would like to describe a very common process, occurring both in the Universe and in Earth’s atmosphere, which is a light transition.
This article will be a far simplification of this process. I am not going to bombard you with some formulas and heavy scientific stuff. I would like to show you this common process practically. The transition of light refers much more to the medium rather than to the vacuum. The transition of light is a kind of molecular electronic transition, where electrons in a molecule are excited from one energy level to a higher energy level. The energy change associated with the transition determines many molecular properties such as color. Relevant information in the Landau Theory covers a general phase transition mechanism. The light transition is the part of this mechanism, that happens abruptly and is associated with a sudden light level difference. This process is related to the difference between illuminated and shaded areas in conjunction with human eye perception.
- LIGHT AND SHADOW – A TYPICAL EXAMPLE
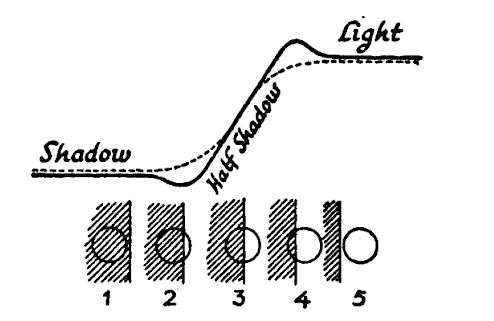
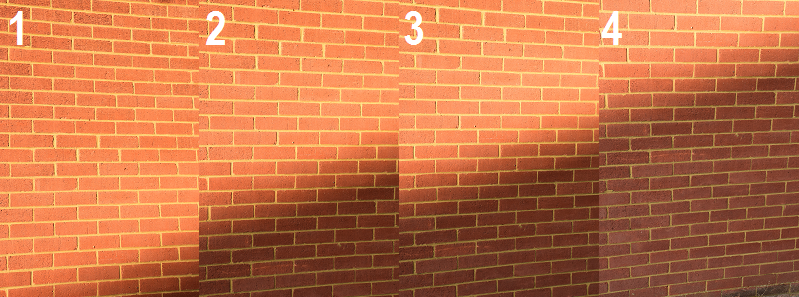
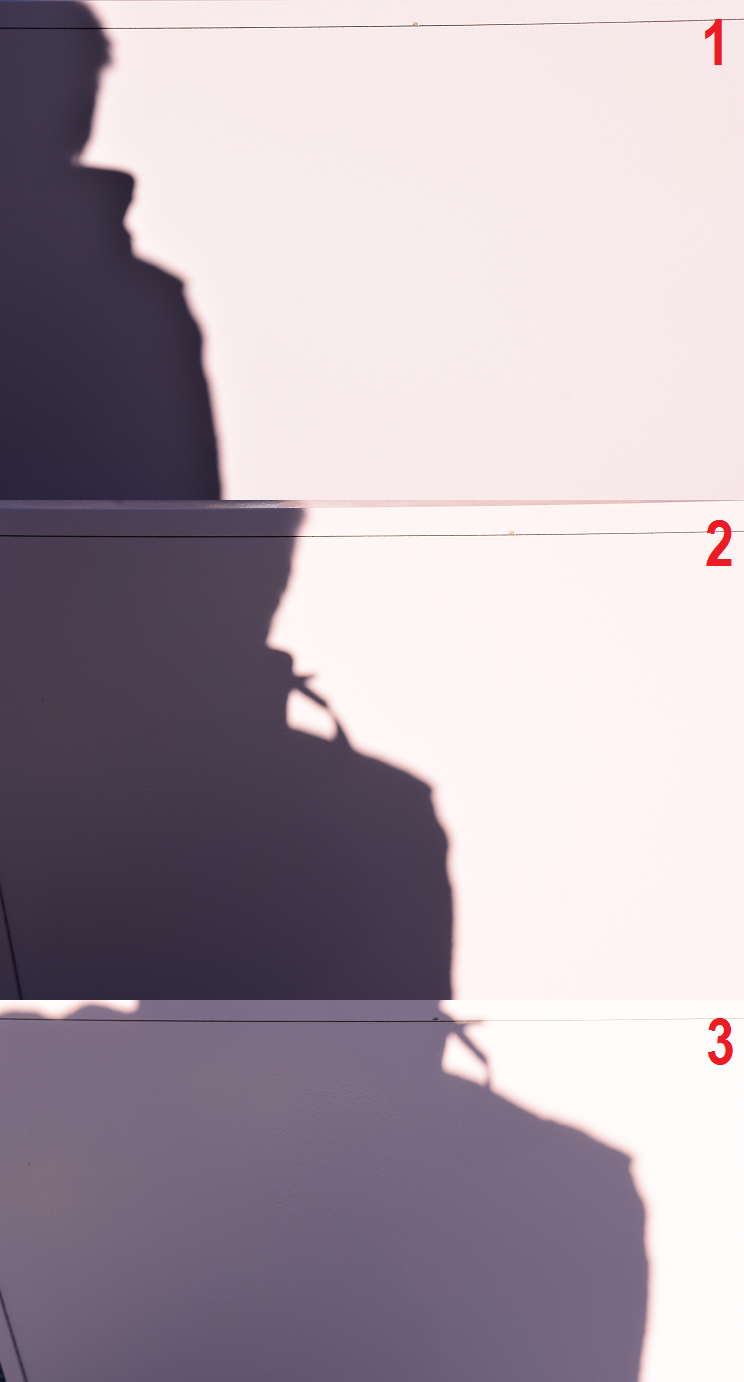
Basically, we have light and shadow. That’s a simple issue. If something is not illuminated, is shaded. However, we have to figure out, that despite the distance between the illumination source and the object shaded we always have the half-shadow zone. Every half-shadow has a bright and dark edge near the transition of light from a fully illuminated area to half-shadow and from half-shadow to shadow (Pic. 1).
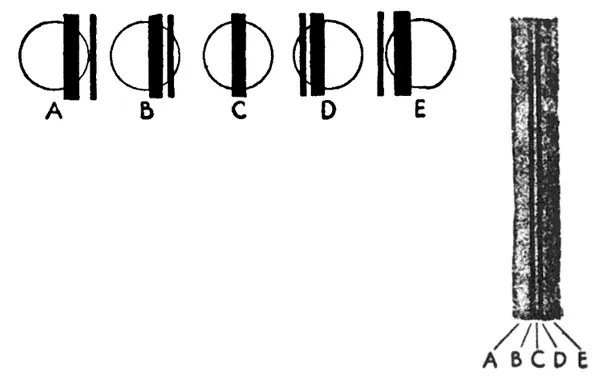
This is a human eye perception effect, which is quite easy to spot, especially on plane-coloured surfaces (Pic. 2).
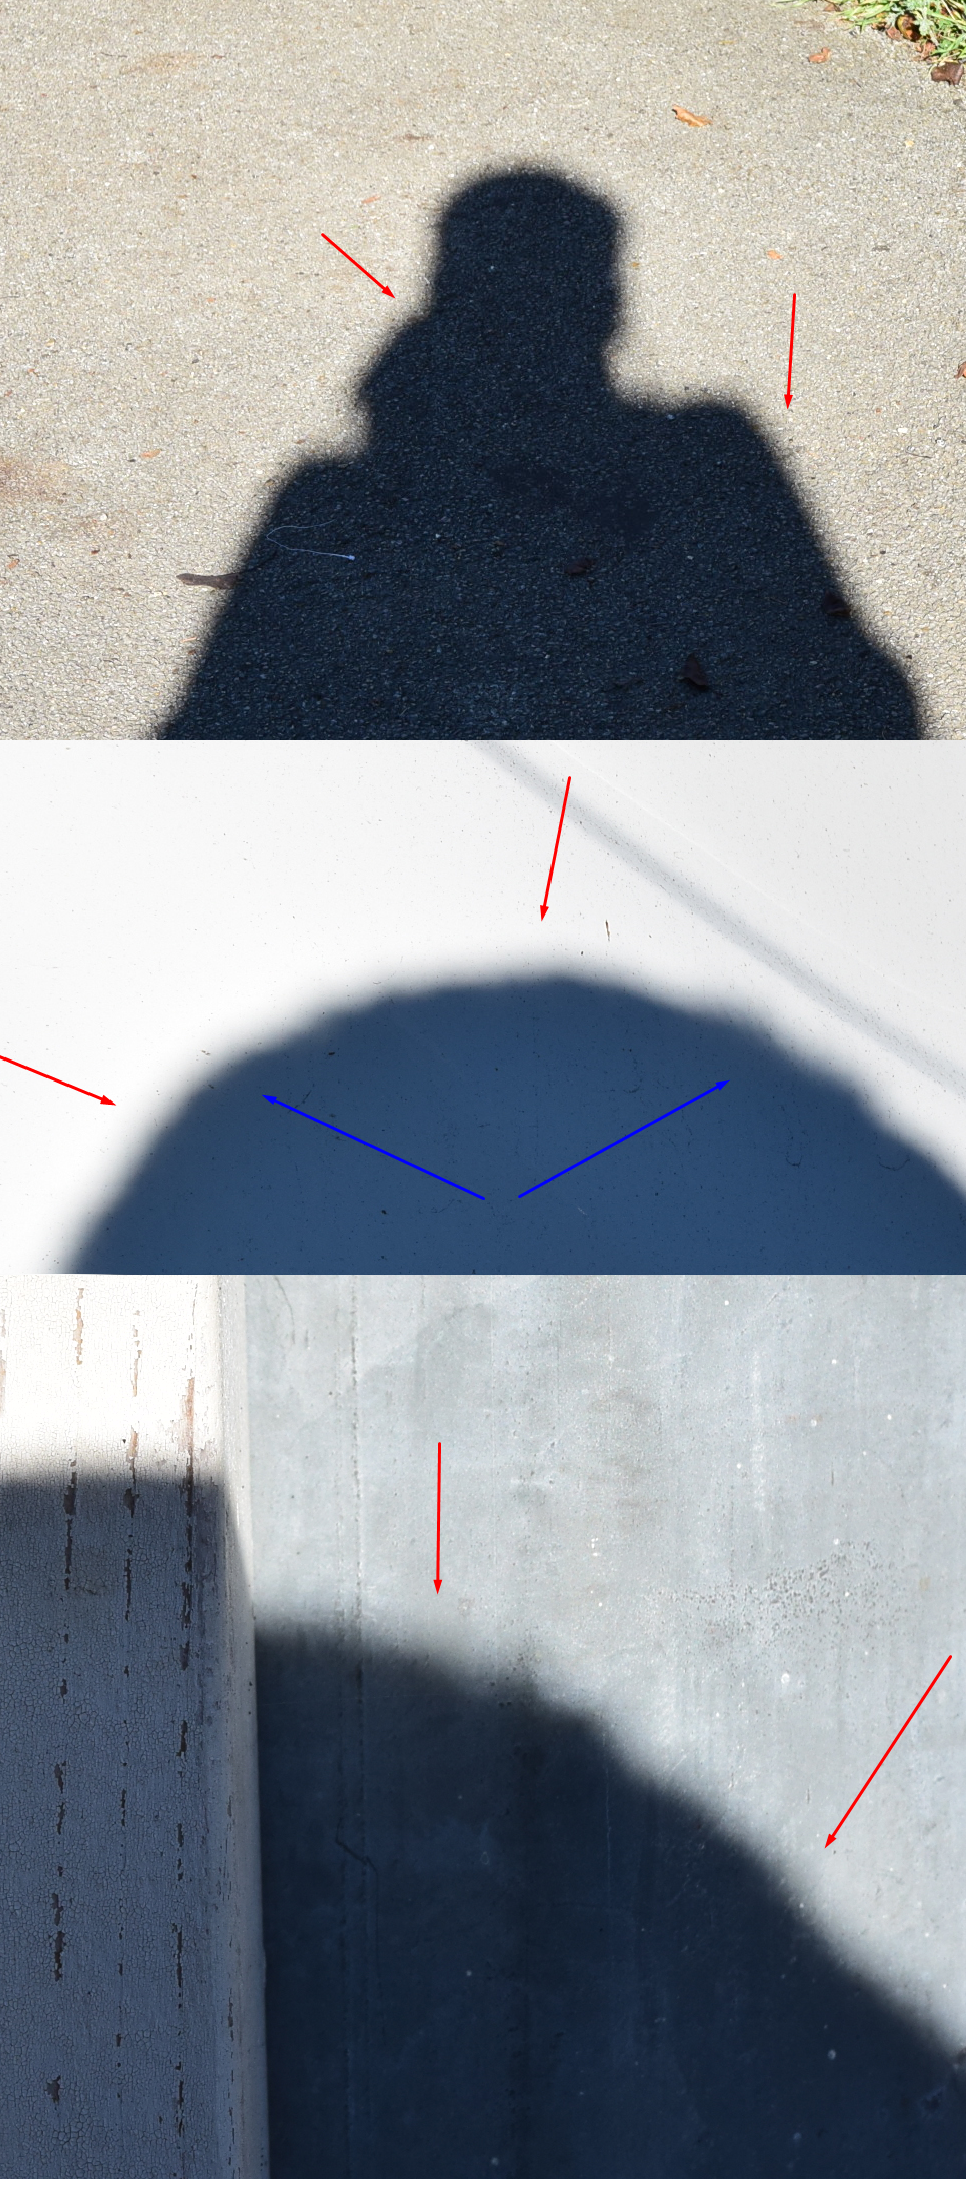
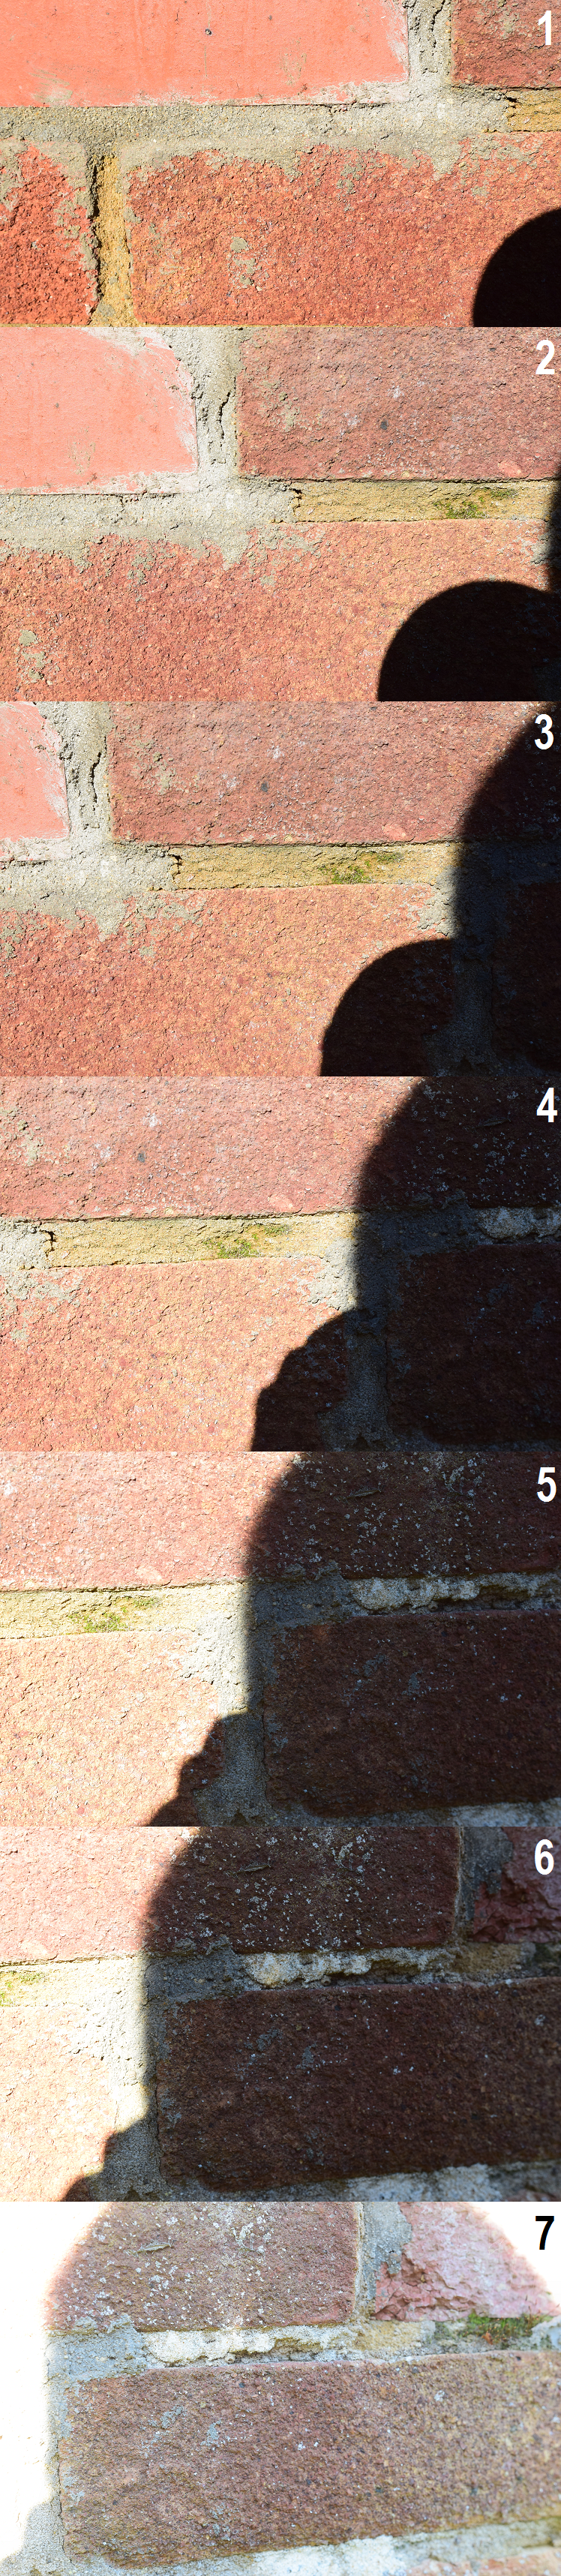
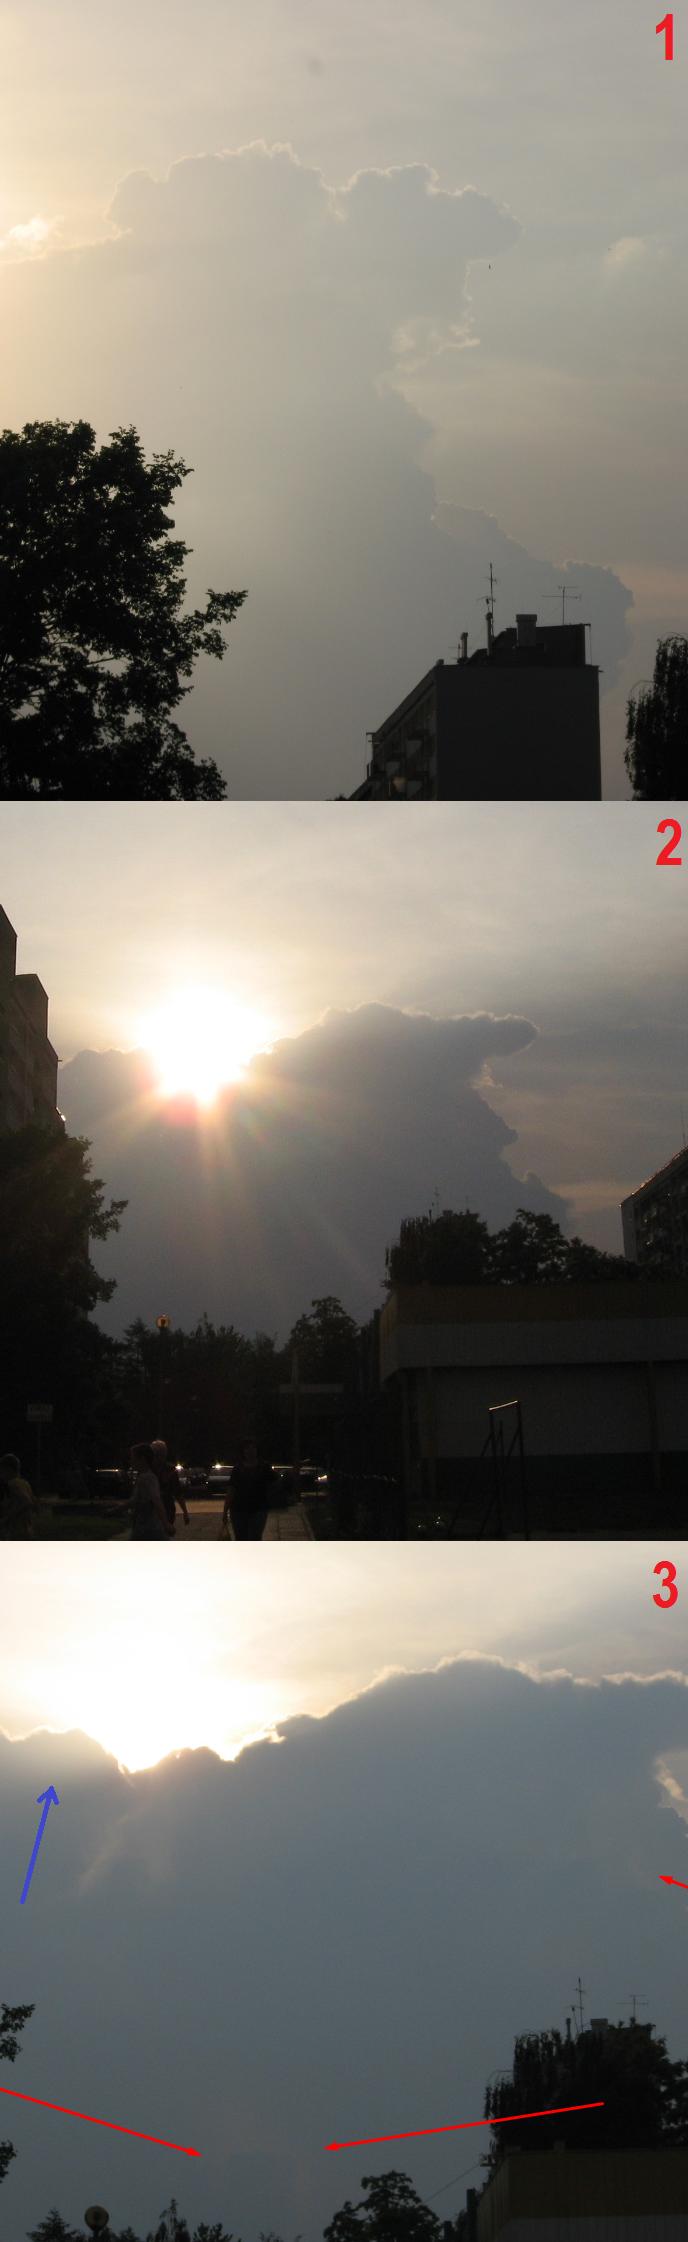
This illusion will appear everywhere, where the beam of light encounters some hindrances. These obstacles can hide an illumination source totally or partially. It depends on the size of this obstacle against the (angular) dimensions of the light source. Sometimes, when the hindrance (seen from some surface) is too thin or small to cover totally the illumination source, then only a half-shadow occurs. In this case, we can also spot this aforementioned brightest “line” between fully illuminated and partially shaded areas. Another “line” is drawn at the border between a half-shadow and a shadow. Maybe you will be able to notice, that the inner part of the fully shaded areas appears to be a bit brighter, than towards the shadow edges. It’s good to mention, that sometimes we can see more than one shadow (Pic. 3, 4), which does not necessarily must cover the light source totally.

When we have more shadows covering the illumination source at once, with beams still coming through, then only a half-shadow is produced. In this case, the light transition is less pronounced.
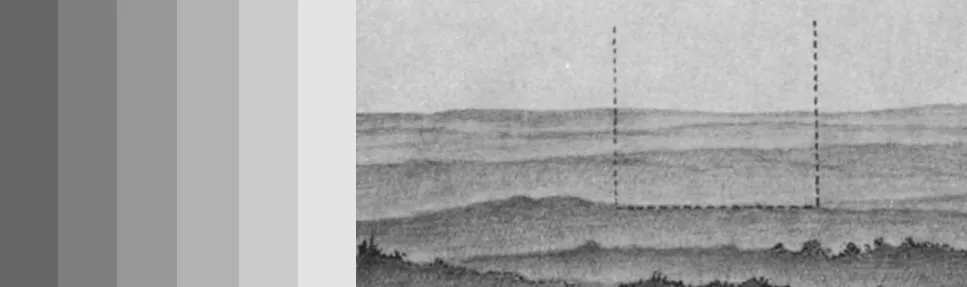
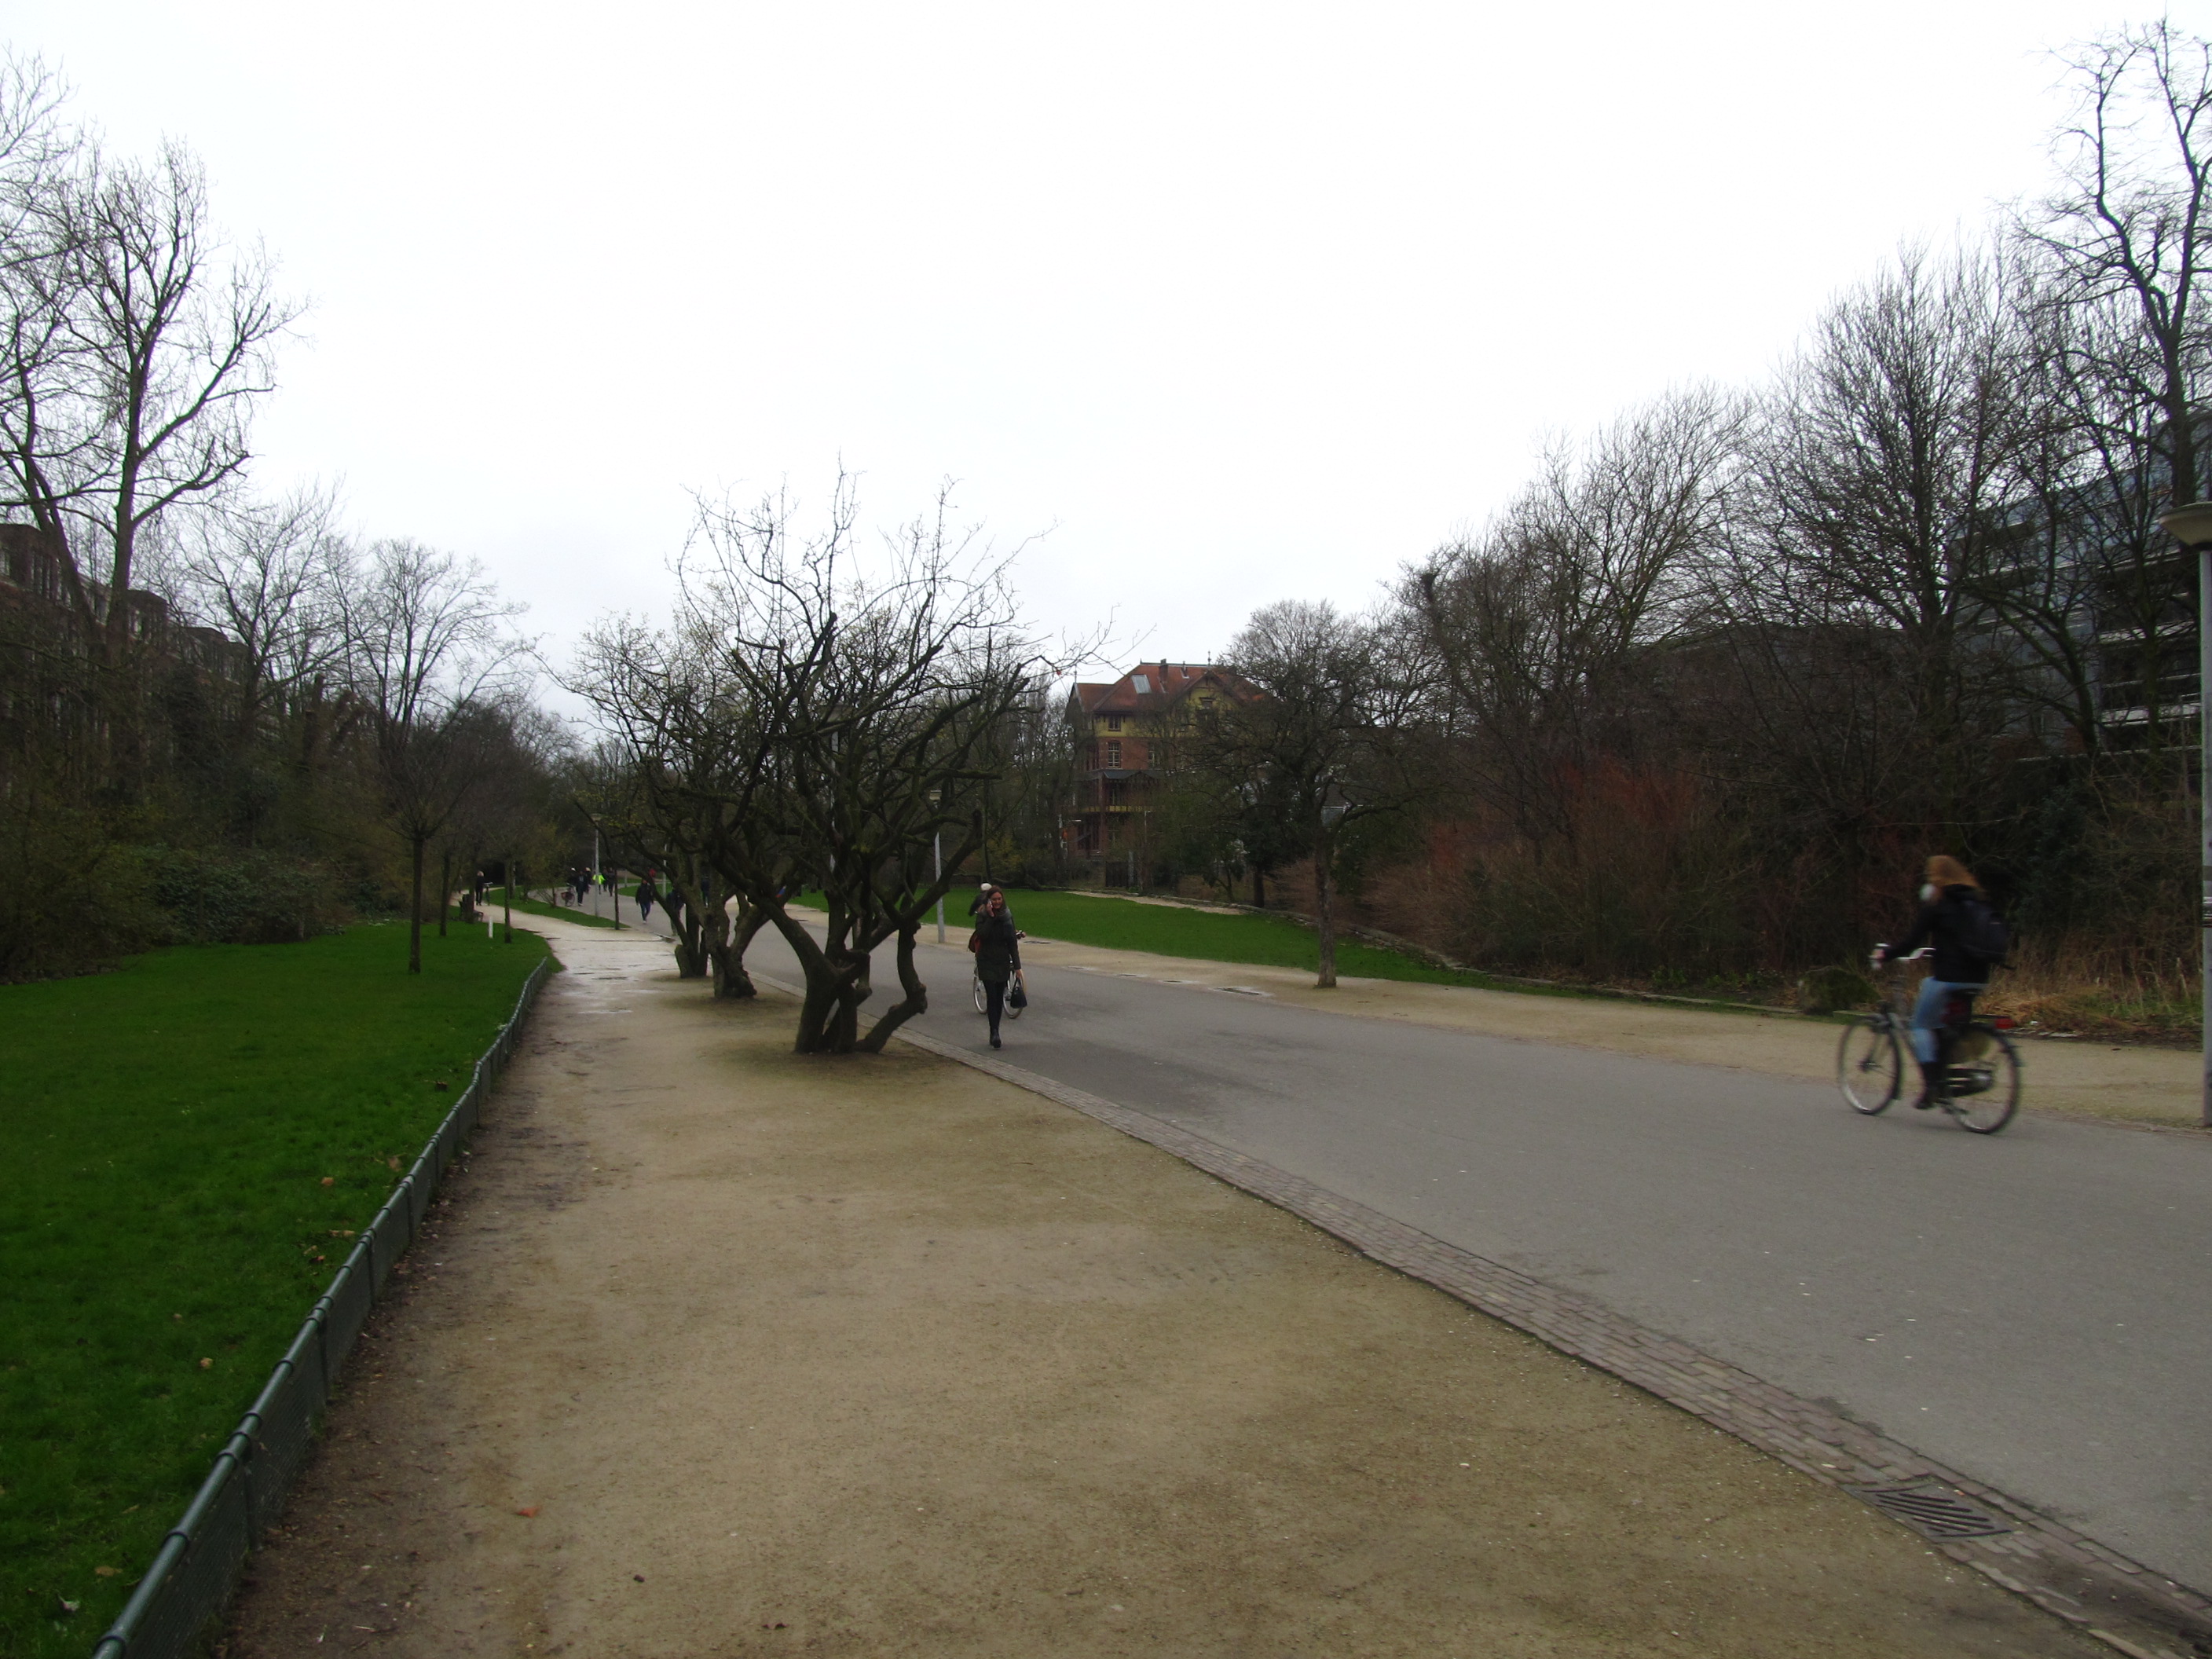
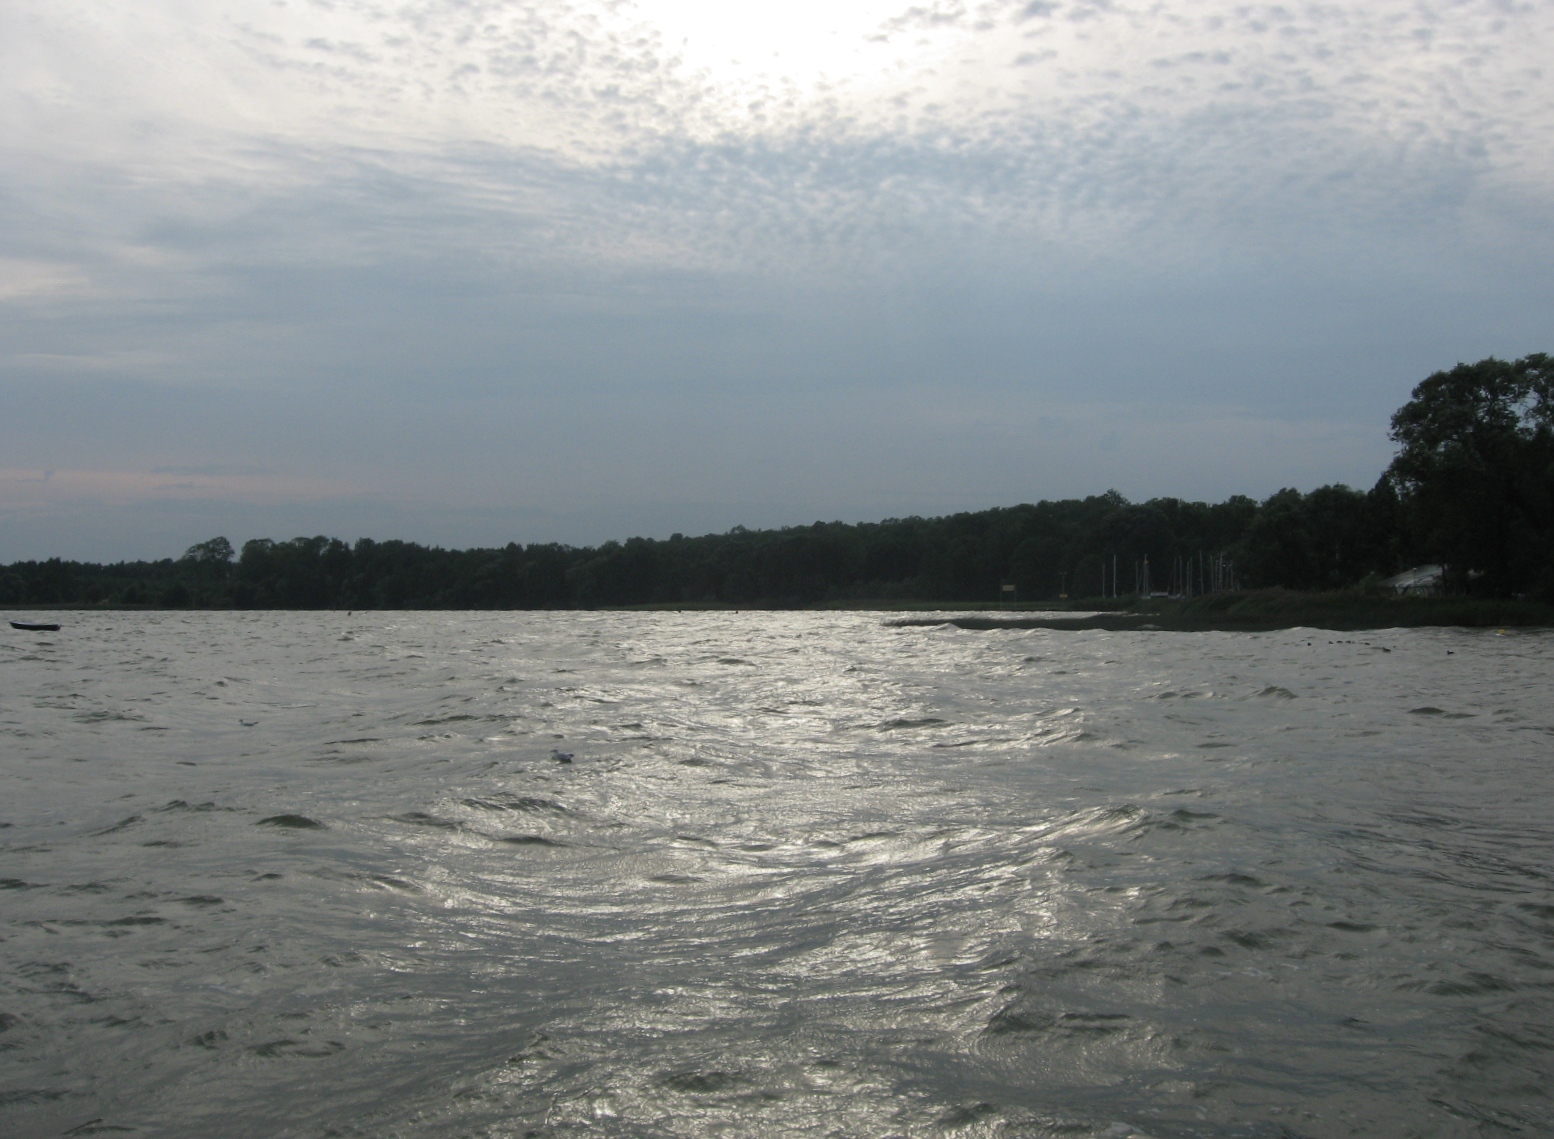
A similar contrast phenomenon can be observed on undulating ground, where this bright illusion is observed just above the ground and is closer. This is agreed with the Machs bands – an optical Illusion, where the contrast between edges of the slightly different shades is exaggerated. It is an effect of human eye perception, triggering edge detection in this case. As a result, the contrast band always appears to be an exaggeration of the curvature (Gilles, Minart, 1954) (Pic. 5, 6).
This example can be also observed during a partial solar eclipse when shadows cast by the Sun disappear and reappear asymmetrically as the eclipse progresses. These changes can be explained as due to changes in the shape of the penumbra of shadows as the visible portion of the Sun forms crescents of different orientations (Ross, Diamond, Badcock, 2003).
2. HUMAN PERCEPTION AND POWER OF VISION
A light-gathering power is the most important ability for observing light by the human eye. Another feature of the human eye is the ability to adjust to the illumination level in the stupendous range between the faintest stars and the brightest light, being about 100 trillion times stronger (Schaaf, 2002). Even a full Moon is actually 465000 times dimmer than the Sun (Schaaf, 2002).
All this shows how easily the human eye adapts from day to night conditions and another way round. The eye works with two fundamentally different (though partly overlapping) systems in bright light and dim, as referred to in my previous article about light around us. There I mentioned the photosensitive retinal cell, which responds well in these different light conditions. Everyone is familiar with the changes in pupil size due to changing light intensity: the pupils are small in bright light and large in dim. The pupil diameter can dilate from about 2mm in full light to 8mm in full darkness, however, as a person ages, the pupil dilation ability is lower leading to decrement in the light-gathering power. Fortunately, this defect is not significant for most of our life as an observational experience.
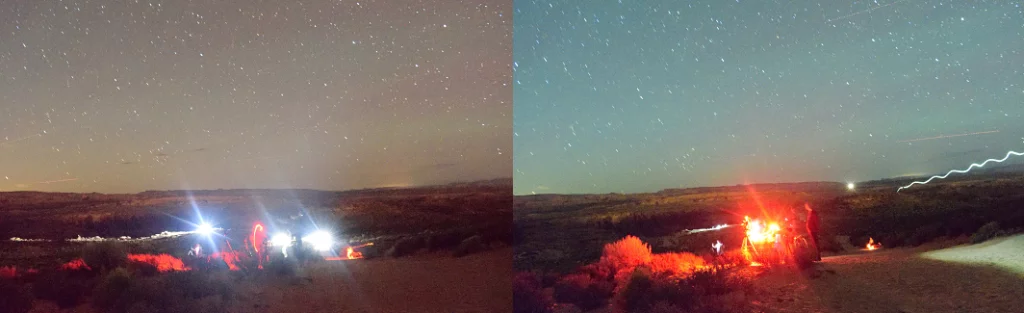
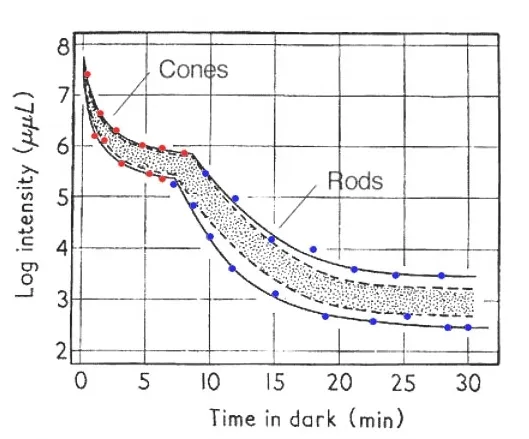
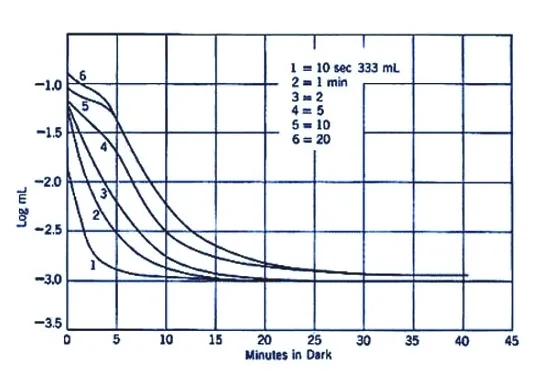
The ability to see faint objects to the naked human eye is the dark adaptation. As I mentioned both above and also in my previous article the human eye has two major kinds of photosensitive cells: rods and cones. Cones work well in bright light, giving the ability to distinguish colors. Rods work well in dim light and cannot distinguish colors. The adaptation to a particular level of light takes a while and depends on the level of transition. In extreme cases, when you go outdoors at night from a brightly lit interior you are not able to see faint stars for a while. The rods need to redevelop in darkness in a matter of minutes. For the biggest difference in illumination the improvement of the ability to see faint objects may take from 15 to 30 min to be mostly accomplished (Schaaf, 2002). The ability to see faint objects to the naked human eye is the dark adaptation (Pic. 5).
This dark adaptation must be also considered in terms of pre-adapting light conditions, which level can vary depending on the illumination difference between the bright and dark areas. The intensity and duration of pre-adapting light are strongly associated with a light transition area. When this light transition is better pronounced, which is caused both by a bigger illumination difference between two separate areas and the width of the half-shadow area, then the intensity of pre-adapting light will be bigger. In this case, when the level of pre-adapting luminance is higher, the duration of cone mechanism dominance extends, while the rod mechanism switchover is more delayed. In addition, the absolute threshold takes a longer time to reach. The opposite is true for decreasing the levels of pre-adapting luminances (Barlett, 1965) (Pic. 8).
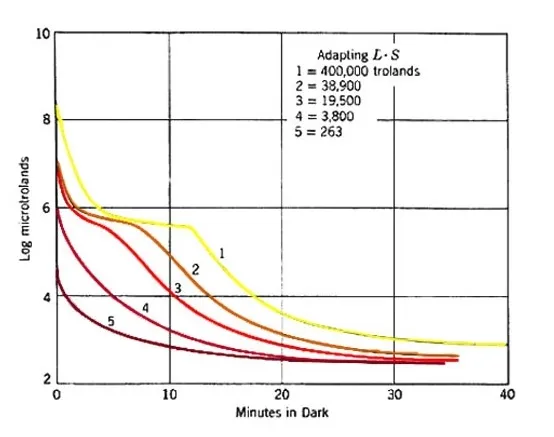
The illuminance impinging on the human eye is measured with the Troland (Td) units, where we have a product of photopic (or scopic) luminance and pupil area (Pic. 8).
If the half-shadow area is less pronounced, what happens basically when the obstacle has much bigger angular dimensions, than a source of light or is too close to the illuminated surface, which in this case is a human pupil. Then the pre-adapting light has a much shorter duration and the decrease in dark adaptation is more rapid (Pic. 9). For extremely short pre-adaptation periods only a single rod curve is obtained unlike to opposite situation when a long pre-adaptation period incurs both rod and cones reaction.
There are also other factors, which affect the dark adaptation like the size and location of the retina, the wavelength of the threshold light, and rhodopsin regeneration.
The wavelength threshold of light plays an important role in dark adaptation curve affection. Basically, long wavelengths such as an extreme red create the absence of a distinct rod/cone break as the rod and cone cells have similar sensitivities to light of long wavelengths. Conversely, at short wavelengths, the rod/cone break is more prominent, because the rod cells are much more sensitive than cones once the rods have dark-adapted (Barlett, 1965).
The process of dark adaptation means also changes in the dark adaptation threshold. The dark adaptation threshold indicates the illumination level, where some point or object becomes visible to the observer at this moment. It changes as the eye adapts more to darkness or as some bright light around becomes stronger. Basically, the dark adaptation threshold is an effect of weak light presence against some stronger light available in the vicinity. Usually, a stronger light beats up the weaker ones, making a dimmer object less visible or even invisible. A good example is a comparison between a single white light from a torch and stars seen in the sky. Using a torch to shine a flashlight in the eyes of the observers may change the dark adaptation threshold rapidly, making some dimmer celestial objects temporarily invisible to the observer (Pic. 10).

Fortunately, the eye can recover very rapidly from a very brief exposure to bright light, obviously when the light is not bright. In this case is much better to use red light instead of white, because the rods of the eyes are hardly sensitive to very red light at all (because rods do not distinguish any colors as colors but with very red light they do not even respond to as illumination (Schaaf, 2002)).
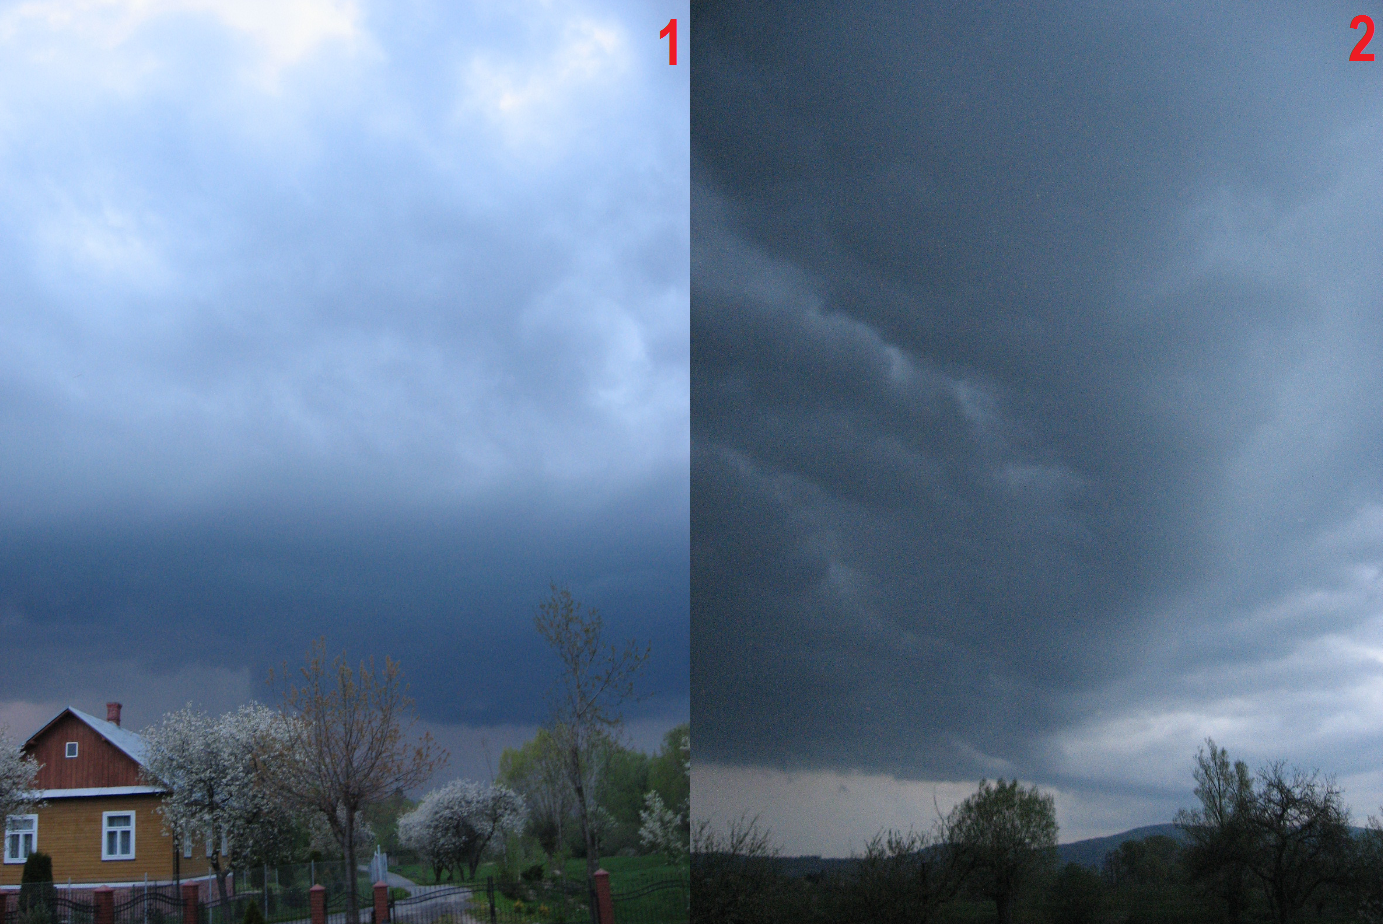
The adaptation to a particular level of light takes place also during the day, however, lasts much quicker than during the night. It can be noticed when a thunderstorm approaches. Usually, a thick cumulonimbus cloud blocks most of the direct sunlight, turning the daylight into the evening or even twilight conditions (especially for interiors) (Pic. 11), which was also discussed in the light scattering issue.
Another example can be found when we enter i.e. the basement, where the light level is really low and remains in nocturnal conditions. A total solar eclipse is also an example of significant light changes. In this case, the human eye adaptation is still no longer than a few seconds. A key role in light transition plays a huge difference in luminosity between one area and another. A much more illuminated area ordinary draws out the details from the less illuminated area, which initially appears to look like a “dark or grey wall”. When an observer is closer to the transition area then some details behind this “wall” become visible (as long as the light has been scattered). This is strongly associated with the contrast phenomena issue, which is to be developed in the next section.
The moment, when some details of the less illuminated region depend on the illumination difference between the bright and darker area as well as the medium, in which the light is scattered. Analyzing the pictures taken by Apollo on the Moon (Pic. 12) I guess, that this process doesn’t work in a vacuum, where there are conditions for light scattering.
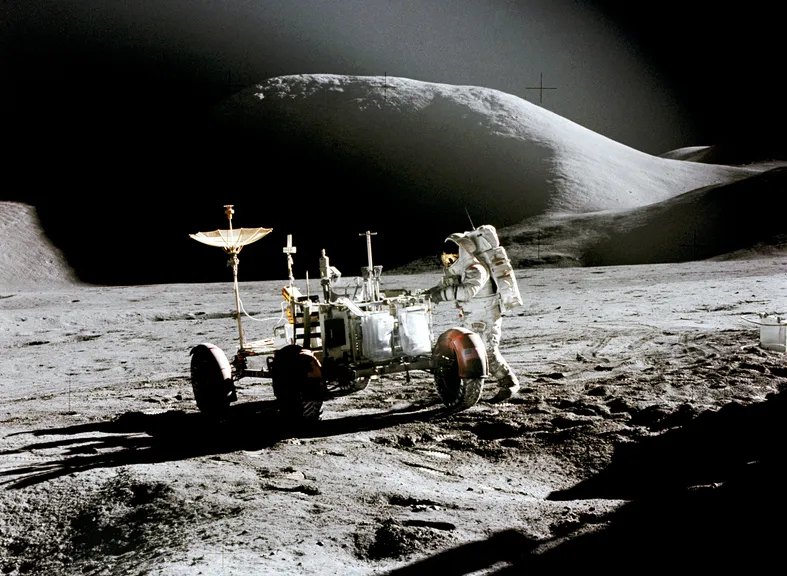
On the other hand, the light will be reflected from illuminated objects giving any illumination to shaded ones. This factor can be also considered in medium, which depends on the object properties and the kind of medium that will be stronger or weaker than scattering.
3. CONTRAST AND VISUAL ACUITY
Next to the dark adaptation, the main role in the perceiving of the light transition plays also a contrast. Contrast is a difference in luminance or color, that makes an object distinguishable. In visual perception of the real world, contrast is determined by the difference in the color and brightness of the object and other objects within the same field of view.

The human visual system is more sensitive to contrast than absolute luminance. An observer can perceive the world similarly regardless of the huge changes in illumination over the day or from place to place. However, at any given moment in time, the eye can only sense a contrast ratio of 1000 (Kitsinelis, 2012).
The contrast ratio is a property of a display system, defined as the ratio of the luminance of the brightest color (white) to that of the darkest color (black), that the system is capable of producing. A retina in the human eye has a static contrast ratio of around 100:1. It means, that the brightest white is 100 brighter than the darkest black. As soon as the eye moves rapidly to acquire the target, it re-adjusts its exposure by adjusting the iris, which adjusts the size of the pupil.

This process is associated with a dark adaptation, described above. Again, the light transition area divides the brighter and darker areas. When the brighter area is far, then only a “grey or black wall” can be visible instead of the details inside the darker region, because the pupil is already adjusted to the illuminated, brighter area. Then our eye has a much better visual perception of objects in an illuminated area unlike in another area being shaded, where the visual perception is really poor. The situation changes when the shaded, darker area approaches and the illumination level of the brighter area in the field of view starts to decrease. Then the details of the shaded region become visible. This is a rough moment when the human eye adjusts to a new level of illumination. An analog situation occurs when in our field of view are two different brightness regions close to each other. Then our pupils open and close adjusting the view dynamically like a video camera. In conclusion, when the illuminance difference between two separate regions is lower, then the contrast ratio is bigger. In effect, we can have more distinguishable details in both regions. Conversely, a huge light level difference between two regions (like the clear and cloudy sky) decreases the contrast ratio. The result is a lack of discernable details in one of the regions, depending on its prevailing presence in our field of view. For instance, when looking at the bright region, you can distinguish only the bright region features, the darker one appears to be featureless (Pic. 15).
The human eye can sense a contrast ratio of up to 1000. The eye adapts its definition of what is black. It is worth mentioning the contrast sensitivity, which measures the ability to discern between luminances of a different level in a static image. To make it simple contrast sensitivity describes the ability of the visual system to distinguish bright and dim components of a static image, and how much contrast is needed to perform a particular visual task. The contrast sensitivity is equal to 1/Contrast-threshold. It means, that contrast sensitivity defines the threshold between the visible and invisible (Pelli, Bex, 2013). The contrast threshold is about 1% for a wide range of targets, independent of size and luminance (Pelli, Bex, 2013).
4. LIGHT TRANSITION IN PHOTOGRAPHY. CONTRAST AND DYNAMIC RANGE TECHNIQUE.
The light transition phenomenon is to be noticed also in photography and movies. Before I start to describe it I would like to bring some information about a dynamic range, which has similarities with the contrast ratio. The dynamic range is commonly used in photography when a big luminance range scene is being photographed. A dynamic range technique is used also for the limits of the luminance range that a given digital camera or film can capture (Myszkowski, Mantiuk, Krawczyk, 2008).
A basic aim of the dynamic range technique is to make the image capabilities comparable to the capabilities of the human eye. Dynamic range is the range of information between the lightest and darkest parts of an image, also known as image luminosity. We can distinguish between a Standard Dynamic Range (SDR) and a High Dynamic Range (HDR). The basic difference between these two dynamic ranges is the ability to show the details and colors of the scene in the picture in comparison to the ability of the human eye. Standard dynamic range (SDR) is the current standard for video and cinema displays. It represents only a fraction of the dynamic range, that HDR is capable of. The High Dynamic Range allows you to see more of the detail and color in scenes. The 6-stops range of the Standard Dynamic Range has a limited dynamic range (Borer, Cotton, 2015). It results in a big contrast of the image with lost details of the darkest and the brightest areas. As a result, shaded areas appear to look dark without any details and the sky (especially cloudy) appears to be completely white, also without any details (white sky effect)(Pic. 16).
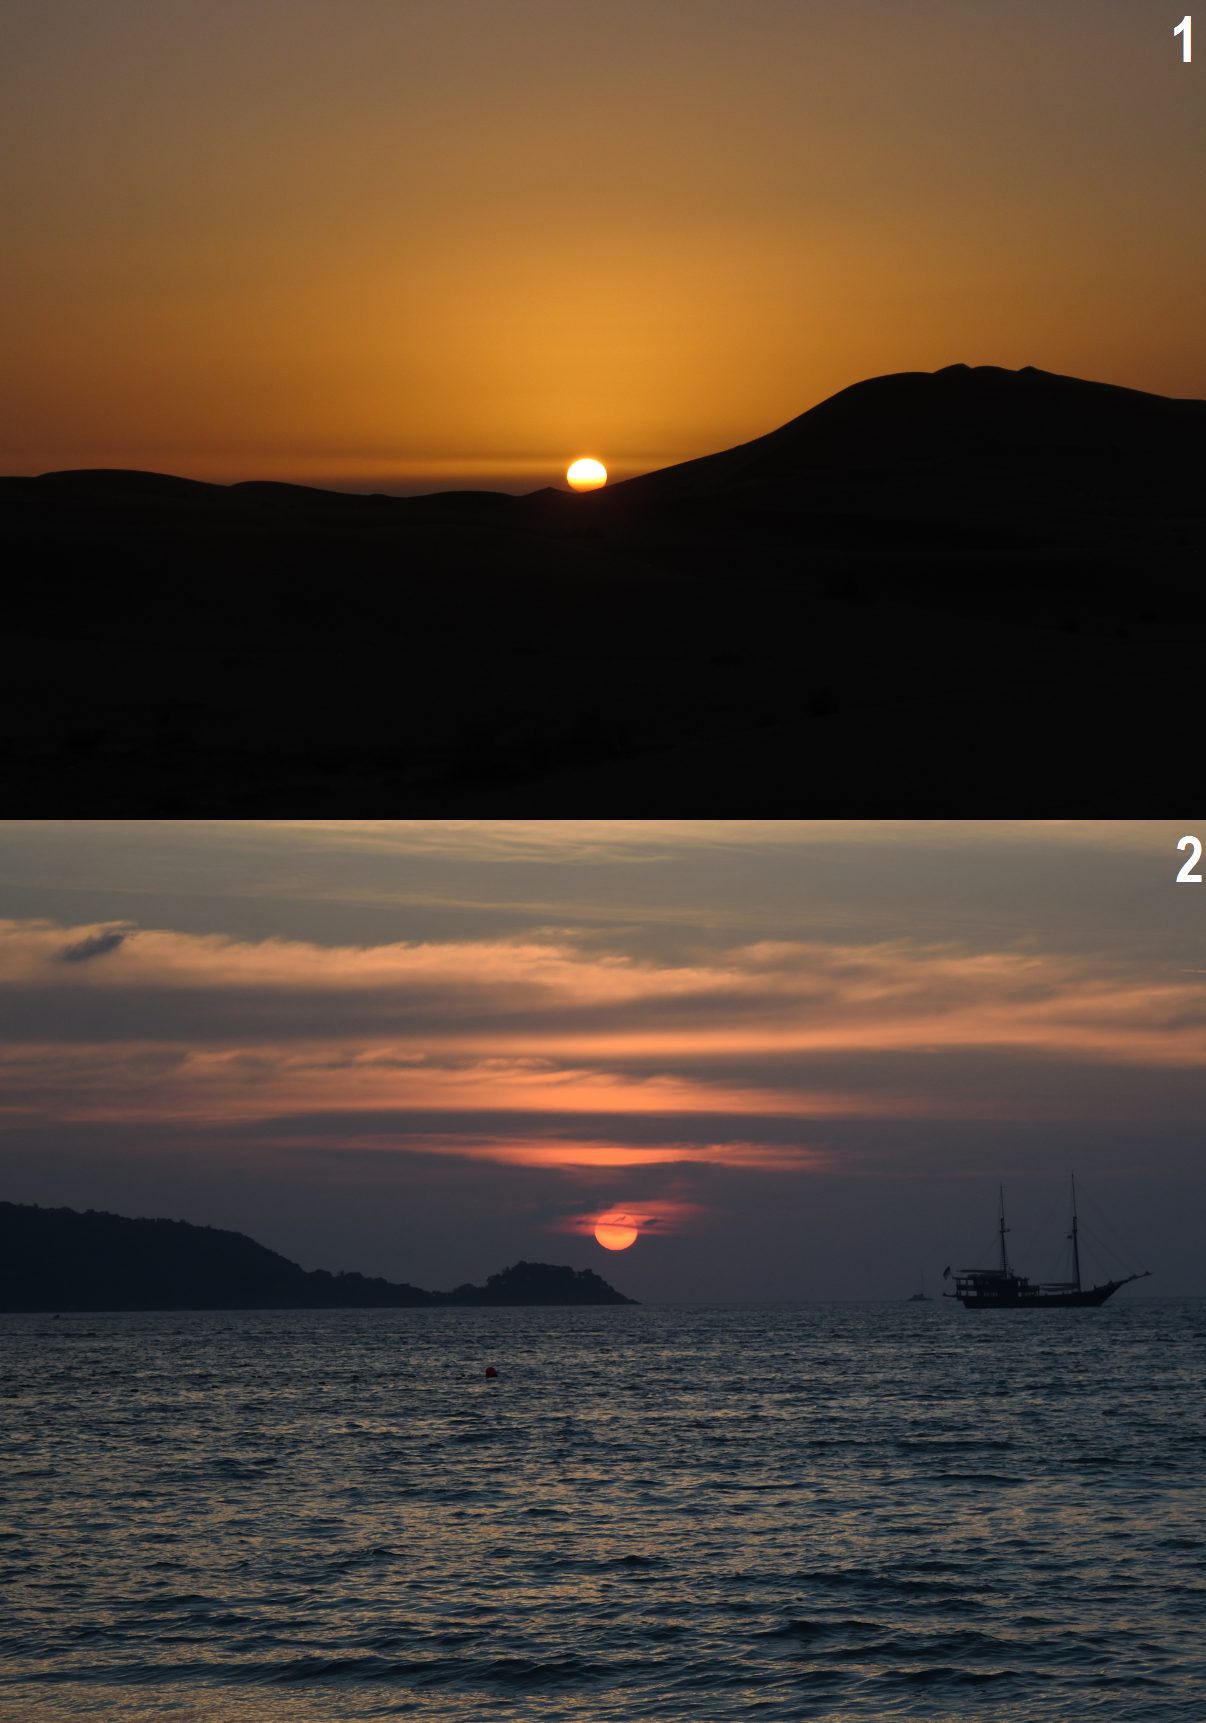
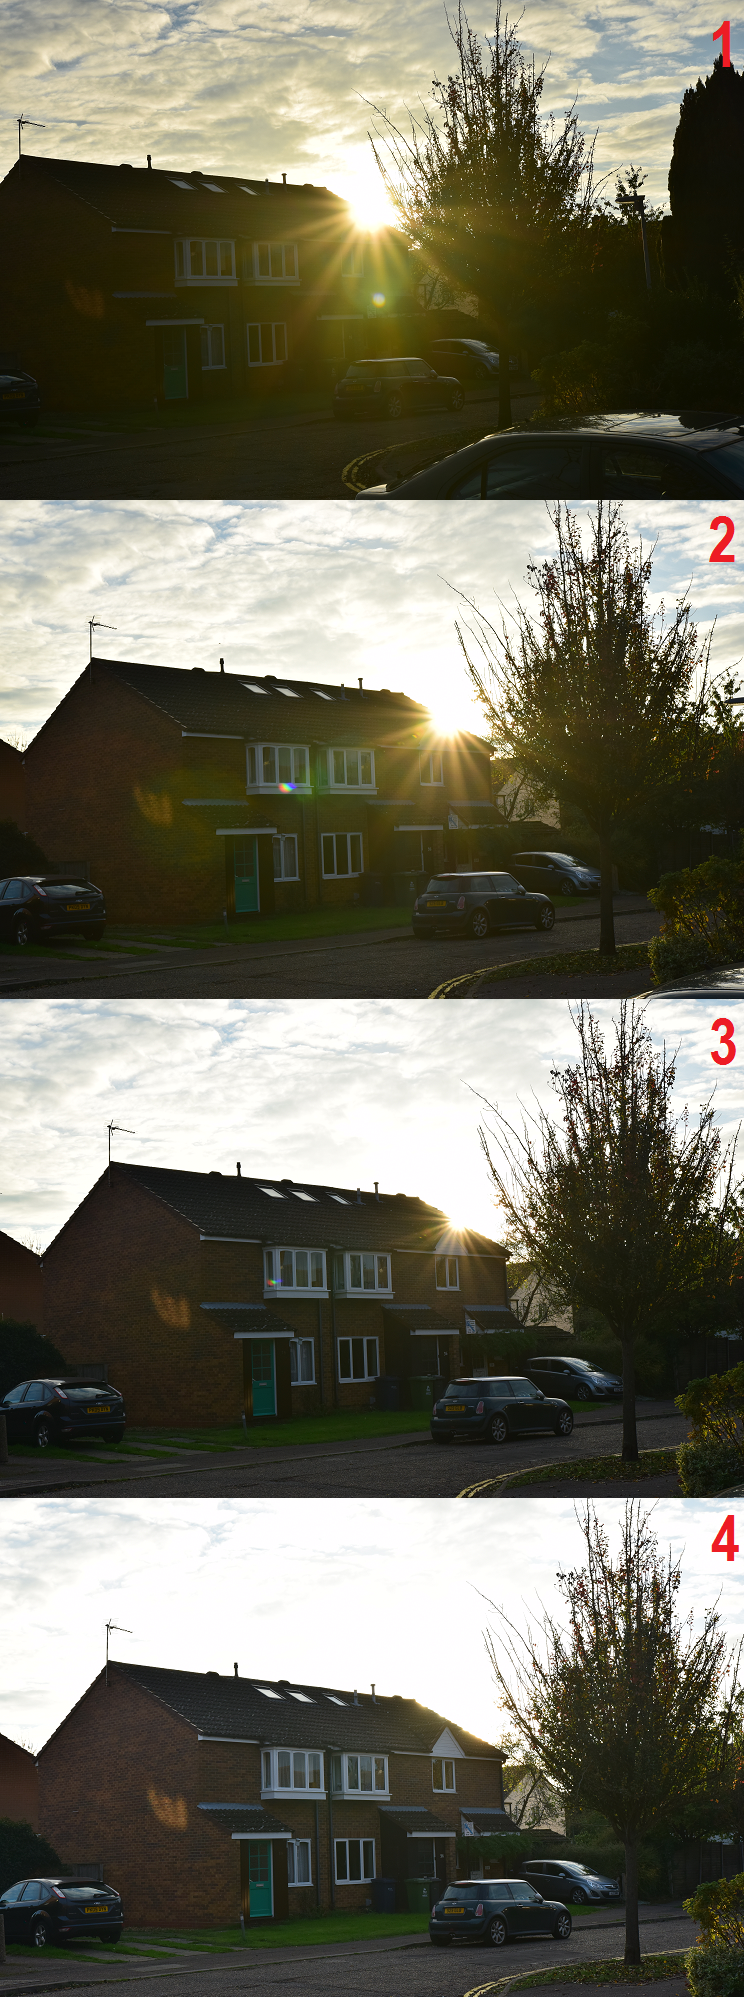
Conversely, a High Dynamic Range (HDR) is able to gain almost triple than Standard Dynamic Range (SDR), with an average approximate total of 17.6 stops. In effect, in the place wherein SDR images, we could see almost nothing, HDR allows us to see many more details. HDR images can represent a greater range of illuminance levels than can be achieved using more traditional methods unlike SDR which provides a limited exposure range with loss of detail in highlights or shadows. The best moment for comparison between SDR and HDR image techniques is to capture the sunrise or sunset (Pic. 17).
The digital cameras, as well as the human eye, need adaptation to rapid changes in illumination level, causing the transition from illuminated to shaded area. A single photo cannot show us this difference, unlike footage. To experience it we need to place the camera or camcorder near the border of two areas with different illumination i. e cloudy bright sky and the building wall. You will see the moment of light adaptation of your instrument. This example clearly refers to the light transition between the illuminated and shaded areas in our field of view.
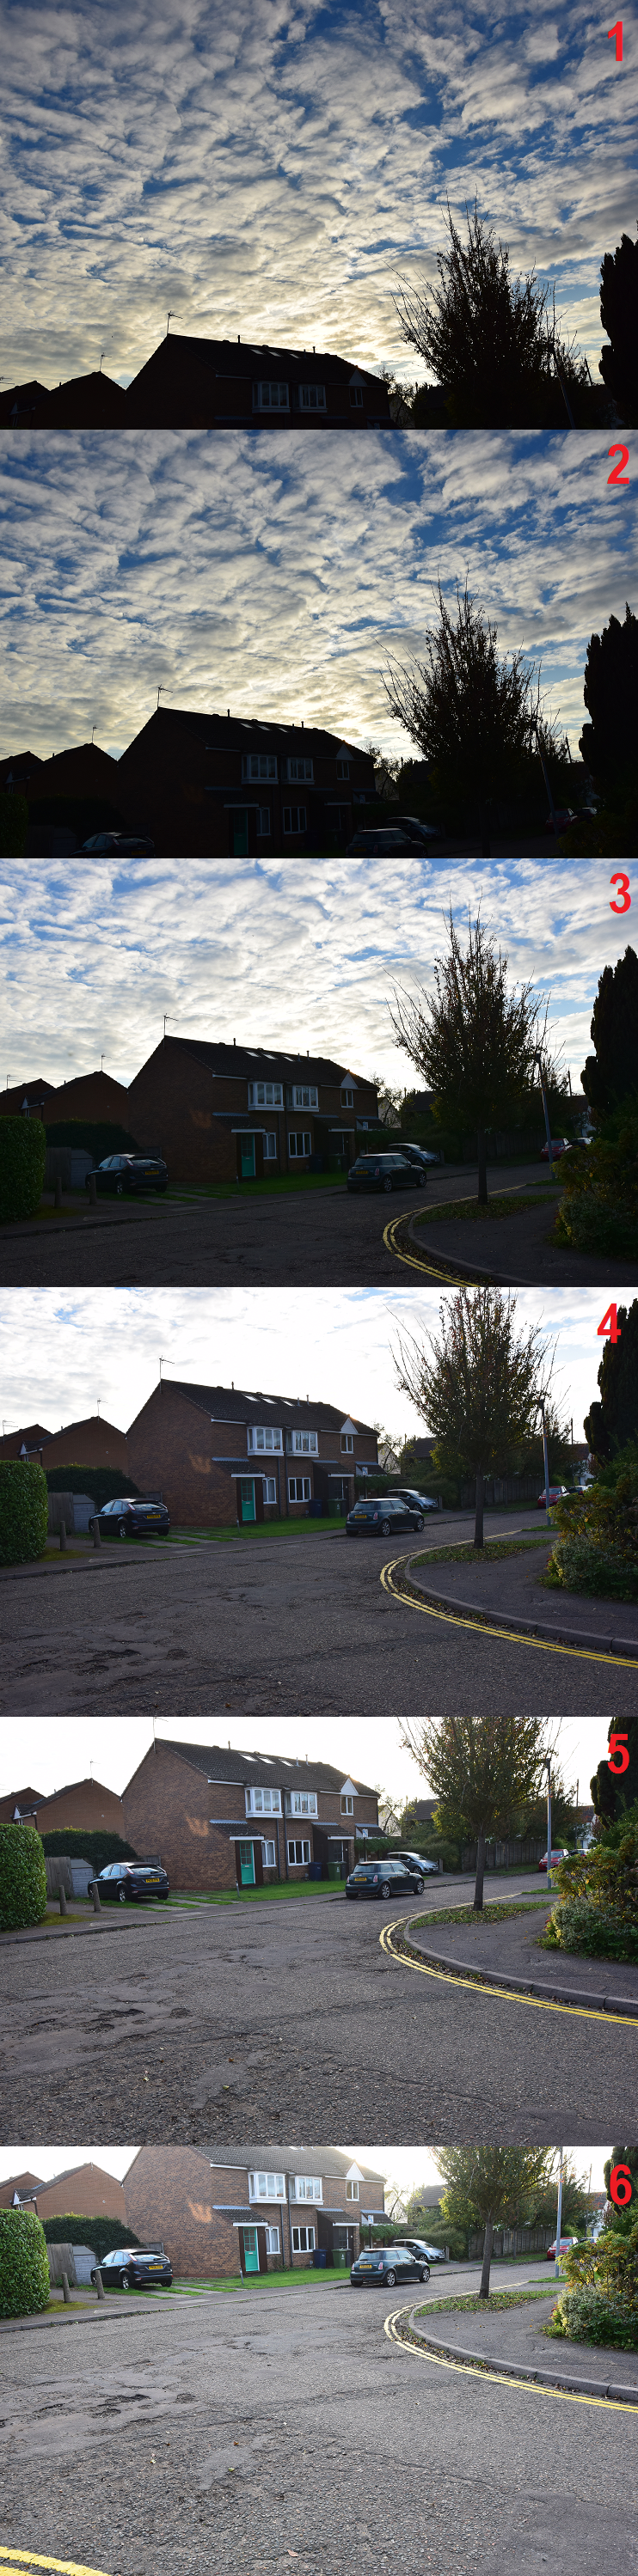
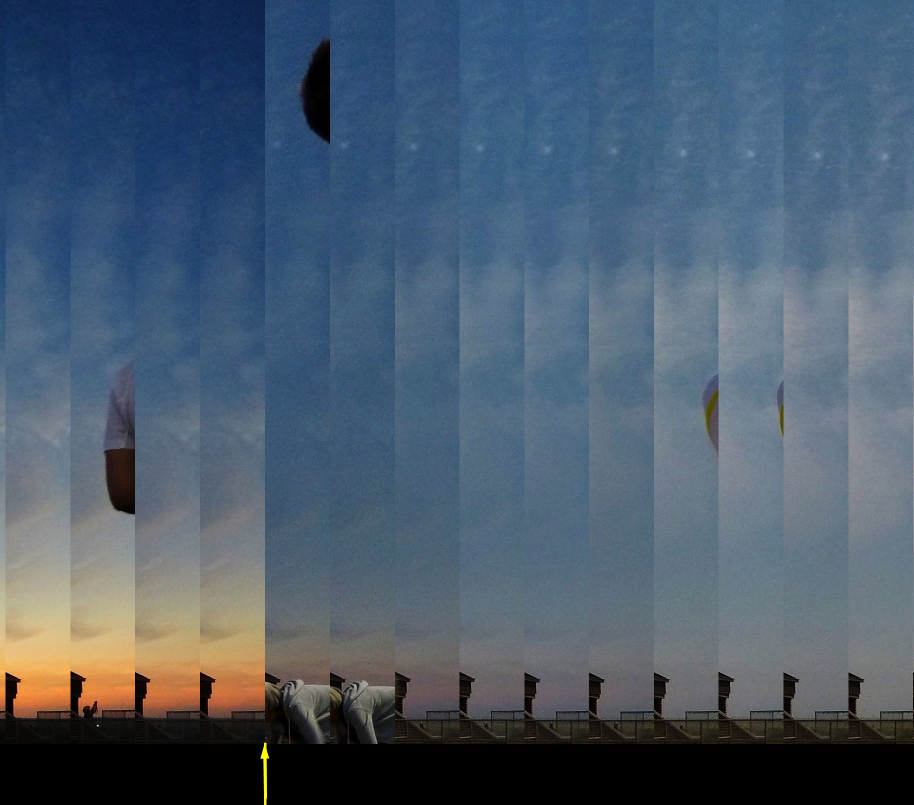
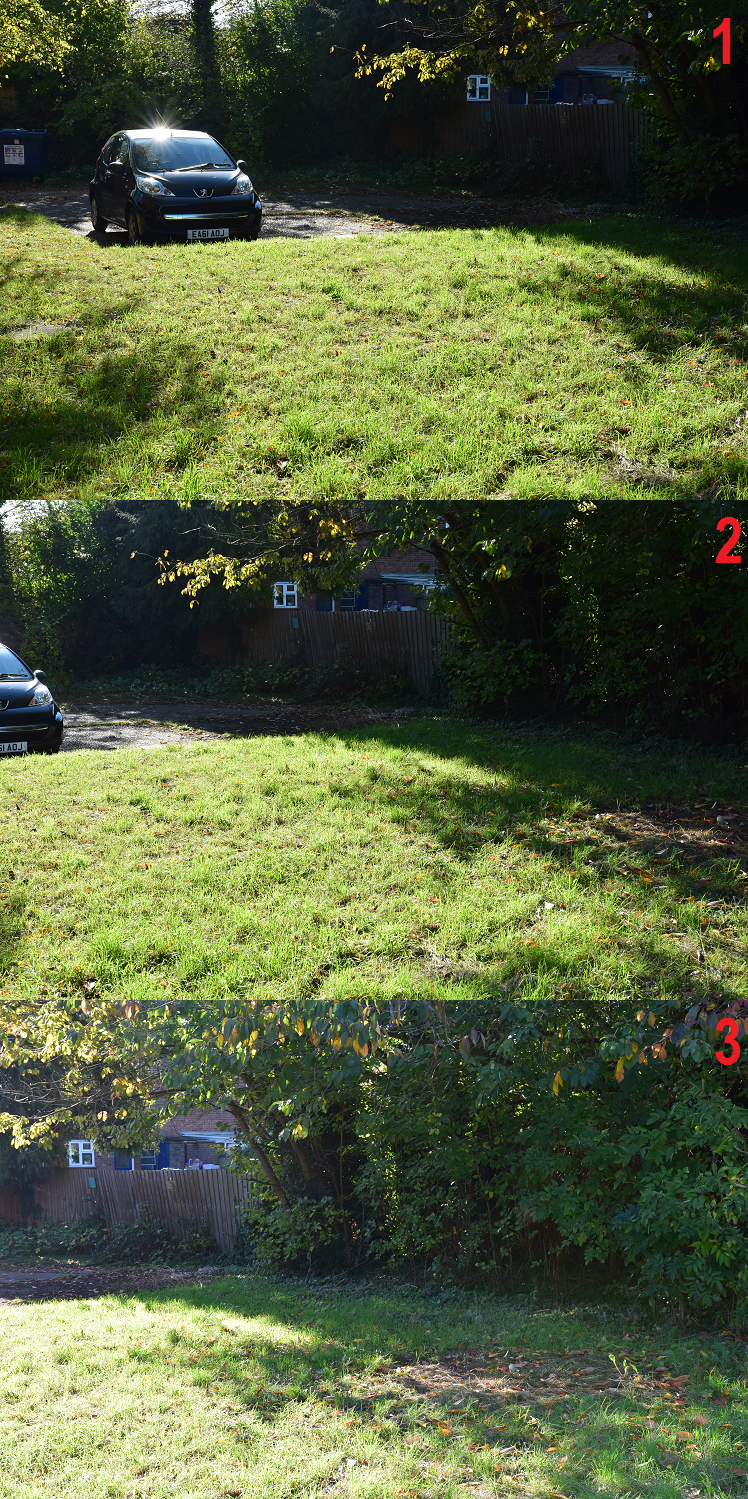
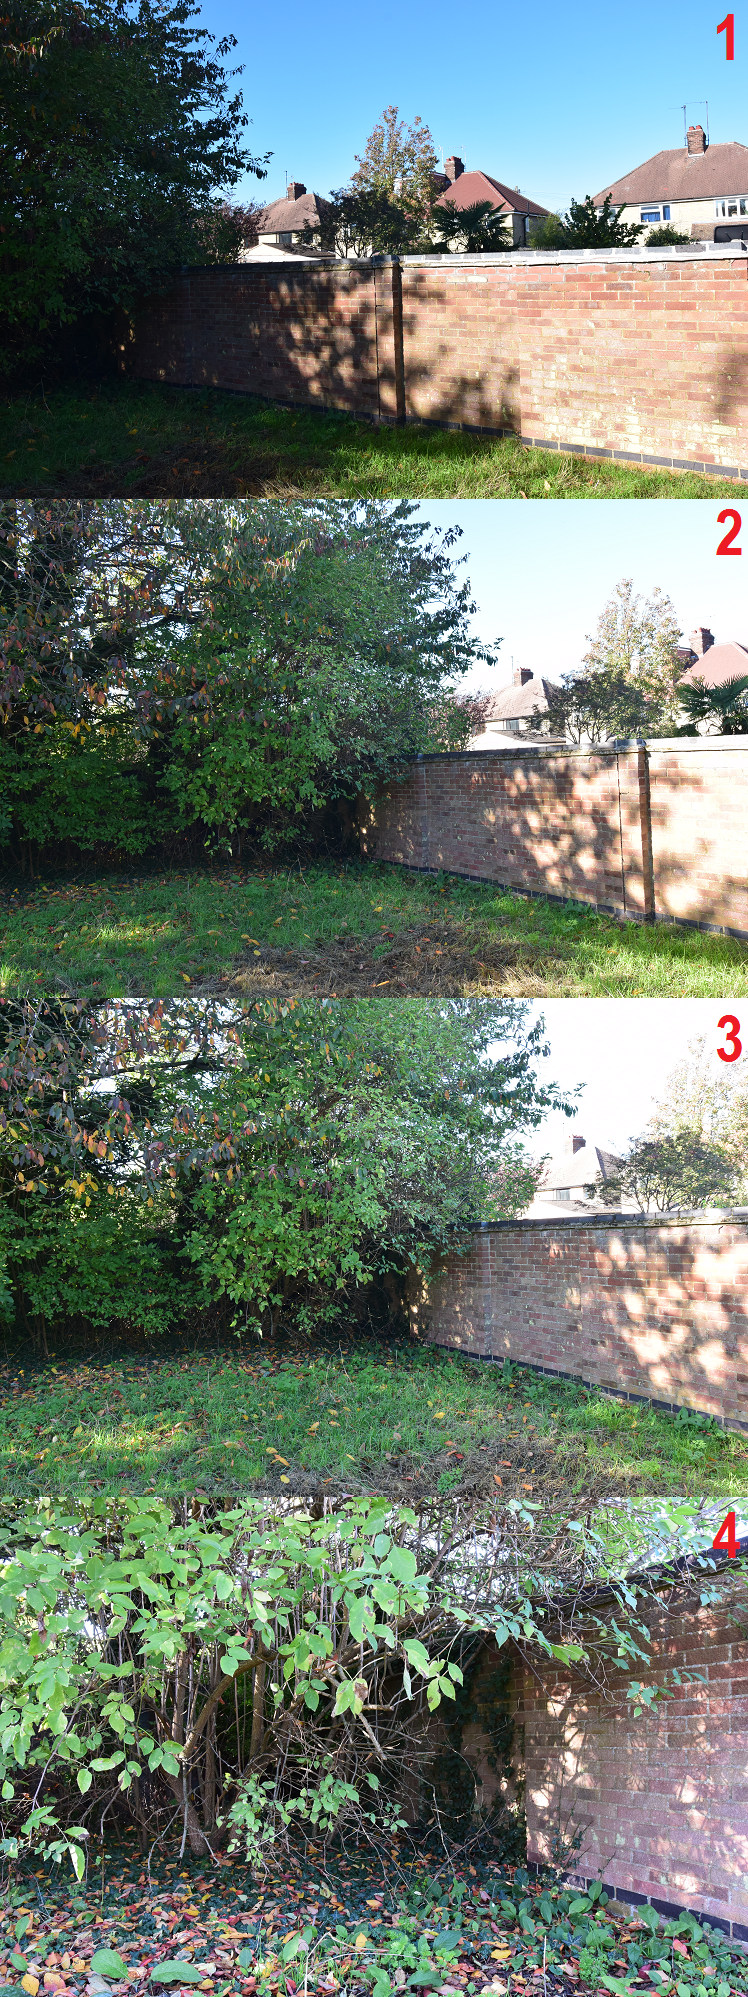
The same exercise can be done with single images, where your field of view moves between the single images, covering darker or brighter areas (Pic. 18 – 22). Stacking all the pictures together you can see every step of light transition recorded by your camera. The human eye response to light transition is analogous, however, the pupil is less sensitive to light changes than the camera sensor is.
The light transition in the photography aspect we can understand as a balance between a highlight and shadow, which is to be adjustable in common graphic software like Gimp, Photoshop, etc.
5. LIGHT TRANSITION EXAMPLES IN THE SURROUNDING ENVIRONMENT
Knowing all major elements, that are associated with the phenomena of rapid illumination changes could be good to bring several examples as an essence of this article
The common examples of the transition phase of light have been listed below.
A. TOTAL SOLAR ECLIPSE – the best example of light transition in macroscale, which occurs in a brief moment. The transition phase, which occurs between about 30s before totality to around 20s “inside” the umbra causes a multitude of phenomena, that is going to be described soon. A total solar eclipse seen from space looks like a dark dot surrounded by an area of gradually diminishing light (penumbra or half-shadow) making the shadow’s edge soft and gradual (Pic. 23, 24).
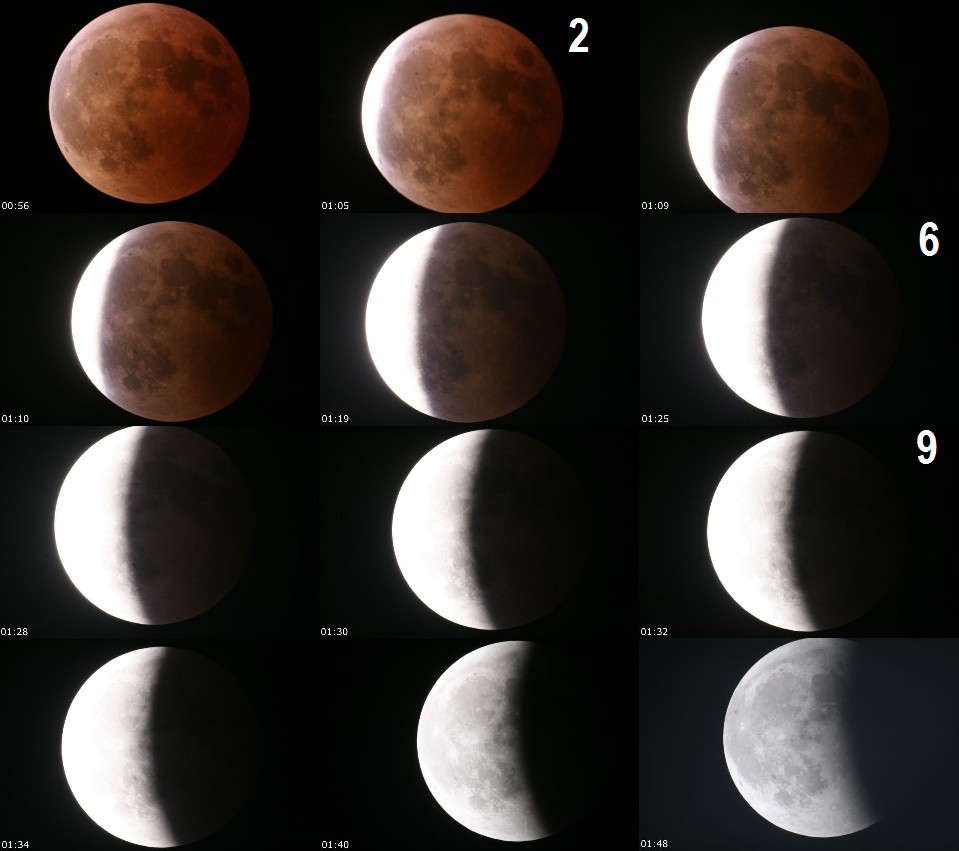
B. LUNAR ECLIPSE – is a very smooth and slow example of light transition, which occurs in nature. Basically, a transition area is the shadow edge. Similar to the total solar eclipse, there is a partially (penumbra) and totally (umbra) shaded area. The transition area is marked by a shadow edge, which gradually moves across the lunar disk. At the penumbral phase, we can see only a diminishing lunar disk, that is less bright towards the side of Earth’s shadow approaching. Once the shadow edge becomes visible the observer can see nothing beyond the transition line. This is because the pupils are still adapted to the brighter part of the eclipsed Moon, thus only in the highlight region, we can see the details. The situation changes as the eclipse progresses. About halfway through the partial eclipse observer cannot see the details neither a shaded part of the Moon nor the most illuminated one. Only visible details are located near the transition area, where the sunlight is deeply eclipsed. On the other side, the limb of the shaded part of the Moon starts to be visible. During the deep partial lunar eclipse, the human eye is adapted to dim light reflected by the eclipsed Moon’s surface, thus some details “behind” the transition area are visible unlike to still highlighted area, which appears to look completely white and featureless (Pic. 25).
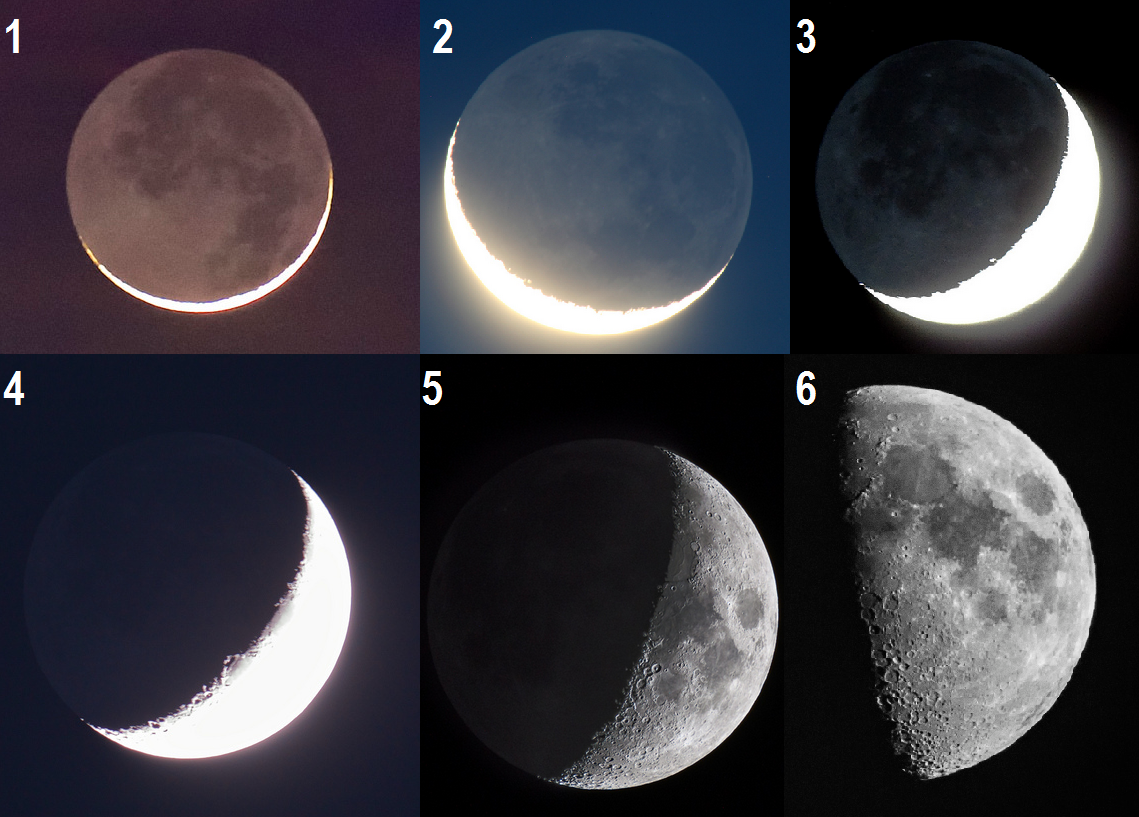
C. EARTHSHINE – is a dull glow, which lights up the unlit part of the Moon as a result of the sunlight reflected from the Earth. The best time to see earthshine is up to 5 days before or after the new Moon. The best conditions to see earthshine are when the Sun is below the horizon. In spite of considerable brightness (-3 Mag), it cannot be seen during full daylight, because is ordinarily drowned out by the Sun being in angular vicinity. The phenomena become visible when the Sun is close to set. In the case of Earthshine, the light transition area is determined by the terminator line. On the very first days after the new Moon, earthshine has the best appearance, because is bright enough against a thin crescent illuminated by the Sun. Earth’s atmosphere impairs its appearance effectively, because the Sun is not deep enough, making a strong light scattering. As the Moon moves further from the Sun earthshine faints. A basic reason is a change in the Earth’s phase from full to waxing or waning, which reduces an area of light reflection. Weaker earthshine successively yields a lunar crescent, which becomes wider and brighter at once. When the Moon is close to the first or last quarter then earthshine is drowned out completely by the much brighter, illuminated part of the Moon. An observer can only spot a faint shaded lunar limb, which at first or last quarter becomes invisible. In this case, a light transition occurrence overlaps with a weakening of reflected light, coming from the Earth (Pic. 26).
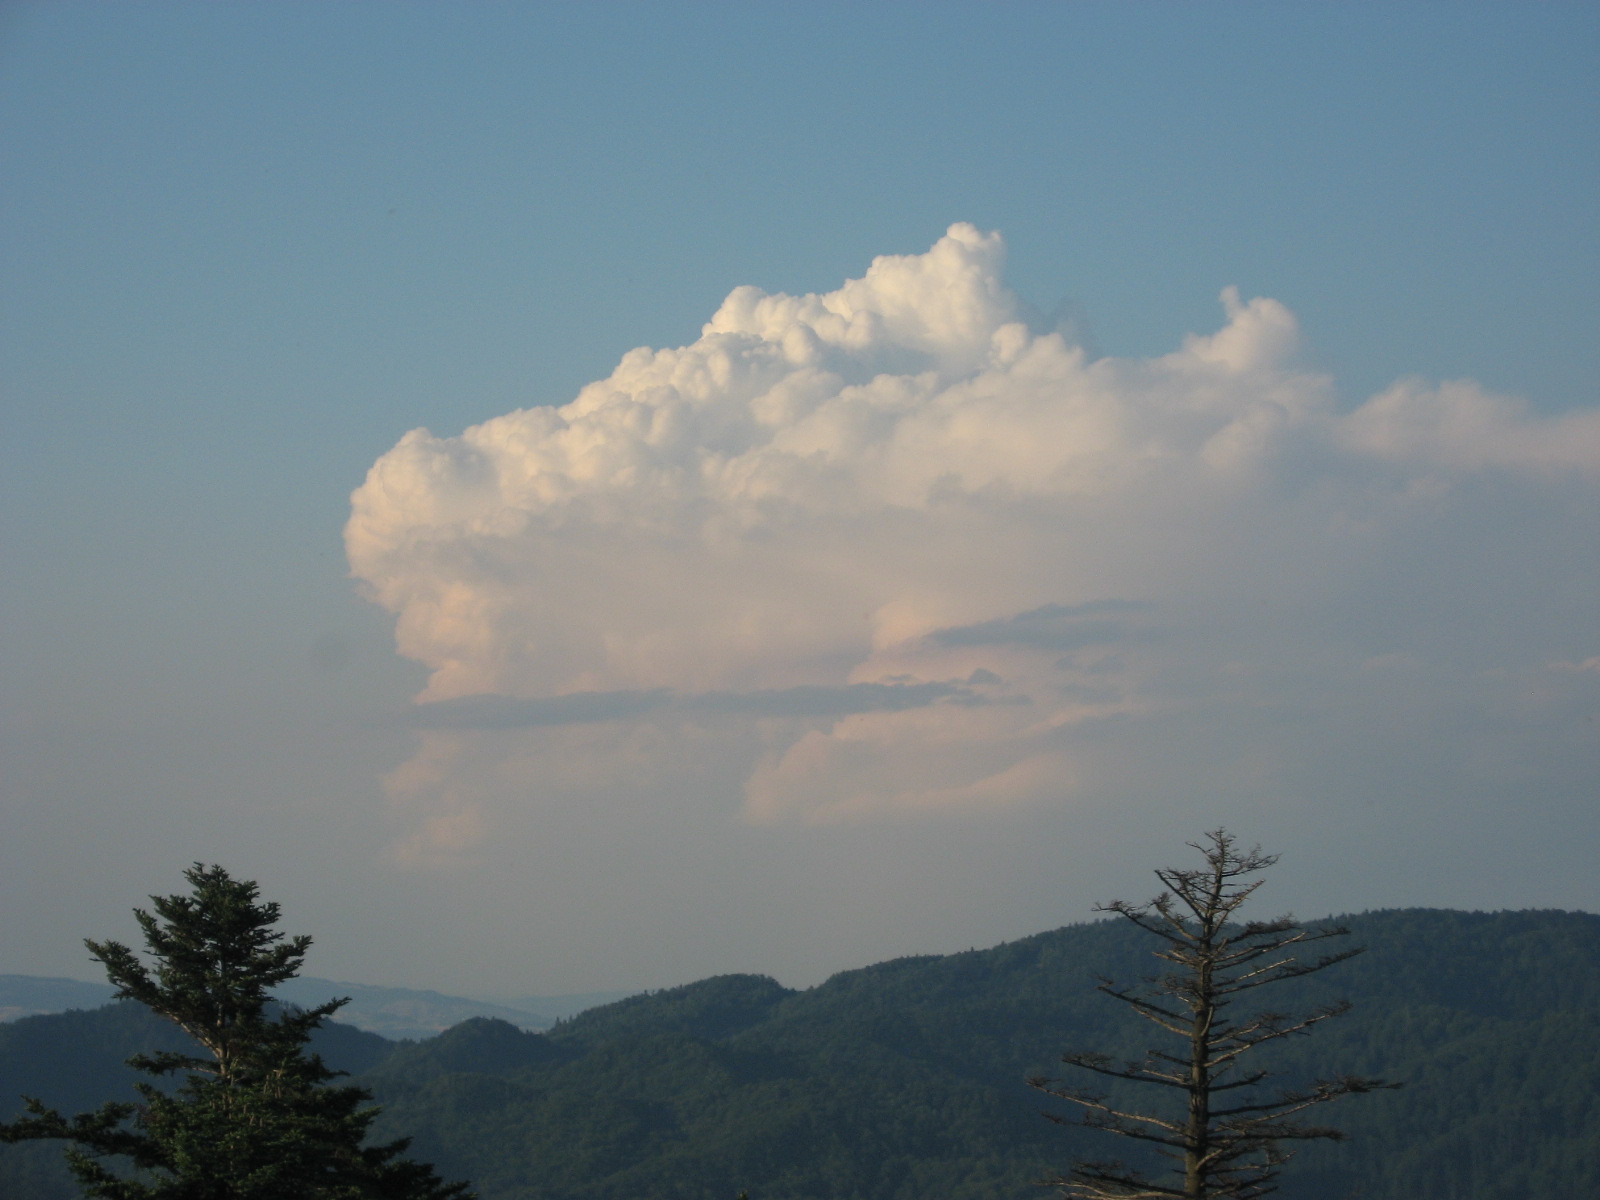
D. THUNDERSTORM CLOUDS AND CLOUD DECKS – are the most massive clouds we can see in the sky. The biggest is cumulonimbus capillatus with a remarkable top. However, this is not the aim of my consideration, because I would like to point out the cloud base. The effect, that I will describe below can refer also to other clouds, which are thick enough or at least uniform. When the cloud is far from the observer, he can see only the illuminated parts of the cloud both from the edges and from the gaps inside. When the cloud appears as a uniform layer then an observer is not able to see the shaded details. For a person standing at a distance to cloud the cloud, the base will look like a “grey wall” spreading down to the horizon. This is because the area of the sky, being illuminated directly by the Sun plays the main role. Moreover, the light reflected from the upper parts of the cloud is also strong, much stronger than light reflected by the inner parts of the cloud base. The situation changes when the cloud approaches closer to an observer. The gaps or areas being directly illuminated by the Sun become more discernable. On the other hand, a brighter part of the shaded cloud base becomes visible. Everything happens due to the decrement of the illumination in our field of view, which incurs an eye adaptation to darker conditions. A light transition area definitely leads to changing the contrast of the cloud base, making all its details clearly visible (Pic. 27 – 30).
.JPG)
In this case, the light transition phenomenon can overlap with the Beer-Lambert law, especially under a high haze concentration in the air.
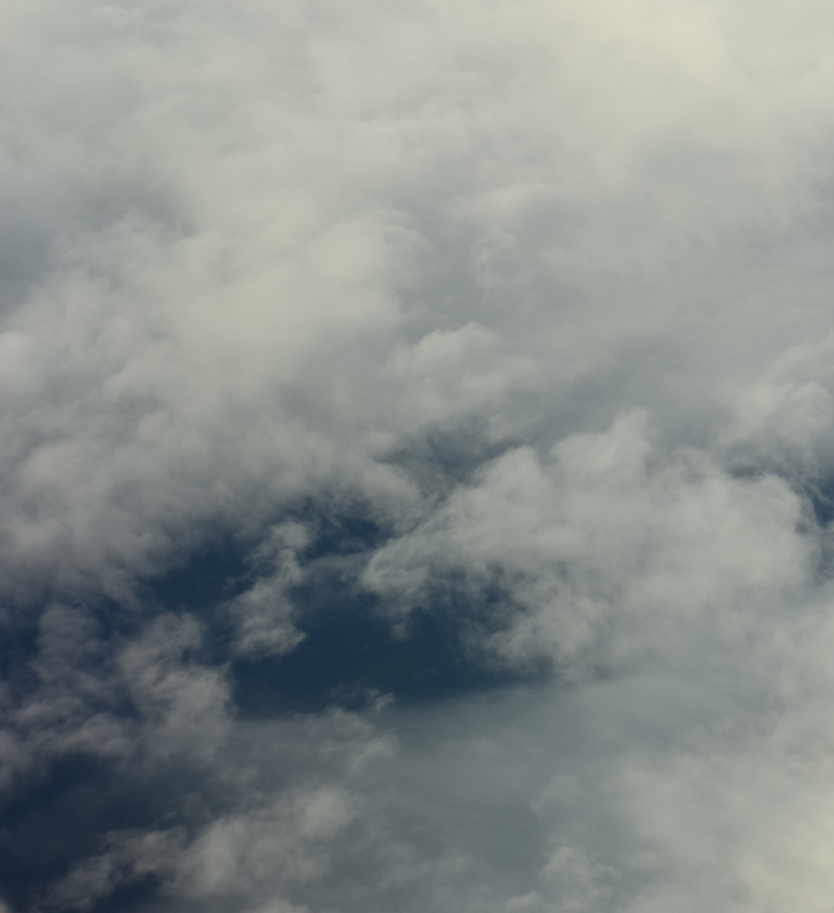
E. CLOUD’S SHADOW – observed mostly with the cumulus or cumulonimbus clouds, especially shifting closer to the Sun, where forward light scattering takes hold. Under the shadowed part of the sky, the strong blue color comes through. It reveals a transparent-looking part of the atmosphere caused by shaded aerosols (or thin cloud layers), which lost the ability to scatter direct sunlight. Utter lack of direct scatter sunlight in the shadowed area near the cloud borders can sometimes remain a sky visible at cloud deck altitude, outside of the planetary boundary layer turbidity (Pic. 31, 32).

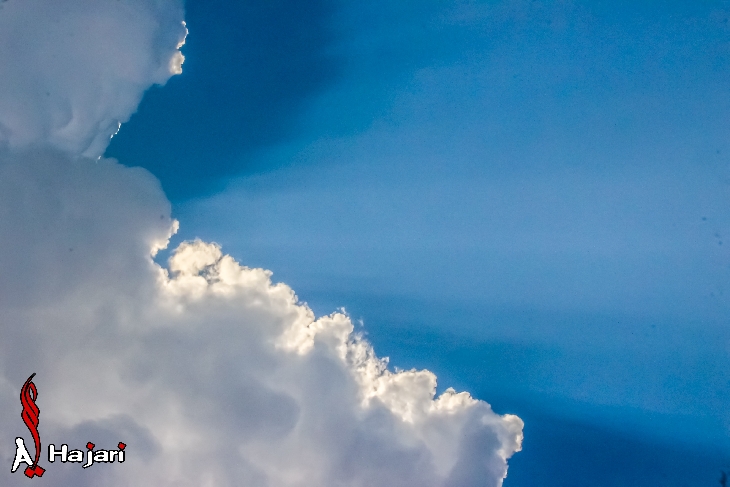
The cloud’s shadow can be also visible on another cloud deck, however, is usually a bit less pronounced.
H. CREPUSCULAR & ANTICREPUSCULAR RAYS – have been mostly described here. They are generated by multiple cloud shadows sweeping together, where single shafts of light reach the surface. Within these narrow illuminated paths, the details of the vista are impaired by haze, scattering this light.

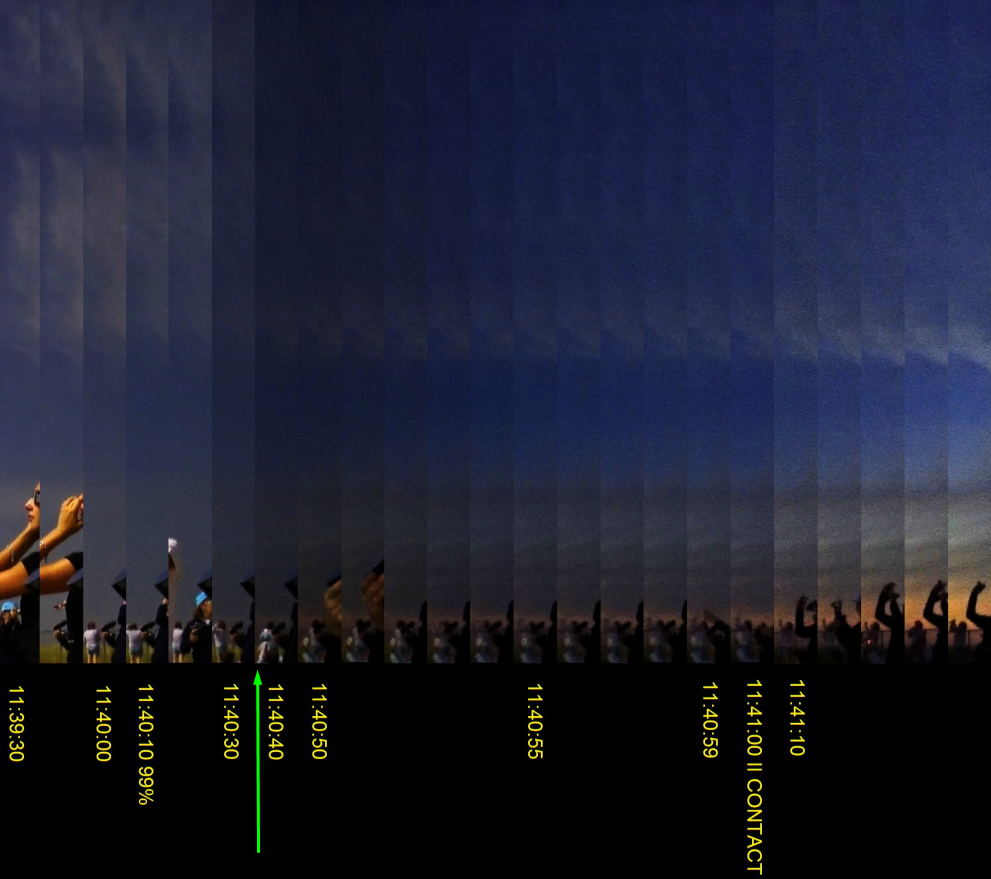
G. EARTH’S SHADOW (BELT OF VENUS) – is also a good example of eye adaptation. When the twilight wedge is low above the horizon, then a highlighted section of the sky prevails. As a result, the observer sees only a grey plain-colored area, just under the transition line. As the Belt of Venus grows up, it changes a tint. The sun is deeper below the horizon, the illumination of the sky is lower. Moreover, the shaded part of the sky prevails in our field of view. As a result of the illumination decrement, the observer’s eye begins to see the different hues of the shaded portion of the sky (Pic. 34).
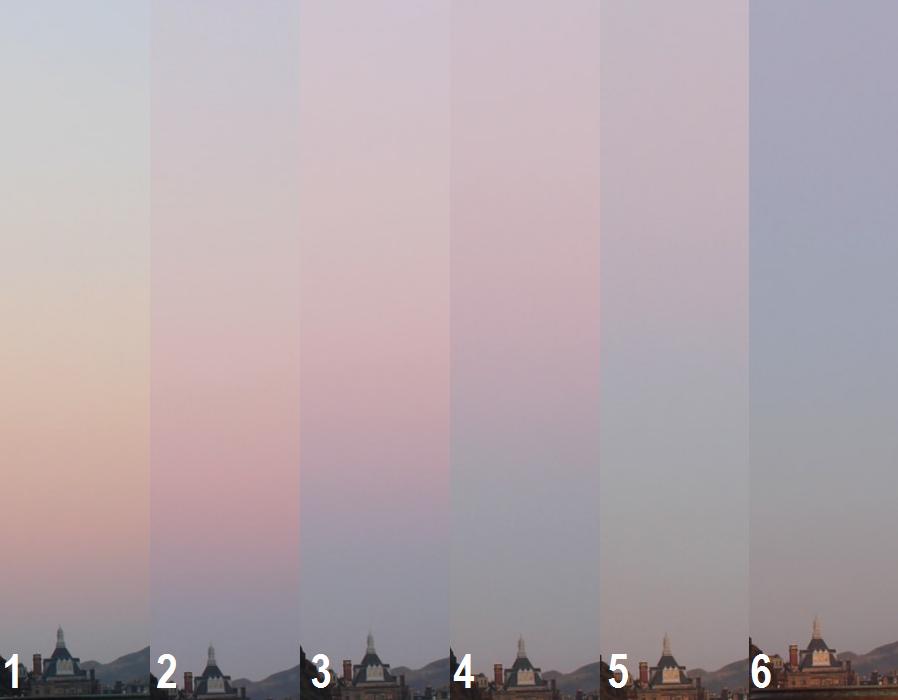
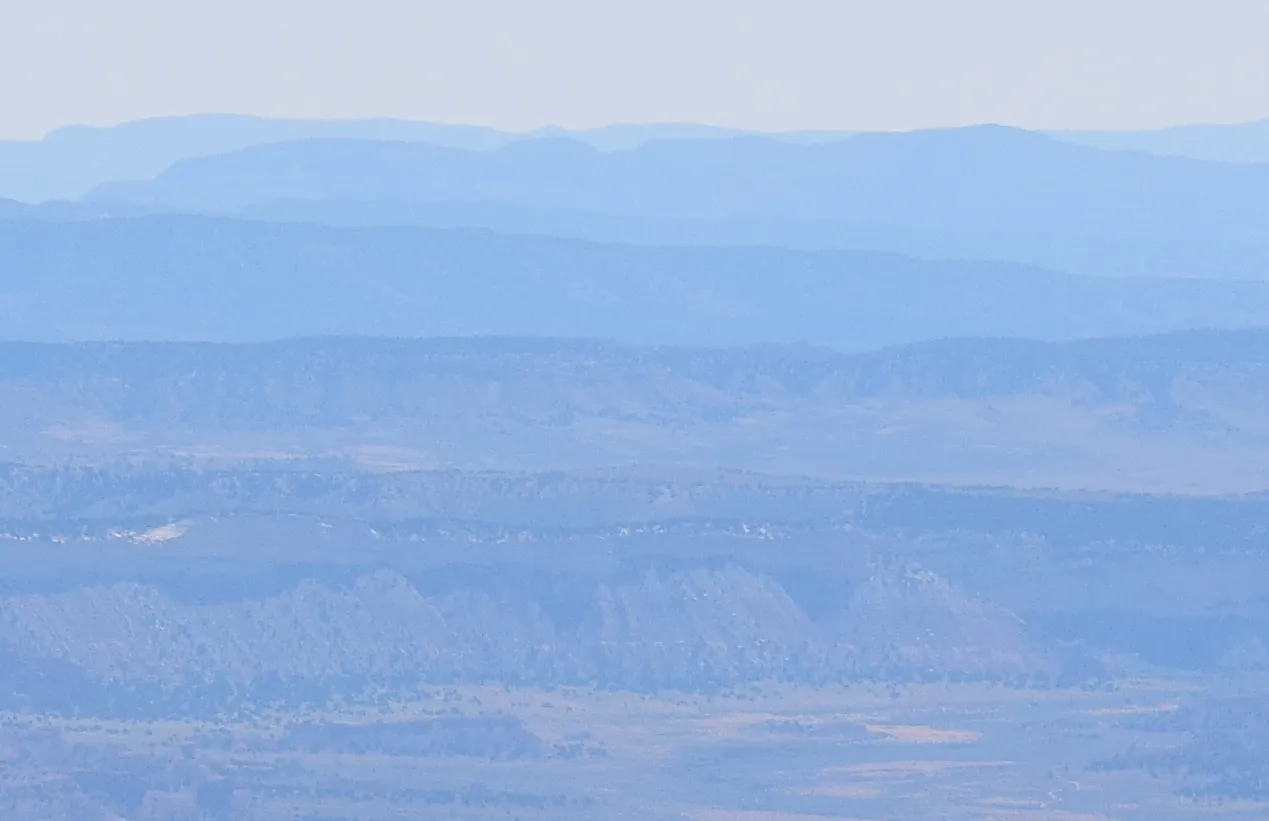
F. SUNRISE & SUNSET TRANSITION – is the same common phenomenon as an Earth’s shadow appearance, but refers to the pollutants and haze concentration, on which the terminator line can be visible by the observer. This is quite easy to spot when looking at remote mountains located close to solar points. Usually, shortly after sunset or just before sunrise the mountain’s shadows are visible in the sky due to some haze and atmospheric molecules concentration. The sunset and sunrise transition is a terminator line visible in the sky then (Pic. 32, 33). An opposite phenomenon can be seen when standing on the top of alone high mountain or volcano at sunrise and sunset.
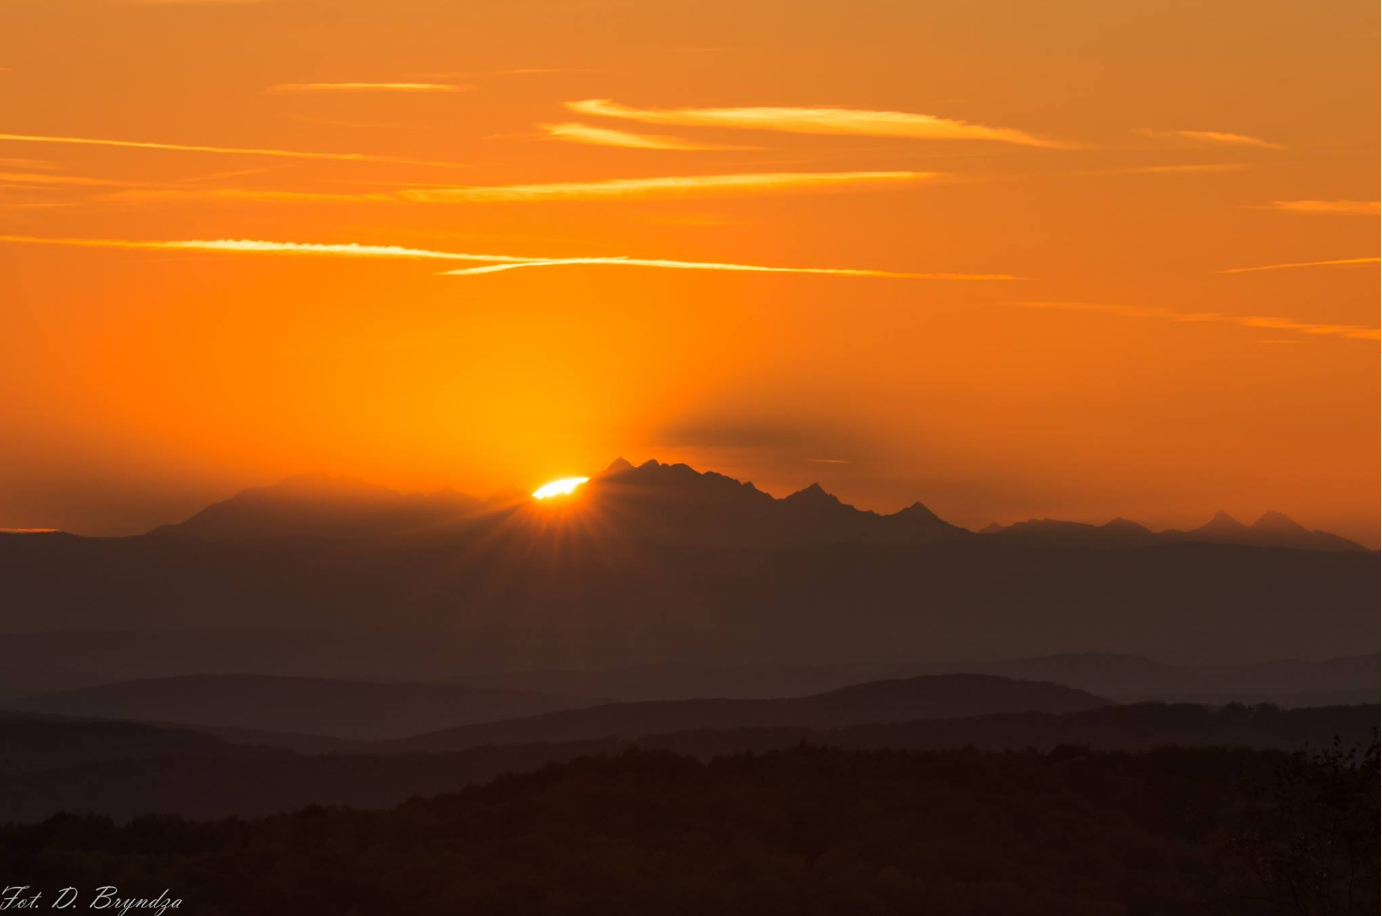
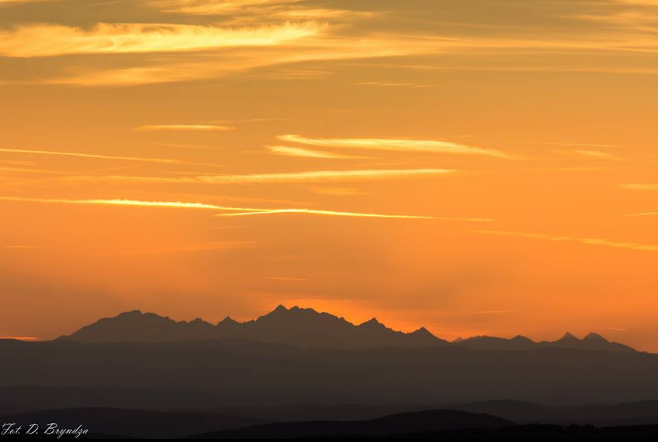
Another example of a sunrise or sunset transition can be a dawn’s warm glow phenomenon, which has been described previously.
G. COMMON DAY-TO-DAY EXAMPLES – for example when you want to see some object in the solar direction you need to shade your eyesight with your thumb for example to see it. It refers to any strong source of illumination, i.e. street lamp or when looking towards the solar direction (Pic. 34).
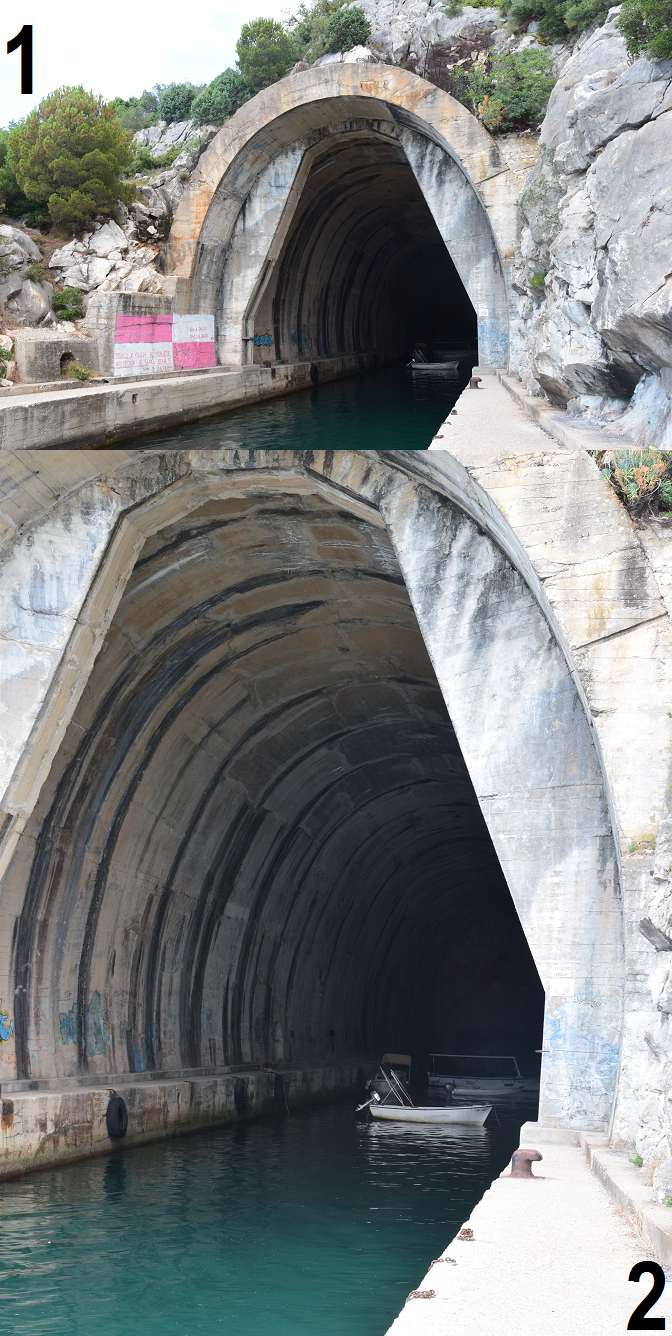
When the street is illuminated by the street lamp we can see the illuminated area perfectly, but the region behind the street lamp remains invisible or barely visible to an observer. The details emerge at the light transition area when the moment of eye adaptation occurs. Always a stronger illuminated source eliminates a weaker one, being in the vicinity or behind. A good example, that has been mentioned above is watching dimmed areas during the day (Pic. 35). For instance, when you look at some big hole under full sunlight conditions, like a cave, well, or a basement then you can see nothing because your eye is adapted to full light conditions instead (Pic. 35). On top of that, the ambiance is illumination directly by solar beams, reflecting the light much stronger than objects being inside this shaded hole, which reflects only light scattered in the atmosphere. As our sight approaches closer to this shaded area, our view of sight loses the regions with stronger illumination and the interior objects become visible. In this case, a transition area is a moment, when our sight range likewise in cameras begins to cover a shaded area only.
6. CONCLUSIONS
In this article, I have presented live examples of light transitions, which occur everywhere in space and our environment on the border between highlighted and shadowed areas. There wasn’t a better way to show it than taking pictures and preparing some relevant movies. Unfortunately, these materials don’t reflect perfectly a real light transition phenomenon as the human eye is able to see. The human mind is able to intelligently interpret information from our eyes, unlike cameras, which do it manually and sequentially. The basic and well-known principle is, that a stronger source of light draws out the weaker ones, especially when situated in the vicinity or beyond. The light transition area cannot be noticed abruptly, because the human eye needs time to adapt. The duration of adaptation depends on the difference in illumination level between the highlighted and shaded areas. The eye adaptation, as well as a digital camera, can be strongly associated with a specific form of light transition, unique for every field of view. It happens anywhere when the illumination level in a field of view drops rapidly. Moreover, the light transition area itself is not a rough line. This is a transition area between the light and shadow, which we call a half-shadow. It is typical for all distances, from i.e. the paper sheet located a front of your eyes to the interplanetary distance. The most significant moment in transition is the border between a half-shadow and shadow, which is because the illumination level drops logarithmically. An important factor is the atmosphere’s reach in aerosols and molecules, that scatter the light additionally making the transition phase more smooth. Except for the natural issues, a key role plays the human eye’s adaptation to rapid changes in illumination level as well as modern photography techniques, giving a chance to extend the contrast range in the field of view. This topic is much wider than the issues raised in this article. I hope, that this material, as well as the references provided, gives you a way to find out more about this occurrence also in terms of different fields.
Mariusz Krukar
References:
- Barlett N.R., 1965, Dark and light adaptation (in:), Graham C.H., Vision and visual perception, John Wiley and Sons, New York.
- Borer T., Cotton A., 2015, A “Display independent” High Dynamic Range television system, (in:) BBC Research & Development
- Caelli T., 1981, Visual perception: theory and practice, Pergamon Press, Ontario
- Gilles M., Minnaert M., 1954, The nature of light & colour in the open air, Dover publications Inc., New York
- Kitsinelis S., 2012, The right light: Matching technologies to needs and applications, CRC Press, Boca Raton-London-New York
- McAuriffe Marisha, 2016, The perception of light – understanding architectural lighting design, Oxford Global Press, London
- Myszkowski K., Mantiuk R., Krawczyk G., 2008, High Dynamic Range video, Morgan & Claypool Publishers, Berkeley
- Olmsted P. D., 2000, Lectures of Landau Theory of phase transitions, University of Leeds, Department of Physics and Astronomy
- Pelli D.G., Dex P., 2013, Measuring contrast sensitivity, (in:) Vision Research, v.90, p.10-14.
- Pirenne MH, 1962, Dark adaptation and night vision (in:) Dawson H., The Eye, vol. 2, Academic press, London.
- Reis J.K., et all., 2016, Pollutant dispersion simulation during sunset transition time using an analytical Eulerian model, (in:) American Journal of Environmental Engineering, vol.6 (4A), p.40-45.
- Rogers K., 2011, The eye: The physiology of human perception, Britannica Educational Publishing, New York
- Ross J., Diamond M., Badcock D., 2003, Mach bands change asimmetrically during solar eclipses, (in:) Perception v. 32(6), p. 767-770
- Schaaf F., 2002, The starry room: Naked eye astronomy in the intimate Universe, Dover Publications Inc., New York.
- Stoppe B & J., 2009, Stopees’ guide to photography & light, Elsevier Inc., Burlington, Oxford
Links:
- Landau theory of a first order phase transition
- A phase transition of light
- Mach band illusion.html
- Spatial frequency channels.html
- Pelli Robson contrast sensitivity chart
- Contrast sensitivity testing.htm
- Contrast ratio – what does it really mean?
- Contrast sensitivity background
- Contrast sensitivity – explanation
- Cameras vs human eye
- Interactive SDR-DHR comparison
- What is HDR? HDR-SDR compared
- HDR vs SDR comparison
- What is Earthshine?
Wiki:
- Contrast_(vision)
- Contrast_ratio
- Dark_adaptation_threshold
- Dynamic_range photography
- Field_of_view
- High-dynamic-range_imaging
- High dynamic range_video
- Landau_theory
- Mach_bands
- Molecular_electronic_transition
- Night_vision
- Standard dynamic range_video
- Terminator_(solar)
- Troland
- Visual_perception
Youtube:
Read also: