
Importing PDF documents directly to Google Sheets still remains a tricky issue. The first stop at this conversion route is using Google Docs, where you can extract the PDF content nicely. One more thing to add here is the content as a whole. Successful transferring of our PDF documents to Google Docs, and finally to Google Sheets doesn’t mean the fulfillment of our process. Sometimes we might need just some particular data from our document instead of all content of our PDF file.
This article comes across some dexterous processes, which eventually would help you to get certain lines or specific data from your PDF document in the Google worksheet. A third-party application is still required, but instead of Google Docs, I will utilize VBA Excel. Furthermore, I am talking about batch conversion, which is also not often found on the web.
1. First of all we should collect all our files in the directory as shown below:

2. Create the Excel macro workbook .xlsm, where you will go straight to the “Developer” panel and create the new VBA module in which you should write the following code:
Sub PDF_To_Excel()

Dim setting_sh As Worksheet
Set setting_sh = ThisWorkbook.Sheets("Your_Sheet_Name")

Dim pdf_path As String
Dim excel_path As String

pdf_path = setting_sh.Range("C4").Value
excel_path = setting_sh.Range("C5").Value

Dim fso As New FileSystemObject
Dim fo As Folder
Dim f As File

Set fo = fso.GetFolder(pdf_path)

Dim wa As Object
Dim doc As Object
Dim wr As Object

Set wa = CreateObject("word.application")

wa.Visible = True

Dim nwb As Workbook
Dim nsh As Worksheet

For Each f In fo.Files
Set doc = wa.Documents.Open(f.Path, False, Format:="PDF Files")
Set wr = doc.Paragraphs(1).Range
wr.WholeStory

Set nwb = Workbooks.Add
Set nsh = nwb.Sheets(1)
wr.Copy

nsh.Paste
nwb.SaveAs (excel_path & "\" & Replace(f.Name, ".pdf", ".xlsx"))

doc.Close False
nwb.Close False

Next
wa.Quit
End Sub
and next, adjust your current worksheet.
In your current worksheet, you have to define the target directory both for the source file and for the converted file as well. It has been already defined in the code above in the emboldened section. You must stick to the cells defined in the code if you want to have your code working properly (Pic. 2).

The next thing I would advise you to add is the simple form control button, where you can assign your macro from above.
Finally, we can run our macro. The time of code execution depends on the number of our .pdf files in the folder. I have got them 5, so I had to wait for about 30-40s. It takes quite a long, as the VBA code converts them first to the .docx file and finally to the .xlsx one. Each of them is opened and closed separately until the last one when the tool will ask you about keeping the last item open (Pic. 3).

I prefer to click “No” and have all my documents closed. Now go to our directory and see our job. It looks like everything is alright. We have made our batch file conversion between .pdf and .xslx (Pic. 4), which is great.

3. Check the content of the PDF file and find the data you need to extract (Pic. 5). You can do it also in your Excel document either by checking roughly in which range of cells it appears. This is the primary thing, which must be done before we start to create another VBA Excel macro needed for the extraction of our data.

4. Now, we can start to develop the macro “responsible” for extracting needed data from every .xlsx file converted in our directory. The code will include two pieces, as has been shown in this example. The first part will define the loop between all the Excel documents (specifically their particular worksheet) and our target file where we want to store our data. All the .xlsx files extracted contain only one worksheet (Sheet1 – as default). Our workbook has one worksheet too, which name we changed to Your_Name_Sheet. The first part of our code will look like the below:
Sub CopyData()

Dim wbSource As Workbook
Dim datTarget As Worksheet
Dim datSource As Worksheet
Dim strFilePath, strfile As String
Dim strPath As String

Set datTarget = ThisWorkbook.Sheets("Your_Sheet_Name") ' Target worksheet, where the extracted data will be stored
strPath = GetPath

If Not strPath = vbNullString Then
strfile = Dir$(strPath & "*.xlsx", vbNormal) ' Browse between all .xlsx files in the source directory

Do While Not strfile = vbNullString

Set wbSource = Workbooks.Open(strPath & strfile)
Set datSource = wbSource.Sheets("Sheet1") ' Pick up data from the default worksheet - Sheet1

Call Copy_Data(datSource, datTarget) ' Calling second macro

wbSource.Close False
strfile = Dir$()
Loop
End If
End Sub


Function GetPath() As String

With Application.FileDialog(msoFileDialogFolderPicker)
.ButtonName = "Select a folder"
.Title = "Folder Picker"
.AllowMultiSelect = False

'Get the folder path

If .Show Then GetPath = .SelectedItems(1) & "\"

End With

End Function
but this code doesn’t make sense without the second part, which defines which range of data should be roughly picked up. So far we have the PDF document checked (Pic. 5), but as I wrote above it’s not enough. We have to enter at least one extracted Excel document and see where roughly all interesting values are located (Pic. 6).

As you can see above, the PDF extractor macro tool collects all the data in the very first column A. It’s good, but the result doesn’t look neat if it’s needed at all. When our PDF document has some pictures, they overlap with some text beneath. Once removed, we can clearly define the range of data we need to extract (look at yellow boxes), which falls accordingly at A16, A21, A23, and A26. It’s enough information for developing our second part of the code, which optionally could look like this:
Sub Copy_Data(ByRef shSource As Worksheet, shTarget As Worksheet)

Const LID_LIFTED As String = "A16"
Const ROOM_IN_CHAMBER As String = "A21"
Const CHAMBER_WATER_PUMP As String = "A23"
Const ADDITIONAL_INFORMATION As String = "A26"
Dim lRow1 As Long, lRow2 As Long, lRow3 As Long, lRow4 As Long

'Determine the last column.
lRow1 = shTarget.Cells(Rows.Count, "E").End(xlUp).Row + 1
lRow2 = shTarget.Cells(Rows.Count, "F").End(xlUp).Row + 1
lRow3 = shTarget.Cells(Rows.Count, "G").End(xlUp).Row + 1
lRow4 = shTarget.Cells(Rows.Count, "H").End(xlUp).Row + 1

'Copy the data.
shSource.Range(LID_LIFTED).Copy
shTarget.Range("E" & lRow1).PasteSpecial xlPasteValuesAndNumberFormats
shSource.Range(ROOM_IN_CHAMBER).Copy
shTarget.Range("F" & lRow2).PasteSpecial xlPasteValuesAndNumberFormats
shTarget.Range("F" & lRow2).Replace "Is there room in the chamber to install a new closure : ", ""  ' removing unnecessary string
shSource.Range(CHAMBER_WATER_PUMP).Copy
shTarget.Range("G" & lRow3).PasteSpecial xlPasteValuesAndNumberFormats
shSource.Range(ADDITIONAL_INFORMATION).Copy
shTarget.Range("H" & lRow4).PasteSpecial xlPasteValuesAndNumberFormats

' Reset the clipboard.
Application.CutCopyMode = xlCopy

shTarget.Range("E2:H" & lRow4).Copy

End Sub
where copying data to the target column row by row could be included. Another thing, that was included in the Replace function, which removing unnecessary strings from cell A21, as the interesting value is after the colon (Pic. 6). Finally, the last line of the code copies all the records to the clipboard.
5. I would prefer to create another form control button (Pic. 7).

By right-clicking on this button, we can assign a macro, which in our case will be the second part of the code “Copy_Data“, which you can see below in the full VBA code captured (Pic. 8).

6. Click the button with your “Copy_Data” macro assigned. Firstly, the macro will ask you about the selection of the directory, where your converted .xslx files are stored. It will be the “MyFolder” as defined for the conversion output (Pic. 2, 9).

7. When selected, wait a minute, the tool will extract the data you need. The time of waiting depends on the number of data requested as well as the amount of .xlsx files located in the directory. Anyhow at the end, you should see the data populated in the columns, where one column (as defined in the code) corresponds to the particular question and one row corresponds to the file. Moreover, all the data have been already copied to the clipboard as you can see in the selection box around them (Pic. 10).

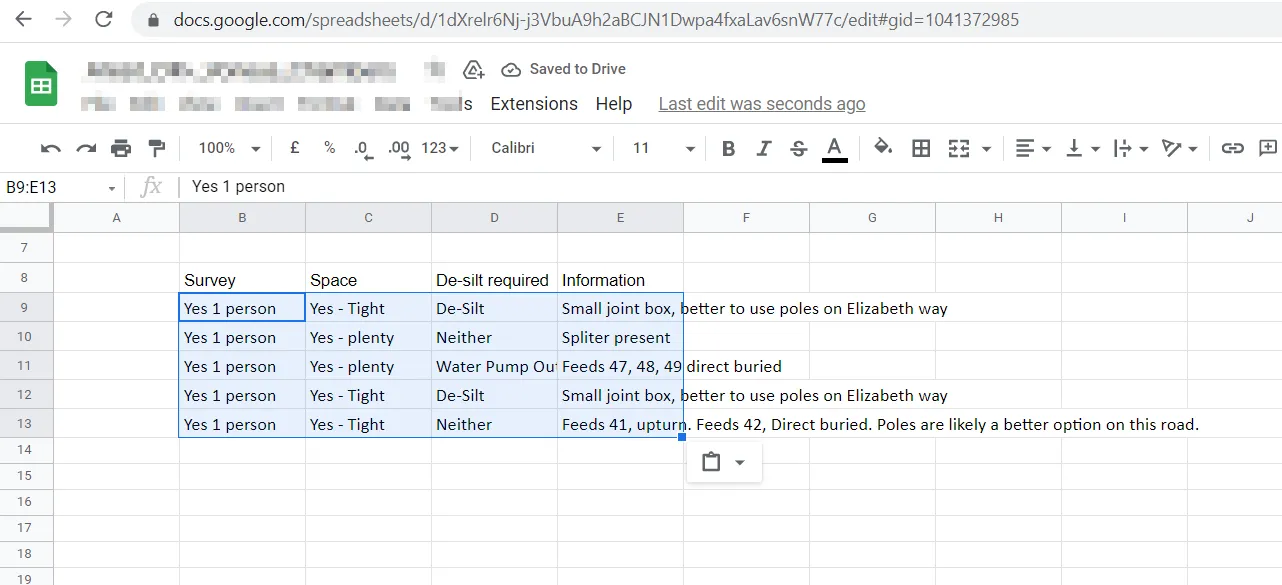
8. As the very last step we can simply paste our data in Google Sheets roughly where we need it (Pic. 11)!

DISCLAIMER:
The data prepared here refers to the individual situation. If your column configuration is different, then you can change it in the code. It’s important also to mention, that it applies to the PDF files fixed with their layout. In practice, the extracted data is placed always roughly in the same cells in Excel. When your PDF documents are similar but not exactly the same, the probably more advanced approach is required, as the final range of selected data can be shifted.
Mariusz Krukar
Links:
- https://productivityspot.com/convert-pdf-to-google-sheets/
- https://blog.cometdocs.com/how-to-convert-pdf-tables-to-google-sheets
- https://itselectable.com/pdf-to-google-sheets
- https://www.pdftoexcelconverter.net/
- https://online2pdf.com/pdf2excel
- https://yagisanatode.com/2020/06/13/google-apps-script-extract-specific-data-from-a-pdf-and-insert-it-into-a-google-sheet/
- https://docparser.com/blog/pdf-to-google-sheets/
- https://hackernoon.com/3-best-ways-to-import-external-data-into-google-sheets-automatically-bw163yxm
- https://www.excelcampus.com/vba/find-last-row-column-cell/comment-page-1
Forums:
- https://stackoverflow.com/questions/16888863/vba-string-variables-does-not-put-constant-string-value-in-string-concatenating
- VBA code to move cursor down one cell
- https://stackoverflow.com/questions/16888863/vba-string-variables-does-not-put-constant-string-value-in-string-concatenating
- https://stackoverflow.com/questions/62381174/object-variable-or-with-block-variable-not-set-error-for-offset-function
- https://stackoverflow.com/questions/33405244/copying-a-range-from-all-files-within-a-folder-and-pasting-into-master-workbook
- Copy data specific data for all files within directory and consolidate in master file
- VBA: Declare a cell range as a value for a Constant
- https://www.excelforum.com/excel-programming-vba-macros/1166247-paste-copied-data-in-rows-not-columns.html
- https://stackoverflow.com/questions/44297686/vba-excel-find-words-in-a-range-and-replace
My questions:
Youtube:
https://stackoverflow.com/questions/45921953/how-to-solve-the-error-user-defined-type-not-defined
Use this hint if you don’t have the required library (Microsoft Scripting Runtime) installed.