
If you are interested in long-distance observations or simply panoramic views from some location, mainly mountain peaks or hills, you should have heard about the Ulrich Deuschle panorama generator. This is the web-based tool, which in 2010 successfully superseded its predecessor – Kashmir 3D software, which was based on simple digital elevation model (DEM) files uploaded to the tool. The Ulrich Deuschle application includes a few useful features, like displaying your panorama in colored scale, sending your mountain panorama via email, or using endless enlargement towards the direction, you want to look at, unlike the Peakfinder.org tool, where this feature is limited. I can assure you, that the Urich Deuschle panorama generator has a bit more options, some of which are hidden. Other ones are more obvious, but some users might not realize their simplicity or they need an external tool occasionally. That’s why I decided to describe them.
1. CALCULATION OF PANORAMIC VIEW INCLUDING THE REFRACTION COEFFICIENT
The common measurement of terrestrial refraction is the refraction coefficient.
The standard terrestrial refraction coefficient for central Europe (Germany or Poland) is believed to be about +0.13. This average value was calculated by German mathematician Carl Friedrich Gauss. The terrestrial refraction (or geodetic refraction) modifies the ray of light coming from the distant object visible, changing its apparent angular position. The terrestrial refraction depends mostly on the temperature gradient above the ground, as the line of sight in terrestrial refraction passes near the Earth’s surface. In practice, some mountains might look higher than usual. On the other hand, the terrestrial refraction also causes some distant objects visible, whereas they are usually beneath the local horizon line. As the terrestrial refraction coefficient increases, the described situation becomes more likely. This is a wide matter, which will be the subject of description and explanation in the future. For now, I want to show you how to include the refraction coefficient when making the panorama query in the Urlich Deuschle tool.
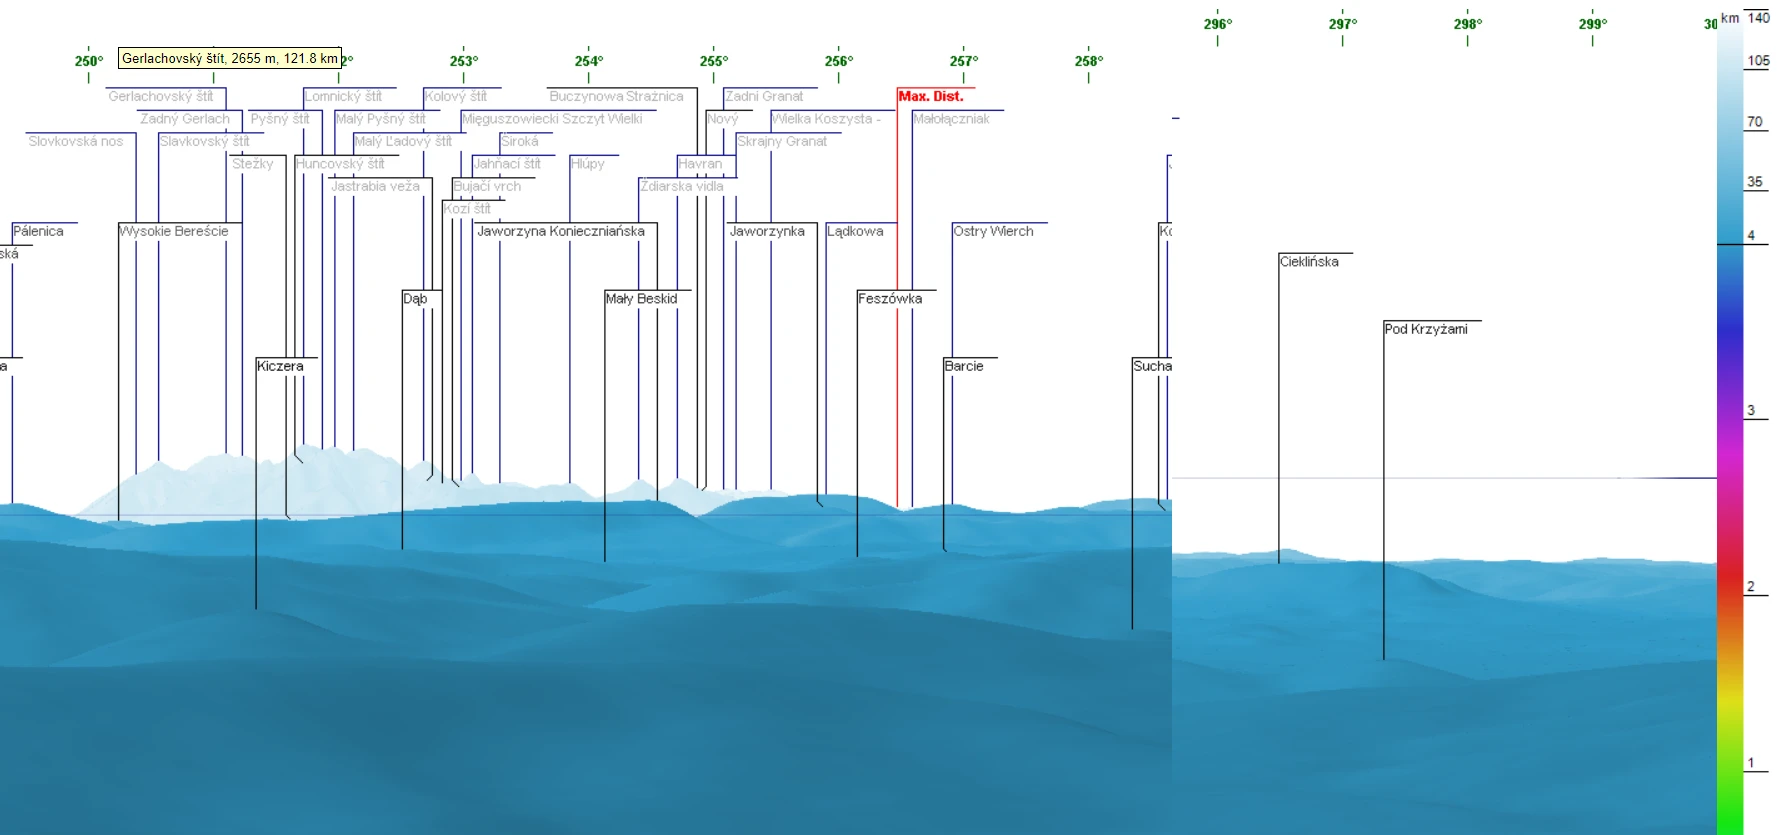
In the “Range of sight (km)” box we should append or value by adding the dash and refraction coefficient, as per an example below:
300_RC0.13
Because the application is JavaScript-based, the tool doesn’t like empty spaces and different types of letters (Capitals or smalls). In the case of the refraction index definition, we should always remember the capital letters, as you can see above. The difference won’t be that big when you include this value, although it can be needed for some problematic analysis.
If we ramp up this value, then the difference becomes significant (Pic. 1).
2. CHECKING THE MOST DISTANT POINT VISIBLE FROM ANY PLACE
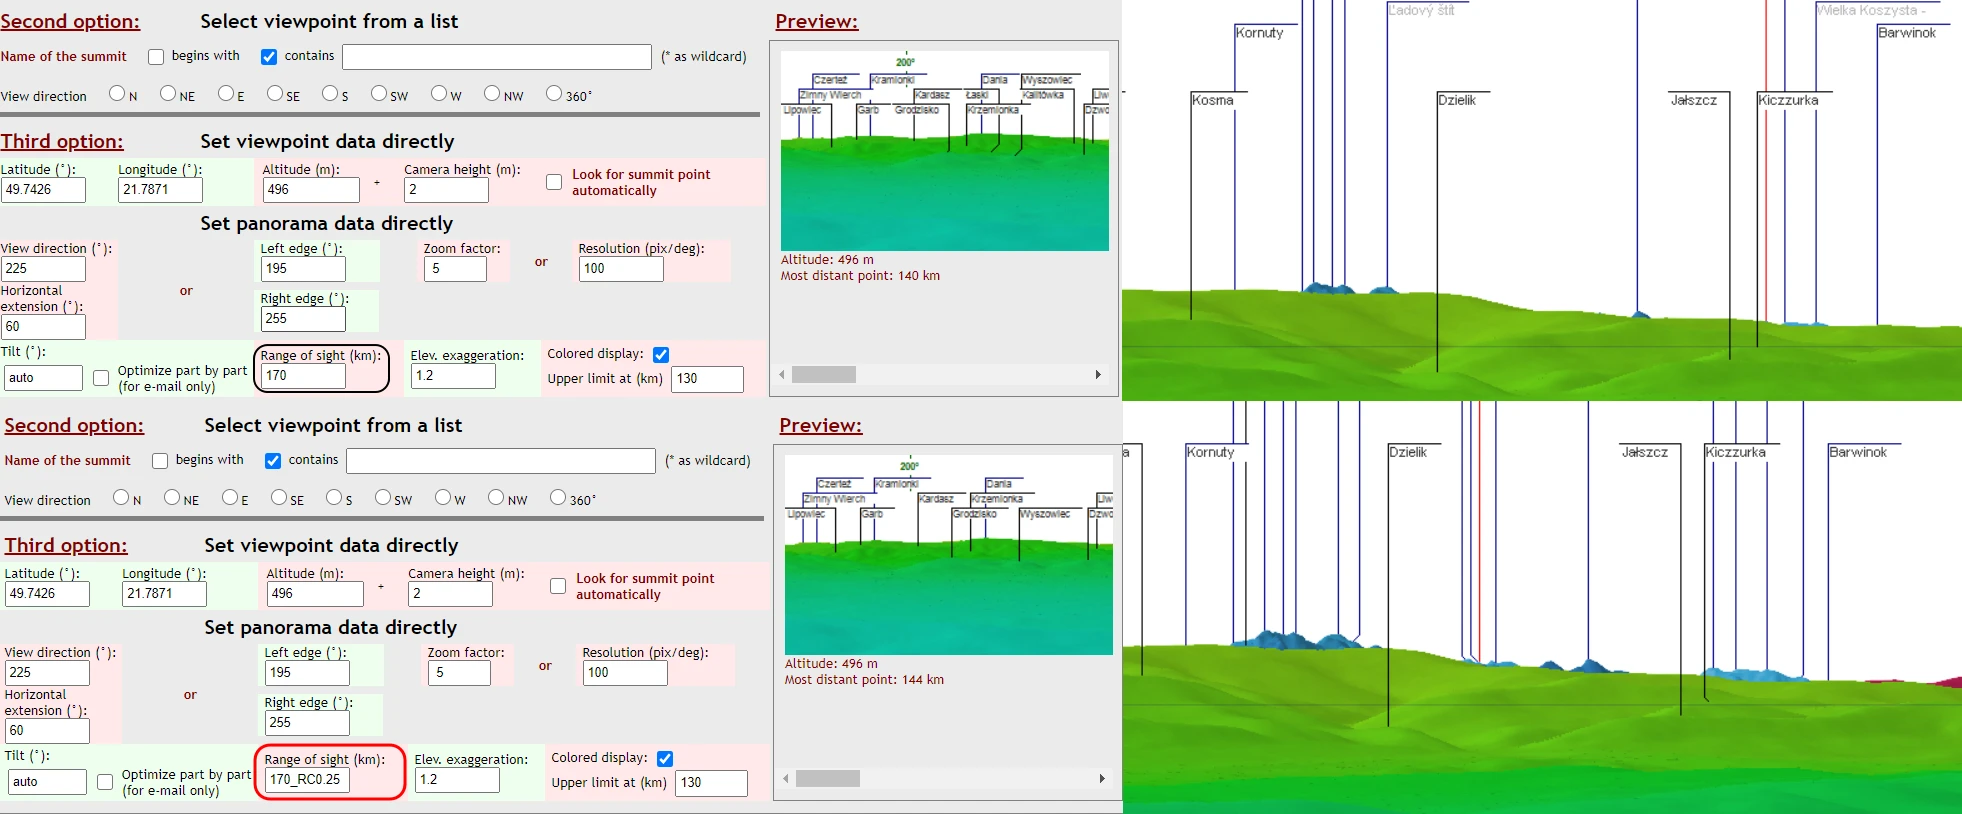
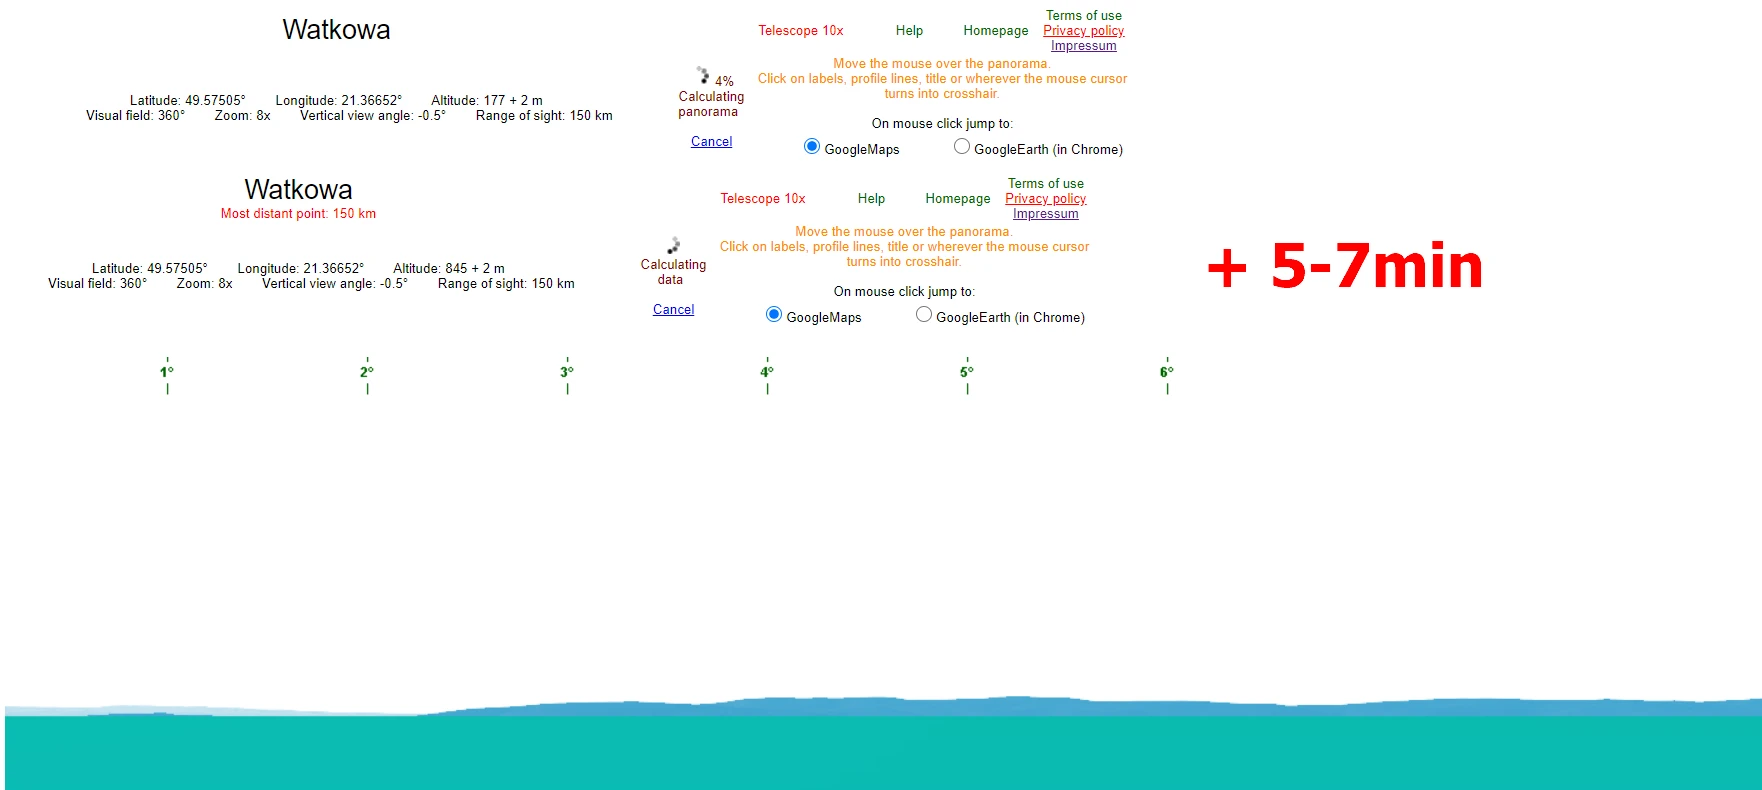
A quite mundane option like a 360-degree panorama can bring us instant information about the most remote object possible to spot from a certain location. You just need to wait until the panorama preview is loaded completely and the maximum distance is shown below (Pic. 2).
3. CUSTOMIZING HORIZON TO BE BLUISH
With the colored display, we can do some customization of our panorama display. The color range used in the Urlich Deuschle panorama generator is dedicated to a clear distance key for visible objects. That’s why they have a strong contrast between each other, which is visible on the scale provided. Unfortunately, if we apply it to real conditions, as occurs on a daily basis at our observation point, the color placement on the scale looks hopeless. We know, that all the objects visible somewhere on the horizon, or even closer to us feature a bluish appearance. It’s driven by the hydrocarbon microbodies originating from vegetation, which are released into the atmosphere and react with the ozone particles. Combining it with Rayleigh light scattering in the Earth’s atmosphere, we always have our horizon bluish. By setting our color scale, we can artificially bring up the effect of clear air with the visibility range set by us. The effect itself is quite poor, because of two reasons. Firstly, we have effectively one color only, which is expressed by the scale of brightness. Secondly, the tendency of fading distant features is somewhat opposite to actuality. The increasing air illuminance of the line of sight should have progressed along with the logarithmic function, which has been described here. In the case of Ulrich Deuschle’s tool, it seems to be distributed linearly. Anyhow, the second reason plays a minor role. More important is the first one, as we play within one color only, although eventually, you can lay with it externally i.e. in Gimp or Photoshop.
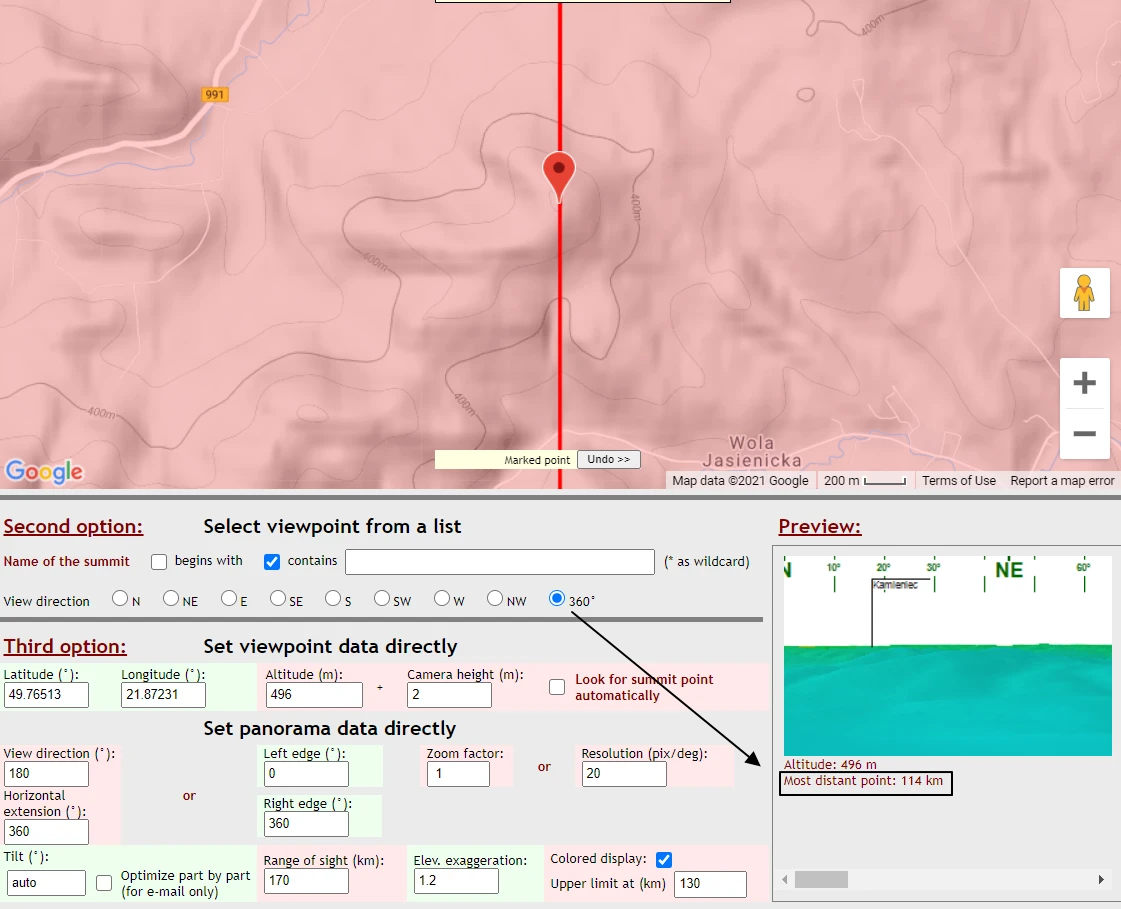
The principle here is simple. You should use three elements from the panel: Range of sight, Colored Display, and Tilt.
Your range of sight should be determined by the most distant point calculated from the given location. If, for instance, the furthest hill is located at 145km, I wouldn’t go beyond 150km with my range of sight. The default range of sight, when launching the panorama generator is 300km, but in order to make this color, range compressed it’s better to cut it down to our most distant point visible unless it exceeds the default value.
Another important step is the color scale range. Just beneath the thick, you have an option to determine the upper limit for your scale. At this stage, you should consider local topography and reduce the colored distance to the features being closer than covered on your screen. It will be at most 1-15km or so. Next, if still, some stranger colors appear in our panorama frame, we can tilt our view up a bit, about 0.5 or 1 degree until they go out of our panorama bounds. It does look pretty much as you see below (Pic. 3 – 4).
Following these steps, we should make the most from this one color being at the top of a whole scale, which has been discerned only by its brightness.

Unfortunately, the color scale will be still visible on the right-hand side, and it will look strange with a whole palette confined to a very few kilometers, whereas the whole range is described by one color only.
Look at the full panorama below (Pic. 5).

4. THE MAGIC OF PERMALINK
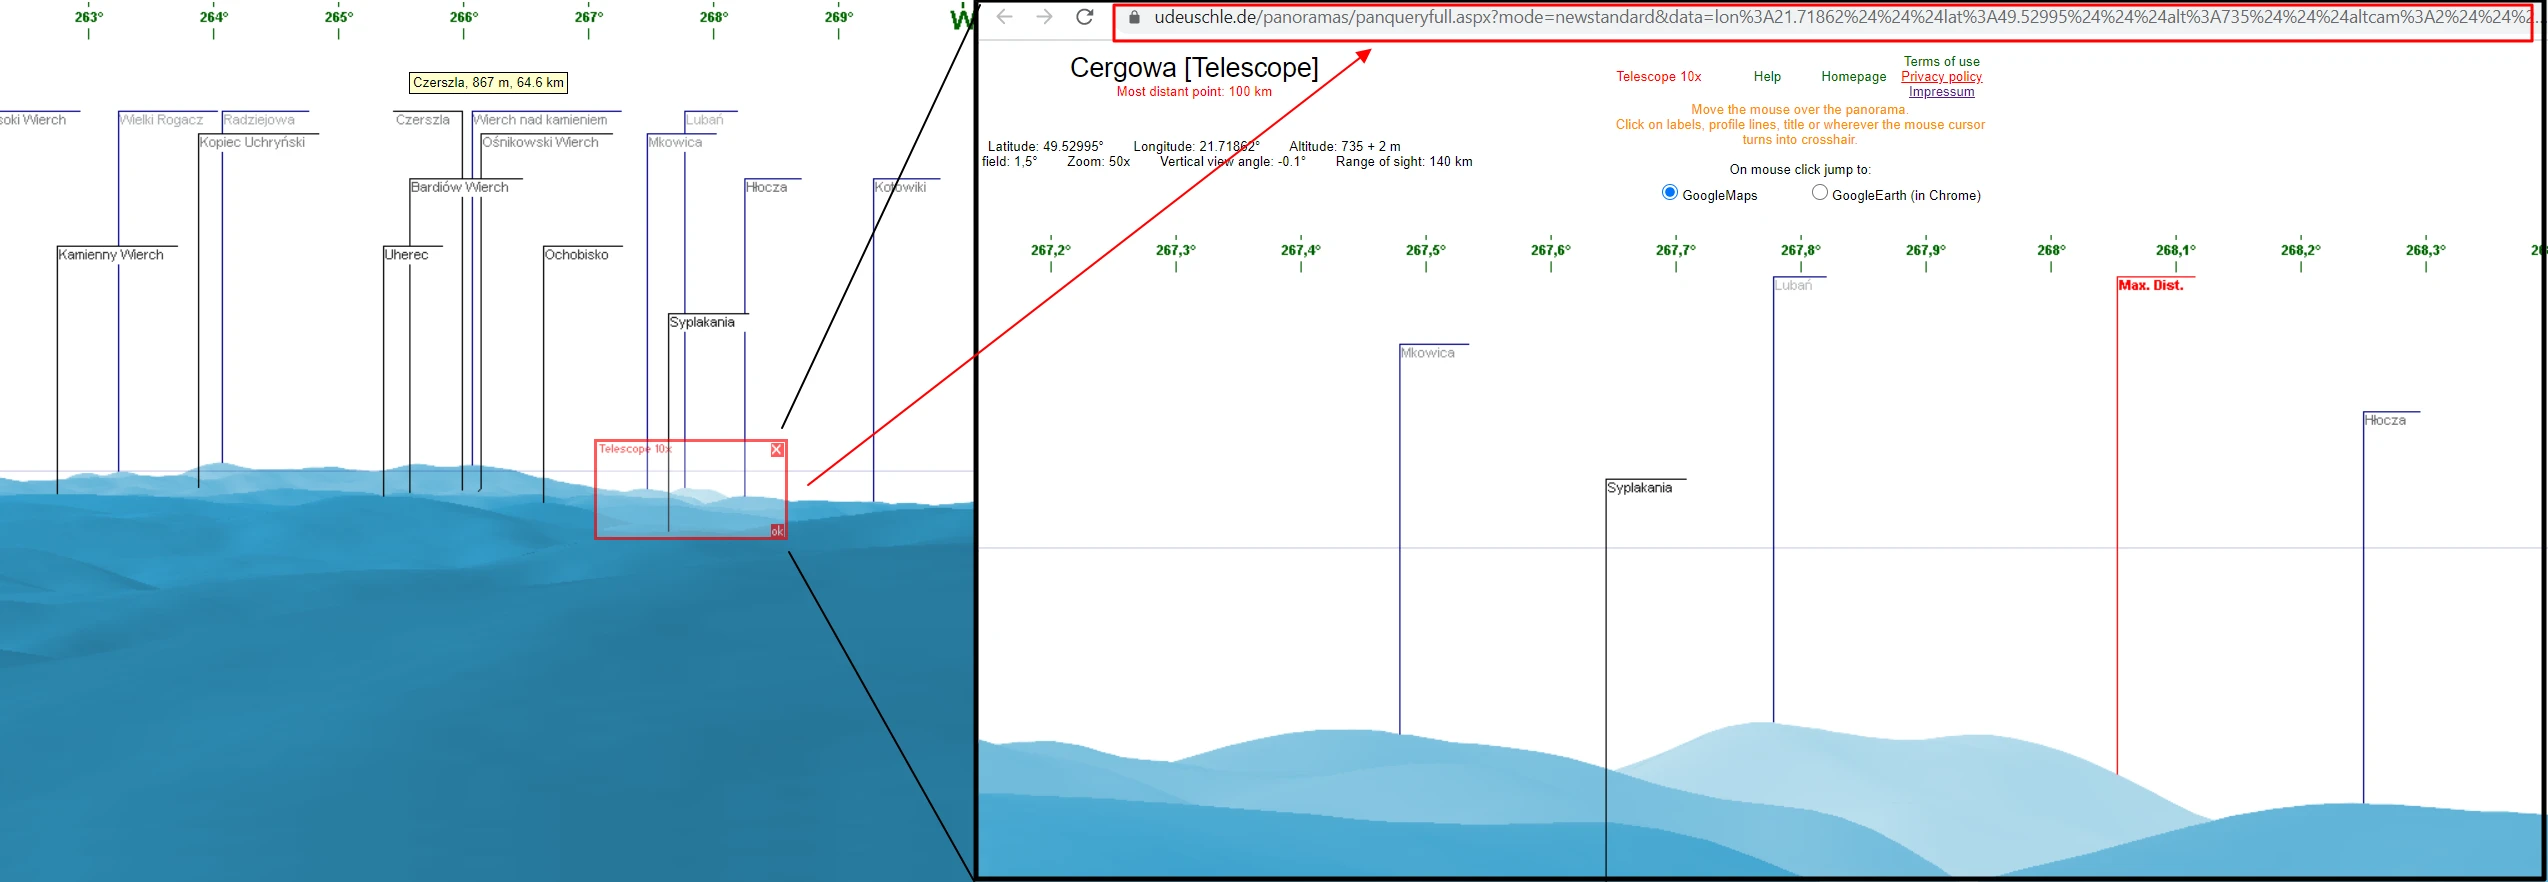
Did you ever wonder about your URL address when the panorama is generated? I guess not. Nowadays a lot of websites have permalink with which you can be instantly redirected to a certain place on the maps (or website) instead of having a whole map visible. Sor the Ulrich Deuschle panorama generator does! When the new tab with your panorama is produced, you can see some weird and extremely long URL addresses in the address field (Pic. 6) both in the normal view as well as in the “Telescope” view (Pic. 7).

It’s a very long string, which can be used for the following purposes:
– embedding panorama to your website,
– opening the panoramic view straight away from any location since linked to the Urlich Deuschle panorama generator,
– alteration of the panorama circumstances without visiting the main application interface.
The full permalink looks as below:
https://www.udeuschle.de/panoramas/panqueryfull.aspx?mode=newstandard&data=lon:21.87231$$$lat:49.76513$$$alt:496$$$altcam:
2$$$hialt:false$$$resolution:20$$$azimut:180$$$sweep:360$$$leftbound:0$
$$rightbound:360$$$split:60$$$splitnr:6$$$tilt:auto$$$tiltsplit:false$$$elex
agg:1.2$$$range:170$$$colorcoding:true$$$colorcodinglimit:130$$$title:Wy
sypan$$$description:$$$email:mariusz.krukar@gmail.com$$$language:en$
$$screenwidth:1536$$$screenheight:824
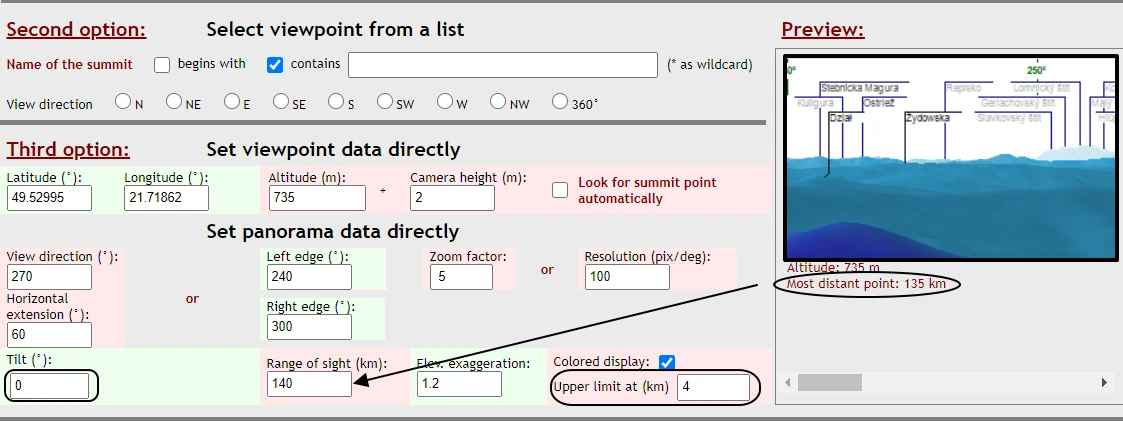
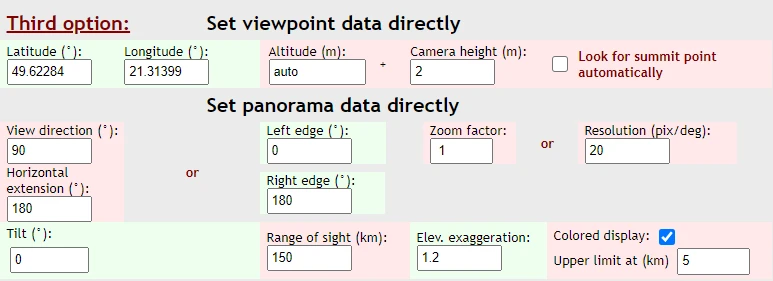
and corresponds to the third option of panorama generation (Pic. 8).
For the “Telescope” mode accordingly below:
https://www.udeuschle.de/panoramas/panqueryfull.aspx?
mode=newstandard&data=lon%3A21.87231%24%24%24lat%3A49.76513%24
%24%24alt%3A496%24%24%24altcam%3A2%24%24%24hialt%3Afalse%24
%24%24resolution%3A200%24%24%24azimut%3A180%24%24%24sweep%3
A360%24%24%24leftbound%3A138.85%24%24%24rightbound%3A146.25%2
4%24%24split%3A60%24%24%24splitnr%3A6%24%24%24tilt%3A-
0.05916666666666659%24%24%24tiltsplit%3Afalse%24%24%24elexagg%3A
1.2%24%24%24range%3A170%24%24%24colorcoding%3Atrue%24%24%24
colorcodinglimit%3A130%24%24%24title%3AWysypan%20%5BTelescope%
5D%24%24%24description%3A%24%24%24email%3Amariusz.krukar@gmai
l.com%24%24%24language%3Aen%24%24%24screenwidth%3A1536%24%2
4%24screenheight%3A824
and “double-Telescope” mode below:
https://www.udeuschle.de/panoramas/panqueryfull.aspx?
mode=newstandard&data=lon%3A21.87231%24%24%24lat%3A49.76513%24
%24%24alt%3A496%24%24%24altcam%3A2%24%24%24hialt%3Afalse%24
%24%24resolution%3A2000%24%24%24azimut%3A180%24%24%24sweep%
3A360%24%24%24leftbound%3A144.76999999999998%24%24%24rightboun
d%3A145.51%24%24%24split%3A60%24%24%24splitnr%3A6%24%24%24tilt
%3A0.13375%24%24%24tiltsplit%3Afalse%24%24%24elexagg%3A1.2%24%
24%24range%3A170%24%24%24colorcoding%3Atrue%24%24%24colorcodi
nglimit%3A130%24%24%24title%3AWysypan+%5BTelescope%5D%20%5BT
elescope%5D%24%24%24description%3A%24%24%24email%3Amariusz.kr
ukar@gmail.com%24%24%24language%3Aen%24%24%24screenwidth%3A
1536%24%24%24screenheight%3A824
All these permalinks include everything, we set in the web interface when defining our panorama parameters. They have been marked red with all their values marked blue.
You can use all of these permalinks anytime. If you copy & paste it to your browser, it will open the panorama I was working on. If you decide to change some parameters, i.e. camera height or coordinates, make it wisely. Sometimes, you can find yourself in the open sea or below the ground.
5. CAPTURING LARGE-SCALE PANORAMAS
Yes! You’ve read correctly – capture! However in this event, we have to use some external tool, but it’s based on the Chrome browser.
Before I start to explain it, I want to show you how to get the big-size panoramic renders from the Urlich Deuschle panorama generator. I have good news for you. You can combat the imposed resolution restriction, which allows you to generate panoramas as wide as 28800Pixels (Pic. 9).
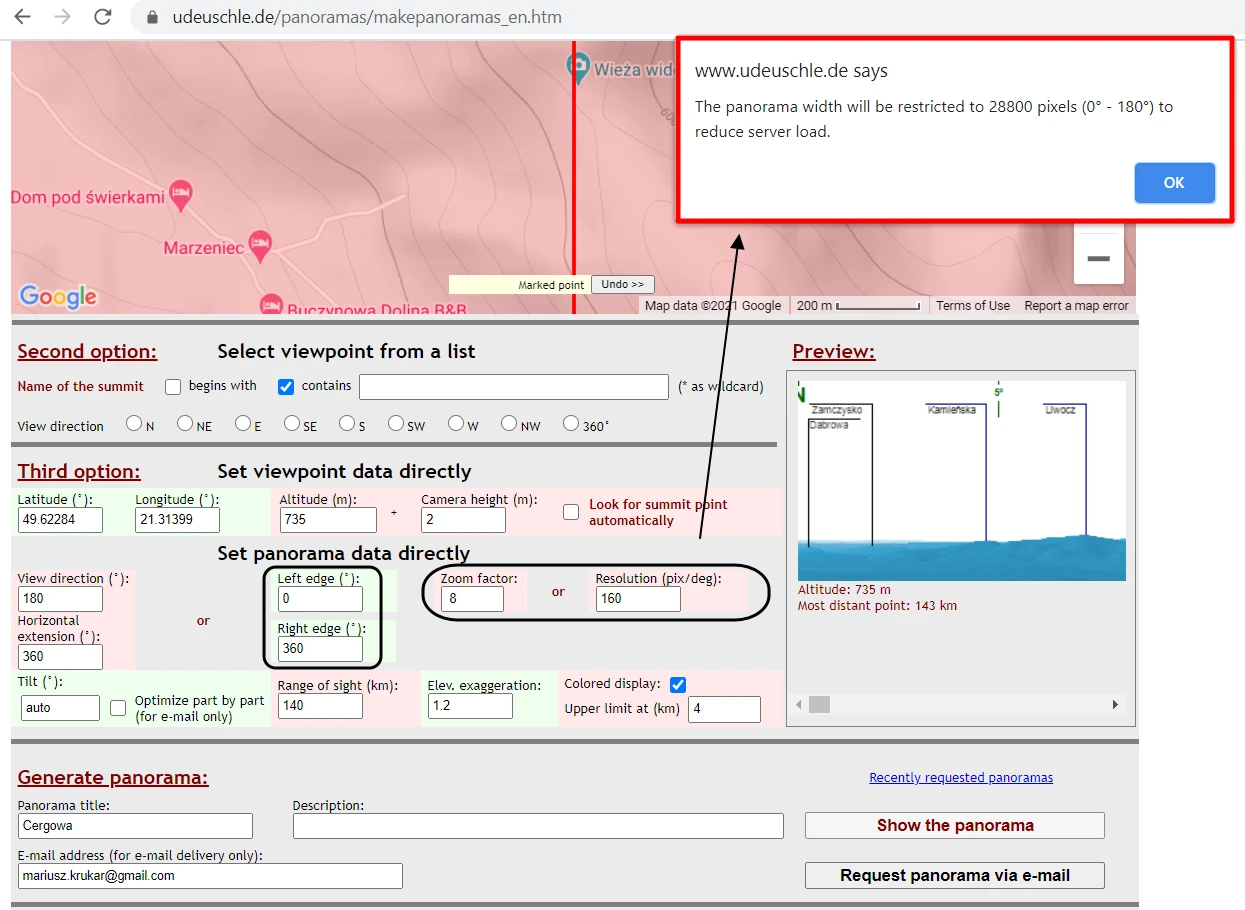
So, in practice, you are able to generate at most 4x zoomed 360-degree panorama. The calculation is very simple. Since 20 pixels fall for 1 degree, then by multiplying this number by 360 we get 7200 pixels. Multiplying it by another 4x we reach 28800 pixels. By the way, even a normal 360-degree panorama (1x zoom) generated by the Urlich Deuschle tool is too big for the custom horizon in Stellarium. That software accepts images not bigger than 4096x2048Px.
I wouldn’t resign from receiving the full 360-degree panorama even from a magnification higher than 4x. If, for instance, you wish to get the full panorama 5x or even 6x enlarged, you can ignore this alert by clicking OK and accepting the angular view range proposed by the application.
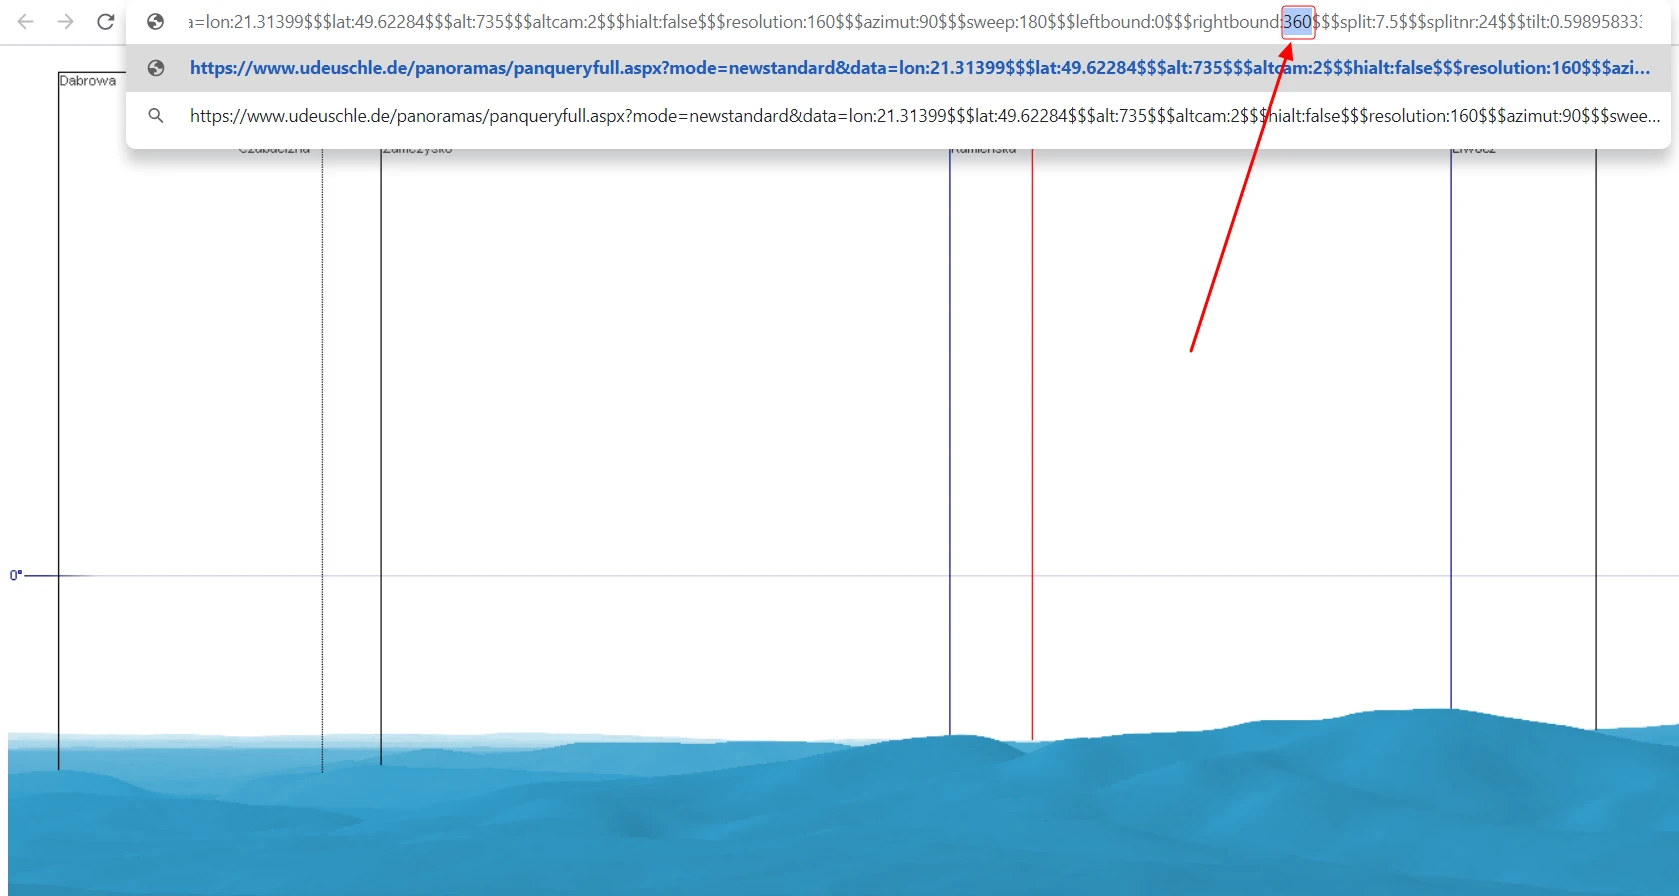
When your panorama is loading in a separate tab, just browse your permalink and find the leftbound and rightbound variables. The first one should be always 0, as the panorama initially starts from the 0 azimuth. Important is the rightbound, which determines where our panorama has ceased due to width restrictions. If, for instance, you set the 6x enlargement, your panorama will finish at azimuth 240, the rightbound value is to be 240 then. When you change the rightbound value to 360 and hit enter (Pic. 10), your panorama will refresh and load upon completion with the enlargement, that you want. However, I would advise you to wait until the first panorama is completed. Otherwise, you might get an alert: “Previous requests of you are still running. This request will be started when the others are finished”.
We should be careful here because the server is very busy now. Any rush may cause the Urlich Deuschle panorama generator to not be responsible for a long while, even for a few hours ahead.
At this stage, you should be patient. As your enlargement is higher, the server needs more time to load. The panorama itself will be ready soon, but you probably need even a few minutes for all the labels to be loaded successfully (Pic. 11).
When our panorama is ready, after about 5-7 or even 10 minutes, we can finally capture them. It’s not possible without the external tool, although if you are savvy enough with the Chrome browser, then you heard about the plugins available. Other browsers like Opera or Firefox can also expand their functionality with various plugins, but my example applies to Chrome, the browser I predominantly work on.
Please visit the Google Chrome web store and try to find the following plugin: Webpage Screenshot – Entire Page Screenshot! or just click the link provided below, which redirects straight to this plugin. Next, click the blue “Add to Chrome” button and wait several seconds until installation is complete. Afterward, you can launch the extensions panel from the Google Chrome command like below:
chrome://extensions/
where you should see all the plugins already installed in your Chrome browser.
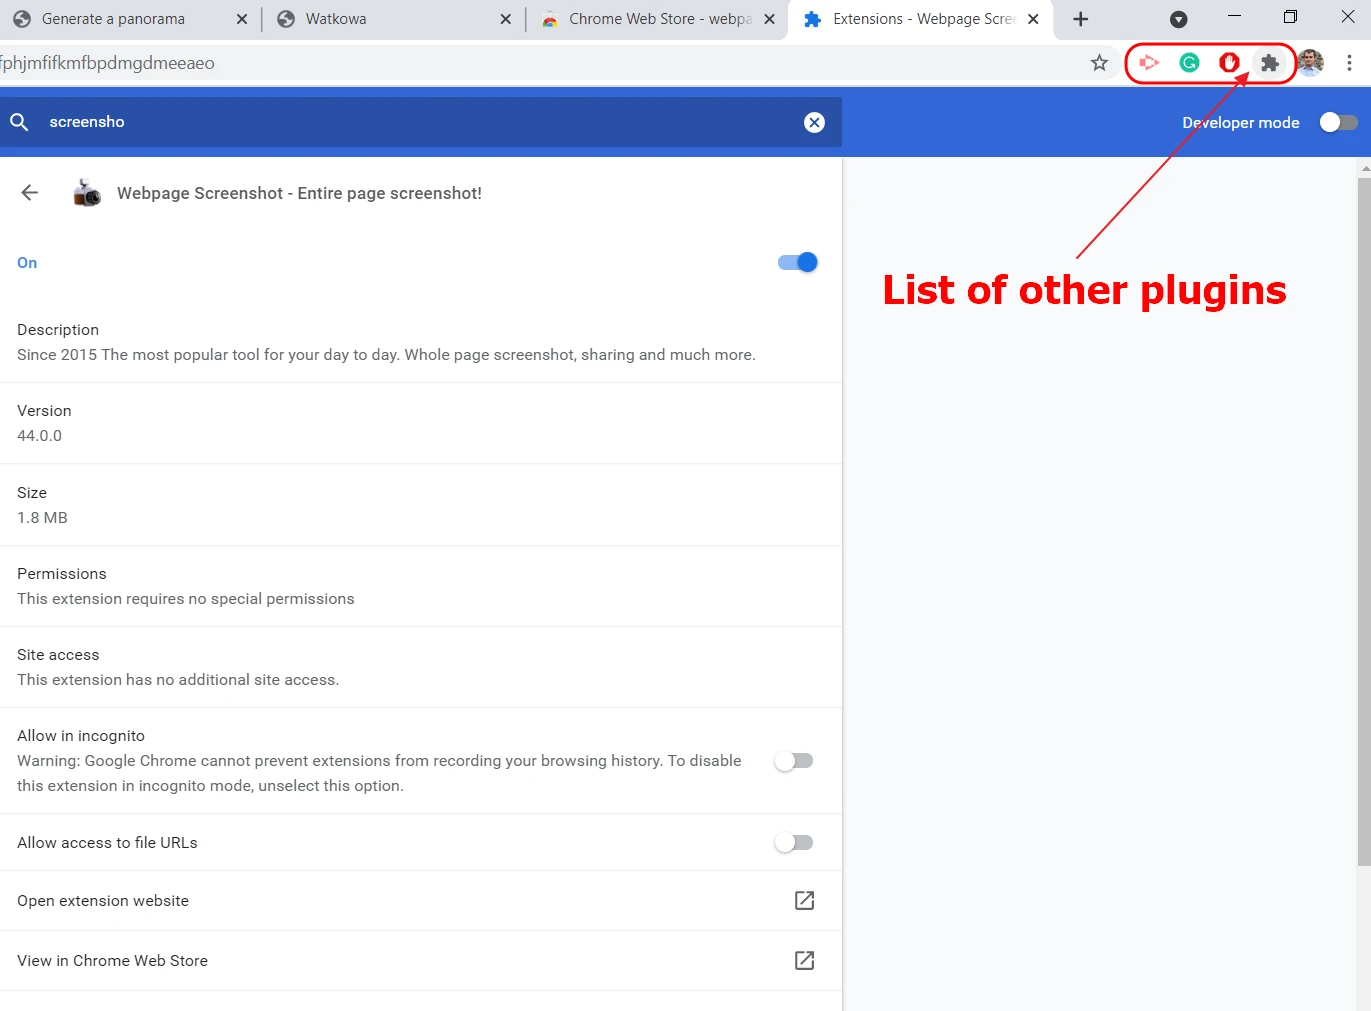
Finally, you can find your plugin in the main toolbar on the right. If you have them more, then they might be collapsed in the grey puzzle (Pic. 12) and can be expanded after clicking.
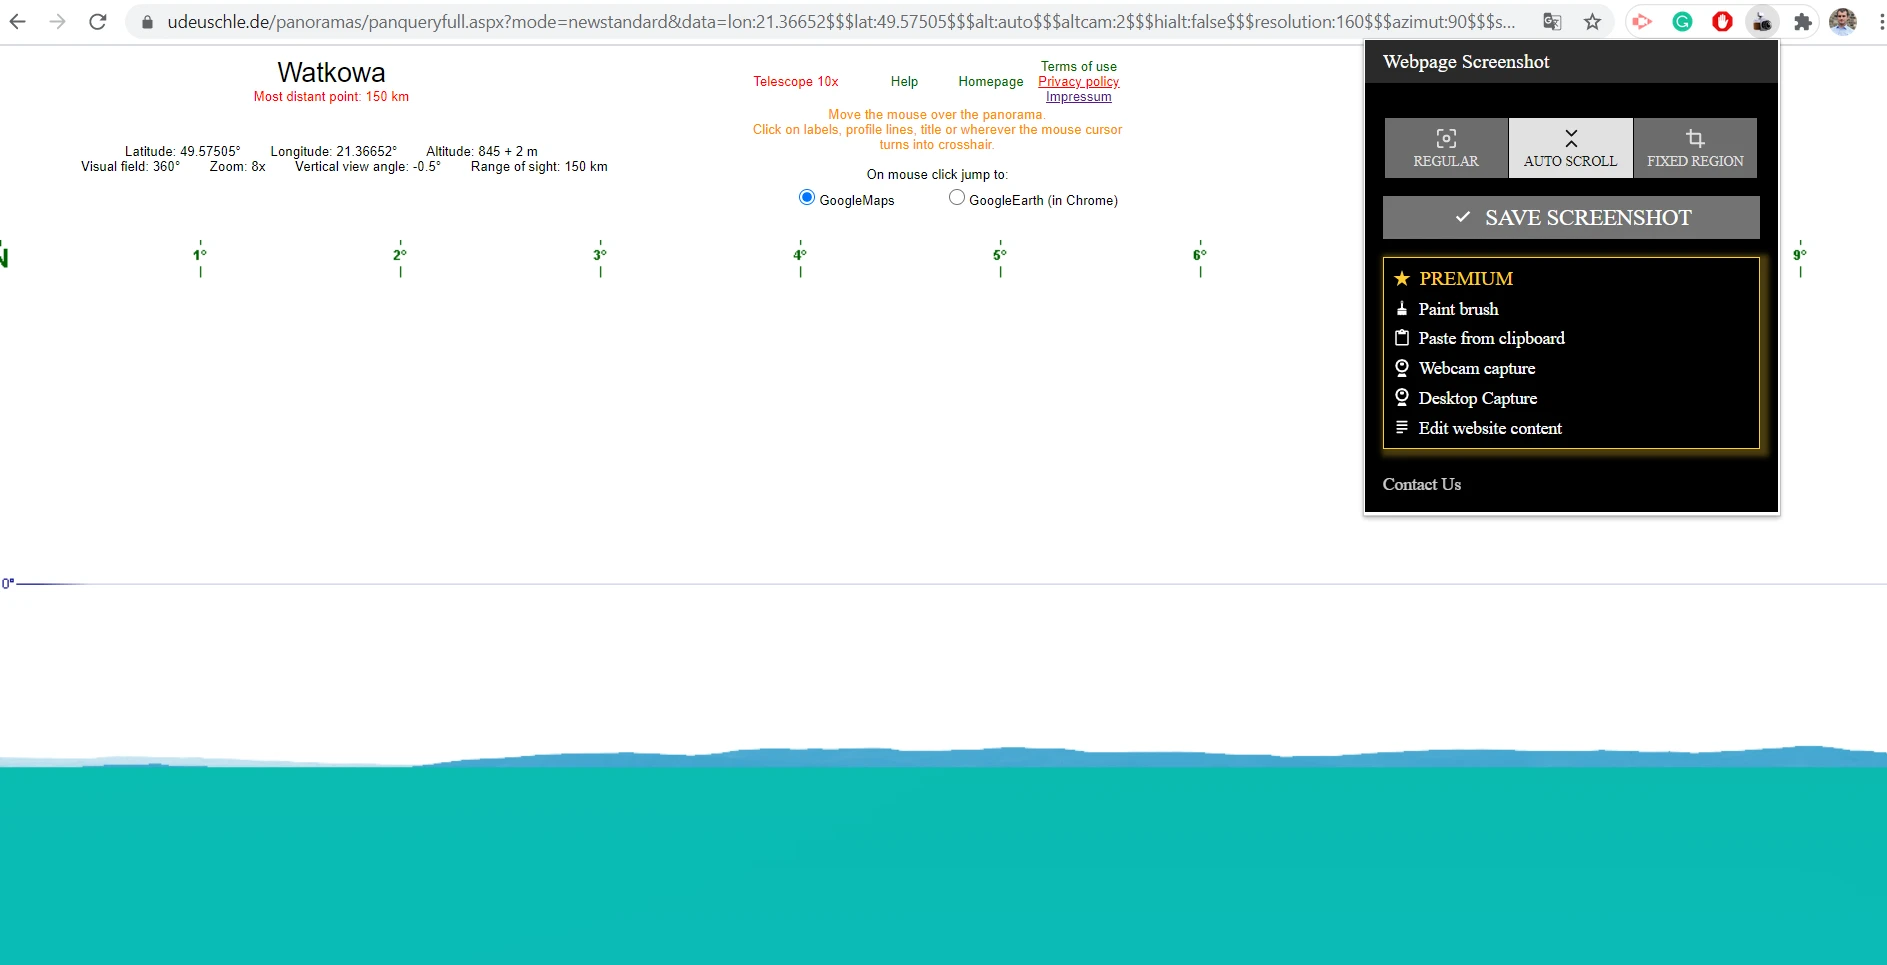
Well, after launching the plugin you should have three options. For the entire webpage purpose, you should pick the “AutoScroll” mode, whilst the “Regular” is capable of capturing only stuff visible on our screen (Pic. 13).
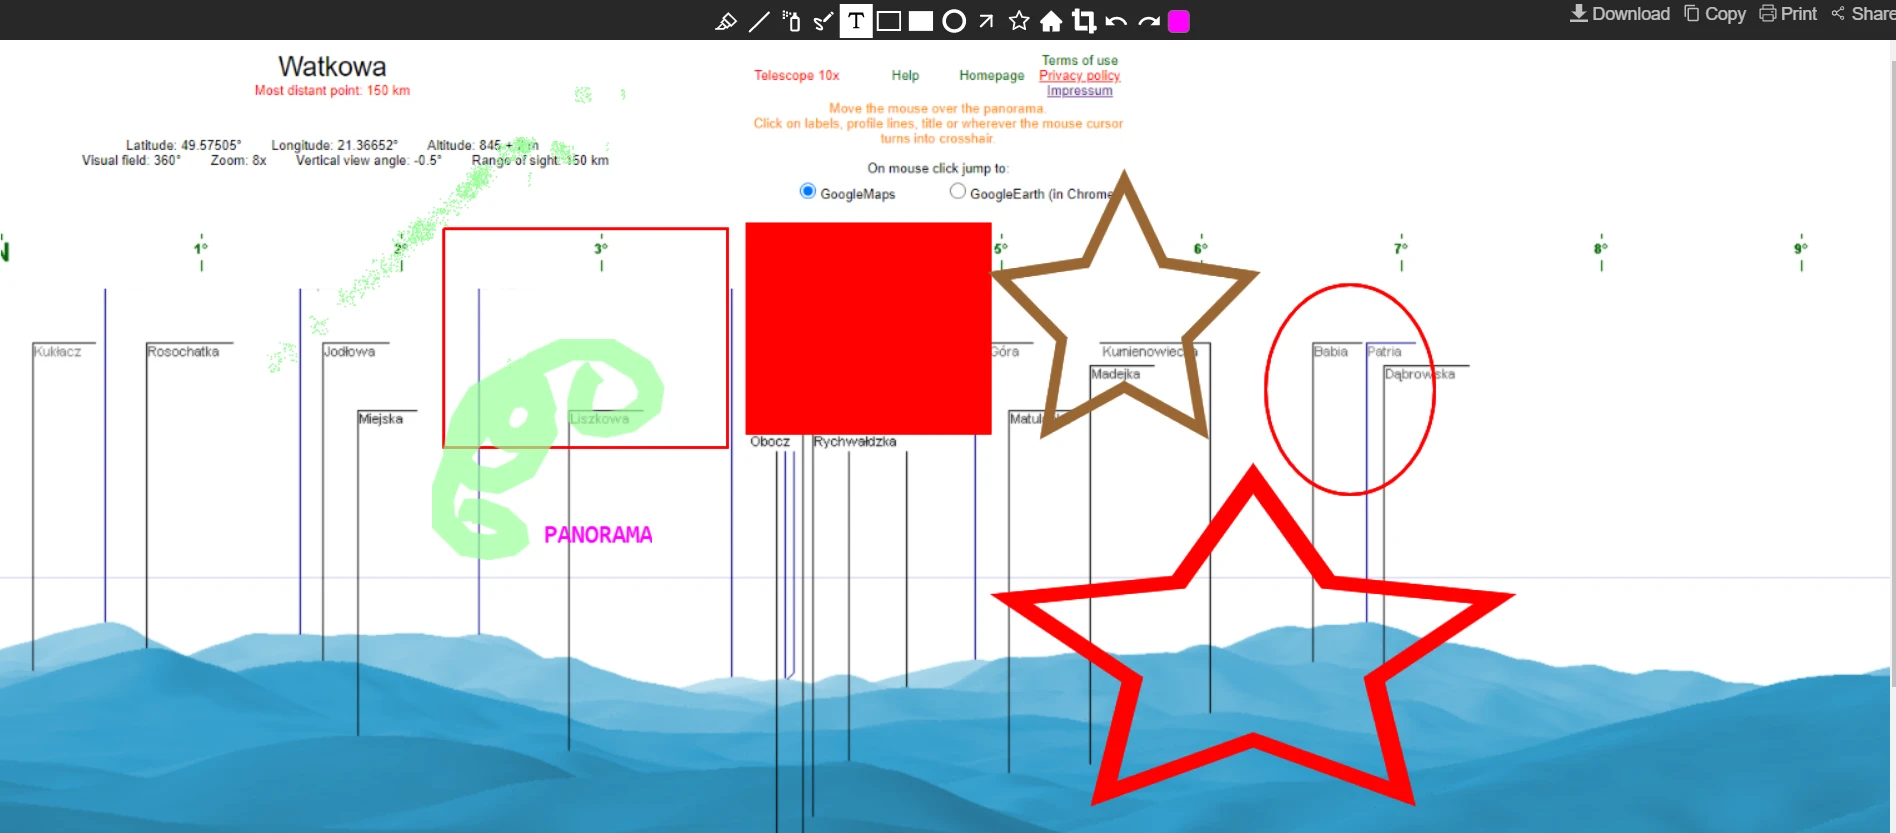
The primary feature, that distinguishes this screenshot plugin from others, even more, popular in the Chrome web store is the edit panel. Although it’s basic stuff only, you can still mark something important on your screen before you download it on your drive. That’s perfect! It can work also in the case of the Urlich Deuschle panoramas if we want to make where some town lies, group the mountain range, and so on.
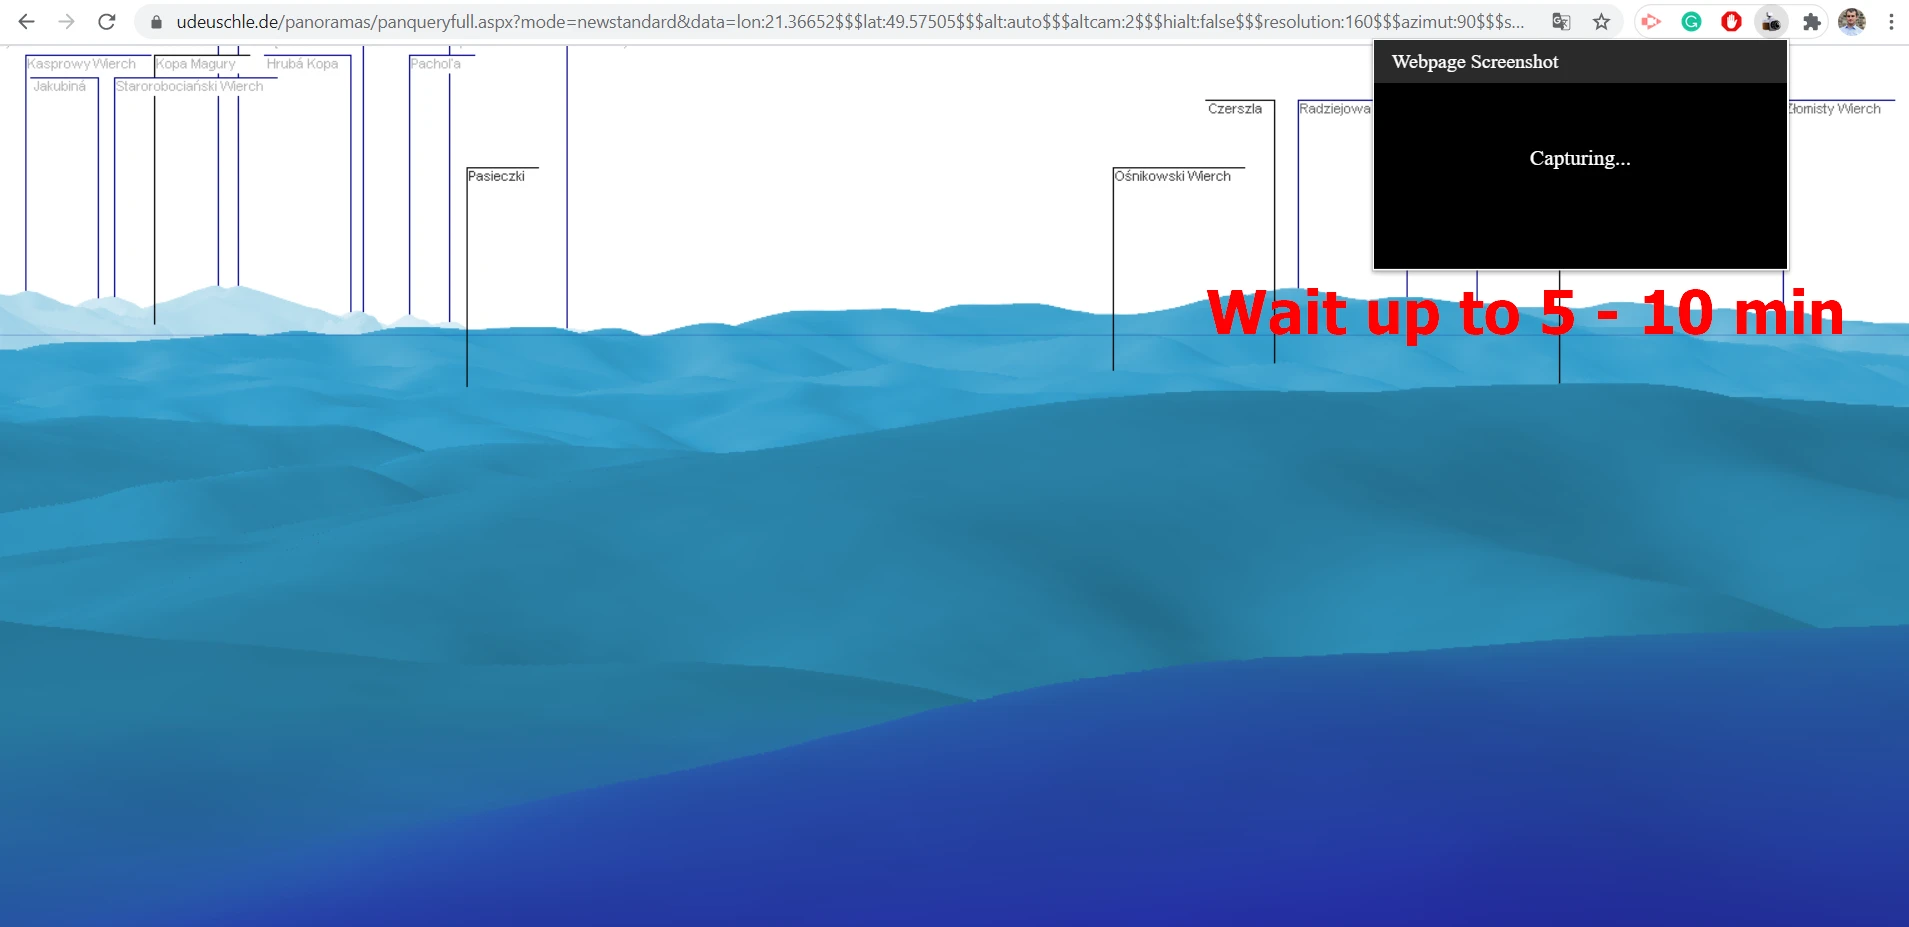
Be aware, that capturing the large-scale panorama, which has tens of thousands of pixels won’t last a few seconds. Sometimes you will have to wait even a few minutes (Pic. 14). It depends both on the server capacity, your internet connection, and the real-time computer performance (CPU & Memory).
The mechanism of this plugin is typical for capturing stuff larger than the screen – the tool saves the image screen by screen and stitches it to the entire image. It means, unfortunately, that if your computer is overtaxed during this process, the panorama won’t be done properly. It might suffer from repeated snips, unforeseen overlaps, and so on. I would inform, you that for the time of the large-scale panorama generation better is to leave your computer until done. Then you can be assured, that your panorama won’t crash in the meantime.
When the panoramic image is saved successfully, you can make some edits before it goes onto your target directory (Pic. 15).
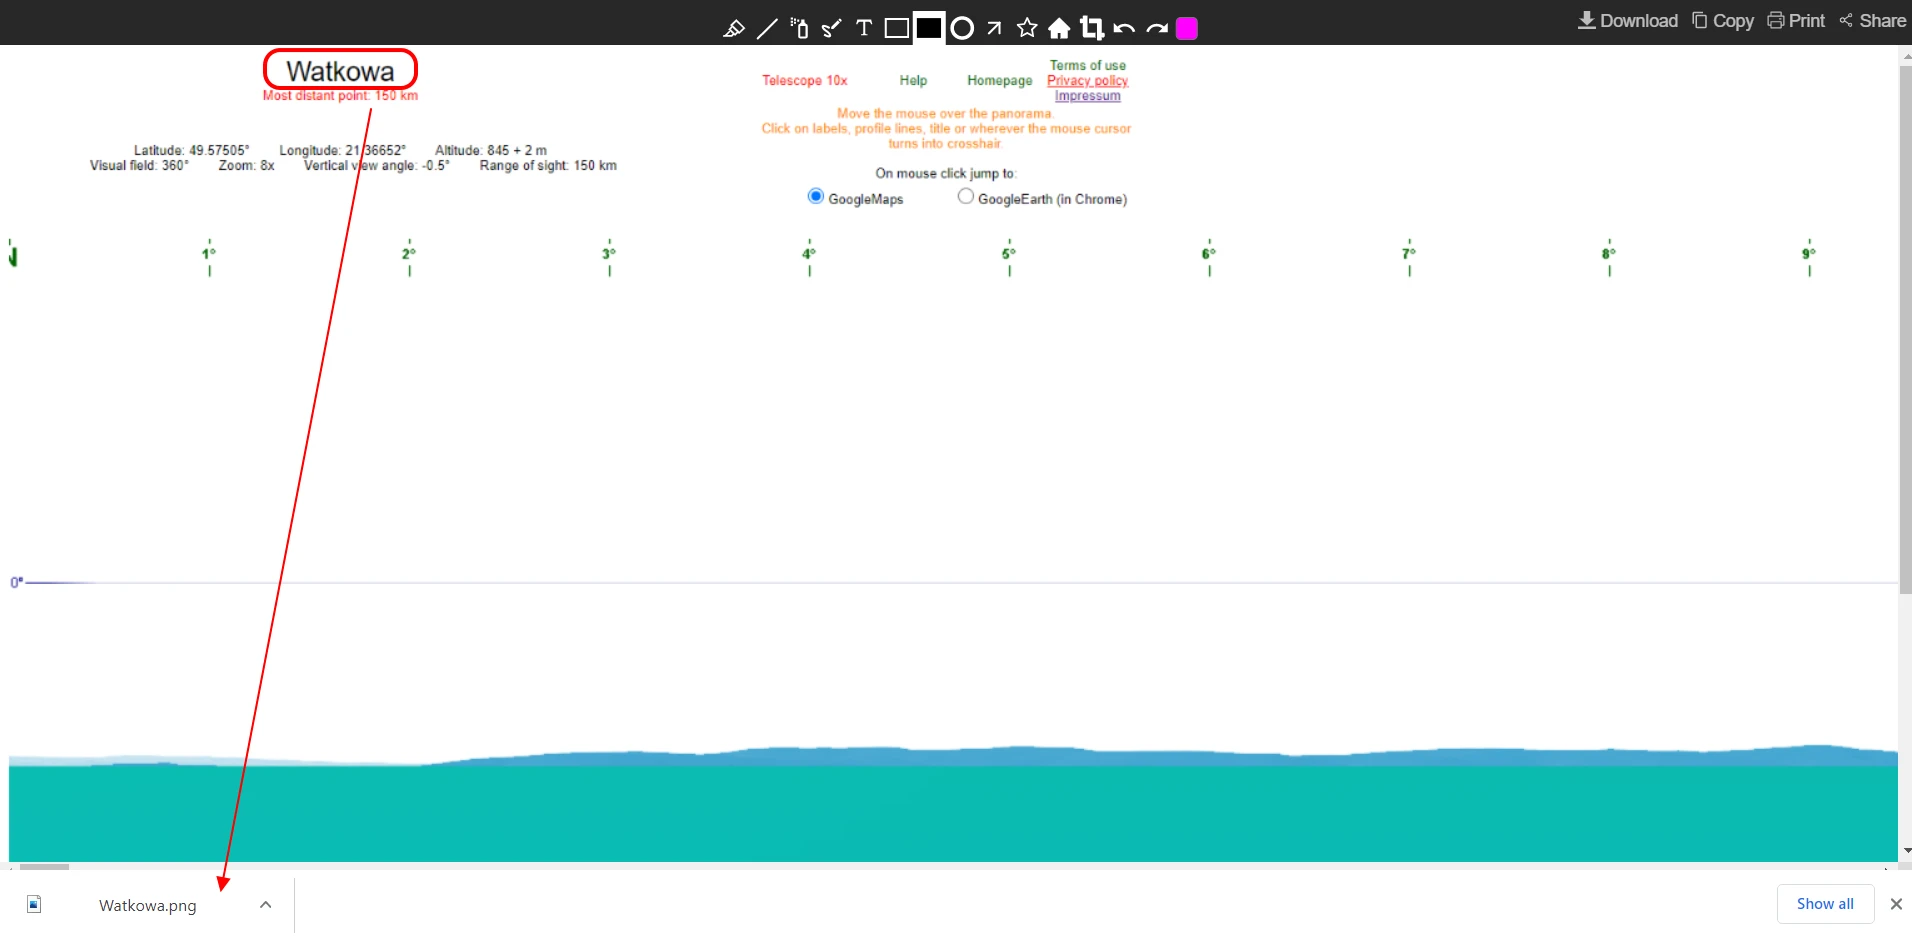
Another, very important thing, which makes particularly this screenshot plugin higher than others is the output filename. It’s exactly the same as defined in the Ulrich Deuschle panorama generator! That’s amazing! (Pic. 16).
Finally, you can open the panorama and see it on a large scale (Pic. 17) This 360-degree panorama was made with 8x enlargement. Another one, underneath with the 4x zoom, is the biggest allowed straight from the application panel.


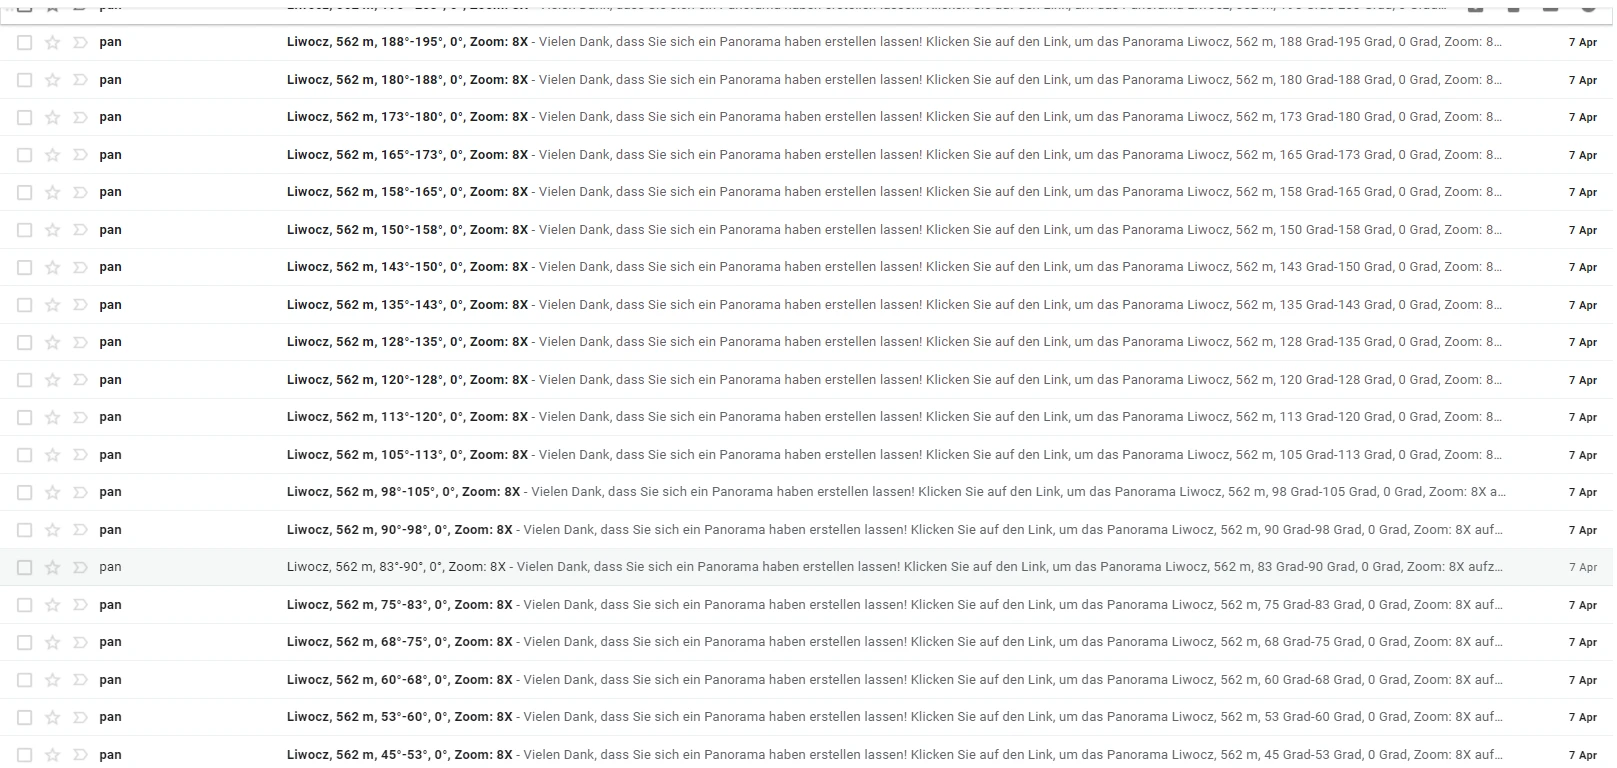
We can have everything at least in one piece! Unlike the portioned panorama received by email (Pic. 19, 20).

The only, and I believe a very important thing is, that since we have coped with the website limitation, we cannot ramp up our enlargement forever. I’ve personally tried not more than 10x, and unfortunately, I couldn’t get the result. Admittedly, the panorama was loaded, but the labels were not, even after 20 minutes. Moreover, it made the Urlch Deuschlepanorama webpage unresponsive for a long while from my address IP. A similar issue occurred with the 9x enlargement. Maximum zoom, which came through was 8x. I believe, that it is a fairly sufficient magnification, which makes all the mountains clearly visible, even the most distant ones. In a bid of calculation, I can tell you, that the 8x zoomed panorama dimensions are pretty much 57600x720Px. You can barely open it in Microsoft Paint or Gimp, but already not i.e. in PicPick, which allowed no more than 37600Px canvas length. It’s a very important matter, especially when you decide to use another Chrome plugin instead of described above, and will attend to stitching the full panorama afterward, although I doubt it will happen at all. Nevertheless, we should be aware of another Chrome full webpage screenshot-dedicated plugin just in case.
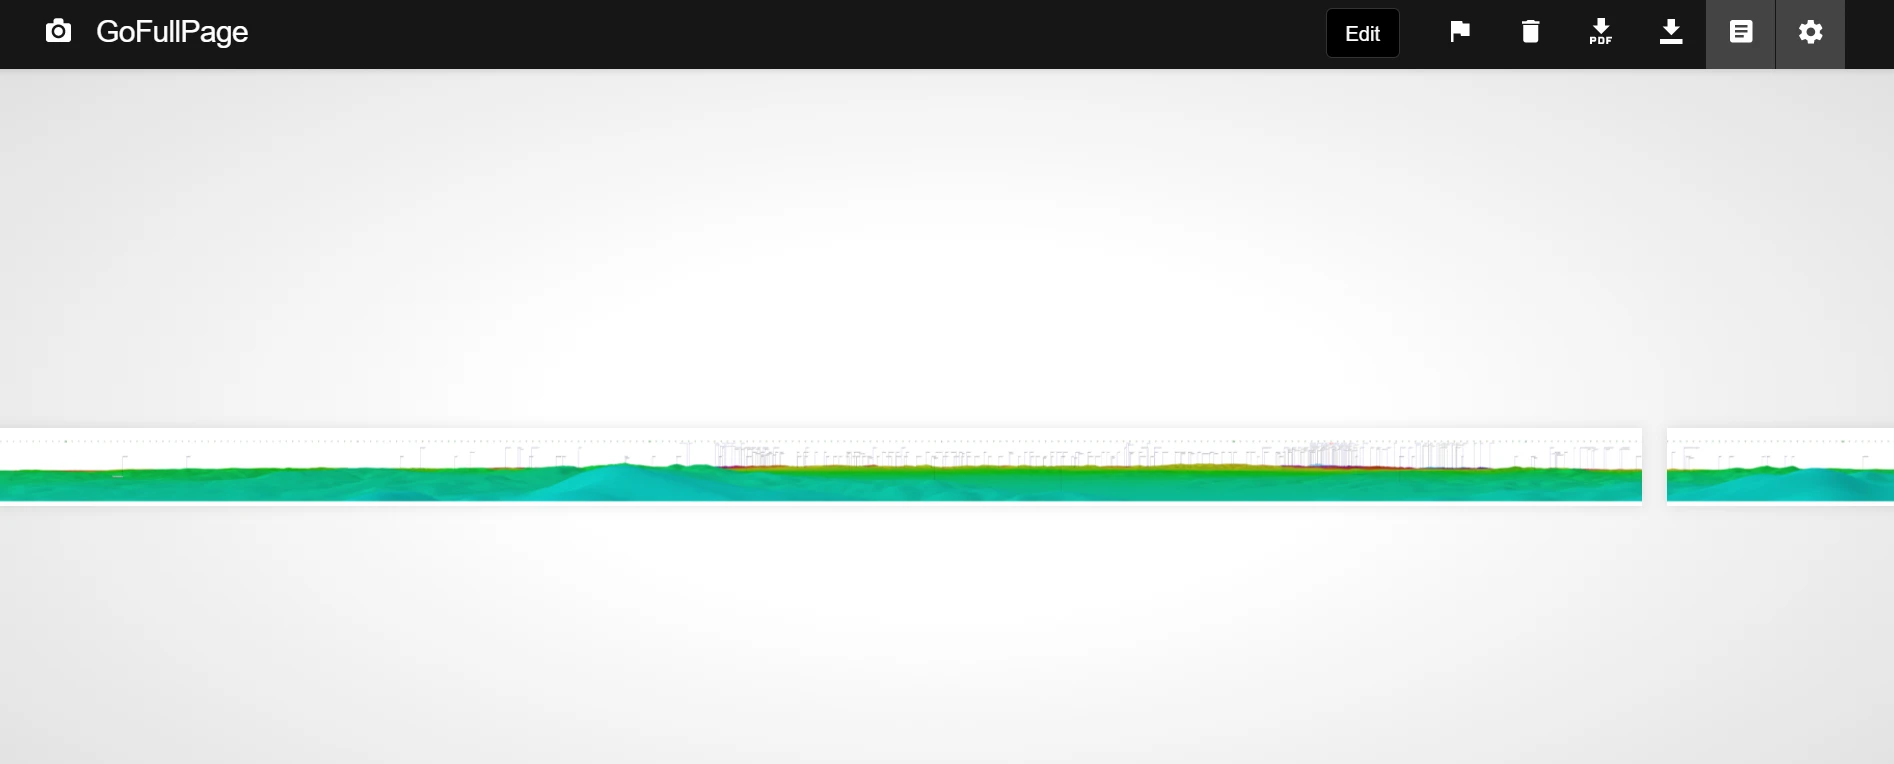
One of them is the GoFullPage – Full Page Screen Capture. It’s a nice plugin because you can see the progress of the capture. The primary downside is, that the resolution (width) is restricted to 28800 pixels. If our panorama exceeds this value, then it will be split into 2 or even 3 separate downloadable images (Pic. 21, 22).

Another one – the Screnshotting – Full Page Capture plugin, seems to be slightly better, as it accepts a bit wider resolution. You can save the large screenshot up to about 32600 pixels in width, but the plugin won’t inform you about too big a size. The panorama will be simply terminated when the limit of pixels is reached, as per in the example below (Pic. 25), where it was meant to be a 360-degree panorama, but it finally is just 326 degrees.

Anyway, I recommend definitely the very first one, where you can also do some basic edits and what’s most importantly save your panorama in one piece.
The Ulrich Deuschle panorama generator is quite wealthy in many practical functions facilitating our final mountain panorama output. You can render the view in any direction using any enlargement for it (especially by the “Telescope” mode). Your panorama can be also full of colors, and what is most importantly, you are able to store the link in your email box. However, as you can be convinced by reading this article, it’s not a full spectrum of useful things offered by this amazing application.
As a disclaimer, we should remember the height of the trees, which is about 30m on average. Because the majority of hills are forested, sometimes the panorama might not be genuine enough, especially when some barely visible mountains are concerned. Another issue is the Shuttle Radar Topography Mission. The Ulrich Deuschle panorama generator is based on the SRTM3, which is, unfortunately, less genuine, than SRTM 1.
Mariusz Krukar
Links:
Forums:
- Nördlichster Punkt mit Alpensicht (German)
- Adding my custom horizon to STELLARIUM; it keeps crashing the program!
Wiki:
Read also:
- Using Heywhatsthat.com to generate multiple summit-perspective views in Google Earth – part 1
- Using Heywhatsthat.com to generate multiple summit-perspective views in Google Earth – part 2
- How to make the custom Stellarium landscape using Street View?
- Rendering the Heywhatsthat.com horizon in Stellarium