
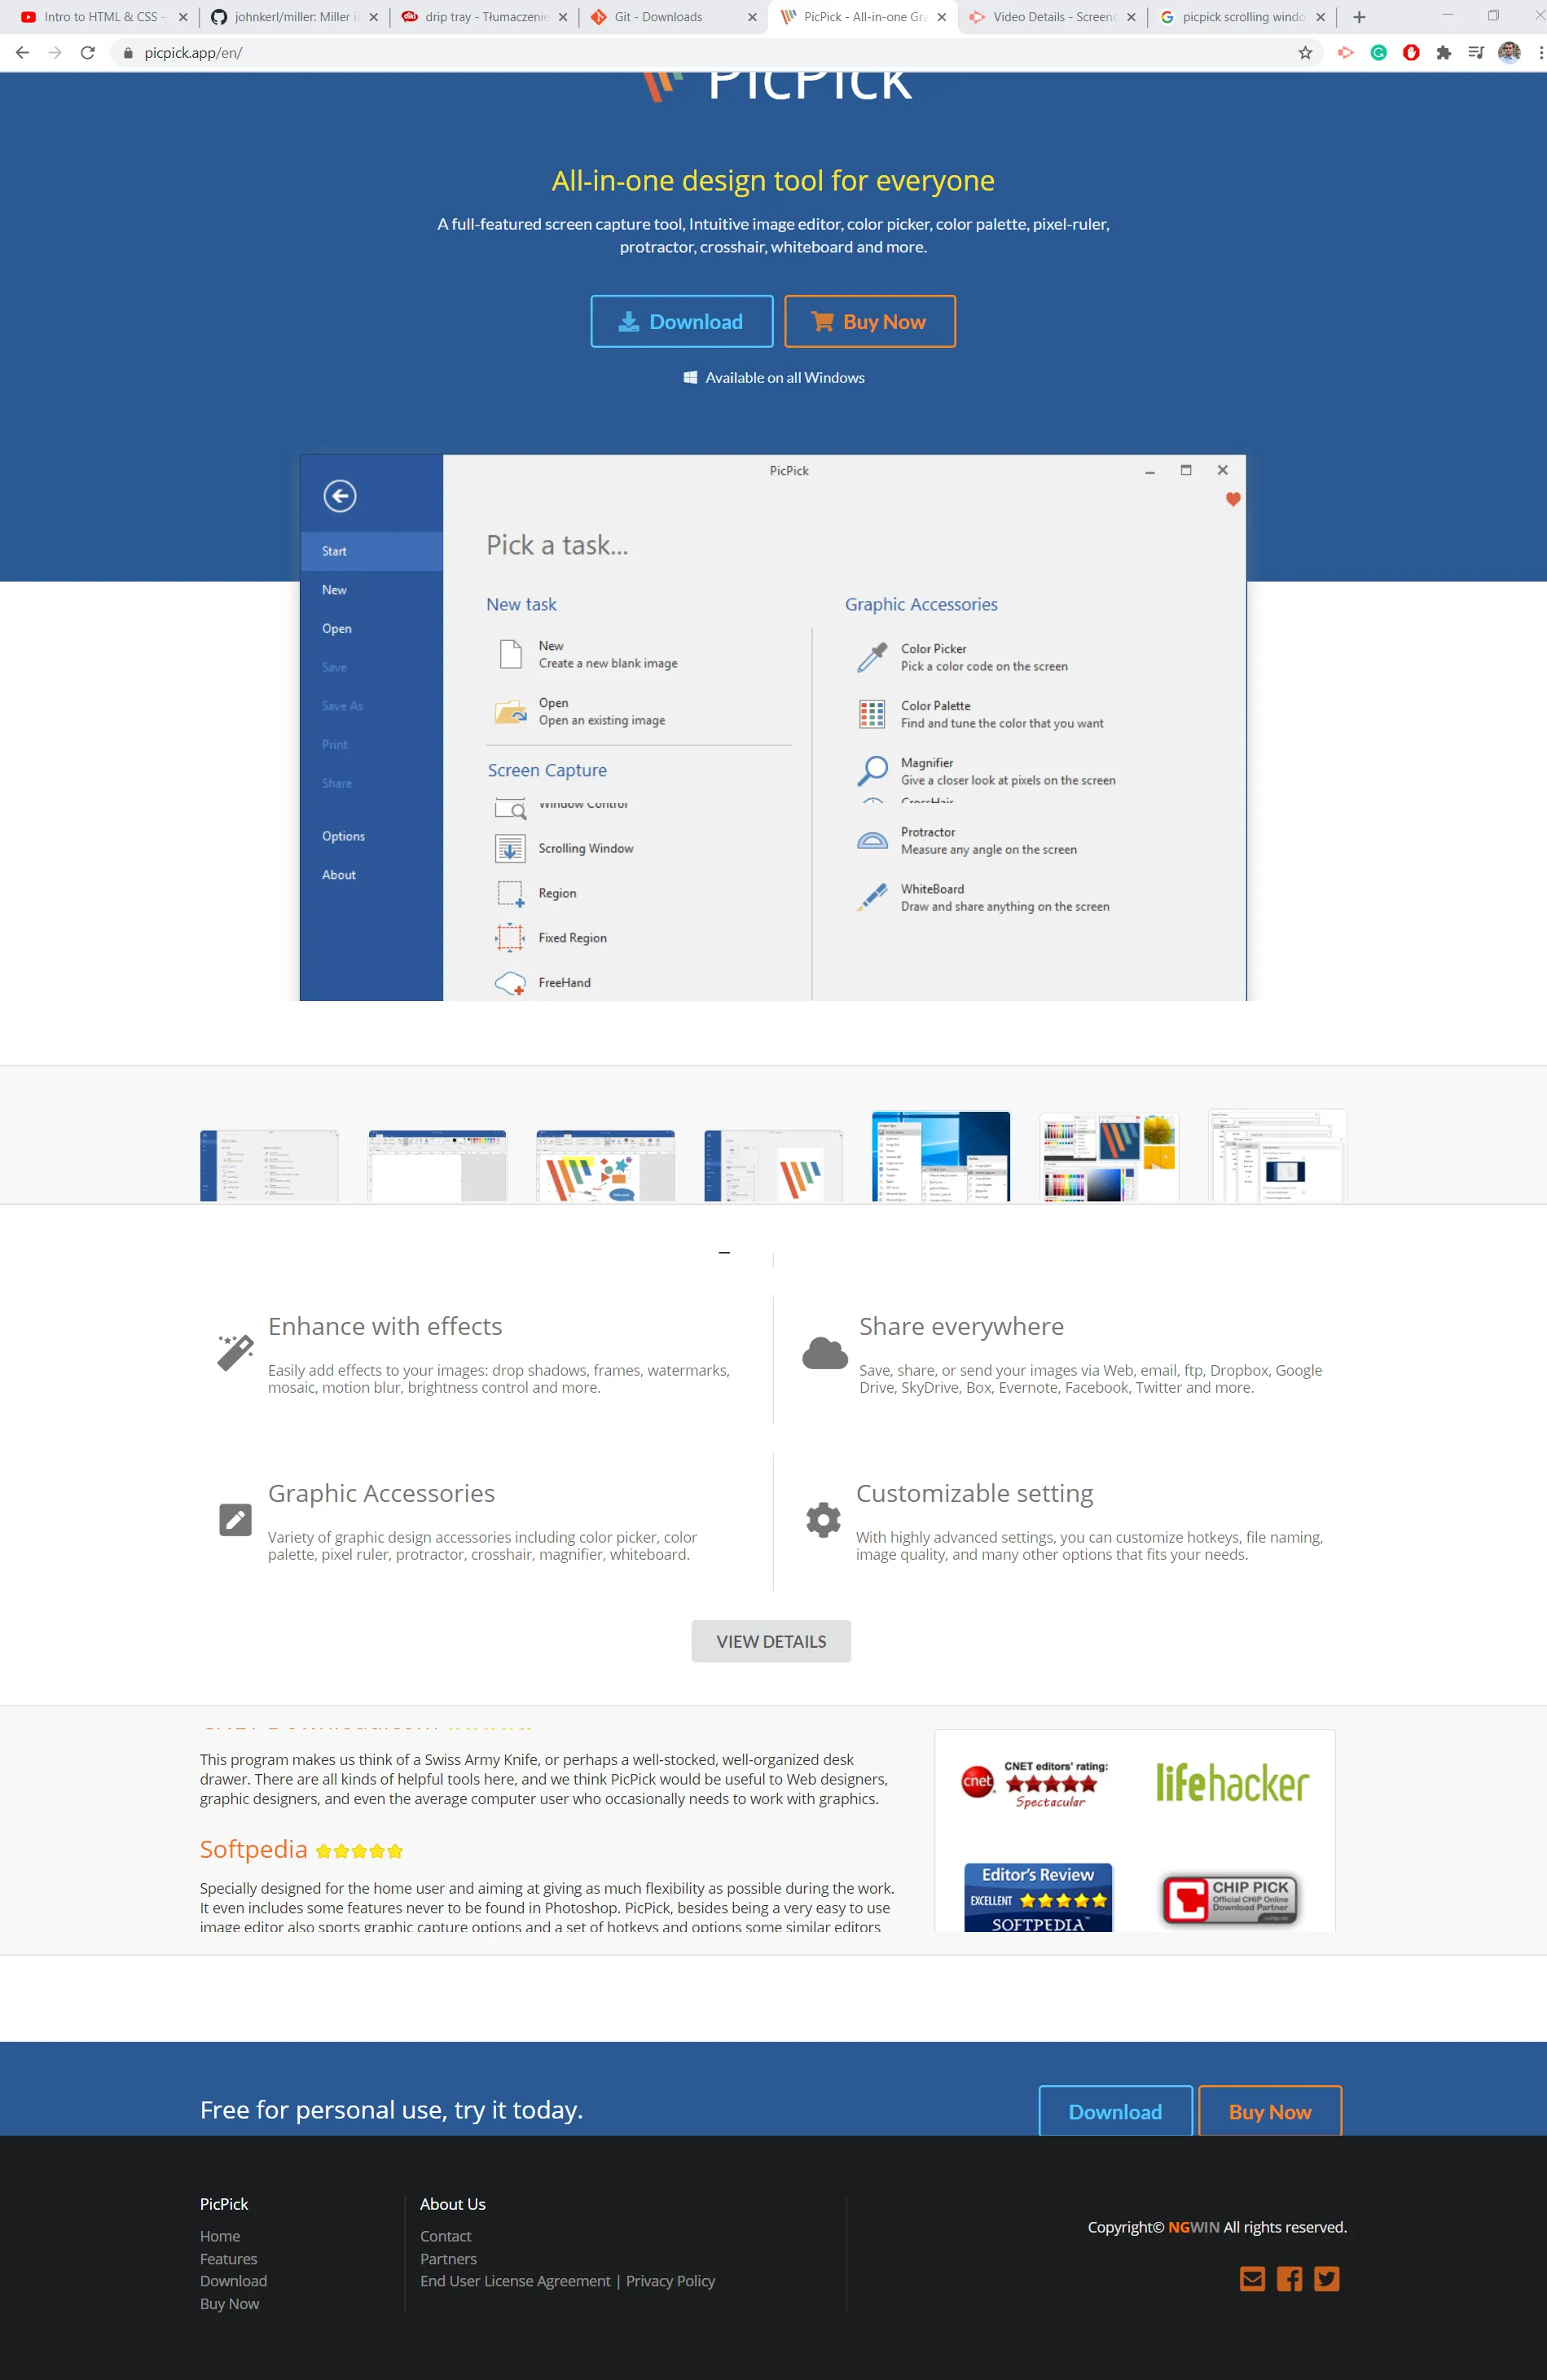
This article is aimed at the recommendation and substantial guideline for apparently the best screenshot application available on the market, which is the PicPick application.
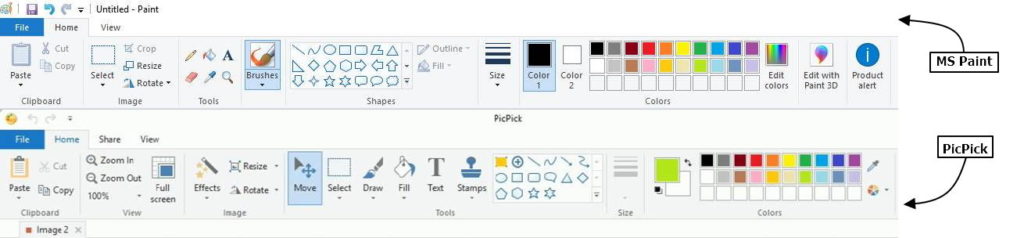
Probably you have been wondering how can I create arrows or some weird elements in my screenshots from time to time. All of them have a common source – the PicPick editor, which will be also described here. Saying frankly, the PicPick application is something like the Microsoft Paint and Screenshot combination. In the practical sense, the interface should be familiar enough to you when editing some intercepted screen images. Let’s get started then.
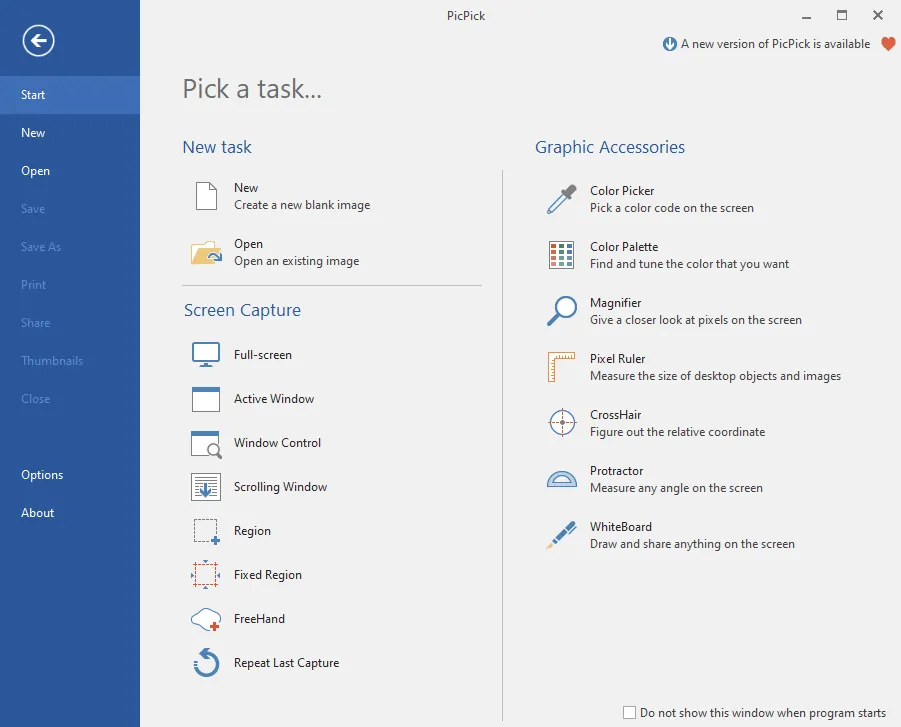
Above you can see the main toolbar. We have three types of tasks available:
A. New Task – including opening an existing image or creating a new, blank document. Both options include widely understood image processing tools, which are explained later. The existing image might come also from external sources, not only captured by PicPick.
B. Screen Capture – includes all the ways of grabbing images from our screen.
C. Graphic Accessories – quite a unique set of tools, which makes PicPick very useful in terms of selection of color palette, making measurements, and so on.
- SCREEN CAPTURE
A. FULL SCREEN – simply captures full screen in real-time. An analog thing to the PrintScreen option in Microsoft Paint, but it is more convenient for the user.
B. ACTIVE WINDOW – grabs our active window, which we are working in now (Pic. 2).
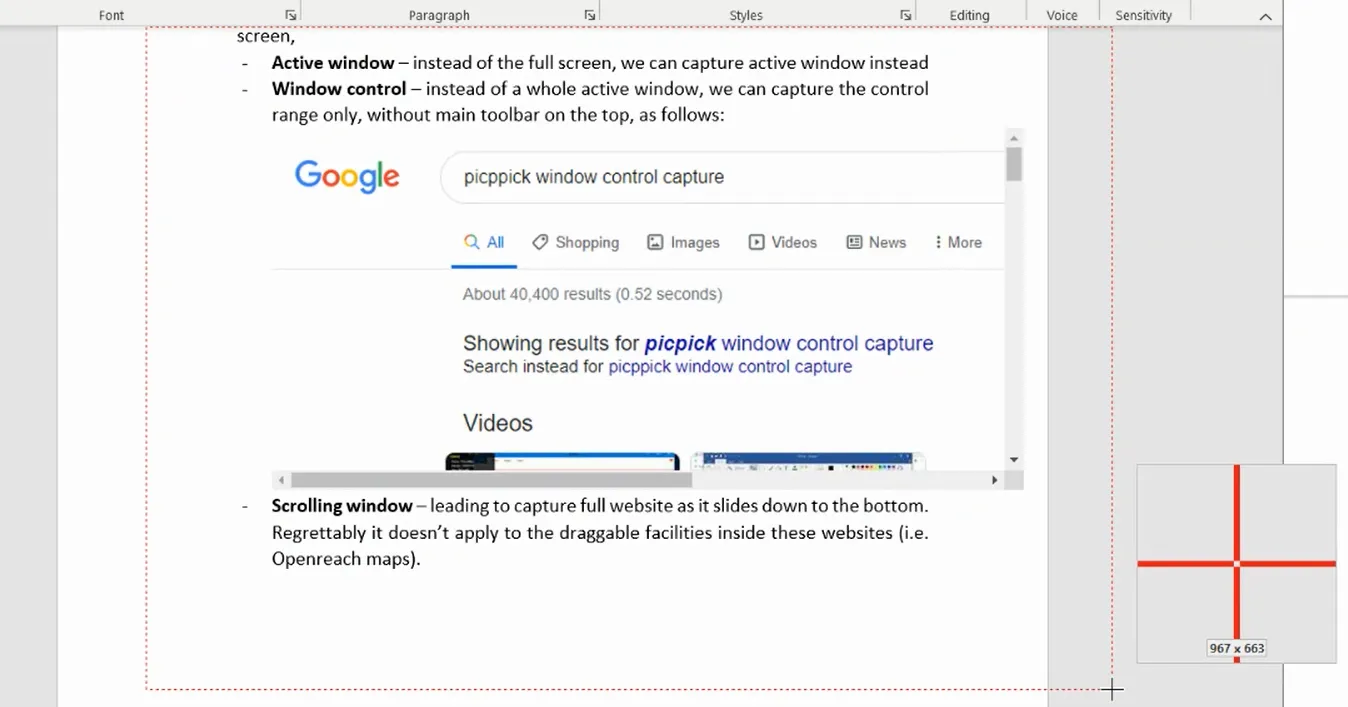
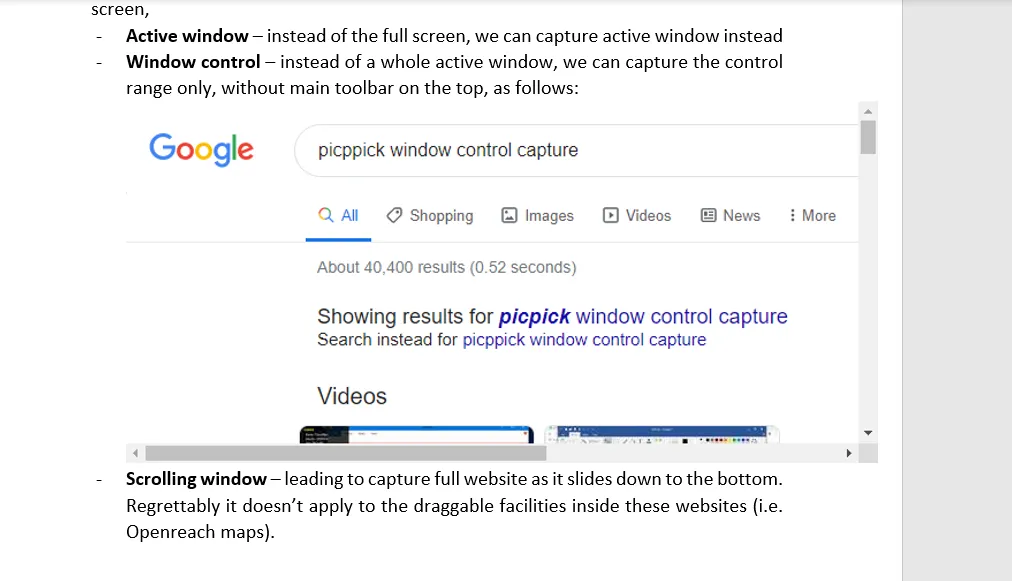
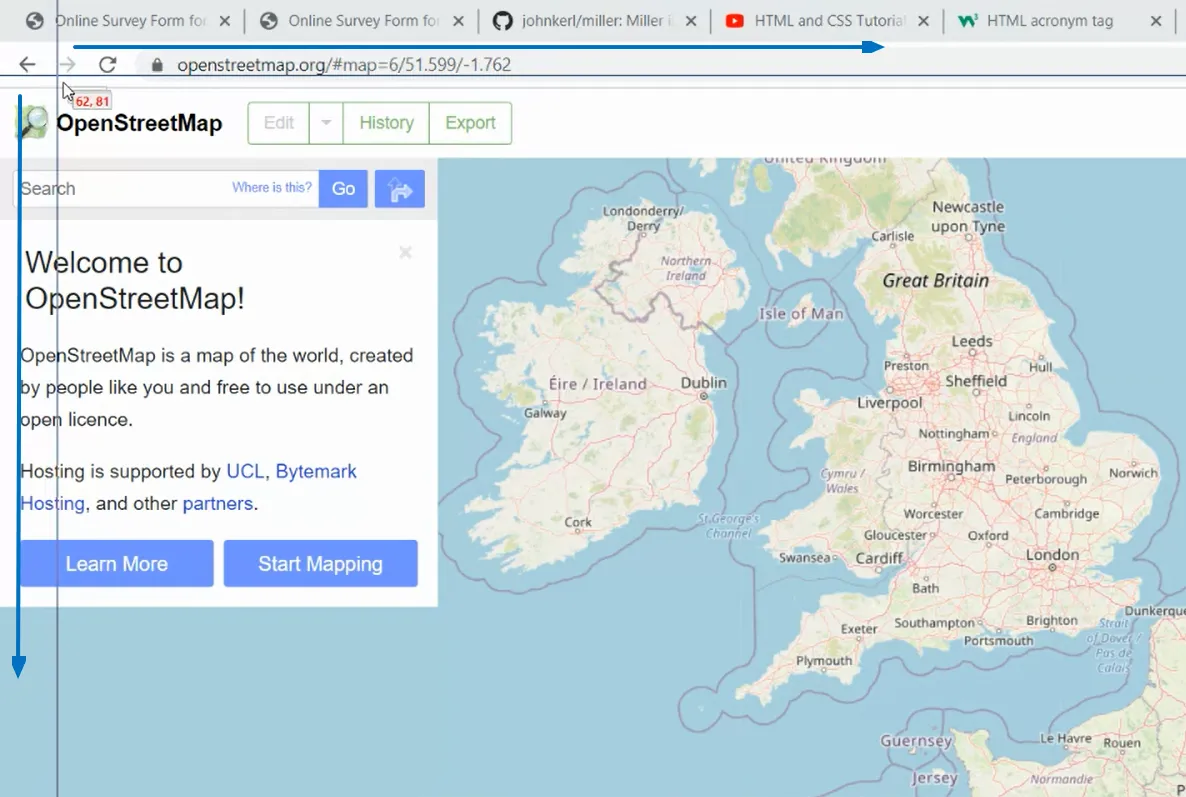
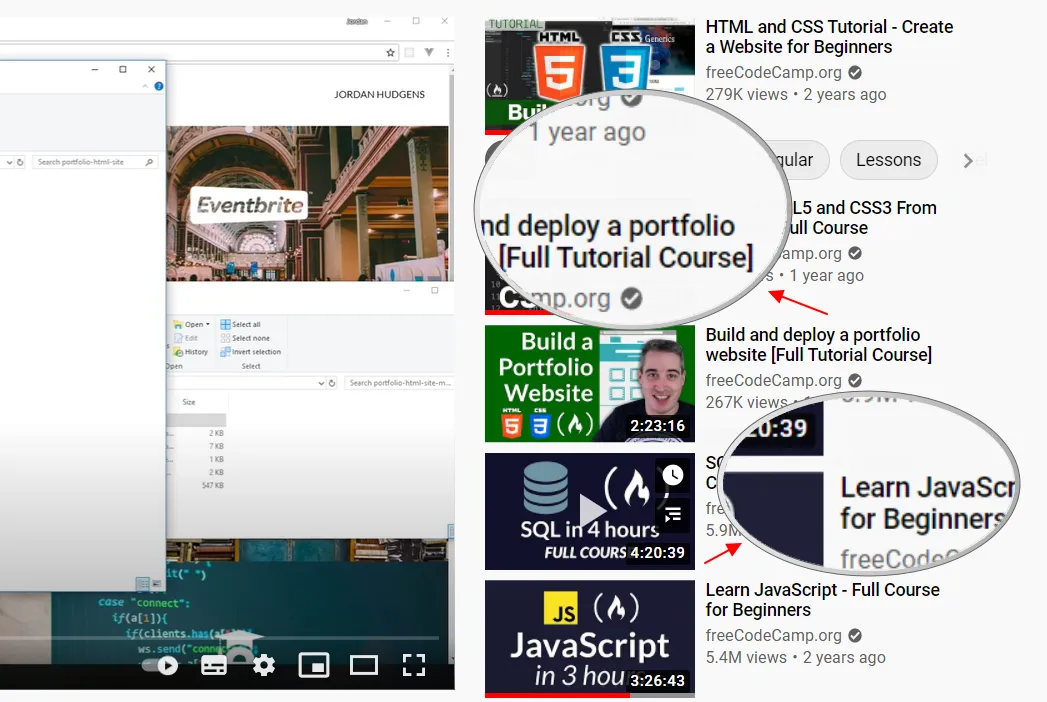
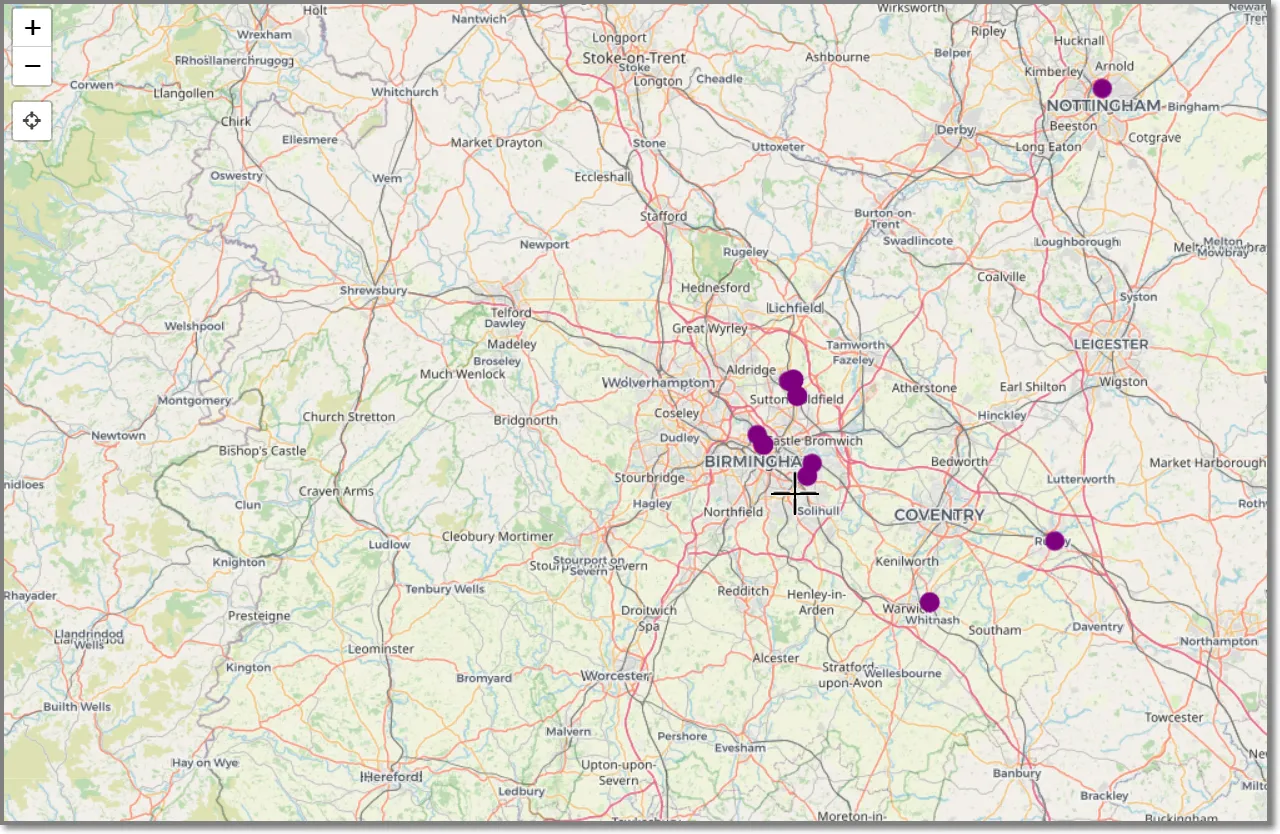
C. WINDOW CONTROL – takes control of all our windows opened and adjusts our screenshots to their real-time dimensions. It takes into account also other elements of our desktop like the search bar in our taskbar, the time and date section, and so on. Before action, you can see the enlarged region with crosshair and the currently selected area bounded red with exact dimensions (Pic. 3, 4).
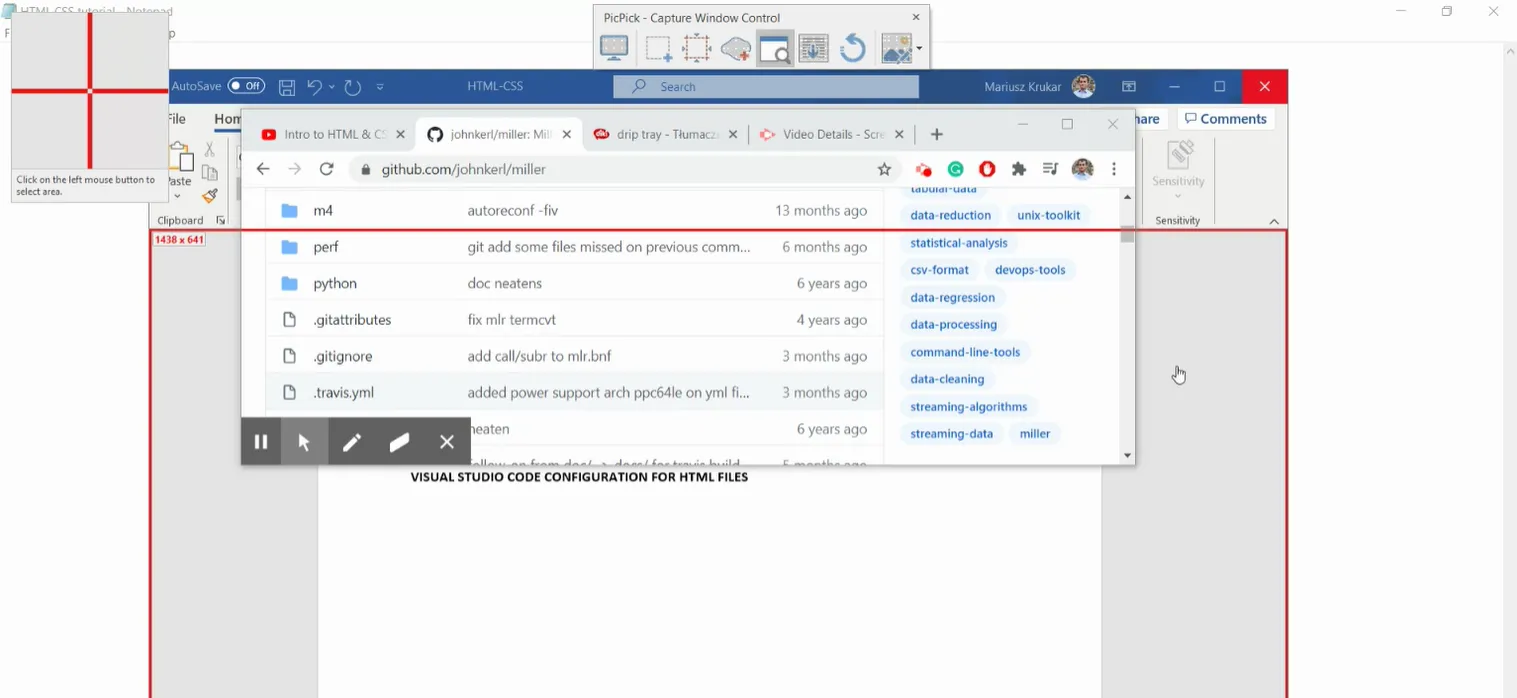
D. SCROLLING WINDOW – the best way to get more than you see on your screen. By clicking “Scrolling window” you should see your window bounded red with the “Active Scroll” in the top left corner. Next, it disappears and the tool starts to scroll and capture your area. Make sure, that you are at the very top, otherwise only the visible screen will be captured. If you see, that application doesn’t scroll down automatically, you can do it on your own by scrolling the mouse wheel until you reach the very bottom. Anyhow PicPick offers the best option to get screenshots from the scrolling window in your operation system (Pic. 4).
E. REGION – snipping by selected region on our screen. You can see the bounds of your screenshot region including also the total dimensions placed in the corner crosshair (Pic. 5,6).
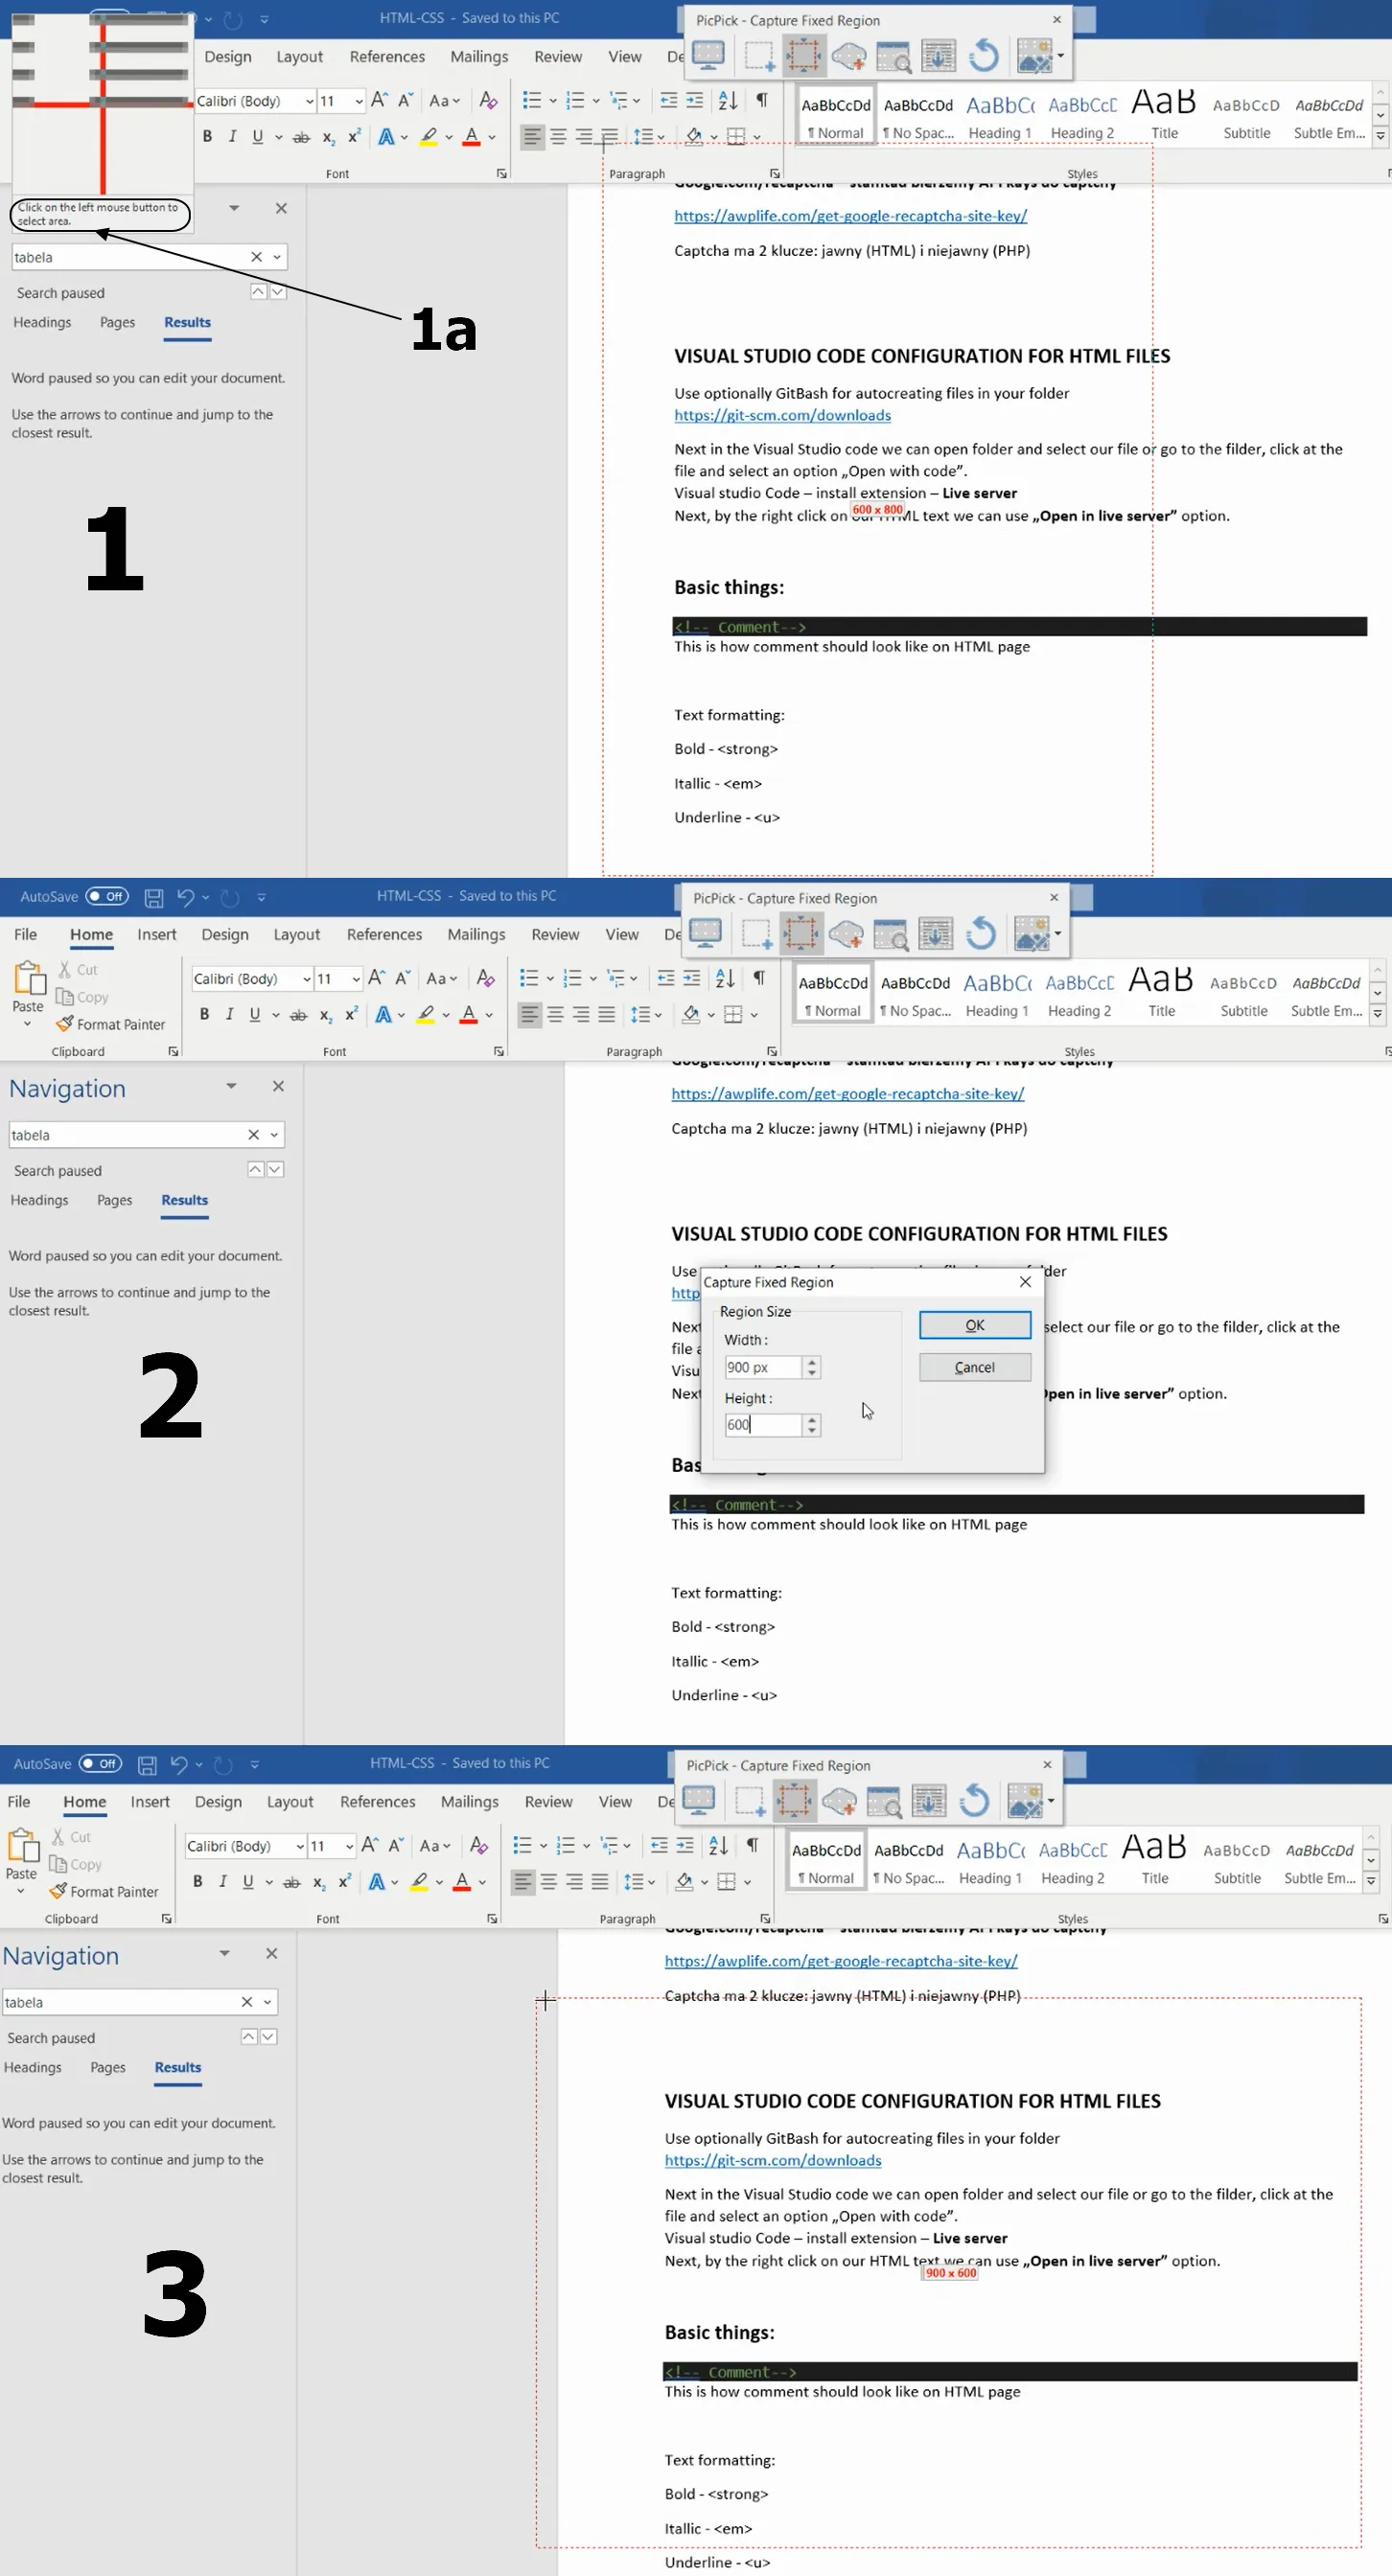
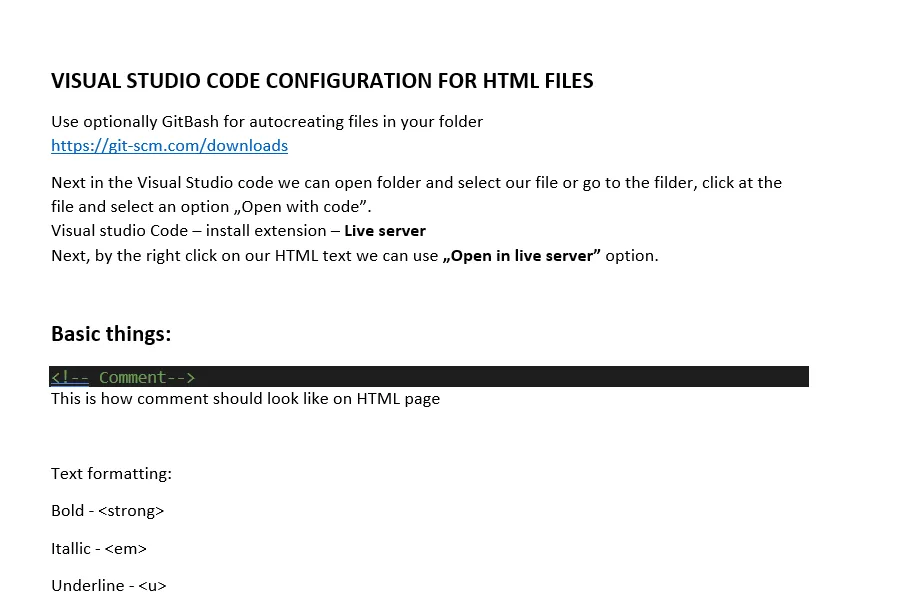
F. FIXED REGION – An analog option, but you can set the dimensions roughly, which potentially matches your area of interest on the screen. I have done it randomly for you below. The most important thing is, that you can change these dimensions once by clicking the Escape (Esc) button. If you repeat it, the tool will be switched off. If you select this option once again, it will retain the dimensions set previously (Pic. 7, 8).
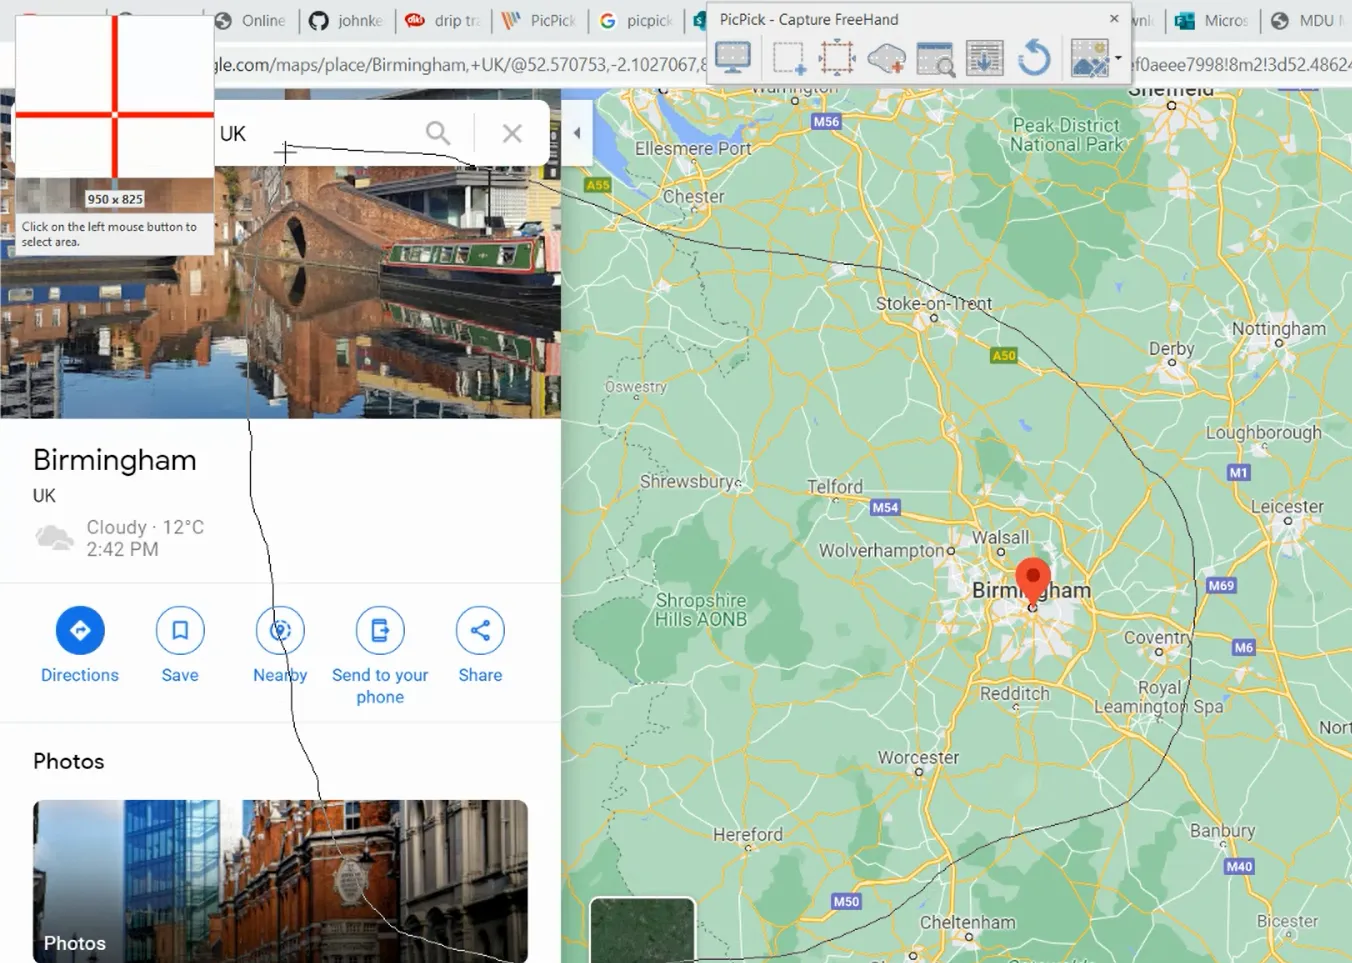
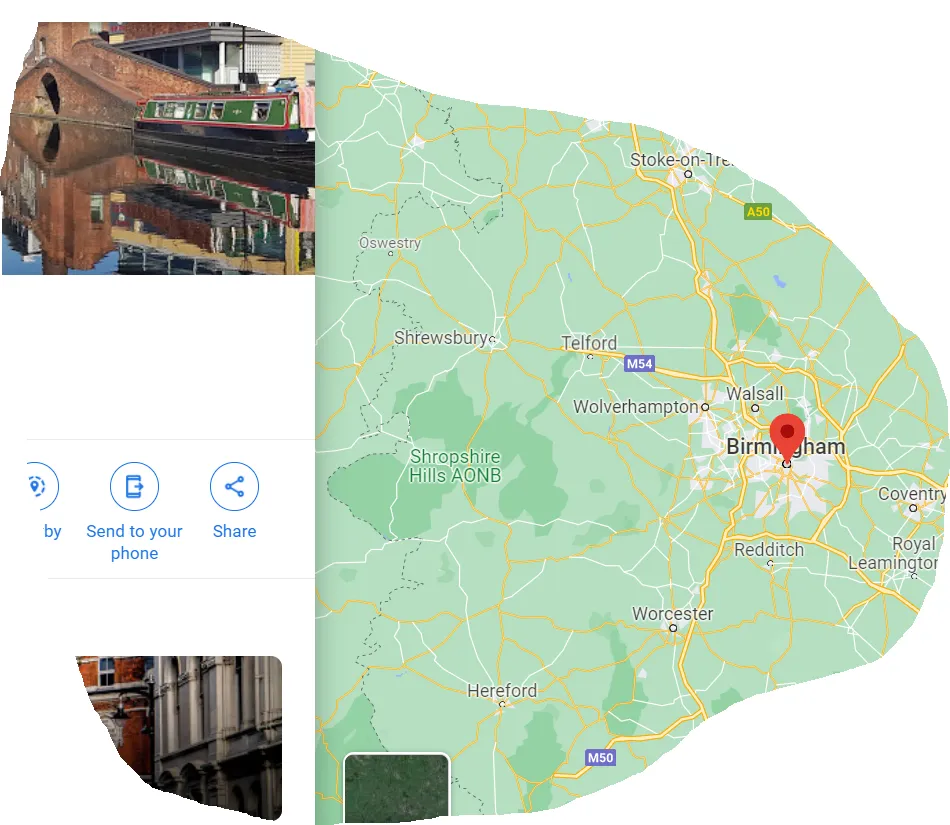
G. FREEHAND – this option allows you to take a screenshot with random borders and various shapes. During the selection of the area, you can see the crosshair with the enlarged current position of your cursor and the actual size of your screenshot, including the white spaces outside, as the tool always saves our job as the rectangle (Pic. 9, 10).
H. REPEAT LAST CAPTURE – also a useful option, where you can save time when repeating exactly the same screenshots. It applies predominantly to freehand and fixed region selections (Pic. 11).
2. GRAPHIC ACCESSORIES
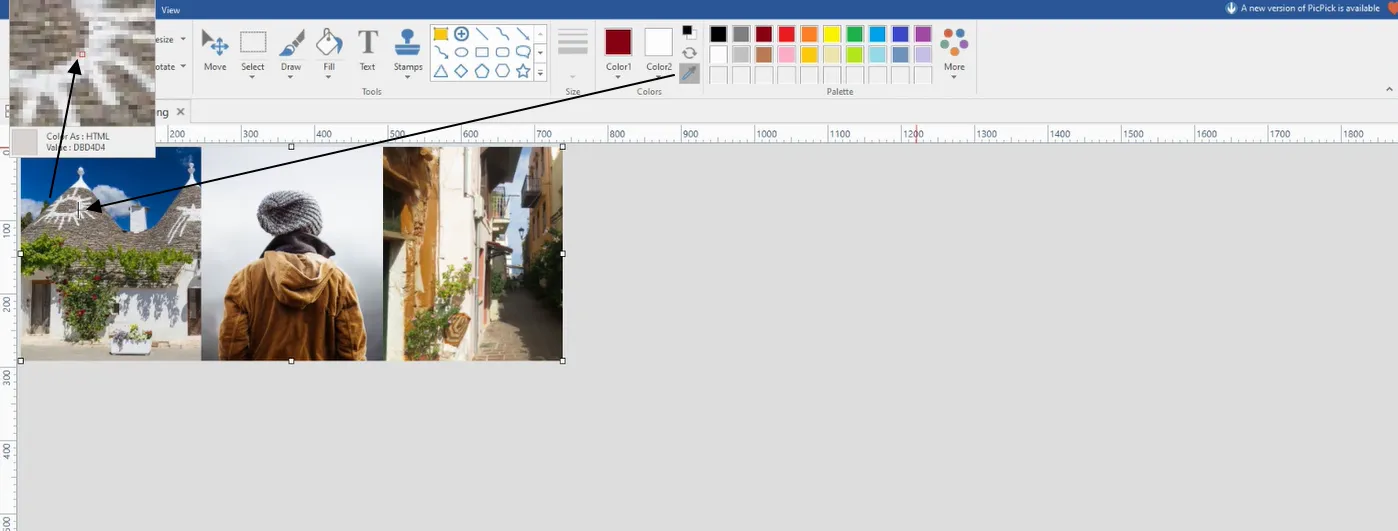
A. COLOR PICKER – Very useful if we want to know the color code or use the particular tint or hue somewhere else. You can select it by placing the crosshair in the proper place as per the screenshot below (Pic. 12).
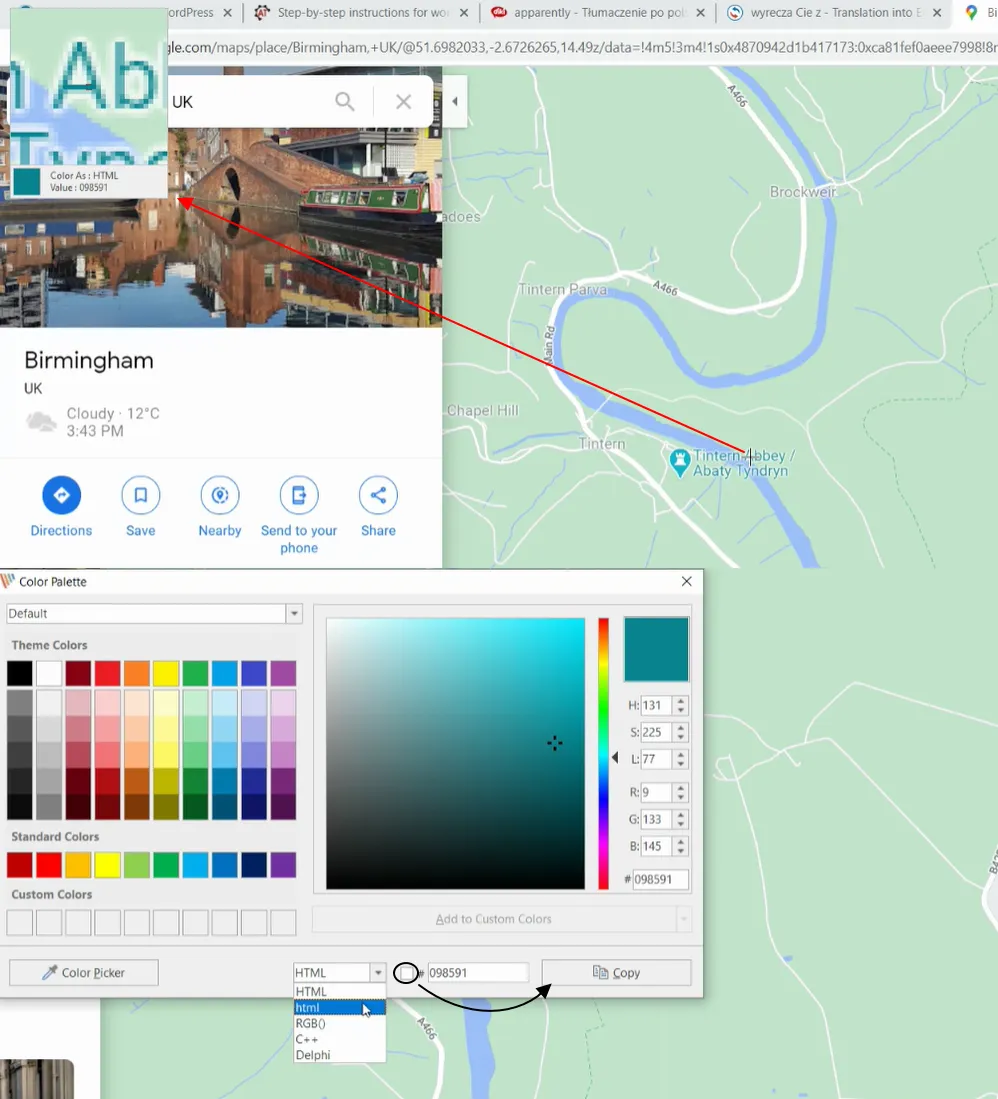
We have a few options to display our color code. You can also copy it straight away. If you tick the box, then your code will be copied with the # symbol too.
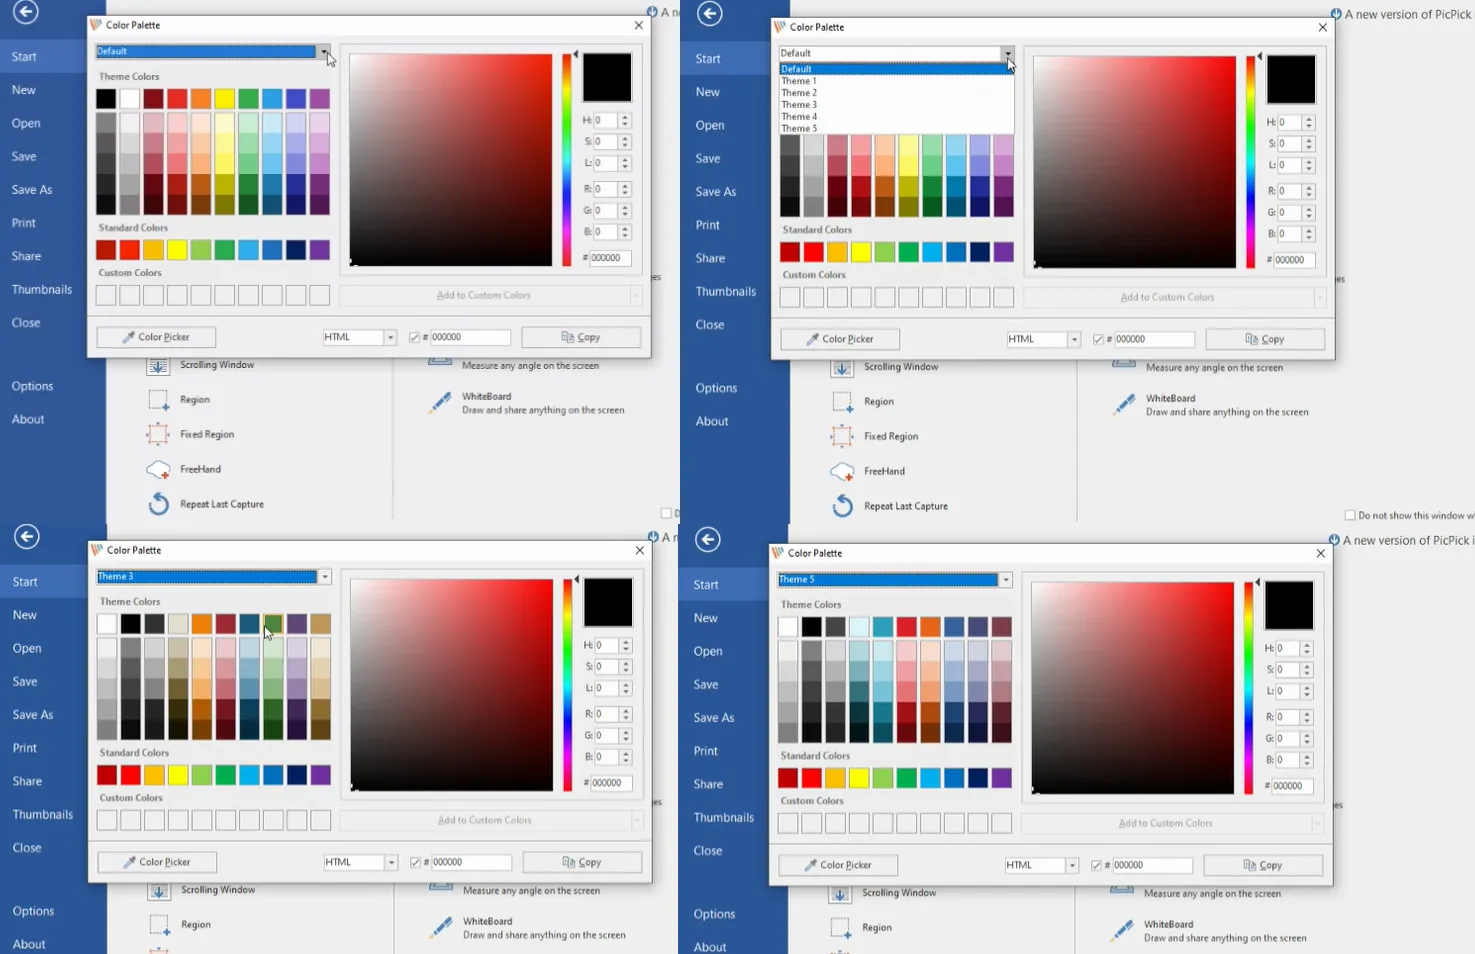
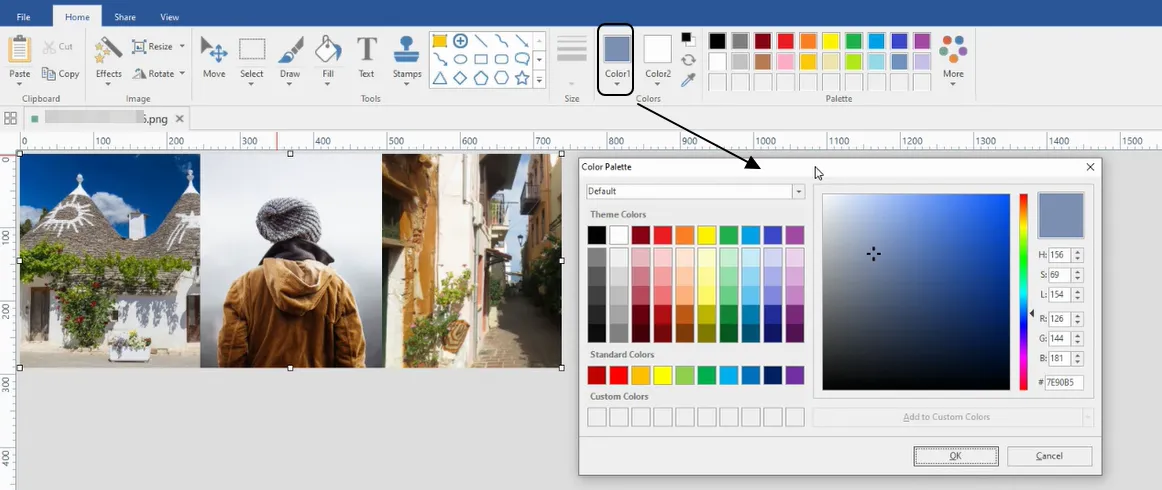
B. COLOR PALETTE – the same tool as the previous one, but instead of picking a color across your screen, you can select it from the prepared palette. There are a few patterns available. Everything works on the same basis as described partially above (Pic. 12, 13).
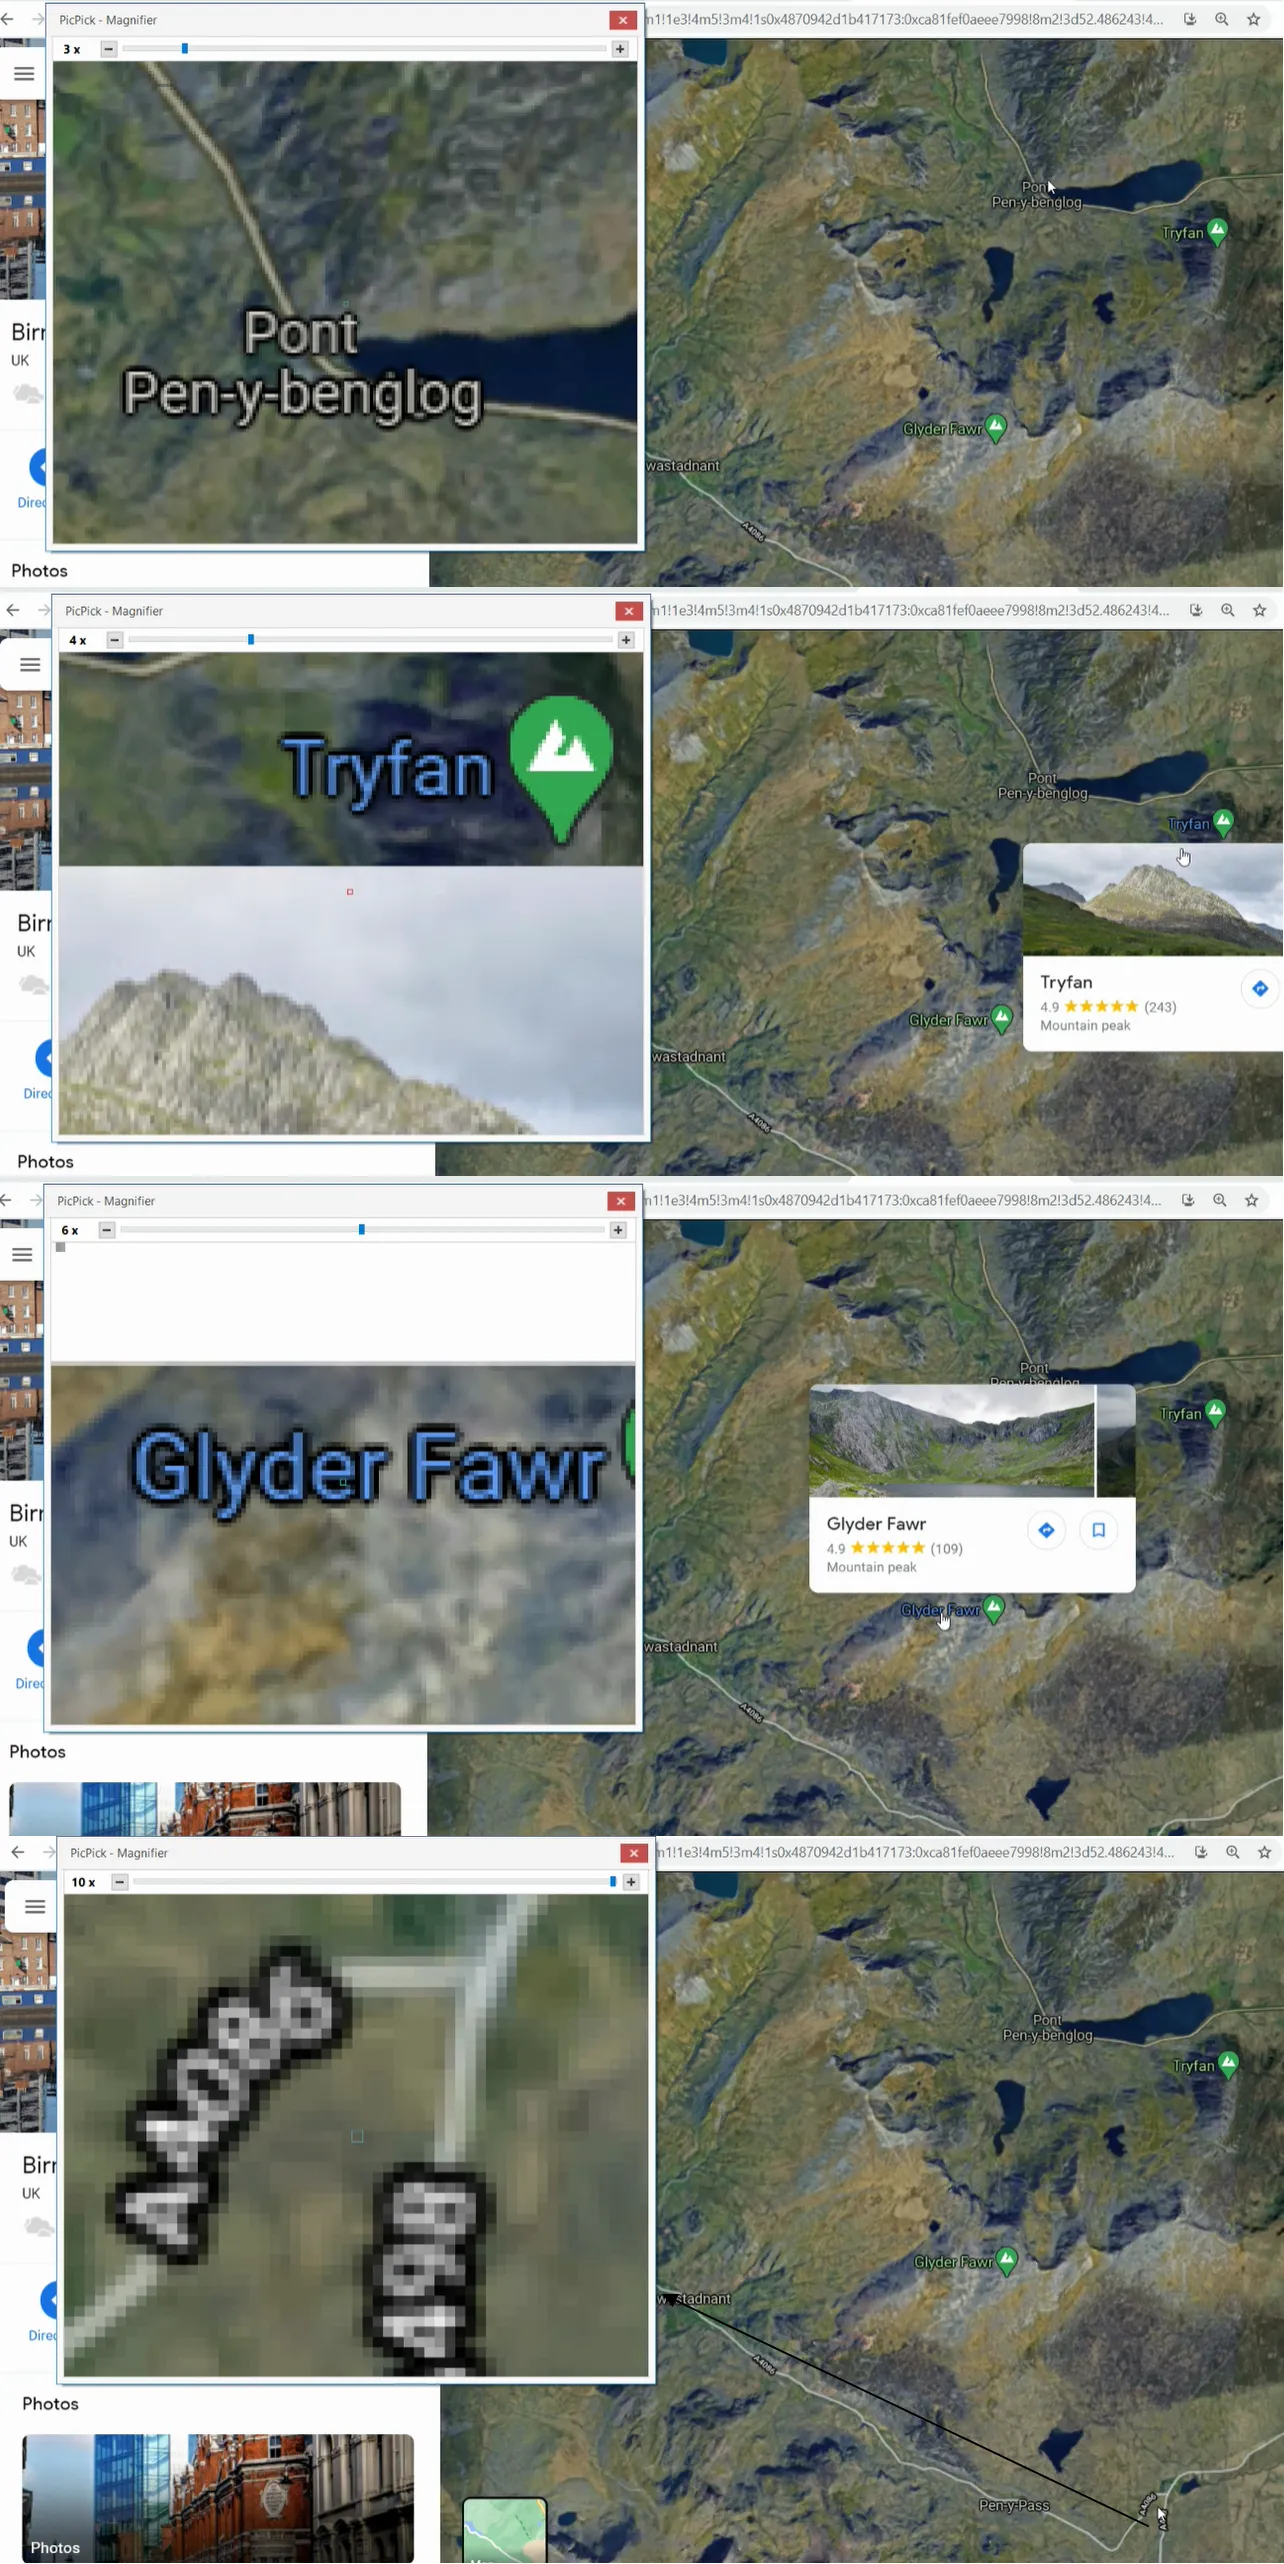
C. MAGNIFIER – useful function, unless you don’t exceed the enlargement. You have the scale up to 10x digital zoom, although your view might be too pixelated. It’s handy when you want to find some interesting elements in the image you working on (Pic. 14).
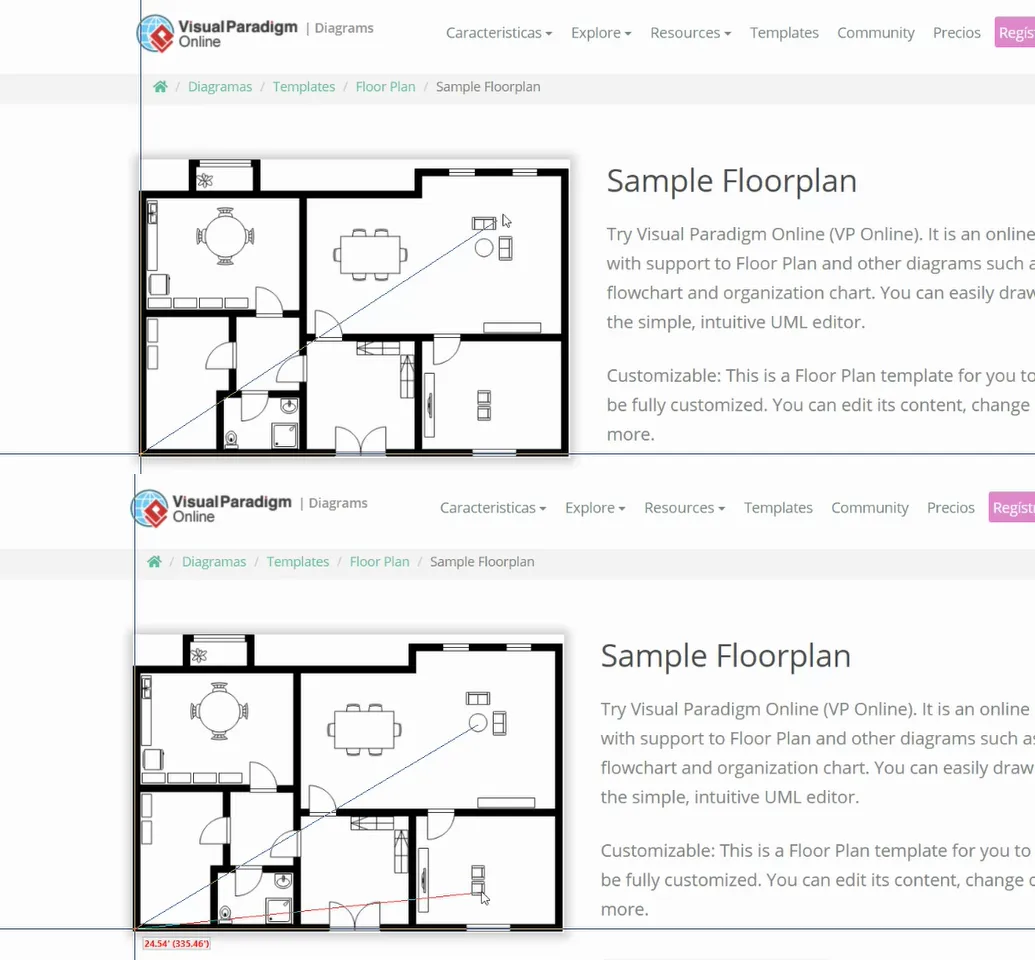
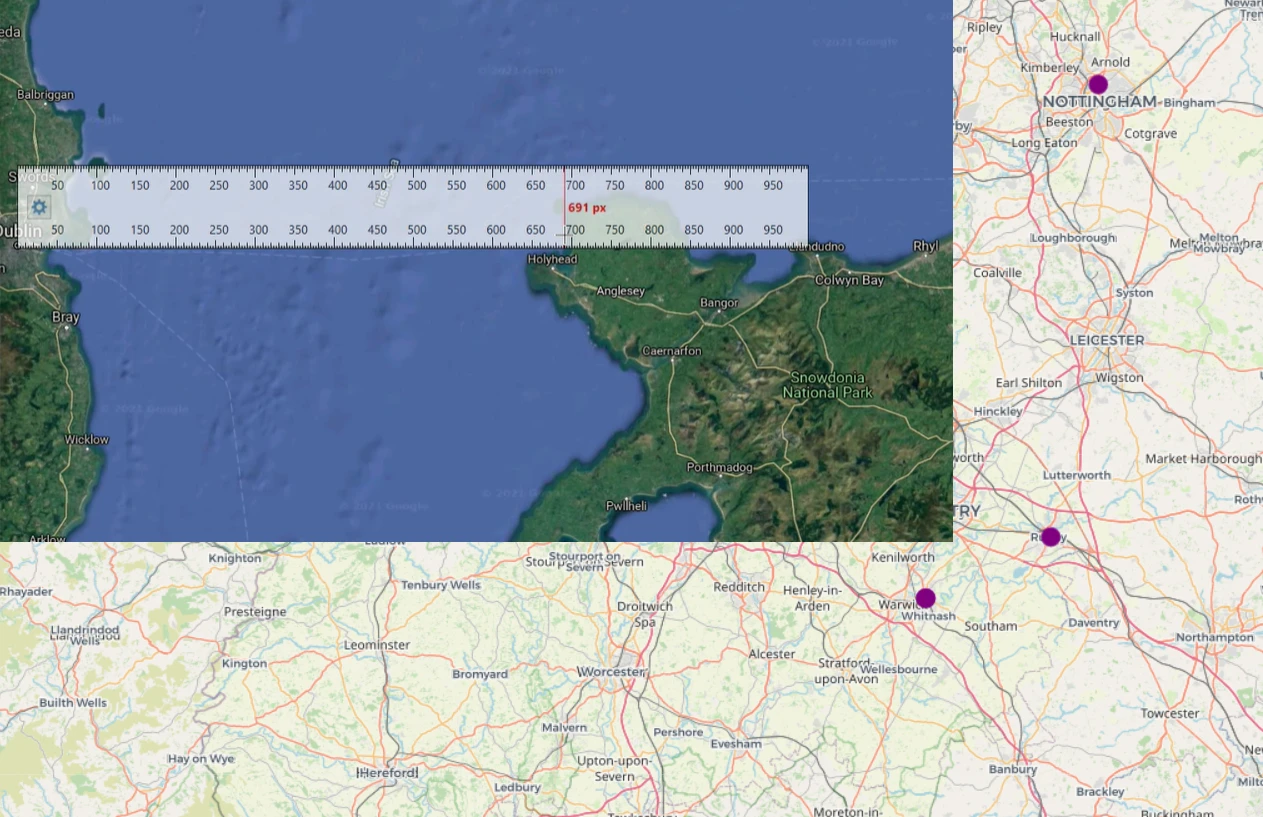
D. PIXEL RULER – an interesting tool, which can be used when you need roughly to know your image width. It works both for horizontal and vertical dimensions (Pic. 15).
The tool offers also a few other options like changing the ruler color or transparency. The most important, however, is the possibility of changing the units from pixels to centimeters and inches (Pic. 16).
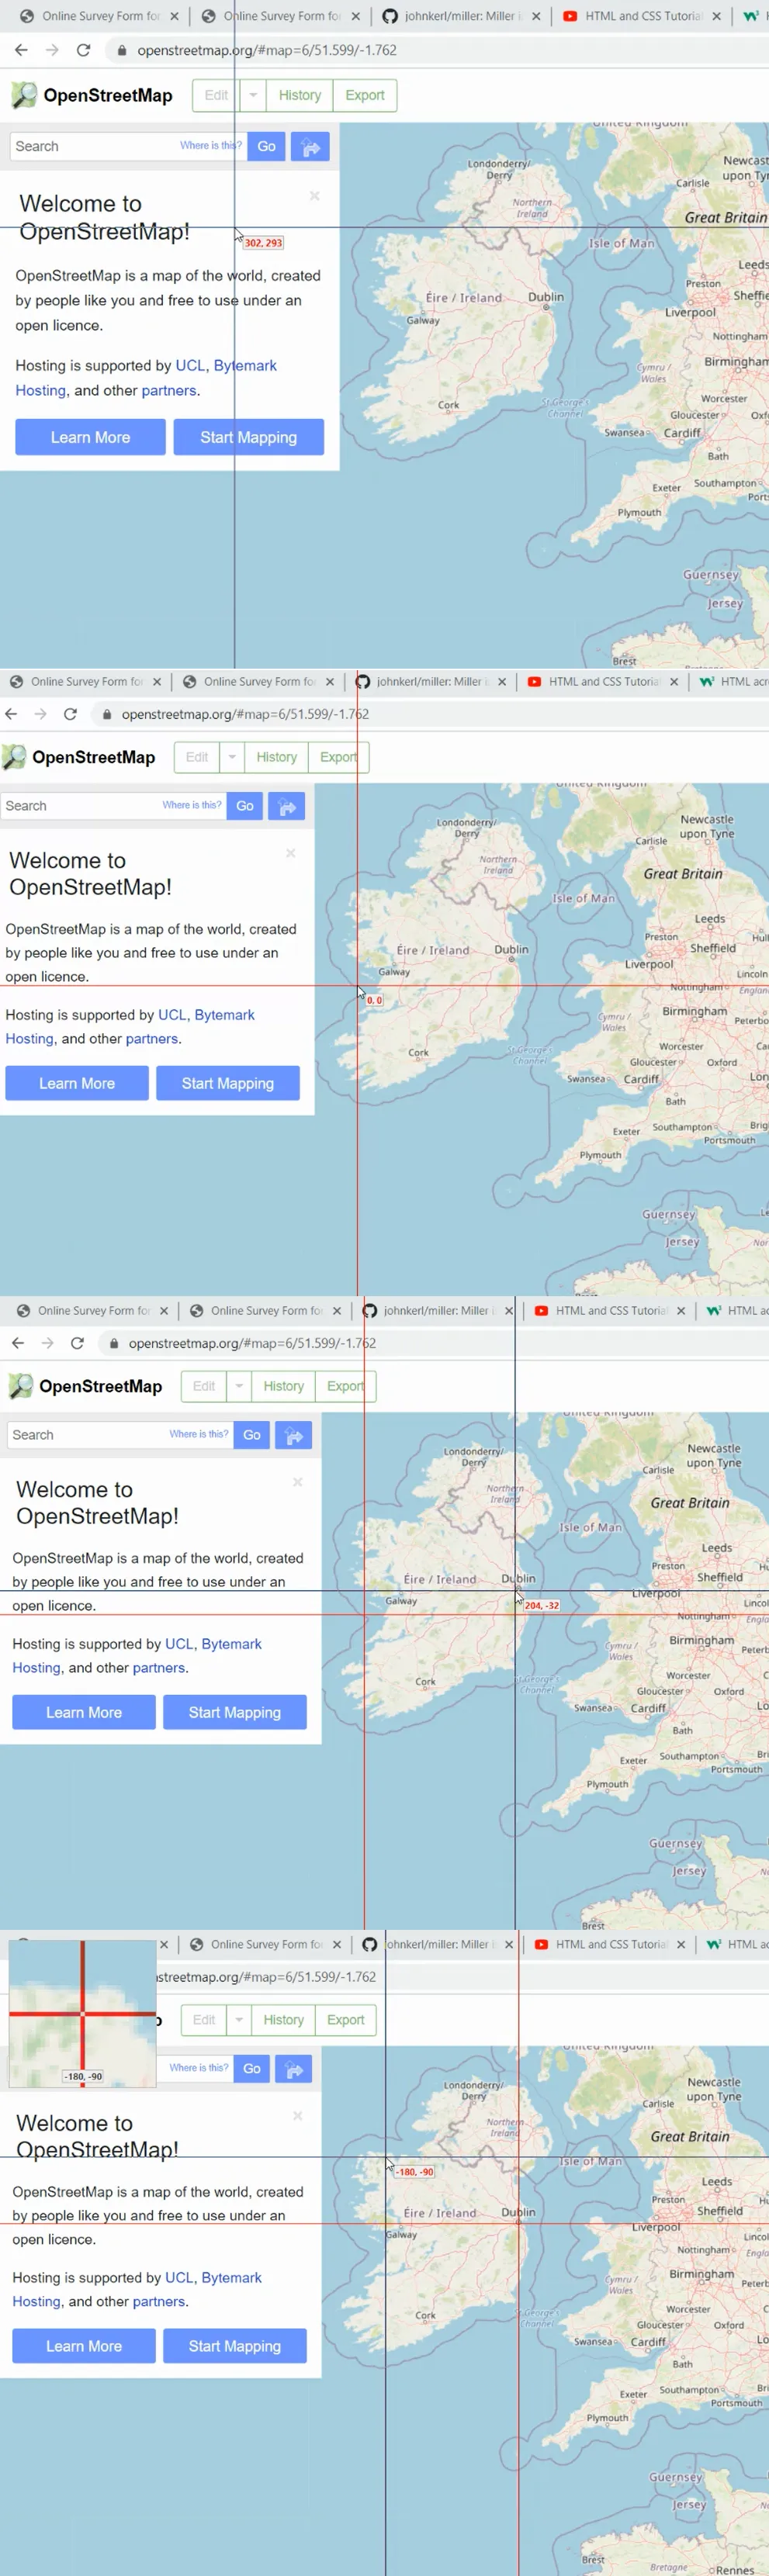
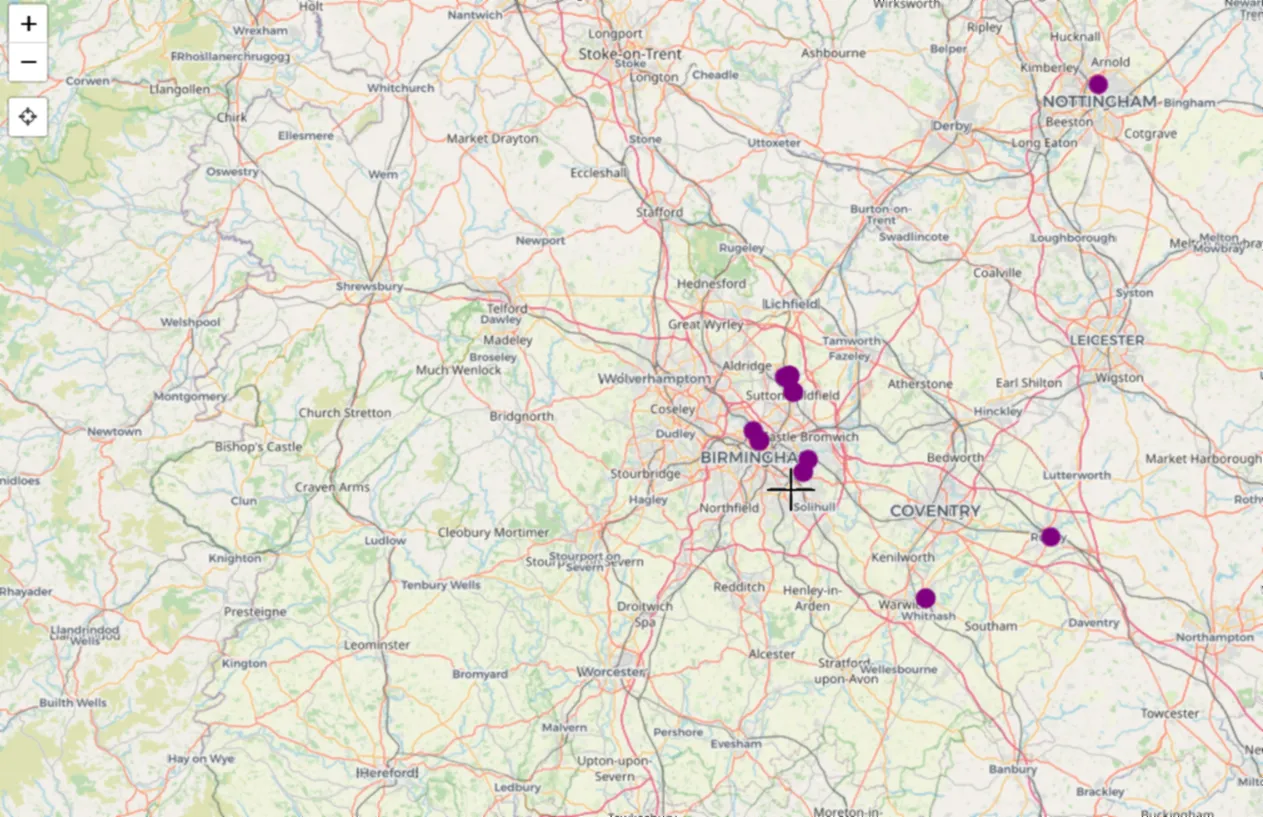
E. CROSSHAIR – another useful tool, which defines the coordinates of our screen. They are calculated from the top left corner, contrary to the Cartesian coordinate system (Pic. 17).
You can also capture the place on your screen, which you want to refer to later. Since your mouse clicked somewhere, the cross lines become red and the coordinates are nullified. Then after moving your mouse, everything is calculated by referring to the last point (Pic. 18).
F. PROTRACTOR – nice tool for the angle measurements, as you can see below (Pic. 19).
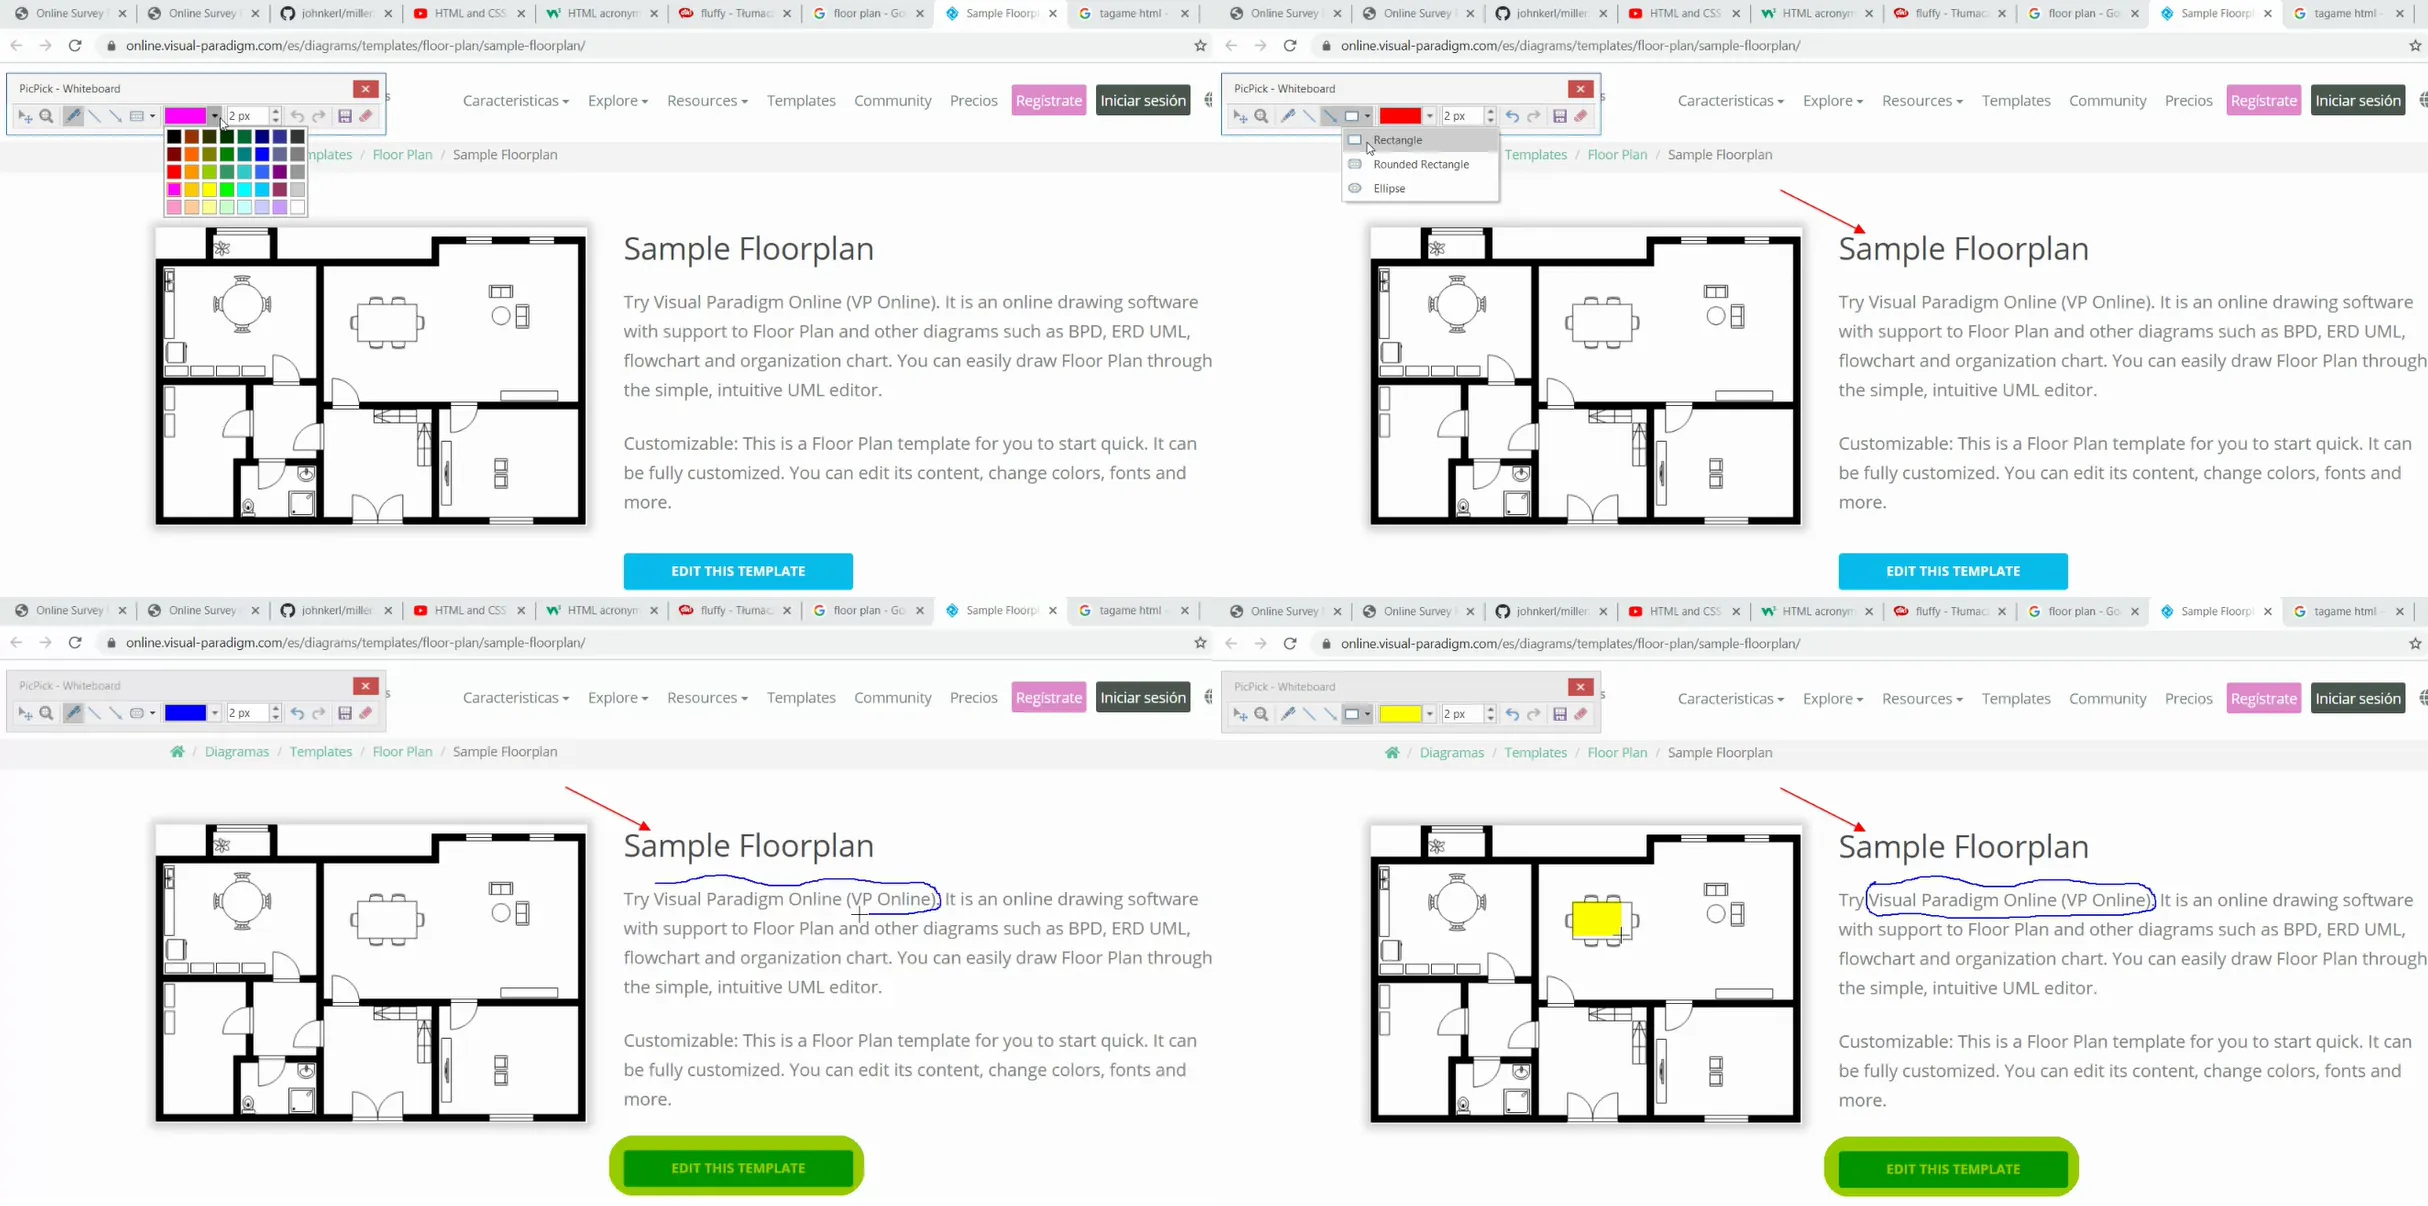
G. WHITEBOARD – Perfect option for a screenshot if you need to mark something on the screen instantly. This option will definitely prevent you from forgetting something important. If you wish to bind some text or object, yet before the screenshot is taken, this choice will be the best for you! (Pic. 20, 21).
3. IMAGE PROCESSING ACCESSORIES
Let’s take a look at what the image processing panel looks like in the PicPick application. First of all, we will find there the elements, already described here, as they are available from the main panel tool. It definitely applies to the color section including the color palette, color picker, and alternatively, the color order, commonly known as Microsoft Paint tools (Pic. 22).
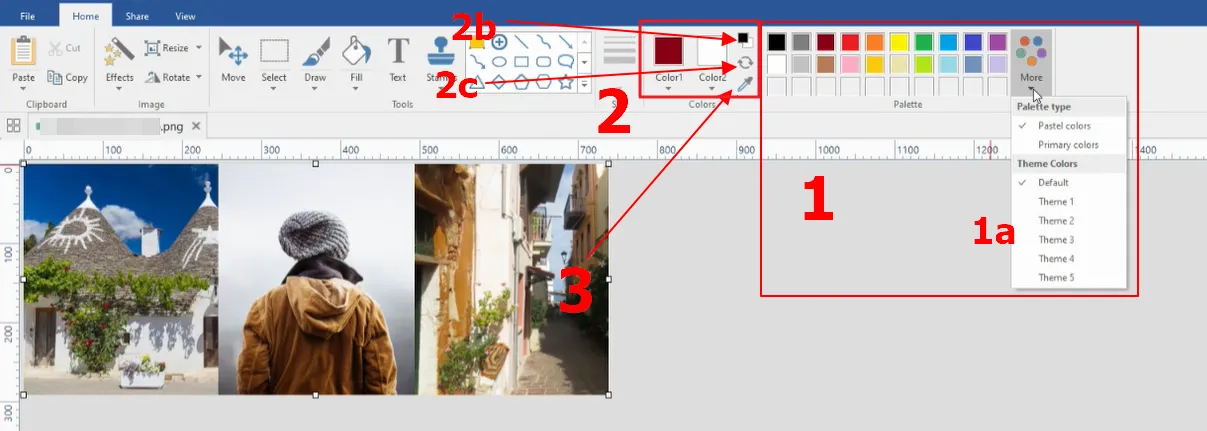
The color palette and color picker were widely discussed above (Pic. 12 – 13). Here I would like to elaborate more about other image processing features, which might be quite interesting for you.
The next options towards the left are: the line & border size scale and the shapes panel (Pic. 25).
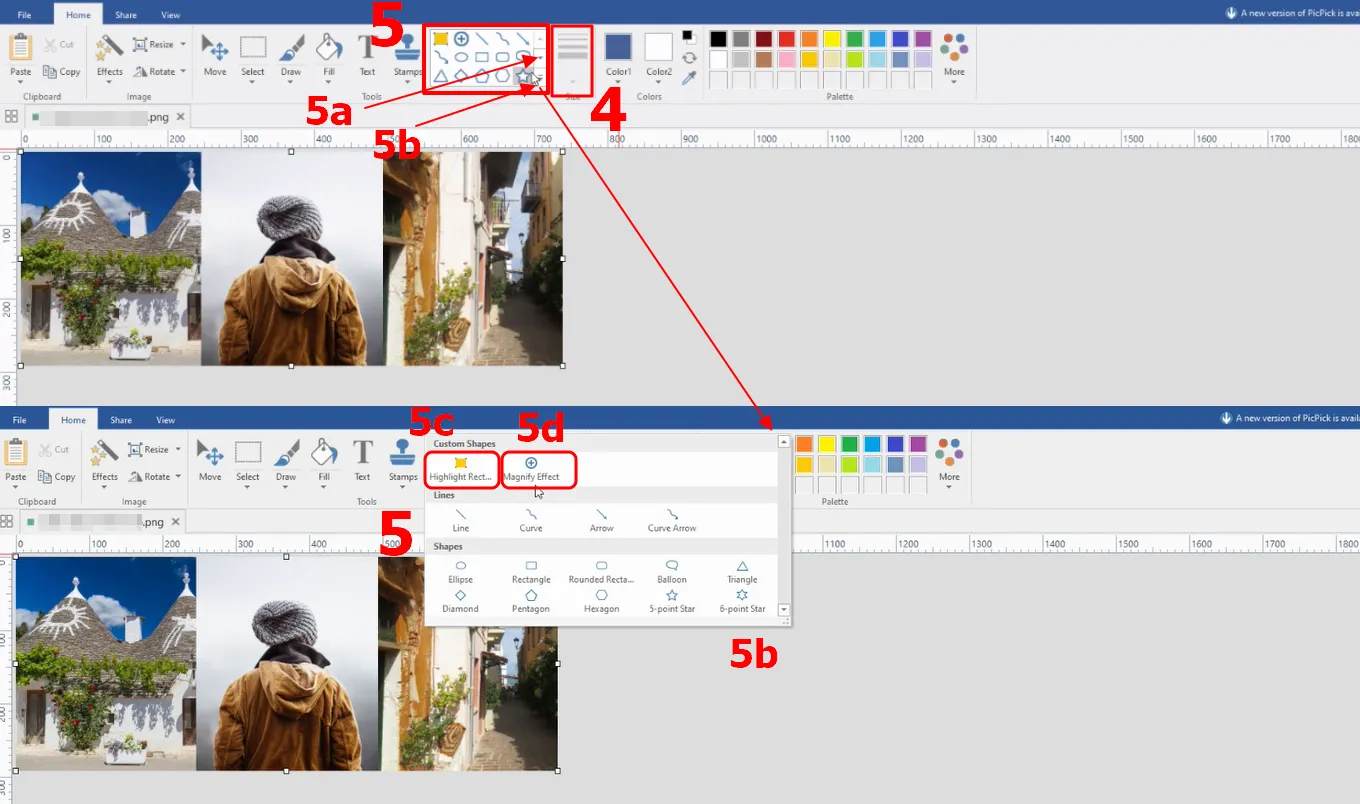
When you start drawing shapes, you should have an additional menu available, giving you more options for customizing your shape. Not to mention, that you can set its color, border thicknesses, and opacity (Pic. 26).
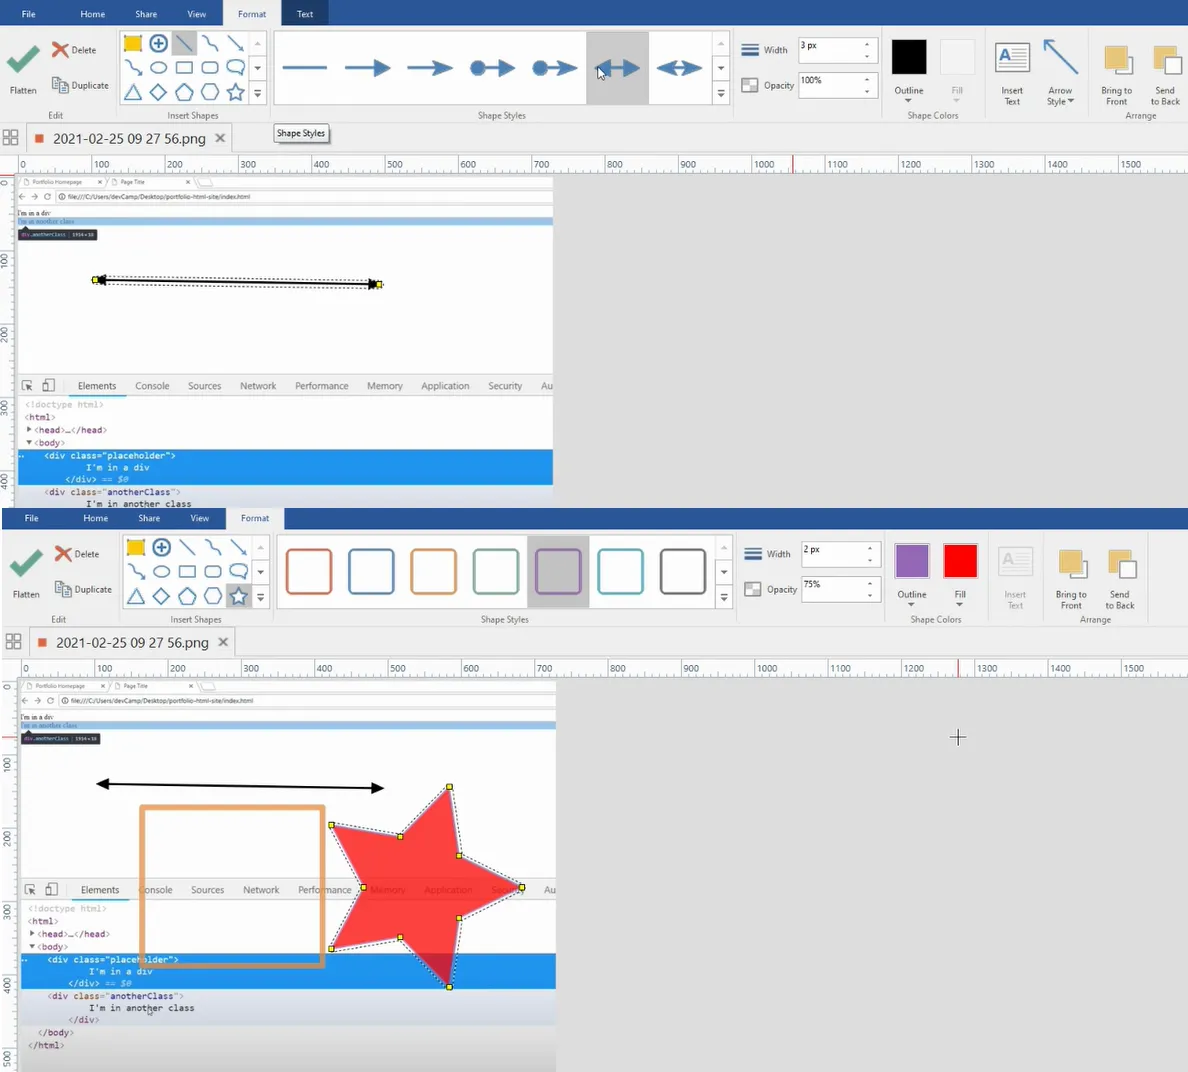
However, I believe, that the most important options are located in the top left corner of the shapes panel. They are the “Highlight rectangle” and the “Magnify effect“. The highlighted rectangle comes initially in yellow color, although you can change it easily thereafter (Pic. 27).

A magnifying effect is a quaint option. It works as a magnifying glass. Once the enlarged piece of our screenshot is created (by dragging the bounds), you can move it wherever you want (Pic. 28).
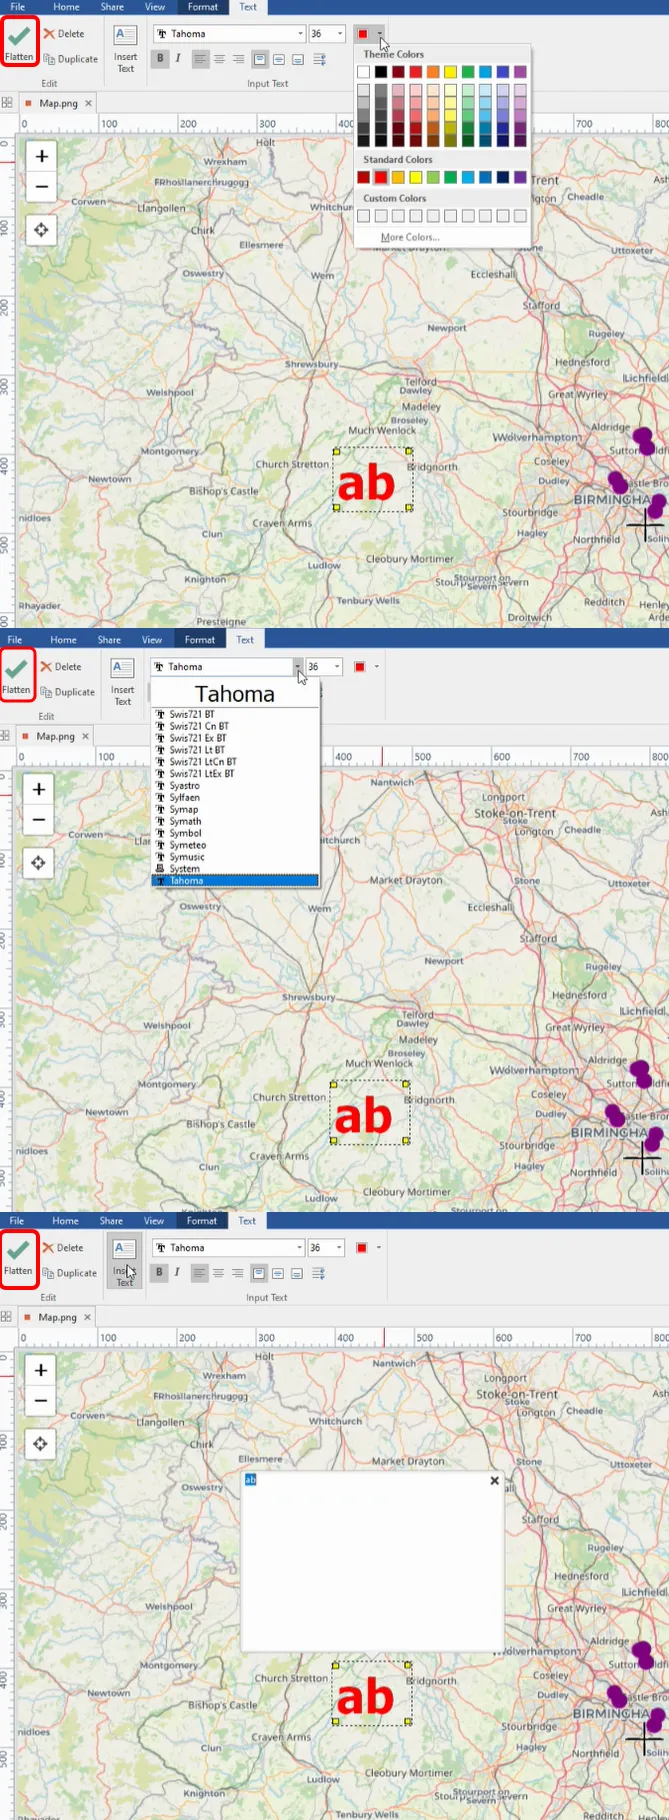
Going further, we have other options. Quite interesting are stickers, which we can place everywhere in our screenshots. Moreover, we can also change them later by choosing the other one from the bar. They work analogically to the object pasted, whose size can be changed by dragging the box corner (Pic. 29). We can do everything until the object is flattened. It means, that it has been firmly integrated with our screenshot and can’t be edited separately.
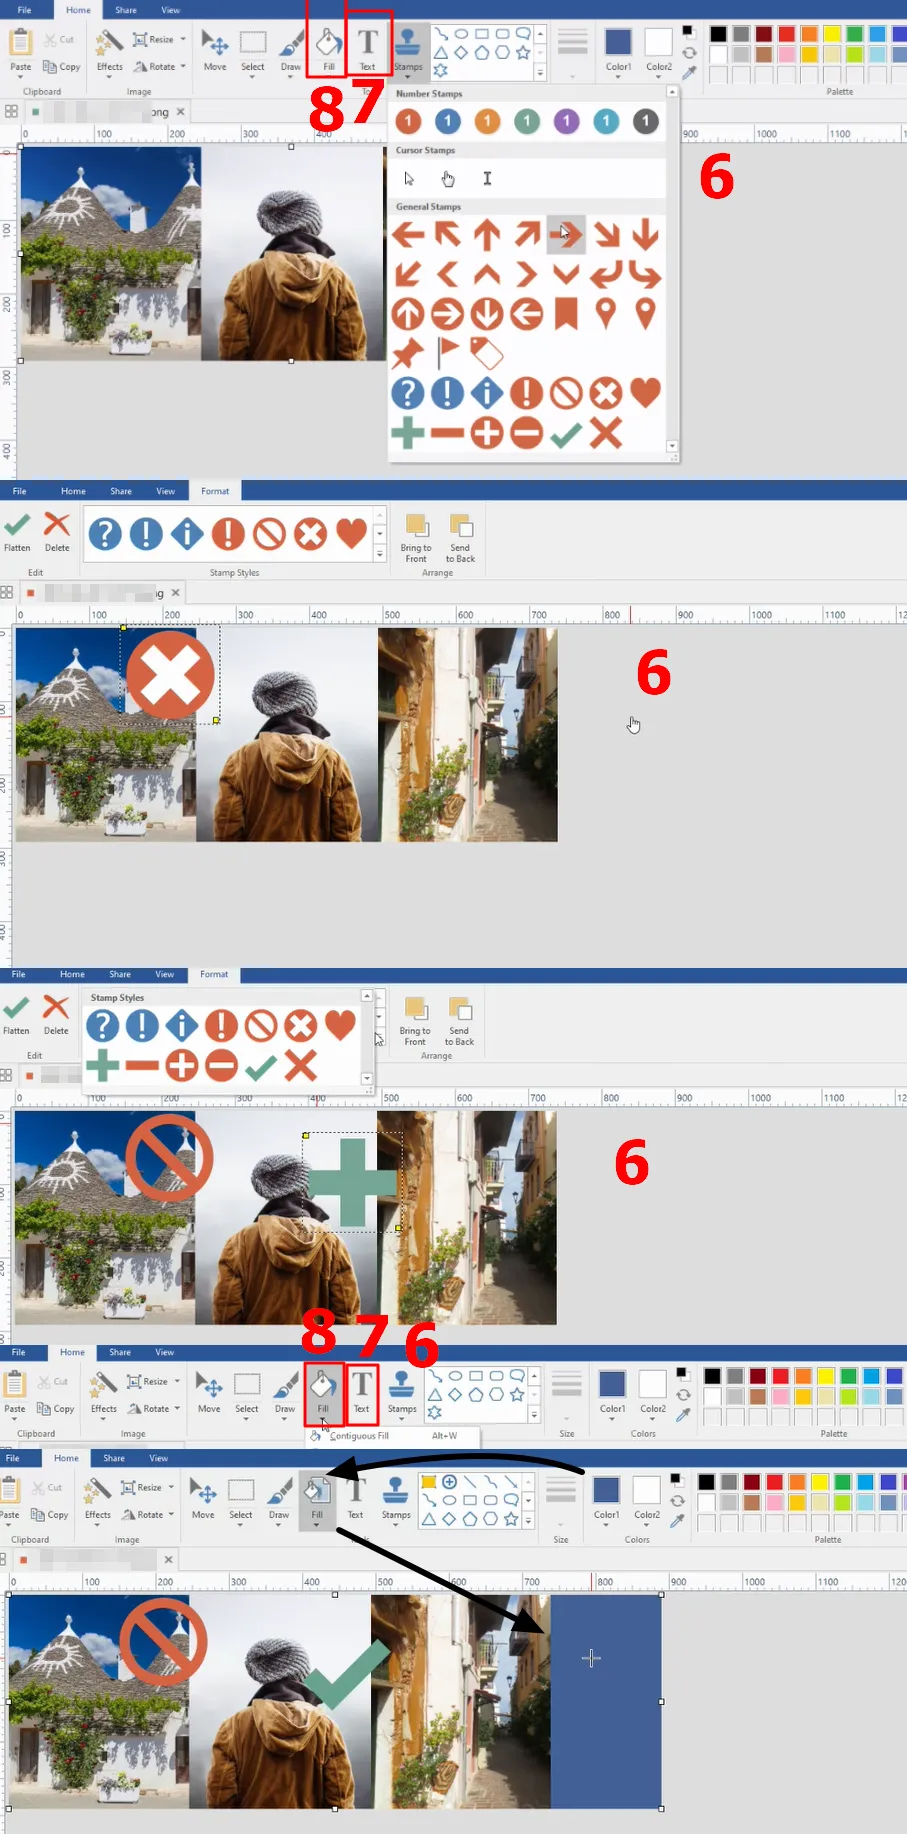
We have quite a few symbols, although their variety is restricted. Anyhow this option might be useful. We need to know, that it’s the screenshot application only not an advanced graphic tool. The color fill option seems to be exactly the same as we know from Paint. It was split here between the contiguous fill and color replacement fill. We know only contiguous fill from Microsoft Paint, where the color can be changed (filled) within a certain area as far as it continues across the image without any breakdowns. The color replacement fill is so much better because we can change the color across the entire image wherever it occurs (Pic. 30).
Between the symbols panel and fill options, we can find the text feature. Text options are quite poor here if I would be honest, they are a tad better than we know from Paint. Besides font type, font size, and color we can make some scant decisions about the placement of our text. On the other hand, there is no underline option, which is a shame (Pic. 31).
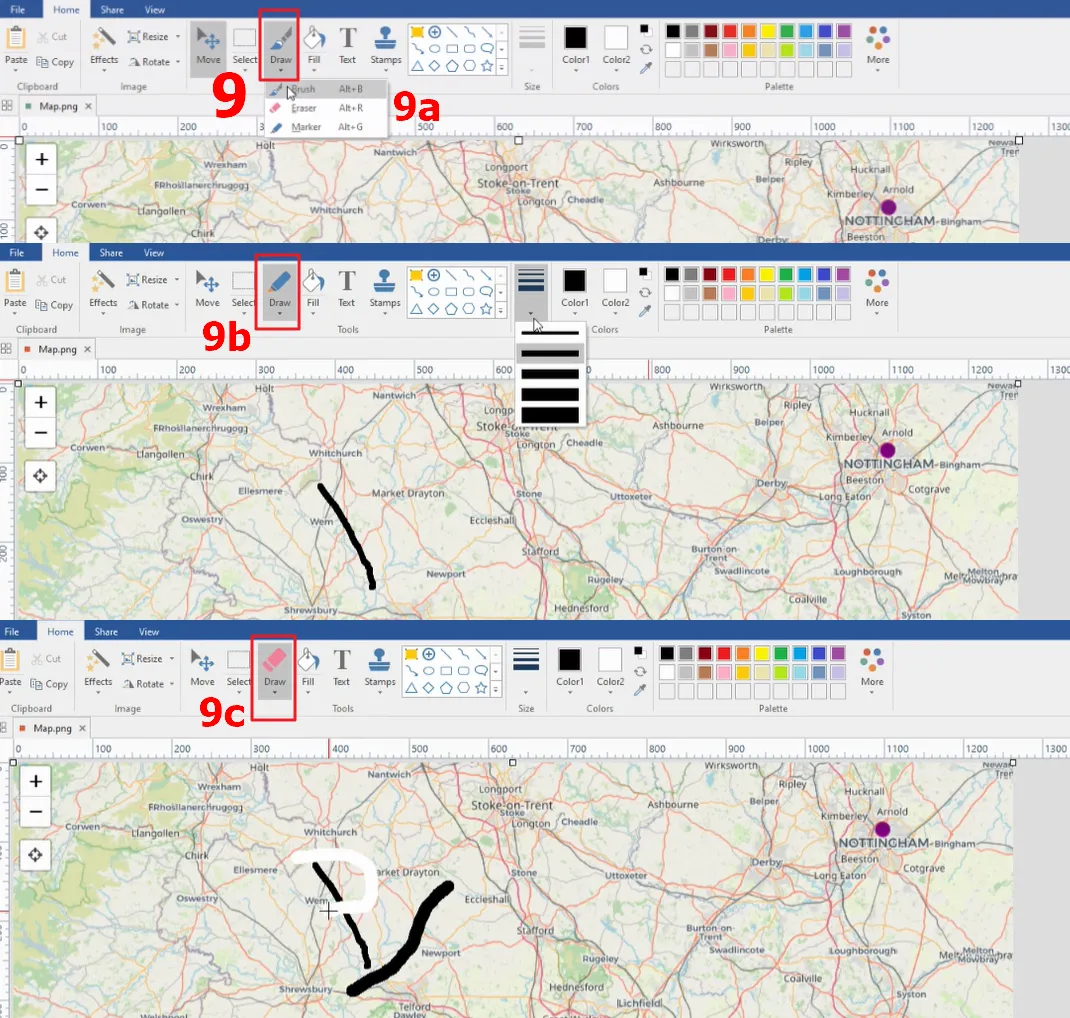
Let’s go to the drawing options, which lie at the very basis of any screenshot processing. Here we have effectively 2 options for drawing with the eraser feature. We have “Brush” and “Marker” options. The “Eraser” gives us the background color, which has been initially set as white. If you swap the colors (Pic 22, 2c) then the eraser will return the color you defined initially for the foreground. I used the “Eraser” option for a white color anyway (Pic. 32).
An interesting option, obviously known already from Microsoft Paint is the selection. We can select both entire areas and make the rectangular selection (Pic. 33). The same as in the “Text” option, one option is missing against the Paint image editor panel. This time, we don’t have the free-form selection. Every selected rectangular section, as well as the other object provided (before flattening), can be moved to the other part of our image by using the “Move” option (Pic. 33).
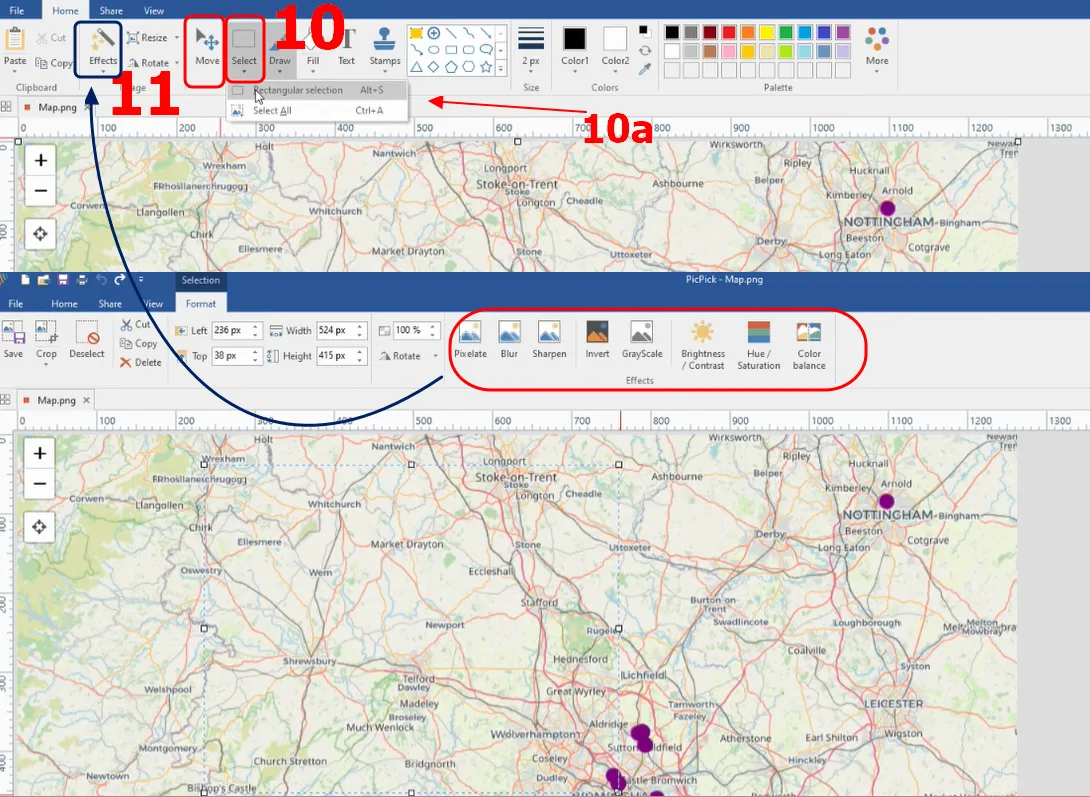
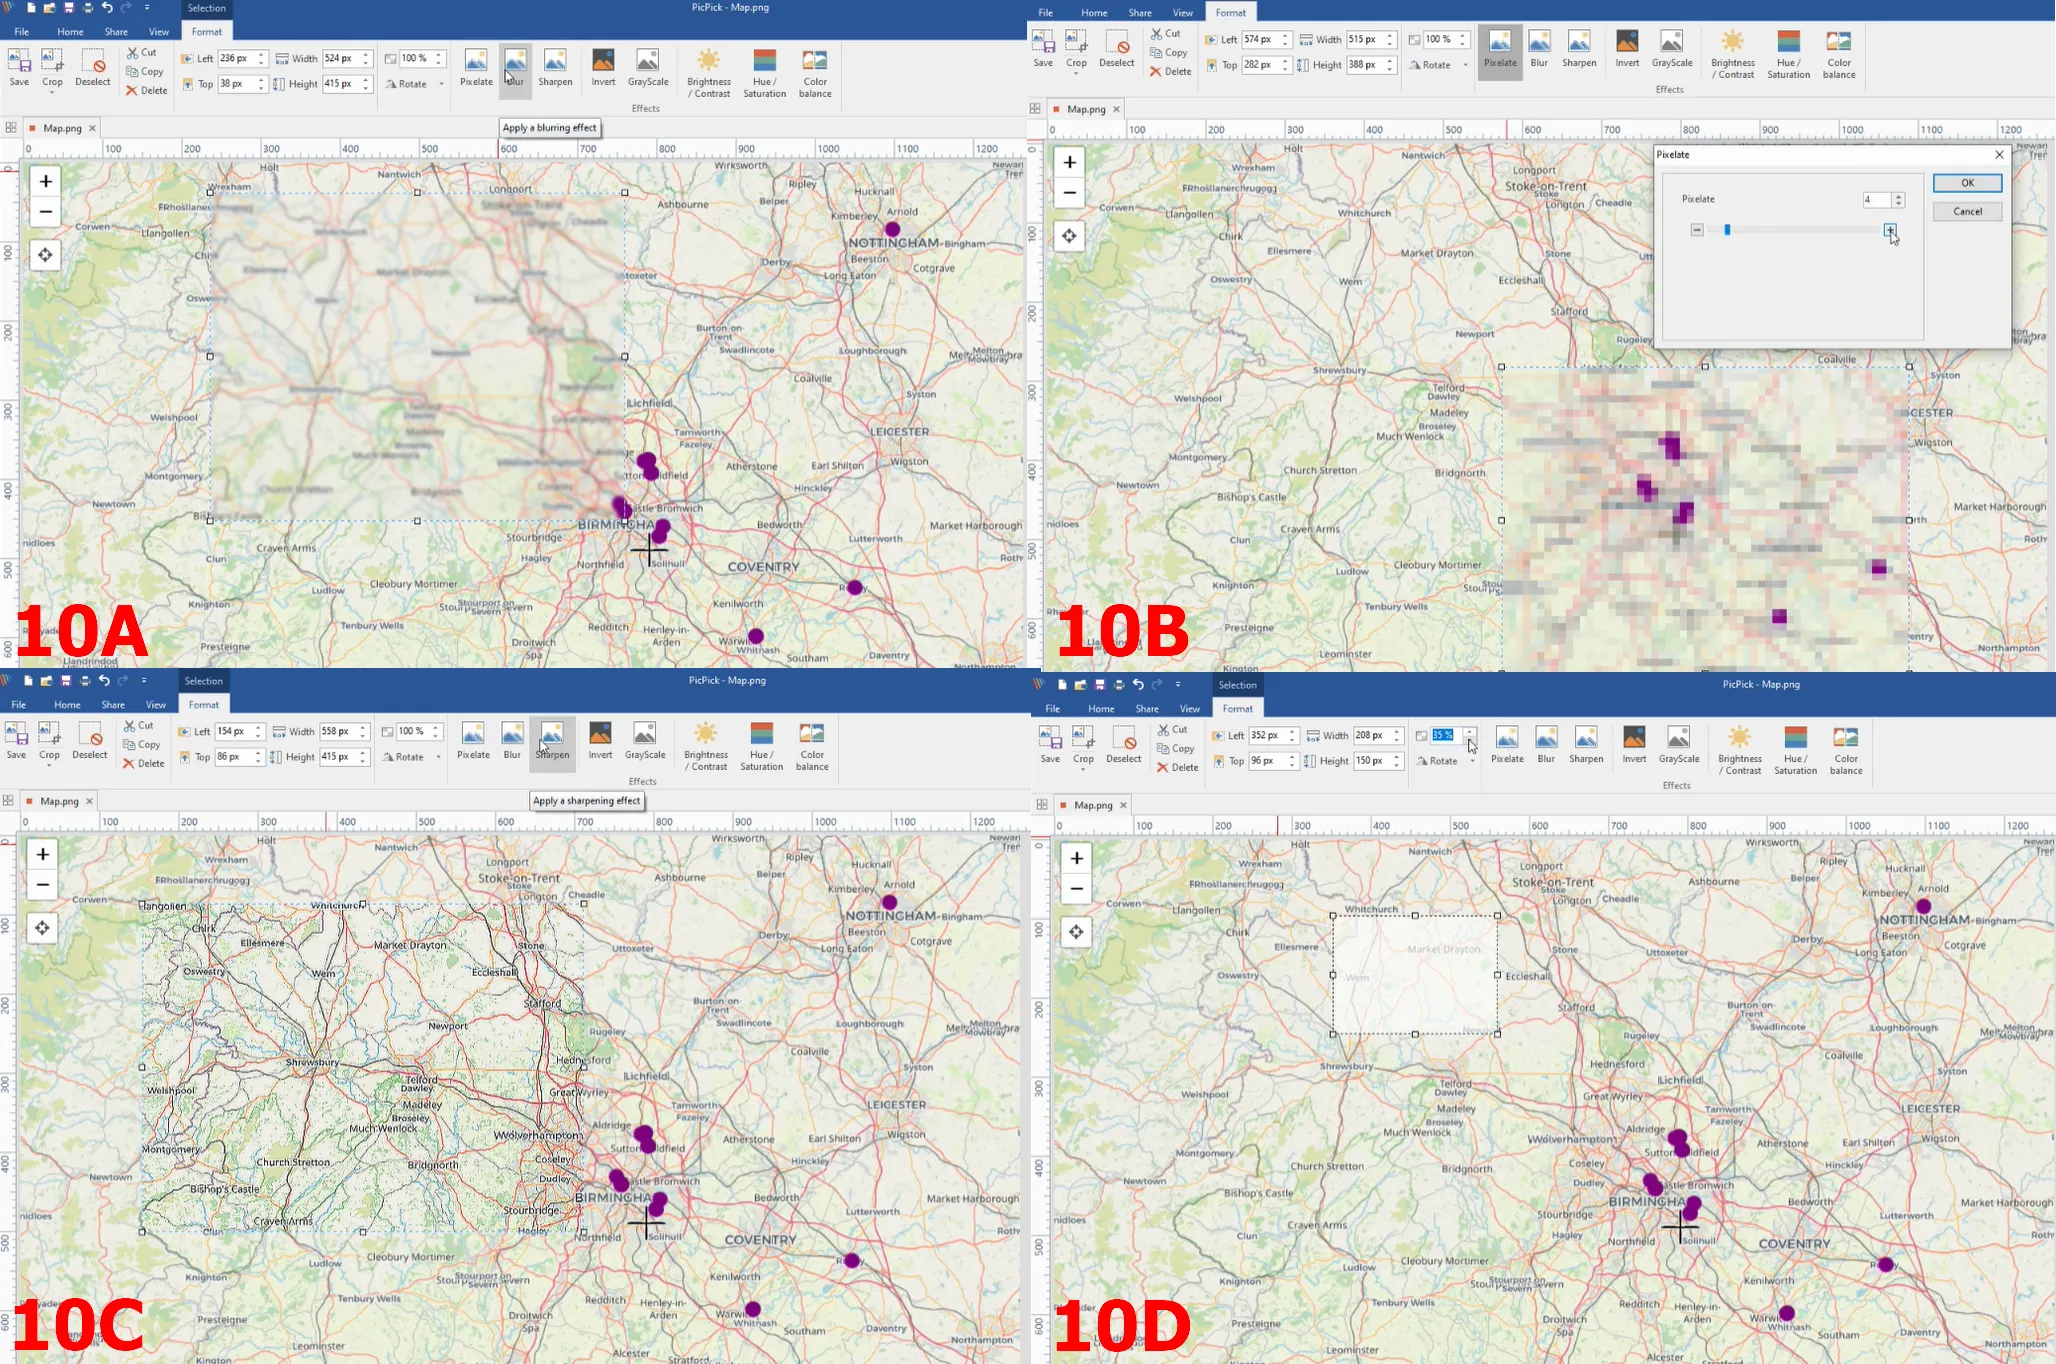
The most intriguing thing here is the auto-population of the “Effects” when some rectangular area is selected. It gives us the ability to make some alterations for this area certainly, leaving the remaining part of our image intact. Because the “Effects” section is to be described later, I am showing only a few examples beneath (Pic. 34). It’s worth mentioning, that apart from the “Effects” we can also resize our snippet or change its transparency (options just left of the “Effects” panel). On top of that, there are not all “Effects” populated. It’s most of them, which are truly dedicated to editions like this. We don’t have i.e. the “Watermark” and “Frame” there.
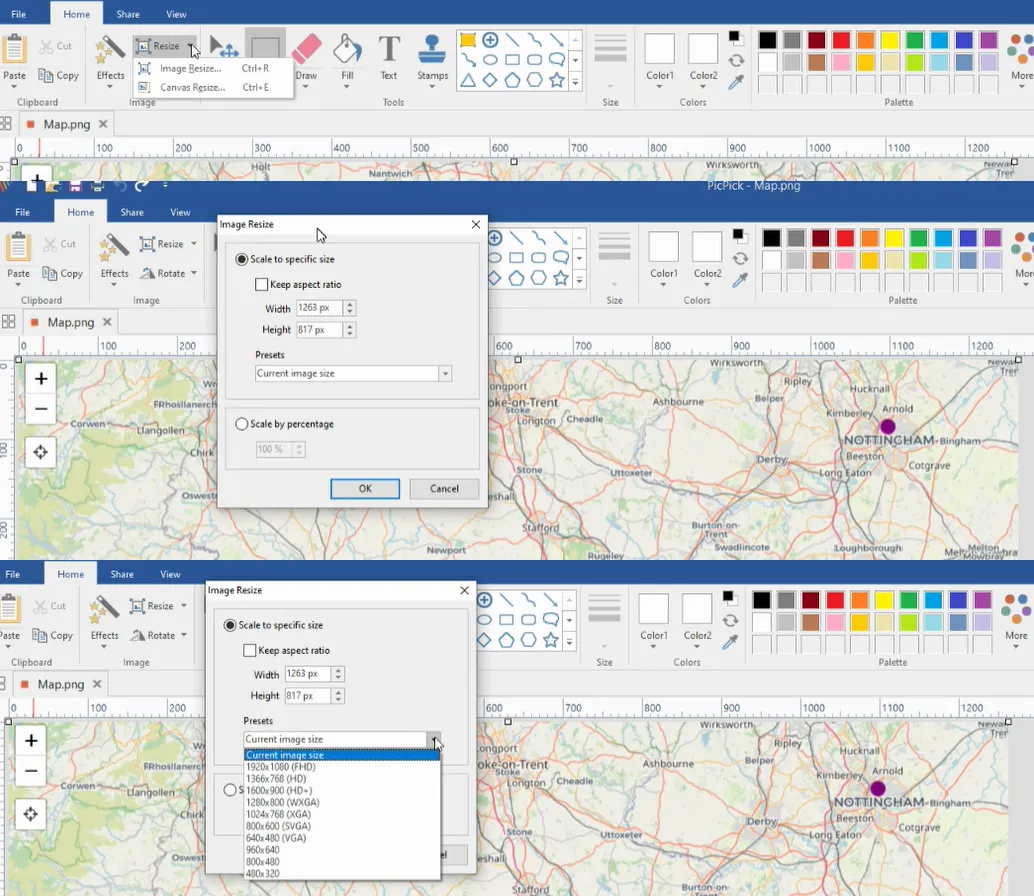
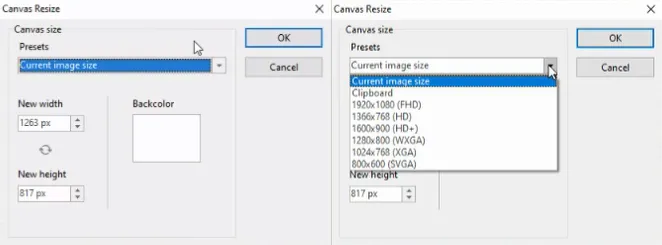
The “Resize” option is developed quite well. We have the option to scale it by pixels or percentage or adjust it to the common formats available (Pic. 35).
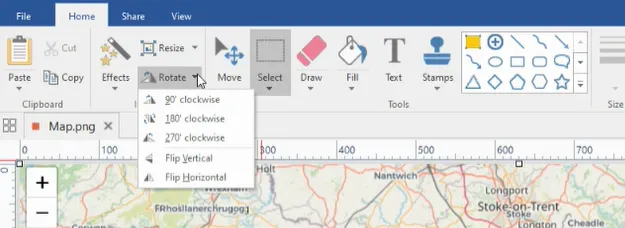
The “Rotate” options are the same as usual. We can spin our image (or selected object) in 90-degree steps or flip it (Pic. 37).
Now let’s go to the “Effects” – the most interesting set of options in the PicPick image editor. There are exactly 10 effects available (Pic. 38), which will be the subject of concern below.

We can combine all of them as we wish (Pic. 41).
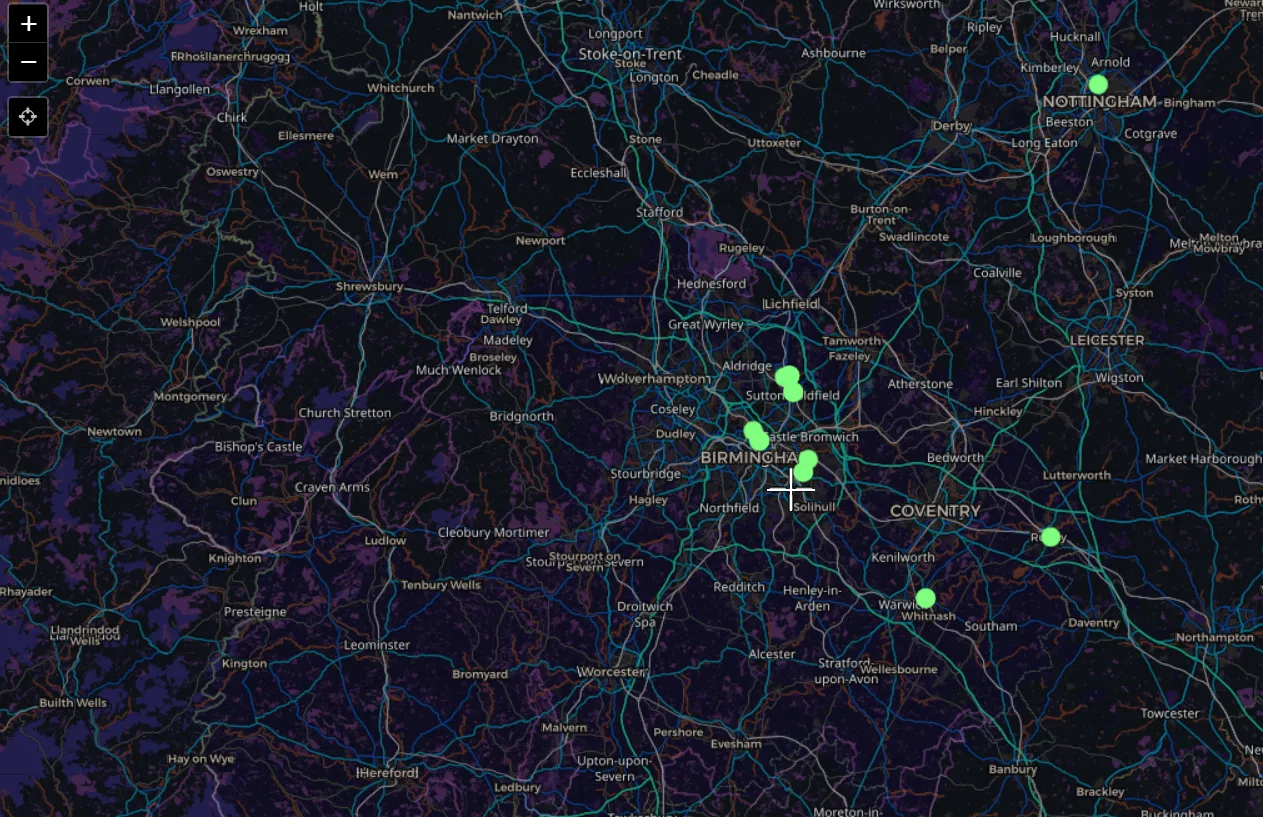
The “Invert” option turns our image coloration upside down.
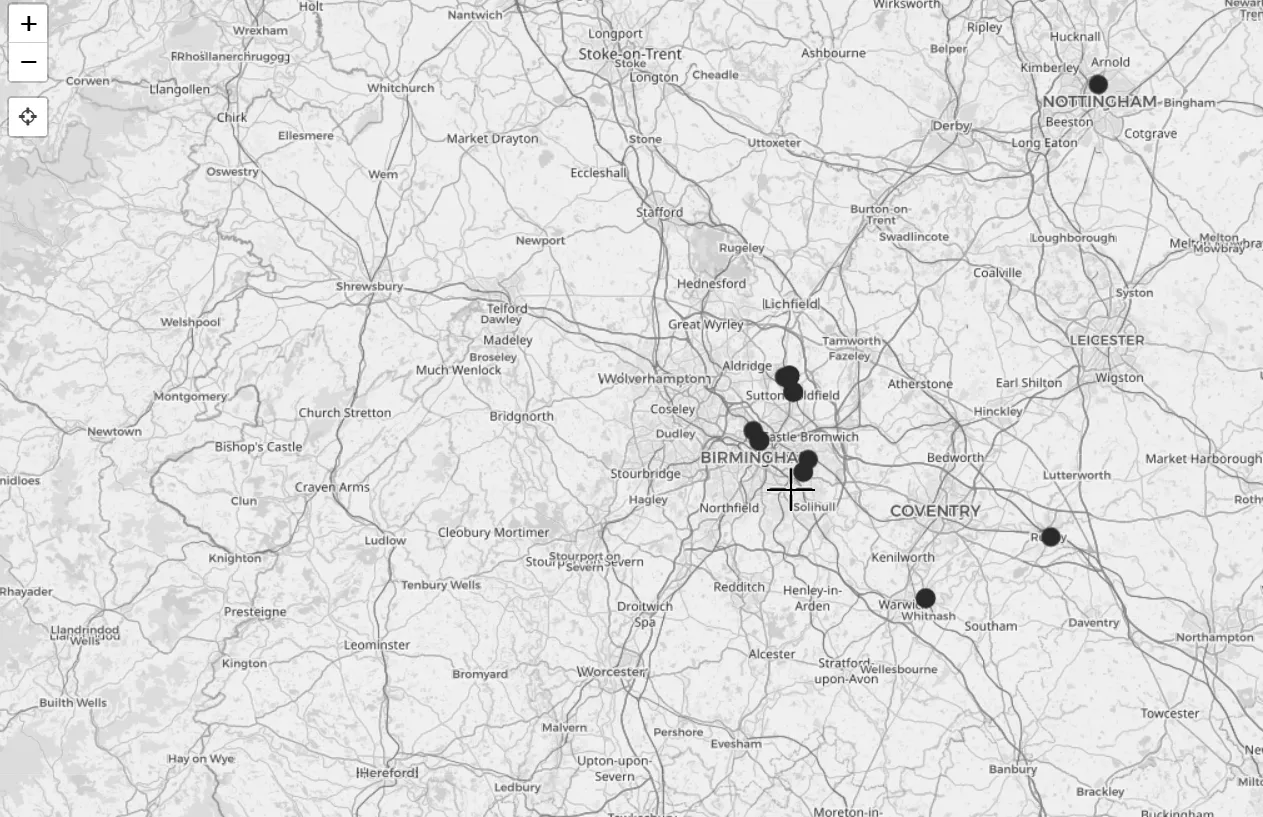
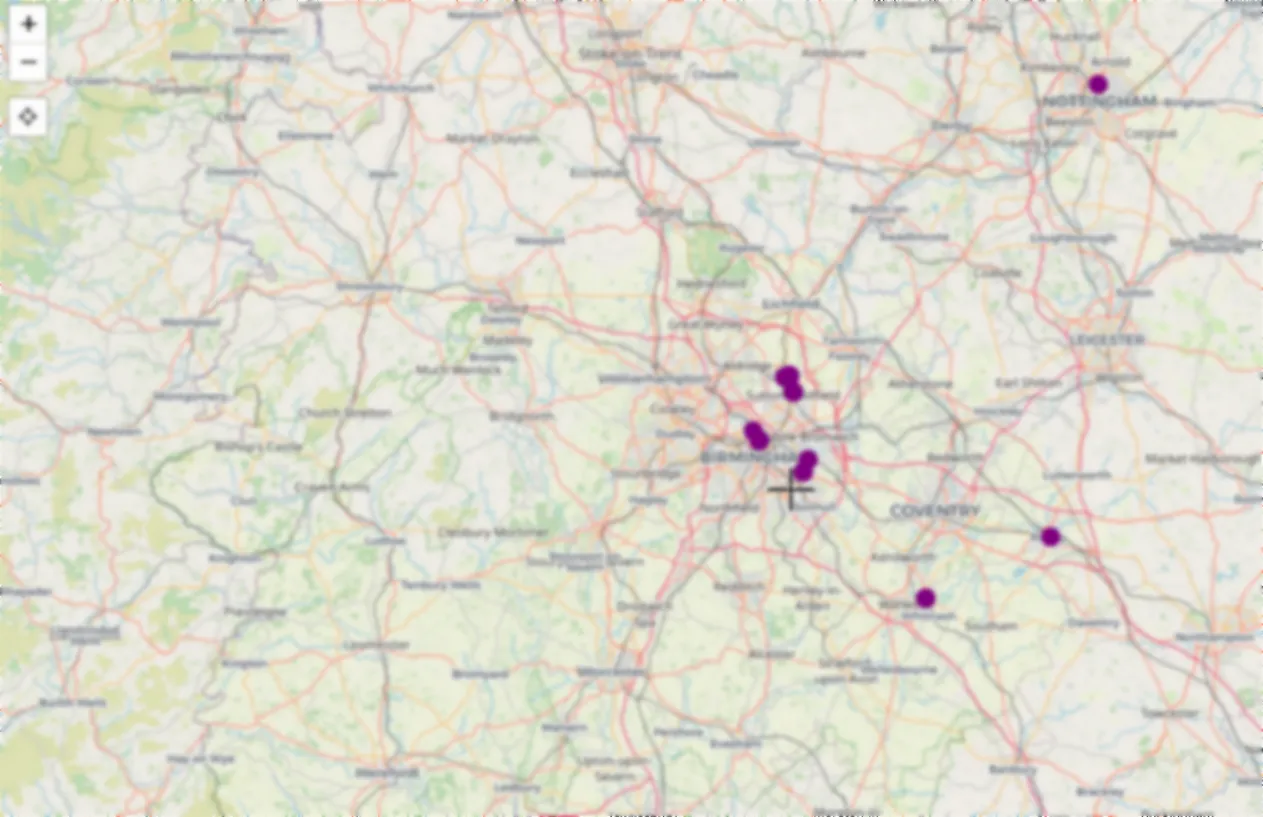
The “Grayscale” option washes out all the coloration, leaving our image in a black-and-white appearance.
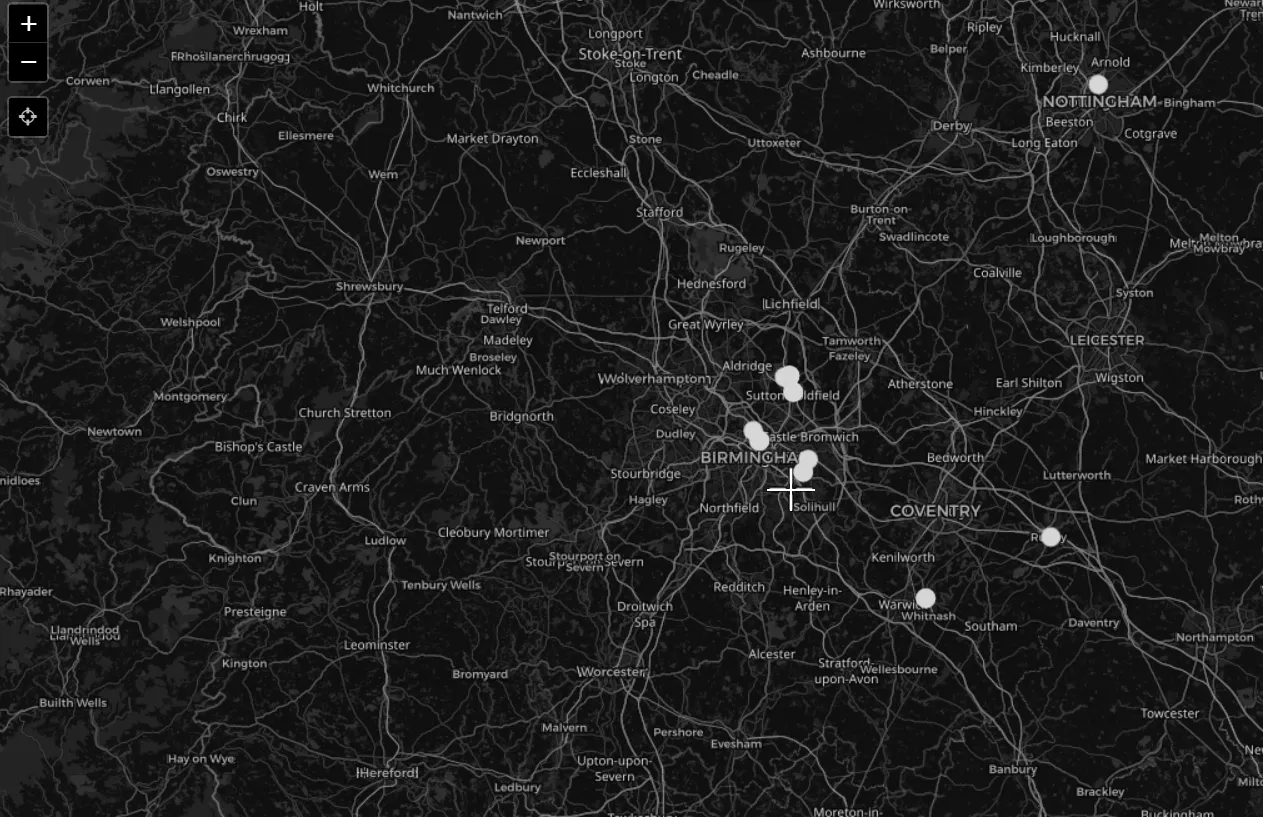
The “Pixelate” option is very useful if we want to hide some confidential parts of our image.
![]()
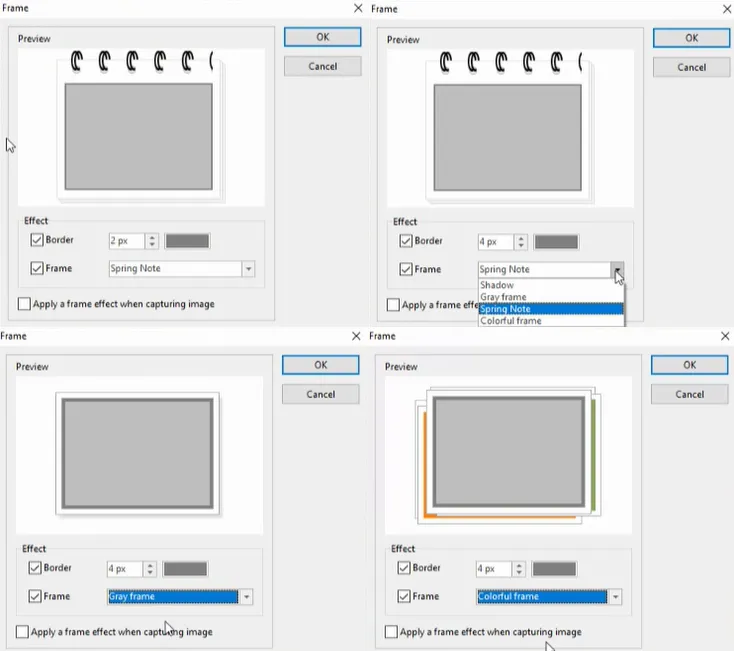
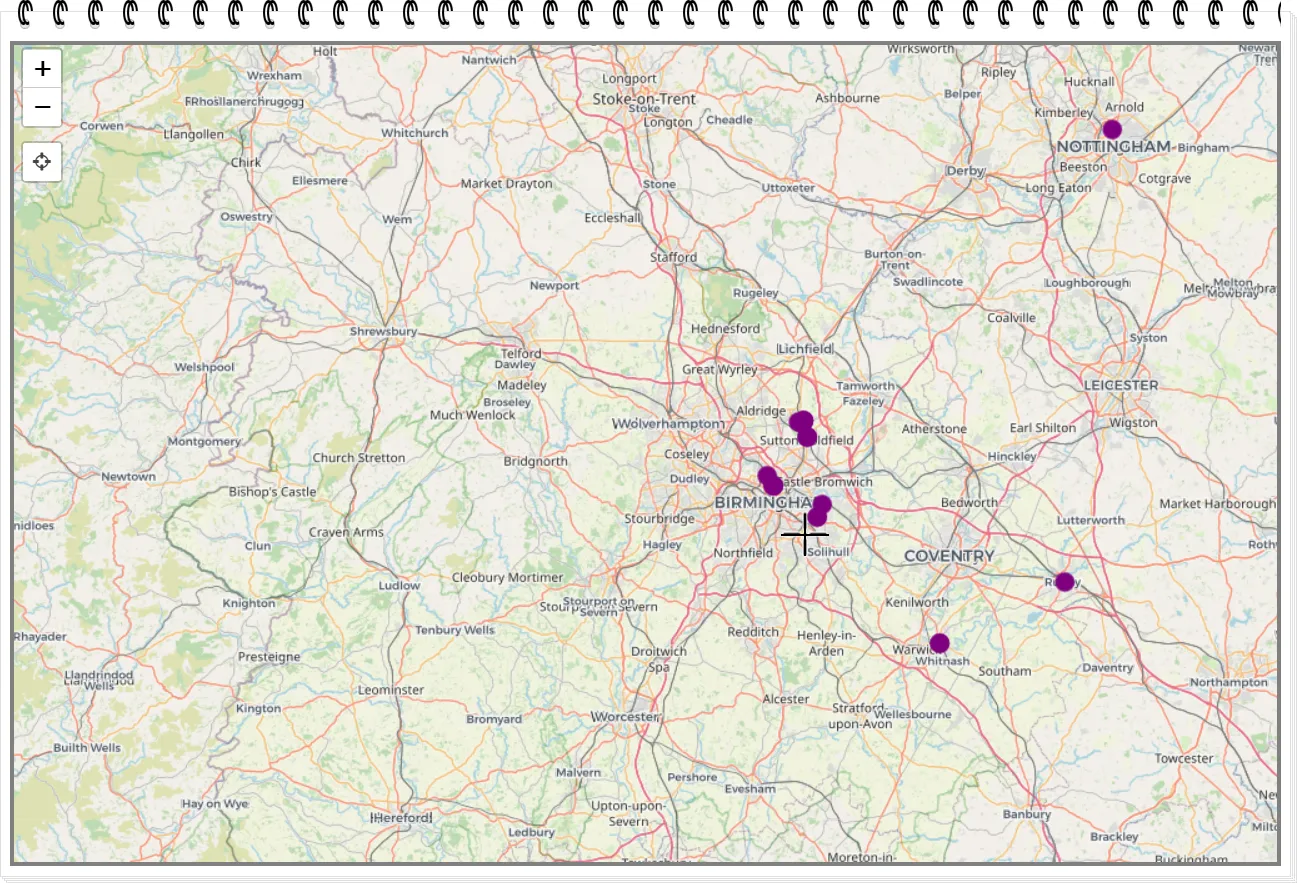
The “Frame” effect is represented by a few options, which can border your image nicely (Pic. 44 – 46).
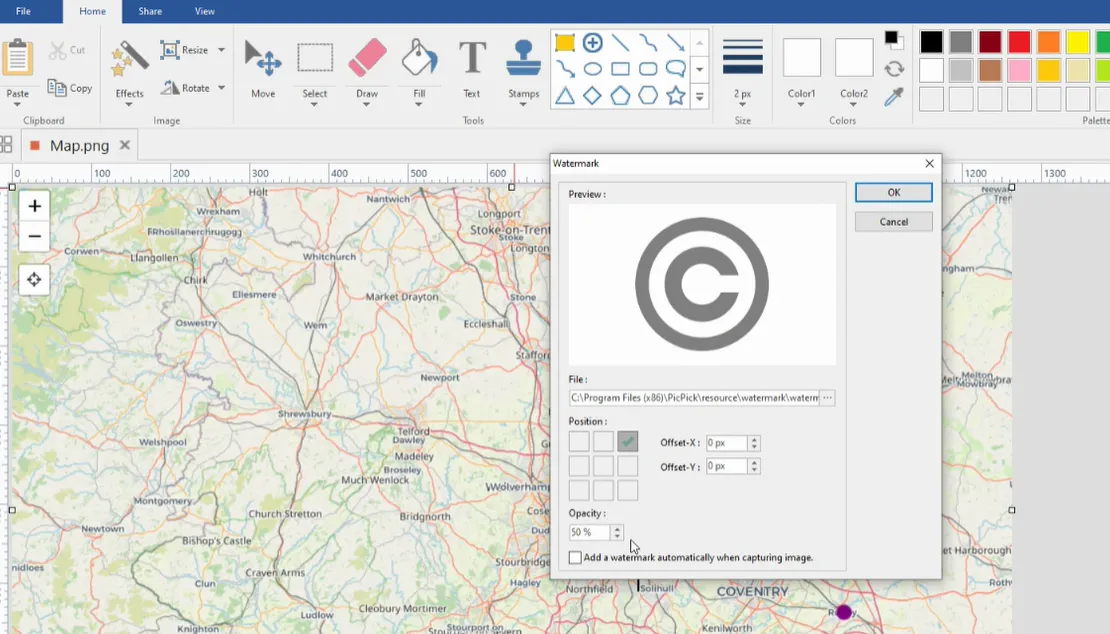
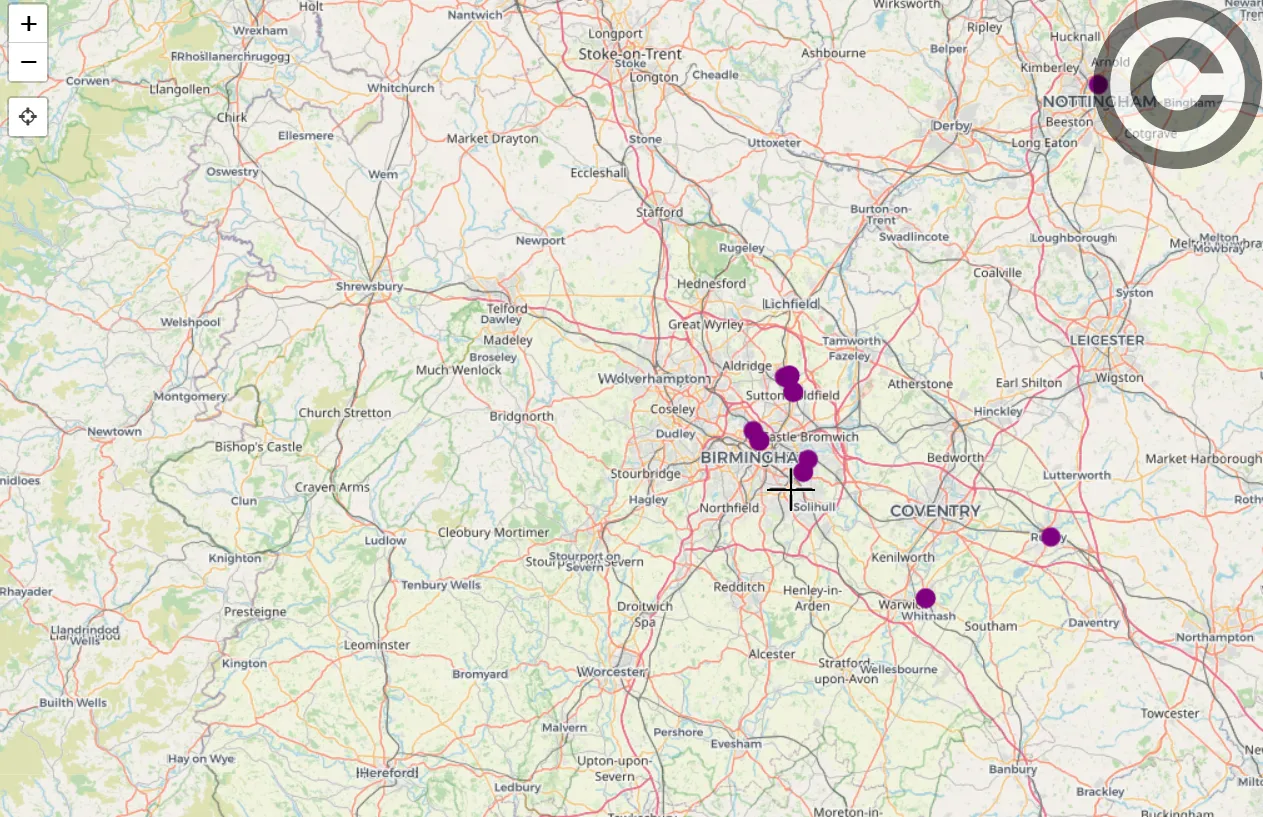
Another interesting, and for sure well-desired option for all publishers, photographers, and so on is the “Watermark” feature, especially since the tool gives an option to import your own.
We have a few possibilities to place our watermark in our image as well as the rough path where our watermark image is stored (Pic. 47, 48). You can also add it as a default when this option is set.
The “Blur” option is quite similar to pixelation but weaker. You must repeat it several times if you want to get a decent result, where all your confident numbers etc. will be covered properly (Pic. 49, 50).
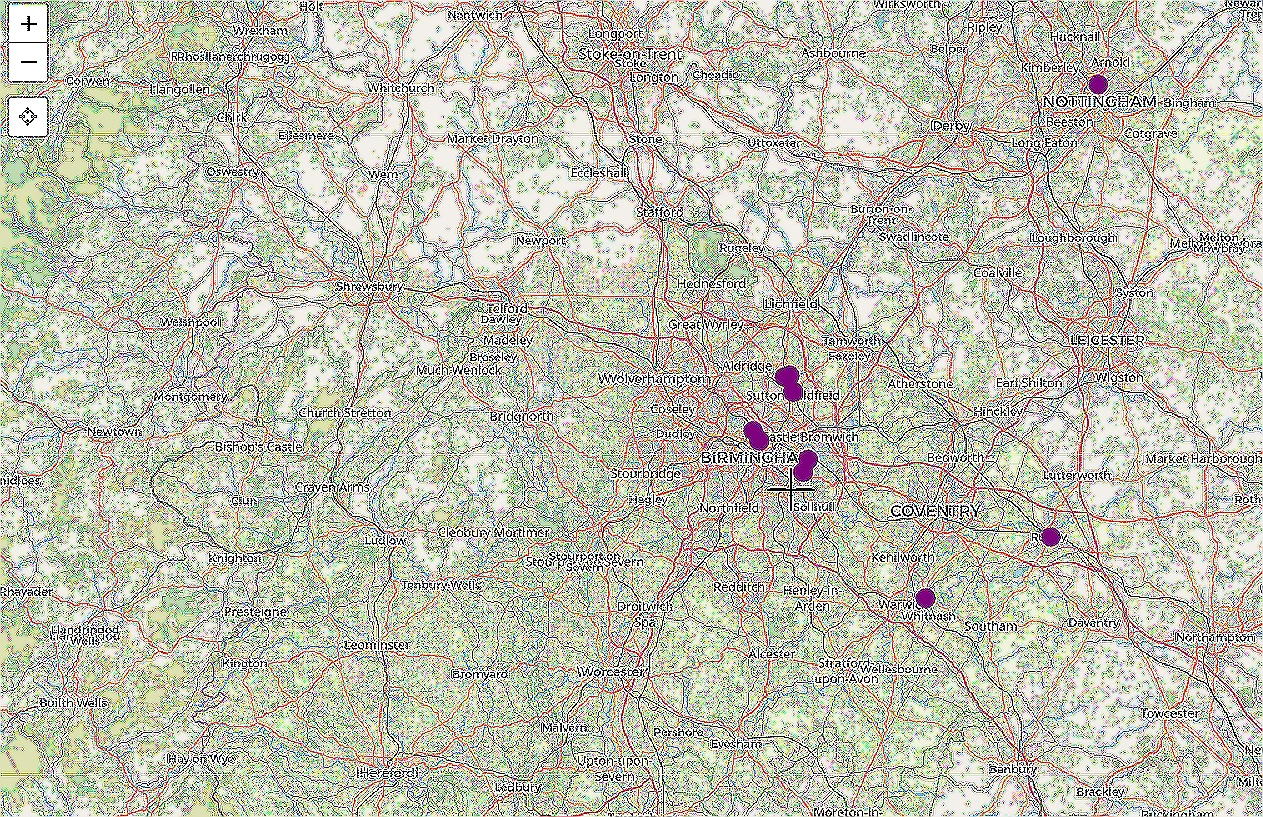
On the same basis, the “Sharpen” option works. By selecting it once, the effect is faint. It comes out, as you repeat the selection. However, like everywhere, there is a quite easy way to exaggerate (Pic. 51, 52).

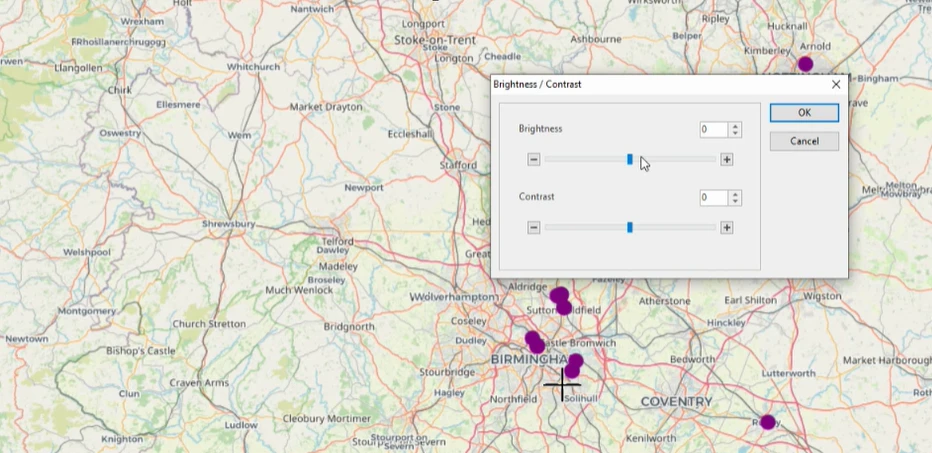
Brightness and contrast changes are typical for every simple image editor. It wouldn’t surprise anyone here, however, it’s always worth mentioning (Pic. 53, 54).
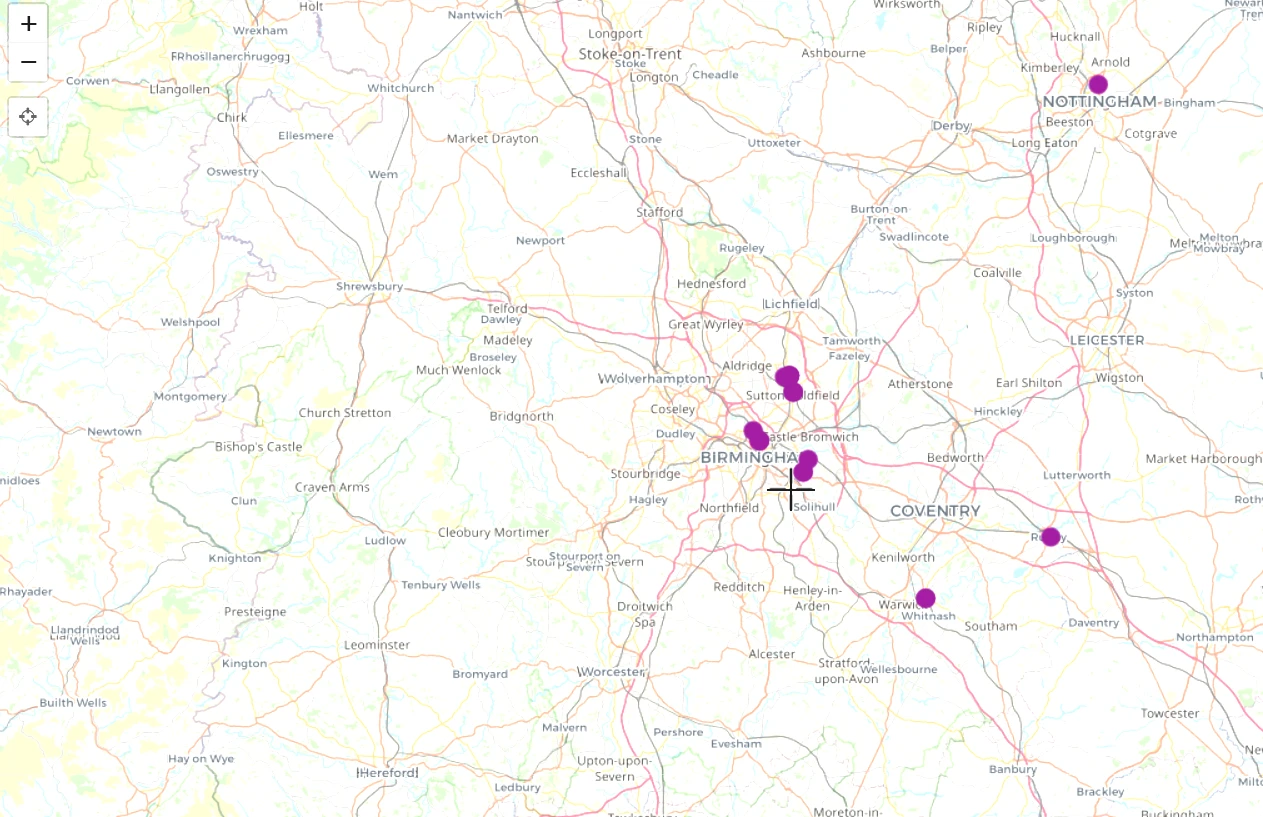
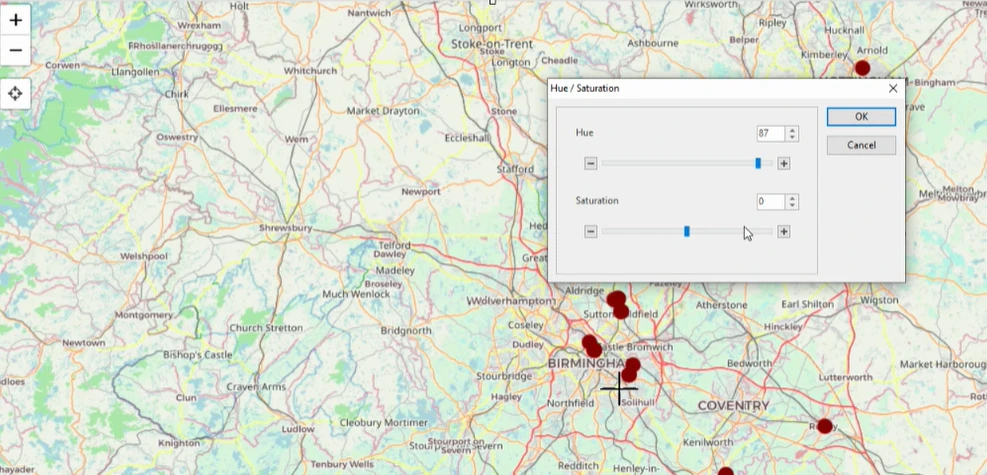
The same is true with the Hue & Saturation mode (Pic. 55, 56).

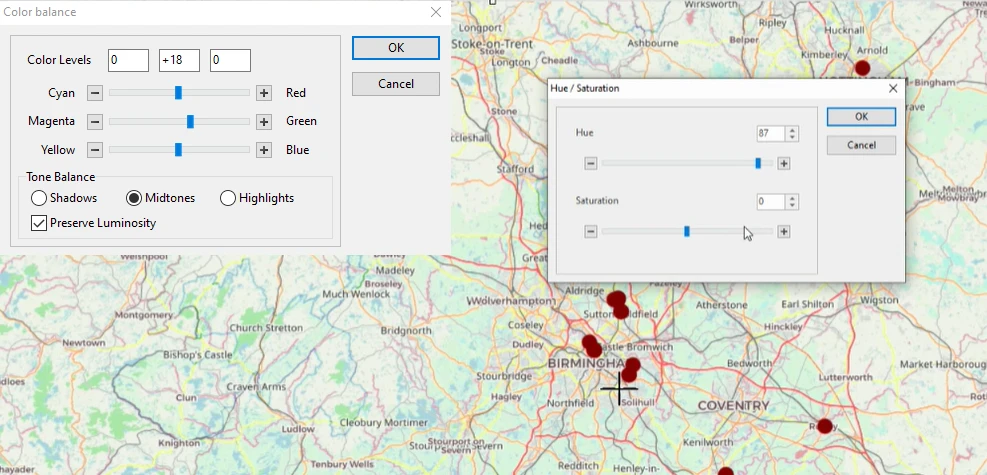
Quite important is the last feature, where we have quite a few ways to change our color balance. We can do it with respect to the shadows, mid-tones, and highlights (Pic. 57, 58).

To summarize this section I would like to show what the image looks like when several effects are applied (Pic. 59).

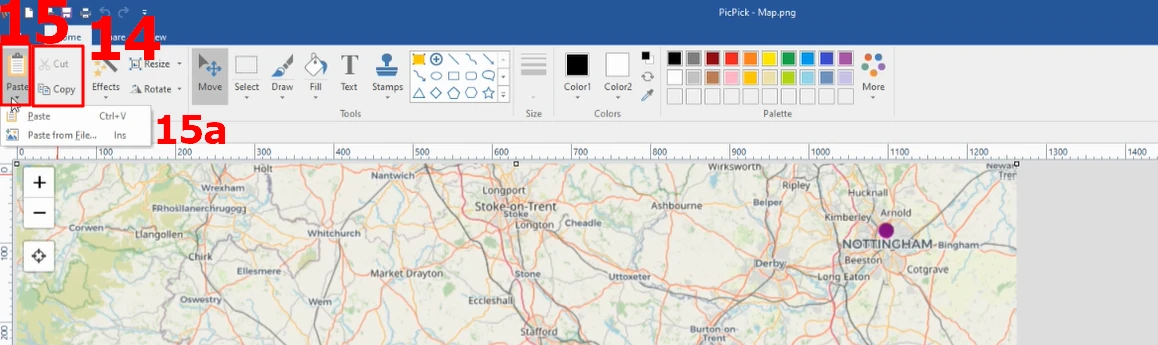
The last section to work on covers the Cut & Copy & Paste features, which seem to be the same as usual. We have the possibility to cut some areas from our screenshot, copy our image, or paste the stuff from the clipboard (Pic. 60). It wouldn’t be so interesting, but we have an option to paste the image from another file. Otherworldly, we can import another graphic file into the one, we are dealing with. It’s a good option, especially since you can easily resize it afterward. The subtle difference between pasting the data from the clipboard is selecting the graphic file from the folder straight away instead of opening it, selecting it, and copying it to the clipboard (Pic. 61).
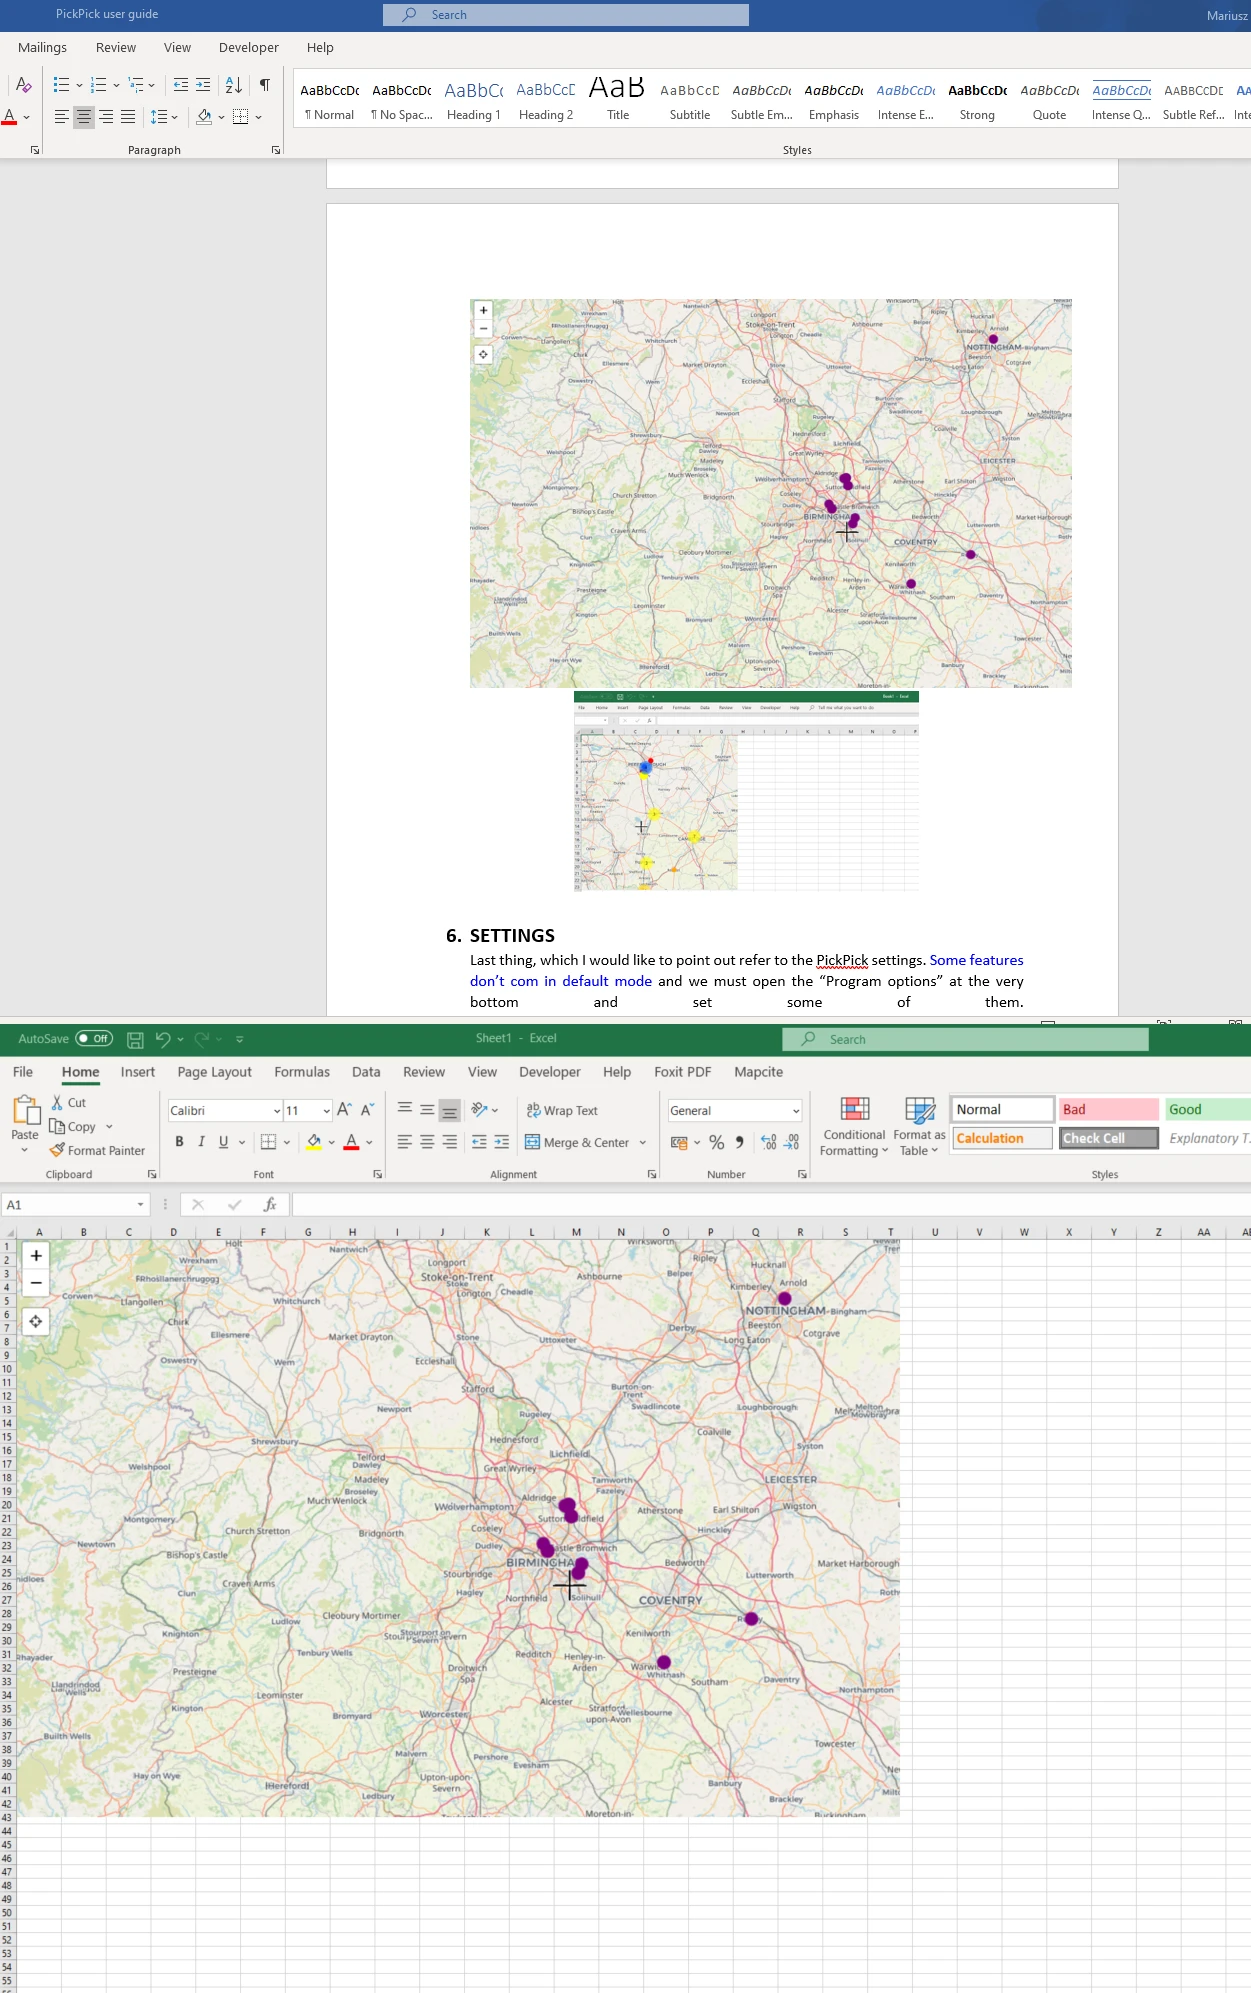
Approaching nearly the end I would like to mention the common ways of sharing our PicPick work. We have quite a few, The most interesting is straight embedding our images to the MS Office package (Pic. 62, 63) as well as the FTP server.
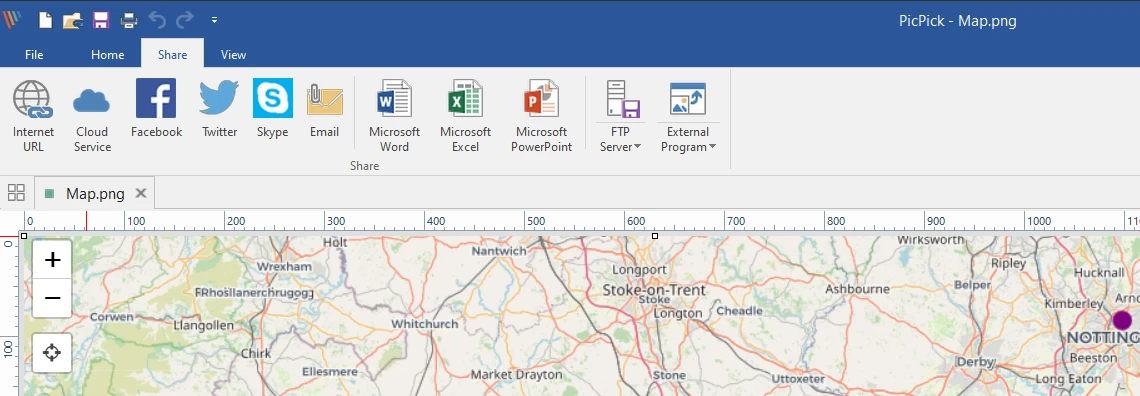
Bear in mind, that your work will be placed in the active document (or worksheet or page) you are working on.
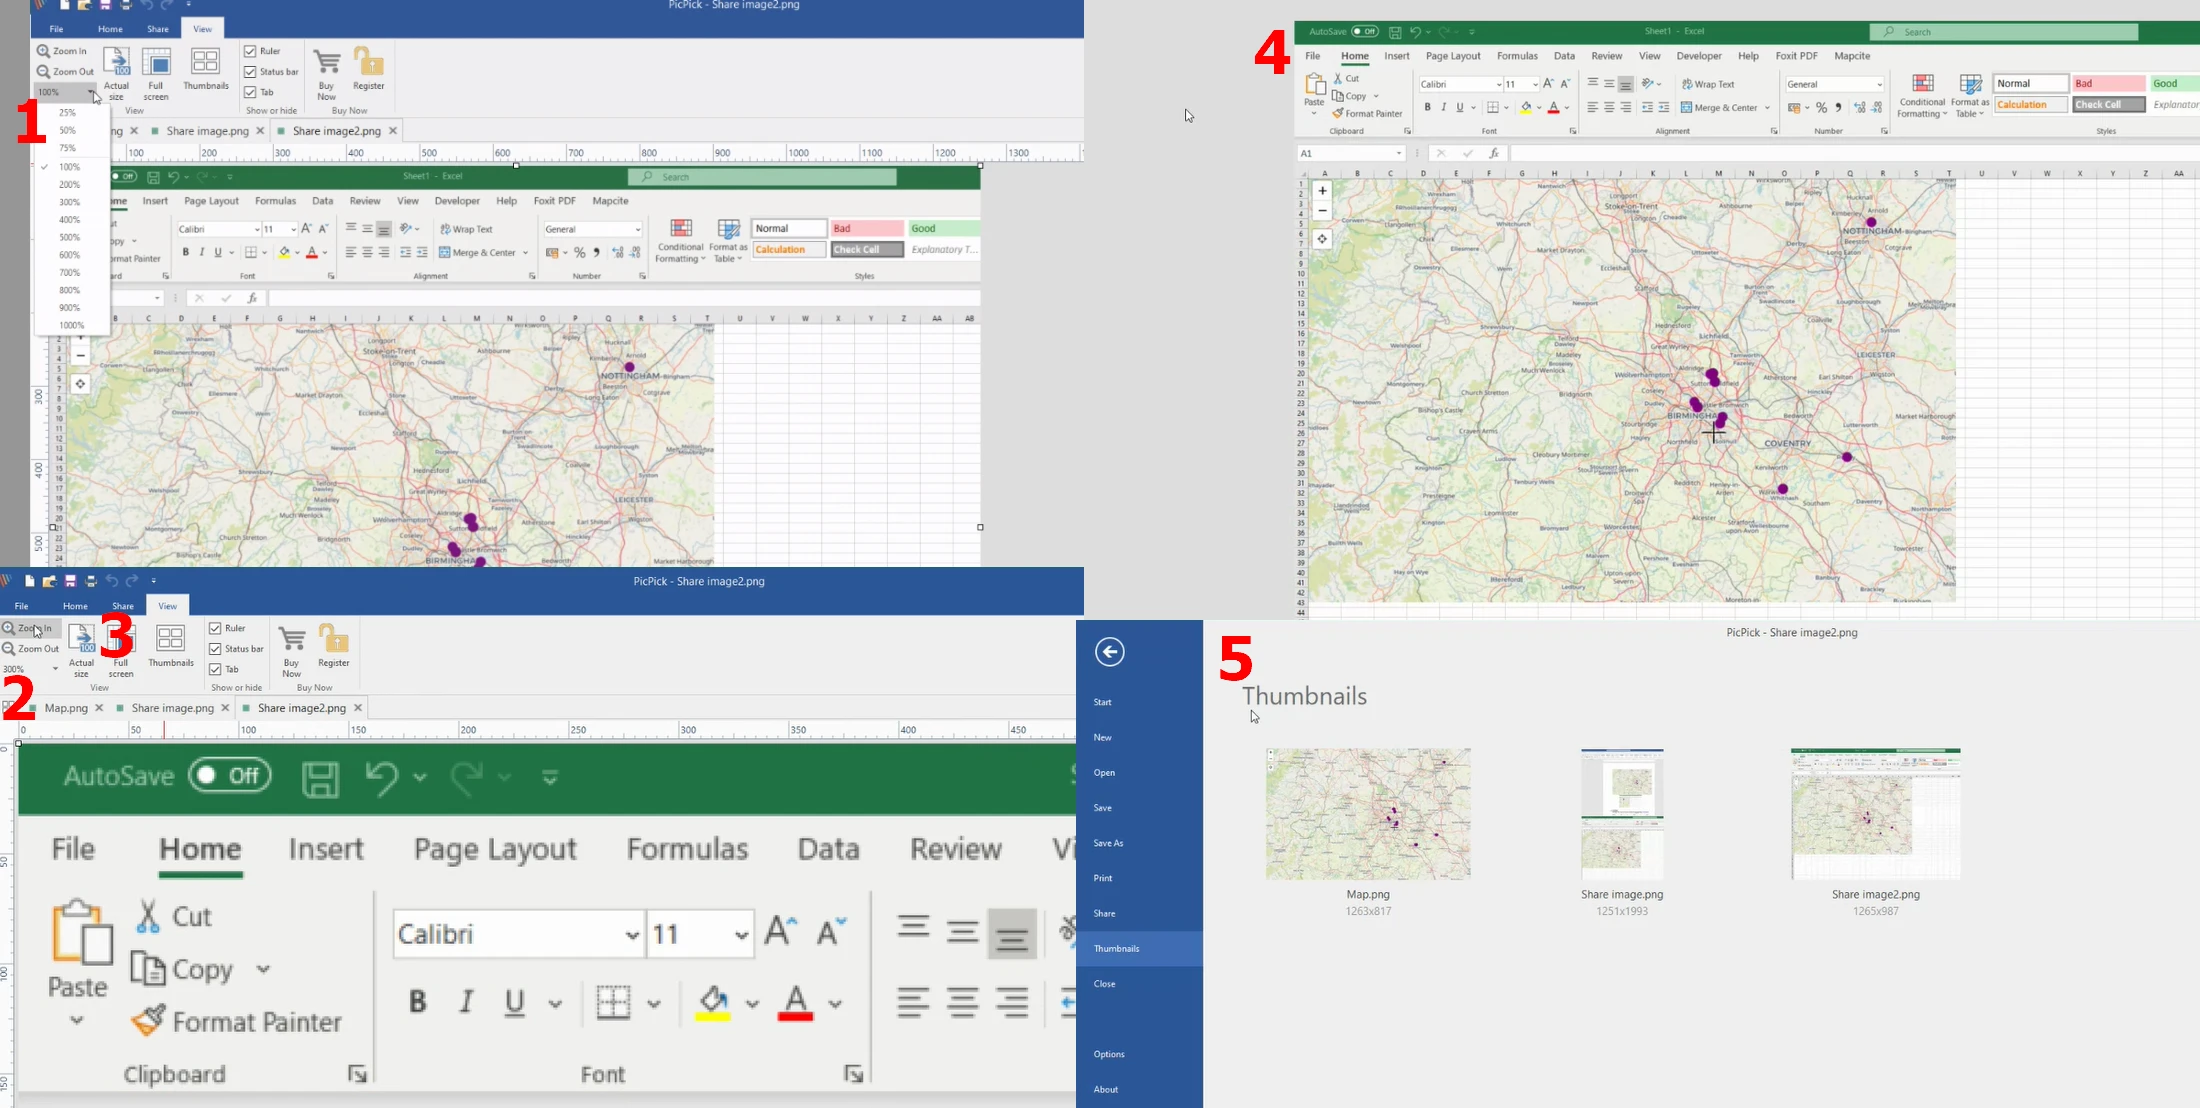
The last thing to mention is the “View” section, which offers a few options (Pic. 64). We can make an enlargement, display our image in its original size, toggle full screen, or switch thumbnails. The status bar display is also optional.
4. OPTIONS
The PicPick application has several useful options bounded in the major sections as seen below (Pic 65).
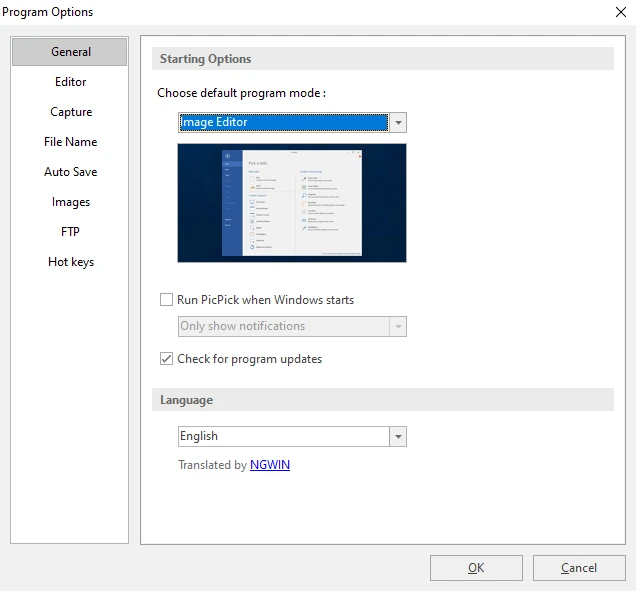
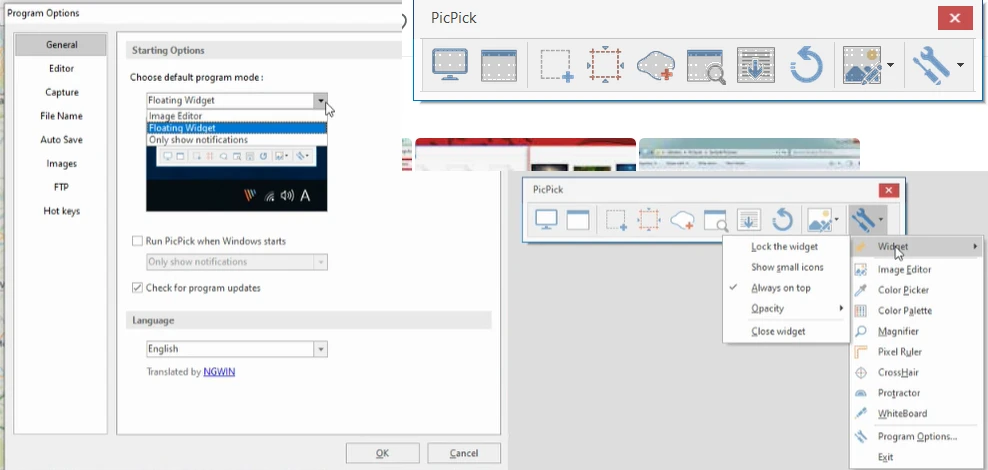
In the “General” panel we can change the language, set PicPick on as Windows starts, and, what is most importantly set the way our program should be run. There are 3 modes available, the handiest is the “Floating widget” giving instant access to the edition anytime (Pic. 66), as it’s restricted to the small snippet floating above the stuff we are working on.
In the “Editor” options, we can set our background and optionally the circumstances of our screenshot/ image processing, as follows (Pic. 67).

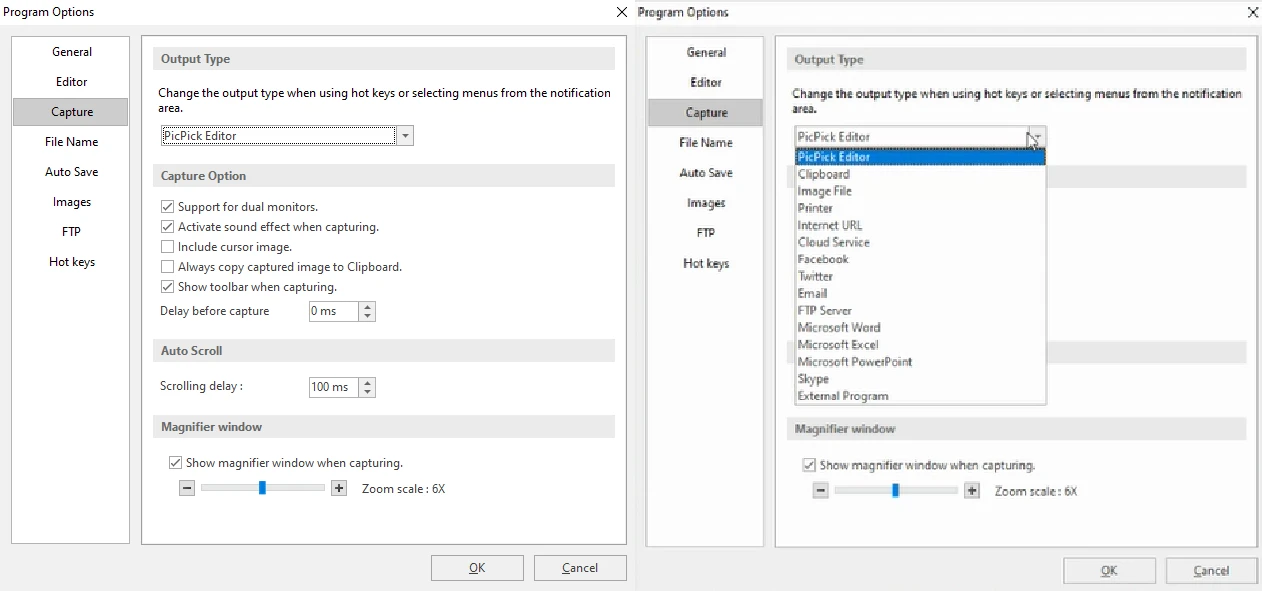
The “Program” options include the image output type and some capturing options. By setting the way of output we can paste our images straight into Word, Excel, or any other target destination, as listed below on the screen (Pic. 68).
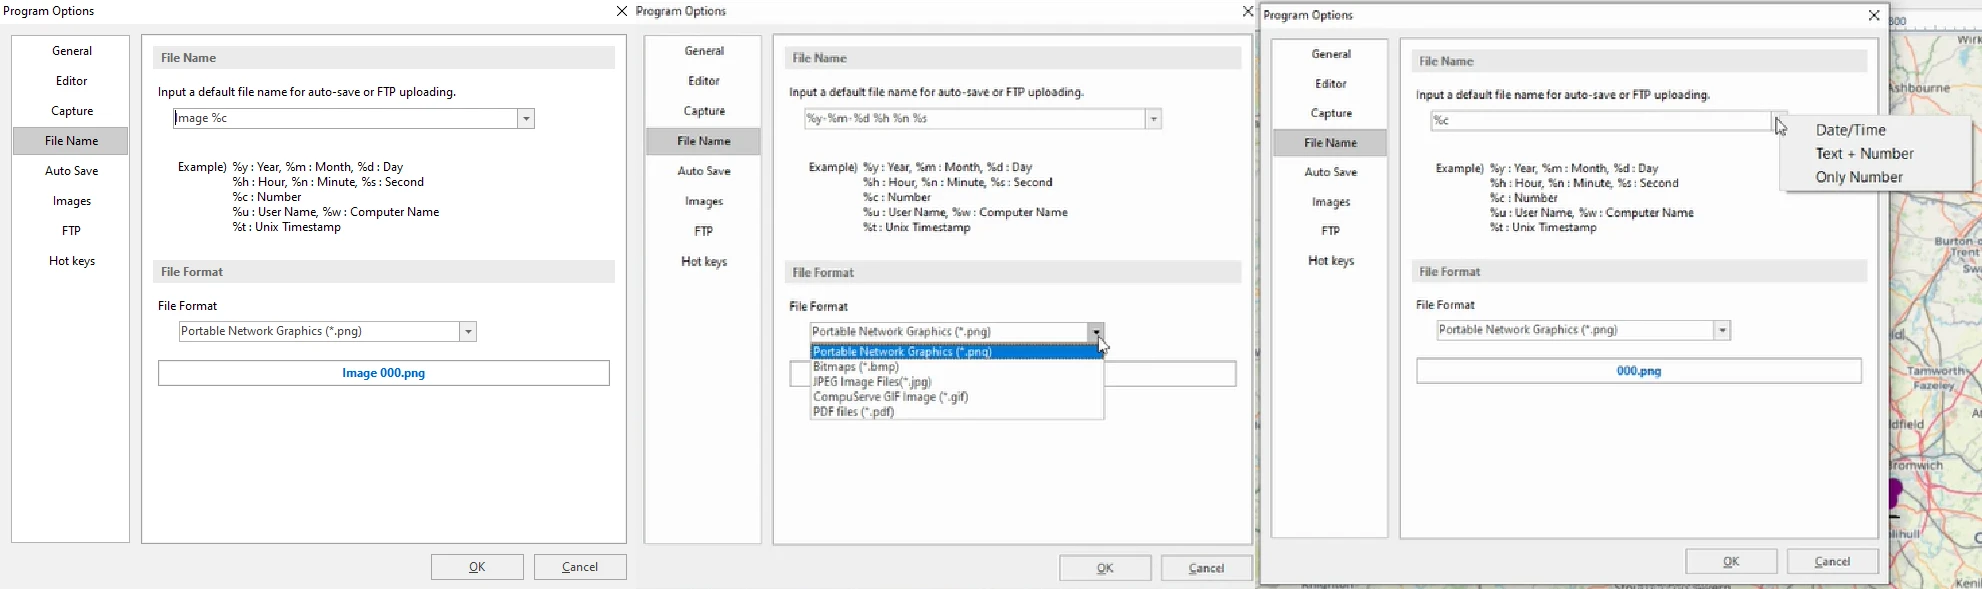
The “File Name” section is very interesting, as we can save our file with the system’s date and time. In turn, we can keep our files chronologically. The file save format covers all common raster graphic formats (.webp, .bmp, . jpg, . gif, and .pdf)(Pic. 69).
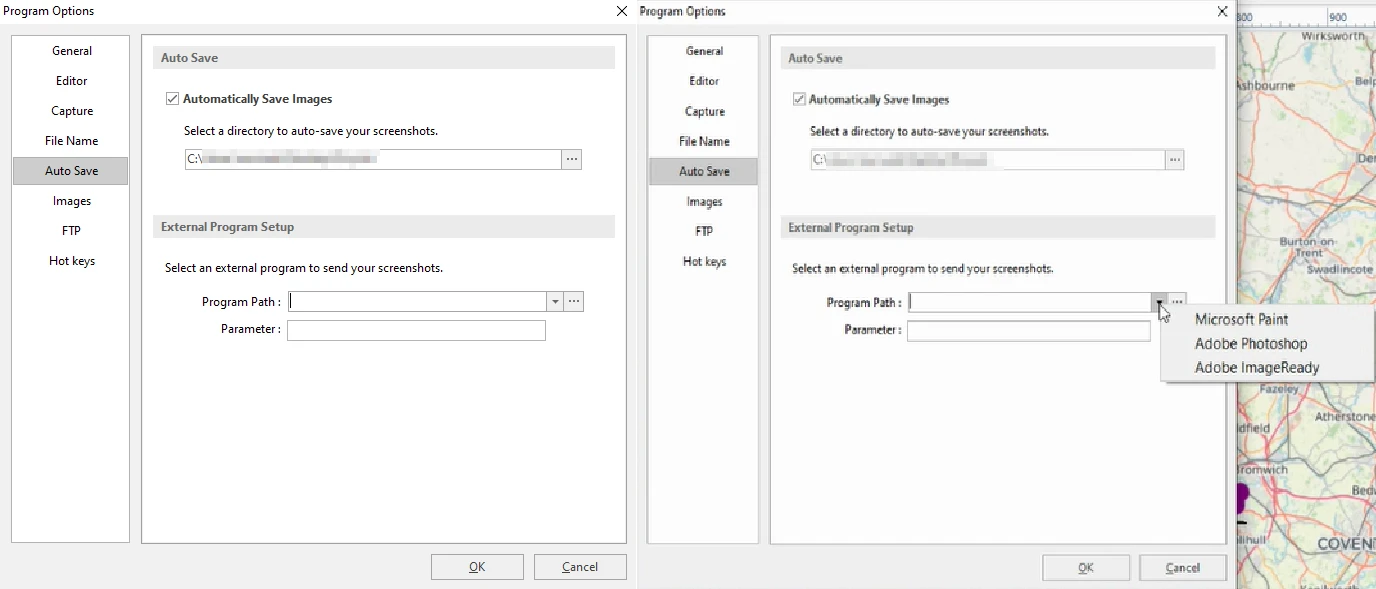
The biggest advantage of the PicPick editor is the “Auto Save” option, where we can instantly get our work in the proper directory. The tool is also able to send it over to Paint or Photoshop straight away (Pic. 70).
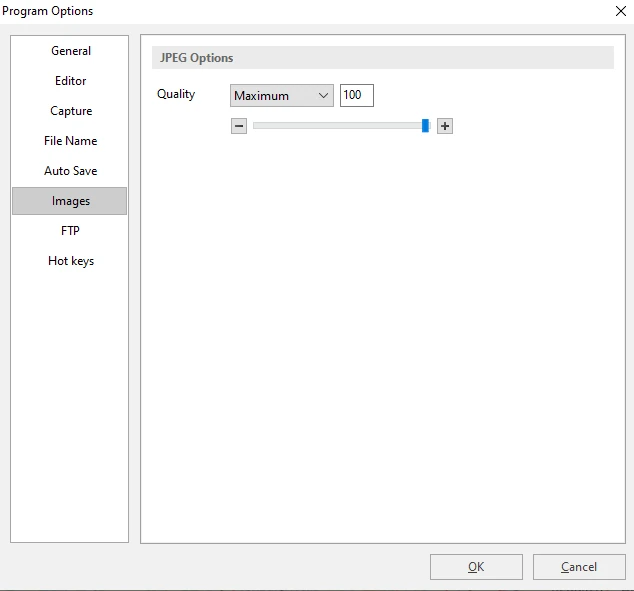
The image quality remains the best in default and we shouldn’t change it (Pic. 71).
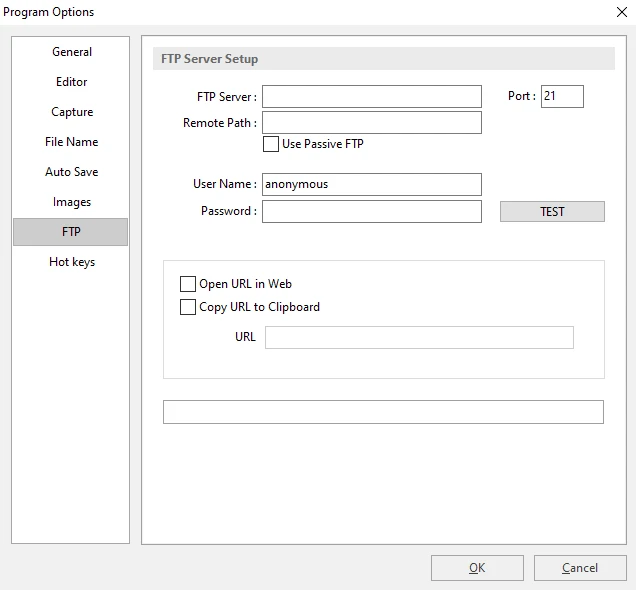
Interesting if the FTP server uploads, what was mentioned earlier. Below you can see all the details required to connect you with the server (Pic. 72).
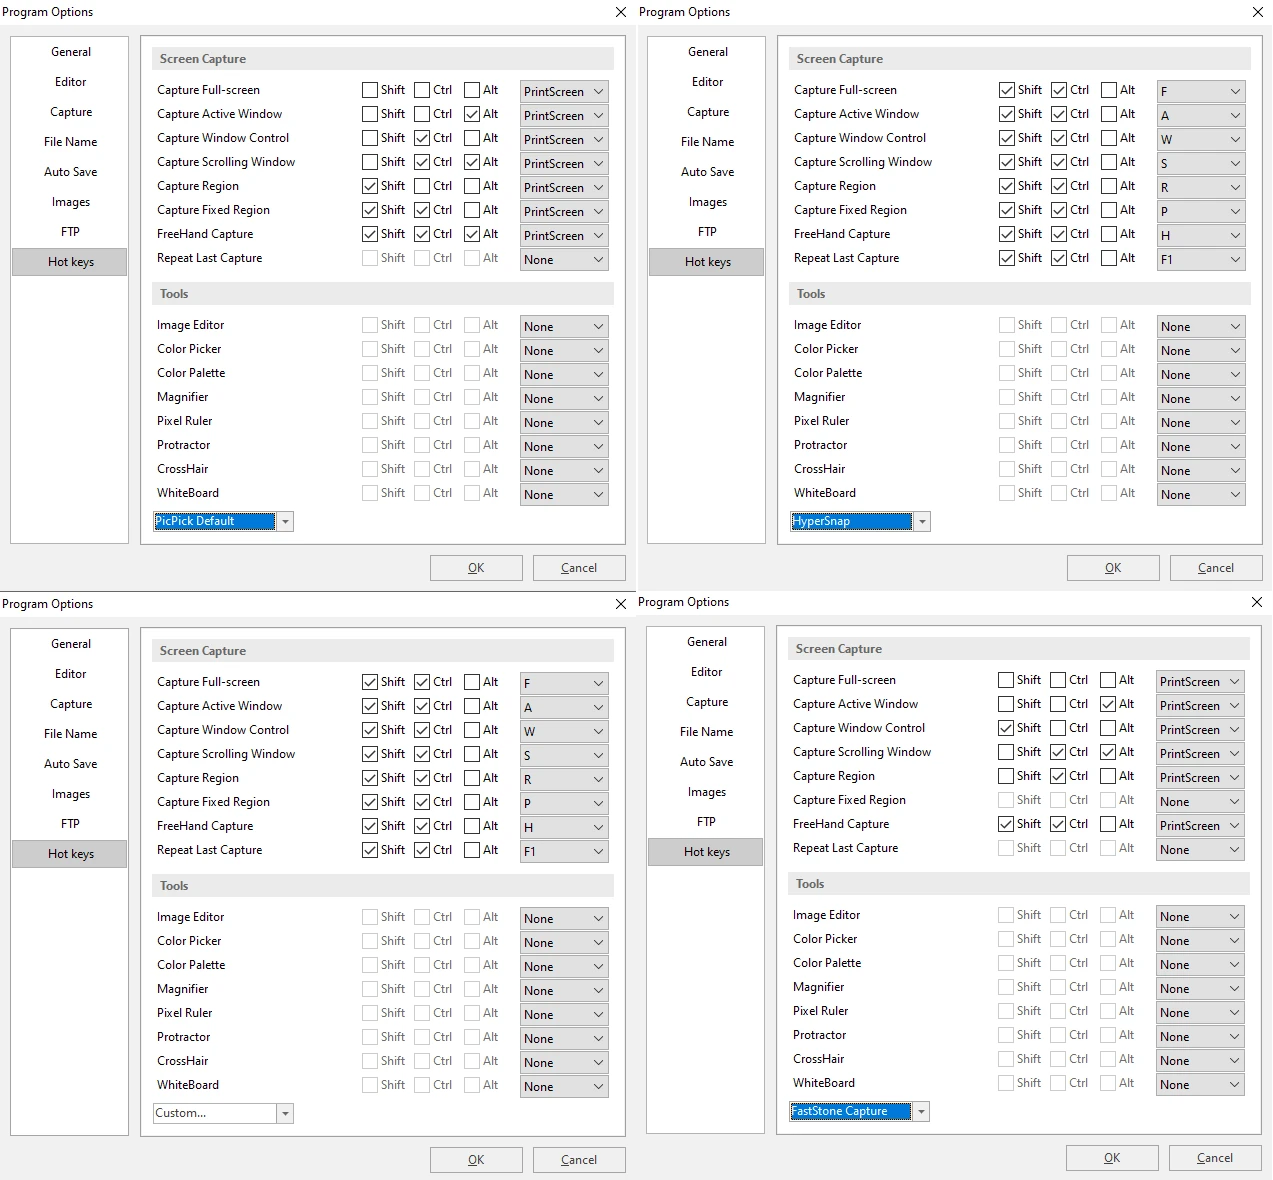
The last options are “Hot Keys”, which can seriously facilitate our work with the program. We have effectively 4 options there (Pic. 73). The 5th option is to disable them all. In the “Custom” mode you can set your own hotkeys, whichever is more convenient for you.
5. SUMMARY
The PicPick is a very handy graphic application, dedicated predominantly to screengrab and its instant processing. However, this tool can be also widely used as the typical image processing program, where we have quite a few basic options to upgrade our captured screenshot or external image. We can use PicPick even in photography if some basic alterations are considered. Obviously, it won’t work with the RAW files, but if you have them converted to .jpg format, you can easily change their size here for example. Some people believe, that PicPick might be an alternative to Photoshop at some points, although we are considering the basic approaches only. The broad selection of options makes this screenshot tool probably the best in the market. I hope, that this granular user guide will help you to use the PicPick application without any doubts. I haven’t included the installation process, which is very simple. You can simply visit this website and install the application on your desktop. I am convinced, that it’s the best alternative for the Windows 10 Snipping Tool.
Concluding this reference manual I would like to point out all the major pros and cons of using the PicPick program.
Pros:
– many options for screenshot capture (region, fixed region, freehand),
– expanded image processing toolbar (interesting effects, stamps, etc.),
– built-in technical tools (i.e. measurements),
– autosave option with a customized image file (including system date and hour),
– many ways of saving images externally (MS Office, FTP Server, URL, or external program),
– option to draw elements straight on your desktop and save them instantly (WhiteBoard),
– possibility to save our image in the .pdf format,
– an opportunity for screen grabbing without running the program (floating widget option),
– very familiar interface, based on the Microsoft Paint application,
– possibility to hide confident regions in your image (pixelate and blur options),
– possibility to import the image from another file (paste from file),
– an easy way to get the programming color code from the palette
Cons:
– some options are missing, compared to Microsoft Paint (text underlining, strikethrough, free-form selection)
– unlike Microsoft Paint, it requires an additional installation for our desktop, which might slow it down sometimes,
– if your computer is not strong enough, this tool might cause unforeseen freezes, disrupting your work,
– some hotkeys might be undertaken, and the custom option may be required
Mariusz Krukar
Links:
- https://picpick.app/en/features/
- Step-by-step instructions for working with PicPick
- https://howtotechnoglitz.com/the-best-screenshot-software-for-capturing-images-and-video-review-geek/
- https://portableapps.com/apps/graphics_pictures/picpick-portable
- https://www.thakkarworld.com/capture-scrolling-window-picpick.html
- https://monkeymanifesto.com/how-to-use-picpick-on-windows-10-mac-1752/
- https://www.softwaretestinghelp.com/best-screen-capture-software/
- https://www.guru99.com/screen-capturing-tools.html
- https://screenrec.com/screenshot-tool/best-free-screenshot-software/
- https://defkey.com/picpick-shortcuts
- https://www.mysysadmintips.com/windows/clients/667-one-drive-hijacks-all-picpick-print-screen-shortcuts
- PicPick graphic editor step by step
- Best free MS Paint alternative software with same interface & featurestures.html
- https://www.theguardian.com/technology/askjack/2018/oct/25/what-is-best-replacement-for-windows-10-snipping-tool
- https://droplr.com/how-to/productivity-tools/5-best-alternatives-to-windows-snipping-tool/
Forums:
- PicPick: Steps to capture a scroll down
- PicPick screen capture problem in Firefox
Wiki:
Youtube: