
The ArcGIS Online Pro doesn’t have the direct option for reproducing the styles of the given layer. Usually when the new layer is created or uploaded from the FileGeoDataBase file we have to set up our style again. It might be painful especially when our styling is quite advanced and requires a lot of time spent on it. This text presents the tricky, but doable solution that helps us retain the layer style as well as other settings without any additional hassle. In this method everything is retrieved accurately, but again, it’s tricky and we must be careful doing it. Therefore if you wish to learn how to do it successfully follow the steps below carefully.
Open the layer, which you want to change. Your layer is fully equipped. It includes the whole setup not only just styling but also the popups and labelling (Pic. 1).
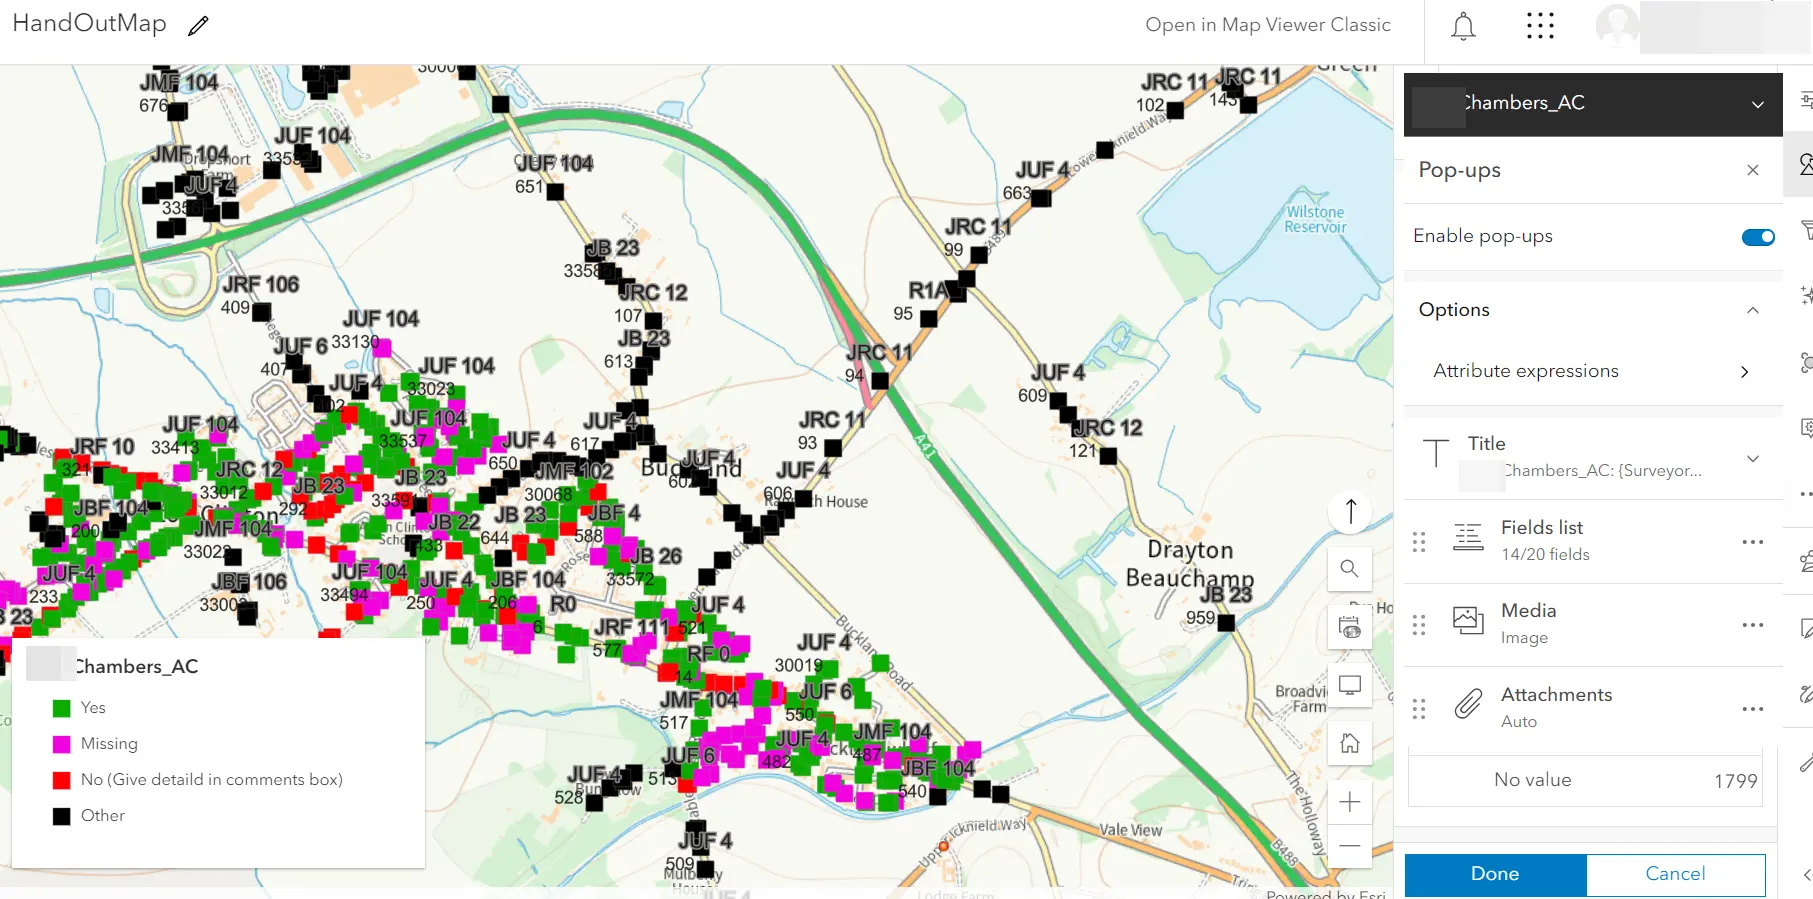
Pic. 1 The example of the layer which style we want to duplicate.
The layer presented in the image above (Pic. 1) is the hosted featured layer. Our goal is to adjust this layer to the new area we are working on. We are using the layer from our recent area and we want to simply move this layer to the new area with the new data and all the styles retained.
1. Open Layers -> Select your layer -> Duplicate layer (Pic. 2). In this case you are simply copying the current layer you have.
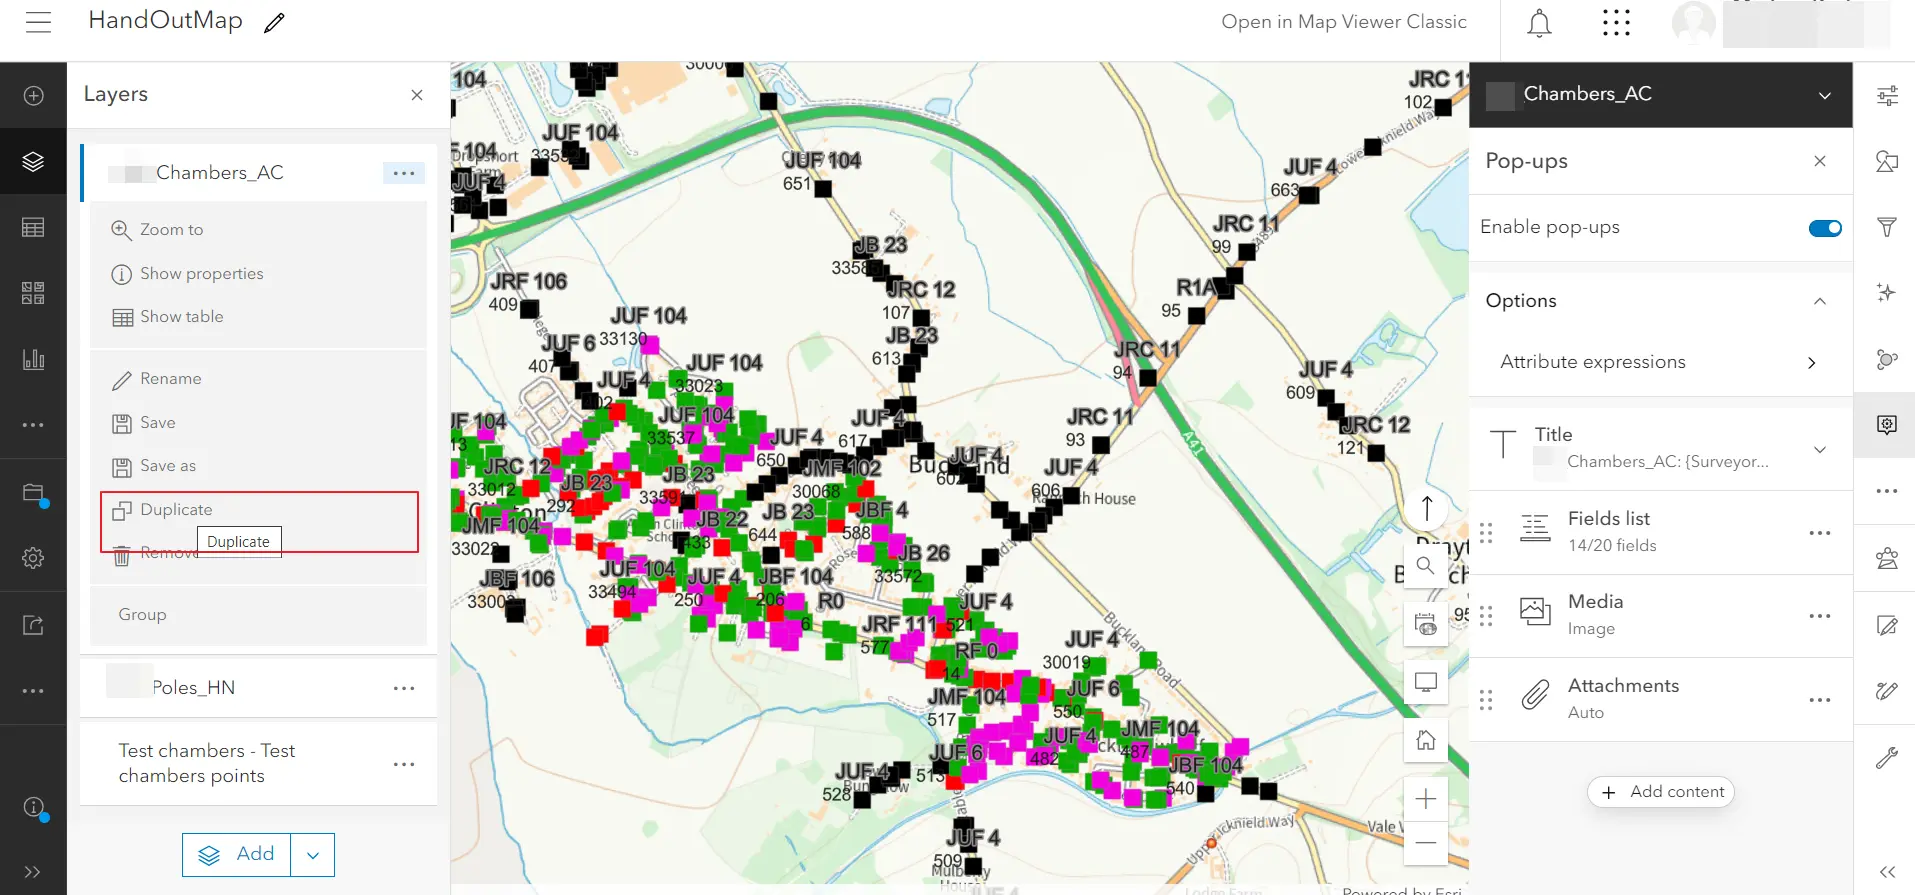
Pic. 2 Layer duplicate in ArcGIS Online.
After that, just above the current layer, you will see the same layer with its name_Copy.
2. Open Layers -> Select your new layer -> Save As. The new dialog Save As window will be opened, where you need to specify the name and the target ArcGIS Online directory where the “new” old layer will be stored (Pic. 3).
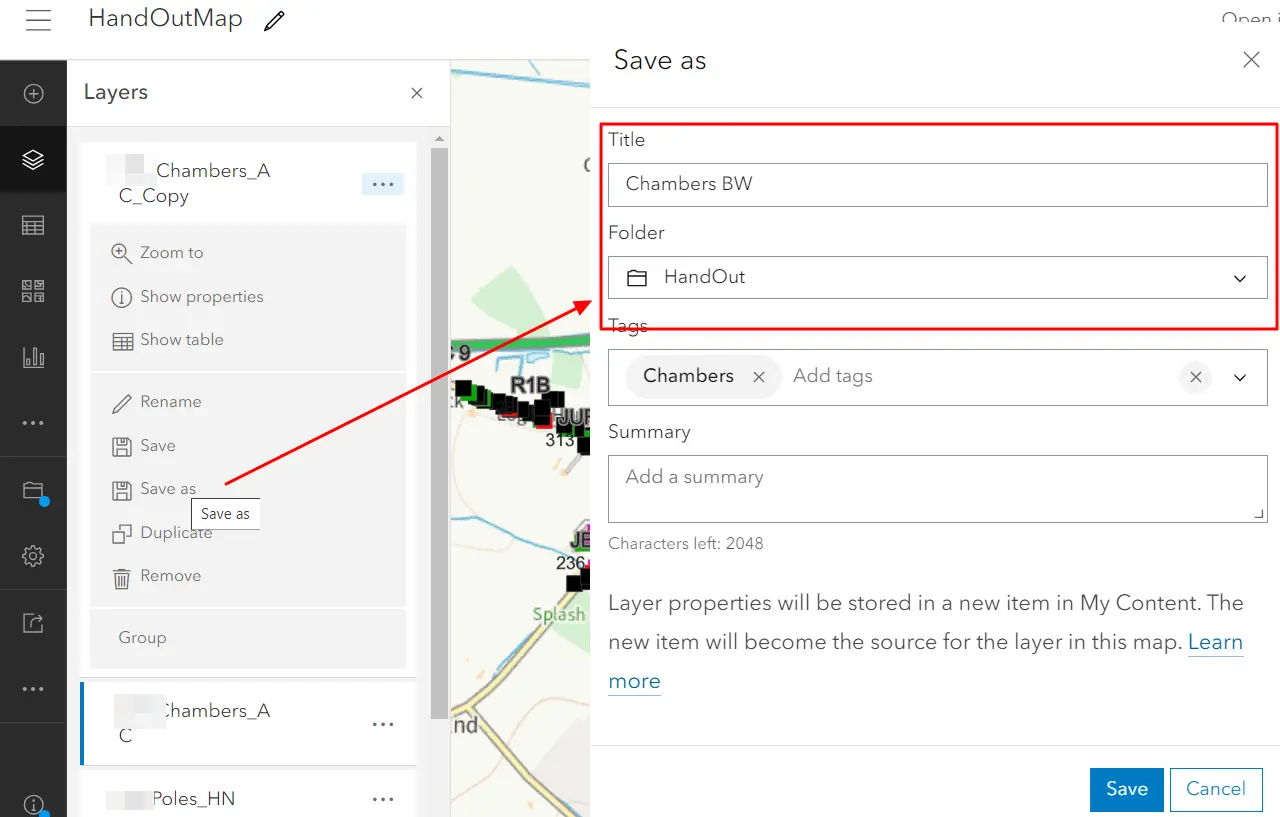
Pic. 3 Saving our duplicated layer As the layer under a different name and different directory.
The duplicated layer must be always saved, because it participates like the temporary scratched layer known i.e. from the QGIS environment. Once the project (map) is reloaded, this layer is gone. By saving it we are defining the new layer body, which can be used later on. Keep in mind, that our newly saved layer is not feature-hosted anymore! Since now our layer is featured only, which original host is represented by the original layer in its original destination. In practice, it will mean, that all the alterations within the Field Map Designer forms must be done within its original “mother” layer.
3. Create a new map (Pic. 4) as you cannot see the newly saved “old” layer on your current one. This is because the new layer is stored in he separate directory and must be added on the same basis as others. On the other hand, you will see a copy of the original layer until your map is closed down or reloaded.
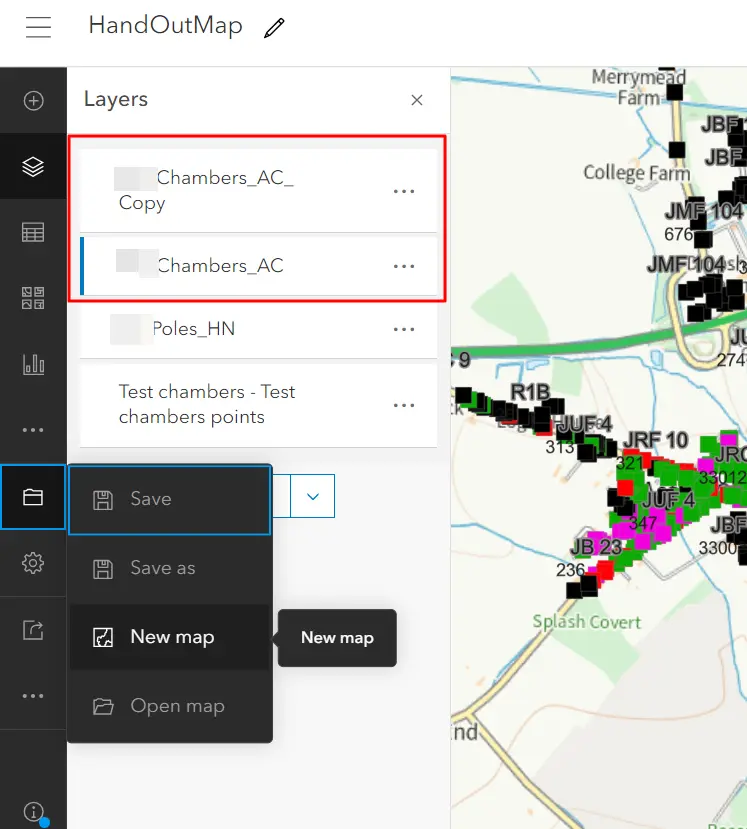
Pic. 4 Creating a new map in ArcGIS Online.
An alternative option can be duplication (Save Map As) of the current map with the removal of all the layers from it. It’s vital to have the new map empty.
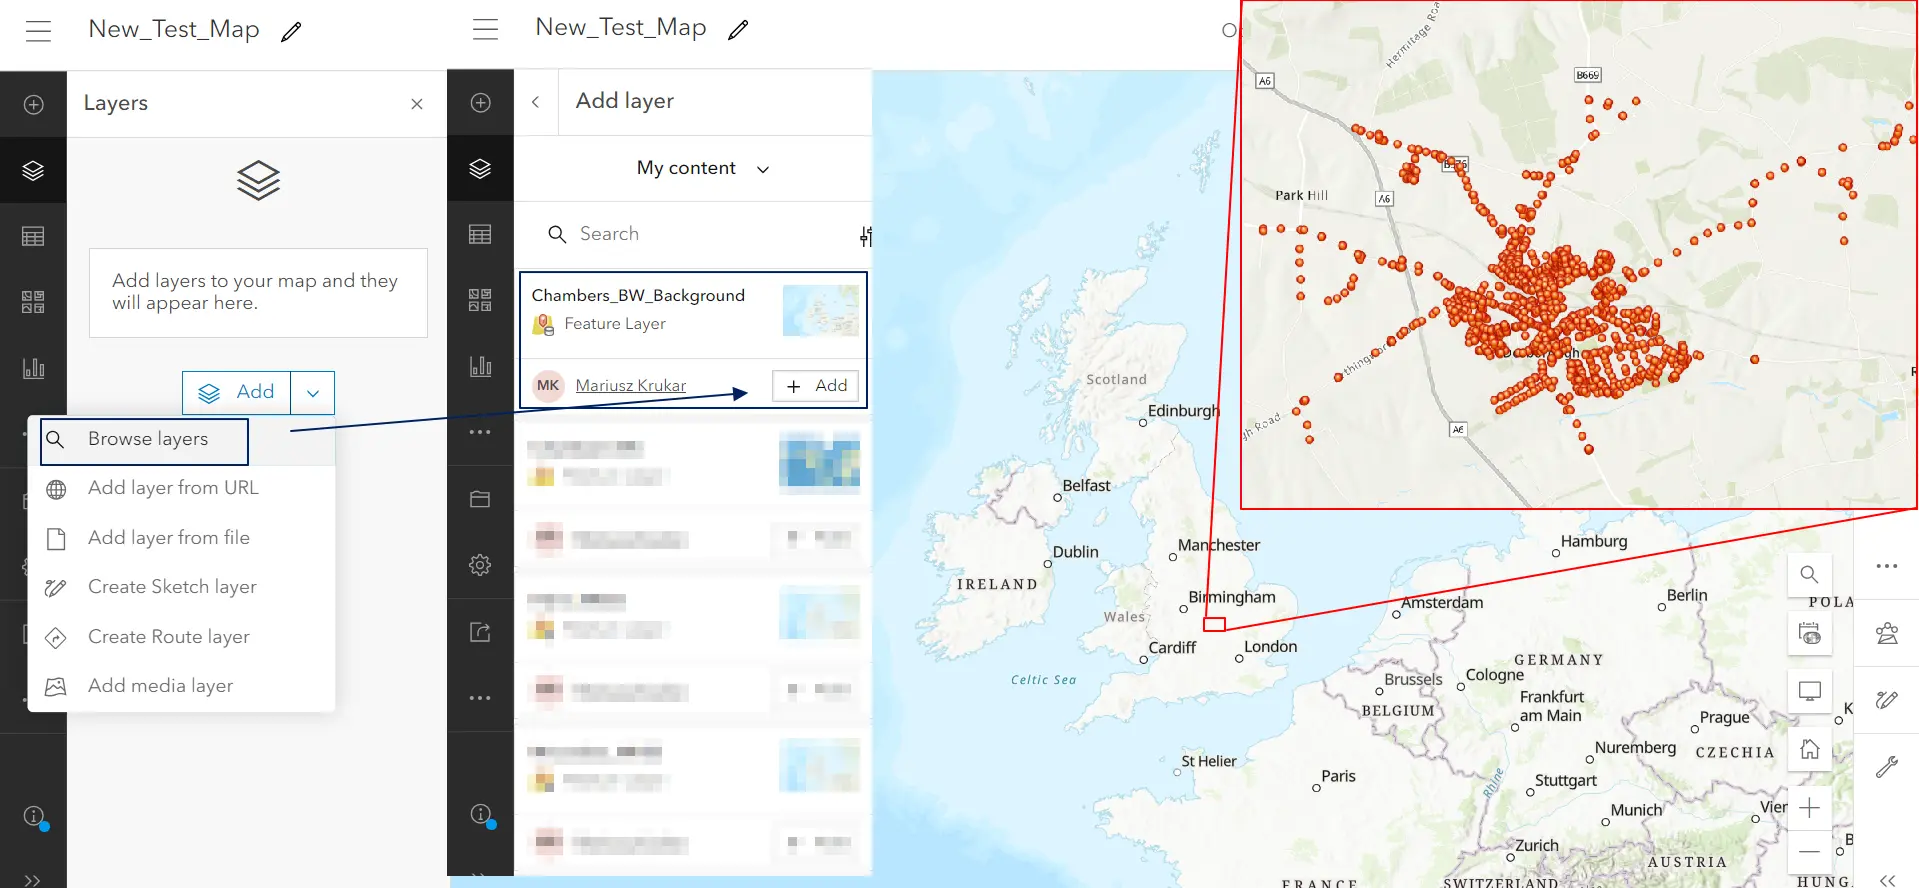
4. Add a new “old” layer to your new map by using Layers -> Add Layer or Layers -> Browse layers. The one you’ve created should appear at the top of the list (Pic. 5).
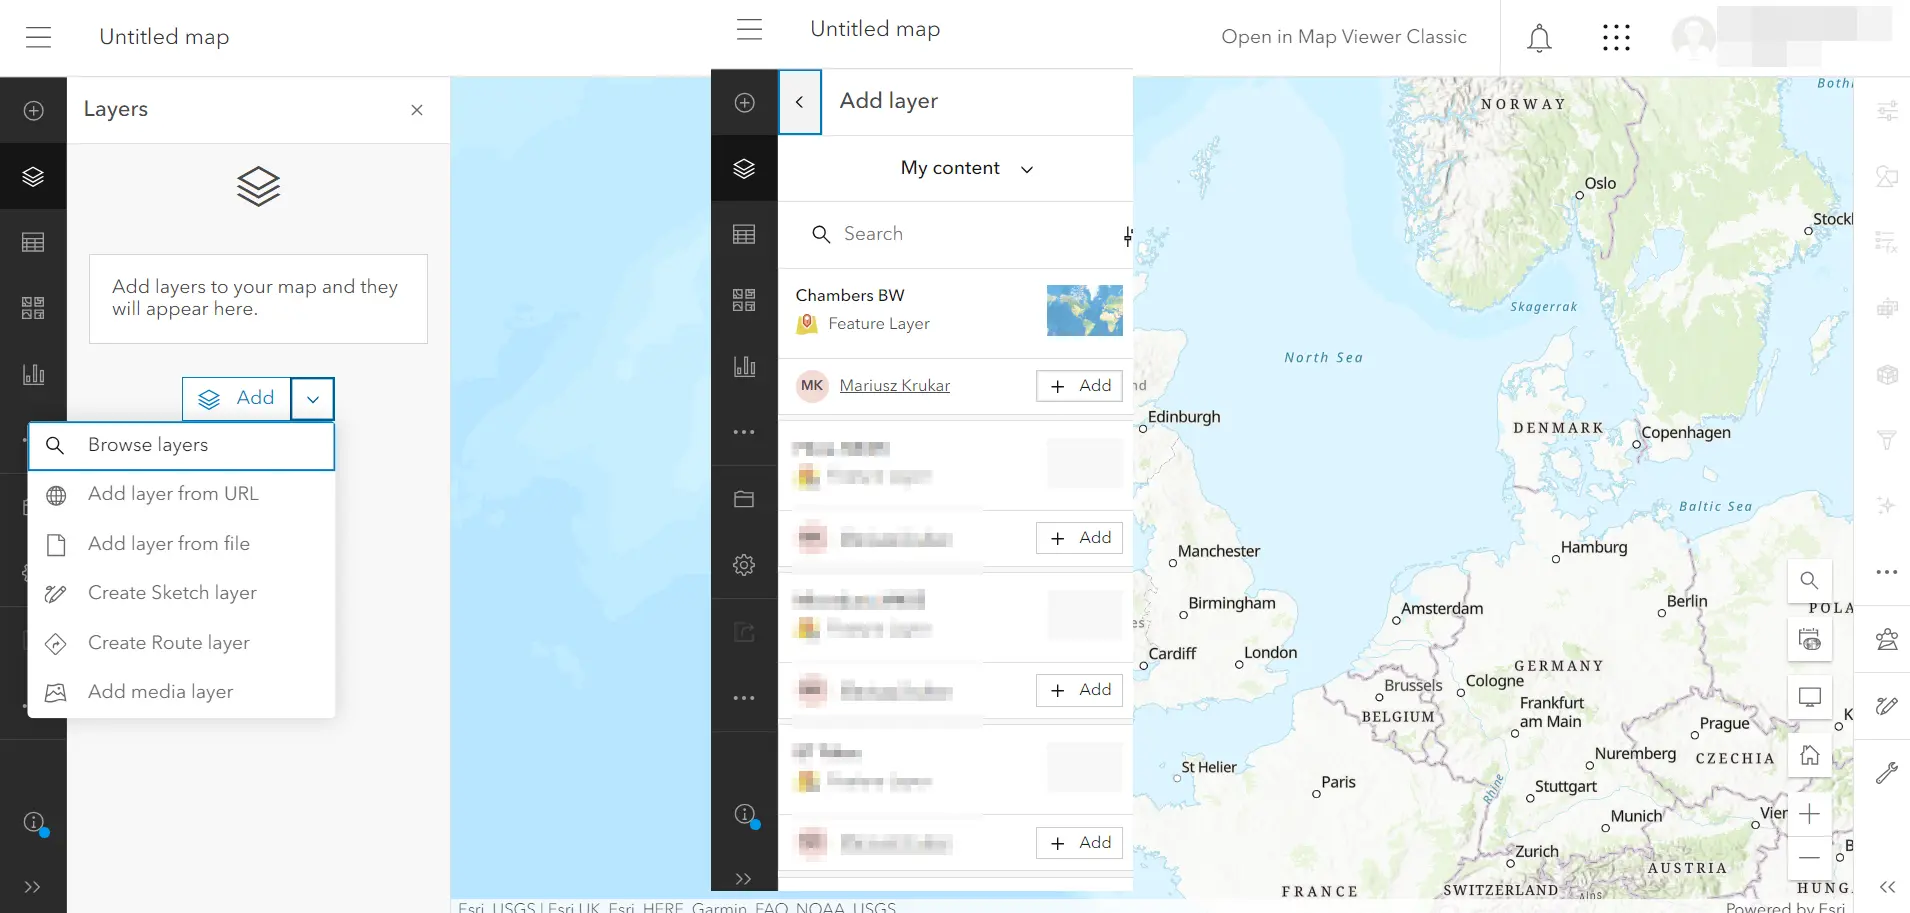
Pic. 5 Adding a new layer to our new map in ArcGIS Online.
Our new layer is already on the new map. Everything is the same from styling through labeling to the popup setup, because it’s the product of the layer duplicated earlier (Pic. 6). However next to the settings it’s not difficult to see, that the layer includes the “old” data with the same area as observed previously.
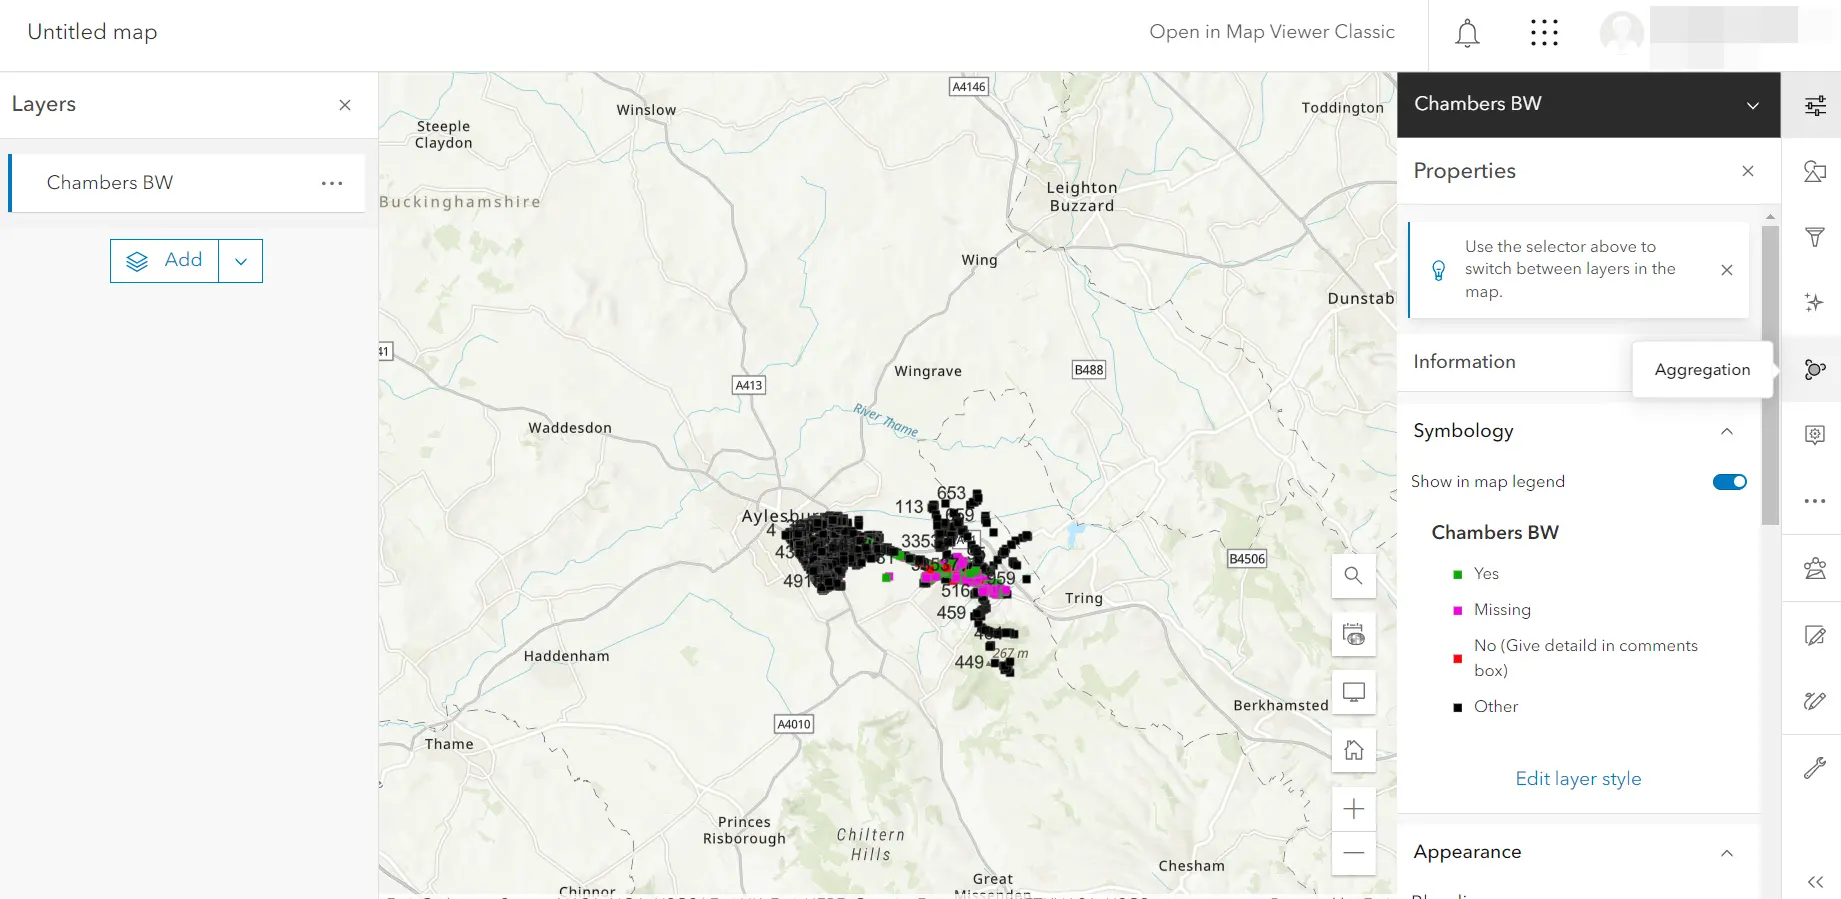
Pic. 6 New layer on the new map in ArcGIS Online.
This new map becomes your main map because it stores the retrieved layer. However another parallel “test map” will be needed for our process.
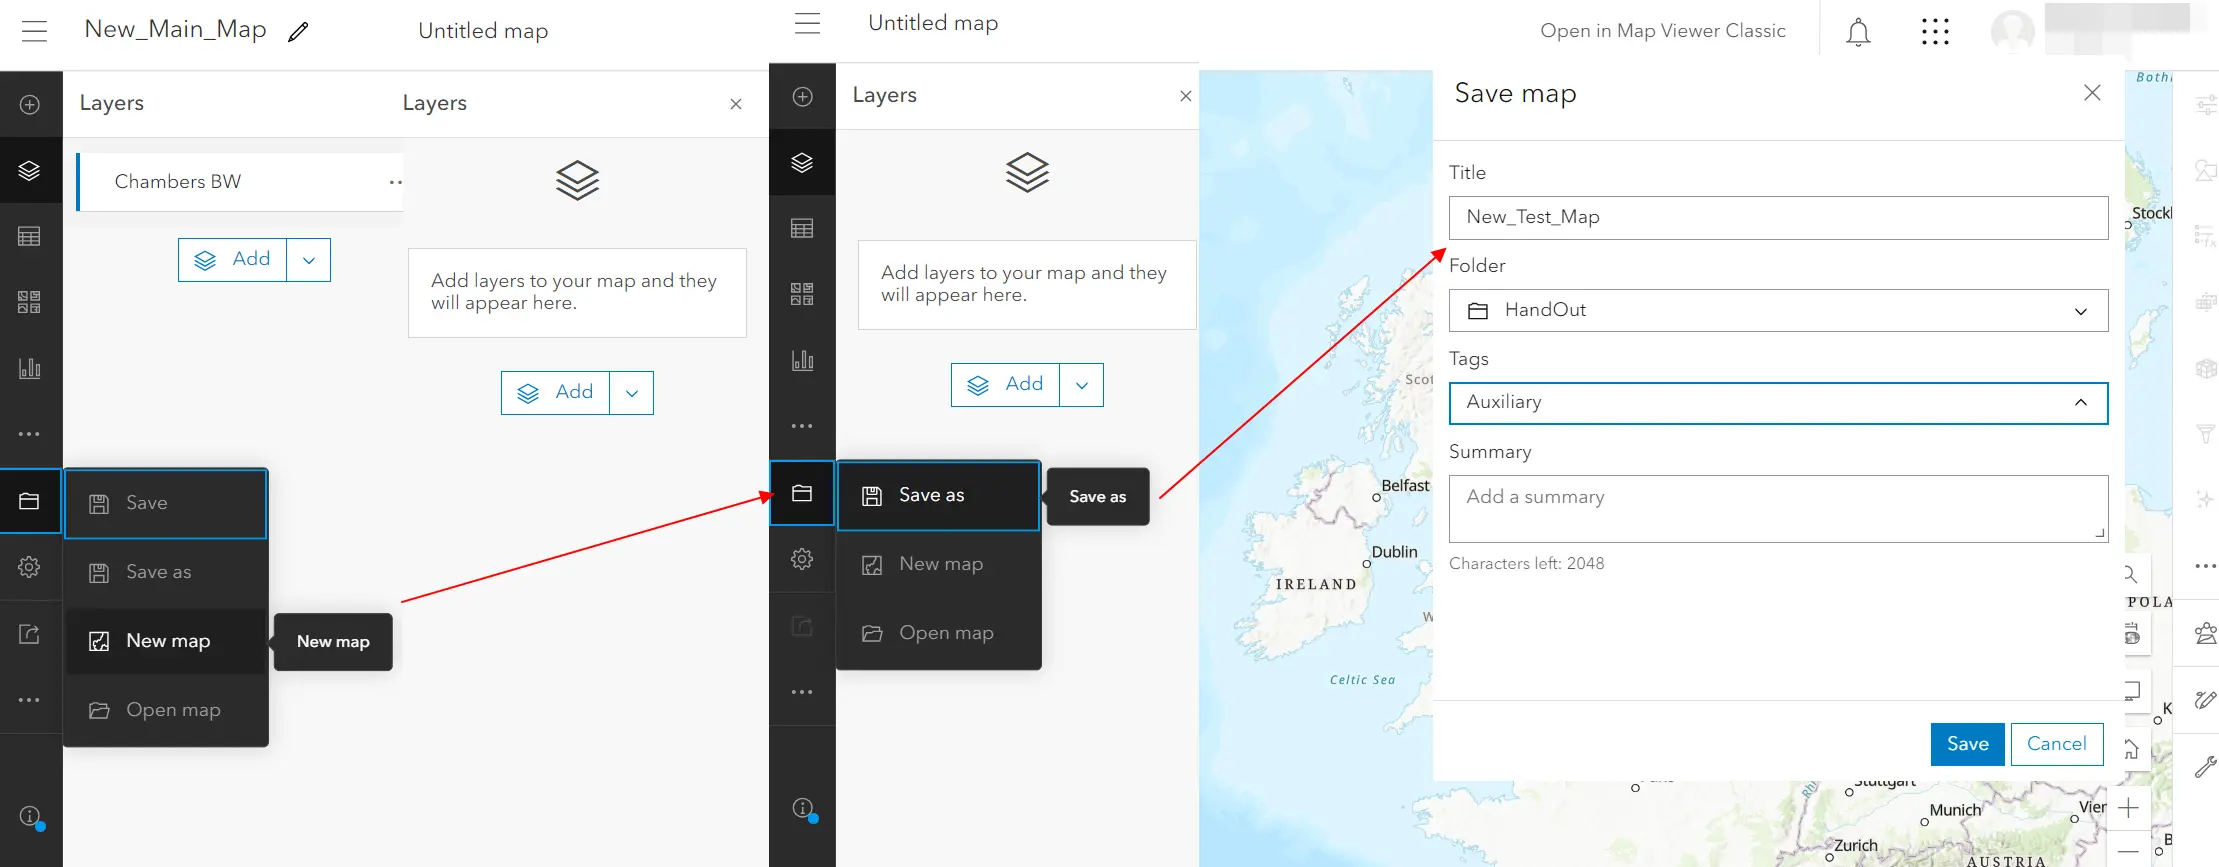
5. Save the map. You opened the new map and loaded the newly saved layer, the map must be saved. Because the layer includes all the styles and setup we can call this map the Main Map, where all the operations and edits on site will be done. However, due to the specificity of this method, you will need another map anyway.
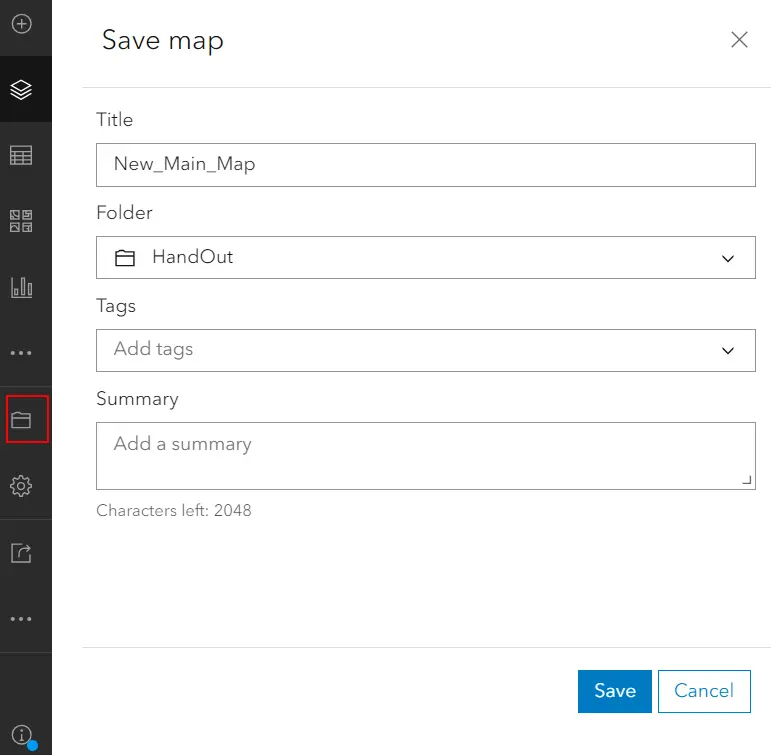
Pic. 7 Saving our map as the New Main Map.
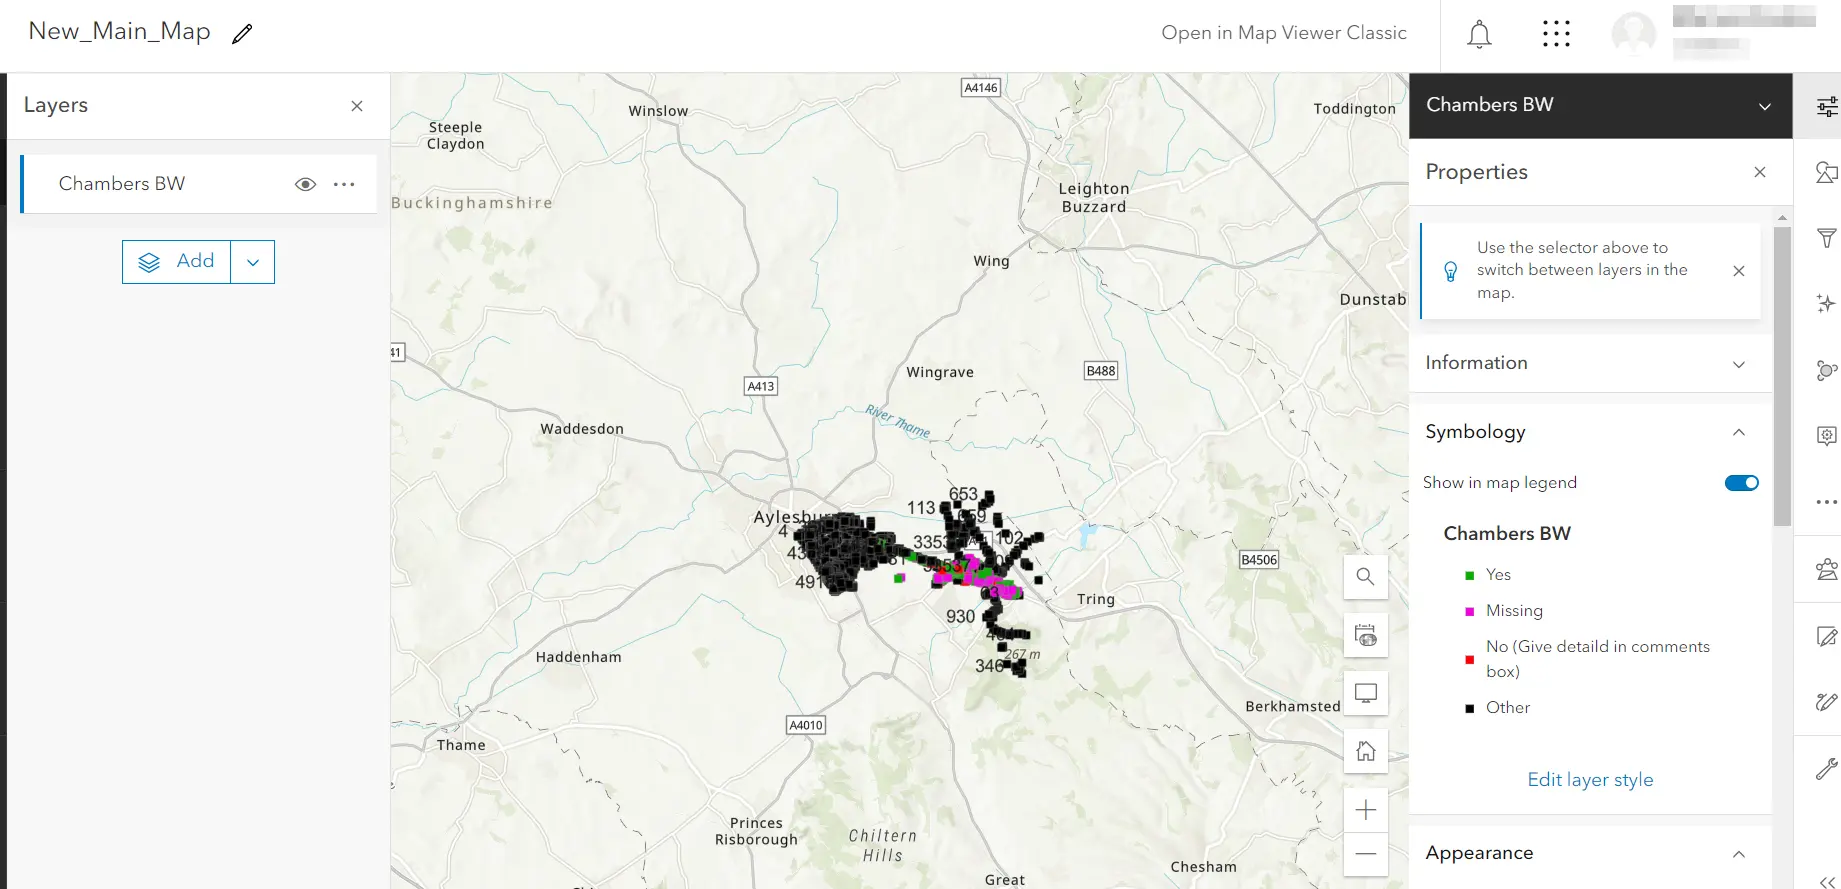
Pic. 8 Our map was saved in ArcGIS Online.
6. Create another New map and call it i.e. New_Test_Map (Pic. 9). This is the auxiliary map, where you will store another layer with the new data. It will be the “home” for the hosted feature layer.
Pic. 10 Creating another new map, which will play the auxiliary role for the main map created earlier.
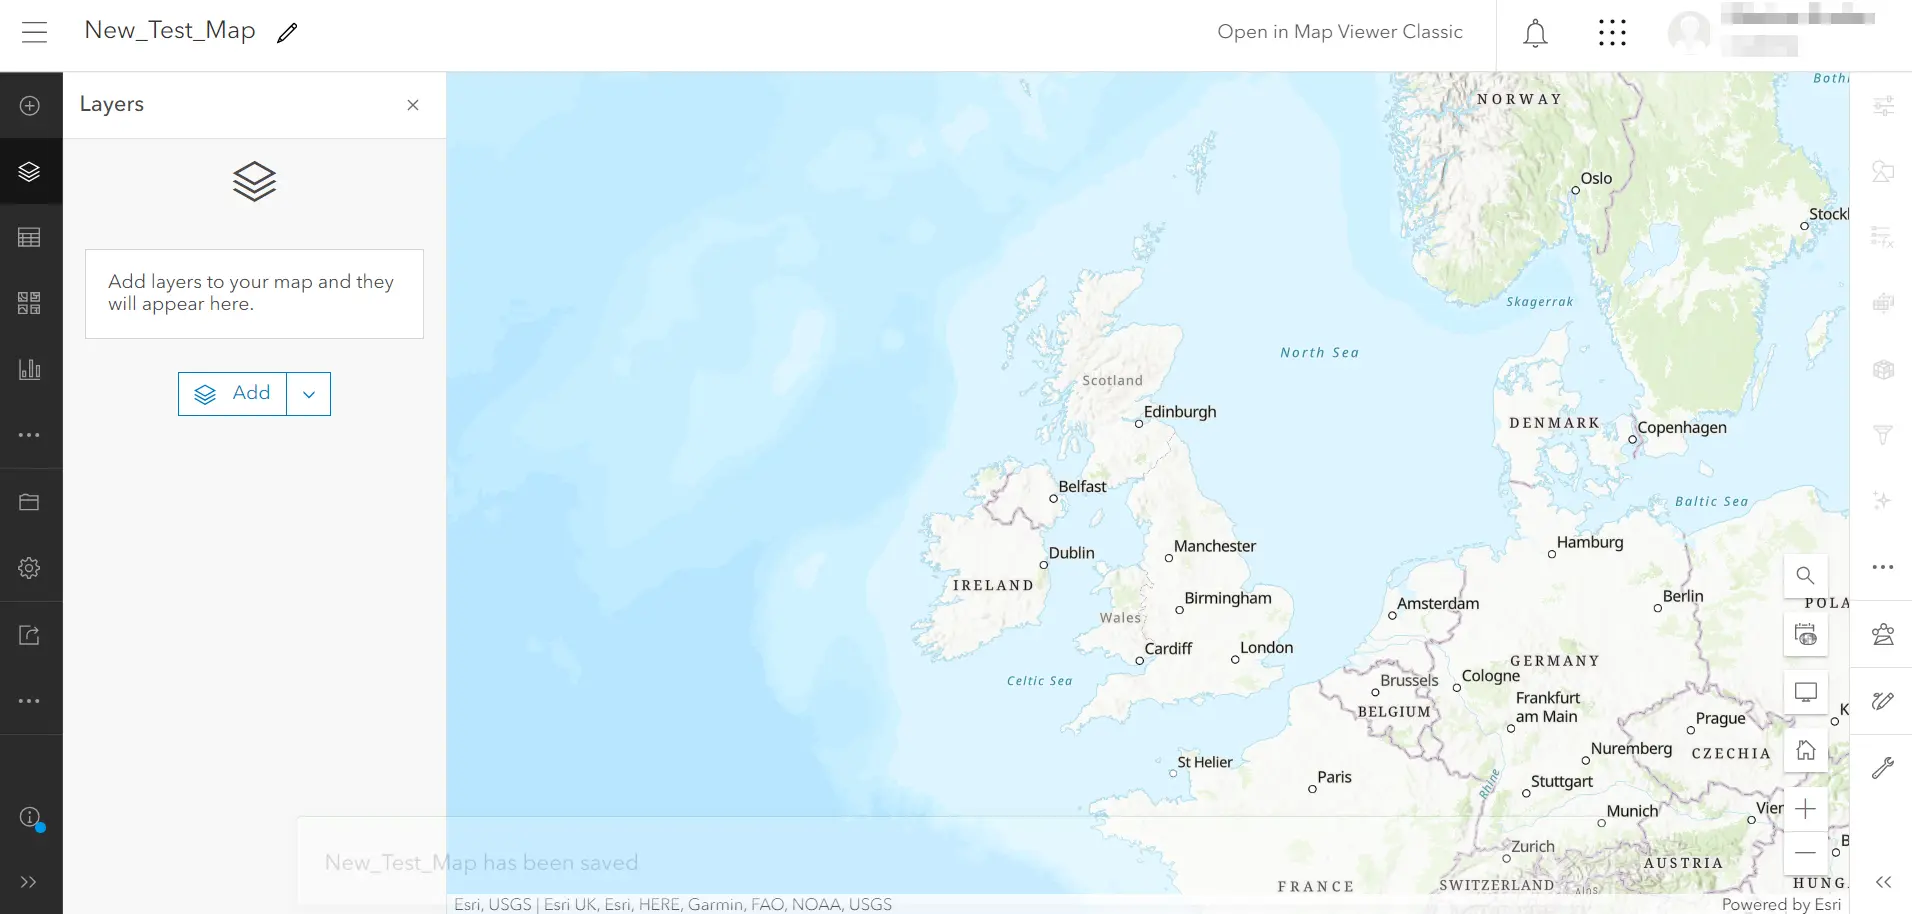
Pic. 11 New Test Map created in ArcGIS Online platform.
7. Go to Content -> + New Item -> Feature Layer -> Select an existing feature layer and pick up the feature layer adequate to your new layer geometry and type as described widely in this article. You will specify the new layer based on some older existing one, which is exactly the same. The pivot thing here is just equipping the layer with the new data for your new working area. Since we deal here with the chambers (point layers with specific question forms and other settings) we should find an analog layer with chambers used for another town (area).
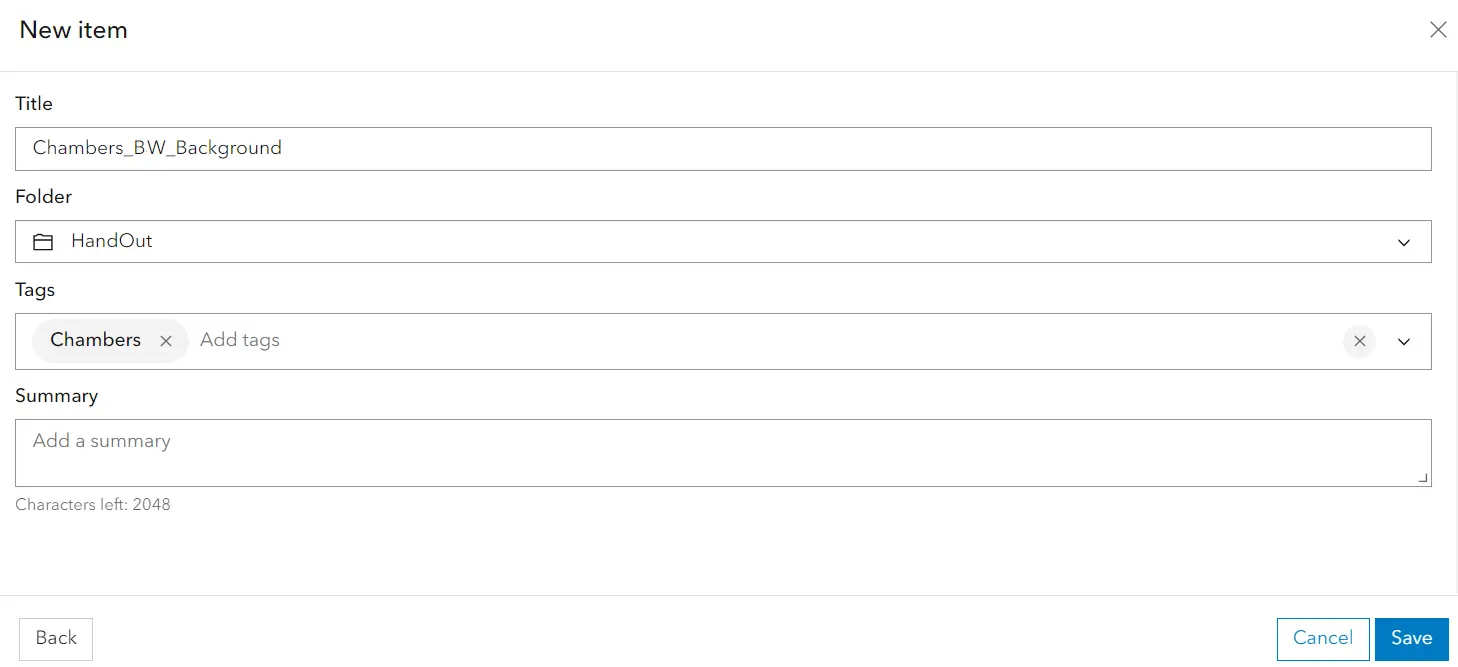
Pic. 11 Creating a new layer under a slightly different name.
Specify the name of your layer (Pic. 11) which should be slightly different. Let’s say, that it will be the “Background” layer, which will host the data and it won’t be used directly on the map. Once the dashboard appears, update the data with the new inputs (Pic. 12).

Pic. 12 ArcGIS Online update data to our newly created layer.
Because we are recreating the layer with the same settings, after data upload some columns are recognized and automatically allocated for us. If now, we can find them easily by using the dropdown just next to each field (Pic. 13).
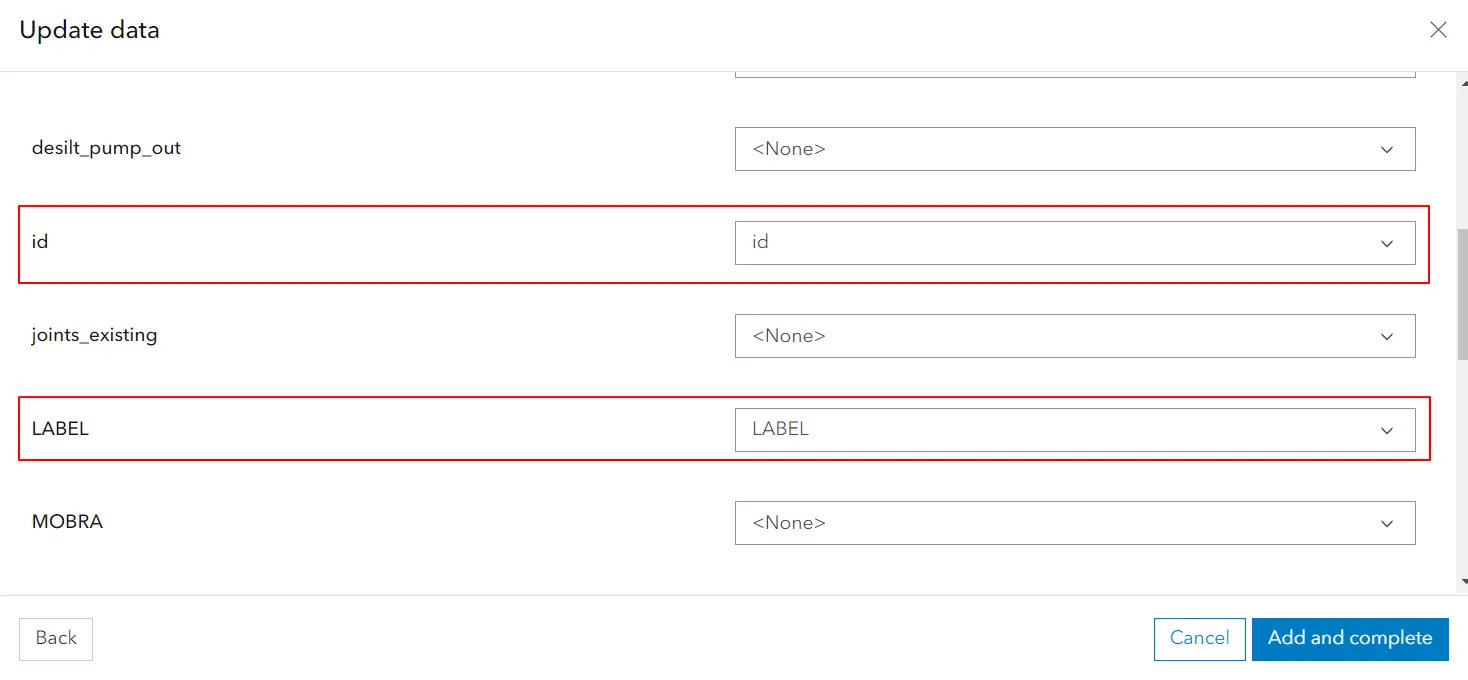
Pic. 13 Uploading data for our layer where the columns are matched automatically or manually.
8. Add this layer to the New Test Map, your auxiliary map where all the feature-hosted layers will be stored eventually. Use the same way as previously (as usual)(Pic. 14). Don’t forget to save your map!
Pic. 15 Loading new layer to our New Test Map in ArcGIS Online.
Our layer, when loaded successfully will look like a scratch with no styling. Only the default style is applied, but it’s not a problem. The most important here is the data uploaded for our new area. The layer here is feature-hosted because includes new data loaded as a root.
9. Open the ArcGIS Online Assistant platform and log in there by using your ArcGIS Online account. You will be asked just for the confirmation without giving the password as long as you are logged in ArcGIS Online already (Pic. 16).
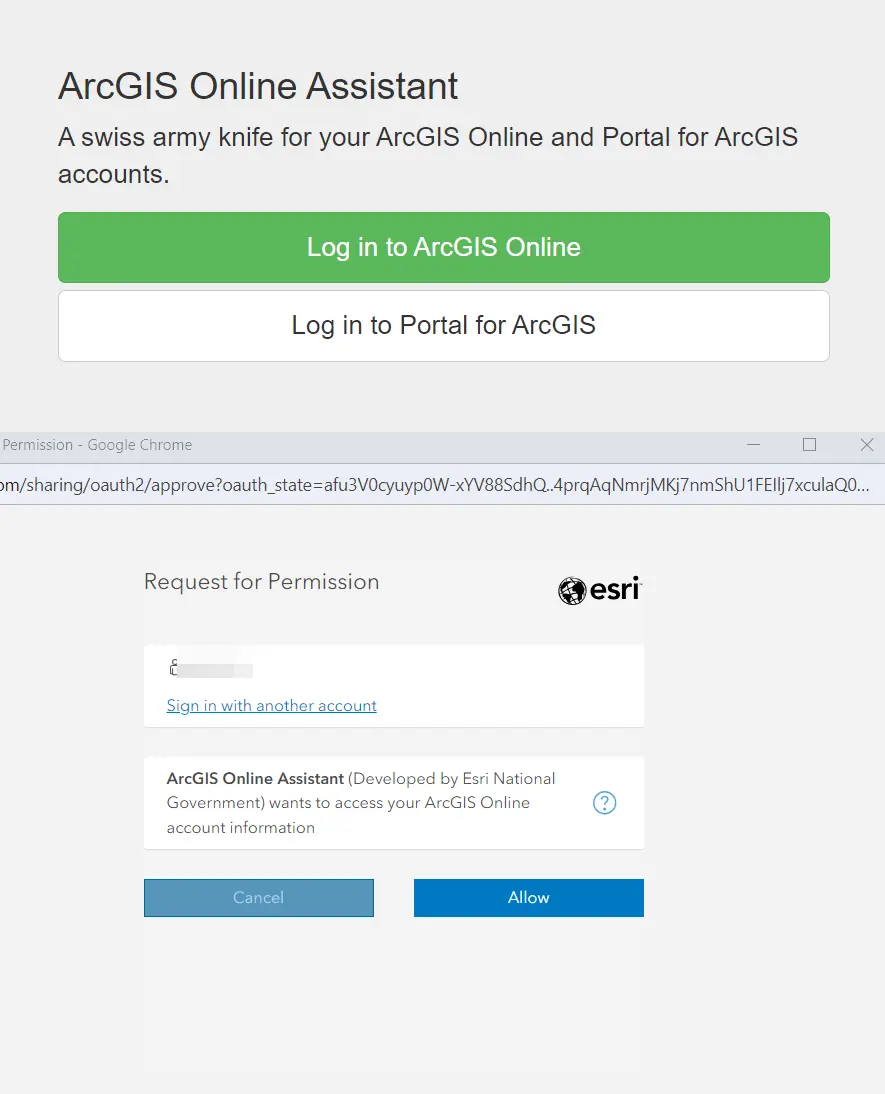
Pic. 16 ArcGIS Online assistant login.
10. Next, you will get to the basic root of your ArcGIS Inline account where all your projects (content with maps and layers) are stored. Each of them has a specific XML link which can be edited here. The panel has a nice categorization of all our folders. Moreover, you can get the link to your ArcGIS Online project here (xxxx.maps.arcgis.com). In the main bar you can find the I want to… option. For layer reproduction we must choose I want to… -> Update the URLs of Service in a Web Map option (Pic. 17).
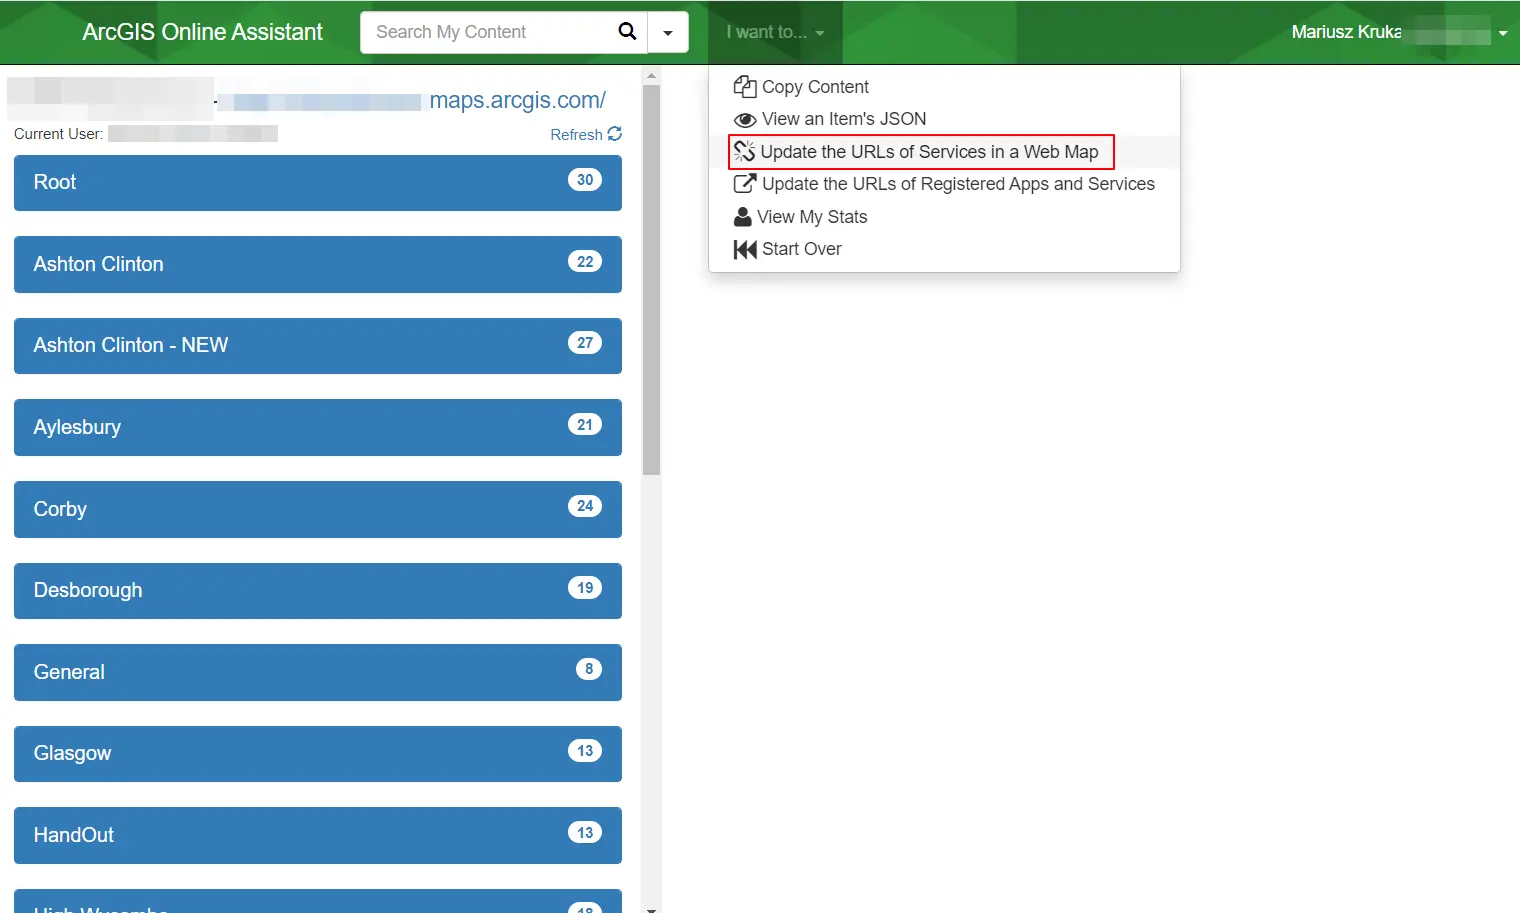
Pic. 17 The main dashboard of ArcGIS Online assistant with all the folders listed in alphabetical order, the main URL address for our ArcGIS Online project, and the general options, from which we should use the Update the URLs of Services in a Web Map for our purpose.
Once you select this option nothing will change, which is a bit misleading. However, if you enter any directory you can see that the map items are highlighted in turquoise color. It means, that the option has been selected.
11. Next find the directory with your new maps and layers you created just recently. As you can see each directory has a number on the right, which informs you how many items are in the given folder exactly. Sometimes it might be a bit helpful when the names of your directories are similar to each other. When you enter the right directory you will see all the items created just before (Pic. 18).
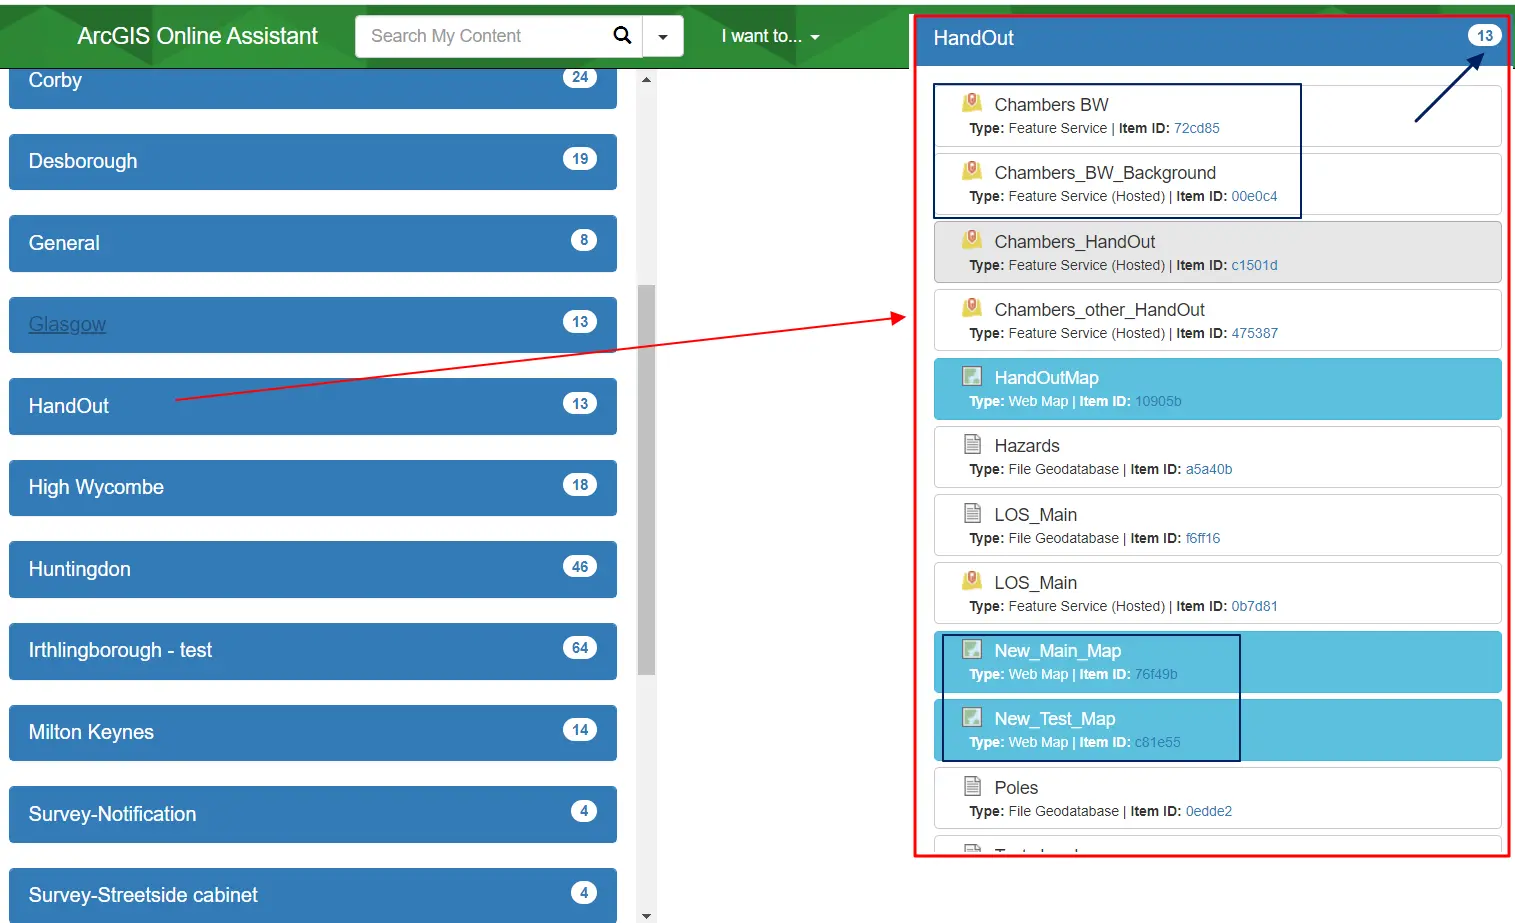
Pic. 18 The content of our directory with item types, where we can see the stuff created just recently. There are both maps and the layers used for this exercise.
Because the map contents are highlighted in turquoise color, it means that something in the main bar (I want to…) has been chosen and in turn, they can be opened (Pic. 19). After that you can see what exactly is comprised of the given map. It should be Operational Layers uploaded by yourself as well as Basemap Layers or the Tables when exist.
Pic. 18 The content of the map item is presented in ArcGIS Online Assistant.
In our point of view, the most important is the XML link, which is based on each item. Let’s compare the links of the Chambers_BW layer located in the New_Main_Map and the Chambers_BW_Background layer located in the New_Test_Map, they are different! (Pic. 19).
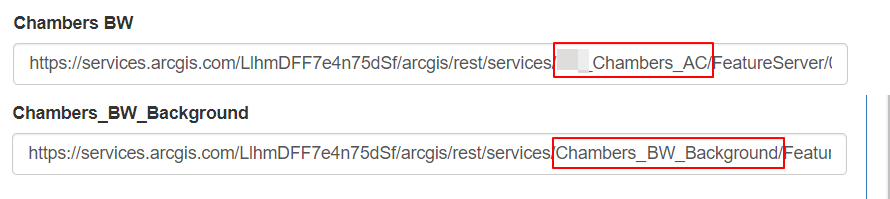
Pic. 19 Difference of layer links in ArcGIS Online Assistant
These links are very similar to each other except for one bit of bounded red. The XML link always refers to the “mother” feature hosted layer from which this layer has been created. When the layer is created from scratch like we did for Chambers_BW_Background the layer will be hosted straight away and you will see it in the link. In the other situation, when the layer has been saved as from another layer it’s at most the feature layer, but NOT hosted. Its mother “host” will be based on the layer, which this one was duplicated (saved as) from. In turn, the Chambers BW layer has its origination in another layer Chambbers_AC. Therefore the content presented on the New_Main_Map reflects still our old project (Pic. 8).
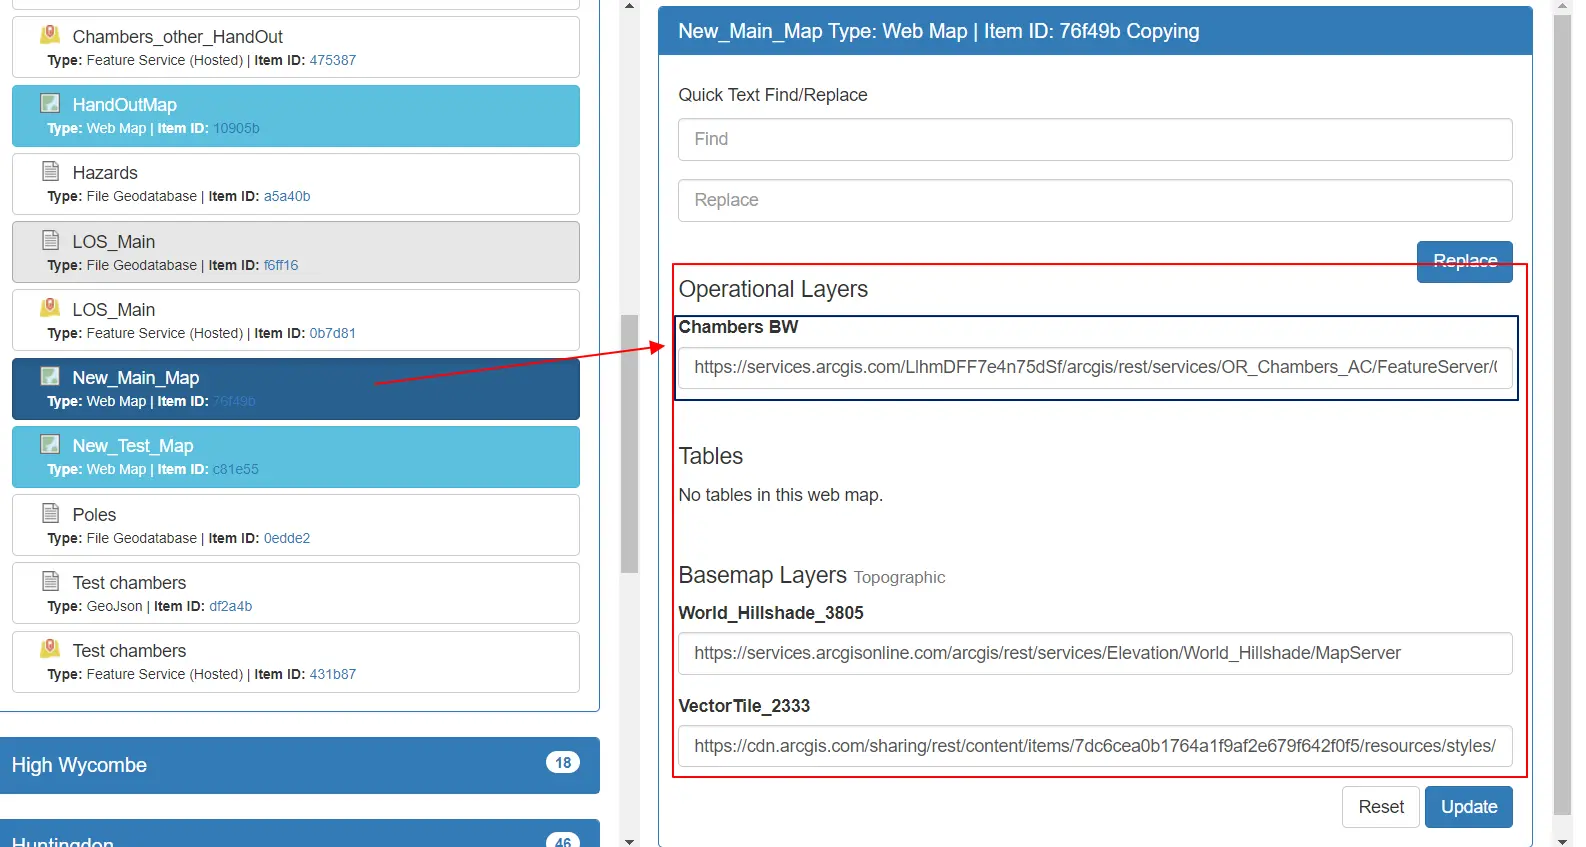
12. Replace the link in your Chamber BW layer, as you want to have the style and setup retained with the new data. Since now the Chamber BW layer is still just feature one, but its host is redirected to the Chamber_BW_Background layer with the new data provided (Pic.20).
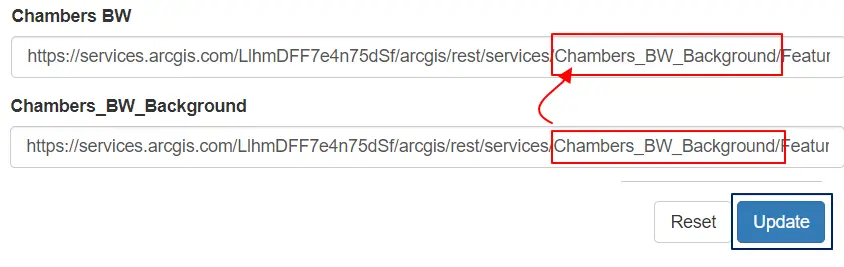
Pic. 20 Replacing the links in the ArcGIS Online Assistant.
Don’t forget to click Update at the end. Wait several seconds until you see the greenish box with Success! saying that everything is alright. If not you must check the link, because probably you copied it wrong and is missing something. As good advice, I would say to copy the link of both layers somewhere outside of ArcGIS Online Assistant i.e. to Notepad to prevent it from being lost. Otherwise, you put your layer at risk of failure, which can be extremely painful when some changes have been already applied.
13. Load the New_Main_Map and see the difference! Your feature layer has been updated successfully! Now it’s empty because nothing has been done yet with regards to changes, site survey, etc (Pic. 21).
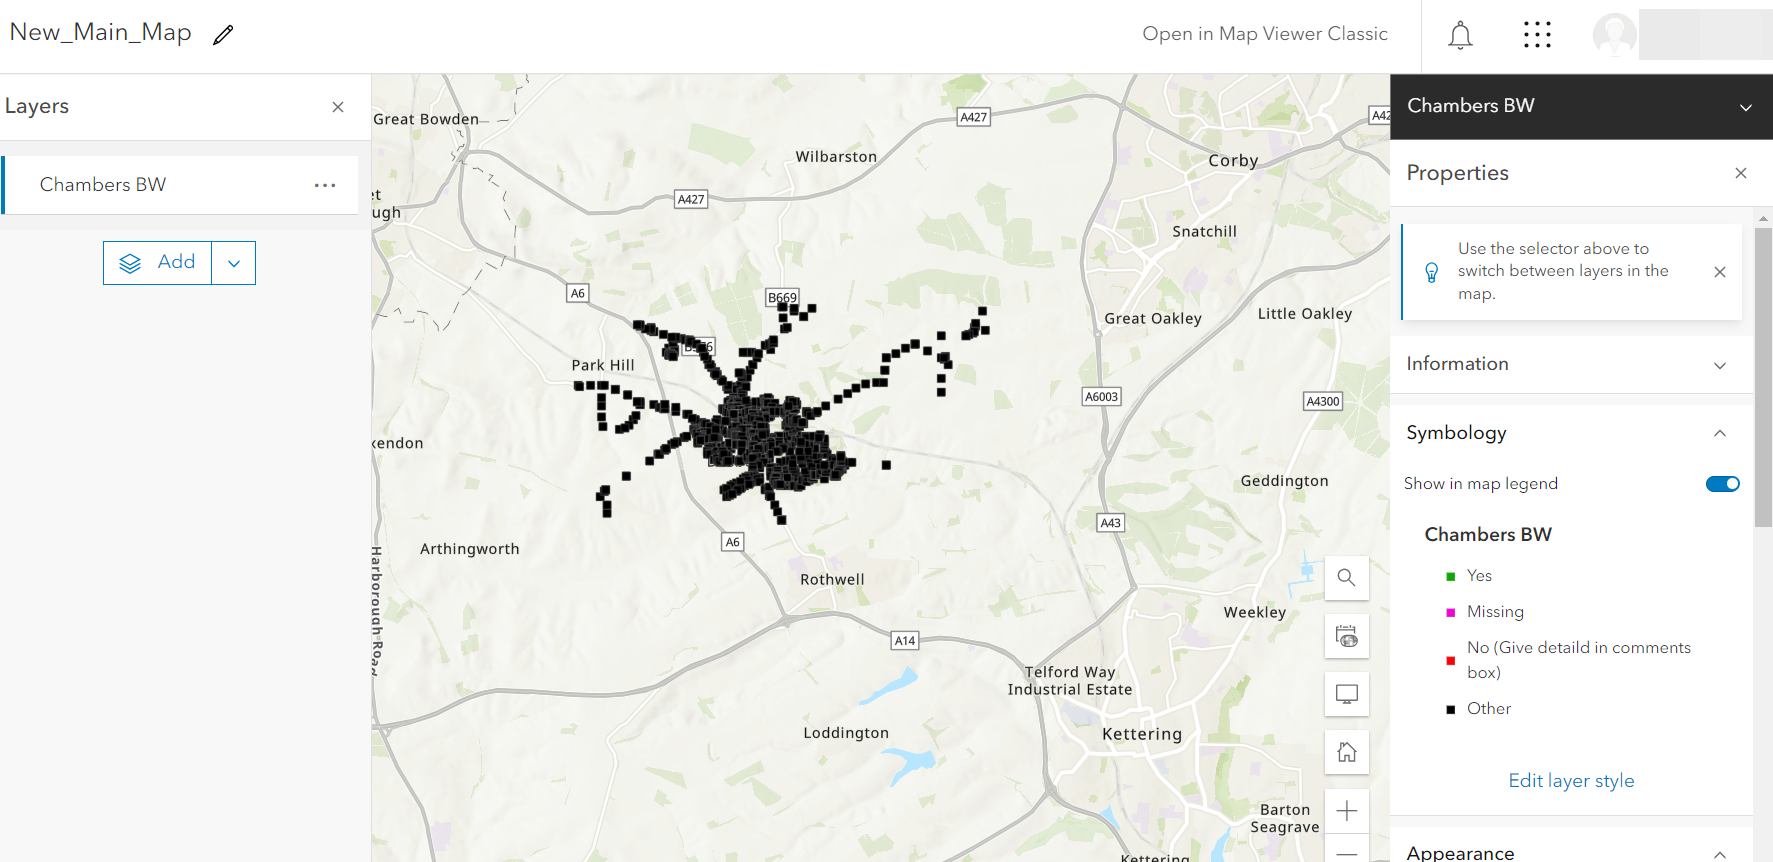
Pic. 21 The feature layer has an updated link with the feature-hosted layer including a new dataset.
The last thing is the Field Maps Designer question form, which can’t be edited from the Feature layer. When the layer isn’t hosted we cannot work with the question form. All our lists are inactive (Pic. 22) and reordering queries might be unsuccessful.
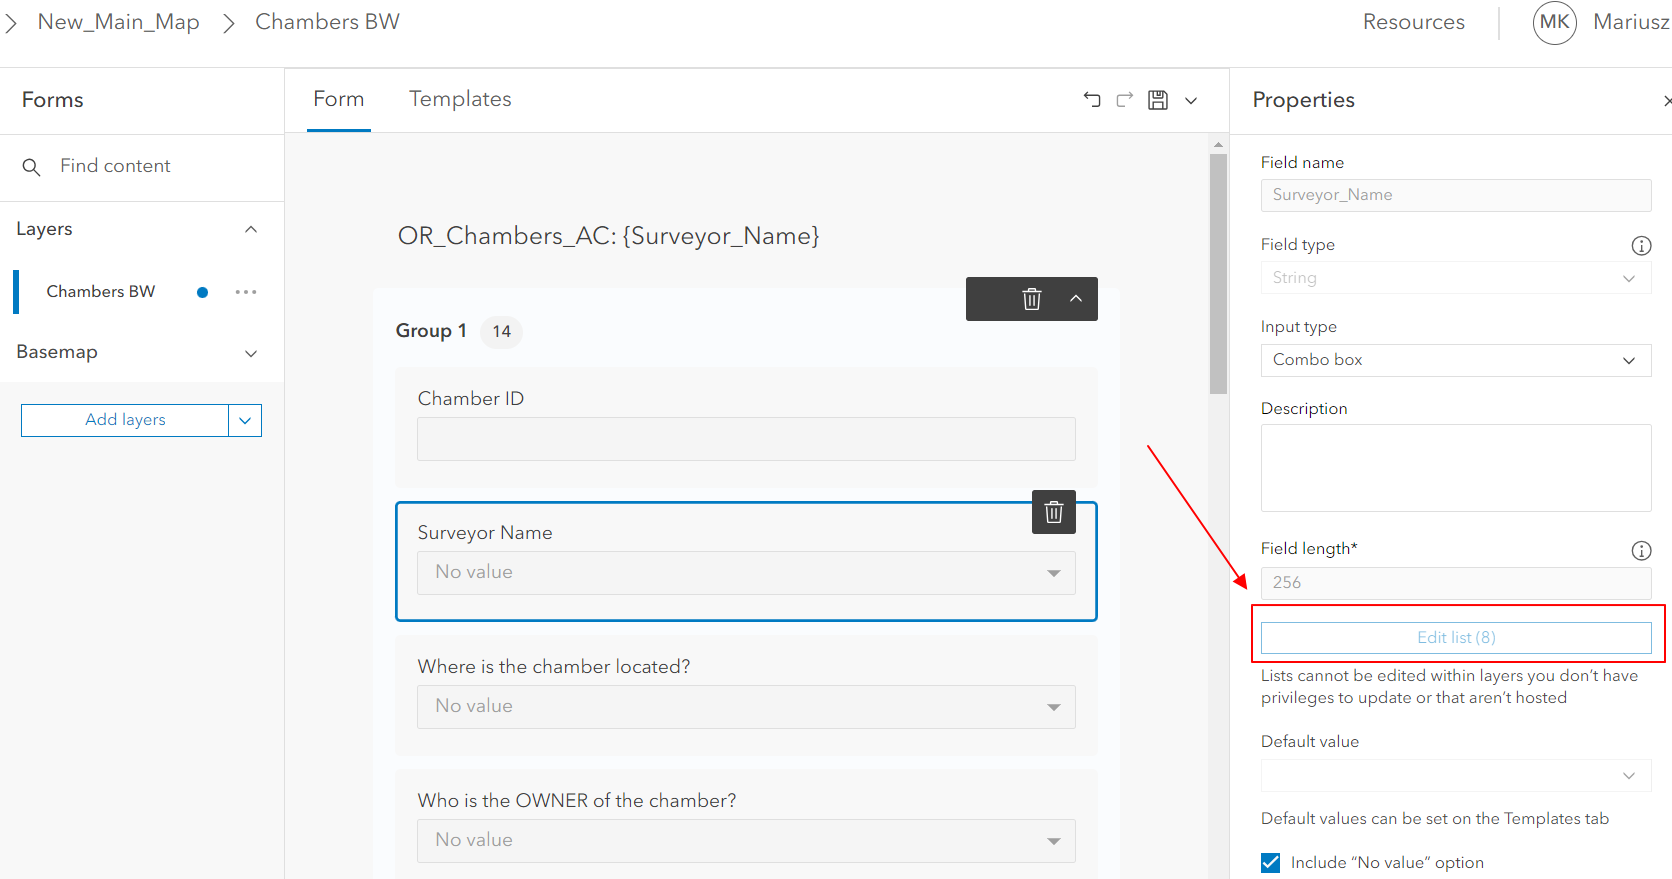
Pic. 22 Inactive lists in the Field Maps Designer mean, that the form builder alterations are restricted to featured but not hosted layer.
All the changes we need to apply to the Field Maps Designer question form must be done in the Chambers_BW_Background layer, which is the hosted layer for the Chambers BW layer retaining just styling and settings.
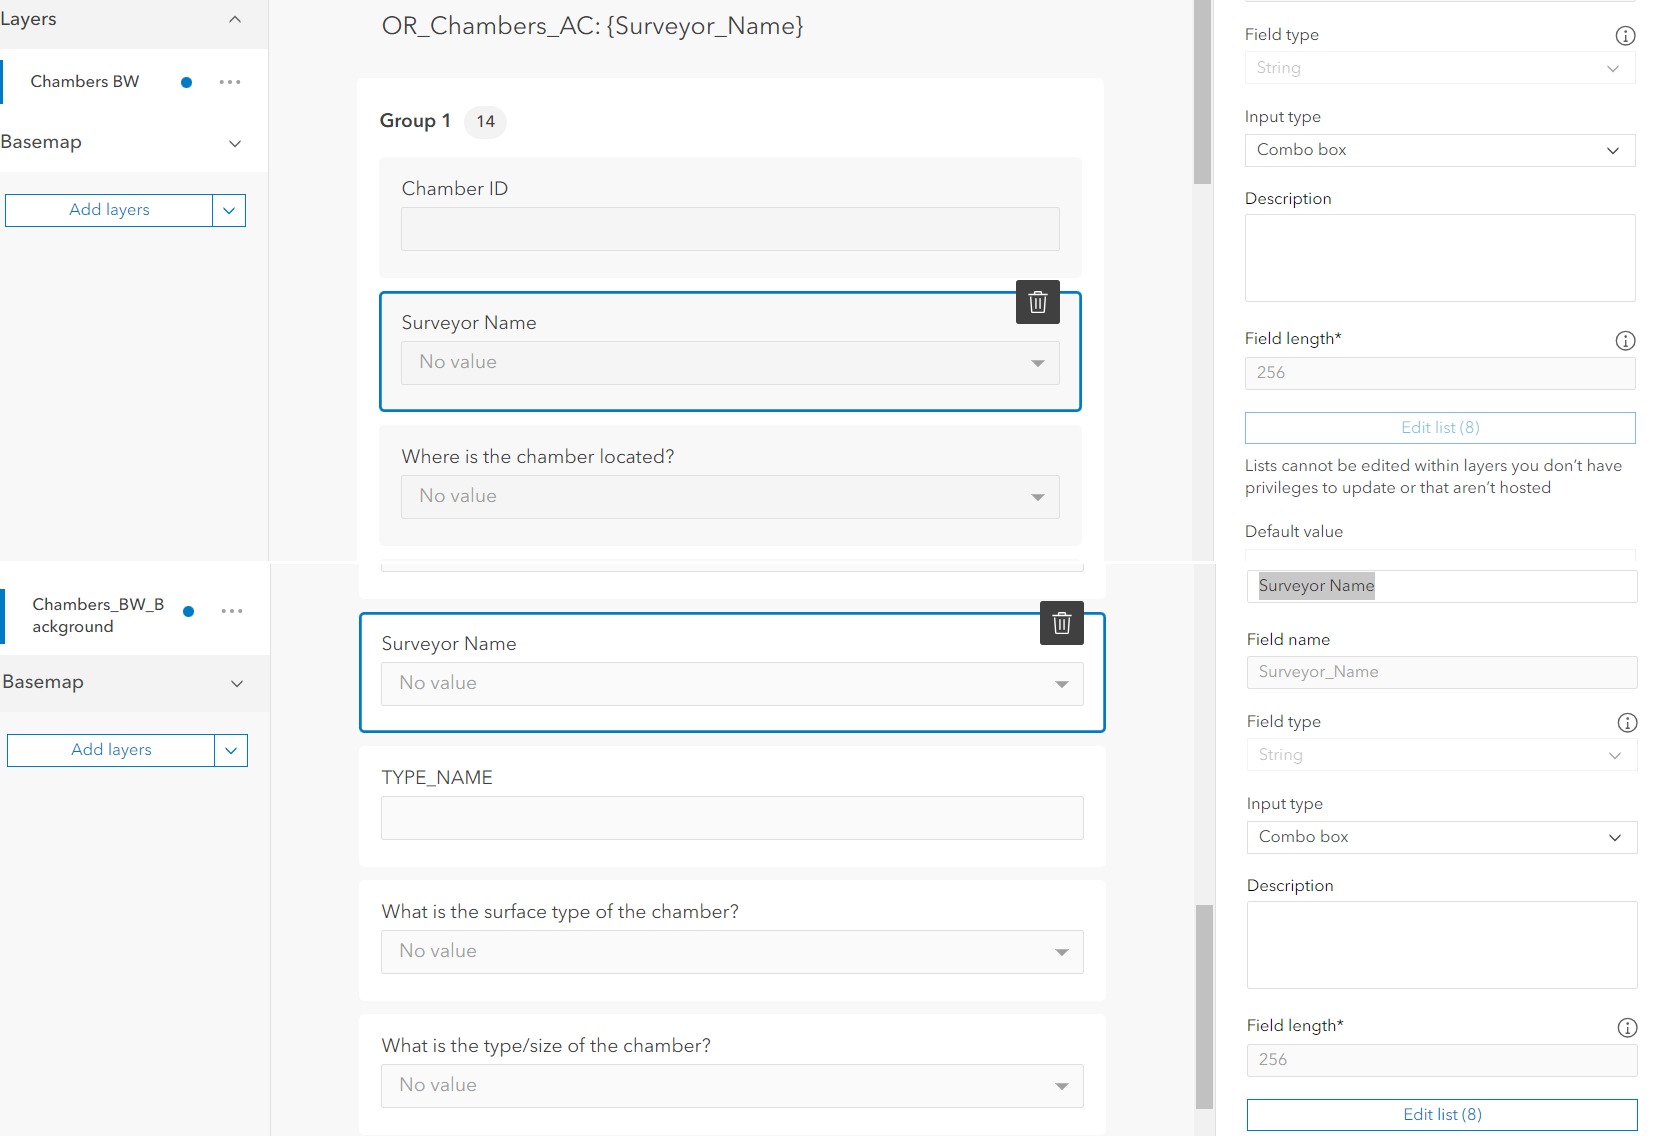
Pic. 23 The difference in question form builder between the hosted (below) and non-hosted feature layer (above).
Remember also, that our question form in the feature hosted layer (BW_Chambers_Background) we created is chaotic and must be reordered first on the basis discussed in this section.
Mariusz Krukar
Links: