
When you finish work on your ArcGIS Online project, everything is stored on the ArcGIS Online server. Next, you have several options for downloading it. Unfortunately ArcGIS Online, unlike i.e. ArcGIS Pro doesn’t have the option for a bunch of data download. You must go through every single feature hosted layer and collect your data.
The Export Data can be accessed straight from your feature-hosted layer panel, which in my opinion is the most convenient option for anyone (Pic. 1). Another option is using the feature hosted layer link below and exporting data by Create Replica of our layer.
The feature hosted layer data export is nothing else like the creation of the independent copy of our layer, which can be used next in various GIS environments. Unfortunately vast majority of the file formats support only the items, but without their attachments. The only format, which can retain all the images and attachments loaded to the ArcGIS Online map is the FGDB (FileGeoDataBase) format, which this text is about.
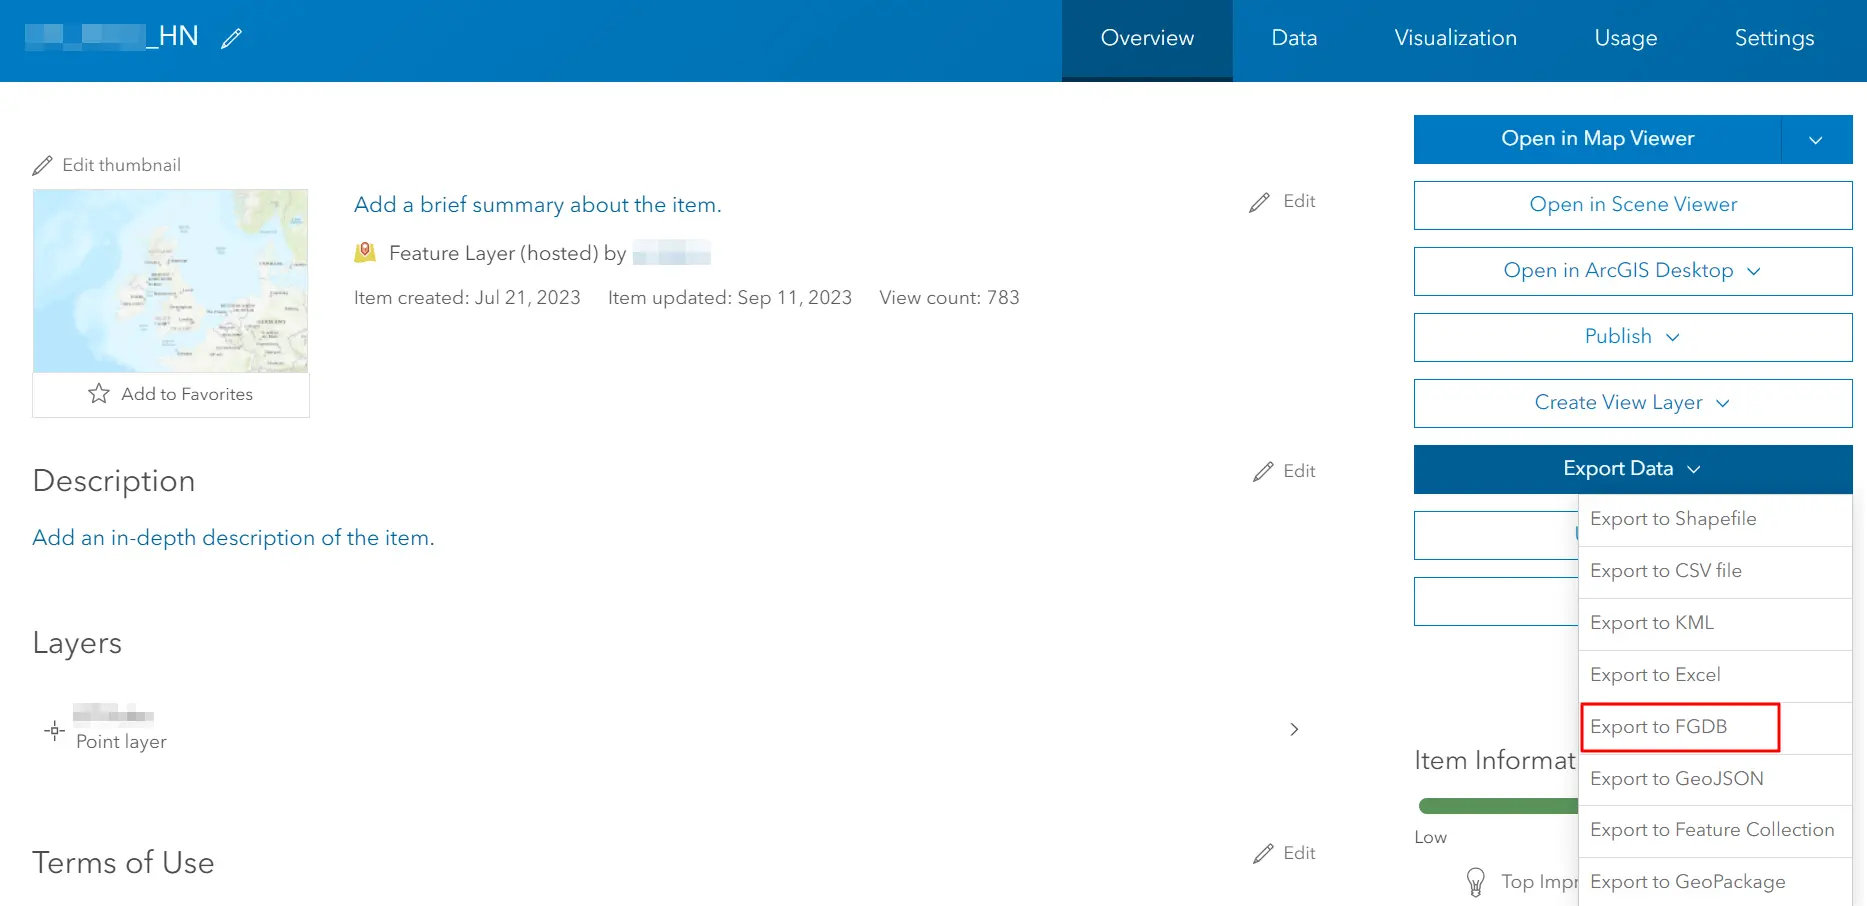
Pic. 1 Feature hosted layer export file format options with the FGDB (FileGeoDataBase) highlighted as the one, which can store all the attachments used in our ArcGIS Online map development.
By selecting any type of file you will see the export options. Bear in mind, that now you are not downloading the layer data, but the platform prepares the downloading file for you! Before it, you need to specify the extracted filename and the target directory within your ArcGIS Online server (Pic. 2).
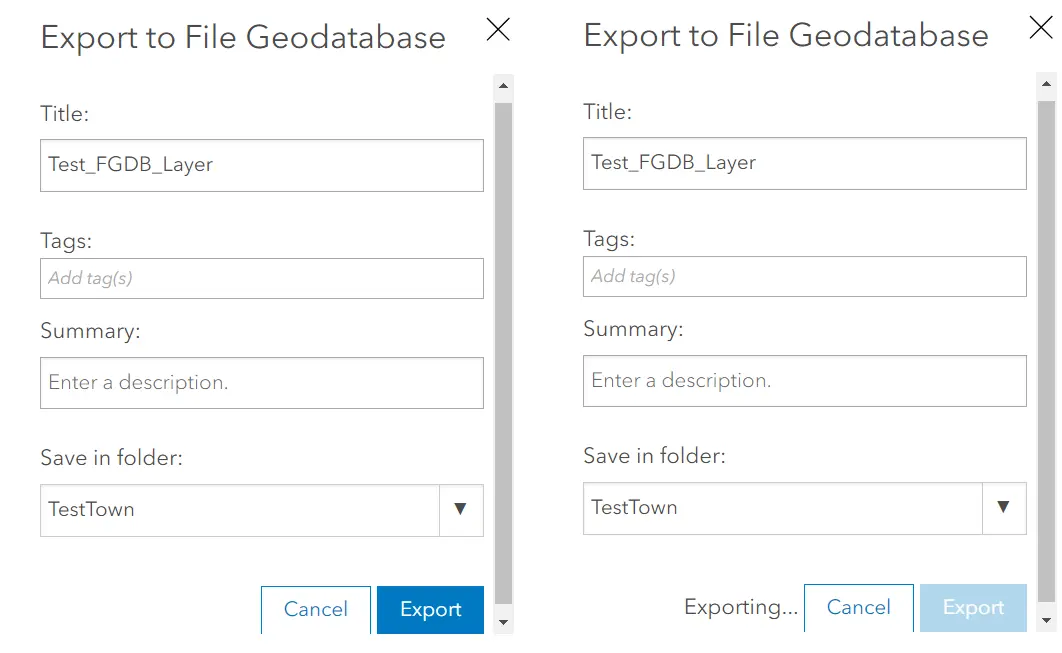
Pic. 2 Feature-hosted layer data export to FileGeoDataBase format.
When your layer includes quite a lot of attachments and large-scale images the file preparation might take a while. After that, you will see the separate dashboard for the data export file (Pic. 3). There are still some options available, although the most important for you is probably the Download one. Before you hit the Download button, you can check the total size of the FGDB file visible below on the right.
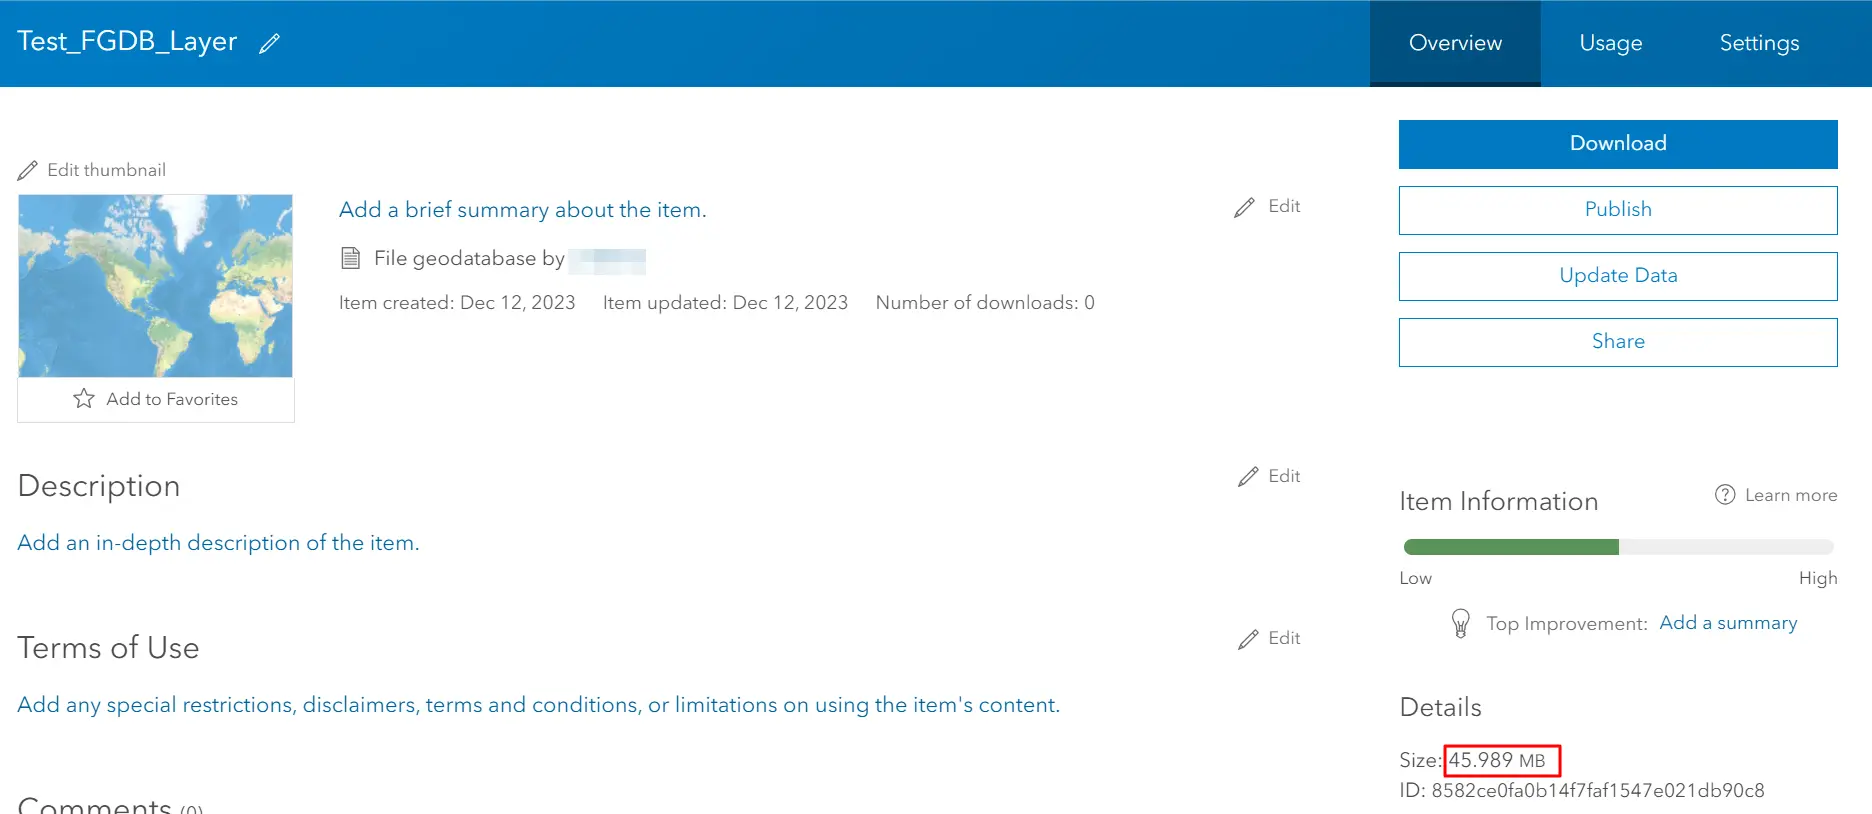
Pic. 3 The feature-hosted layer data exported to the FGDB file is ready for download. The information about the total file size can be found on the bottom right.
After some time your zipped file will be downloaded. After unzipping you will see the major binary file in which all the attachments are stored (Pic. 4).
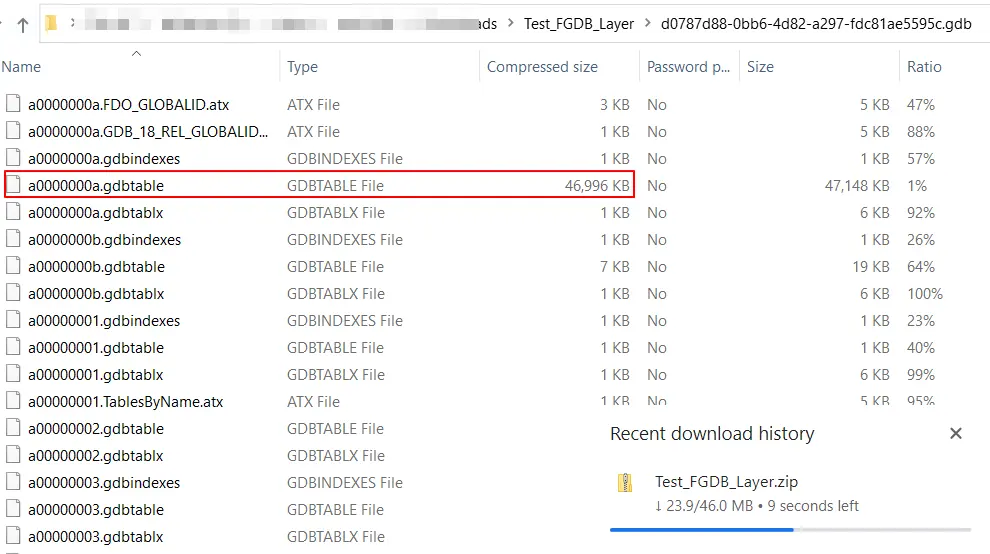
Pic. 4 The FGDB file was downloaded and unzipped.
The downloaded file must be unzipped.
Since then, we need some software, which could extract the content of this GDBTABLE file for us. Let’s use QGIS for it.
There are 2 options for adding an FGDB file to QGIS. The quickest one is just like this:
Top main bar -> Layer -> Add Vector Layer. In the Source Type select Directory and as a Source define the Type as OpenFileGDB and provide the target path of your Vector Dataset, which should be inside of the unzipped FGDB file (Pic. 5).

Pic. 5 Adding database layer into QGIS.
Another method is using the Browser section on your left-hand side in the QGIS panel. By browsing the directory, in which our ArcGIS Online FFGDB file was located we can find it. The folder with all the data doesn’t look like a typical folder as it features the database icon. It means, that these are data you are after. Next by opening it, you have 2 basic sets of data – the point (or line) layer which states the geometry and information content, and another one that includes all the attachments. You can drag them easily to your QGIS project map canvas making them visible in the Layers panel (Pic. 6).
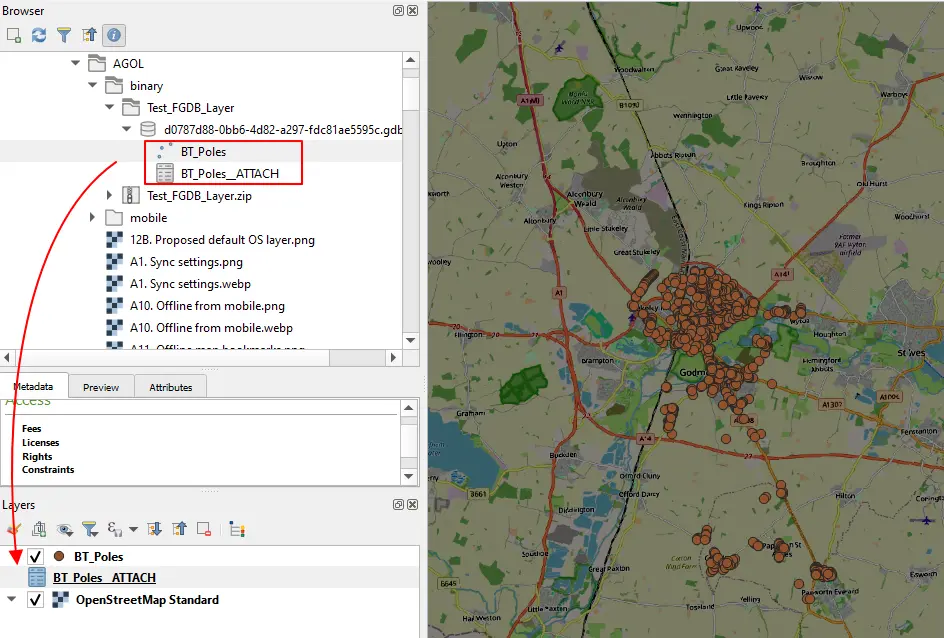
Pic. 6 ArcGIS Online FGDB file is now displayed in the QGIS environment.
The biggest result can be seen on the QGIS map canvas anyway. Your database file content is loaded successfully.
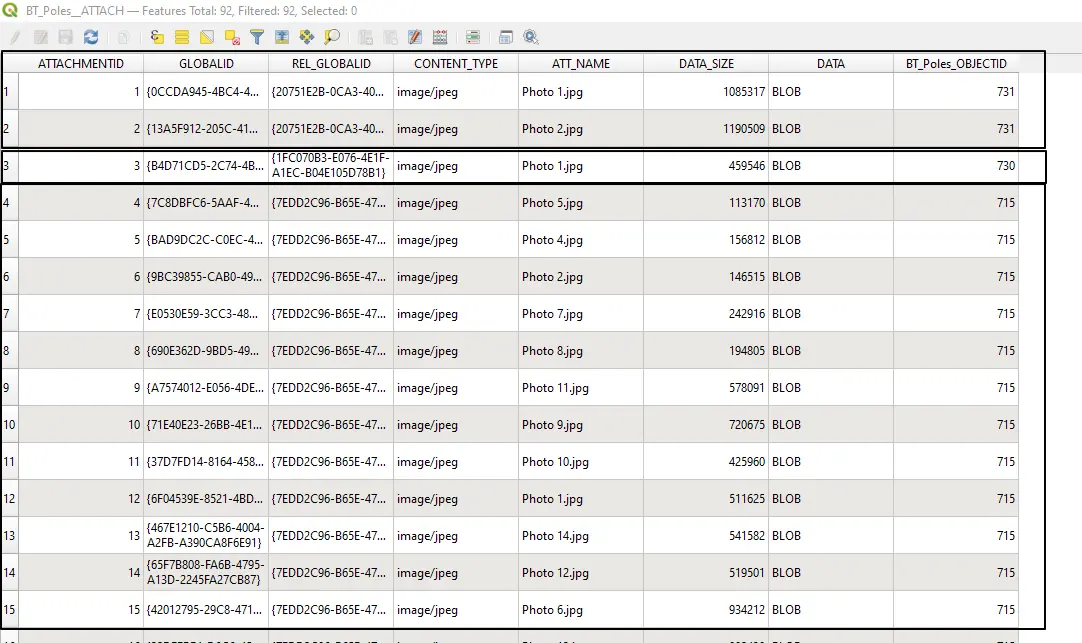
The final task is the extraction of all the attachments. The thing is simple as far as the entire dataset is concerned. Even so, you would need a couple of operations for the correct allocation of the given attachment to the proper object. For this purpose, we need to look at attribute tables from both layers (Pic. 7). At first glance, you will see, that the attachment layer doesn’t include all objects! It means, that not all objects edited on our ArcGIS Online map have been equipped with attachments. Secondly, important is to find the mutual column correlating the attachments with their mother objects.
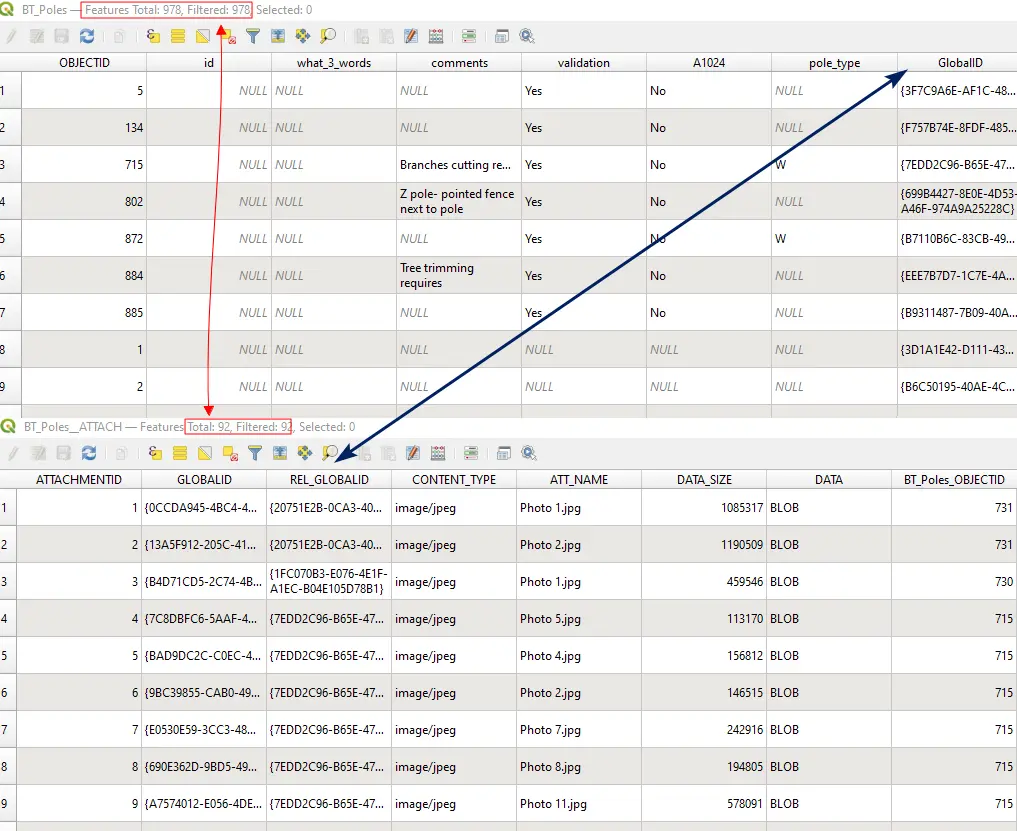
Pic. 7 The attribute table comparison between the item and attachment layers, which includes also the mutual columns with the code.
The point (or line) layer has the unique GlobalID code, which is assigned to the individual OBJECTID number. The same GLOBALID code appears in the attribute table of attachments, but we can’t use it. The GLOBALID column, despite the same name, represents the unique code allocated for the single image. The correspondant of the GlobalID column from the layer of items (points, lines, or polygons) is the REL_GLOBALID column here. By looking at the code you can see, that it repeats from time to time over the rows, which means, that several images (GLOBALID codes) apply to one object (REL_GLOBALID). Now you have to make the correlation between these 2 tables and the best way is using the Joins option.
By right-clicking on the _ATTACH layer -> Properties -> Joins you can Add Vector Join (Pic. 8).
Pic. 8 Joining columns between item and attachment layers.
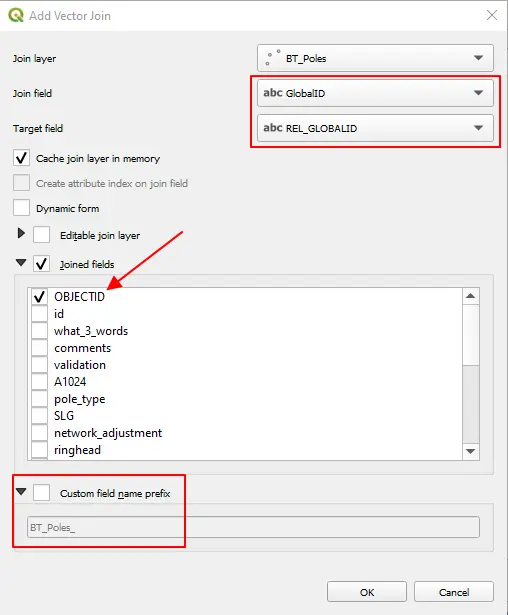
Next, you need to define the join layer, which will be the point (or line) layer, basically the layer with items and their content. The Join field and Target field must roughly correspond to each other. Our case is simple because the same column occurs in two layers. Finally, you need to define the field, which you want to join. Since you found the correspondence between the ObjectID and REL_OBJECTID layers, you should find the analog correlation within the item layer column. As has been flagged up earlier, in your point (or line) layer the unique OBJECTID column corresponds to the GlobalID. This is the column, that must be joined, so select it.
Lastly, optionally some Custom field name prefixes can be provided, but it’s not mandatory. The tool will assign for you the string visible in the inactive grey field.
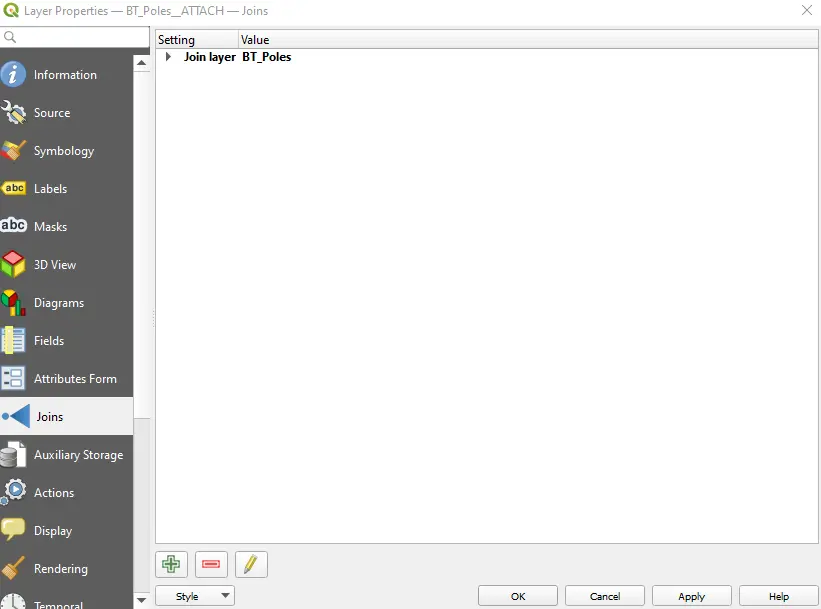
Pic. 9 New join defined.
When done, you will see the new join made (Pic. 9) and there is nothing but just hitting the Apply button.
Afterward, you will see the changes in the attachment layer attribute table, where the OBJECTID has been appended (Pic. 10).
Pic. 10 Joined OBJECTID column from the item layer, which indicates which object the image code belongs to.
By having the OBJECTID column appended you will see which object the image code belongs to and also how many pictures (attachments) fall under the given item.
Your last step will be simply the extraction of the attachments based on their allocation to the layer item. There is a good algorithm in QGIS that does it smoothly. Find the Processing Toolbox -> Extract Binary Field and fill up the options in the box as shown below (Pic. 11).
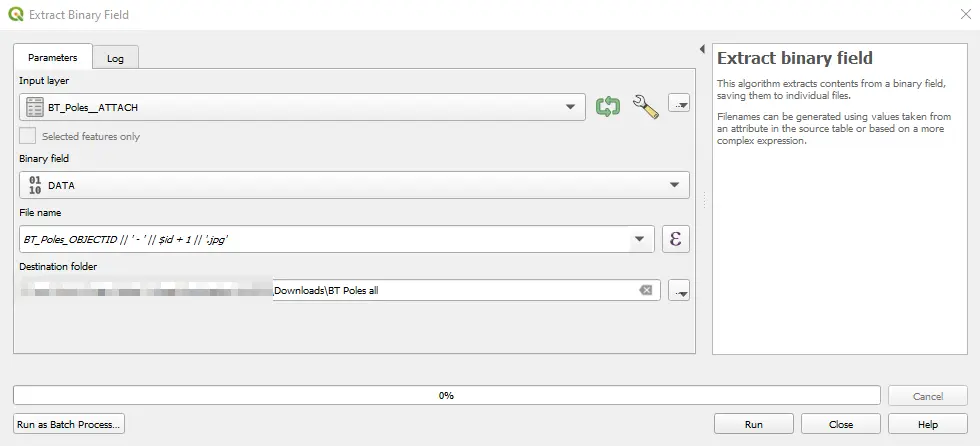
Pic. 11 Extract binary fields in QGIS.
The most important is the Binary field, which must be always DATA. Next, you will define the output File name by providing the following expression:
BT_Poles_OBJECTID || ' - ' || $id + 1 || '.jpg'
where you are concatenating the OBJECTID with the number of the image and its extension (.jpg). In turn, all the images will be extracted to your Destination folder (Pic. 12).
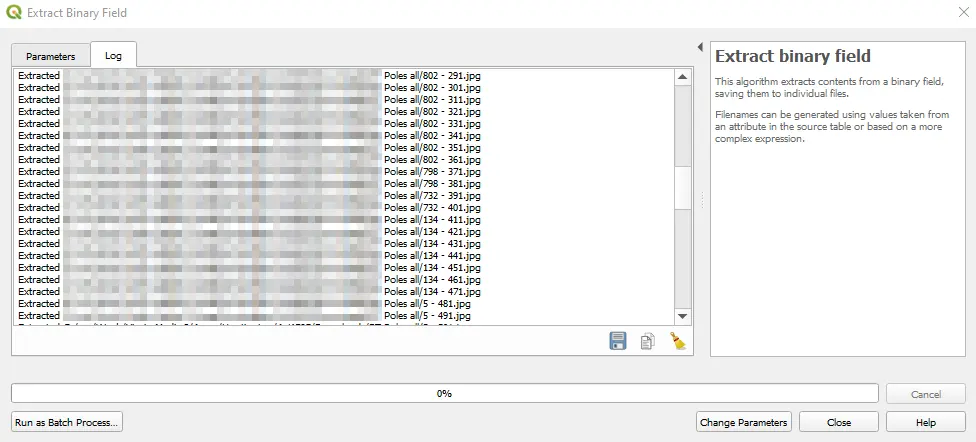
Pic. 12 All the attachments are extracted to the destination folder.
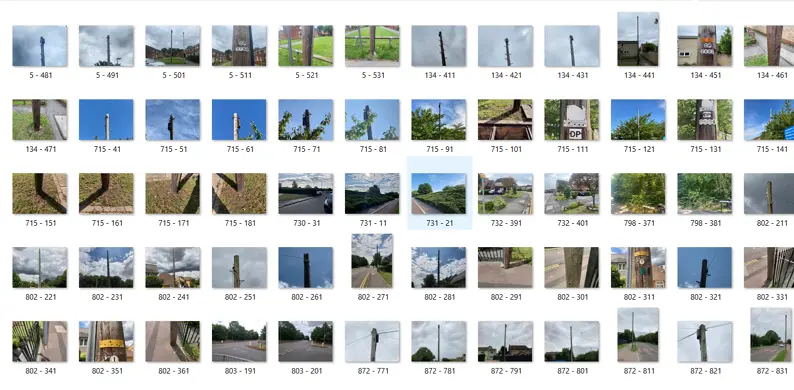
Pic. 13 All the ArcGIS Online map attachments are downloaded to the folder.
Now let’s consider the situation when you need the attachments from some region instead of the entire area. For this reason, you need to select the area and open the attribute table, where the Show Selected Features option will be applied (Pic. 14).
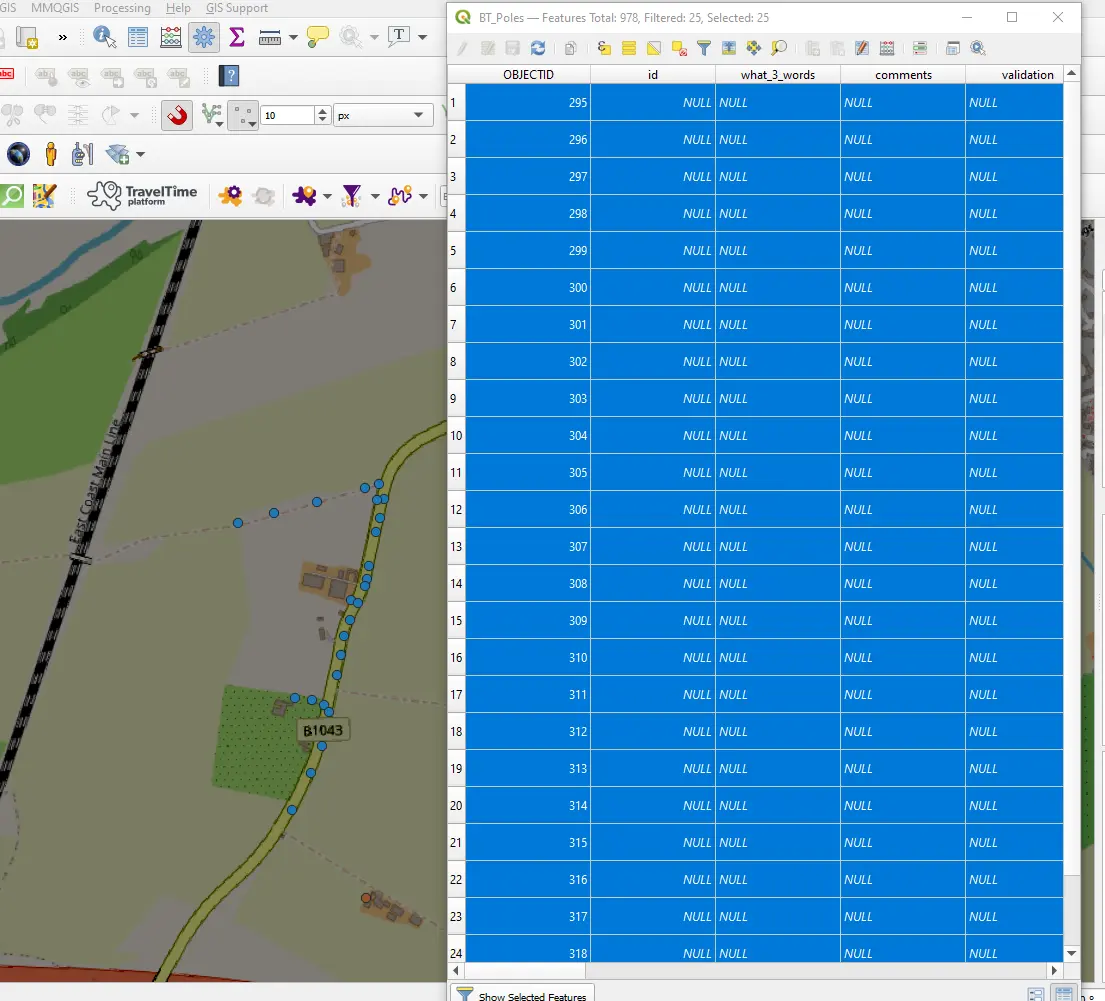
Pic. 14 Attribute table showing just selected features.
By knowing the OBJECTID, we can make the parallel selection in our attachment layer. Open the attribute table of your attachment layer and choose Select Features using an expression option (Pic. 15).
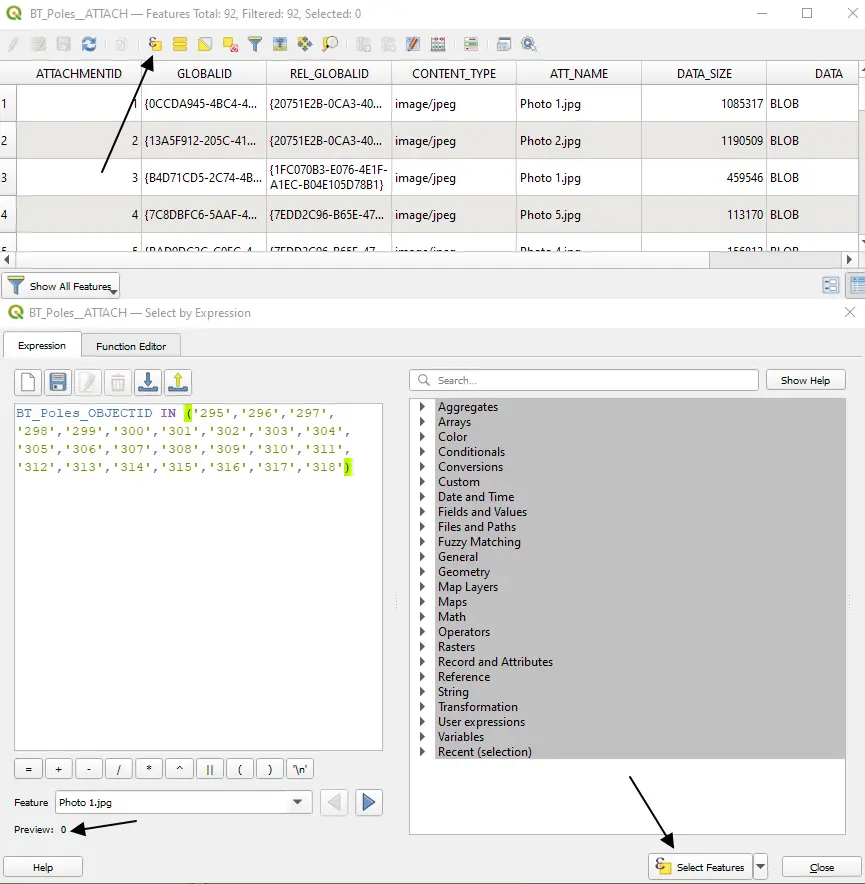
Pic. 15 Batch selecting items in QGIS attribute table.
In the expression the following formula is required:
BT_Poles_OBJECTID IN ('id1','id2','id3'...)
which will pick up all the single items in a bunch.
Make sure, that you don’t have the red text in the preview. If 0 or another black value is shown, then everything is right.
Optionally you can open the attribute table and check the applied selection by togling Show Selected Features. Finally, by using Extract Binary Field, you must include only Selected Features (Pic. 16).
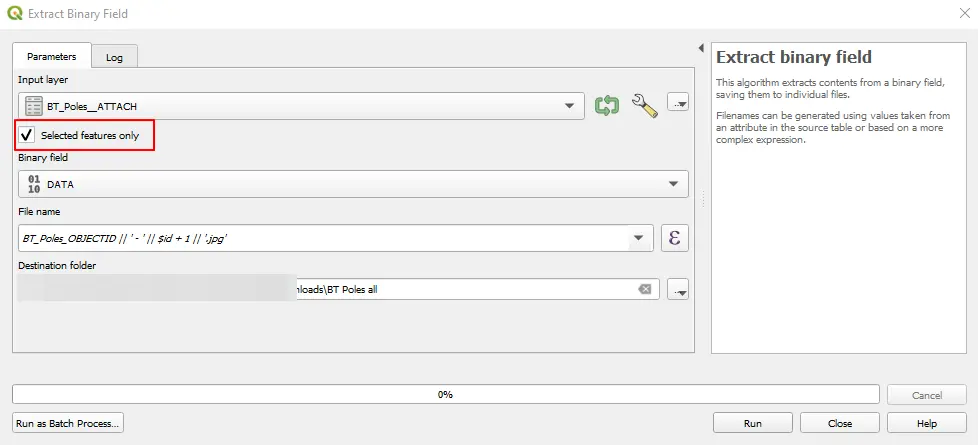
Pic. 16 Extracting binary field with the Selected features only option.
The File name expression remains the same.
In other situations, you can also make the selection of features based on its type, etc. The principle in this case will be the same. As you see, the process isn’t complicated and all the attachments provided to the ArcGIS Online map can be downloaded later.
Mariusz Krukar
Links:
- https://doc.arcgis.com/en/arcgis-online/manage-data/use-hosted-layers.htm
- Batch download hosted feature layers from ArcGIS Online in ArcGIS Pro
- Download publicly shared data from ArcGIS Online to the local machine as shapefiles
- How To: Download and Extract a Hosted Feature Layer with Attachments as a File Geodatabase in ArcGIS Online
- Enable file geodatabase downloads
- Create an independent copy of a hosted feature layer in ArcGIS Online
- ArcGIS Online what’s new
Forums:
- https://community.esri.com/t5/arcgis-online-ideas/batch-export-feature-layers-from-arcgis-online-to/idi-p/937923
- https://www.reddit.com/r/ArcGIS/comments/og455i/arcgis_online_best_way_to_download_photos_from/
- https://gis.stackexchange.com/questions/26285/installing-file-geodatabase-gdb-support-in-qgis
- https://gis.stackexchange.com/questions/78133/how-to-select-a-multiple-field-value-by-expression-from-the-same-layer-in-qgis
- https://community.esri.com/t5/arcgis-online-questions/upper-limit-of-storage-in-arcgis-online/td-p/415965
Youtube: