One of the most important features offered by ArcGIS Online is using the maps in the Offline mode. It sounds like the contradiction of the major platform, which is intuitively dedicated to Online work only. The Offline mode requires some conditions to be met upon launching, but everything is doable quite easily.
I decided to elaborate this thread here with the hope, that it will help everyone to work with ArcGIS Online this way.
The preparation for the offline maps should commence from the changing settings of our layer.
When entering Content -> Our folder -> Your layer name -> Settings -> Feature layer (hosted) in the Editing section you can find the Enable Sync option as shown below (Pic. 1).

Pic. 1 The Enable Sync (required for offline use and collaboration) option.
The most important prerequisite for offline map use is the feature (hosted) layer created from scratch or template. The offline mode won’t work for other types of layers (files loaded from the device or hosted layers created along with direct file loading).
The alternative way of enabling our layers offline, admittedly much quicker (as we can do it in a bunch) is the Field Map Designer mode for our map. To access this mode we should go to the Content -> Our job folder -> Our Map. Remember, that the Field Maps Designer applies to the Web Map only. You can choose neither the feature hosted layer nor the file uploaded, because this option won’t be visible.
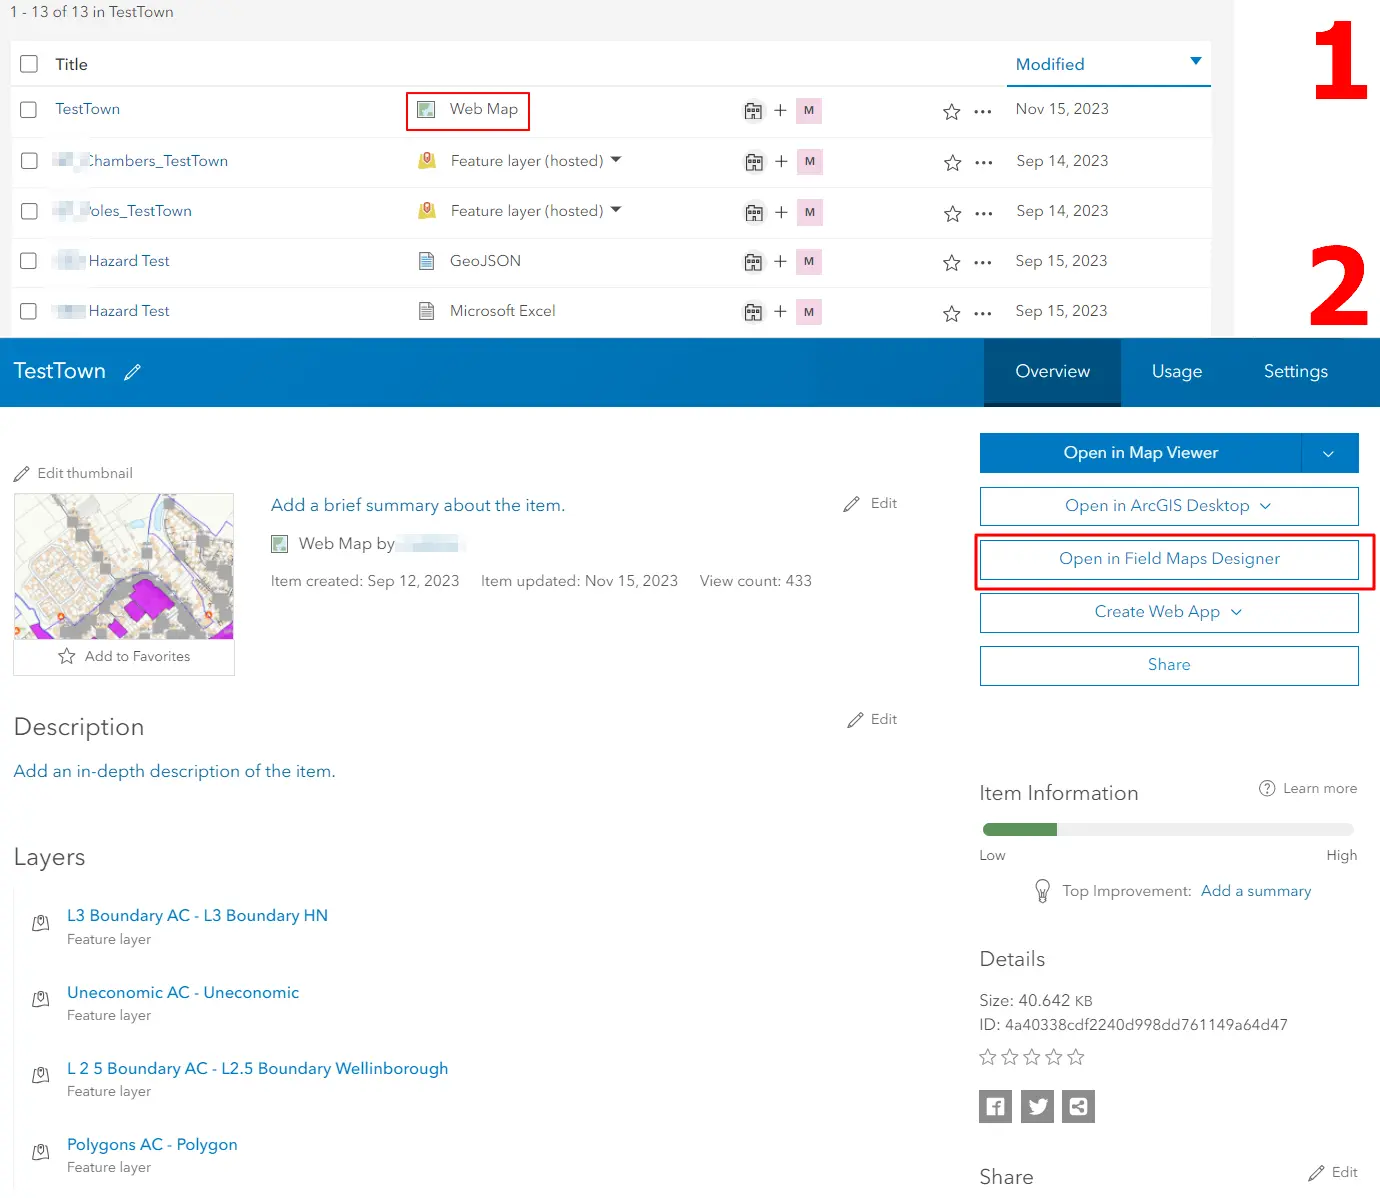
Pic. 2 Selection of the Web Map item (1) and the set of options (2).
This option (2) is available only when the Web Map item is chosen (1). When enter the Field Map Designer mode, you have a different set of options. By opening the first one – the Overview, you can browse the general information about your map (Pic. 3).
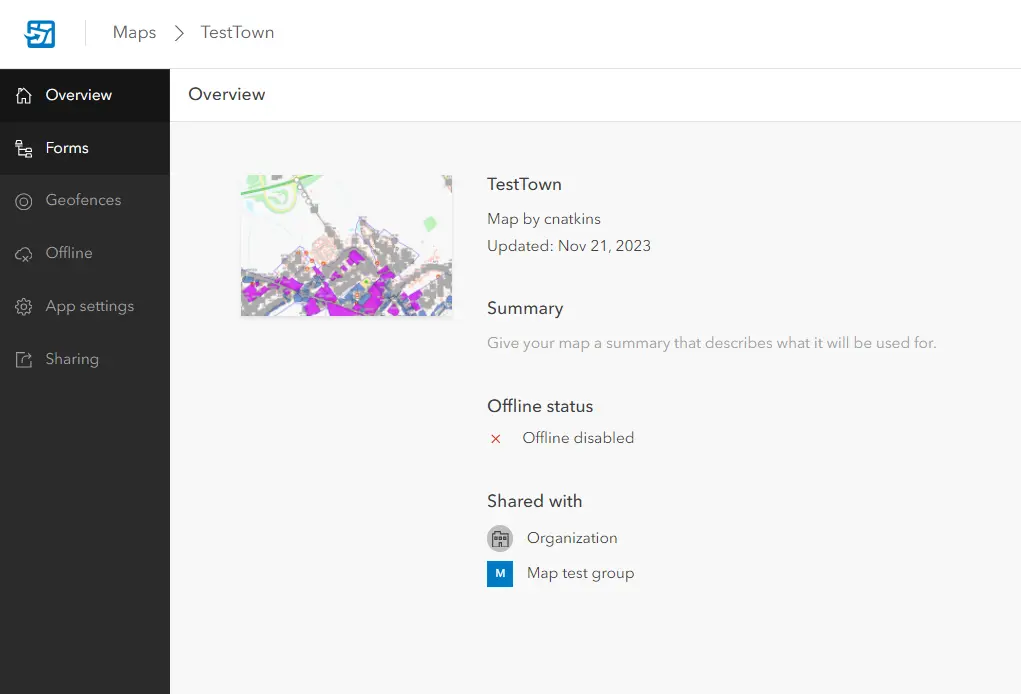
Pic. 3 The Overview of our Web Map item in the Field Map Designer mode.
We can read, that the Offline status of our map is disabled. There are two complementary reasons for this. The first one means, that at least one layer isn’t compatible with the Offline mode or has the Sync disabled. The other one means, that the Offline mode is disabled. Since all the layers are adaptable to offline usage, the mode itself can be turned by toggling it. (Pic. 4,5).
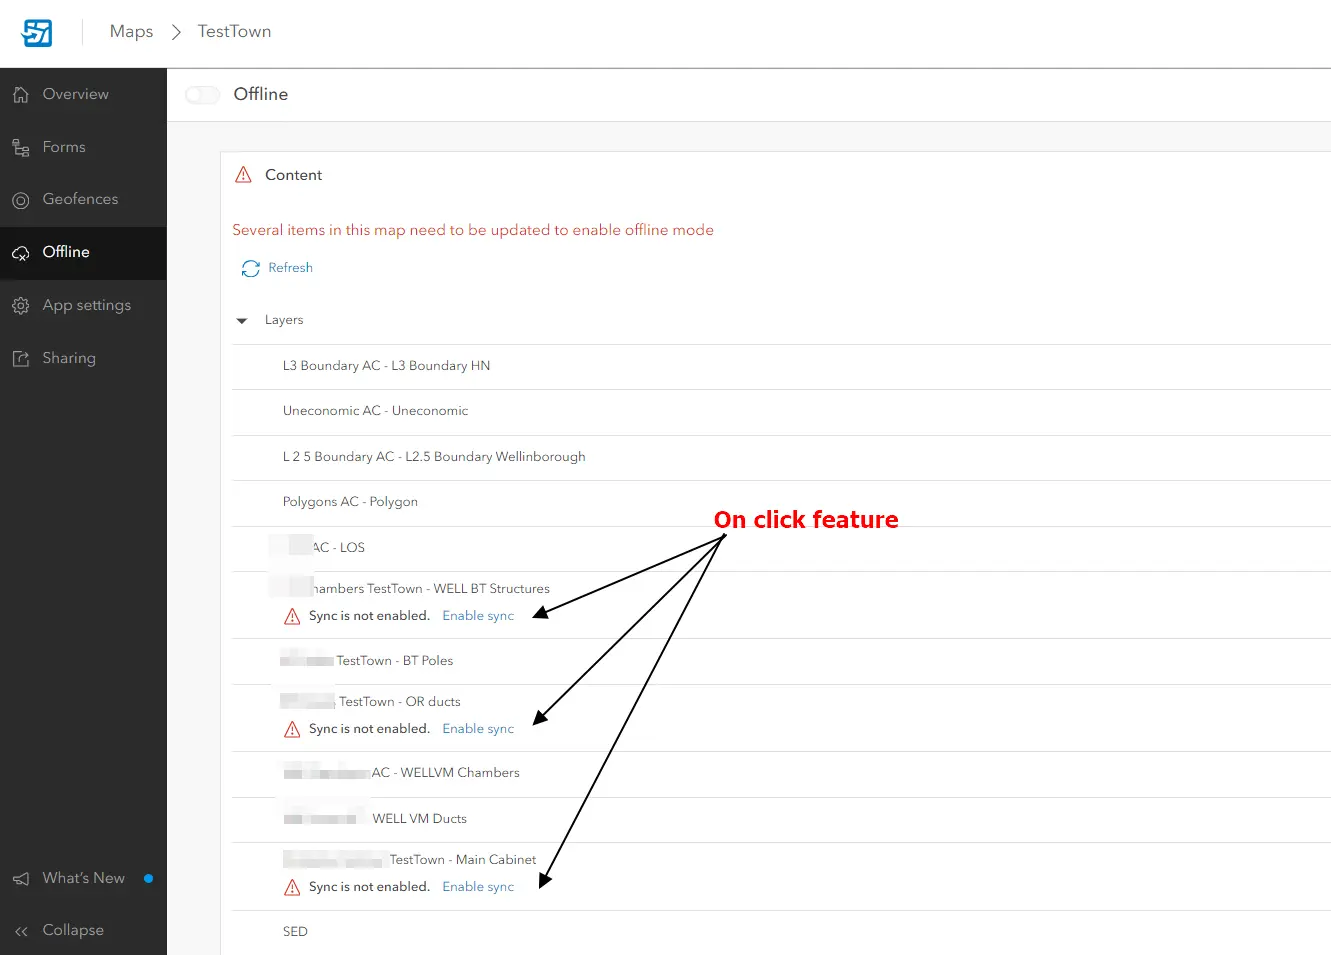
Pic. 4 The details of the Offline mode where all the layers are listed with their status. When you see, that Sync is not enabled, you can simply click on the Enable sync text, wait a few seconds and the given layer will become offline-friendly. Because it’s just on-click-based, you can do it for several layers in a short time.
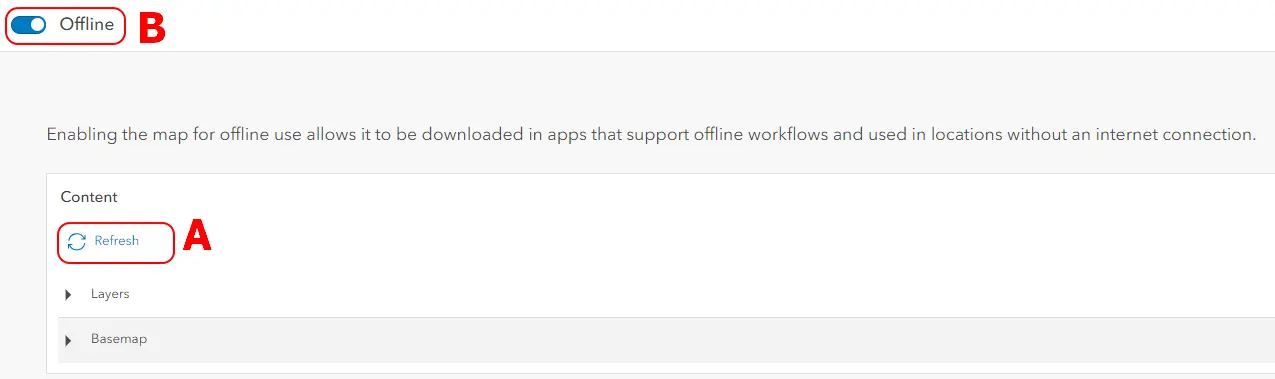
Pic. 5 Offline mode enabled (B), although the content refresh is vital before it (A).
However, before it, it’s vital to refresh our content, making sure that everything is alright.
Worth looking are other options available in this mode.
Map area – allows us to select the offline map area from the desktop. All the steps are presented in the image below (Pic. 6).
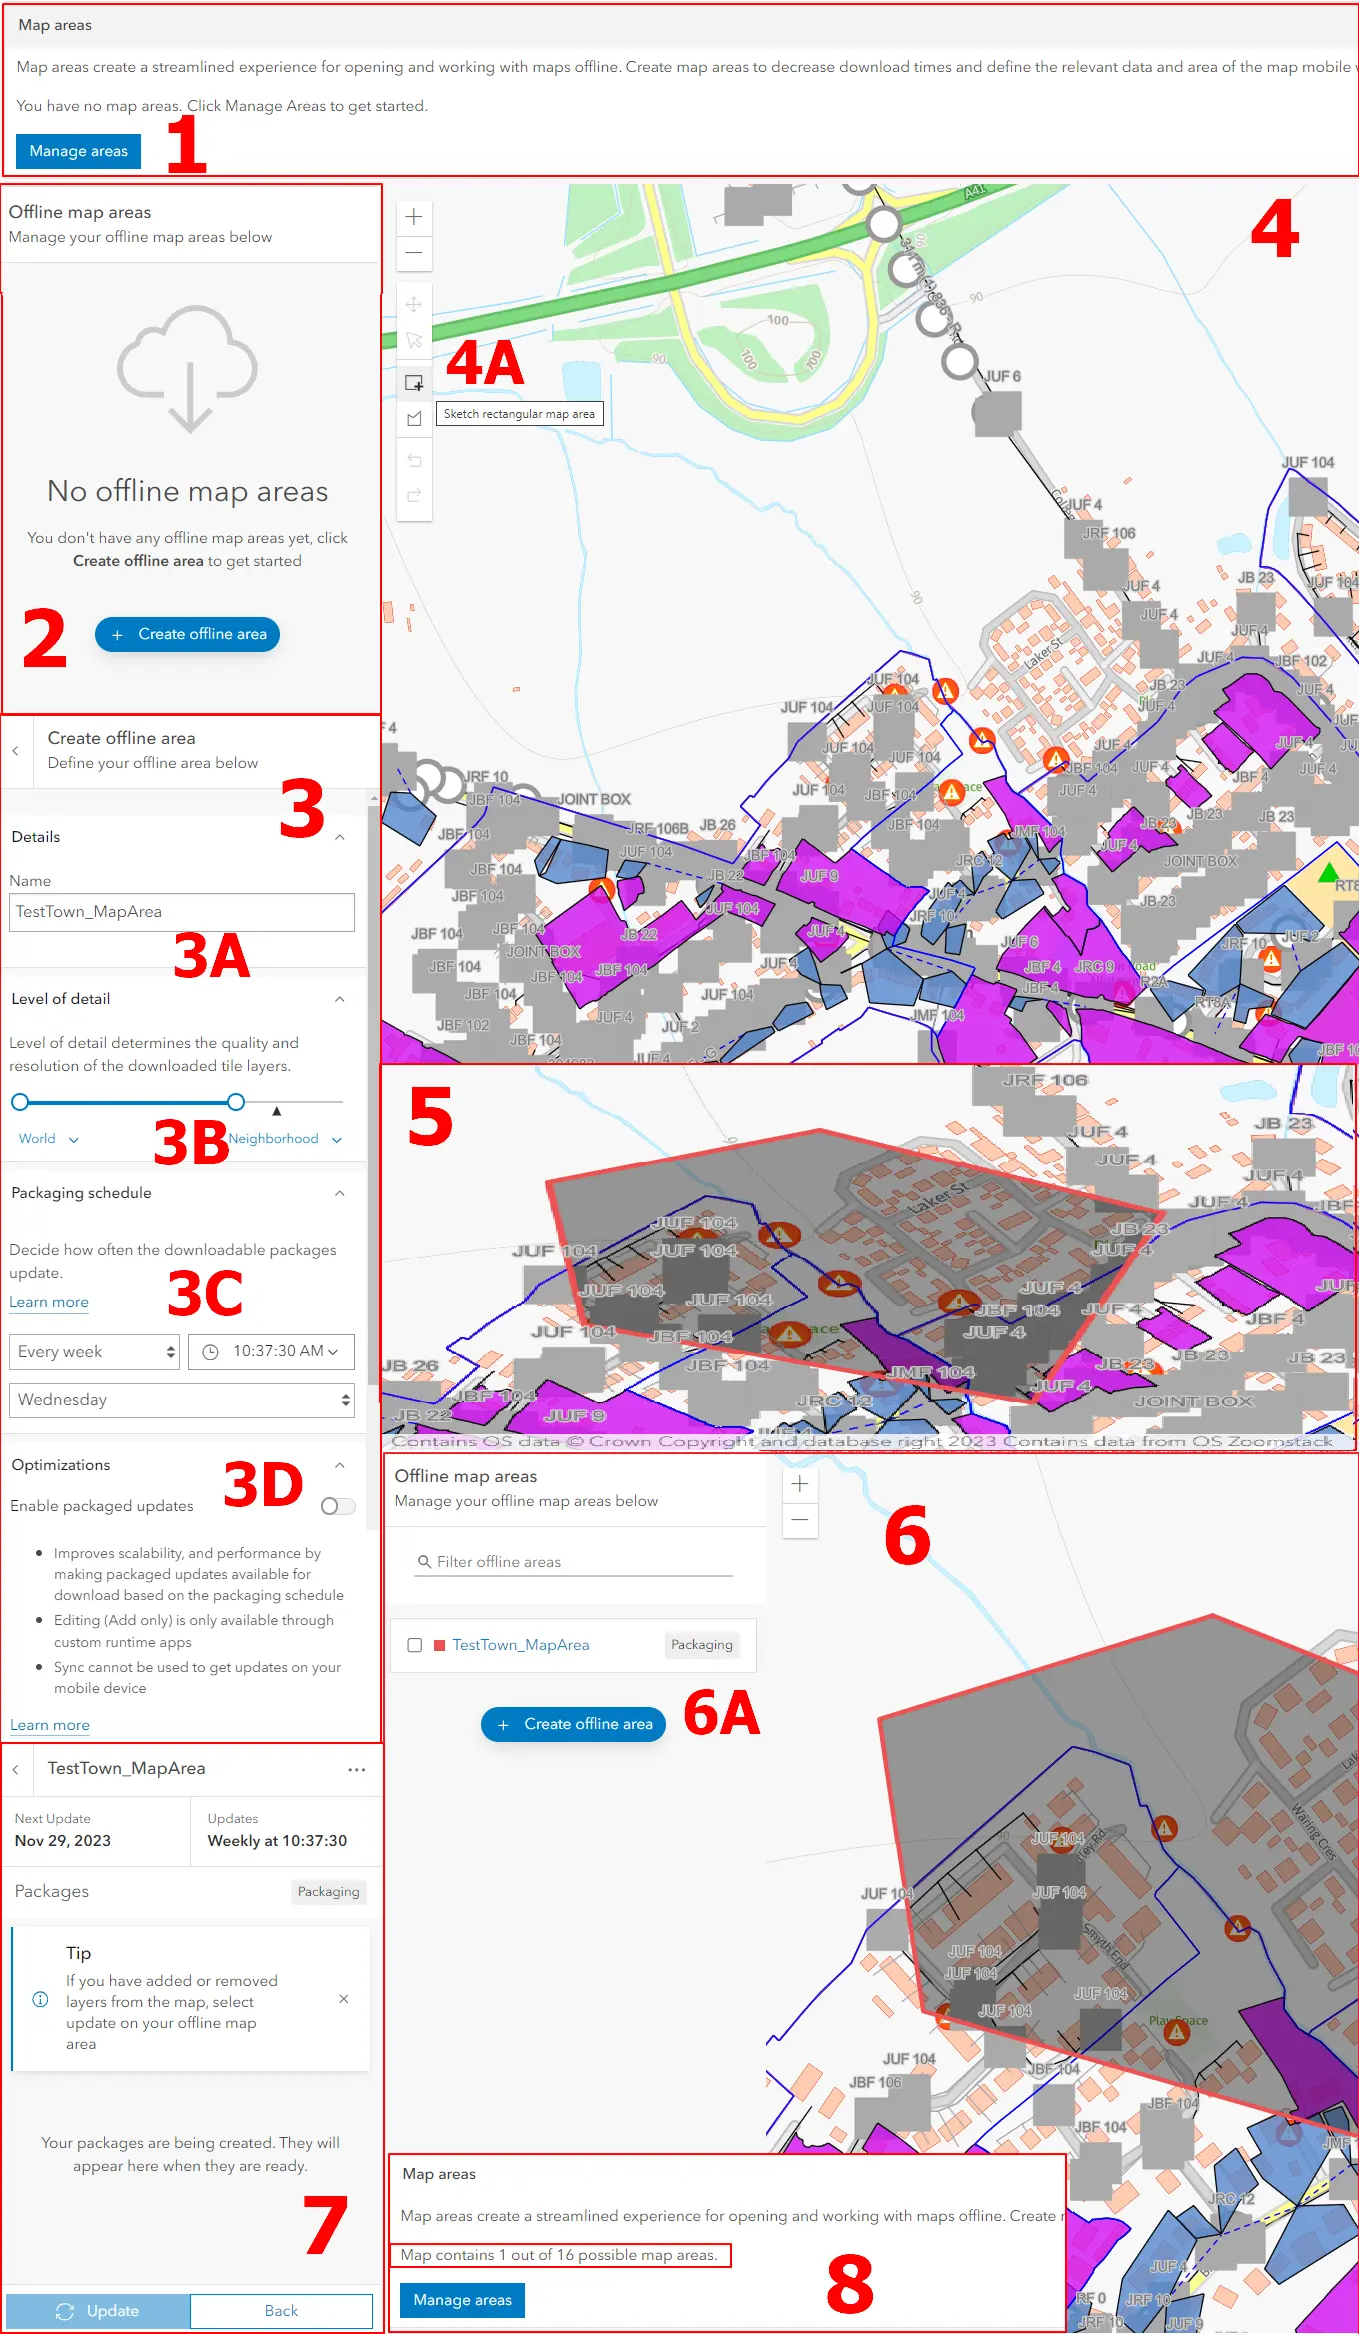
Pic. 6 Preparing maps offline: 1 – the Map areas section; 2 – Creating new offline map area; 3 – Create offline area options; 3A – The name of the offline map; 3B – Level of detail; 3C – Packaging schedule; 3D – Optimizations; 4 – Selection the offline area on the map; 4A – Area sketching options (rectangular, box or polygon); 5 – Selected polygon; 6 – Saved selected polygon; 6A – The details of new offline map; 7 – The offline map area packaging details; 8 – The information about the number of the offline products within one map, which have been saved offline.
In the Offline mode, our attention should be drawn to the Map areas section (1), where you can get the information about currently downloaded offline areas if there are any. Because initially they do not exist, you should click the Manage Areas button below. Next, you will be informed about the offline map areas if they exist. If yes, you will be redirected directly to the map, if not, the No offline map areas text will appear (2) with the “+ Create offline area” button available at the bottom.
Once clicked you can provide some basic settings of your offline map (3) like the name (3A) level of detail (3B), packaging schedule (3C), and optimizations (3D).
The level of detail is important with respect to the final map quality and resolution of downloaded items. If you would like to work on a small area you probably would need the highest level of detail and vice versa. The map resolution also determines the output size and further speed of the packaging schedule. The maximum weight at which the map can be kept offline is 2.5GB. You can try to work with larger sizes, although don’t be surprised if your map keeps crashing occasionally or fails to be synchronized/updated.
A packaging schedule is important for keeping our offline map up-to-date against the main online product. Any changes applied to the map like adding new layers, basemap changes, and so forth can be applied offline without redownloading the area, but with the package update. This option isn’t mandatory, by selecting Never our map will be kept in an original downloaded version for its entire life.
Optimizations are used rather for making our map packages for read-only use. For this reason, the Enable packaged updates must be switched on.
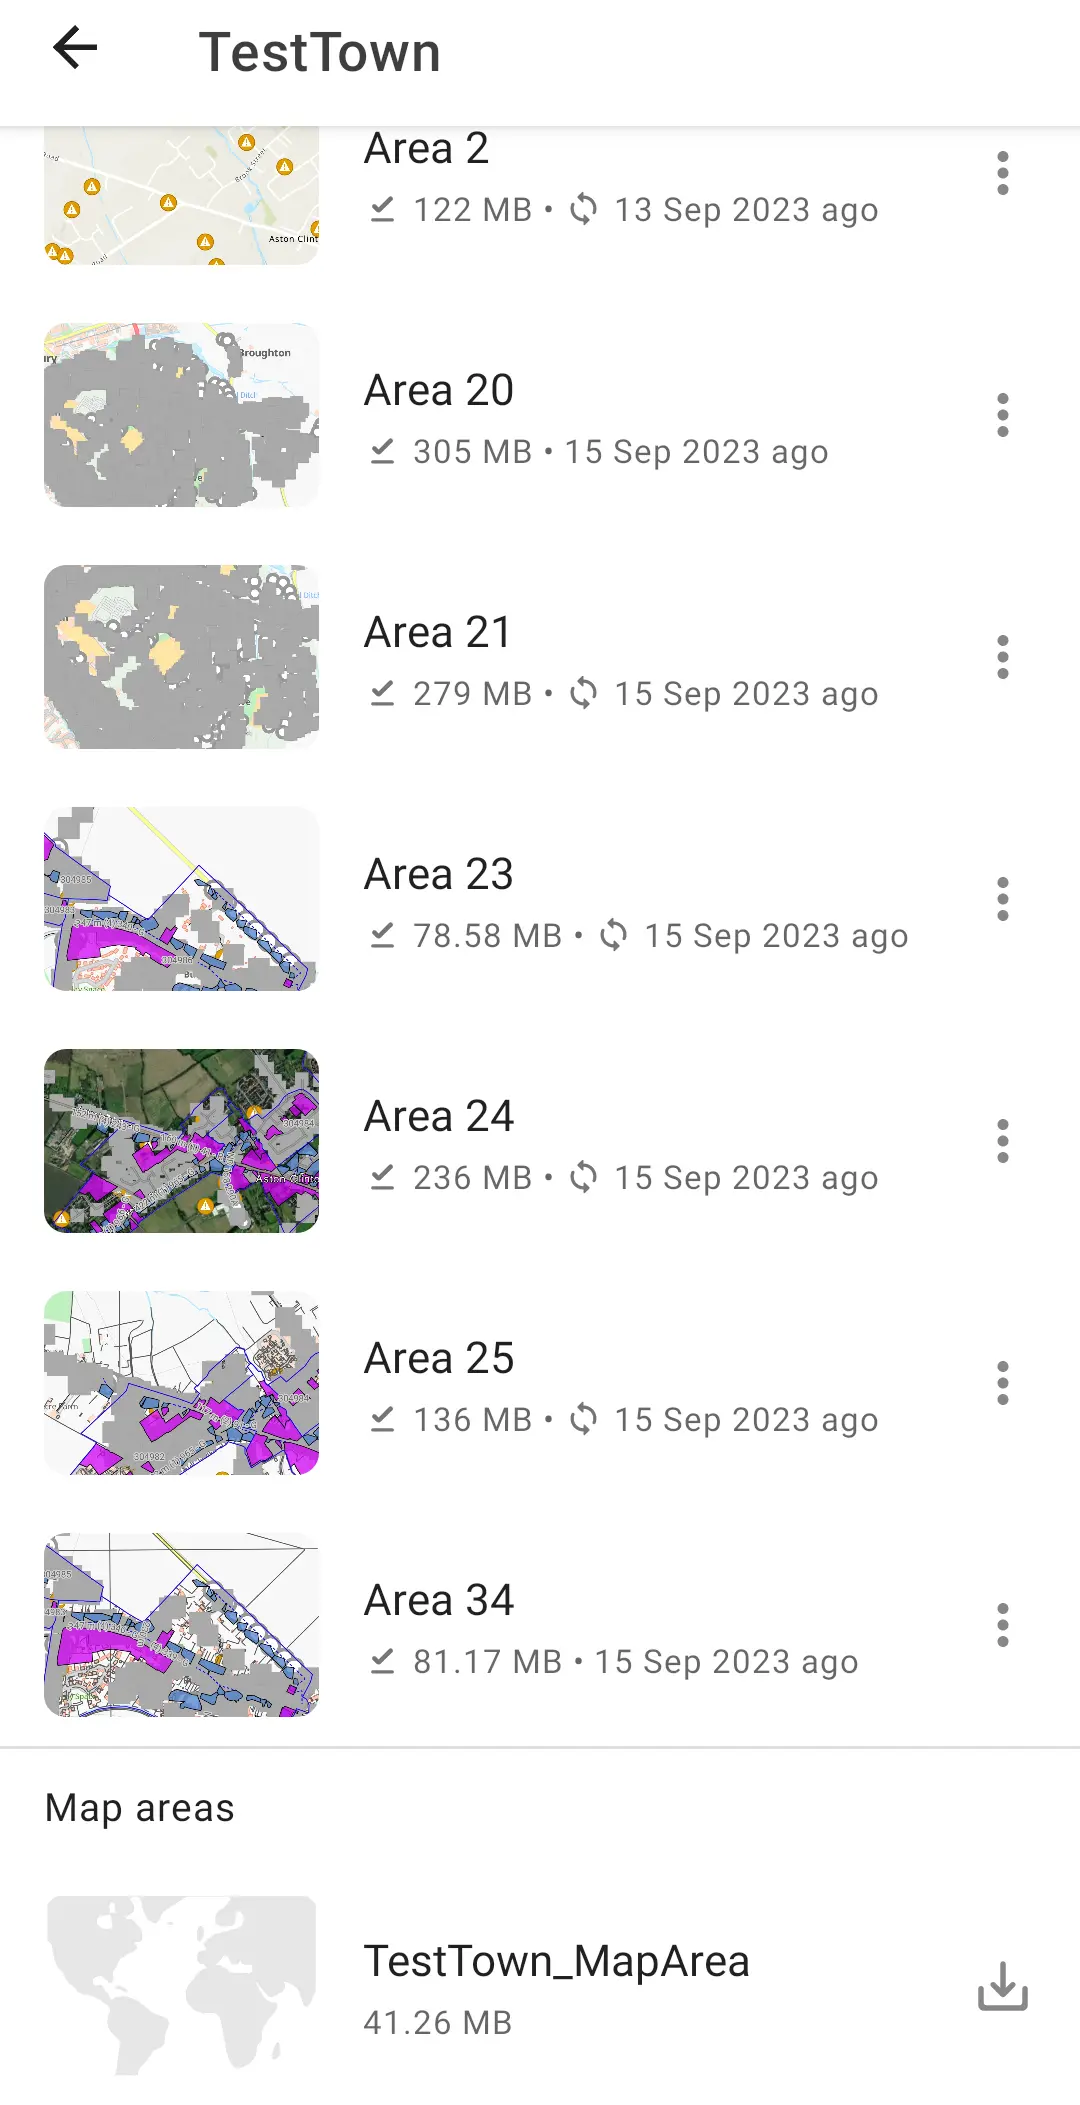
When all these options are defined, we are redirected to our map for selecting the offline area (4). The selection can be done by box or polygon (4A). When you specify your offline area (5) it will appear in the top left corner. By selecting the map, we can use three options but only when the Packaging is ready(6). You can update the given area, recreate it, or delete it. Unfortunately, some time is required to build up the package and its size-dependant. When the Packaging box is gone, then the box is gone. By clicking the “+ Create Offline area” at the bottom you can make another offline region straight away. Finally, our offline map is being prepared (7). When done, you can back to the Map Areas section and check the total number of offline areas created (8). The upper limit is 16 offline areas per one map. This is because the offline areas prepared on the desktop are visible in all devices, whereas the offline areas prepared on mobile device are accessible just for this one device.
Since then, our map has been stored on the platform. Straight after the package is completed, the map can be downloaded also on the mobile device. The moment of the Offline area creation marks the moment of its visibility on mobiles even if the download isn’t available just yet. Before we jump to this let’s mention the remaining Offline map options below the Offline Areas section (Pic. 7).
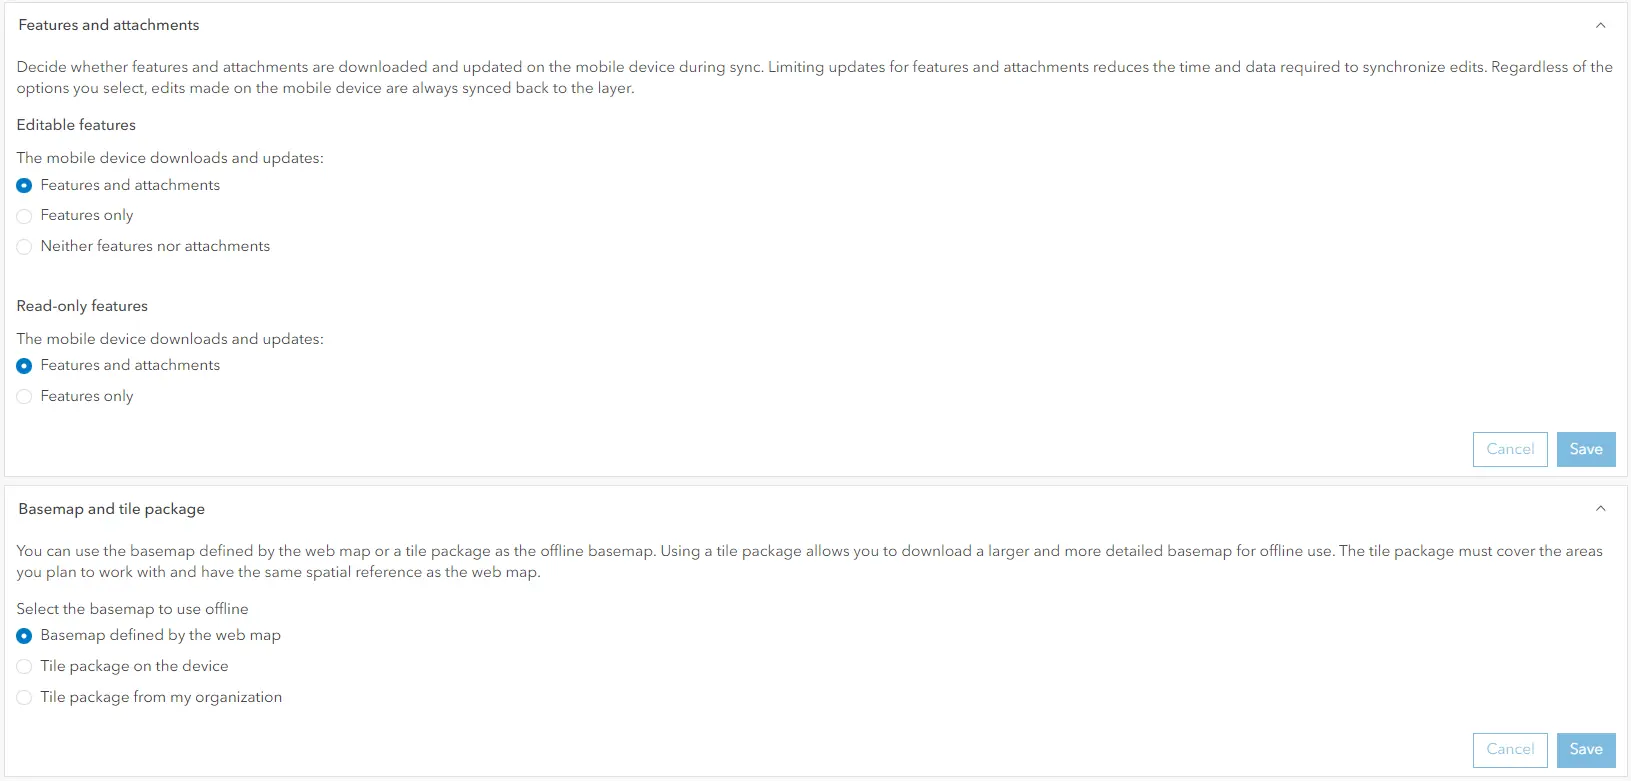
Pic. 7 Another Offline map option in ArcGIS Online. Click to enlarge.
There are another 2 sections worth attention. The Features and Attachments will tell you about the elements, which you want to edit in your offline map version. Advisable is to leave it as it is in default, where the Features and Attachments are selected. The same applies to Read Only features, where the default option includes attachments too.
Another section plays around the base map and initially, the Basemap defined by the webmap is set, although there is a space for using your tilemap.
The Offline maps saved on our desktop or office workstation can be used later on our mobile devices and this is very positive information for all of you. However, they aren’t available immediately, as you have to download them first. As I said earlier, the download isn’t possible when the area packaging isn’t ready (Pic. 8).
Pic. 8 At the same time when our Offline package is prepared on desktop, we can see it on mobile too. However, downloading isn’t possible yet.
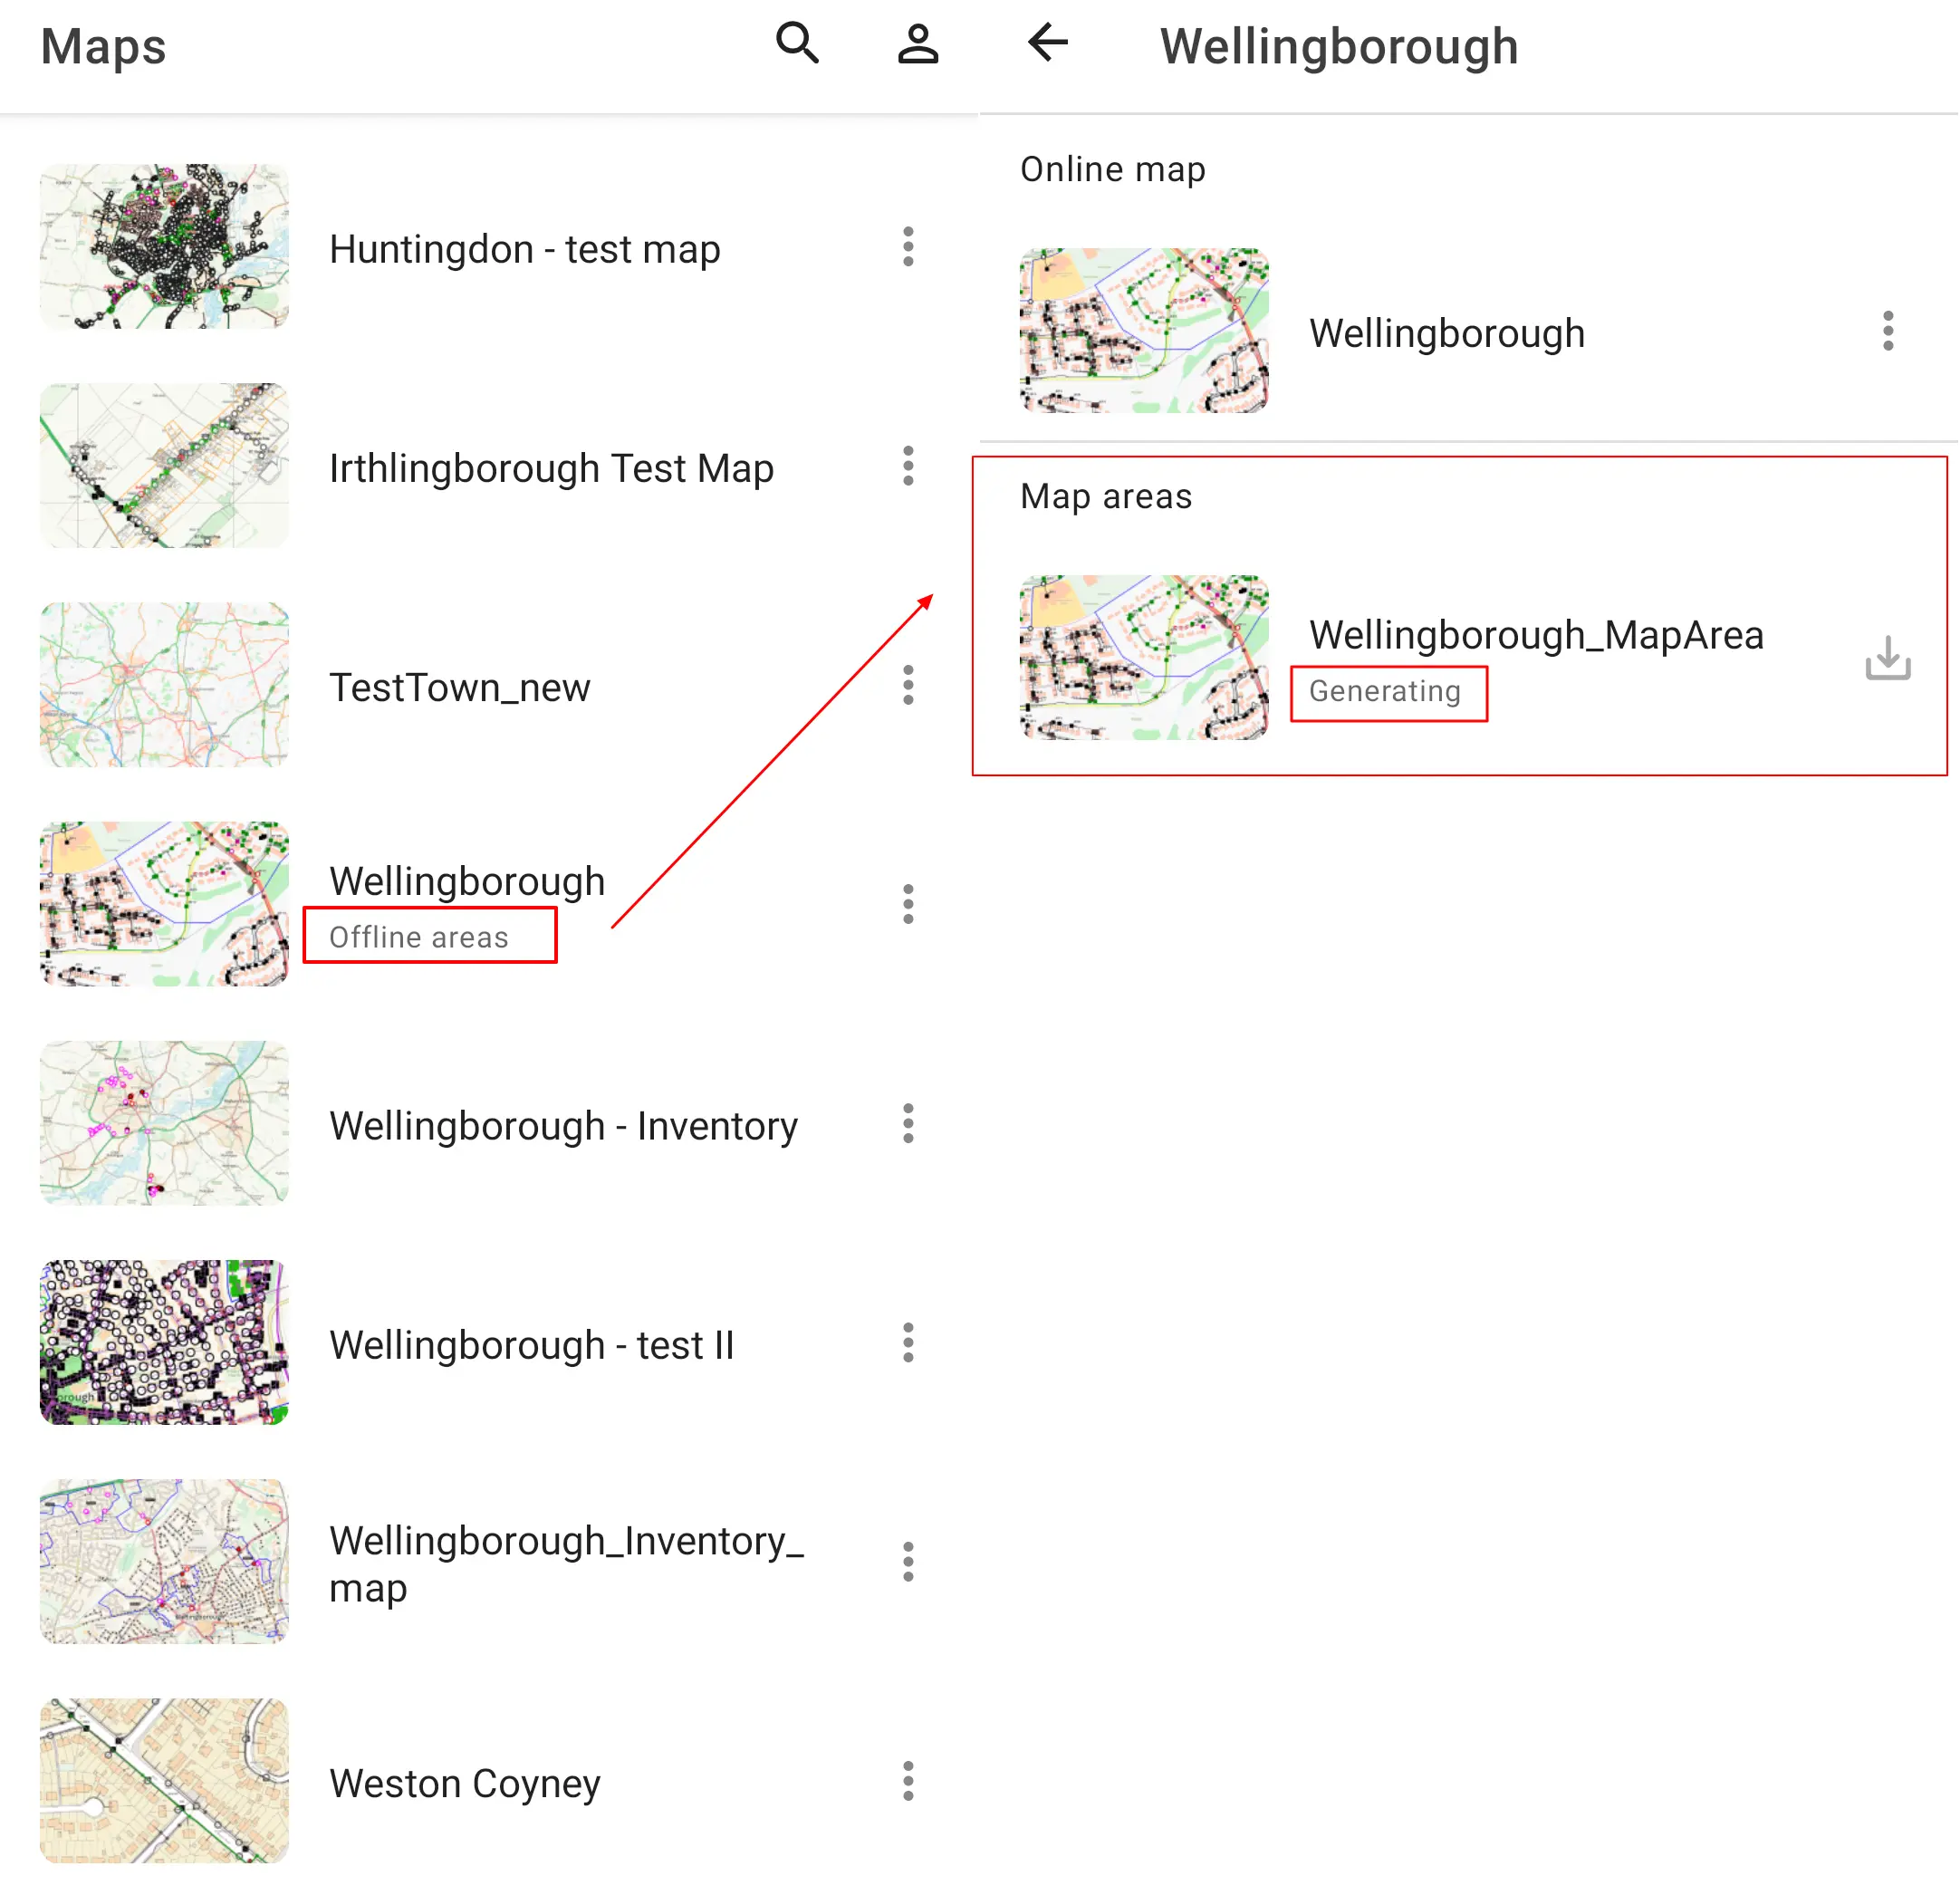
Once the offline area is created and ordered to package it becomes visible on mobile devices, which straight away will inform you, that the map includes some Offline areas. By entering inside it, we can be confused at this stage, because the Offline map doesn’t exist in 100% as the platform generates it. The Download icon on the right isn’t active yet.
A different situation occurs, when our Offline map is ready on the desktop (Pic. 9). Instead of the Generating text, we can see the full size of the map(2). By pressing the Download icon our device starts downloading the map file (3). When ready, just beneath the name of our offline area (defined on the desktop) the full size and download time appear (4). The map is ready to use (5).
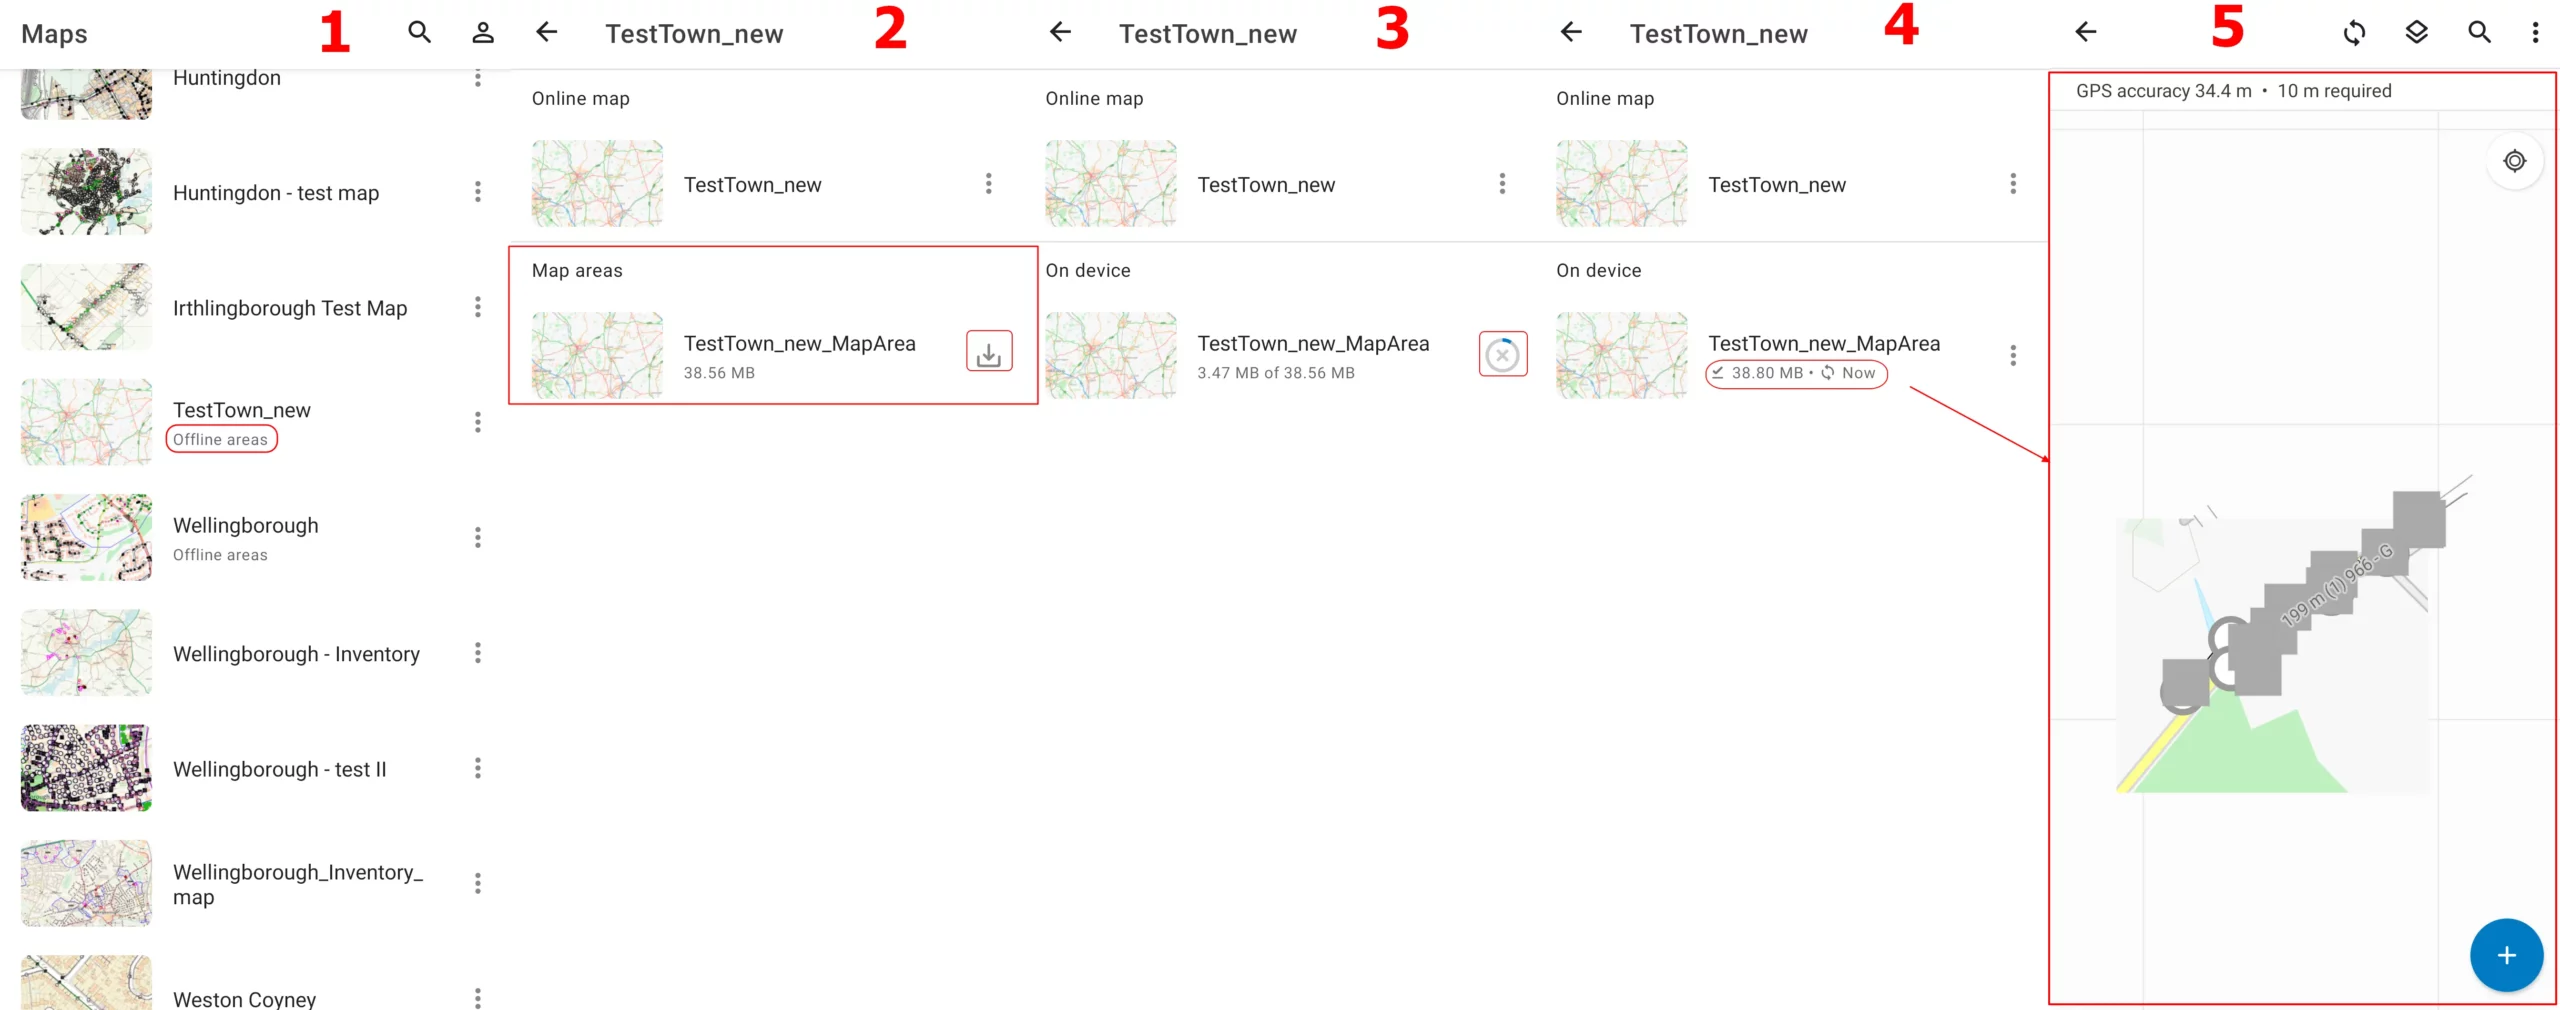
Pic. 9 Download the Offline area from desktop to mobile.
The Offline areas can be created also straight from our mobile devices. By clicking on the “three dots” on the right (Pic. 10) you will see all the options (2), but the Add offline area appears only in the case when the map is available offline. If at some point your map isn’t ready for offline usage, what was discussed earlier, you won’t see this option here.
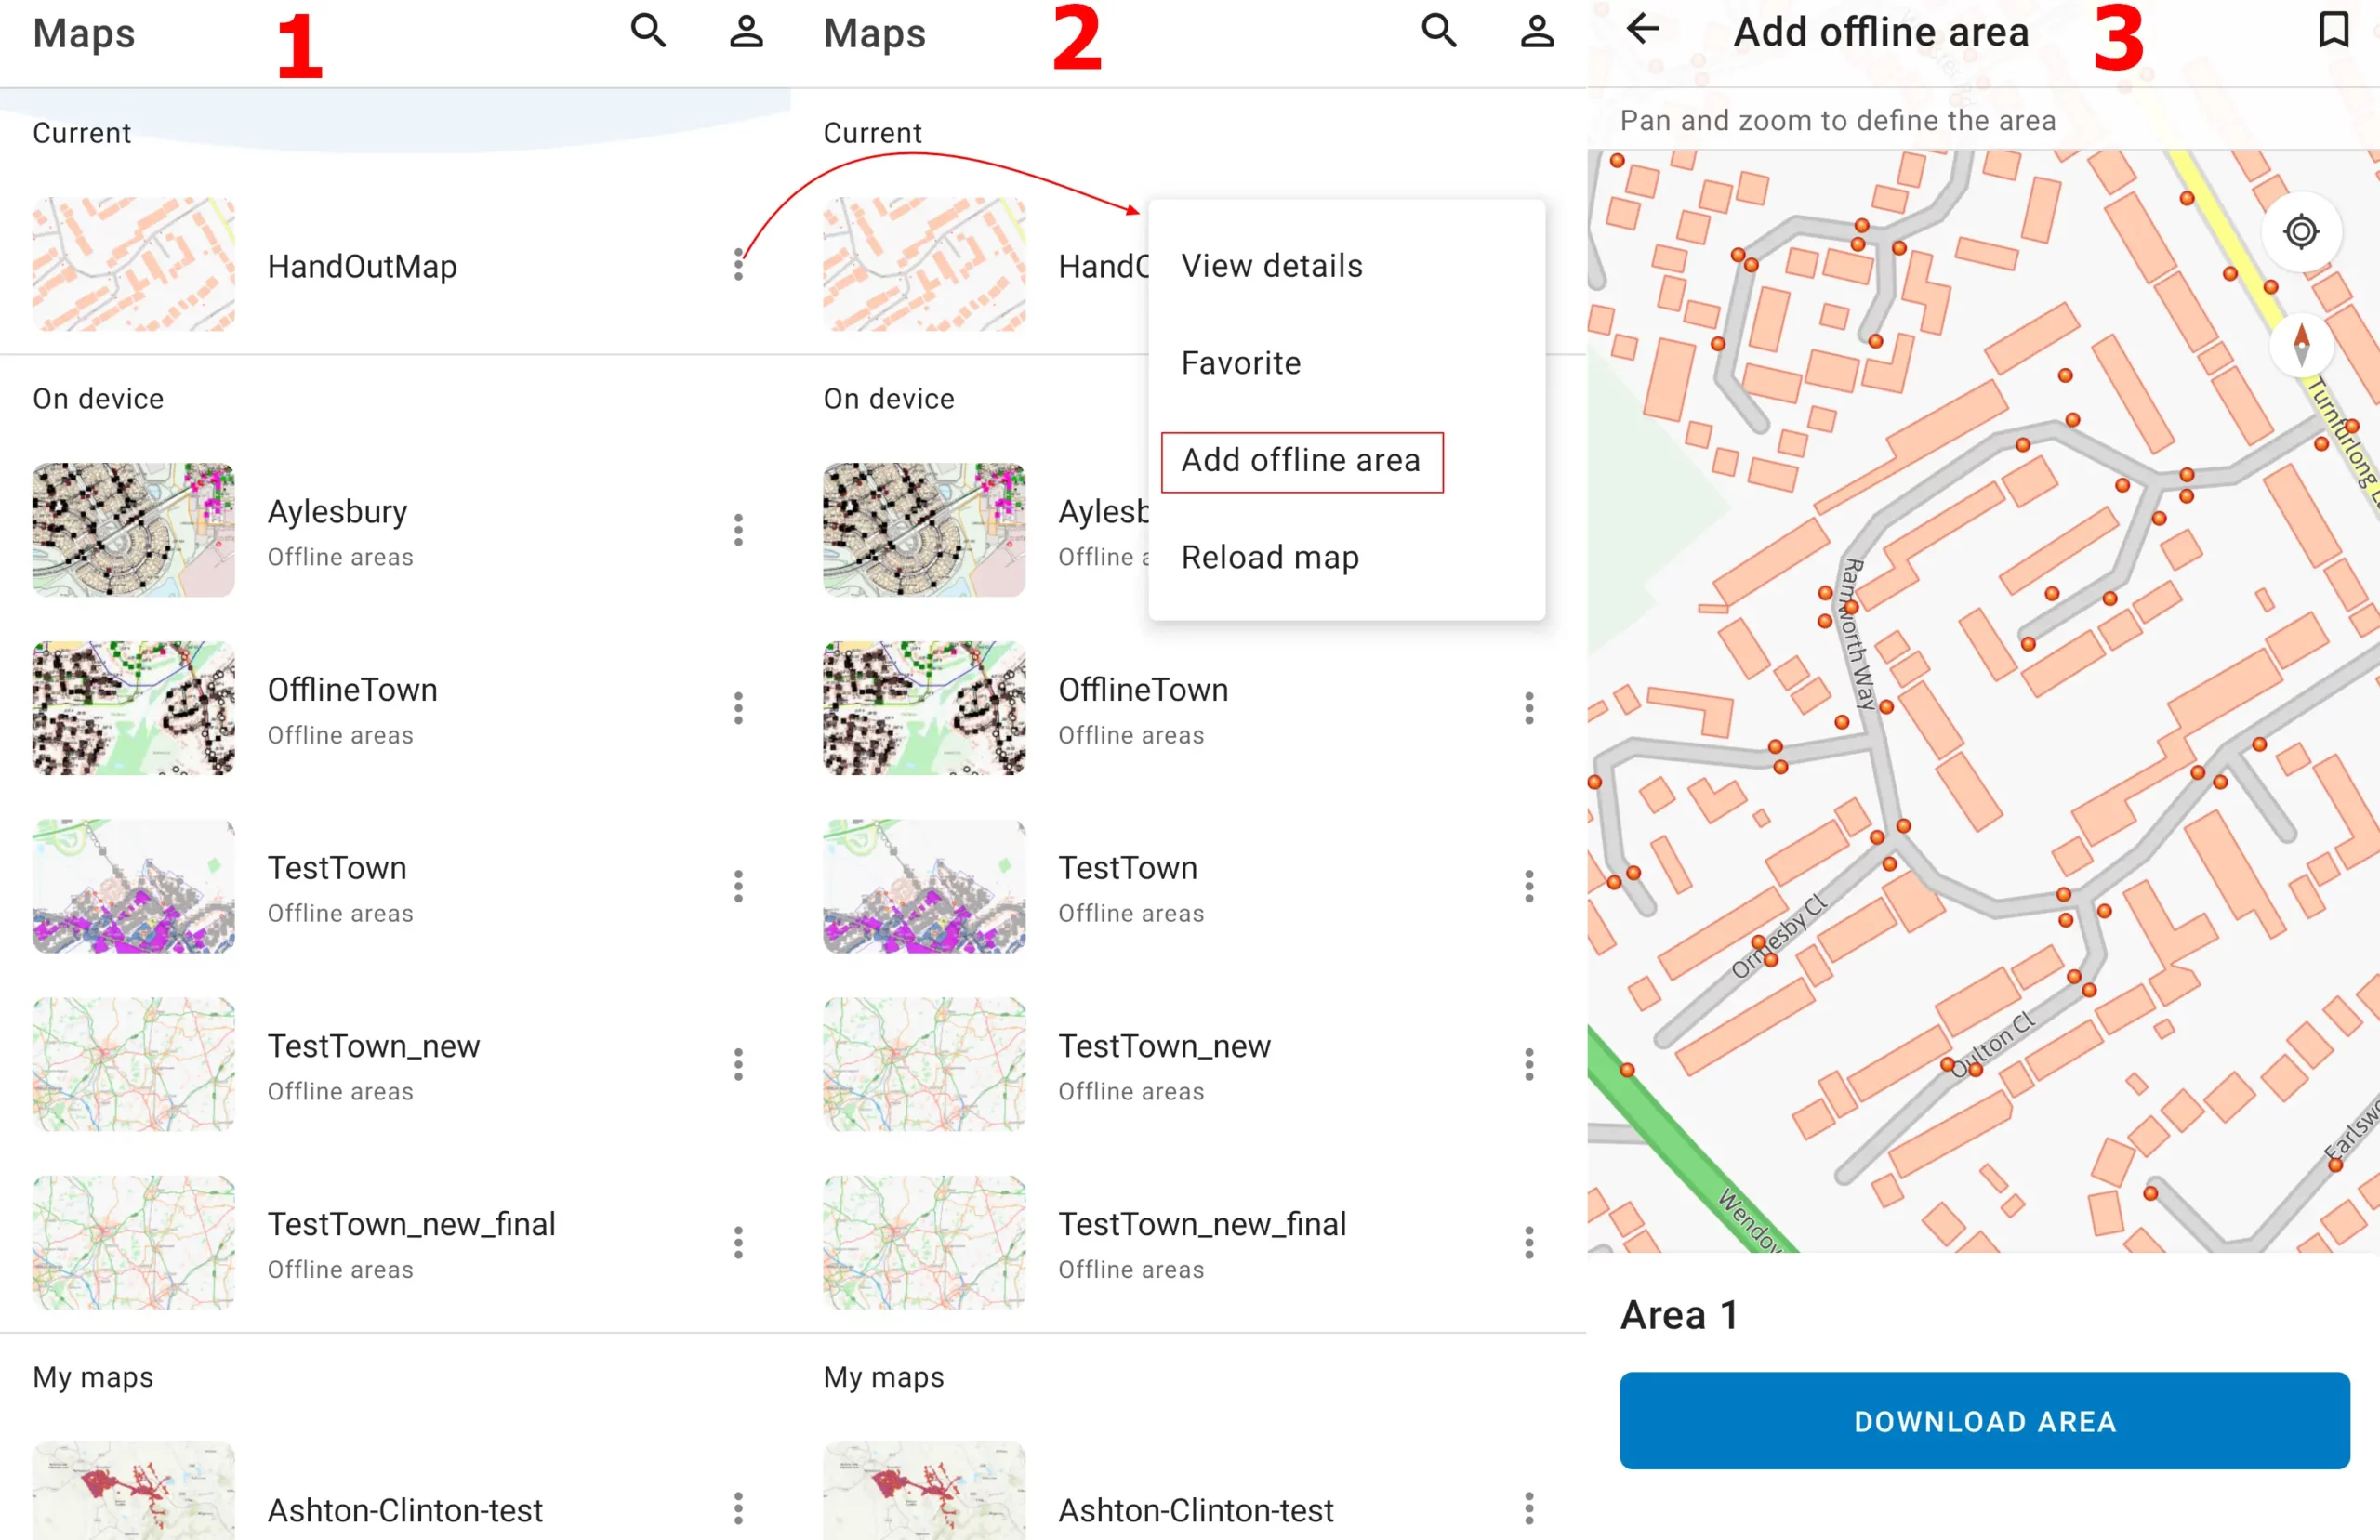
Pic. 10 Adding offline areas in Field Maps Designer, where: 1 – List of available maps; 2 – Map options; 3 – The Offline area box ready for download.
By clicking the Add Offline area you will be redirected predominantly straight to the map with the last zoom level used. Sometimes, the list of zoom options appears on your device and you can select the level of detail.
Most of the time you won’t see this list as your device keeps the last choice remembered for all of the maps. Before you hit the Download Area button it’s worth checking the bookmarks icon (Pic. 11), where some zoom settings can be stored.
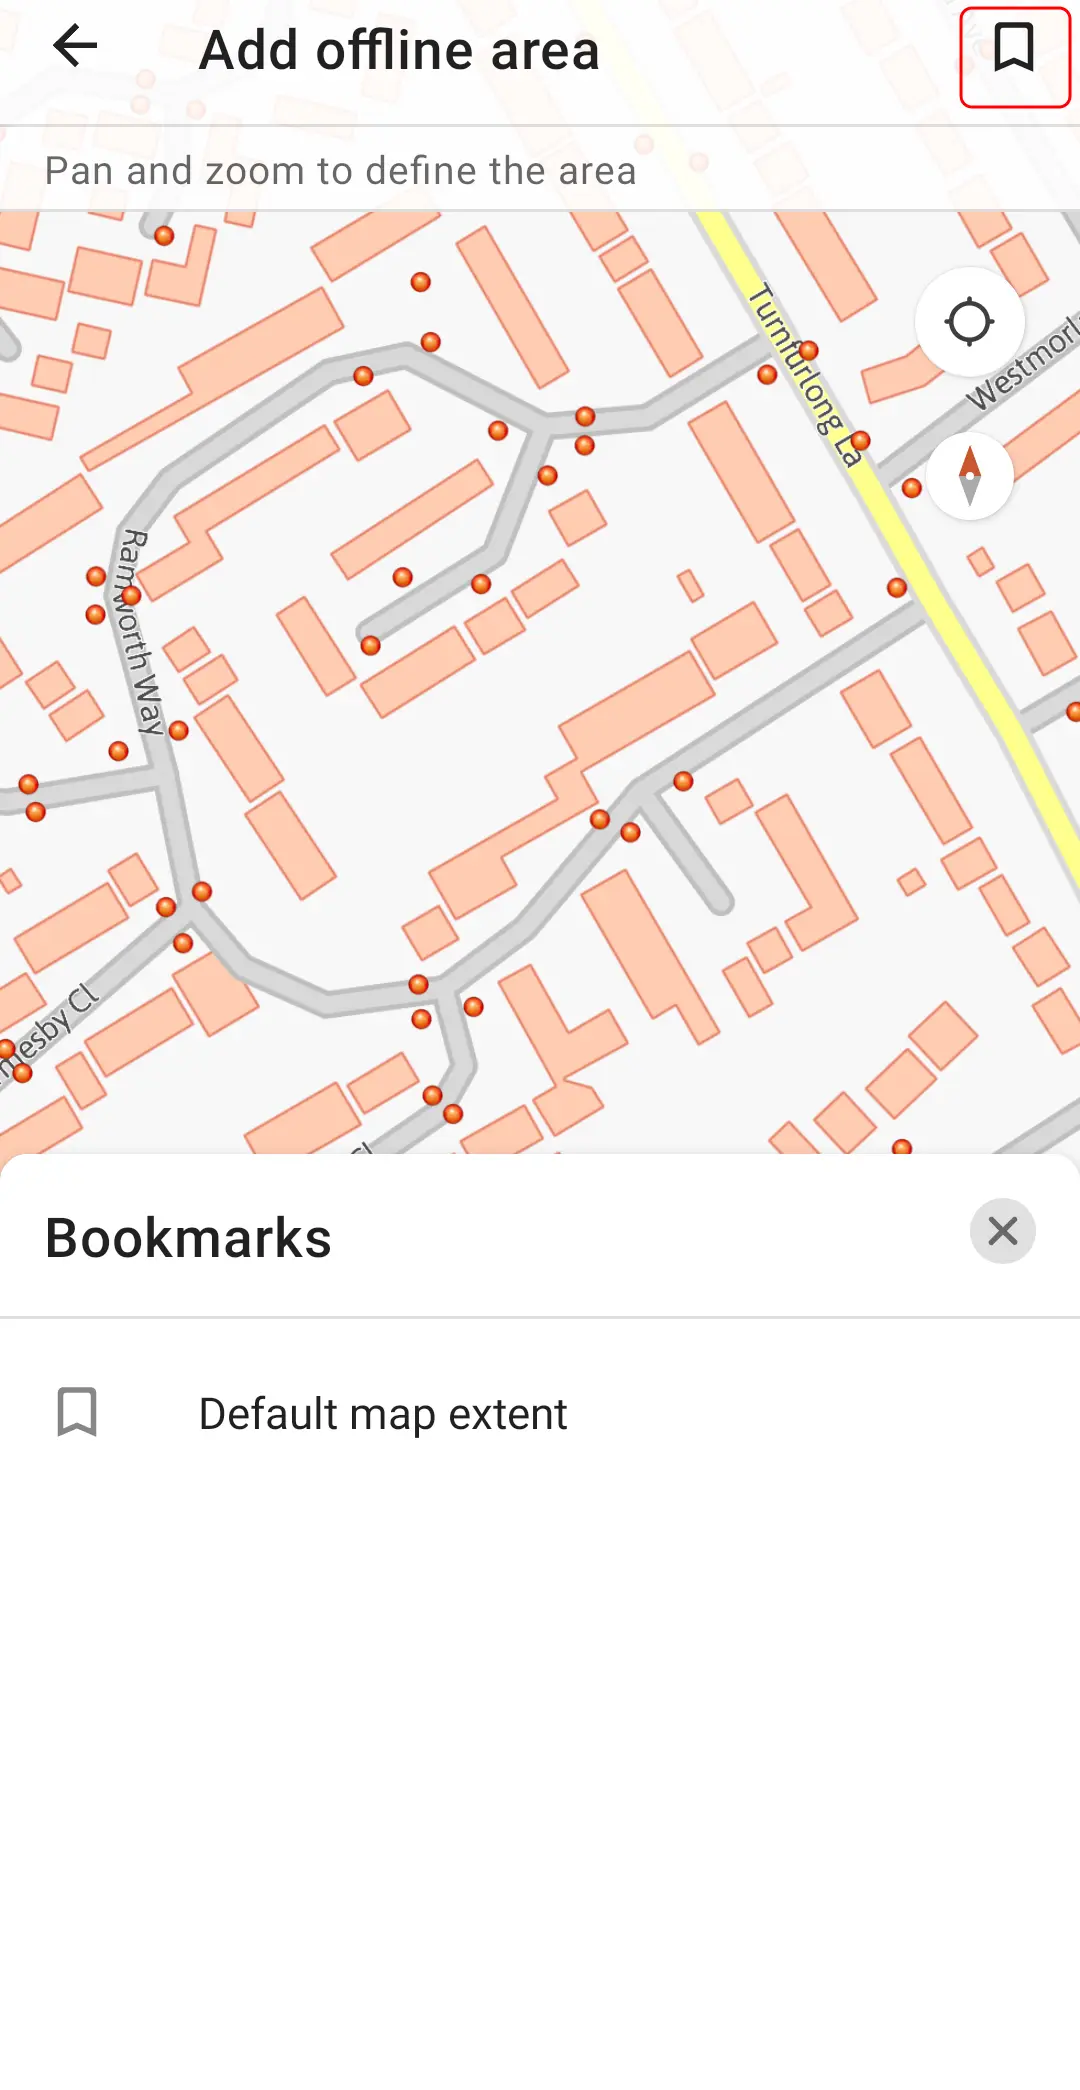
Pic. 11 Browsing the available bookmarks, which could be potentially defined earlier.
By selecting the bookmark you will get the zoom level “booked” earlier.
Assuming, that your area has been defined, you can hit the Download Area button and wait for your map a while (Pic. 12).
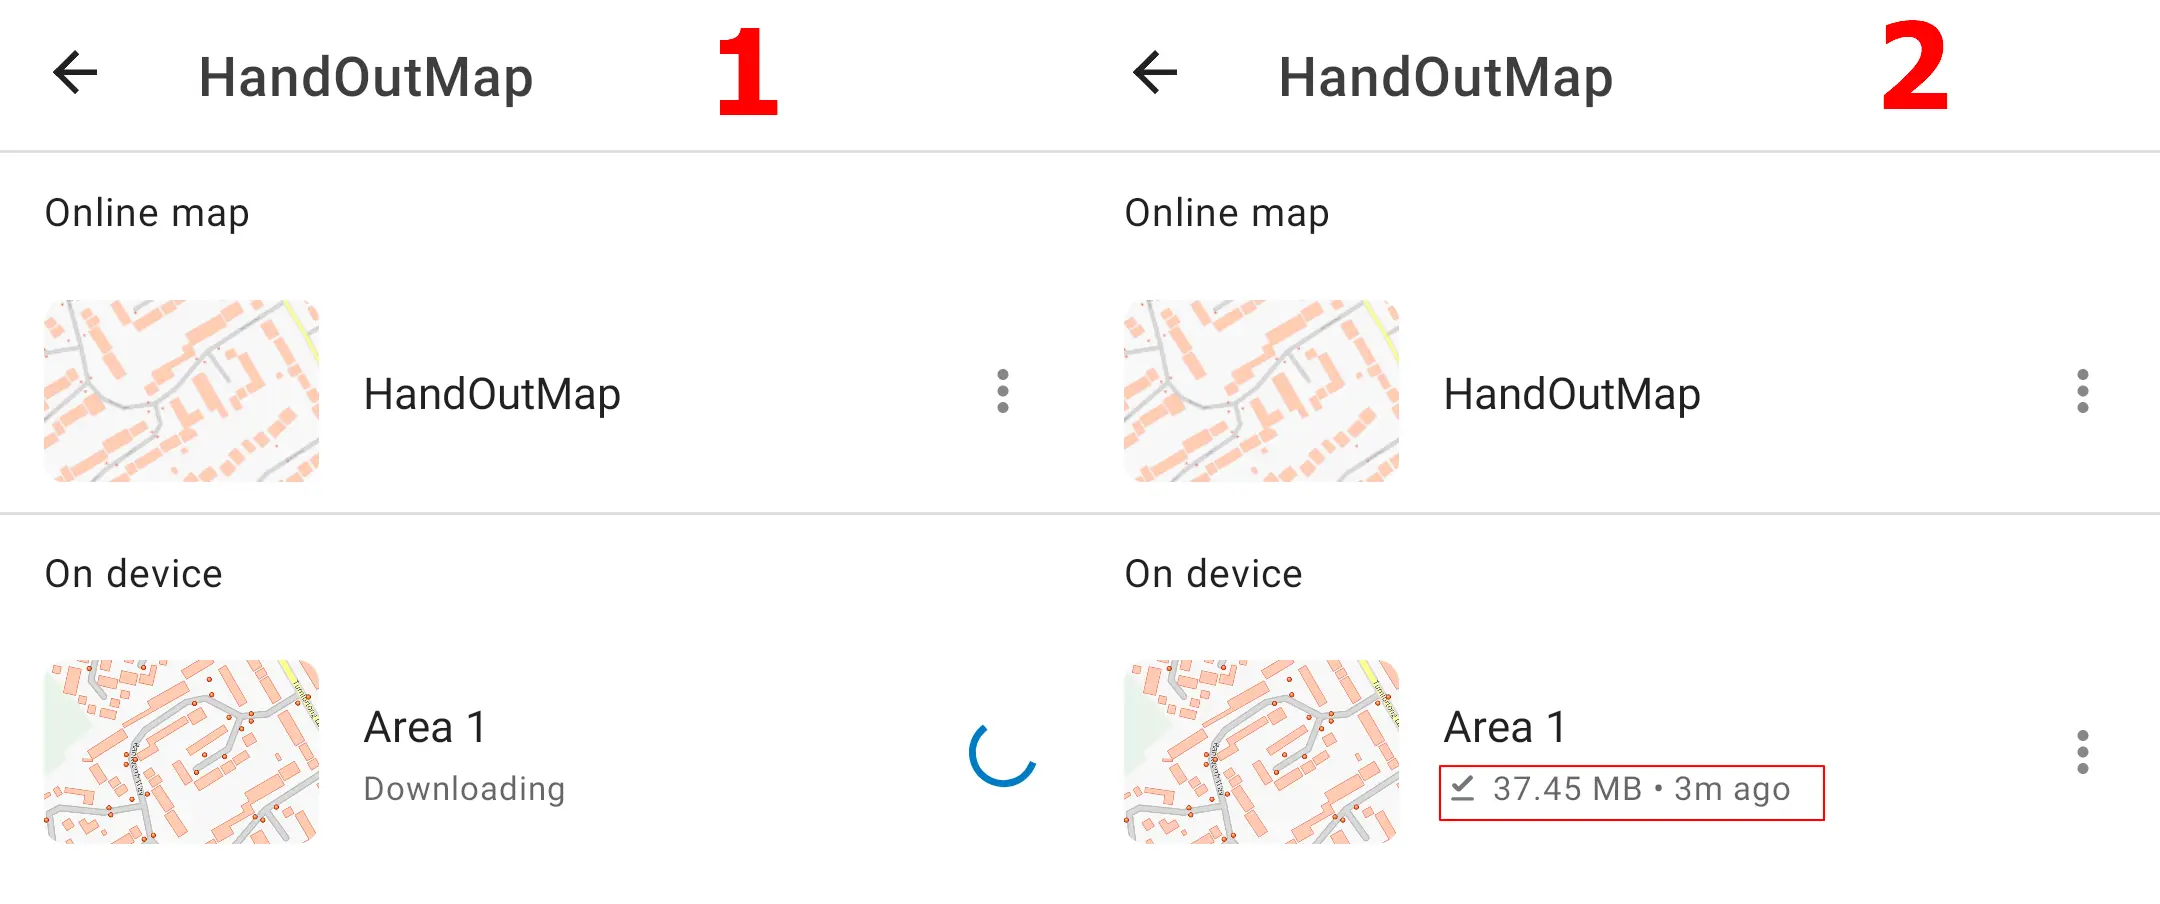
Pic. 12 Downloading the offline areas in Field Maps Designer, where: 1 – Downloading process; 2 – Downloaded map with its size displayed.
Once completed you will see the total size of the map, which is ready to open and use (Pic. 13).

Pic. 13 Downloaded offline map ready to use with some options.
In the View Details option, you will see the map capabilities (Editable or Read-Only), who is the owner (ArcGIS Online user with the creator license), and what time the map was modified.
By clicking Check for Update, the application starts to upgrade the map for us. The progress bar looks the same as when downloading (1). After a size-dependent time, the update is ready and you can see how long ago has it been completed (2)(Pic. 14).
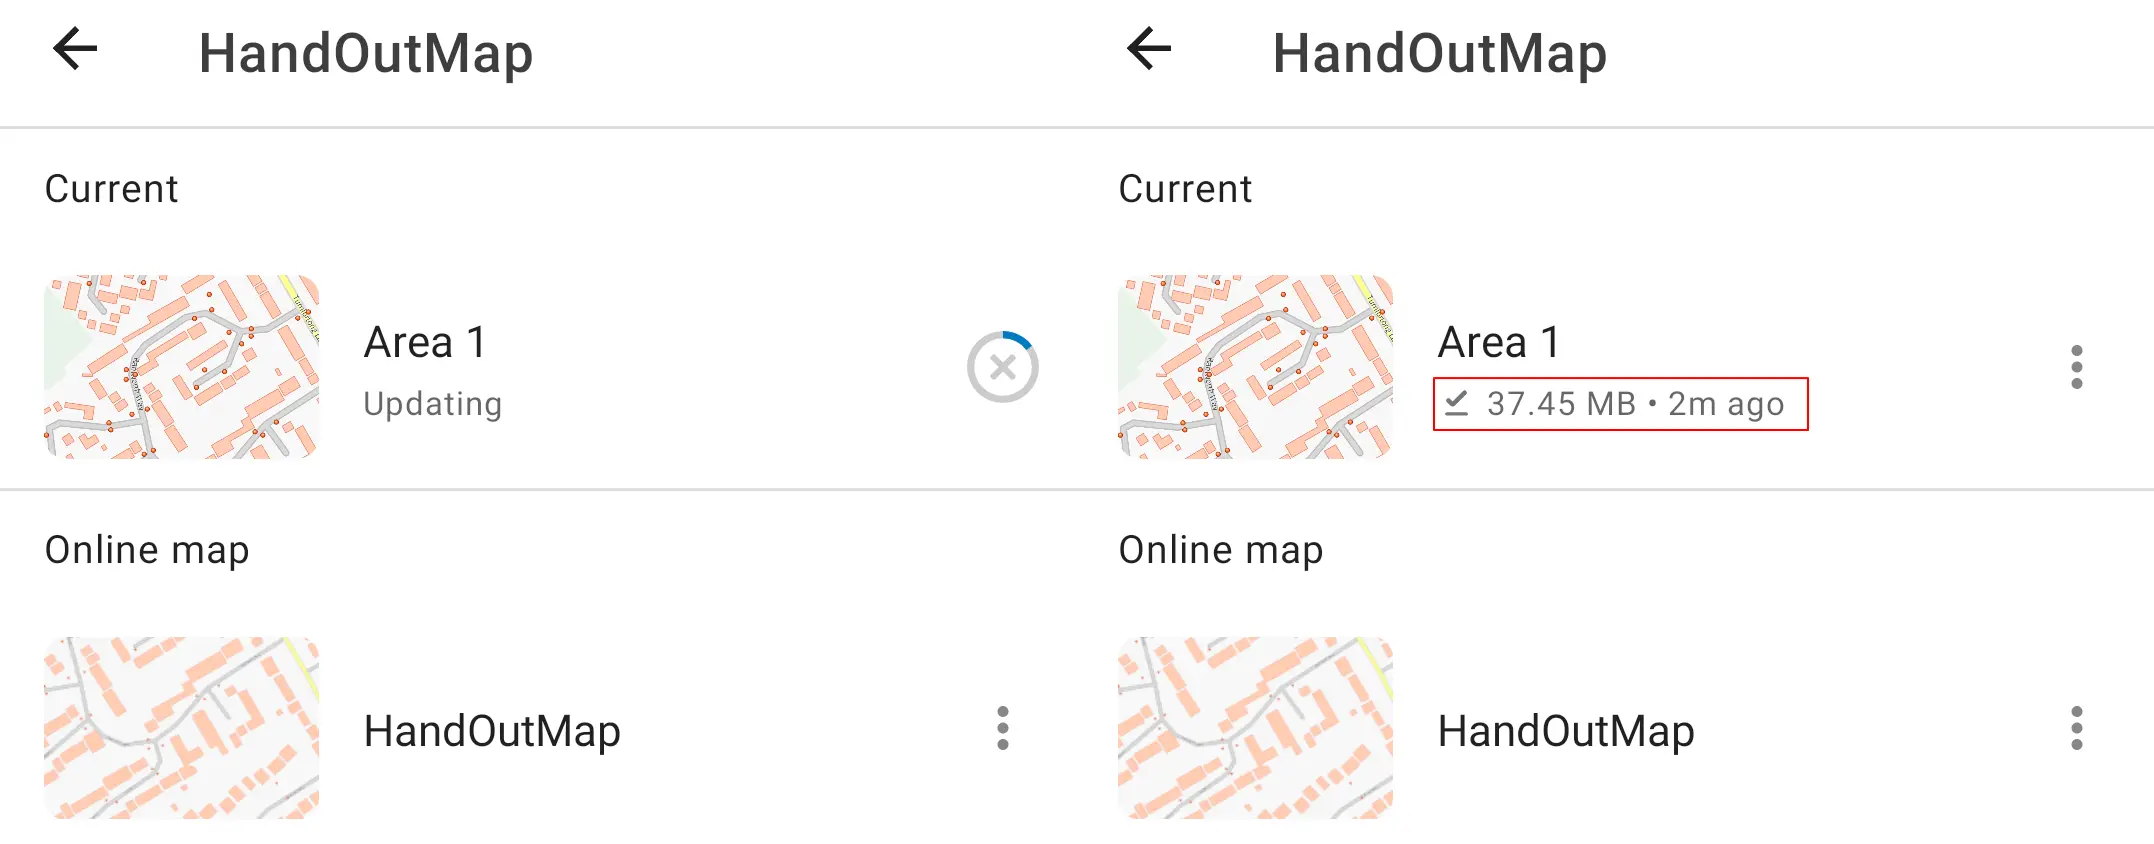
Pic. 14 Updating offline area.
- The principle is the same as creating manually the up-to-date map packages discussed earlier.
The last two options are Rename Area and Remove Area. There is nothing to explain here. When attending to remove, the application will ask you about the confirmation. By clicking Remove, your offline area is deleted and cannot be restored.
The biggest advantage of creating offline areas from a mobile device instead of the desktop is the higher upper limit of single offline areas per 1 map. You can have at least 20 on your device and it should be still fine (Pic. 15).
Pic. 15 The Field Map Designer app allows you to download more than 16 offline areas per 1 map.
So eventually you can download 16 areas on your desktop and next carry on downloading on your mobile device.
When your areas are downloaded, you can finally use them on your devices in offline mode. However, any changes made in offline areas will stay there and won’t be visible on the online map. You must get a good connection first and synchronize your offline area edits with the online map version.
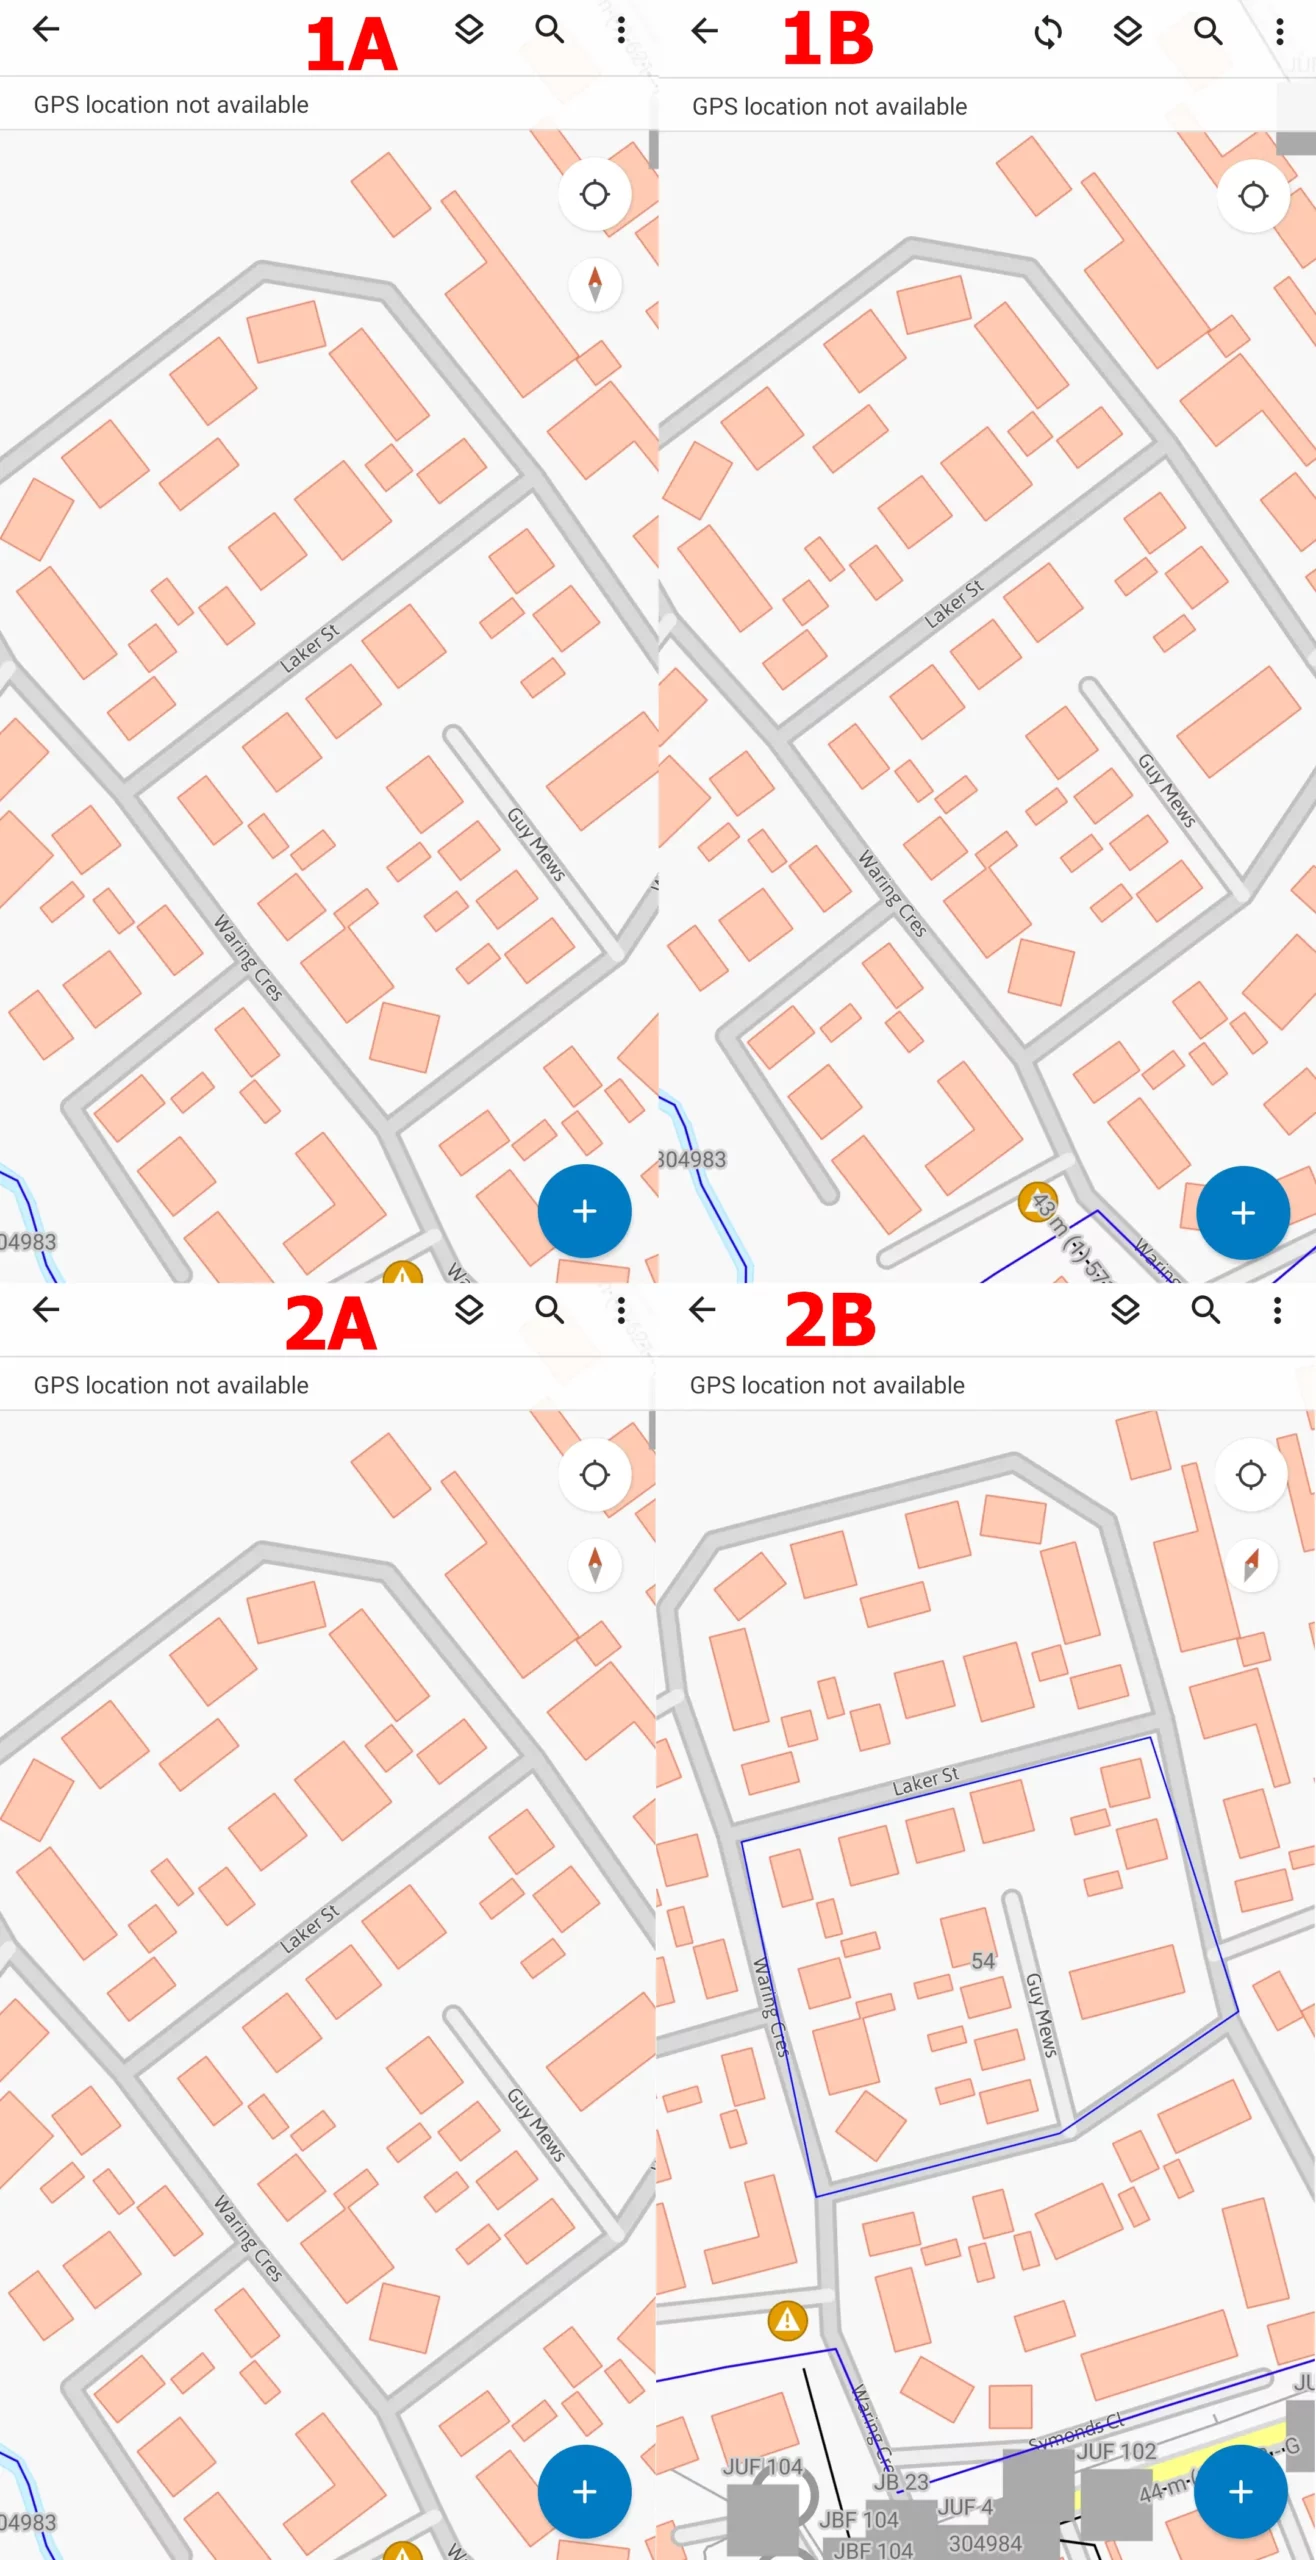
Pic. 16 Our edits were done in the offline area against the online map at the same time, where: 1A – default offline area; 1B – online map; 2A – edited offline area; 2B – online map after editing offline area.
The synchronization can be done by using the Sync option available when clicking on the “dots” set in the vertical row (Pic. 17). Anytime alterations to your offline area are done you will see the total number of edits awaiting synchronization.
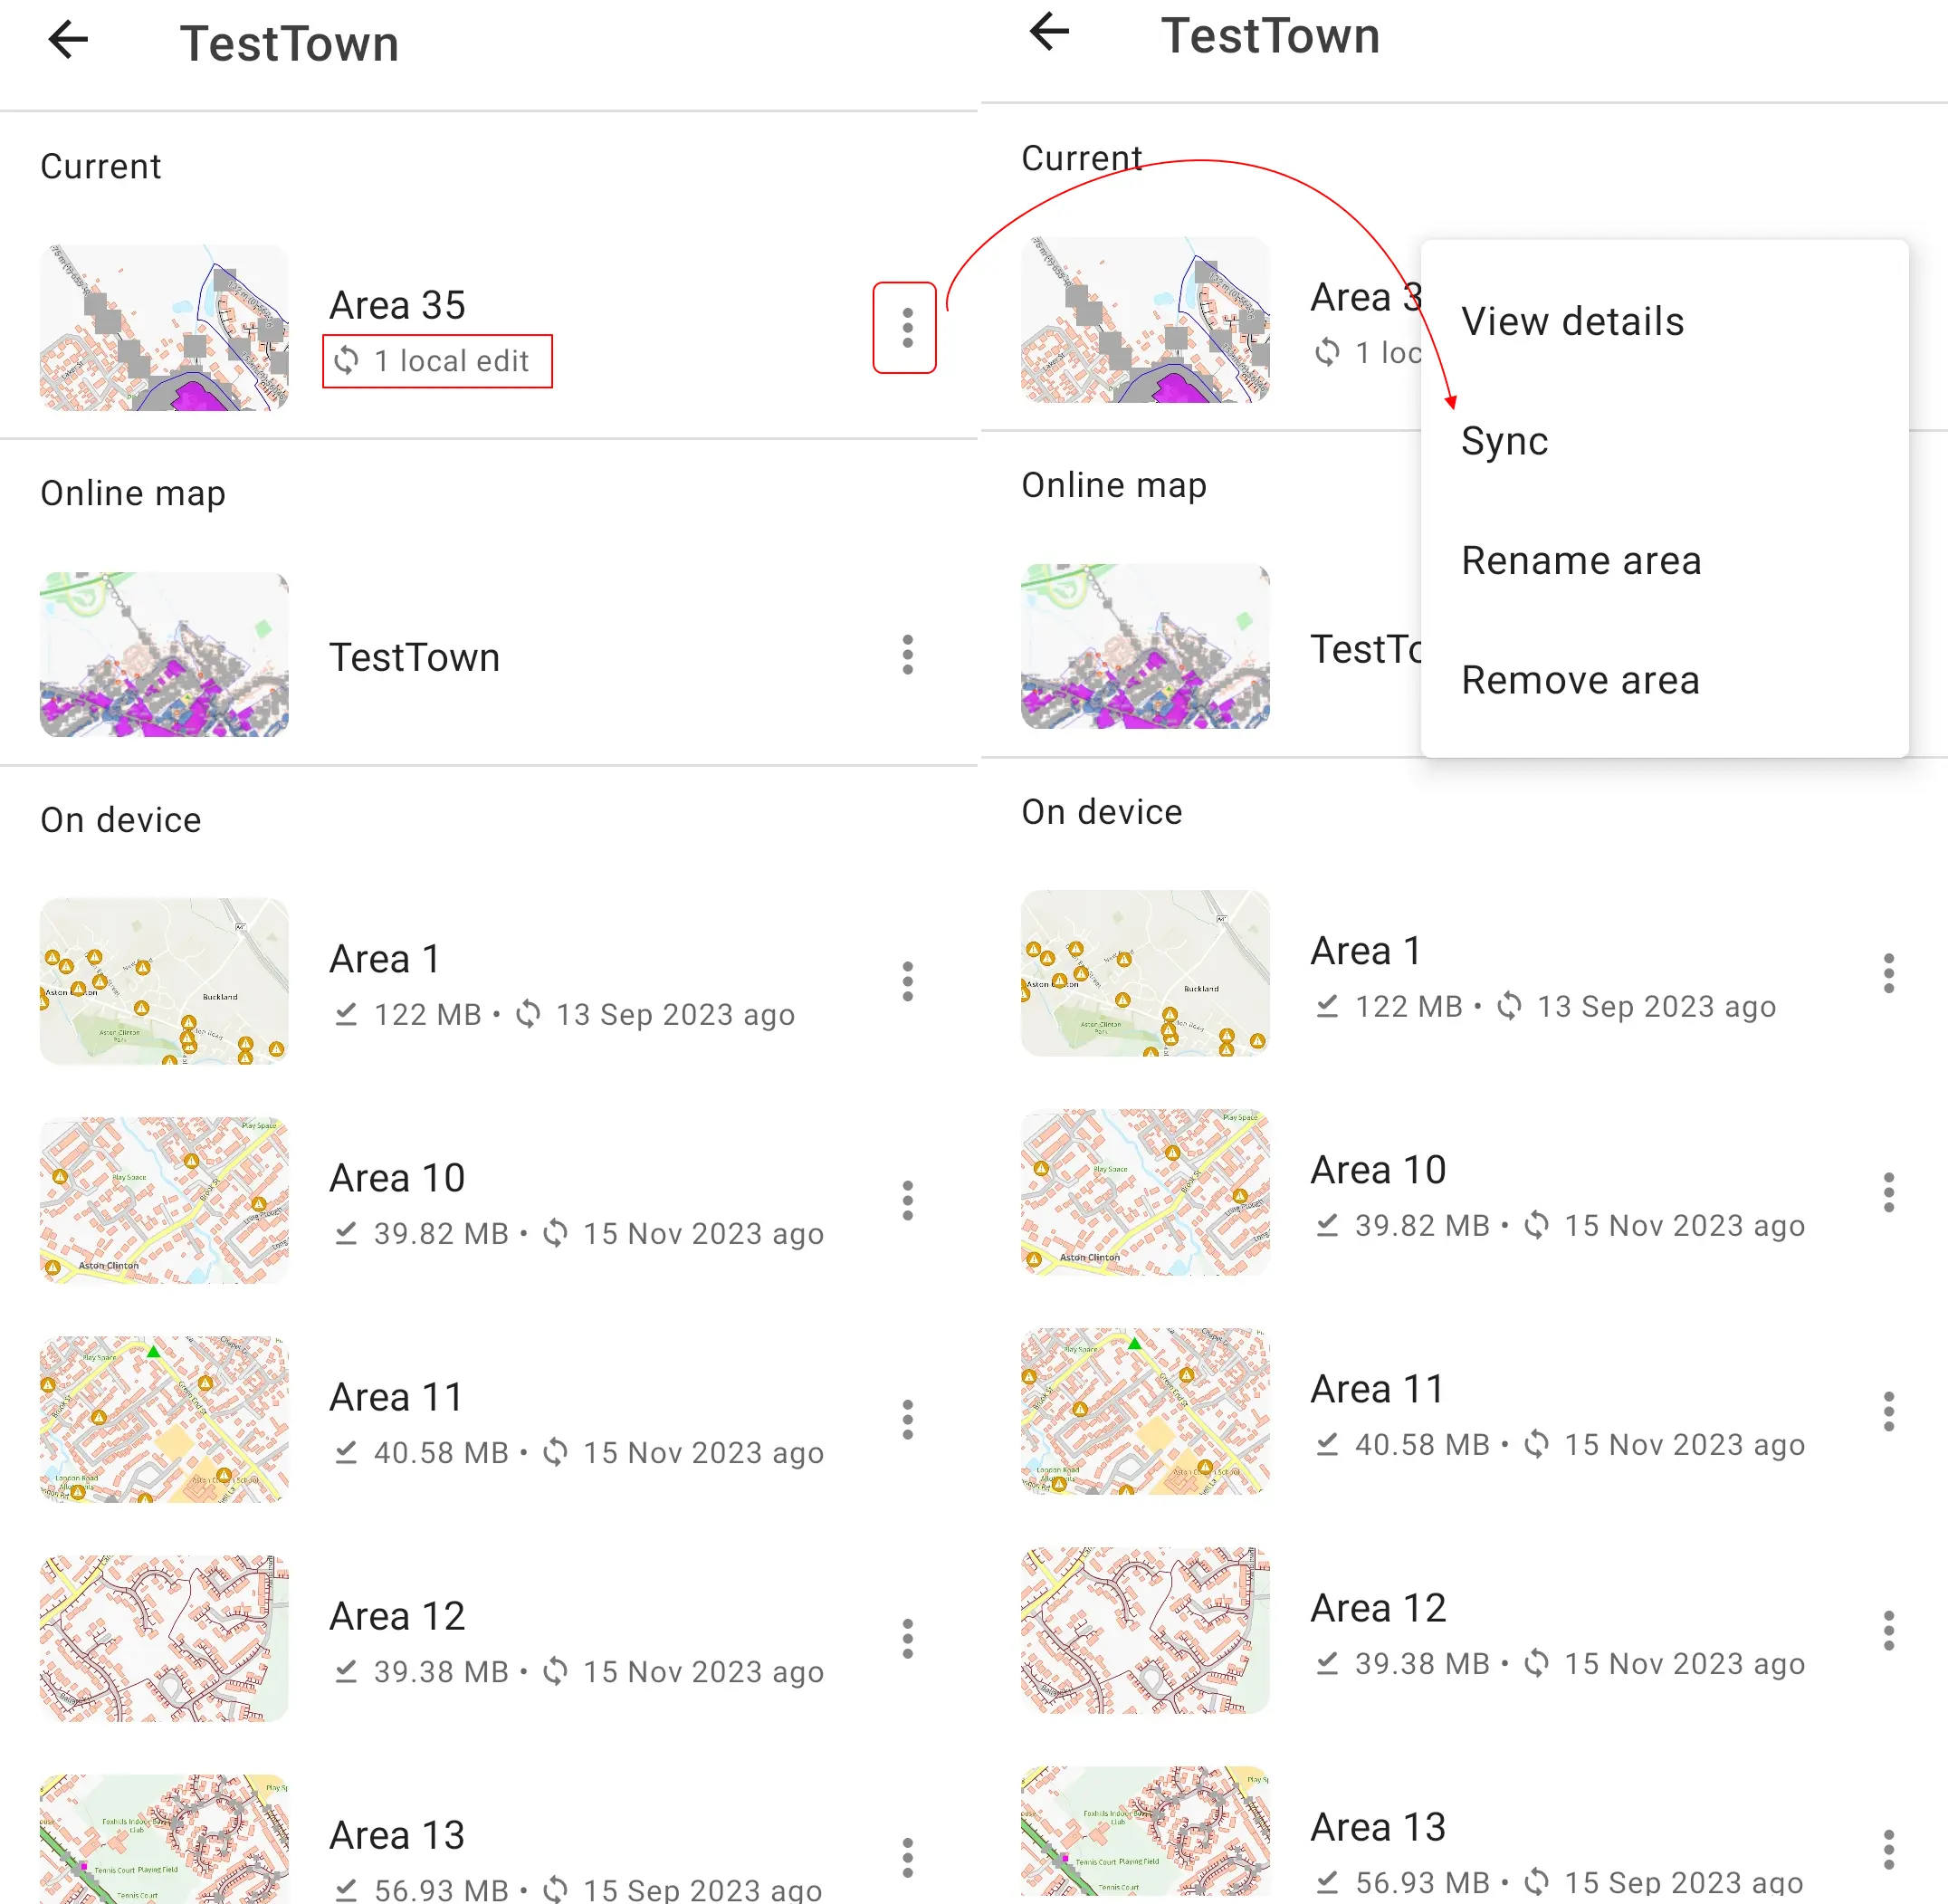
Pic. 17 The Field Maps Designer Offline area local edits and sync options.
By clicking Sync, our offline product starts to be synchronized with the main online map, which takes a while. The time of synchronization depends on the number of changes you provided as well as the strength of your connection.

Pic. 18 Synchronization of the offline area with the main online map.
The synchronization process works the same as downloading, where the round progress bar appears. When completed, you can see the actual size of your offline area at the moment of the last update (Pic. 18).
Now, the object created offline appears on your map (Pic. 19).
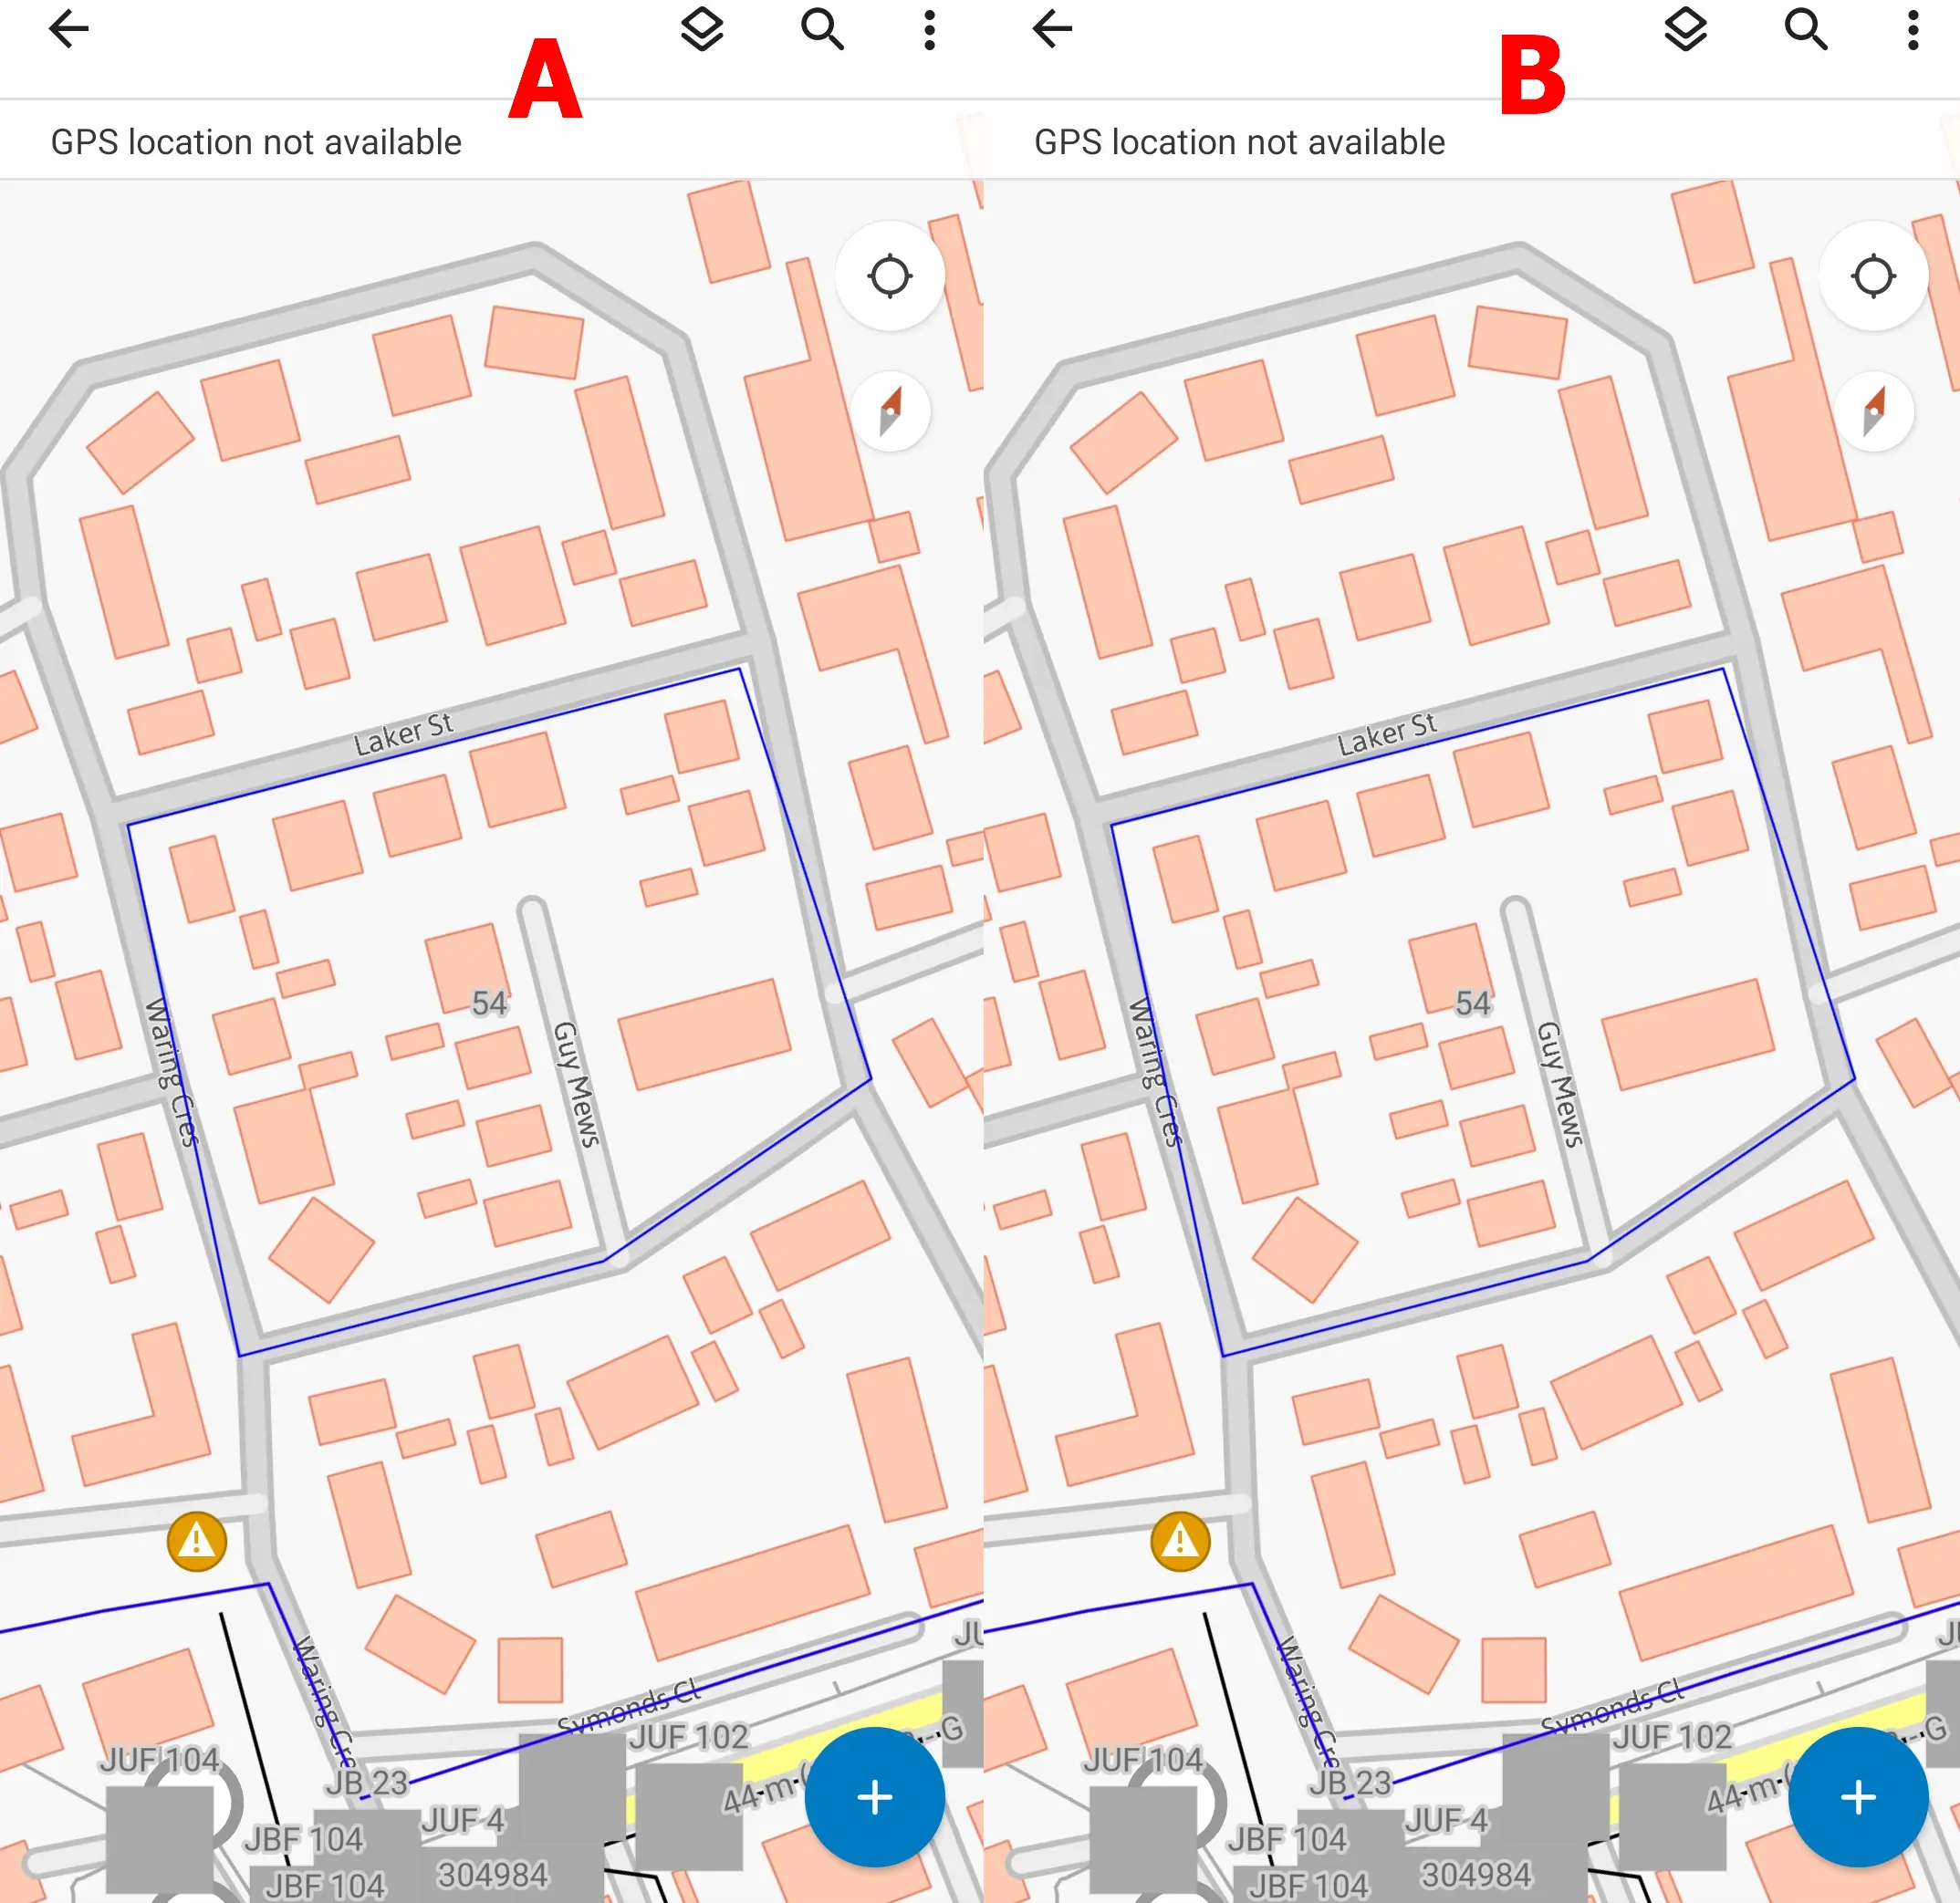
Pic. 19 The object created offline (A) is now visible in the online map (B).
We cannot forget about some potential errors, which might occur on the way of offline area preparation and their further synchronization.
Below you can see the list of potential problems and proposed solutions. This list will be expandable in the future.
LIST OF POTENTIAL ERRORS AND POSSIBLE SOLUTION
1. Layer type not supported for Offline usage – the reason behind it is, that the WMTS layer can’t be downloaded for free of charge use. The other basemap must be selected.
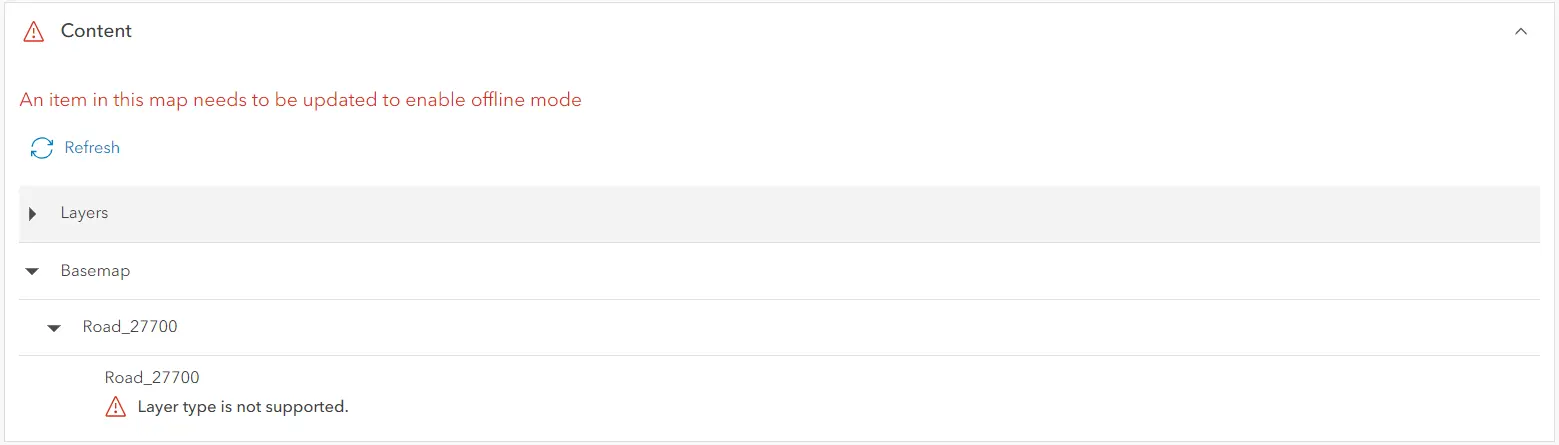
Pic. 20 Layer is not supported for offline use.
2. Sync failed, Error while handling start sync geodatabase on the server – this issue is caused by i.e. poor connection. Occurs usually in a situation when at least one of the layers cannot be read properly by the server. If it happens, the server is unable to approve it offline. The best solution is to reopen the Field Maps Designer when your connection has been restored.
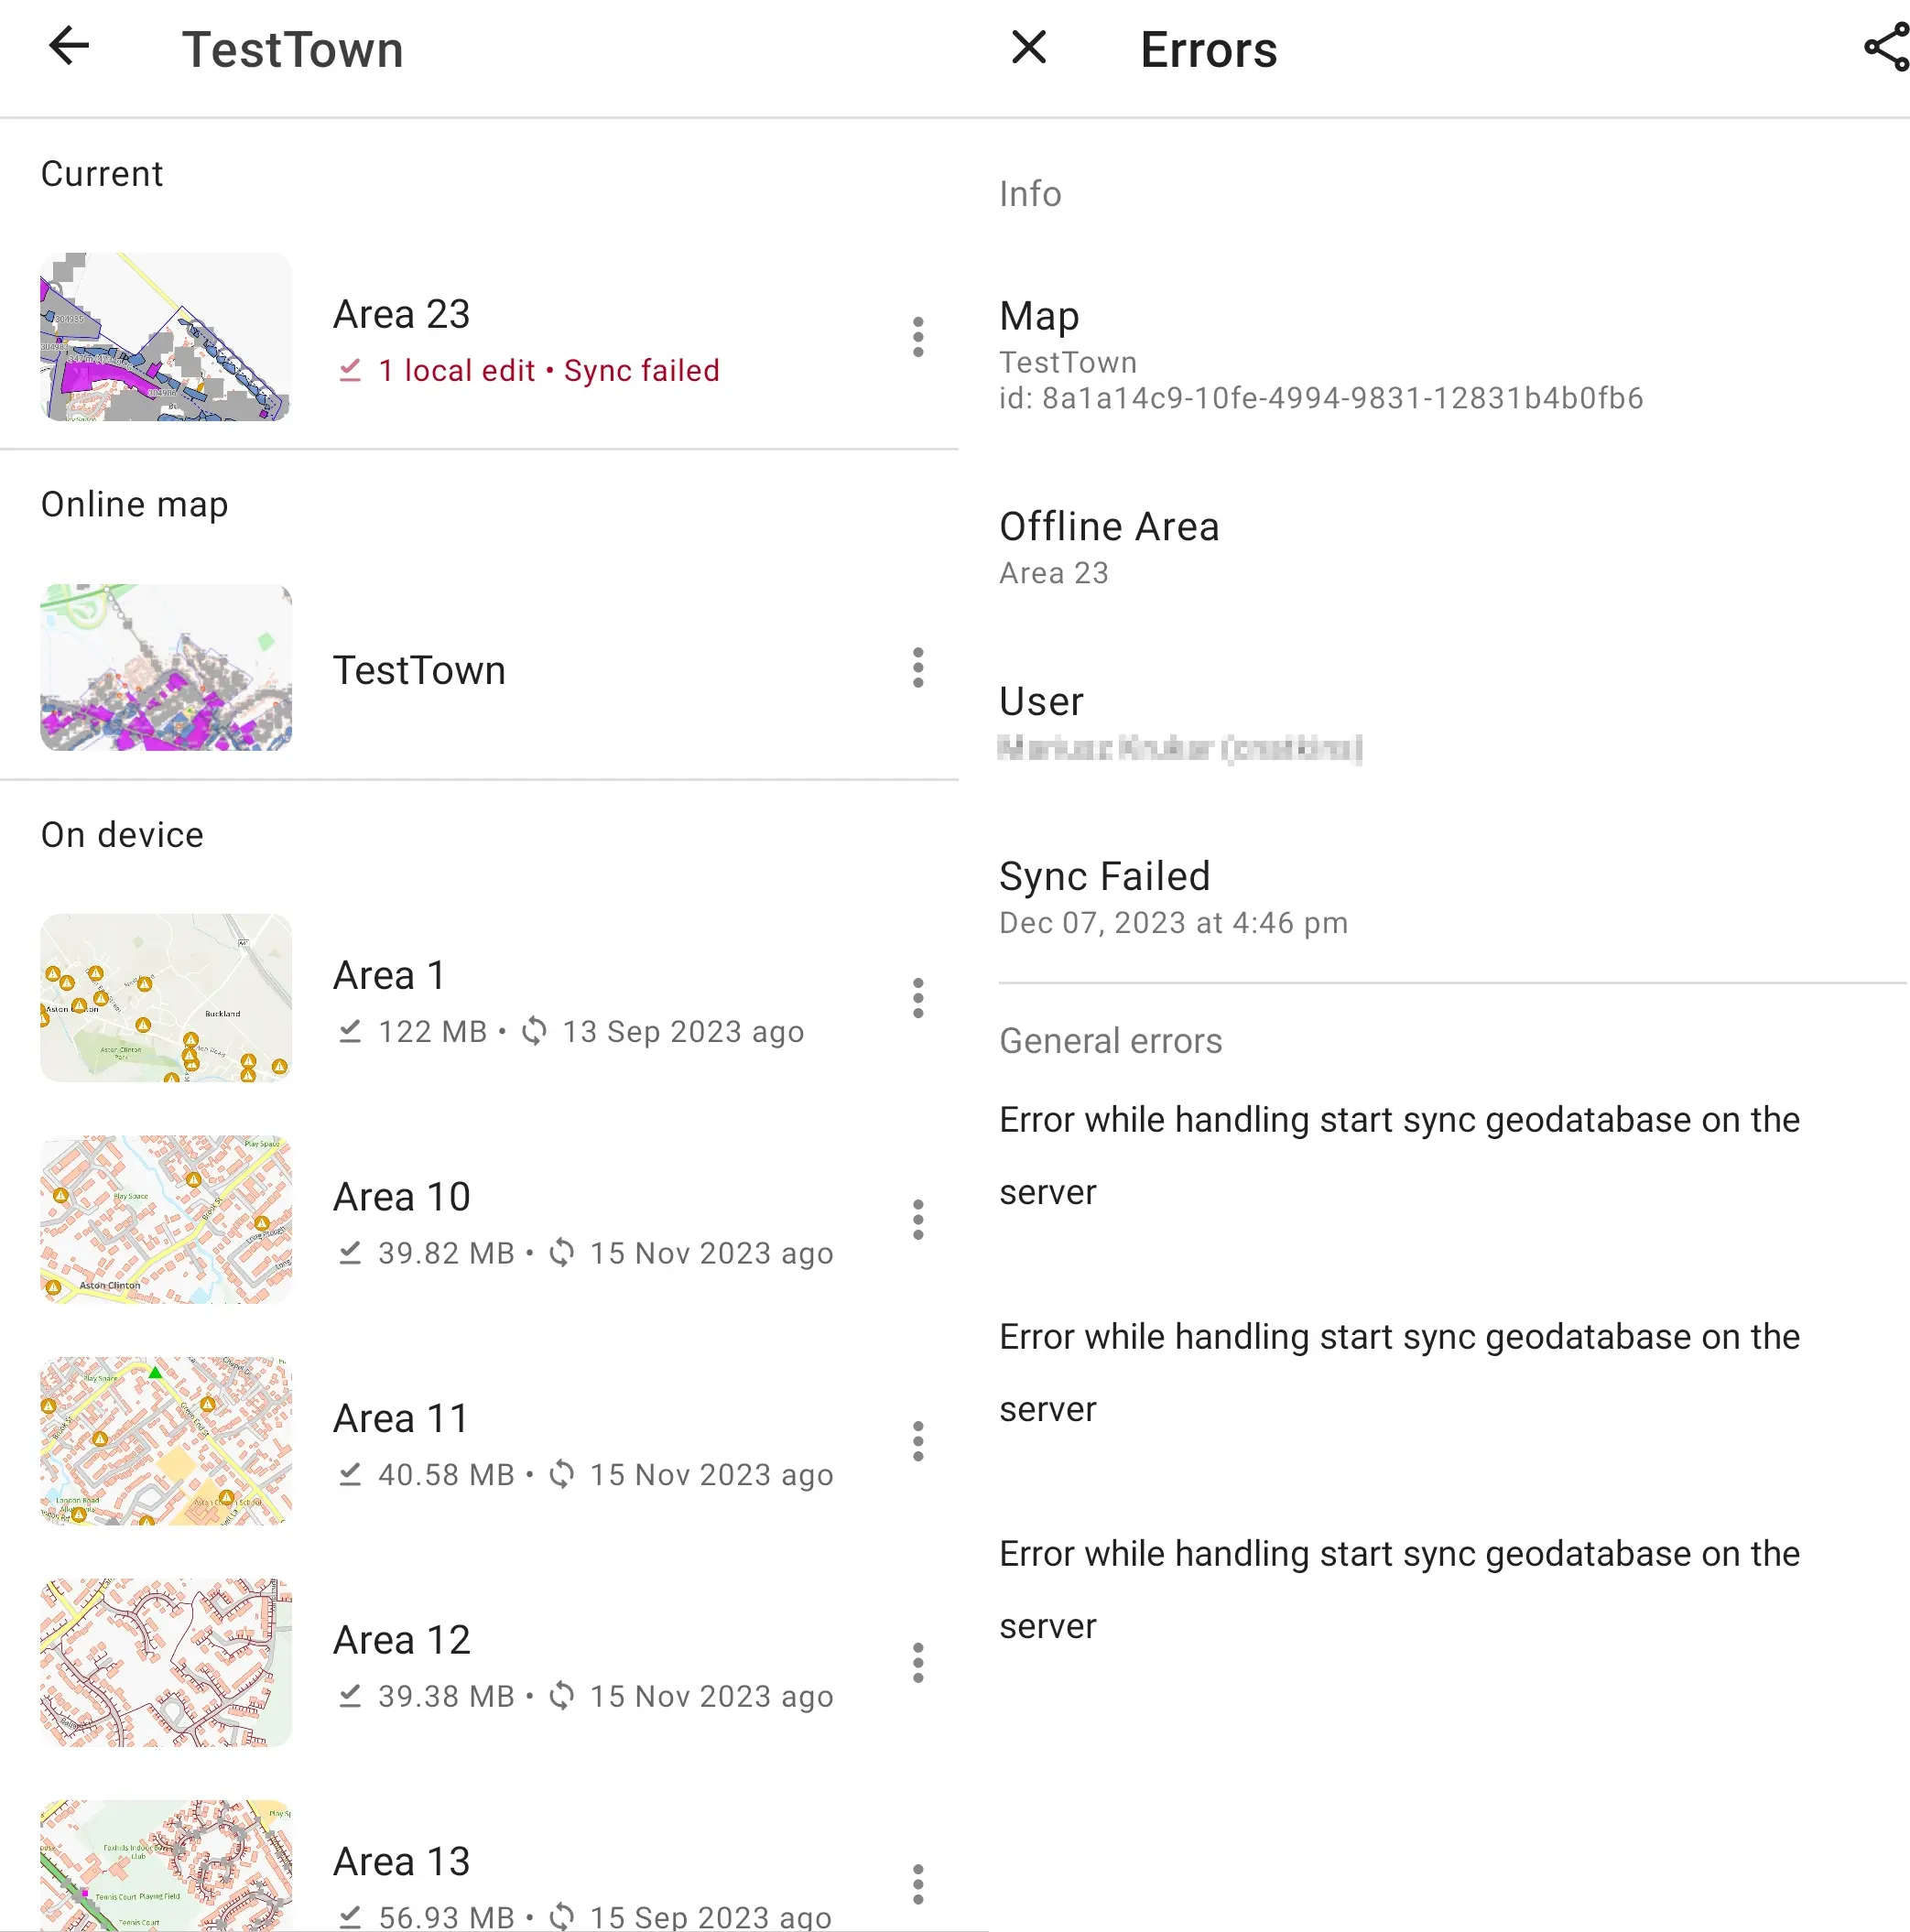
Pic. 21 Sync failed in Field Maps Designer.
Links:
- https://doc.arcgis.com/en/arcgis-online/manage-data/take-maps-offline.htm
- Unable to create offline areas on web maps in ArcGIS Online
- https://www.esri.com/arcgis-blog/products/field-maps/field-mobility/from-desk-to-field-in-5-easy-steps-with-field-maps-designer/
- https://eos-gnss.com/knowledge-base/articles/how-to-work-with-arcgis-collector-offline
Forums:
- Sync Error Esri Field Maps
- https://gis.stackexchange.com/questions/129842/getting-sync-error-from-collector-for-arcgis
My questions:
Youtube: