
HOW IT WORKS?
There are 2 ways of finding the Identify Results tool in QGIS.
The first one is in the main panel View -> Identify Features.
The second one requires toggling the attribute bar (View -> Tooolbars -> Attribute Toolbar) and selecting the cursor with the “i” symbol (Pic. 1).

Pic. 1 The “Identify features” symbol in QGIS.
The tool works by clicking just once on the random feature (Pic. 2), in which attribute field details appear in the Identify Results panel on the right sidebar. This panel even if inactive will pop up automatically. We can find there everything about our feature, which basically includes:
A. Derived – includes the information about Feature ID, the XY coordinates, and XY clicked coordinates.
B. Actions – just one action visible – View feature form
C. Data attribute fields with all the details
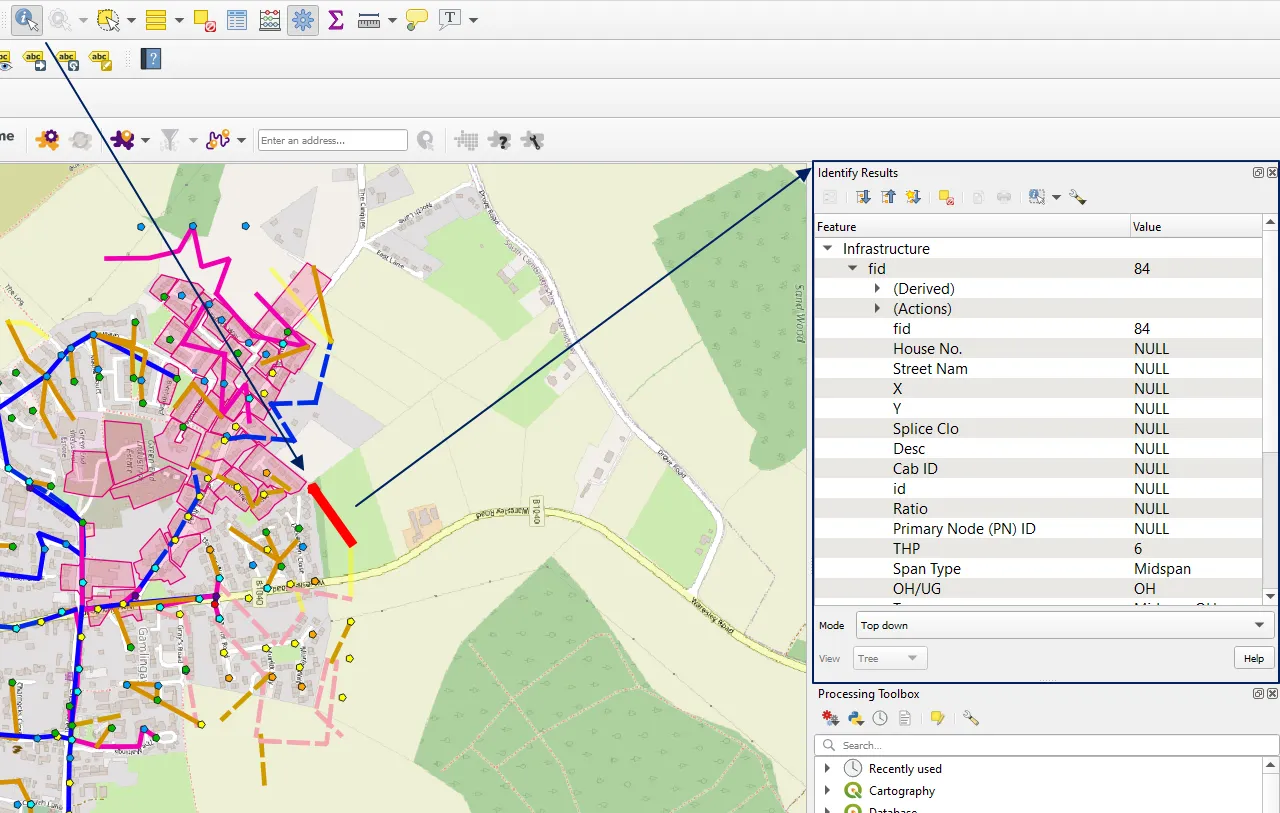
Pic. 2 Identifying features in QGIS.
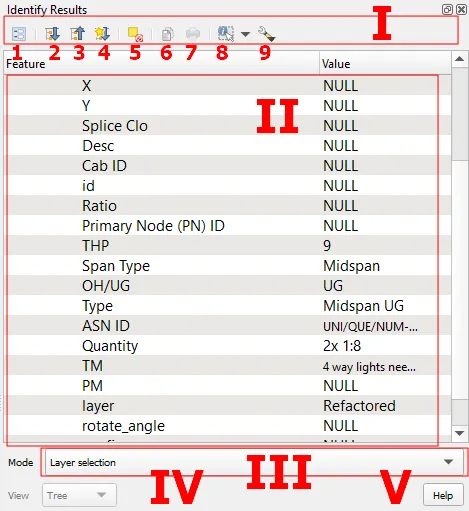
Pic. 3 Components of the Identify Results panel in QGIS.
The Identify Results dialog includes (Pic. 3):
I – The main options, are discussed below.
II – Main information interface with all information listed.
III – Mode – means how the selection should be made.
IV – View – you can define the view of your layer item information like “Tree“, “Table” or “Graph“. The “Table” or “Graph” is active only for raster layers. The “Tree” view might look deeper sometimes.
V – Help – this button redirects you directly to this QGIS reference manual page, which usually tries to be the most up-to-date of the current QGIS version.
Main options of the Identify Results panel:
- View Feature Form – shown in the image below (Pic. 4). This is the section, where you can edit the values of feature attributes. Obviously, it’s available only when your layer is toggled in editing mode. Otherwise, you will see greyed inputs like those below.
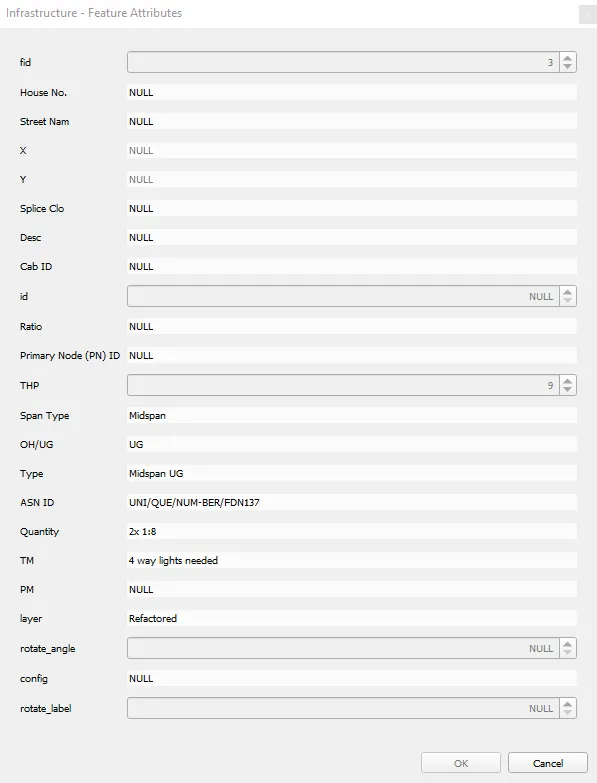
Pic. 4 The Feature Attributes option in the QGIS Identify Results tool where a user can change the layer item values. Once grey and inactive it means, that our layer is not editable right now.
- Expands all sections – preceded by the gray triangle symbol although it’s not necessary to use it because by default we have all the information from the attribute table, which we need.
- Collapse Tree – it’s rather not recommended because we will have everything hidden.
- Expand New Results as Default – it determines whether the next identified feature’s information should be collapsed or expanded. It’s better to keep this option switched off as we don’t need the full sections (Derived, Actions) expanded all the time, just pure data from the attribute table. When this option is disabled we have the “Derived” and “Actions” sections just optional (collapsed).
- Clear results – erase everything leaving an empty dialog window.
- Copy selected features to clipboard – copies whole identified content to the clipboard.
- Print selected HTML Response – this option is rarely used and remains inactive most of the time. The HTML response should come from getfeatureinfo. The option in fact can be mistaken for simple printing of Identify Results panel content. However, its big complexity and incompatibility don’t allow it for common use. Instead of it, we can print our identified results in another way via Project -> New Report.
- Identify features by area or single click – exactly the same options as for selection. We can select the items we want to identify in the following ways:
– Identify feature(s) – by clicking just one item or selecting the box, which will include everything falling inside,
– Identify Feature by Polygon – the same basis as previously. Thereby it’s worth mentioning, that the polygon produced by selection will highlight these items, which even touch the selected area. It doesn’t apply for point layers, because they must be just within, but in the case of a linear layer, the item will be selected even if its part will fall inside of the selected polygon.
– Identify Feature by Freehand – an analogous option to the previous one, you just click once on the map and move your cursor. The area is selected (Pic. 5).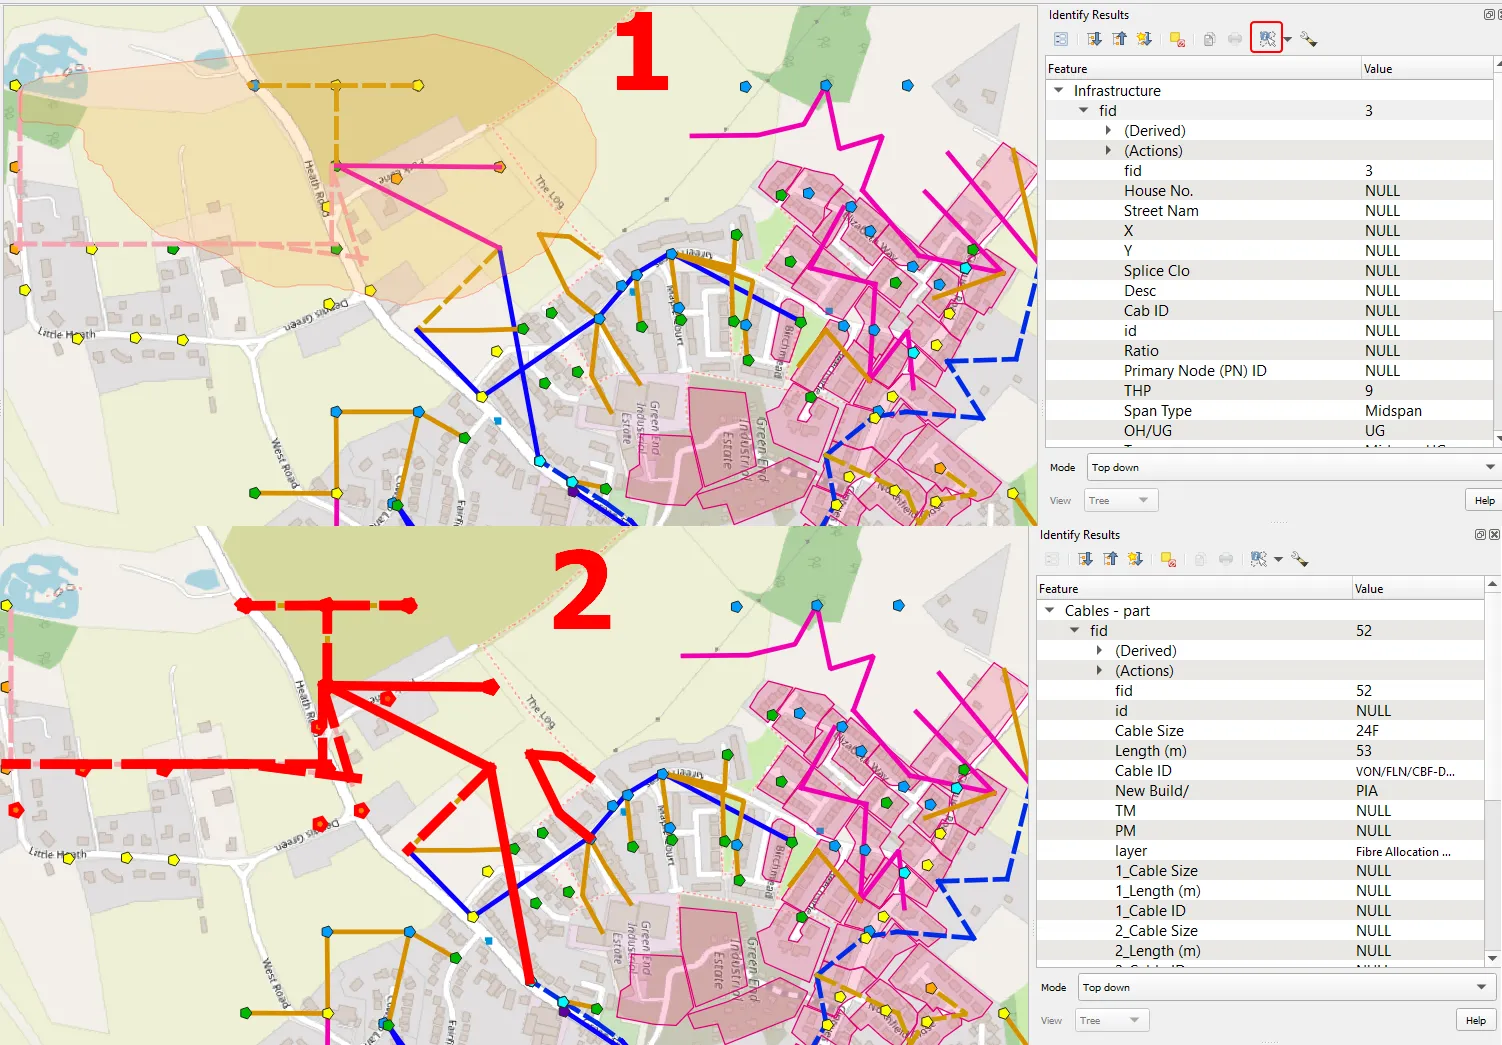
Pic. 5 Identifying features by freehand in QGIS. The linear items are also selected even if the majority of the shape falls outside of the selection polygon.
– Identify Feature by Radius – You can provide your own radius distance (Pic. 6). Usually, it should come in meters, but if you have some doubts you can always install the Select by Radius Plus plugin, which will let you define the distance unit.
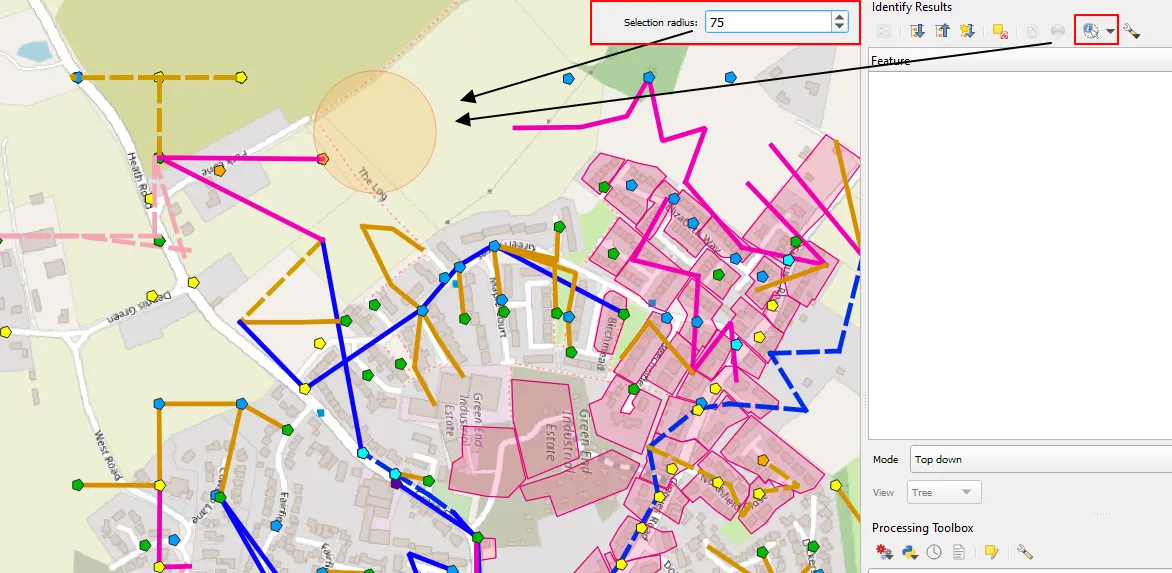
Pic. 6 Identifying features by radius in QGIS.
- Identify Settings – it’s just one option here – Auto-open form for single feature results, which opens instantly the Feature Attributes form when clicked on just one single feature of our layer. Can be useful in the case when the user wants to edit something quickly. The Feature attribute is launched on account of Identify Panel which must be toggled this time manually from the View-> Panels -> Identify Results.
Main information interface (Pic. 3, II) – here all relevant information is shown. Basically the “Derived” and “Actions” section is not needed to know. We just need to know all the inputs from “fid” to the bottom, which correspond to our data attribute table (being more precise to the Feature Attributes section).
Mode (Selection Mode) (Pic. 3, III) – it’s important because it defines how we can select the layer. Usually, we have more than 1 layer in the place of clicking. The following options here define the way the items must be selected:
– Current layer – it works just for the active layer in QGIS, which is usually highlighted in the Layers panel (Pic. 7)
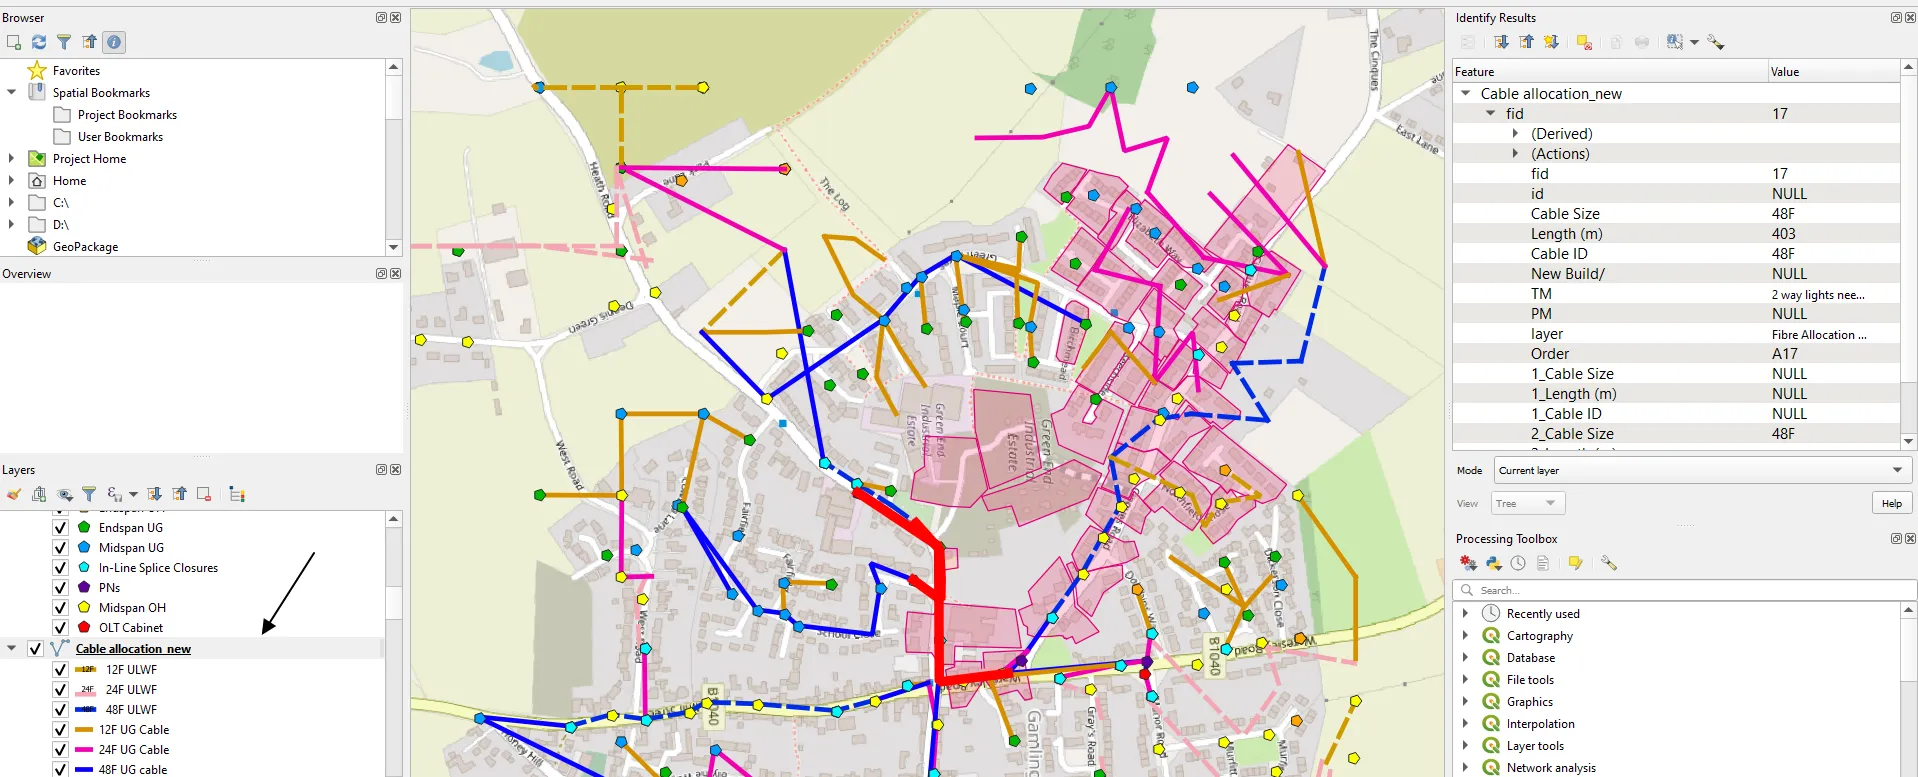
Pic. 7 Identifying features in QGIS by using the “Current layer” mode.
– Top down, stop at first – user can select all layers regardless of their position, although only one layer can be selected at the given time.
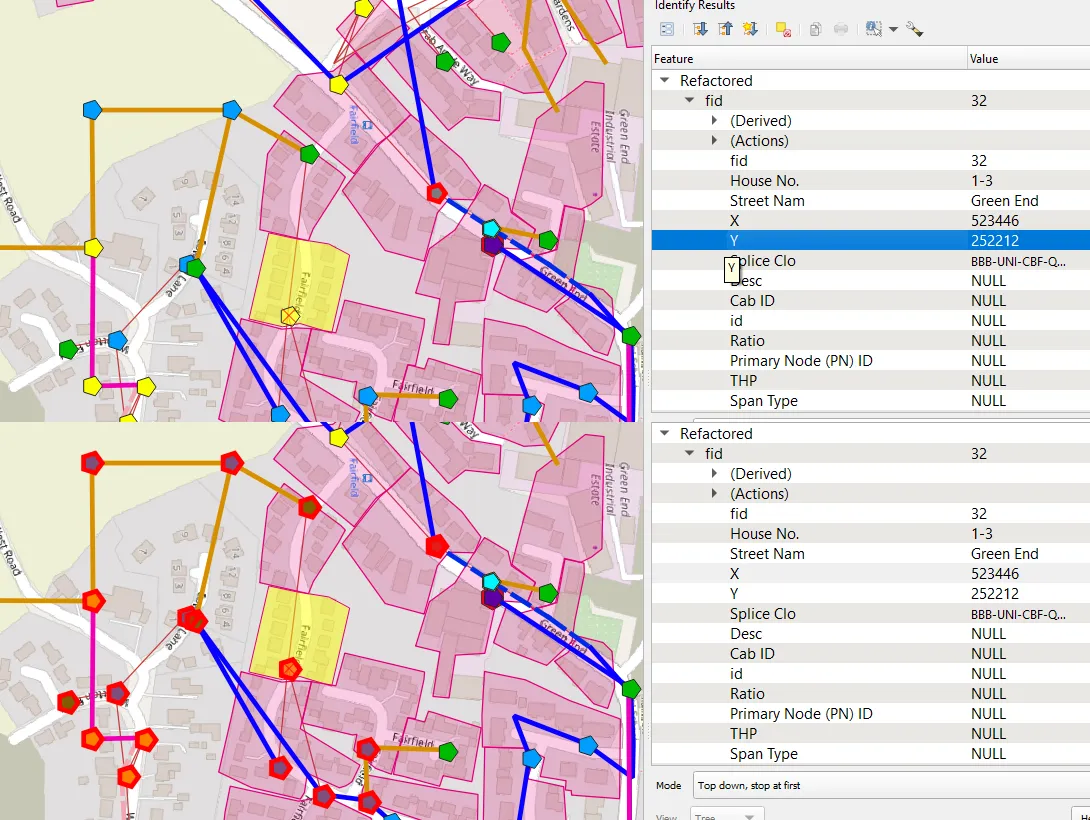
– Top down – all the layers are selected from the bottom to the top when clicking at a certain location (Pic. 8).
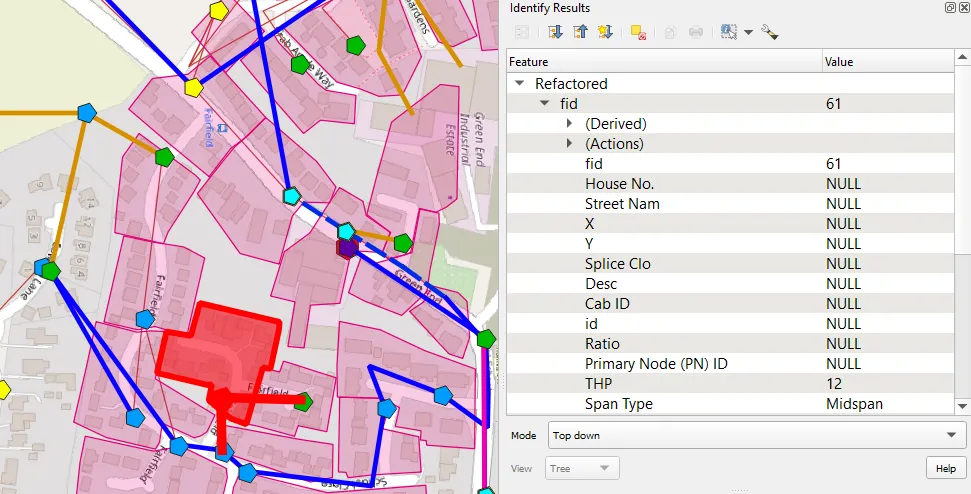
Pic. 8 The “Top down” selection mode in the Identify Results panel.
– Layer selection – the panel gives you an opportunity to choose which layer you want to inspect when clicking at some location (Pic. 9). The same effect you can have regardless of the mode when you right-click on your selected location.
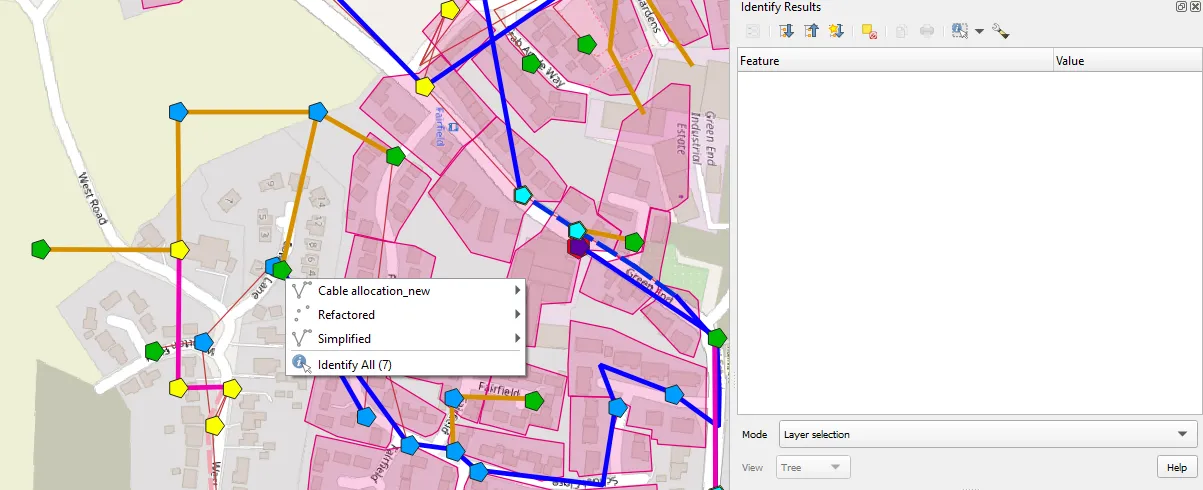
Pic. 9 Using Identify Results in QGIS by the Layer selection mode.
View (Pic. 3, IV) – comes in the Tree as the default. It’s only one type of view available for vector layers. Raster layers can be browsed also with Table and Graph views (Pic. 10).

Pic. 10 The View option in the QGIS Identify Results panel (top – Tree – default; bottom left – Table; bottom right – Graph).
Help (Pic. 3, V) – this button opens the QGIS documentation in a certain section.
Mouse right-click options (some of them repeat with the main panel and are highlighted red):
-> Edit Feature Form… – as discussed above, the user can provide some new inputs into the attribute table via this form.
-> Zoom to feature – QGIS takes us directly to the place where this selected feature (or group of features) is located.
-> Copy Feature – option for copying an item to the clipboard.
-> Toggle Feature Selection – selects the current feature under investigation.
-> Copy attribute value – the same option as in the main panel, simply another way of how we can copy the attribute value to the clipboard.
-> Clear Results – erases everything leaving blank panel.
-> Clear Highlights – deselects the features selected just for identification. If we used the “Toggle Feature Selection” the typical selection remains in place.
-> Highlight All – works just in the case when we selected more than 1 element for inspection. Obviously, we can read just one per time, therefore just this one will be highlighted within the area of our selection. By choosing the “Highlight All” option we can see all of them active again within the area of our selection (Pic. 11).
Pic. 11 Highlighting all items within selected polygon/area.
-> Highlight Layer – it works similarly to the previous option, although instead of all elements in the selected area, just the items of one layer are highlighted.
-> Activate Layer – this option activates the layer and toggles editing mode for the layer concerned.
-> Layer Properties – opens a pop-up window with all layer properties. This exactly the same option as right-clicking on any layer in our QGIS project.
-> Expand All – Expands all sections in the identify information dialog.
-> Collapse All – Collapses all sections in the identify information dialog.
SETTINGS
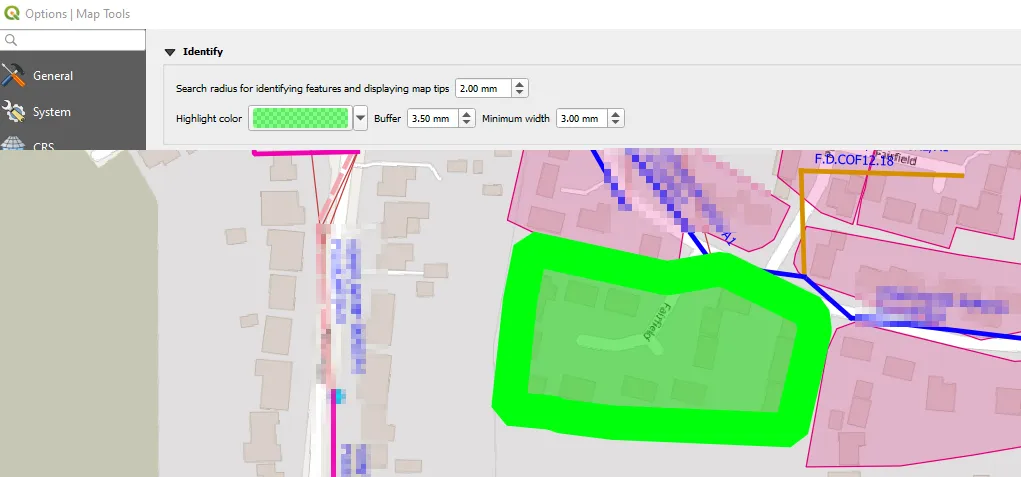
In the QGIS main panel -> Settings -> Options -> Map Tools we have two options for customizing the Identify Results display in our QGIS map canvas. They are:
– Search radius identifying features and displaying map tips – as default set to 2mm, which means that we must click almost always on the layer. However if you change it to 20mm instead for example, then the buffer between clicking on the map and the highlighted layer for identifying will be much thicker.
– Highlight colour – can be changed, as default comes semi-transparent red. Everything is changeable here along with the Buffer thickness and its minimum width (Pic. 12).
Mariusz Krukar
Links:
- https://docs.qgis.org/3.22/en/docs/user_manual/introduction/general_tools.html#identify
- https://docs.qgis.org/3.4/en/docs/user_manual/introduction/general_tools.html#using-the-identify-features-tool
Forums:
- https://gis.stackexchange.com/questions/67867/where-to-find-identify-feature-tool-in-qgis
- https://gis.stackexchange.com/questions/189674/can-i-control-what-field-comes-up-first-in-the-identify-results-window-in-qgis
- Make ‘Derived’ and ‘Actions’ optional in the Identify Results Tree panel
- https://gis.stackexchange.com/questions/34194/qgis-identify-features-button-issue
- Identify results panel: too deep tree is displayed
- https://gis.stackexchange.com/questions/378224/how-do-i-stop-the-identify-results-popup-window-in-qgis-3
- https://gis.stackexchange.com/questions/88808/is-it-possible-to-remove-actions-and-derived-from-the-qgis-identify-dialog
- Print the content of Identify window
- https://gis.stackexchange.com/questions/377958/print-identify-results-qgis
- https://gis.stackexchange.com/questions/370330/reset-the-auto-open-form-for-single-feature-results
- https://gis.stackexchange.com/questions/173207/how-to-define-precisely-the-radius-size-when-using-select-features-by-radius-i/433743#433743
- https://gis.stackexchange.com/questions/199318/setting-layer-as-unselectable-to-avoid-identifying-features-in-multiple-layers-u
- https://gis.stackexchange.com/questions/118073/qgis-2-2-identify-tool-highlight-settings
- https://gis.stackexchange.com/questions/189520/how-to-identify-feature-from-multiple-layers-in-qgis
- https://gis.stackexchange.com/questions/397093/qgis-identify-tool-not-working-on-selected-layer
Youtube: