
The quickest way to dehaze your photo for long distance observation purposes
The basic way to remove the haze and color casts in your picture in open-source software is by using Gimp. This program can trivially easily do it for you, however, you must spend up to a few minutes adjusting your color preferences. Basically, the Gimp software is perfect for people, who want to enhance the colors more and reduce the unpleasant thin layer of fog. Aside from normal photos, generally, the editor is focused on the foreground or 2nd plan only the Gimp can be also used to emphasize the colors of the background. Frankly speaking, the software is also tailored for long-distance observation lovers.
Another tool, that can take full advantage of the picture and bring all the desired colors for us is IrfanView. I can recommend this simple open-source graphics software only when you want to modify your picture in the quickest possible way. Looking for it from the other side the IrfanView will bring the quality of your picture down when you use it for the purpose described here by myself.
Gimp 2.8
The example below comes from the Gimp 2.8 open-source graphic program. All steps shown in this article may be traced to RAW image processing, as we used to do nowadays. However, this is not the issue for this text. I have focused on .jpg and .webp images only because they must be quick and also without extravagant system requirements.

Pic. 1 View from Hidcote Manor Gardens car park area towards NNW: on the right Stratford-upon-Avon, Shakespeare’s birthplace (13km), and Birmingham beyond on the left (43 km).
Well, the aforementioned picture shows us the example of a far-reaching view from Cotswold’s northernmost brink (Ebrington Hill’s western slope) near Hidcote Manor Gardens. The first plan is not interesting, because there are fields and trees. 2nd plan becomes more curious because we can see some settlements there This is the Stratford-upon-Avon town, where William Shakespeare was born in 1564. Beyond is getting more interesting because we can spot some objects on the horizon. Unfortunately, the haze interrupts our view and only we can say, that something is there, but not sure what it is.
Before we start to investigate what is there I will show you the GIMP tool, where we can do some photo amendments. First of all open the picture, which you want to work on, and next from the main toolbar menu on the top choose “Colours” and next select “Levels” to get the window as per in the picture below (Pic. 2).

Pic. 2 Our original photo and the “Adjust color level” box.
The box shows you the histogram with values. You can also adjust your picture by changing the single-channel saturation, but I will back to this next.
Possibly you spotted 3 small arrows just below the histogram. You can adjust them by watching the visual changes in your picture at once. Another image, slightly modified is a good example, where dehazing the picture in Gimp is commonly used. The brightness and contrast have been changed a little bit whereas colors remained the same (Pic. 3). As a result, our panorama became more distinct.

Pic. 3 The image with contrast and brightness was modified whereas the colors remained the same. The picture appears to be bluish, however, our panorama is more distinct.
The next step involves more advanced image processing. I think everyone according to his own preferences can rectify this picture. My examples are below.


Pic. 4,5 Further image processing within contrast, gamma, and brightness.
Treat Pic. 5 as the final output. Admittedly the horizon appears to be clearer, but we lost many tinges. Our image is strongly blue. The blueness appears everywhere even on trees and fields. Moreover, some hues are gone. When you spot the foreground it looks almost dark. Let’s have a look at what can we do to make our processed image better.
Looking at the “Adjust Colour Level” box you can notice the “Channel” dropdown list. The “Value” is our default variable. Once you click on the arrow on the right you will have the choice of the RGB channels, which you can adjust separately. And there you go! Now you have RAW-looking image processing (Pic. 6). Gimp is very good at it.

Pic. 6 The color channel selection in Gimp 2.8.
I am telling you again; that everyone can adjust the picture in a different way. My process is only an example.


Pic. 7,8 The Gimp image processing with color channels amendments.
Pic. 8 is my final image. It looks quite realistic and the horizon is clear, although Pic. 7 shows a better horizon, where you can be able to distinguish the colors of the buildings. Anyway, Gimp 2.8 is a really good tool to enhance the colors of the foreground of your picture and reduce the haze. You must spend a few minutes to do it, it is not the quickest way but is definitely worth it. The description above refers to Gimp 2.8. See the links at the end to study this process for older Gimp versions.
IrfanView 4.42
IrfanView is a much simpler graphic open-source tool than Gimp. It sounds better for someone, who wants to process the image quickly. For the purpose of long-distance observations, this is definitely the quickest way to get rid of the haze from your photo. The other side remains in the quality, which I am going to consider in this part of the article.
First, I show you where can we find the color correction boxes in the IrfanView software. From the main toolbar on the top select “Image” and click “Color corrections” from your drop-down list (Pic. 9).

Pic. 9 Select the “Color corrections” option in IrfanView.
Unlike the Gimp software, IrfanView has everything located the same in most versions. Once you’ve got an older one this “Color correction” box is to be found in the same place.
When you have the “Color corrections” box opened you have a few options to change the colors of your picture. The basic de-hazing tool is a “Gamma correction” value, always as a default set at 1.00. When you decrease this value down to around 0.50 the difference will be considerable (Pic. 9). Alongside the gamma, you need to change the “Contrast” as per in the picture below (Pic. 8), because the gamma only will make your photo too dark. The preview at the upper part of the box helps you to adjust the photo colors correctly (Pic. 9).

Pic. 10 The “Color correction” box. The most important are “Gamma correction” and “Contrast”.

Pic. 11 New colors on your picture as is seen in the preview on the right.
When you have ascertained the “Gamma correction” and “Contrast” values just go OK and see how the image changed.

Pic. 12 Color channels correction in IrfanView. The example with a preview is on the right. Red arrows show what has been changed.
In the picture above the horizon looks much clearer. We can even point out which object far away is brighter or darker. The worst side of this image is strong blueness.
The left part of the box includes other options for color corrections in your picture. There are RGB canals and “Saturation” values (Pic. 13).

Pic. 13 Color channels correction in IrfanView. The example with a preview is on the right. Red arrows show what has been changed.
Unfortunately, IrfanView doesn’t handle it like Gimp. To be honest is better not to touch these options in the left part of the box when you dehazing your panorama (Pic. 14).

Pic. 14 The output image processed in the IrfanView software with de hazed horizon
I spent maybe tens of seconds correcting the image above. This option to de-haze is definitely the quickest, but…
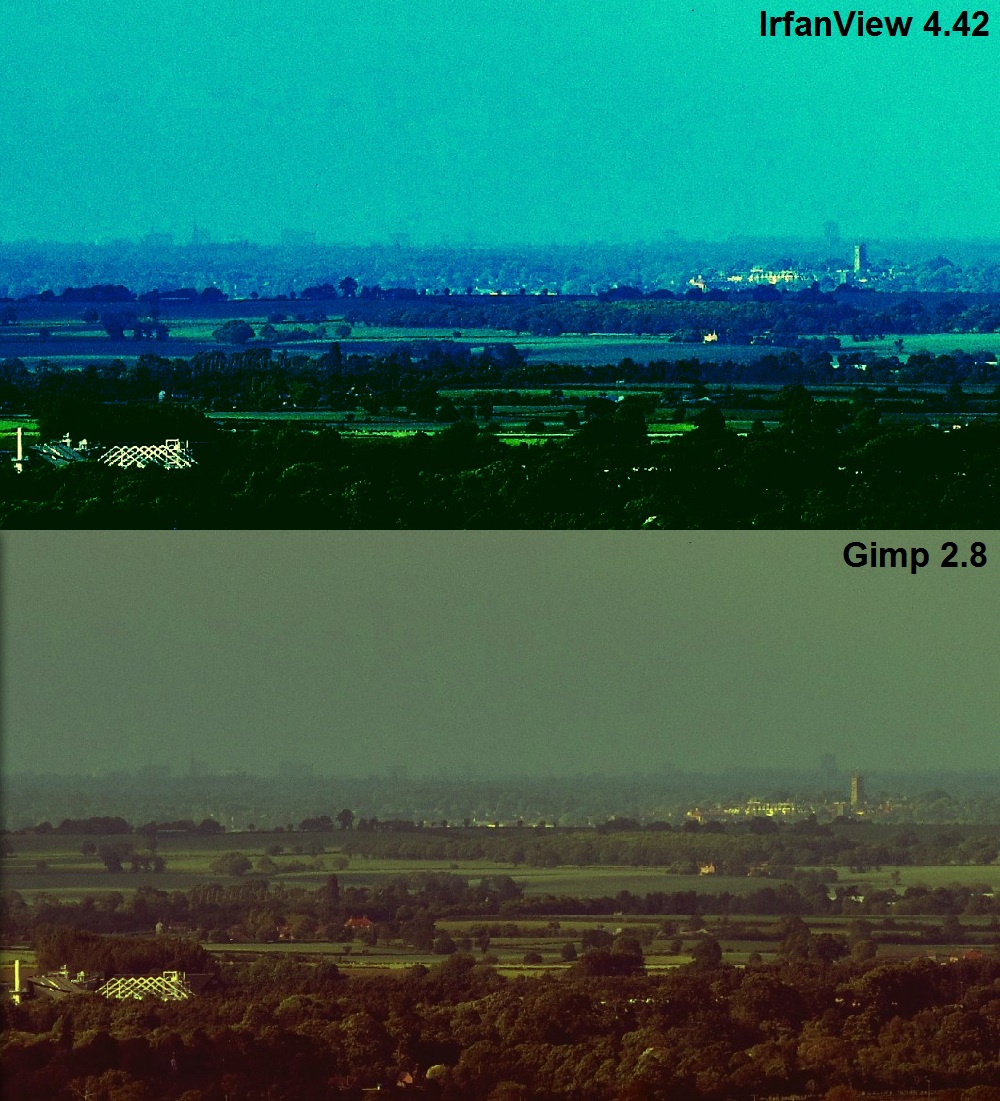
Pic. 15 Comparison of the pictures with corrected colors between Gimp 2.8 and IrfanView 4.42. The Gimp image looks much better, but the IrfanView picture seems to be slightly better de hazed.
… the output can bring you down on the contrary with Gimp software. However, there are pros and cons to everything. Gimp cannot de-haze your horizon like the IrfanView does. That’s why I showed you the quickest way to de-haze your picture for long-distance purposes; when you don’t care about the quality and only want to document the far-reaching view, choose the IrfanView. You won’t spend longer than a minute doing this.
Mariusz Krukar
Links:
1. Dehazing the picture – explanation
2. About digital photo dehaze
3. Dehaze the picture with Gimp – older versions
4. Haze removal with open-source photography software (Gimp 2.2.13)
5. https://photo.stackexchange.com/questions/84495/can-my-overexposed-hazy-backlit-photo-be-fixed