
The Ordnance Survey grid conversion is usually required when dealing with some projects across the UK. Usually, along with the standard WGS 84 datum, we need to define X (Easting) and Y (Northing) coordinates. This task might be quite time-consuming when converting our locations one by one. Fortunately, we have some tools, which can do the job for us. However, even there, you are too involved, since the data must be pasted from our Excel file and then copied back to our spreadsheet. In this article, I am going ahead with the solution, which will help you save time in batch Latitude/Longitude to OSGB XY conversion and the other way round. Before I start to show you how it works I would like to explain to you what is the difference between WGS 84 and the OSGB 36 coordinate grid system.
WGS 84 is the latest version of the World Geodetic System (WGS), which is standard for use worldwide and uses the GRS 80 reference ellipsoid. It’s a standard coordinate system for the GPS system. It consists of a three-dimensional Cartesian coordinate system with an associated ellipsoid, which means, that the positions can be described either in XYZ or Latitude and Longitude. The origin of the WGS 84 datum is the center of the mass of the Earth (Geocenter). The basic parameters of the WGS-84 are shown in the image below (Pic. 1) with an inverse flattening of 1/298.25722.

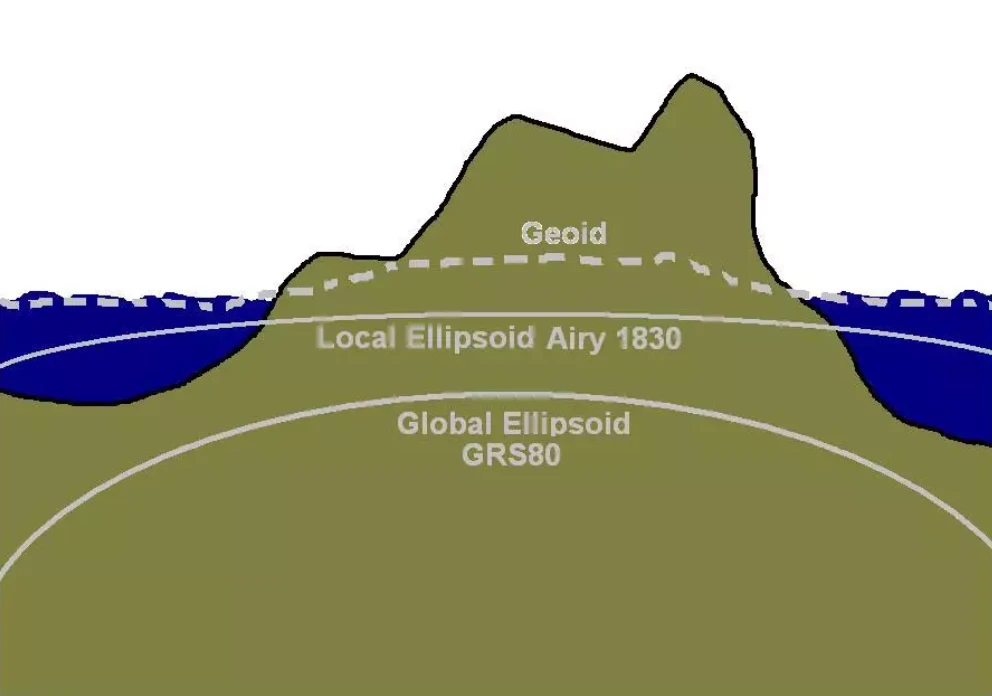
The primary reason, that differentiates WGS 84 coordinate system from any other local coordinate system is the accuracy. Since the World Geodetic System has been designed to best fit the Geoid of the Earth as a whole, it cannot fit the Geoid in a particular country. It cannot also fit the non-geocentric ellipsoid used for mapping that country.
The secondary reason lies in the tectonic plate motion, which results in the movement of some parts of the world. Different parts of the globe move relative to each other with velocities up to ten centimeters yearly. In the case of the United Kingdom, the movement occurs in the north-easterly direction at a constant rate of 2.5 cm. In the span of decades, this motion becomes too much noticeable in large-scale mapping.
This is why it better is to use the local coordinate systems instead of the standard ones like WGS 84.
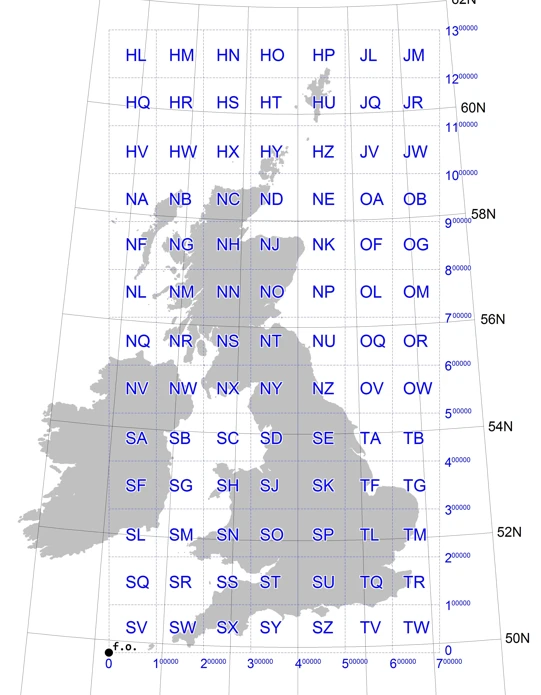
For Great Britain, we use the Ordnance Survey National Grid (OS) also known as the British National Grid (BNG), which is distinct from latitude and longitude.
The difference between longitude and latitude positions in WGS 84 and OSGB 36 increases from a point at the Atlantic Ocean west of Great Britain. The WGS 84 longitude lines vary about 70m against OSGB 36 longitude lines in Cornwall and about 120m at the North Sea east of East Anglia. The smallest datum shift is on the west coast of Scotland, on the contrary, the biggest is in Kent.
The ellipsoid parameters used in OSGB 36 are accordingly:
a – 6377563.396m
b – 6356256.909m
inverse flattening – 1/299.32496
In order to transform WGS 84 into OSGB 36 coordinates, we should use the position vector transformation method and a specified set of Helmert transformation parameters. It will allow us to change the coordinates between WGS 84 and ED (European Datum 1950) within the area including Great Britain, the Irish Sea, the English Channel, and the North Sea. The European Datum 1950 covers mainland Western Europe.
The Helmert transformation is the most commonly encountered simple geodetic transformation method, which is used within 3D space. It’s used in geodesy in order to produce distortion-free transformations from one datum to another.
We have effectively 2 ways of conversion between WGS 84 latitude/longitude and OSGB 36 XY coordinates. The first one leads to including all relevant functions needed for the conversion between these 2 coordinate systems straight in our Excel worksheet, which is the primary purpose of this article. The second one requires a bit of play with the repeatable running of the VBA macro in order to copy & paste the data from the web-based converter. Furthermore, this option seems to be more versatile regarding other coordinate system’s transformation.
Considering the simplicity of our calculations, it’s vital to use the common calculations, which have been prepared by the Ordnance Survey in the spreadsheet located here. If at some point you wish to have more detailed calculations, with an accuracy of more than 3 meters, then OSTN15 or OSGM15 will be required. The simple (“Helmert” style) coordinate transformation, which is going to be explained here features an accuracy of about 3 meters. The steps below describe a whole method of launching the transformation such as this from our own workbook.
I. ORDNANCE SURVEY COORDINATE CALCULATION SPREADSHEET
1. Go to this link, where you can download the coordinate calculations spreadsheet (.xls format).
2. After downloading, you can open it and save it in the .xslm format just in case in order to avoid some unforeseen alerts from your MS Excel version. Take a look at the file itself, which is quite big. It includes several important spreadsheets, where each step of transformation has been explained and computed. Moreover, you should also take a look at the VBA Excel functions attached to this file. I assume, that you already know how to manage with a VBA editor in Excel. If not, please take a look at this source.

You can read the “README” tab, which will run you through the whole process. However, we don’t need to use all of the computations included there, as for our purpose we have everything perfectly concluded in 1 tab only.
3. In the “Coordinate calculations spreadsheet.xls” or alternatively under your workbook name, if you decided to re-save it in .xlsm format find the “UD Funcs Transformation Example” worksheet and make it copy in your own workbook (Pic. 4).

As mentioned at the top of this worksheet, all cell references are absolute, which means that function inputs can be easily identified. In the practical sense, we can base our work on this one worksheet only. That’s why we can create a copy of this tab only in our workbook.
4. We have to do the same with the VBA functions included. These are core calculations for our grid reference transformations. The process is very simple. We need just export the VBA module included in the worksheet downloaded from the OrdnanceSurvey.co.uk website into the .bas file (Pic. 5).

Afterward, open the VBA editor in your own workbook, where you will import the .bas file saved previously. The process is simple, and your module should immediately appear in the VBA project tree on your left sidebar. If you need any details, read this article carefully.
5. The sheet “UD Funcs Transformation Example” includes all relevant steps of our coordinates transformation in both directions. The first part refers to the WGS 84 Latitude/Longitude to OSGB 36 XY coordinates conversion, the B-side represents the opposite direction. I’ve bounded the first conversion in red. As an example, I will show you how to cope with the transformation from WGS 84 to OSGB 36. Since you know how to do it, the other “direction” of transformation won’t be a problem for you.

Every single step considered is defined by the specified formula, which I am going to write about further down in this article.
6. For the sake of simplification of the implementation of the formula into our own workbook I would advise making the copied workbook name shorter (preferably OSGB or XYZ, as I did for my example). It will be easier to modify the links in the Excel formulas provided.

7. Take a look at the formulas included in the Ordnance Survey worksheet. I’ve presented one of the examples for you below (Pic. 8). They are built from the VBA Excel functions stored in the module.

Next, you can prepare your own workbook for the essential calculations, as I did (Pic. 9).

We start from the second row with values, so we should keep our calculations within the same rows. I’ve put the column names in the 1st row and from the 2nd the calculation will go through. Each block bounded red represents the transformation step described earlier (Pic. 6). Now, we will put it into the effort. The formulas made by OrdnanceSurvey.co.uk should be altered for our own workbook, especially the sheet, where the coordinates data is stored. In my case, the values start from D2 (WGS 84 Latitude) and E2 (WGS 84 Longitude), so formulas should include these cells from now. Below I listed all the formulas altered in my case, which refers to each input. I’ve grouped them in the calculation steps, as discussed above (Pic. 6, 9).
Calculation 1 – we are picking up our coordinates from cells D2 and E2
 X     =@Lat_Long_H_to_X(D2,E2,XYZ!$B$13,XYZ!$I$15,XYZ!$I$16)
 Y     =@Lat_Long_H_to_Y(D2,E2,XYZ!$B$13,XYZ!$I$15,XYZ!$I$16)
 Z     =@Lat_H_to_Z(D2,E2,XYZ!$I$15,XYZ!$I$16)
Calculation 2 – we are picking up the cartesian values from the cells X2, Y2, and Z2
 X     =@Helmert_X(X2,Y2,Z2,XYZ!$I$21,XYZ!$I$26,XYZ!$I$27,XYZ!$I$24)
 Y     =@Helmert_Y(X2,Y2,Z2,XYZ!$I$22,XYZ!$I$25,XYZ!$I$27,XYZ!$I$24)
 Z     =@Helmert_Z(X2,Y2,Z2,XYZ!$I$23,XYZ!$I$25,XYZ!$I$26,XYZ!$I$24)
Calculation 3 – now the reference cells are the Helmert calculation AA2, AB2, and AC2
Lat    =@XYZ_to_Lat(AA2,AB2,AC2,XYZ!$I$36,XYZ!$I$37)
Lon    =@XYZ_to_Long(AA2,AB2)
Calculation 4 – finally we are getting the X(Easting) and Y (Northing) coordinates by picking up the cells AD2 and AE2
Final X  =@Lat_Long_to_East(AD2,AE2,
XYZ!$I$47,XYZ!$I$48,XYZ!$I$50,XYZ!$I$49,XYZ!$I$52,XYZ!$I$53)

Final Y  =@Lat_Long_to_North(AD2,AE2, XYZ!$I$47,XYZ!$I$48,XYZ!$I$50,XYZ!$I$51,XYZ!$I$49,XYZ!$I$52,XYZ!$I$53)
9. Our final results will come in decimal numbers. In order to make their appearance neater, we can use the ROUND function, which will round our decimals to the nearest total value.
Final X =ROUND(@Lat_Long_to_East(AD2,AE2,XYZ!$I$47,XYZ!$I$48,XYZ!$I$50,XYZ!$I$49,XYZ!$I$52,XYZ!$I$53),0)
Final Y
=ROUND(@Lat_Long_to_North(AD2,AE2, XYZ!$I$47,XYZ!$I$48,XYZ!$I$50,XYZ!$I$51,XYZ!$I$49,XYZ!$I$52,XYZ!$I$53),0)
The “0” means, that we want a full number. In other cases, we can put 1 or 2 instead and get the value with 1 or 2 decimals accordingly.
10. The last step is linking the cells, where the final X (Easting) and Y (Northing) were calculated to our proper table. In my worksheet, the “Final X” was stored in column AF, and the “Final Y” in column AG. As mentioned earlier, the column head was in the first row, and all the formulas and calculations came into the effort from the second row.
So in my cell F2, I should have “=AF2” and in cell G2 accordingly “=AG2”. The result now matches the Gridreferencefinder.com website (Pic. 10).

11. Now you can auto-calculate all of your coordinates by simply dragging down the formulas to the last cell concerned. Remember to do it first in the area, where you calculated everything from WGS 84 (Pic. 11).
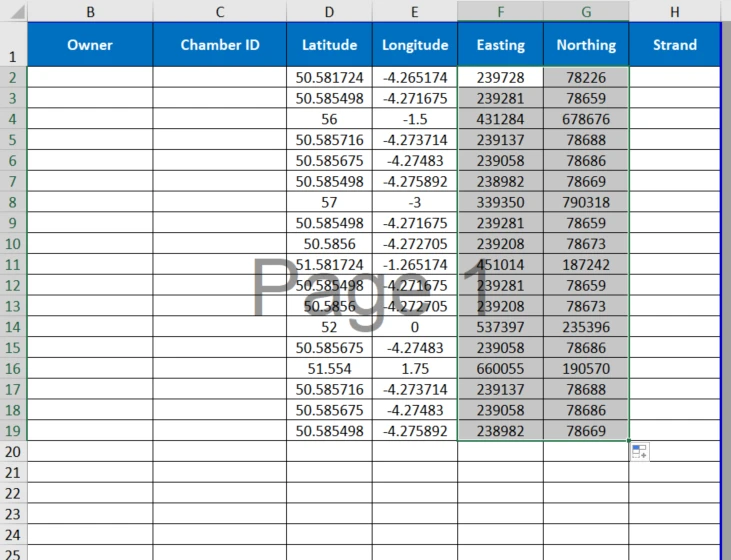
You can do it for as many inputs as you want. there are no restrictions!
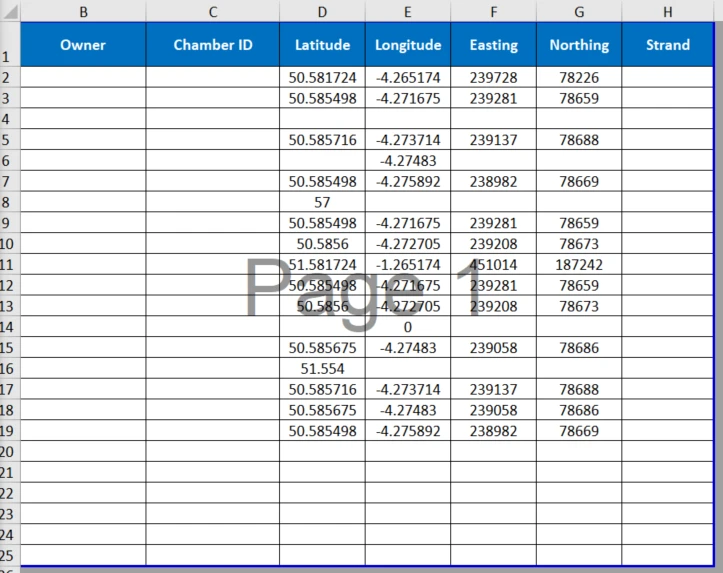
12. The last thing, which comes to mind is the table clear-up. How about if we remove the inputs, leaving our “Latitude” and “Longitude” columns blank? In this case, the “Easting” and “Northing” will return the “#VALUE!” error, and rightly so! We should think over our existing formulas and prevent them from situations such as these.
By returning to the certain calculation steps explained earlier, I would advise applying the nested IF statement as well as the IFERROR function.
The formula from the first calculation (Calculation 1) should be prevented from empty input both from latitude and longitude. The final formula would be like this, where:
instead of:

=@Lat_Long_H_to_X(D2,E2,XYZ!$B$13,XYZ!$I$15,XYZ!$I$16)

it should be:

=@IF(D2="","",IF(E2="","",(Lat_Long_H_to_X(D2,E2,XYZ!$B$13,XYZ!$I$15,XYZ!$I$16))))
it applies to our X value, although in the case of Y and Z is exactly the same.
For further calculations (2-4) I would go with the IFERROR function, where the formula should look as follows:
=IFERROR(@Helmert_X(X2,Y2,Z2,XYZ!$I$21,XYZ!$I$26,XYZ!$I$27,XYZ!$I$24),"")

instead of:

=@Helmert_X(X2,Y2,Z2,XYZ!$I$21,XYZ!$I$26,XYZ!$I$27,XYZ!$I$24)
and obviously, it’s applicable as well for Y, and Z parameters of the Helmert calculation and OSGB 36 Lat/Lon coordinates.
Finally, if any of our WGS 84 Latitude/Longitude input is empty at some point, we receive no result in OSGB 36 Easting & Northing calculations (Pic. 13).
Looking at it in reverse sequence, if we wanted to make the transformation from OSGB 36 XY to WGS 84 Latitude/Longitude, we should take a look again at the “UD Funcs Transformation Example” sheet at the bottom part (Pic. 6 section B).
The very last step is making the XYZ worksheet hidden by right-clicking on this tab and selecting the “Hide” option.
II. VBA EXCEL FOR GRIDREFERENCEFINDER.COM BATCH CONVERTER
This way is a bit longer in use, although far quicker in the preparation. The biggest downside is that conversion can be done in two steps. One step is copying the coordinates from our spreadsheet to the clipboard, and another step, copying our converted data into target cells in our spreadsheet. I’ve prepared 2 VBA macros for this occasion, and they look as you can see below. The first macro refers to the copy of our WGS84 coordinates data to the clipboard.
Sub CoordinatesCopy()
Dim LastRow As Long      'Last row including coordinates
Dim wks As Worksheet

Set wks = ActiveSheet
LastRow = wks.Range("D2").End(xlDown).Row + 1

'Add another row just in case, as the macro cannot copy one single record

Range("D2:E" & LastRow).Copy    'Copying our coordinates to the clipboard

wks.Activate

MsgBox ("Please paste your coordinate list in gridreferencefinder.com (https://gridreferencefinder.com/batchConvert/batchConvert.php) and follow the batch conversion steps.")
End Sub
The second macro refers to getting the converted OSGB 36 XY coordinates into the target destination of our worksheet.
Sub CoordinatesPaste()

'Adding new blank sheet, where the converted coordinates will be copied

Sheets.Add(Before:=ActiveSheet).Name = "Coordinates"

Dim wor As Worksheet, work As Worksheet
Set wor = ThisWorkbook.Sheets("Coordinates")
Set work = ThisWorkbook.Sheets("Pole data")

'Pasting the XY coordinates to the blank worksheet
wor.Range("A1").PasteSpecial

wor.Range("D1:E5000").Select
wor.Range("D1:E5000").Copy
'Pasting the XY coordinates to our target destination
work.Range("F2").PasteSpecial xlPasteValues
Sheets("Pole data").Activate

Application.DisplayAlerts = False

Sheets("Coordinates").Delete

Application.DisplayAlerts = True

MsgBox ("XY coordinates pasted successfully")

End Sub
The whole process looks pretty much as shown below (Pic. 13).

You must follow all steps correctly on the Gridreferencefinder.com batch converter website. It’s not a problem, since all of them have been set as a default – conversion from Latitude and Longitude, column selection, tab separation, and so forth. Same as previously, you can do the conversion in reverse sequence too.
I have shown you the most efficient ways of conversion between the Latitude and Longitude and XY coordinates in Excel. The first method is very similar to the incorporation of the Bing geocoding tool into your own workbook, which has been widely explained in this article.
The second one can be useful if you don’t have enough time for the setup of the first one. Furthermore, it seems to be more versatile across other coordinates conversions like MGRS to Lat/Lon, etc. Both work fine and can be helpful for you.
Mariusz Krukar
References:
- A guide to coordinate systems in Great Britain, 2020, Ordnance Survey, Southampton
- Wylde R., 1999, Guidance notes on the use of coordinate systems in data management on the UKCS, UK Offshore Operation Association, London
Links:
- 100,000 Digits of Pi
- WGS 84 – main parameters
- Info about WGS 84
- https://gisgeography.com/wgs84-world-geodetic-system/
- https://www.ordnancesurvey.co.uk/newsroom/blog/ostn15-new-geoid-britain
- Coordinate transformation tool
- Ordnance Survey coordinate tools
- https://gridreferencefinder.com/batchConvert/batchConvert.php
Forums:
- https://www.excelforum.com/excel-programming-vba-macros/651579-converting-latitude-longitude-to-osgb-grid-ref.html
- https://gis.stackexchange.com/questions/8650/measuring-accuracy-of-latitude-and-longitude
My questions:
Wiki:
- Earth_ellipsoid
- ED50
- Flattening
- Helmert_transformation
- Ordnance_Survey_National_Grid
- Semi-major_and_semi-minor_axes
- Spatial_reference_system
- World_Geodetic_System
Youtube: