

It’s been a while since the previous part of this article when I showed you the way of geocoding the addresses via Google Sheets. Here you will get the knowledge of geocoding straight from the Excel sheet, without launching external platforms. A front of your eyes you have another two options. These ways were mentioned previously but without further explanation so far.
Firstly let’s say a bot more about the Google API geocoding, which is not for free anymore. I was hoping, that some alternative solutions could be found. There was one way described recently, based on the WEBSERVICE Excel function, which should execute the coordinates for 2,500 addresses daily. Regrettably, it returns the “REQUEST DENIED” only, which is typical for users without Google API. It means, that there is no option for free geocoding by Google API nowadays.
The geocoding by Bing looks far better, as we are eligible to work on 10,000 addresses on our account, nevertheless from the daily input. The usage is straightforward, as we can simply download the existing geocoding tool tailored for Bing. The whole geocoding process is explained well for example here, although all explanations are pretty much the same refer to the Excel 2013 version. My goal is not only to expand this explanation, and show it to everyone step by step, but mostly to demonstrate how we can integrate this tool with our own workbook, which we are currently working at. Let’s get started then.
I. USING THE EXISTING EXCEL GEOCODING TOOL FOR BING
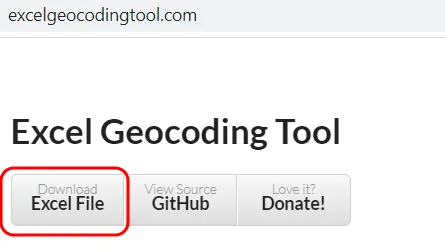
1. The file can be downloaded from the http://excelgeocodingtool.com/ platform (Pic. 1) or the GitHub mother source of the project.
2. Once opened the file, click “Enable Editing” in the highlighted yellow bar on the top, when the file is opened under the protected view (Pic. 2).
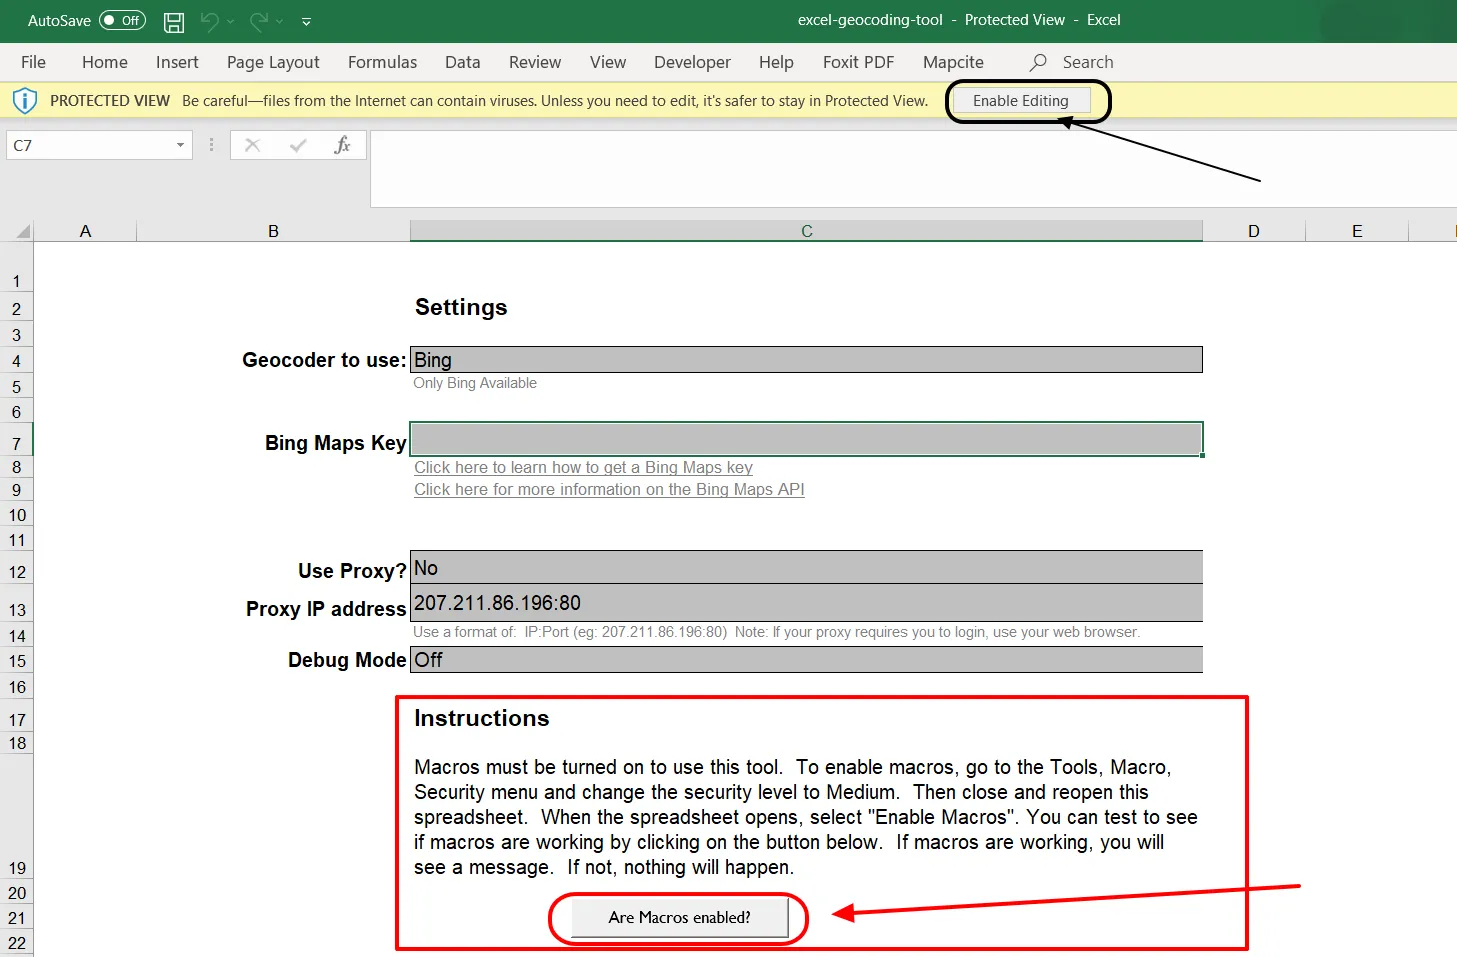
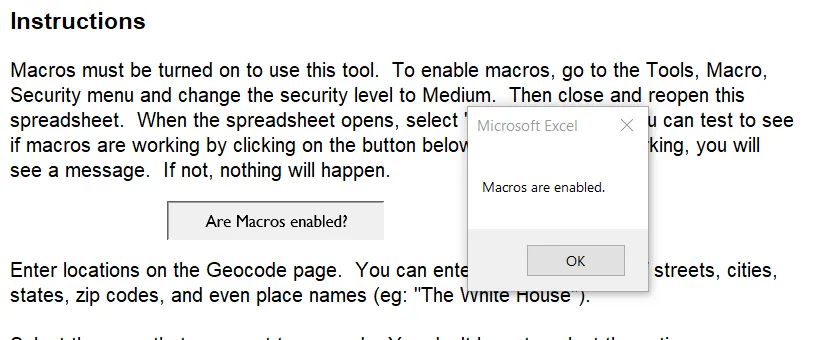
3. Your next step is checking the macros. Are they enabled in your Excel at all? If you work on VBA from time to time, they should be, although it’s good to check by clicking the button shown in the aforementioned image. You will get the answer rapidly (Pic. 3). If the box says, that they are enabled, you can sip the step below.
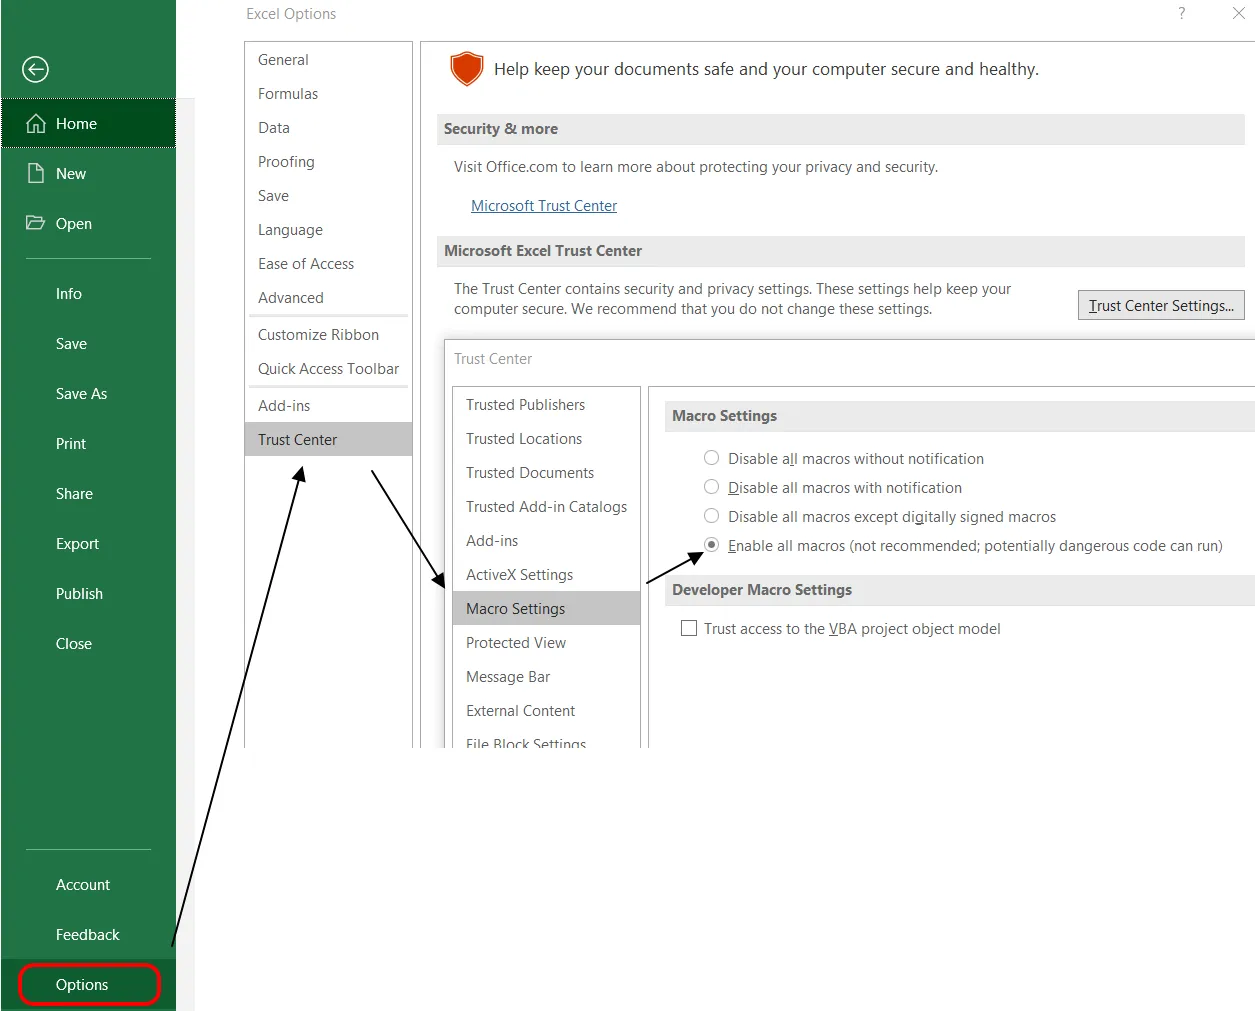
4. If macros haven’t been enabled yet you must click the “File” in the main top bar, next select “Options” at the very bottom, then pick up the “Trust Center” options and enable all macros even if it’s not recommended (Pic. 4).
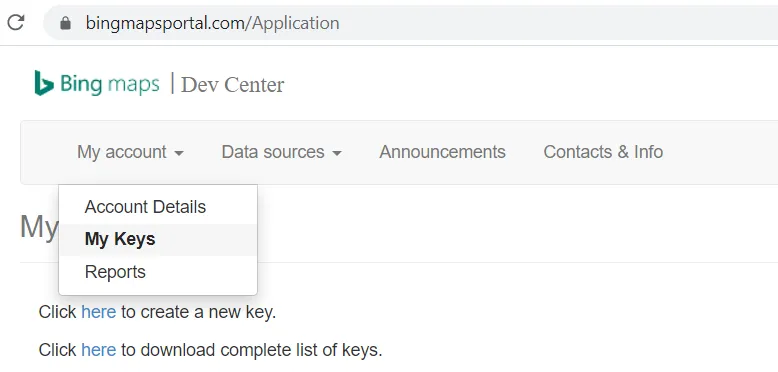
5. Sign in or create an account in Bing Maps Dev Center. Right after jump to “My keys” in order to generate the new API key (Pic. 5).
Now you can create a new key, or if you have it already, just scroll down and see it (Pic. 8). If you have more than 1, a quite convenient option is “Download the complete list of keys” in .csv file (Pic. 6), from where you can easily copy the proper one.

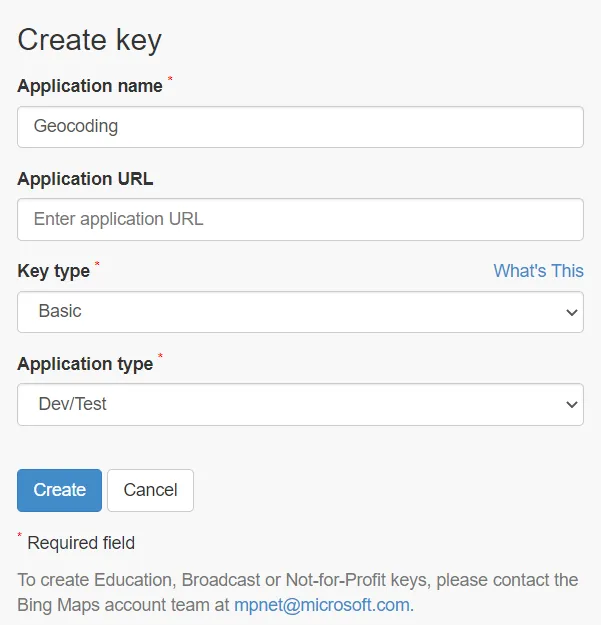
6. I assume, that you haven’t got your Bing API Key so far. In this event click the “Create new key” option and fill up the box properly (only fields with a red asterisk are required) (Pic. 7).
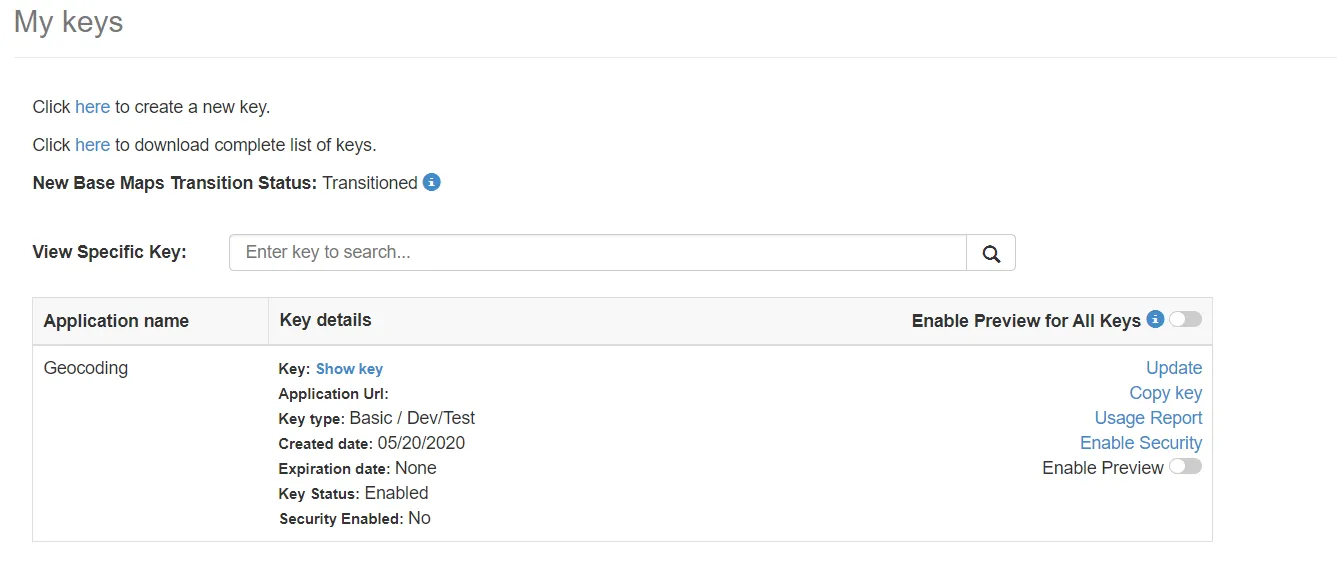
7. Now your newly created key should appear on the main list (Pic. 8).
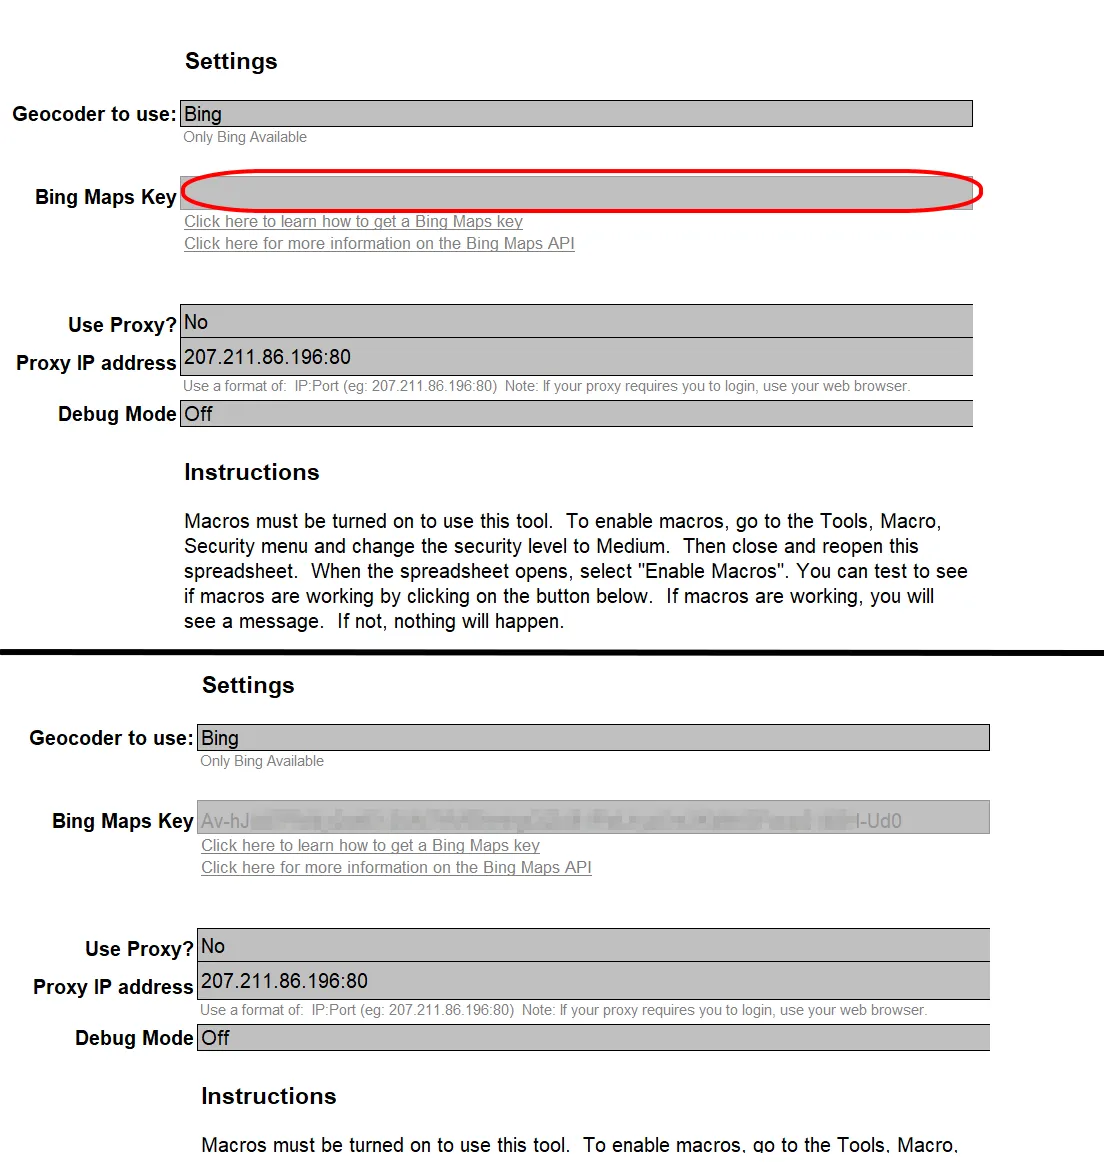
8. Your next step is pasting the Bing API key into cell C7 in your “Settings and instructions” sheet. (Pic. 9), which will next appear as faint and grey font.
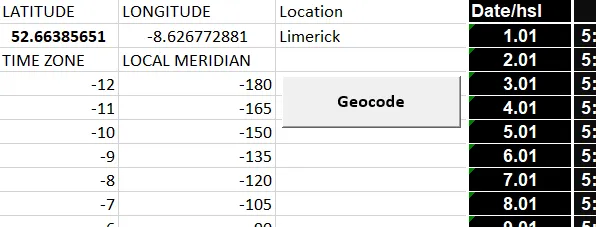
9. Now, you can start the geocode. You have two options: select only the active row or geocode all of them (Pic. 10). If you click on some empty cell beneath the rows with addresses, this button can misleadingly not work. Cheer up and select the “Geocode all rows” or simply select the address, in which you are interested. On your top right you will see the progress in percentage. When completed, the bar will display 100%.
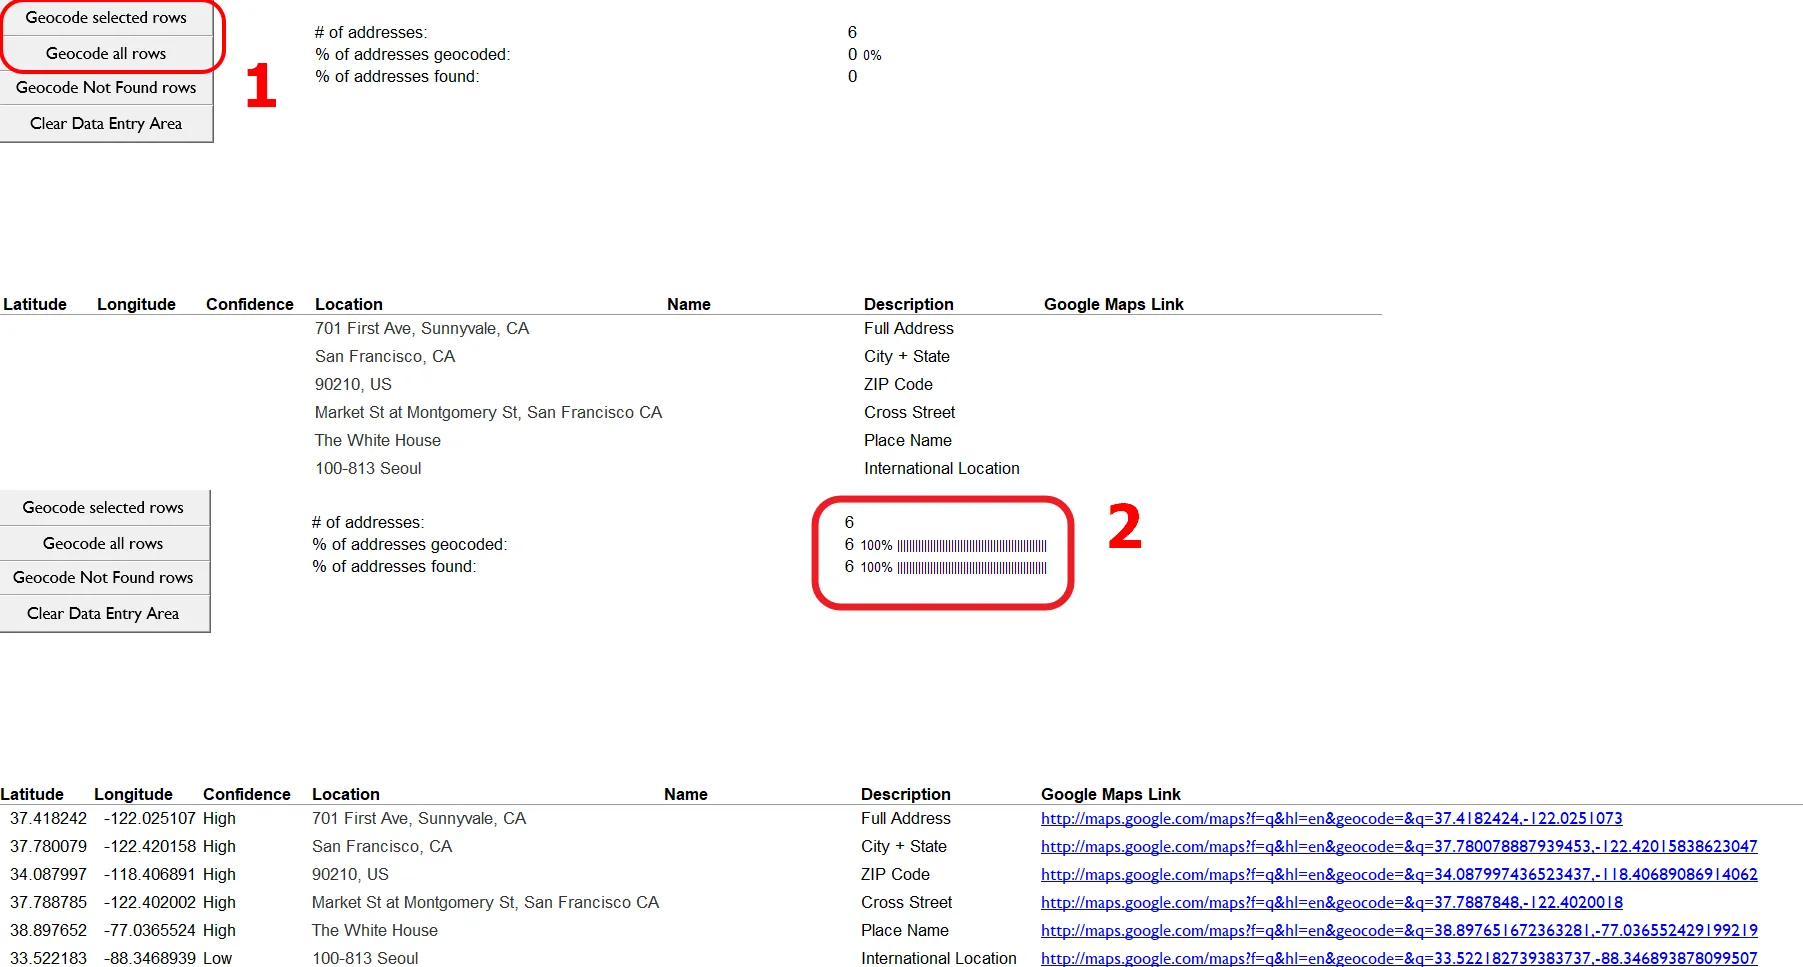
Important is to look at the addresses provided as a default. You can see, that almost each of them is different. It means, that the tool is able to manipulate various kinds of addresses including:
– full address (street number, street, postcode, optionally state or voivodship),
– city + state,
– ZIP code or postcode,
– cross street (obviously in the town and state optionally),
– place name (only for green signatures described in Bing maps!)
– postcode + city (known as the international location)
On your left, you have the confidence level, measured from low through medium to high, which brings you information about the accuracy of the geocoding process.
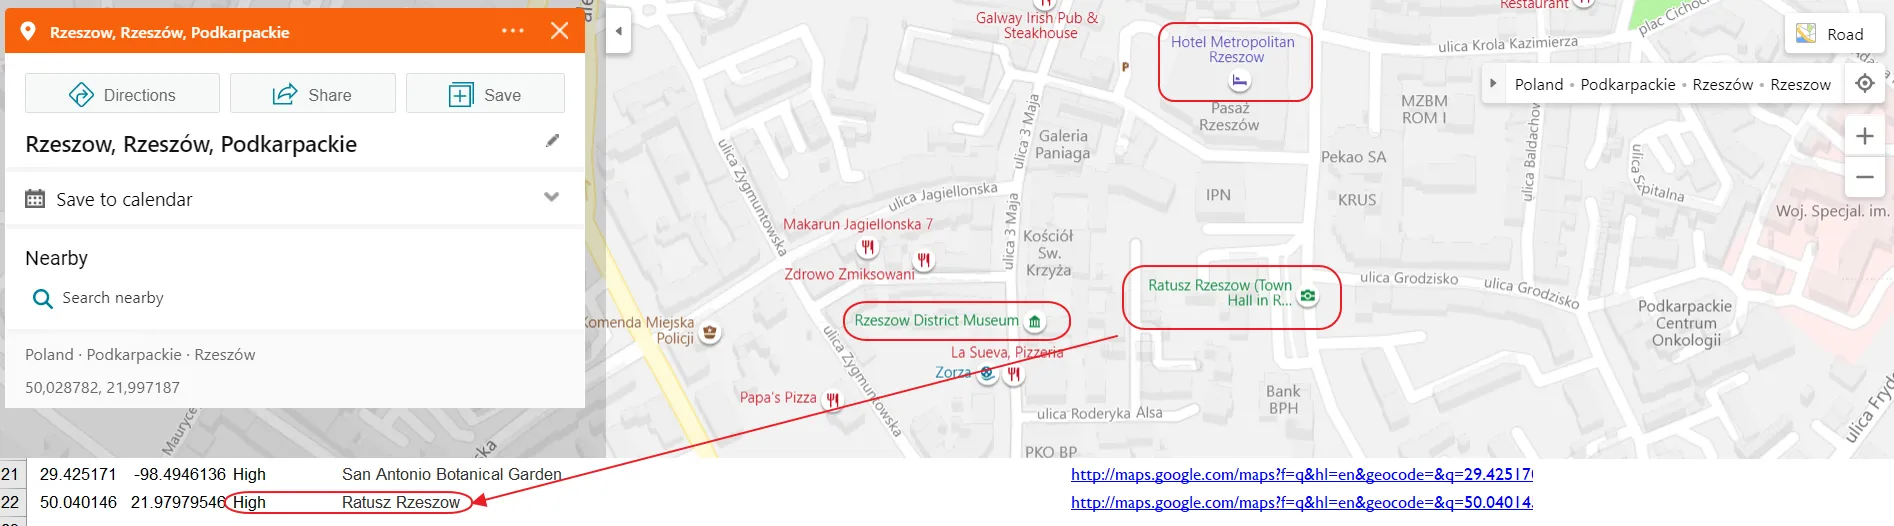
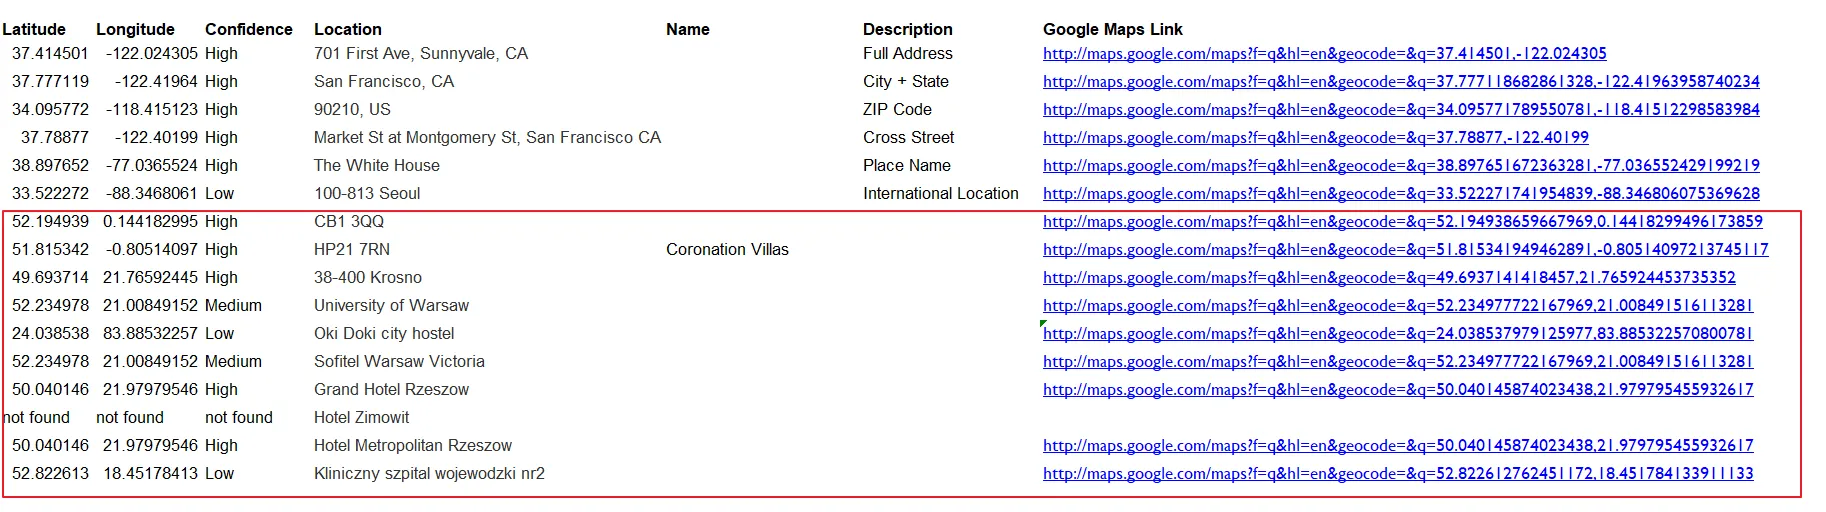
Concluding, we have many options for address input, of which the most ambiguous is the “Place name”. I am sure, that you know, what is the place’s name at least from Google Maps. It always comes with the signature, appropriate to the object type. In Bing Maps we have exactly the same. Once you zoom in significantly onto the urban area, you can spot a lot of various places with their signatures and names. Important is to know, which type of place is acceptable by this tool. Obviously, we can use all types of objects, but the most important is their individual character. If the name of the object is unique, then it will be easily calculated by this tool. It applies to all green signatures, which represent mostly landmarks and other tourist attractions. The blue ones, displaying some tourist infrastructure or places of education can be used, but usually with medium accuracy (Pic. 11). On the other hand, some places with local prominence only may not be found (Pic. 12). You can use the “Geocode not found rows” button, which will redo the process for you, although it doesn’t work always.

I have intentionally selected an area different than the United States, where Bing Maps are the most popular.
The default list of addresses can be easily expanded if we want to (Pic. 13).
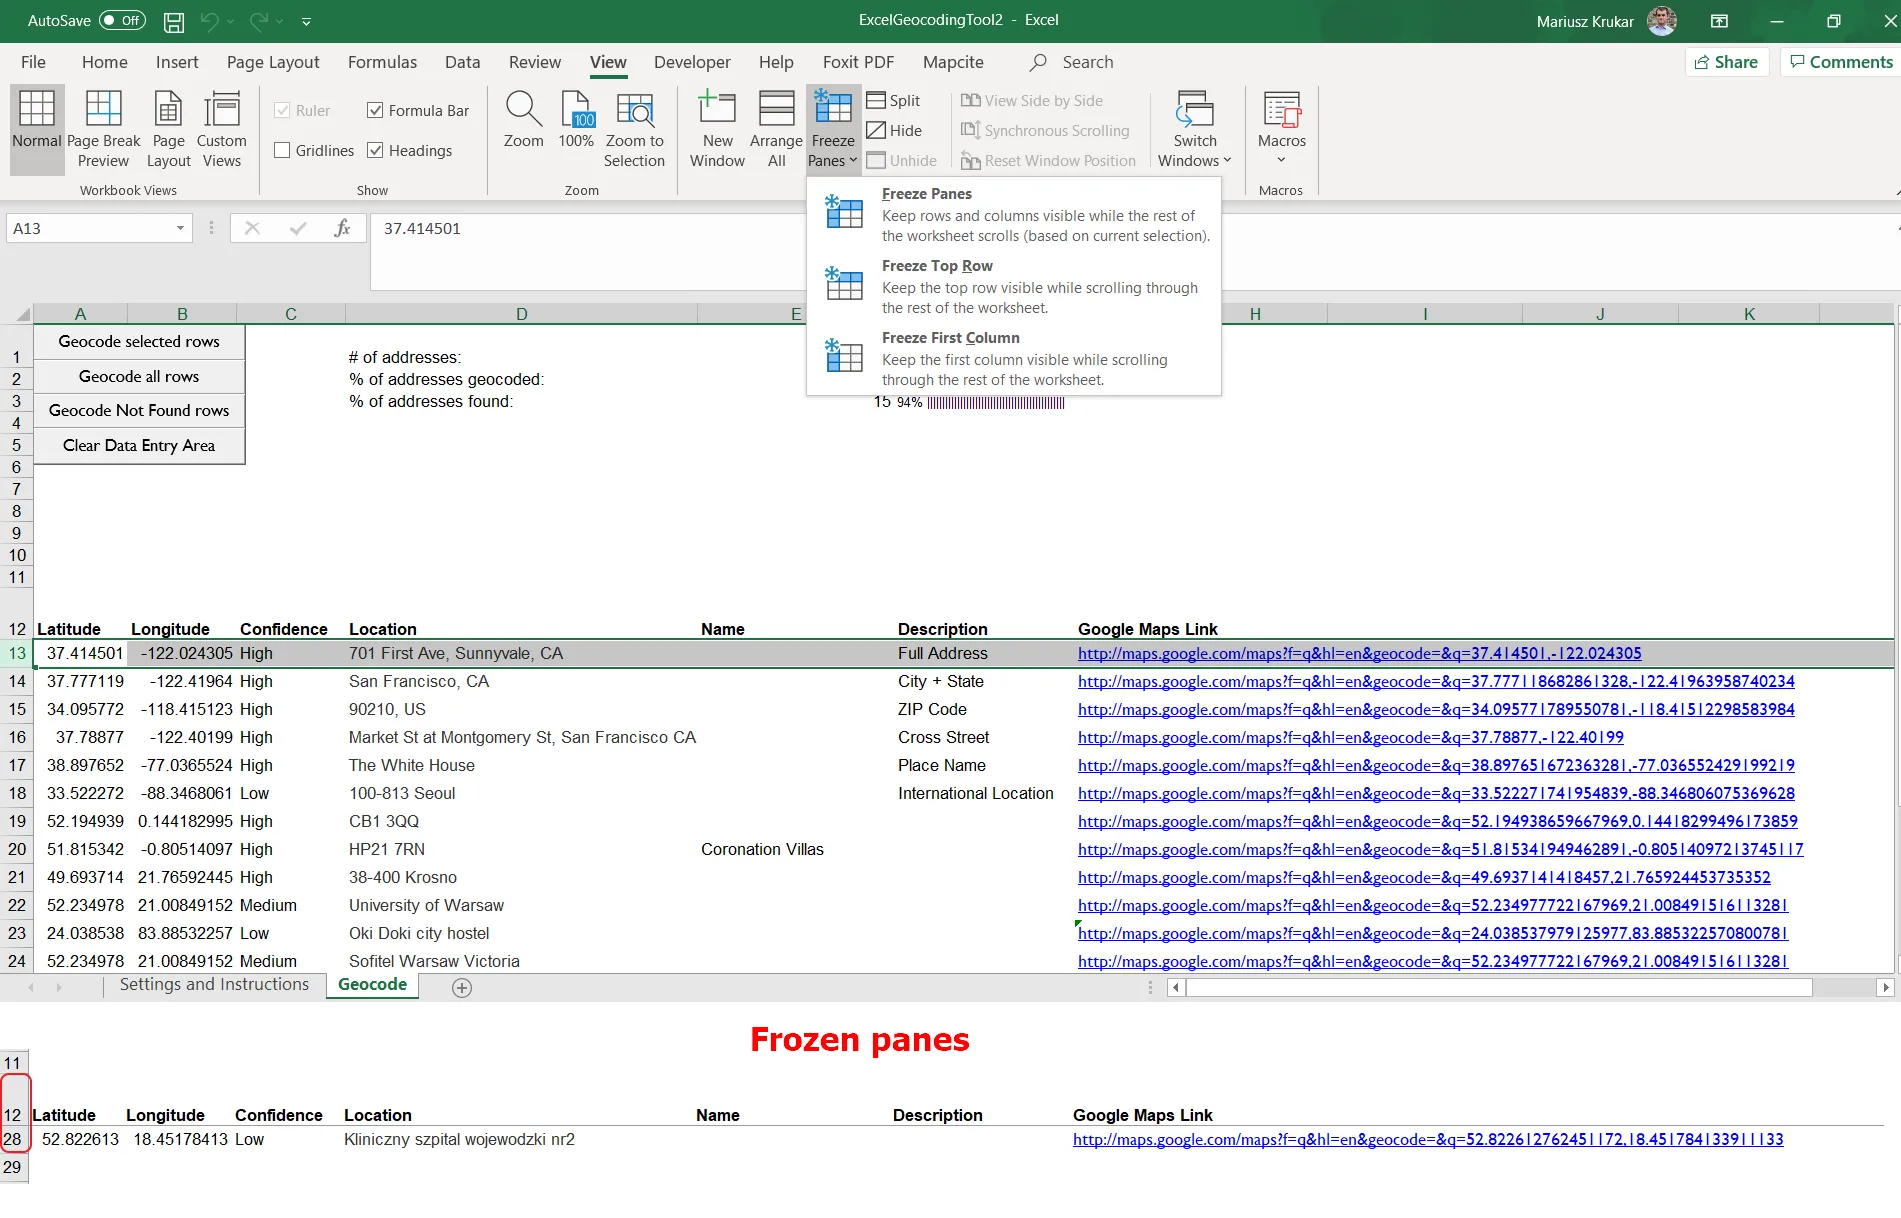
If your list is getting bigger, you might want to see all of the addresses instead of a few. The Excel geocoding tool keeps the sheet simple and is not aimed at using the scrolling slider. Therefore the panes are frozen. We can unfreeze panes, making our address list visible in its entirety. We can obviously freeze the panes again (Pic. 14).
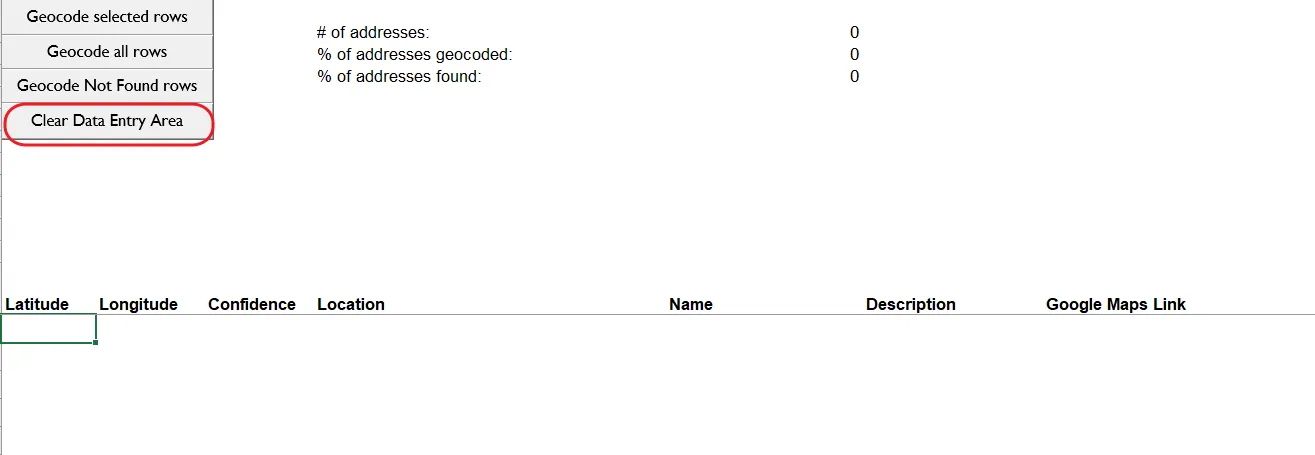
10. If you wish to tidy up your tool after every geocoding task, then click the “Clear Data Entry Area” button and everything will be gone (Pic. 15).
Now we have fully explained the geocoding process with Bing API in Excel. Our other goal, more important I guess is to show how the tool can work in our own worksheet.
II. USING THE EXCEL GEOCODING TOOL IN OUR OWN WORKBOOK
The geocoding process in Excel with using the Bing API is simple when we have the tool ready for it, as you could convince about already. Unfortunately, I haven’t found a way to use this tool integrated with already existing workbooks. We often have some projects in Excel, which might require automatic geocoding straight from the workbook we are working on. For this purpose, we need to incorporate this tool, and this is exactly what this section is about.
Obviously, we can do it in different ways. I will show it in my personal example step by step, explaining all the things requiring attention.
1. First of all, we have to incorporate the existing VBA code into our document. It’s feasible in 2 ways:
a) through export and import of the .bas files
b) through dragging the modules between Excel files open in the VBA console
The first way takes longer, but as a result, you can apply the same .bas files for more than 1 workbook when they’re similar. Dragging the modules between a few files present in the console can be sometimes troublesome, although it’s only my opinion. Maybe this option will suit more for you more. I am showing them 2 for you anyway.
In both cases, you must open your Visual Basic console in the “Developer” section. There are a lot of places, where customizing the Excel ribbon has been explained. I am assuming, that you have done it already and you are seeing the VBA Excel console a front of your eyes.
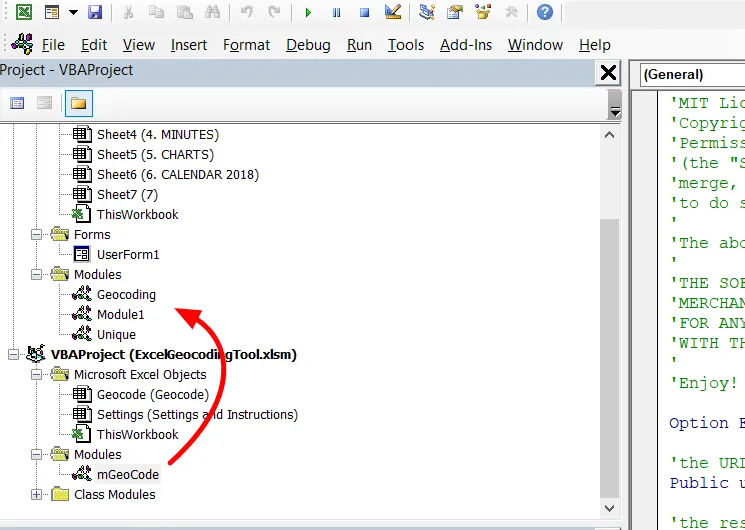
In your VBA console on the left side, you should see 2 windows opened as default. The upper one is our project “Project – VBA Project”, and the lower one refers to the properties of our Excel file. We need to use the upper one, which should include the “folder tree” for our Excel file. Possibly you know, that the Excel file is comprised of many separate files, zipped together. Here we can see our Excel job divided by single worksheets (Microsoft Excel Objects) as well as existing VBA files classified by “Modules” (.bas files), “Forms” (.frm files), and “Class modules” (.cls files) (Pic. 16). In order to import, exporting, making or editing macros we should be interested only in these last 3 types, whereas Microsoft Excel Objects are inherent to the typical macro-free workbook.
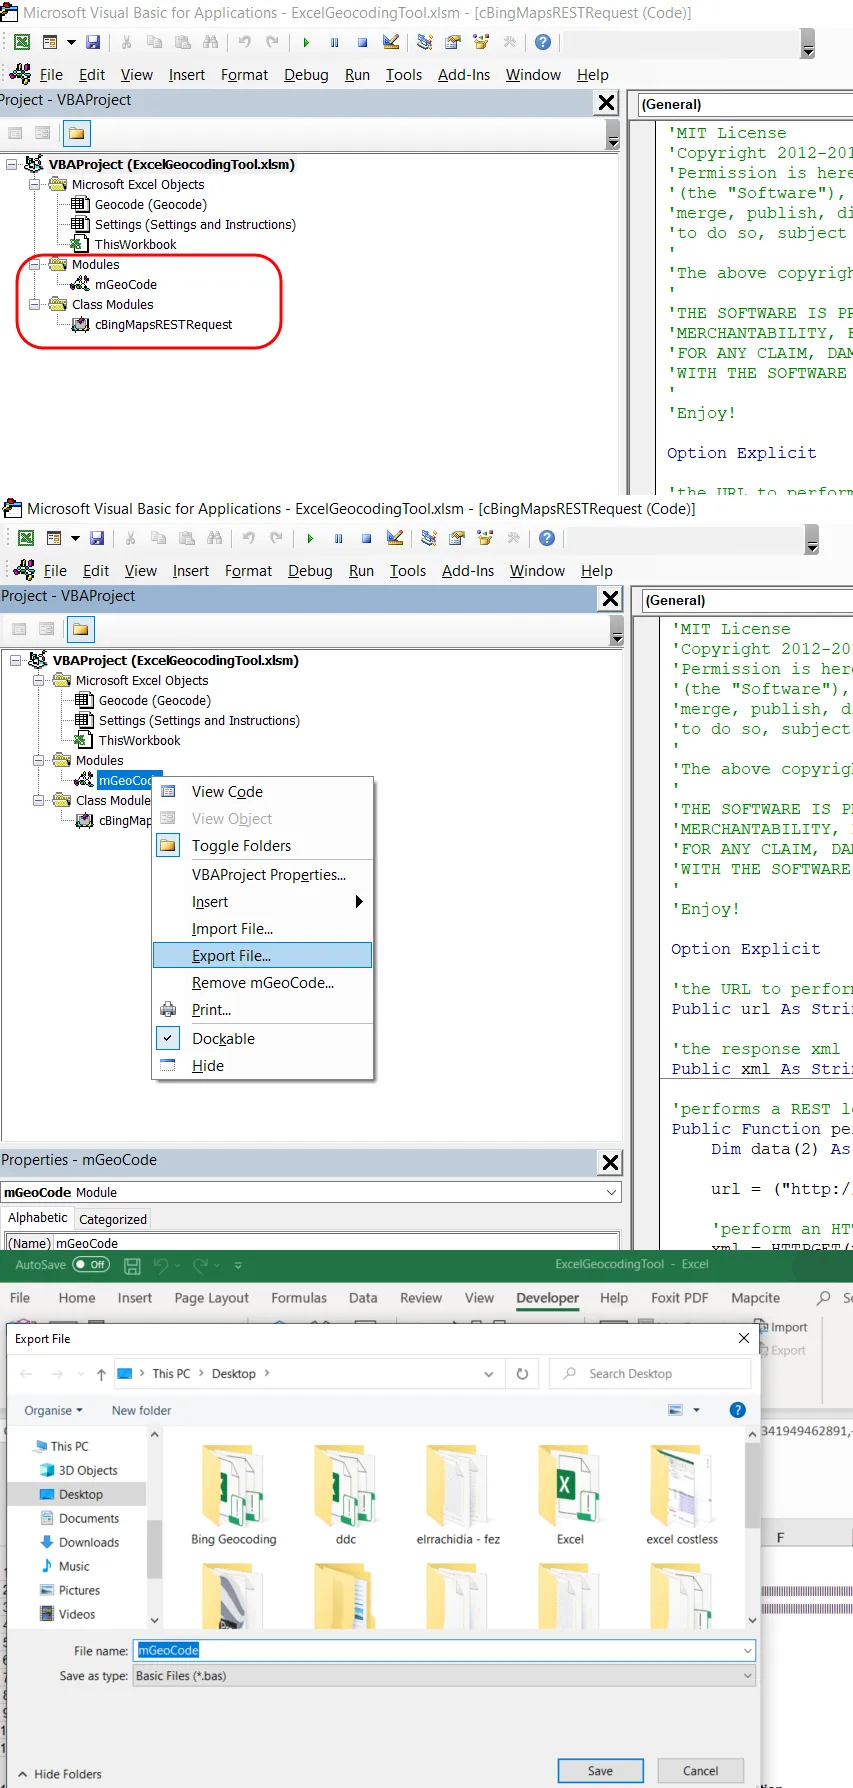
If you are already in this VBA section, you must right-click on the module needed, choose the “Export file” and select a proper directory for it. As you can see above (Pic. 16) the VBA module comes out as a file with the extension described above.
Once they are saved in the directory, you must import them into your own workbook. It can be done simply by selecting the File -> Import file or just by right-clicking somewhere within your active workbook in the VBA Excel module (Pic. 17).
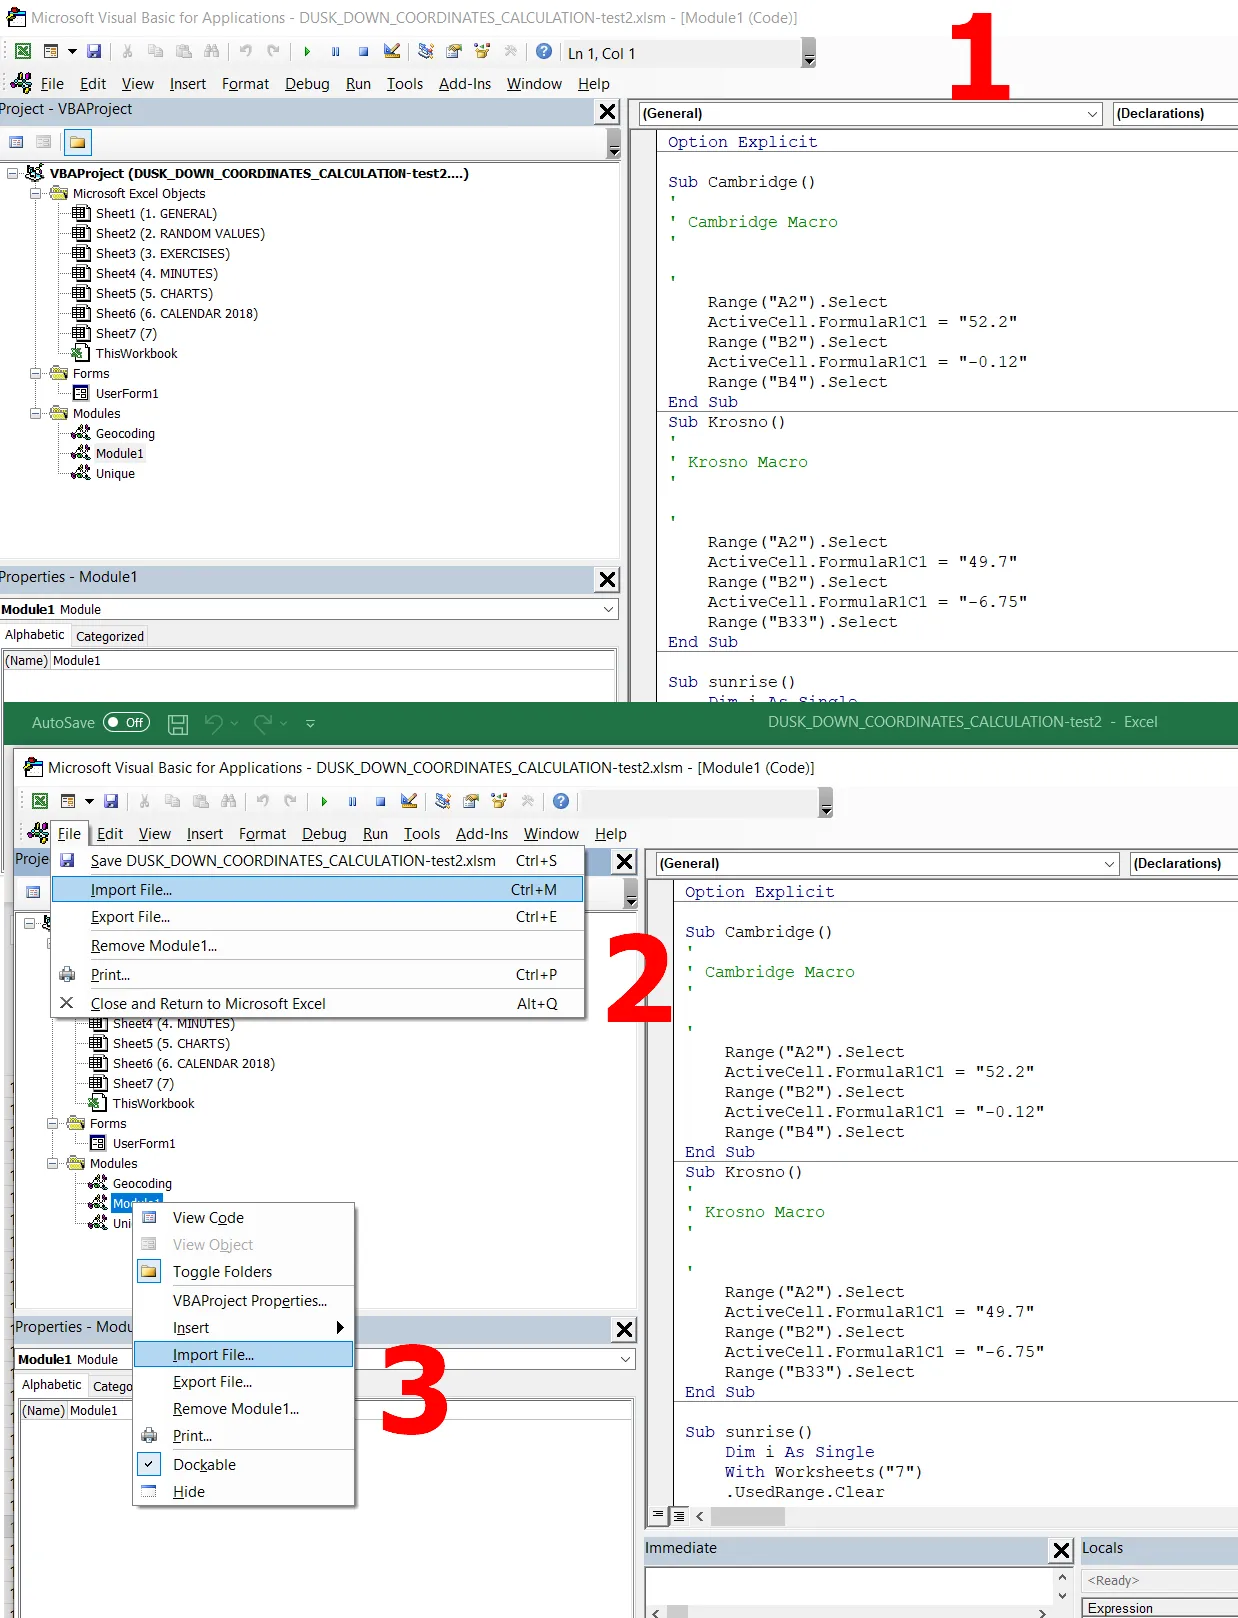
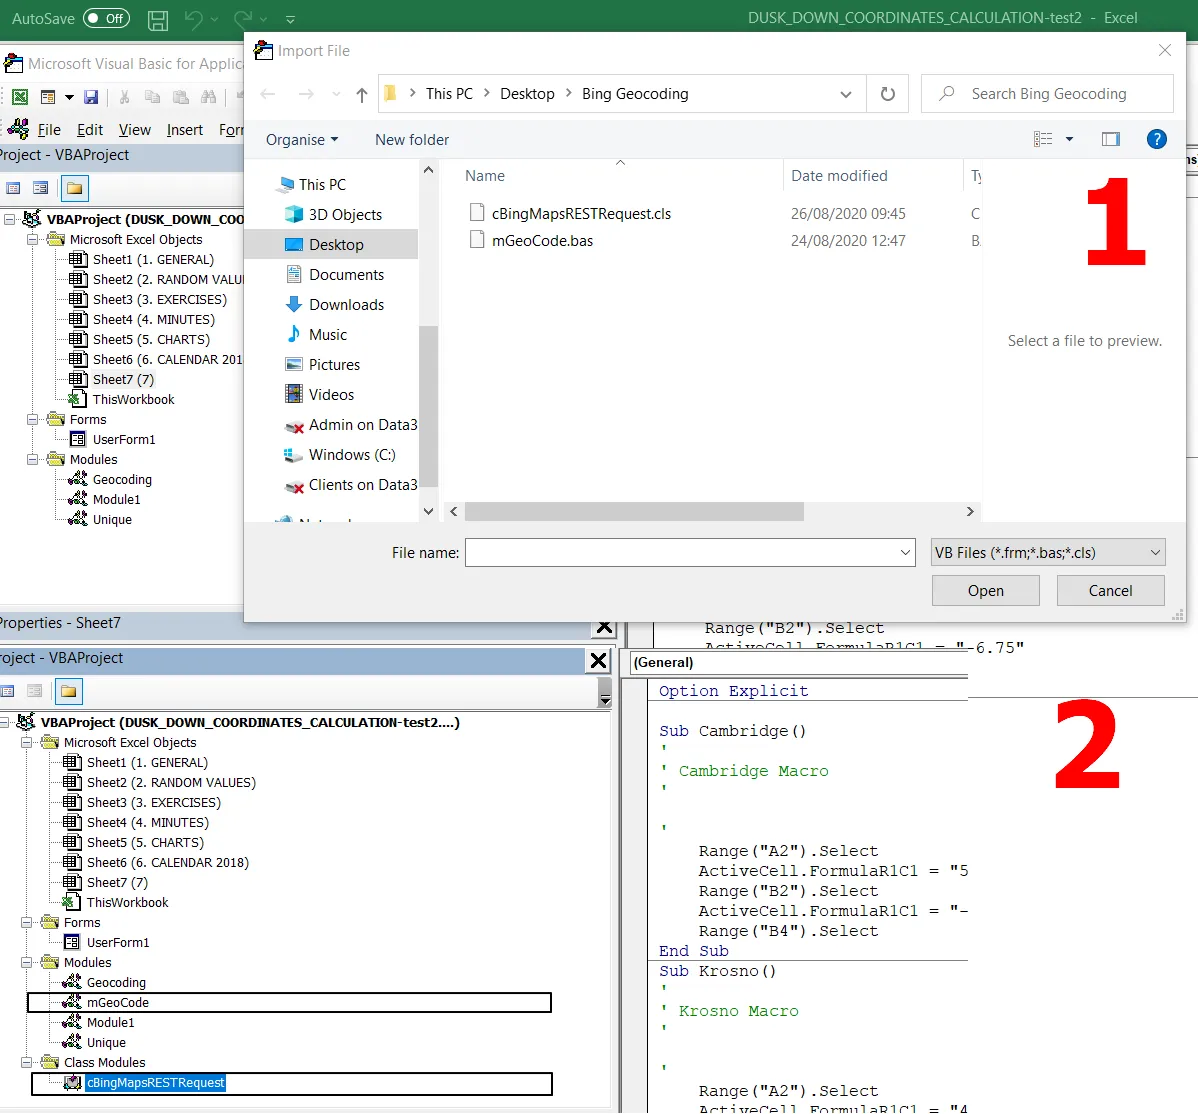
Possibly you knew before, that Excel is comprised of a multitude of single files, which was better explained in this article. Some of these files we can see now in the VBA console. They appear as separate worksheets, VBA Excel modules, forms, or classes. All of these files are placed in their appropriate folders, making the visibility of our Excel document the folder tree (Pic. 17). When you import new files with VBA code, they are immediately populated in the aforementioned Excel file structure (Pic. 18).
There is obviously a much quicker way to do this, although it works when all the concerned sheets are opened and when there are not many of them in the console. I mean, if you have i.e. 7 workbooks with expanded folder trees, then there might be a problem with finding the right one, where the VBA module should be put in. This is why I frankly recommend the first option described above.
Assuming, that you have for instance the 2 workbooks only, the second method will be definitely quicker and more convenient. You need only click the necessary module, hold it, and drag it to your own workbook (Pic. 19), then drop it. It will be automatically allocated to the right section in your workbook structure.
If it’s still unclear to you, watch the video tutorial attached to the bottom.
2. When your VBA modules have been placed properly, you can copy sheets from the Excel Geocoding Tool file. The Excel Geocoding Tool is built of 2 sheets and you have to copy all of them. The best way is to select them all, right-click, and choose the “Move or Copy” option (Pic. 20). Next, you choose the target workbook – your own one and the optional location of these sheets. Remember to switch on the “Create a copy” option. Otherwise, these sheets will be moved and left the geocoding file empty.

The Excel application will automatically redirect you to these sheets in your own project if everything is right. Sometimes you might see the alert (Pic.20) stating repeated names for all groups of names included in the geocoding file. If you haven’t had this alert and your sheets have been copied correctly, you can omit this section and go to the bottom.

It means the geocoding sheets were previously in this workbook and next have been deleted. Bear it in mind, especially when you are going to migrate the geocoding sheets more than once, because of some mistake reasons.
You can obviously set the new names for these groups and everything will be fine. When you decide to click “Yes to All”, which is a kind of expression for ignoring this comment, then you should open the “Name Manager” and remove all unreferenced groups of names manually (Pic. 21).
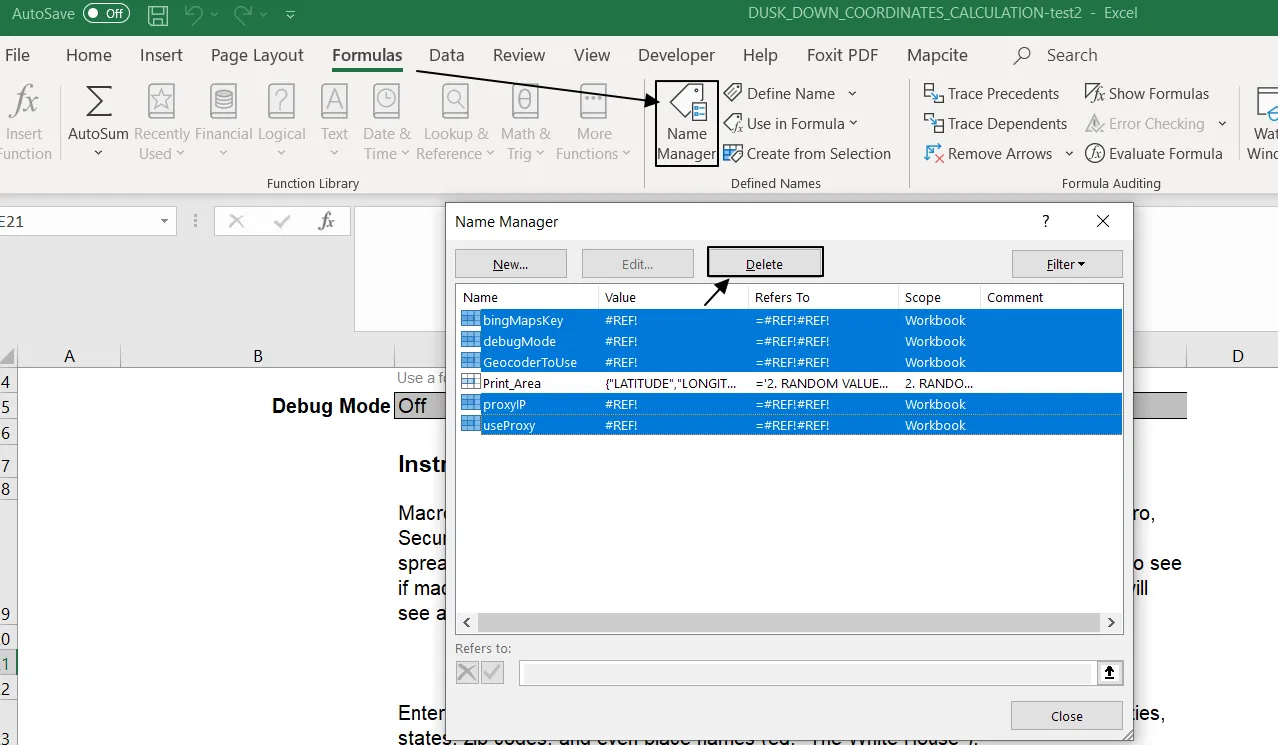
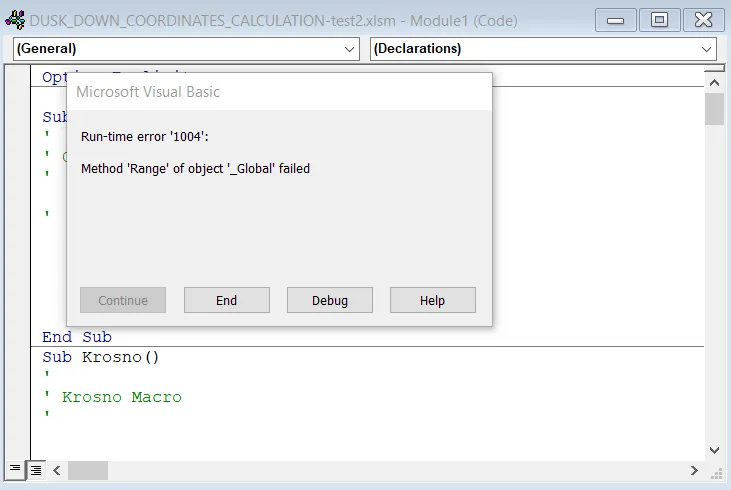
If you don’t do it, you won’t be able to geocode any location! (Pic. 22) The tool needs these name groups referenced properly.
It’s advisable to delete the unreferenced name groups as well as recently copied geocoding sheets and transfer them again.
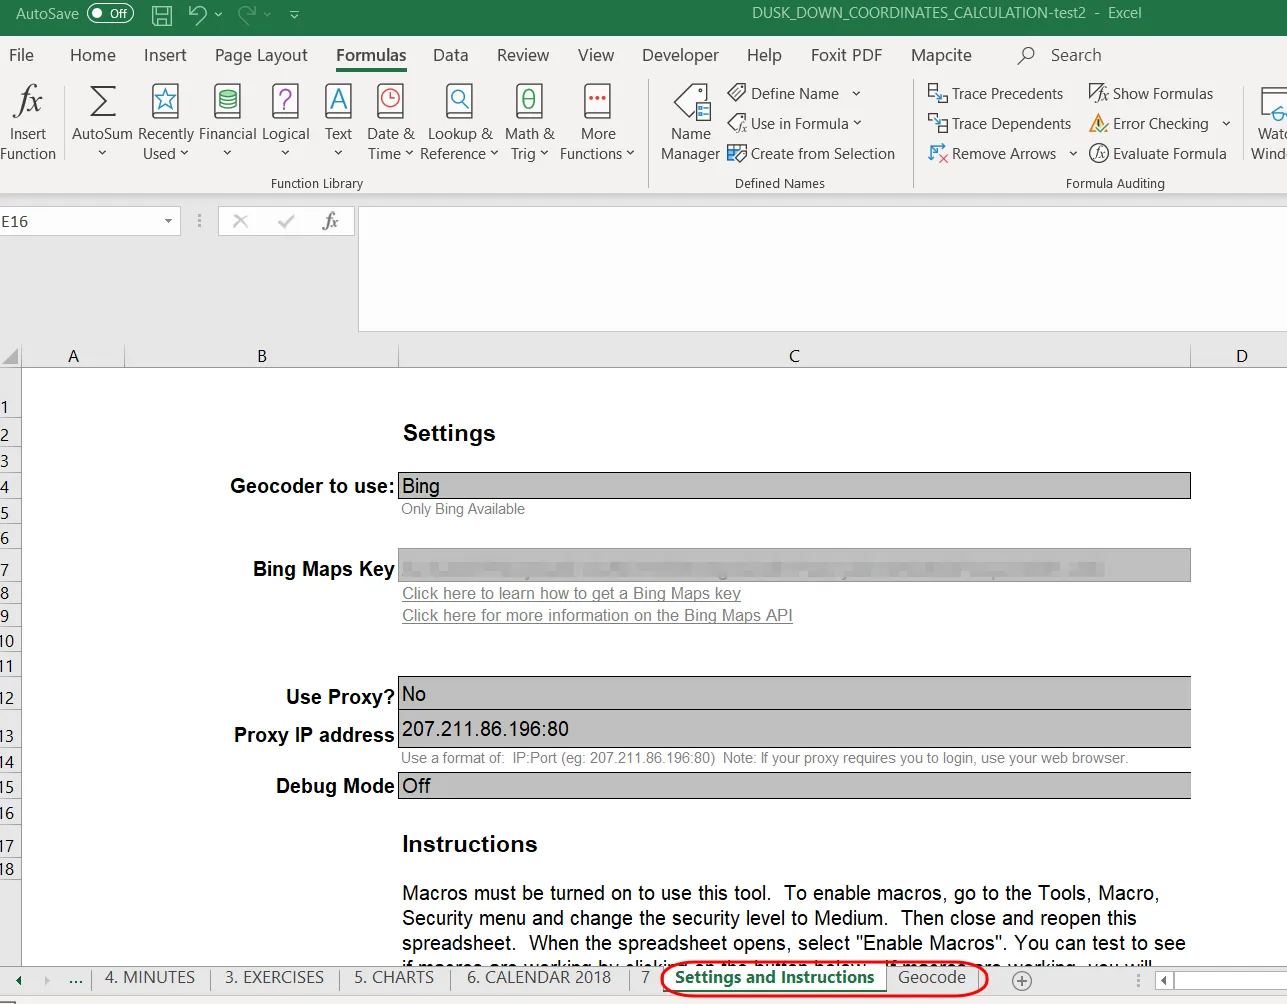
When the sheets have been transferred successfully, you should have an Excel document opened on your workbook with active one of them (Pic. 23).
3. It’s still not the right time to start using this tool, because we have to check all the macros included. Often, these macros come along with their older addresses with reference to the mother file, which is the Excel geocoding tool. They can work misledly unless you close the Excel geocoding tool file down. Then debugger will inform you about the script being “out of range”. In order to fix it, we must open the “Geocode” sheet and validate all the macros assigned to the buttons in the top left corner. They’re grouped, so you must right-click twice on the button.
Firstly you will spot the transparent box bounding all buttons, which border will turn into a dotted line after double-click, separating the clicked button with a solid line (Pic. 24).
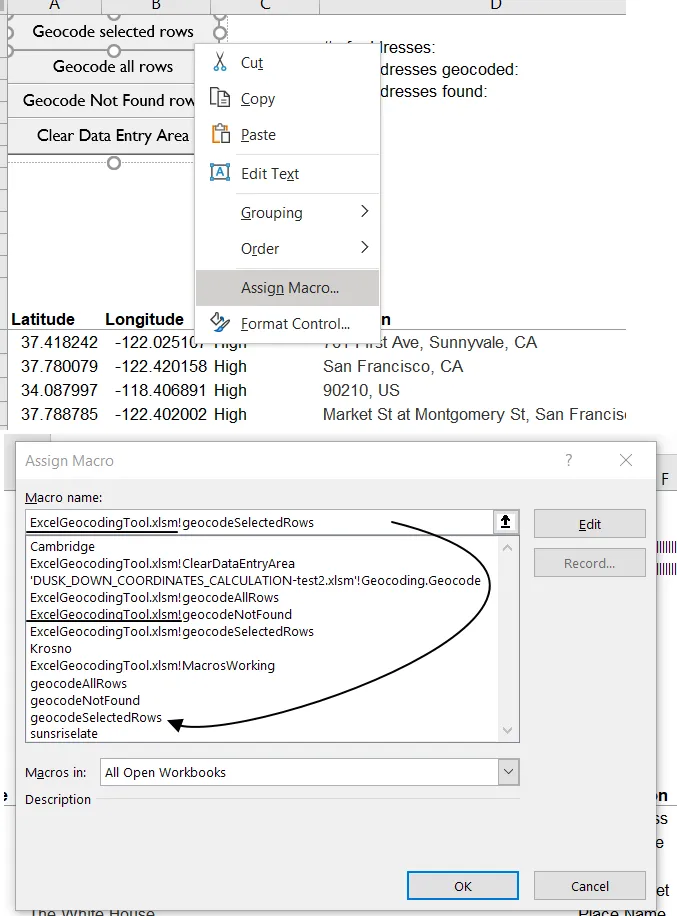
At the same time, the dialog box should pop up. Choose “Assign macro” there and see how it looks. Quite often you will spot the view like the above (Pic. 24), where macros are still referenced to their mother file. In order to make them run correctly, you have to supersede them with the same ones included in your workbook already. They appear as single names instead of the file suffix.
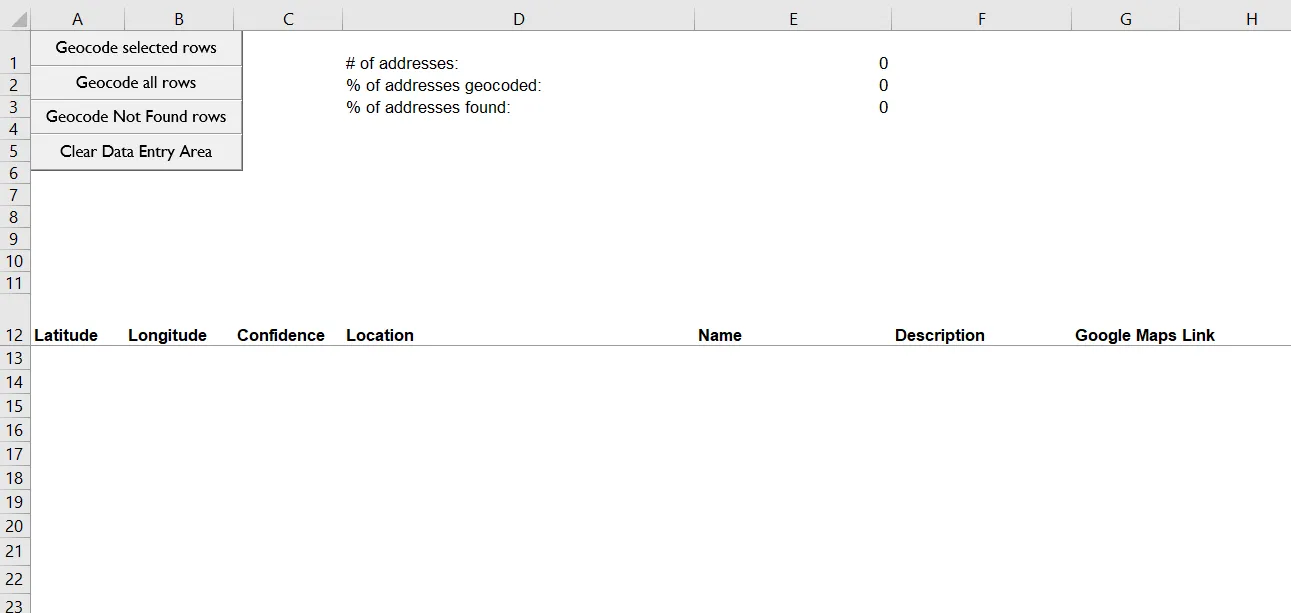
4. When all your macros have been validated, we can finally start to use the geocoding tool. Firstly I would recommend clearing all existing addresses (Pic. 25) by clicking the appropriate button. If you omit this step, the toll can erase older data and rewrite them with the new coordinates.
Secondly, we can put some examples of places in order to check how the integrated geocoding tool works (Pic. 26).
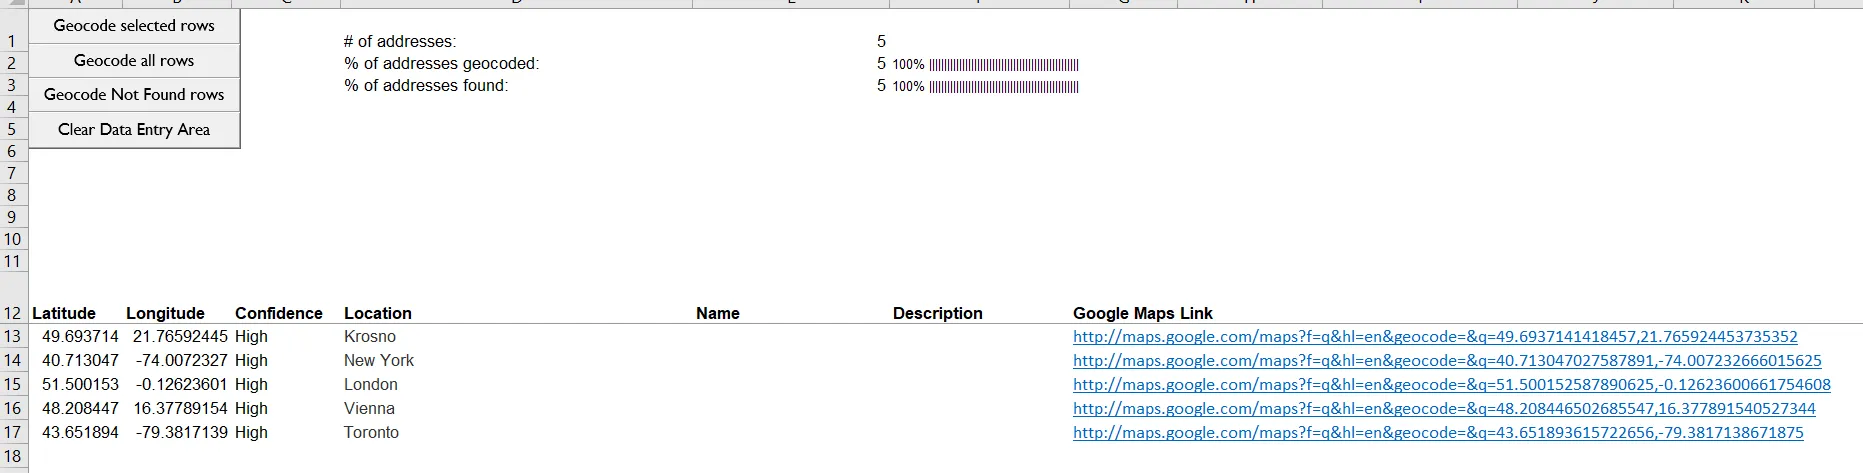
5. If everything is correct, like in the image above (Pic. 26), then you can finally start to fully integrate your workbook with this tool by linking some formulas, developing macros, etc. The range of tasks, possible to launch here is very big. I provided a simple example, which is based on the one location only, as I don’t need them more in my workbook, although your situation might be slightly different.
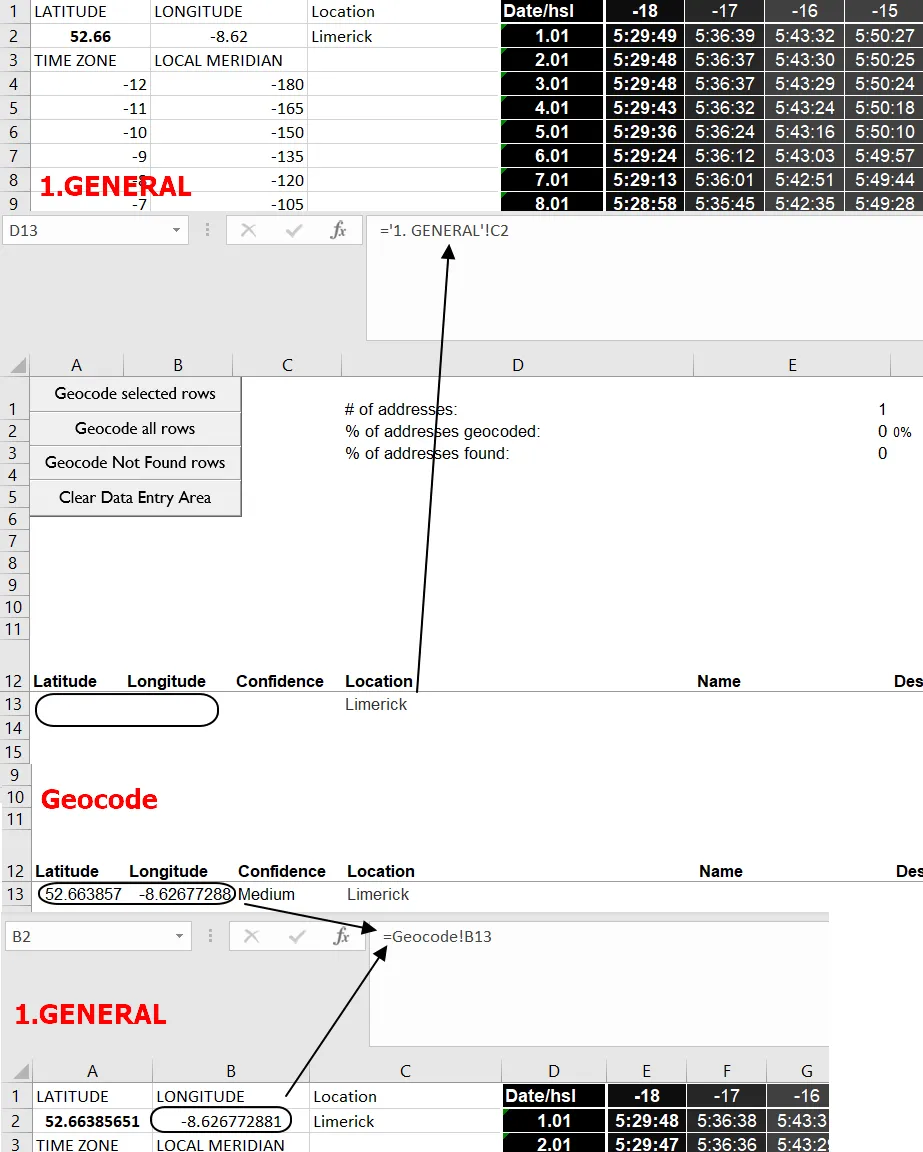
I just needed one location to be synchronized with the tool as well as the coordinates. I’ve linked the location name from my first sheet and did another way round for the coordinates (Pic. 27).
At this stage, I had to develop some small macros, enabling me to launch the geocoding tool straight from my first sheet, where the information about the location is based. The macro with a short description looks as follows:
Option Explicit
Sub Geocode()
‘1. Activating the Bing geocoding sheet
Sheets(“8.GEOCODING”).Activate
‘2. Clearing all potential default address list
Call ClearDataEntryArea
‘3. Linking the very first input in “Location” column with our address defined on a different sheet
Range(“D13”).Value = “= ‘1. GENERAL’!C2”
‘4 Geocoding our address with Bing
Call geocodeSelectedRows
‘5 Back to the sheet, where our address has been defined
Sheets(“1. GENERAL”).Activate
End Sub
Basically, I prompted two macros included in the Excel geocoding tool for the Bing Maps API. I needed just clear the data, just in case some unnecessary addresses are already there, and geocode the selected row, including my location linked from the first worksheet.
Finally, I created the Form Control button (Pic. 28) and gave it a go.
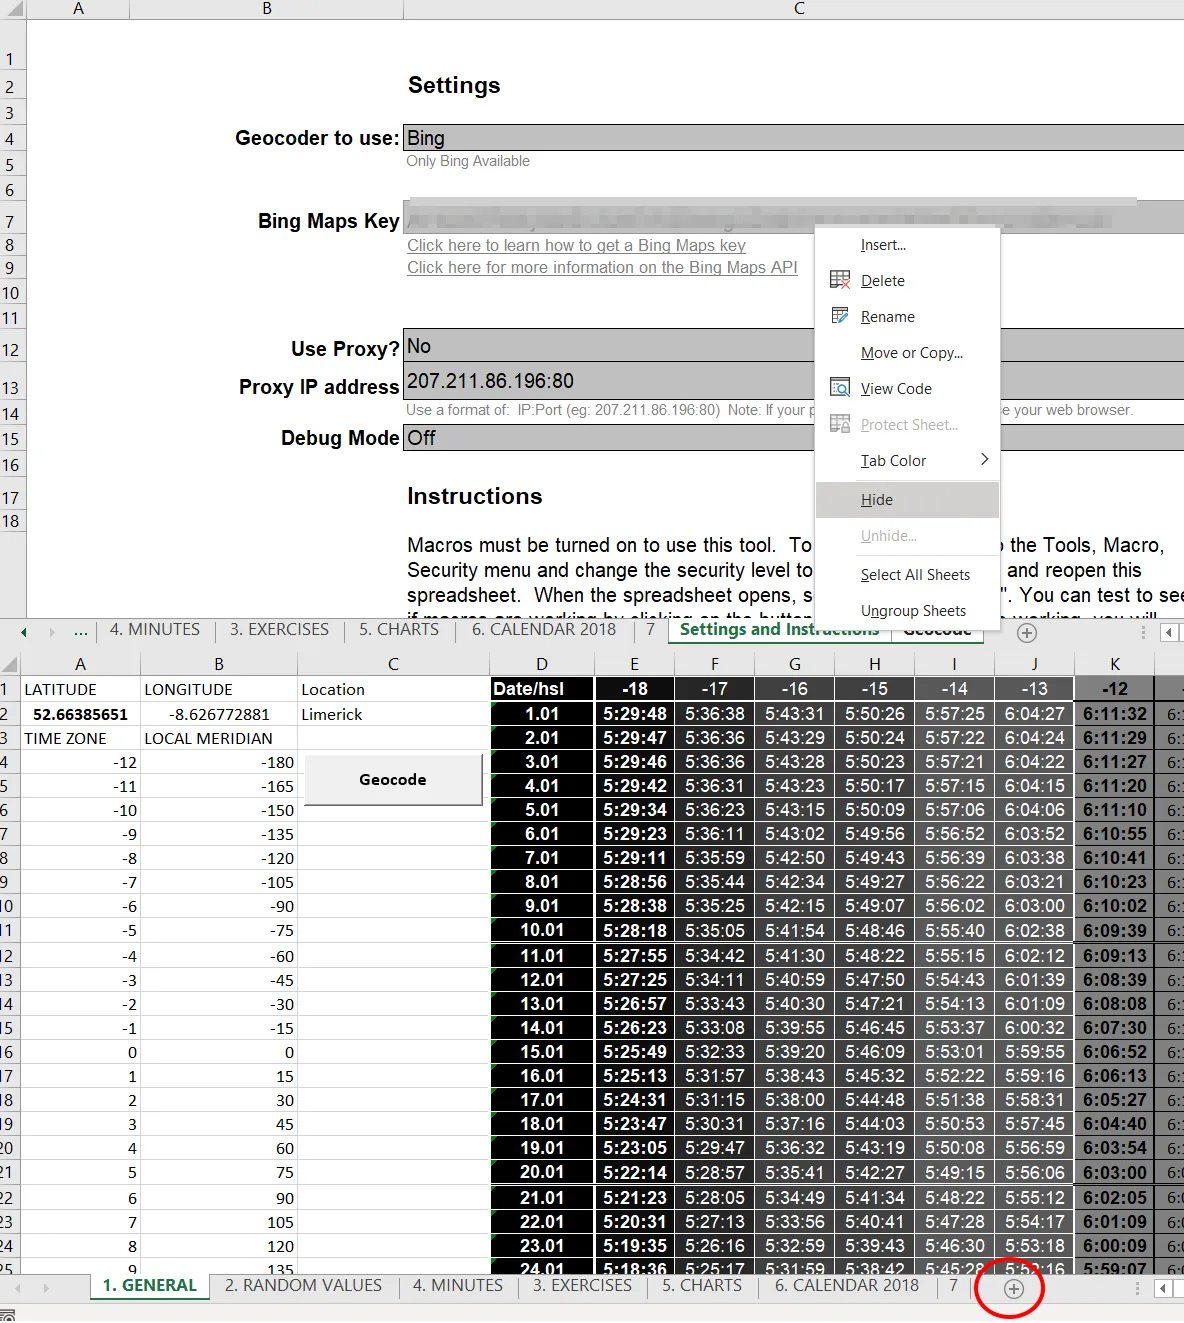
The last thing to work with, obviously if you need to is the sheet hiding. You can hide these 2 sheets, which probably won’t match your workbook layout. Just select them all and simply right-click one of them, where you can choose the “Hide” option (Pic. 29). They will disappear instantly, giving your document the same appearance as at the beginning of our work. They will do their work for sure.
I think, that we are done by now. If something was not clear enough for you, watch the video below then.
This is for sure one of the ways, how we can integrate this Bing Maps API Excel geocoding file with our workbook.
You will probably find the other way to do it for your purpose. Treat this article as a good example then.
Mariusz Krukar
Links:
- 7 Geocoding and Reverse Geocoding Services for Pinpointing Addresses [Free and Paid]
- Free batch geocoders
- OpenStreetMap geocoder
- MapCite add-in Excel geocoding
- https://geocodify.com/
- https://www.maptive.com/map-excel-data/
- https://www.geoapify.com/create-a-map-from-excel-data-with-mapifator/
- https://rapidapi.com/collection/reverse-geocoding-apis
- https://atcoordinates.info/tag/geocoding/
- http://excelgeocodingtool.com/
- https://github.com/maxrice/excel-geocoding-tool
- https://sqldusty.com/2016/04/26/power-bi-and-the-bing-maps-api/
- https://www.shayatik.com/2014/04/batch-geocode-addresses-using-bing-maps-api-and-an-excel-worksheet/
- https://manifesto.co.uk/google-maps-api-pricing-changes/
- https://grindgis.com/software/microsoft-excel/geocoding-excel-and-bing
Forums:
- https://www.reddit.com/r/PowerBI/comments/dujj5v/geocoding_in_powerbi_address_to_longitude_and/
- https://forum.enterprisedna.co/t/help-needed-reverse-geocoding-using-longitude-latitude-as-input/2775/2
- c-sharpcorner.com/article/how-to-add-excel-addin-for-geocoding-batch-geocoding/
My questions:
Youtube: