
Digitizing administrative maps in Google Earth
The digitizing process is needed when we want to transform our map into vector data. This process is aimed at tracing the map features, which later appear as coordinates in either point, line, or polygon format. Digitizing is essential in the case where our data cannot be instantly integrated with the other GIS data. In other words, it’s the conversion of raster data to vector data. The digitization can be done with various GIS software, which is able to export our output to the vector file. The most common GIS platform used for digitizing purposes is ArcGIS or QGIS. There you can do very detailed digitizing because these programs have a lot of options. I mean various objects, polygons, rivers, roads, etc., because of assorted ways of further customization of our digitized object. We are considering manual digitizing here.
In this article, I would like to demonstrate to you how to digitize effectively the administrative units in Google Earth. I assume, that you don’t need as many details as you could get from these 2 GIS platforms mentioned above. If you are interested in only digitizing the boundary map or administrative region in order to prepare your data i.e. for an interactive choropleth map, then this way should suit your purpose.
The primary attitudes of digitizing in Google Earth are:
– toolbar easy to use
– instant access to the detailed satellite imagery
– a simple way of editing the nodes and features
– You have a look at every single shape (polygon) you created
– an easy way to add the description (further data attribute table development)
The primary disadvantages of digitizing Google Earth are:
– pan option not available when drawing the shape
– time-consuming node edition caused by lack of snapping vertex tool
– the shapes cannot be edited just when hovered, you must select one of them in the panel
Let’s consider the sources, from where we can get the raster data to Google Earth. Basically, the major format, relevant for displaying our map correctly on Google Earth is the GeoTiff format. Because the GeoTiff format is fully compliant with the TIFF 6.0 format, we will have these files with a .tif extension. Anyway, this is the most desired file format for importing the raster data to Google Earth.
If we cannot get the GeoTiff file directly, the best way to get it will be the conversion from another raster format. When digitizing administrative regions we need these conversions from any raster image formats. Additionally, we can get our raster data from the raster PDF file (Pic. 1).
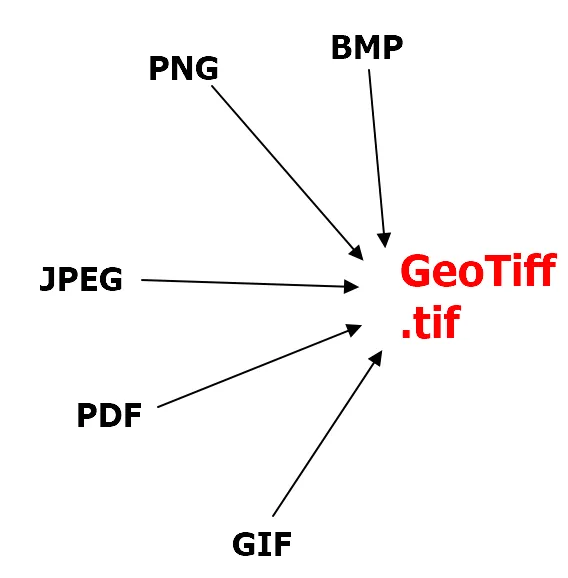
Pic. 1 The most common raster image formats can be converted to GeoTiff .tif format. Additionally, we can convert the raster .pdf file too.
Besides the most common raster image formats visible in the aforementioned image there are many more of them available. The GeoTiff format can be produced also from the Digital Elevation Model file formats i.e. .dem, .srtm, or .hgt, but I won’t use them for the time being. The full list of raster images and GIS files can be found on this website. These 2 groups of files are mostly considered for the conversion to GeoTiff files as well as the other ones available here.
There are a few ways of the file conversion into GeoTiff format, from which I can list:
1. Instant conversion online – it’s available, but you must make sure, that the output meets your expectations. Often the output GeoTiff conversions come with low quality, which frankly can be still used for digitizing some lines or boundaries. Firstly I listed the “to GeoTiff” online converters for free, which are:
– https://geoconverter.hsr.ch/
– anyconv.com
The first one provides a poor-quality output, which can be used for digitizing some lines and boundaries only. The second one works for small-sized files only. There are by far all the “to Geotiff” free converters available. You can pick up the freemium ones from the list below:
– MyGeodataCloud – the best freemium tool available on the web. The GeoTiff image quality is really good. Make sure, that you don’t exceed the monthly upload limit, which is 5MB only. It might restrict us to larger raster map files. Alternatively, you can try to do the conversion from the incognito tab. In this event, you can gain another monthly limit. On the other hand, you cannot convert more than 3 files per month. The tool is great, but the pricing is not necessarily.
– Georeferencer.com – another tool, where you can convert your raster map into the GeoTiff file, but you can’t download it unless you purchase at least the “Start” plan.
– Safe Software – the most expensive platform that offers at least the demo version once you sign in.
2. Saving (export) map as GeoTIFF (.tif) format – a good option for someone, who has a custom-fit GIS software. A good application is, for example, MapInfo or G-Raster. It’s good to know that many GIS packages can read the GeoTIFF format straight away.
3. Converting the raster image file to GeoTIFF (.tif) format with GDAL – this way gives us the great opportunity to take full control of our raster map. I mean, that you can georeference the map in detail and take control of proper reprojecting. The georeference can be done using ground control points.
4. Georeferencing raster images – the manual task, which is possible in major GIS platforms such as ArcGIS or QGIS. The user can pick up the characteristic points from his raster image and match them accordingly with their counterparts appearing on the map canvas. Next, after assigning the proper coordinates and transformation, the process can be done. As a result, we gain the GeoTiff (.tif) map.
5. Download the GeoTiff file format from the Web – it’s possible for sure when we enter the free GIS data source. A lot of them cover these file formats worldwide. One of the most detailed is the 250m True Marble global dataset or USGS National Geospatial Program, which is costless for the low-resolution version. Another option is searching for the GeoTiff files locally. Some platforms operating strictly within some areas sometimes have an option to download raster imagery, which might include the GeoTiff format also. A good example here is Mesacounty.us or CityofLondon.gov.uk (Pic. 2).
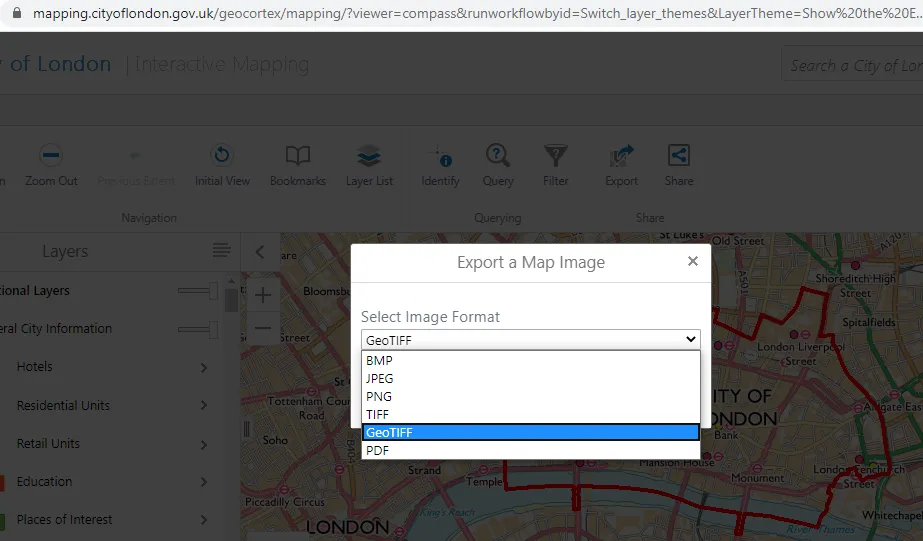
Pic. 2 The GeoTiff format download option from the CityOfLondon interactive Ordnance Survey map.
6. Creating the GeoTiff file manually (programmatically) – this is the solution, where we can render the GeoTiff file format from the existing XYZ map tiles by programming. The essence is to find a good way to download the existing map tiles from the web map tile server, georeference it, and save it as the GeoTiff file. The best programming language for it is Python. The user can also create the GeoTiff image with Python from scratch, but it’s not practical for our current purpose. Anyway, this is a good exercise to elaborate on in the future.
The last thing to mention is the alternative option to display your raster map on Google Earth. This is the image overlay option. This solution is poor because we have to stick manually our image bounds to the proper coordinates, which is not easy. I would advise you to stand with the GeoTiff file then.
Now I can assume, that you already have got your GeoTiff (.tif) map prepared and you can display it on Google Earth. If so, I can show you in the few steps how to digitize the boundary map in this OpenSource platform.
- First, we must import the GeoTiff file into Google Earth. We can do it mainly by the File -> Import… from where you must select the appropriate file extension, which is GeoTiff (.tif) as per in the image below: (Pic. 3).

Pic. 3 Import the GeoTiff file to Google Earth.
2. When you pick up the GeoTiff file, it is loaded instantly on your Google Earth map canvas with proper georeferences assigned (Pic. 4). Beside the raster map covering our area, we have the pop-up window with display options available.

Pic. 4 Loading GeoTiff raster map in Google Earth with display options available.
Considering appliance some of these options (Pic. 5), we can take into account, especially transparency. Transparency of our file is the key feature if we want to get some data out to our future vector map. If the raster file is opaque we cannot see what is underneath. Even if it’s georeferenced correctly we still need to know how our boundaries look in the area. If you find some small discrepancies in the GeoTiff location, you can rotate it a bit or simply move the corners of your image overlay. It’s possible when you hover over any of the green lines visible.

Pic. 5 Useful options when loading your GeoTiff raster map into Google Earth.
The helpful option for it can be the “Convert to LatLonQuad“, where you can edit the image location more deliberately (Pic. 6).

Pic. 6 The “LatLonQuad” option in Google Earth, where the user can adjust the coordinates of every corner more deliberately.
We are done now. When you click OK, your raster map should appear on Google Earth’s map canvas. There might be an error with the transparency slider, which in turn won’t work properly. Our layer might remain fully opaque throughout all values between 1 and 100% and completely transparent when the slider shows 0%. The reason behind it is the “Photorealistic atmosphere rendering” option, which must be switched off. If we do so, the slider works fine.

Pic. 7 Our small GeoTiff file overlaid in Google Earth. The map is partially transparent, as we switched off the experimental “Photorealistic atmosphere rendering” option in Google Earth’s tools.
However, it’s not always so quick. Quite often you will have a bigger GeoTiff file, which cannot be manipulated in one piece by the Google Earth tool. In this event, you will get an alert informing you about the supported maximum size exceedance (Pic. 8).

Pic. 8 Google Earth alert informing you about the maximum file size exceedance and giving you some further options.
The first option is “Create Super Overlay“, which requires choosing a new location (folder) where this overlay will be stored.
When this overlay is generated, we have it stored as the multitude of .kmz files in our target folder chosen previously. All these files comprise our final raster map visible on Google Earth from now (Pic. 9).
Pic. 9 Our imported GeoTiff raster map as the “Super Overlay” in Google Earth now is built of a lot of .kmz files.
The last step to mention here is obviously the transparency, which can be set in a different way, as we are dealing with .kmz files instead of a raster image overlay.
Just below the “Places” panel, we have got the horizontal slider, which we can use. Make sure, that your layer (the folder including all .kmz files) is selected (Pic. 10).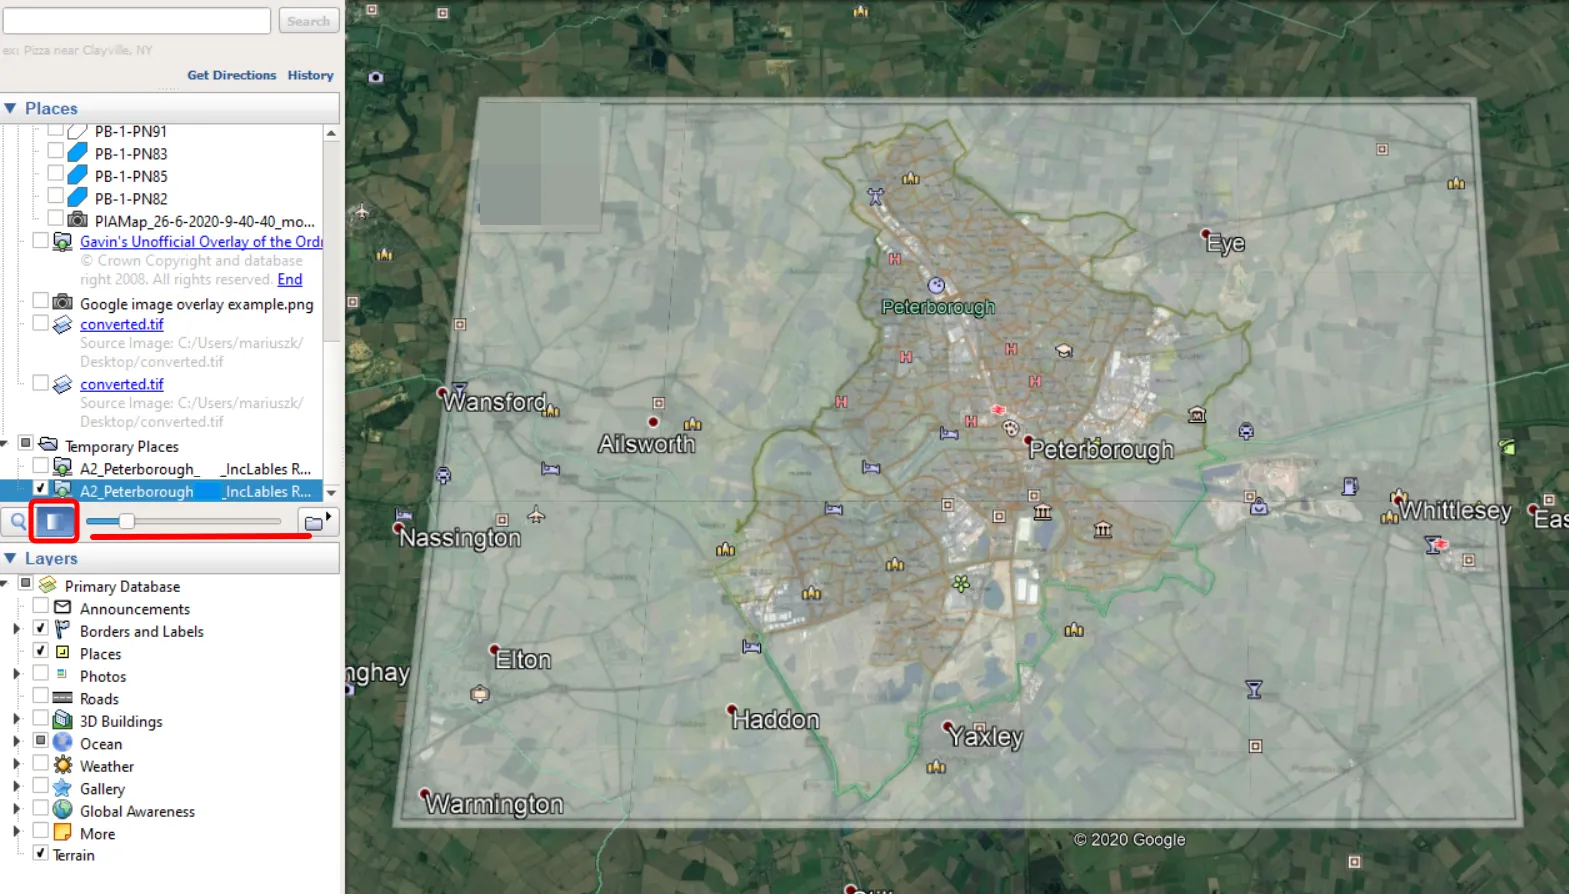
Pic. 10 Our GeoTiff map appears as the “Super Overlay” in Google Earth with the transparency level added in.
The next option is the “Scale” layer to the maximum supported size. This choice results in our raster image quality deterioration (Pic. 11).

Pic. 11 The difference in quality between loaded GeoTiff raster image as the .kmz “SuperOverlay” (1) and scaled to the maximum supported size (2).
The last option available is “Crop”, which saves the original resolution of your GeoTiff image, but trims it down to the maximum supported size. You decide which part of your GeoTiff overlay will be visible on Google Earth (Pic. 12) by clicking the green pointer.

Pic. 12 Deciding which part of our cropped GeoTiff image will be displayed on Google Earth by clicking the green pointer anywhere within the georeferenced raster boundary.
The GeoTiff raster layer cropped down to the maximum supported size is visible on Google Earth right away (Pic. 13). At this stage, you have all the options described above (Pic. 5, 6). Time for georeferencing!
3. Having the GeoTiff raster map issue sorted we can start digitizing the elements, that we need. In our case, there are all lines creating the boundaries both external and internal. We need them for further choropleth map.
The best way to digitize the borders, which are enclosed will be the “Polygon” selection from the main toolbar (Pic. 14).
Pic. 14 Selection the “Polygon” from the main toolbar.
Next, we should have the pop-up properties window, similar to those described above (Pic. 4), where we should take a look at the: “Name”, “Description” and “Style, Color” features (Pic. 15). These ones decide about our future polygon appearance along with its basic metadata.

Pic. 15 Digitizing boundaries in Google Earth, where every single area is closed with borders and can be treated as a polygon at once. The most important features have been red off.
When you are happy with your description and color & style corrections, then you can digitize each polygon one by one (Pic. 16) making sure, that the nodes don’t overlap adjacent polygons significantly (Pic. 17). Otherwise, our result won’t look great.

Pic. 16 The boundary map digitizing process in Google Earth.

Pic. 17 The boundary map digitizing process in Google Earth – one polygon highlighted with all nodes.
The last thing to mention here is the edition of nodes. If you see, that the boundaries are not correct, alterations are needed. In order to create the additional node between those already existing, we must click one of them making it active. Next, the new one will be created following the direction of the initial polygon drawing. In practice, it means, that if your second node has been created right from the first one, any new node will appear right from the currently active node later. On the other hand, when you are making the polygon towards the left, the newly created node will emerge left from the presently active node. See the graphic explanation below (Pic. 18).

Pic. 18 The basic mechanism of new node input into an existing polygon in Google Earth.
Right-click on the node and remove it. The map dragging option doesn’t work during the digitizing, so if your object extends beyond your current view please use Zoom-in and Zoom-out options instead (by mouse scroll).
4. If you are done, then you can take down the GeoTiff layers, revealing your complete job situated on the Google Earth satellite canvas (Pic. 19).

Pic. 19 Example of boundary map digitized in Google Earth. All polygons are included in one folder.
All your polygons are included in one folder, which can be further saved as a .kml file.
5. The .kml file can be saved by right-clicking on our folder and selecting the proper extension (Pic. 20). We can save it also as a .kmz, but it won’t be as versatile as .kml is and finally, it might not be opened in other platforms (i.e. interactive map builders) or being transferred to another format.

Pic. 20 Saving our digitized boundary map in Google Earth as the .kml file.
6. Now our job is ready. We can open it i.e. in some interactive map builders like Google MyMaps, or convert it to .geojson format in order to produce the choropleth map in Leaflet.


Pic. 21, 22 The effect of boundary map digitizing in Google Earth is visible in the Google MyMaps interactive map builder.

Pic. 23 The boundary map is digitized in Google Earth and displayed as the .geojson file (Geojson.io).
This is the simplest method of raster data digitizing, but not necessarily the quickest. However, the bright side of this method is full control of the styles and colors of your polygon, whilst the MMQGIS plugin doesn’t return all these features correctly. In any other line of work, digitizing the administrative map in QGIS seems to be quicker and more convenient, at least due to the pan option available in the meantime when drawing your shape. The node correction also is quicker there.
Nevertheless of the time, we must spend digitizing our map on Google Earth, this method remains very good for someone, who starts their own adventure with GIS.
Again, having this boundary map digitized we can use it to build the choropleth map in a different GIS platform or interactive maps like Leaflet opensource software. Knowing any way of digitizing leads you to a better understanding of the whole process of virtual map preparation from scratch.
Mariusz Krukar
Links:
- Polygon digitizing in Google Earth
- Georeferencing and digitizing scanned maps or aerial images in Google Earth
- Digitization in Google Earth
- Digitizing High-Resolution Coastlines in Google Earth
- Digitization in QGIS – Exploring tools for Digitizing
- Digitizing tablet
- https://fileinfo.com/browse/
- MyGeodata Converter – list of the Raster Formats Conversions
- Write the GeoTiff file
- Generate merged GeoTIFF imagery from web maps (xyz tile servers) with Python
- https://trac.osgeo.org/geotiff/
- MapInfo – export to GeoTiff format
- http://geotiff.maptools.org/faq.html
- Creating_a_multi-band_GeoTIFF
- Example – Convert dataset to raster (GeoTiff)
- https://www.gislounge.com/what-is-a-geotiff/
- samueltoepke.com/geotiff-creation/
- Programmatically Creating a GeoTiff Image
- MAPC2MAPC – digital maps manipulation program
- https://www.igismap.com/convert-grib-to-geotiff/
- edc.uri.edu/blog/usgs-topographic-maps-converting-geopdf-to-geotiff/
- propelleraero.com/blog/how-to-convert-dwg-dxf-files-to-geotiff/
- HDF-EOS to GeoTiff conversion tool
- Tif,_tiff,_geotiff – Manifold Viewer
- https://www.geospatialworld.net/article/geotiff-a-standard-image-file-format-for-gis-applications/
- https://freegeographytools.com/2011/cheap-geopdf-to-geotiff-converter-for-garmin-custom-map-imagery
- github.com/callumrollo/geotiff-generator
- github.com/geotiffjs/geotiff.js
- Geoserver – GeoTiff data store
- How to georeference map in ArcGIS
- Georeferencing maps in QGIS
- https://gisgeography.com/best-free-gis-data-sources-raster-vector/
- View GeoTiff with Google Earth Pro
- Open GIS Shapefile Map Layers and GeoTIFF Images of the World by Country
- https://www.fulcrumapp.com/blog/working-with-geotiffs-for-offline-maps/
- Globalsolaratlas: GeoTiff maps download by region or country
- Use images as Google Earth overlays
Forums:
- Does the data extracted by digitizing in Google Earth be directly used in ArcGIS program for further analysis?
- stackoverflow.com/questions/47195137/how-to-convert-png-to-geotiff
- gis.stackexchange.com/questions/242659/converting-hundreds-of-georeferenced-jpg-files-to-geotiff-using-qgis
- knowledge.safe.com/questions/64555/convert-plain-image-jpegtiff-to-geotiff.html
- https://gis.stackexchange.com/questions/16986/steps-to-creating-a-geotiff
- stackoverflow.com/questions/33537599/how-do-i-write-create-a-geotiff-rgb-image-file-in-python
- https://knowledge.safe.com/questions/78481/how-to-combine-metadata-with-tiff-to-create-geotif.html
- https://gis.stackexchange.com/questions/322436/how-to-create-geotiff-from-png-raster-and-and-pgw-world-file-with-gdal
- https://www.reddit.com/r/gis/comments/9trsoj/png_to_geotiff/
- https://gis.stackexchange.com/questions/118180/convert-png-to-geotiff-using-gdal
- JPEG to geotiff
- https://gis.stackexchange.com/questions/322042/error-using-gdal-to-export-raster-to-geotiff
- https://gis.stackexchange.com/questions/23321/where-can-i-download-a-good-world-image-in-geotiff
- https://www.researchgate.net/post/How_can_I_download_the_LANDSAT_images_in_geotiff_from_USGS_website
- How to add overlay without mercator projection?
- GEPro image overlay transparency slider not working
- How do I change the opacity of a KMZ file?
Wiki:
Digitizing
GeoTIFF
GDAL
Image file formats
WorldFileTool
Youtube:
https://www.youtube.com/watch?v=NDY953kVBBU