The first test of Nikon D5300 – JPG image retouch

I have been using a new camera for over 2 months. As I was writing
previously the NIKON D5300 digital single-lens reflex camera has many
options to make quaint photos.

In this article, I would like to show you what can you do with non-RAW images saved in your camera. You will learn how to create your own base of painting and how to get comic photos. Obviously, you must be aware of battery endurance. Once the producer says
about 600 shots, he has it in mind just taking photos without a live view. When you start modifying your photos using the screen the battery is running out so quickly.
It’s hard to say how many photos you can take beside modifying previously saved images, however, I guess that you can keep the camera screen switched on for 2-3 hours.
Anyway, you can modify your JPG images either on your camera or on your computer.

The Retouch Menu offers a wide range of options to amend your photo as you want. Some of them are available just for RAW photos. I will text you about this soon. There are a couple of links, where you can find a way to create retouching copies. I personally recommend getting the main D5300 References and following them (Pic. 1).

Nikon D5300 retouch mode options Reference manual

Pic. 1 D5300 Retouch Menu options (Nikon D5300 Reference Manual).

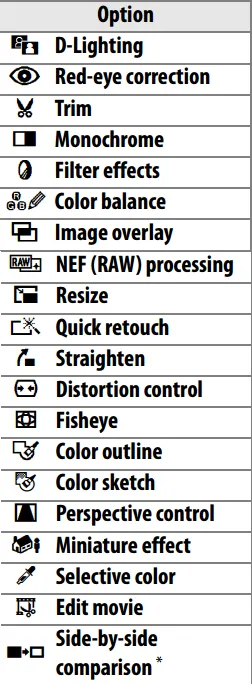
Refers to the main source and the D5300 interface I would
like to show a couple of retouched copy examples.
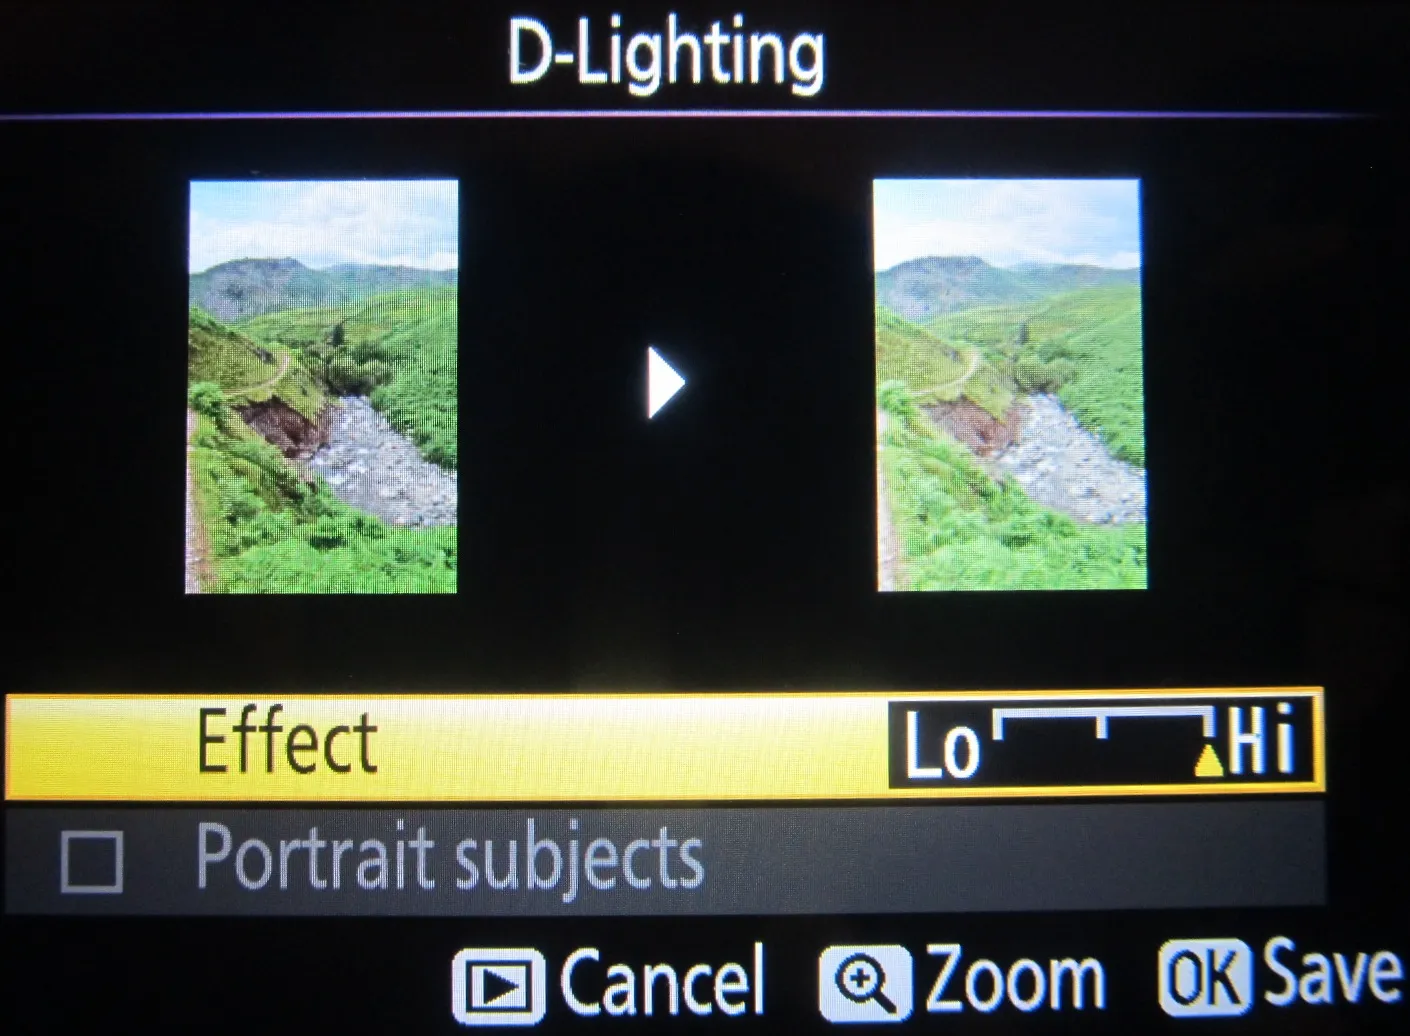
D-lighting

D-lighting makes ideal images for dark or backlit
photographs (Pic. 2,3).
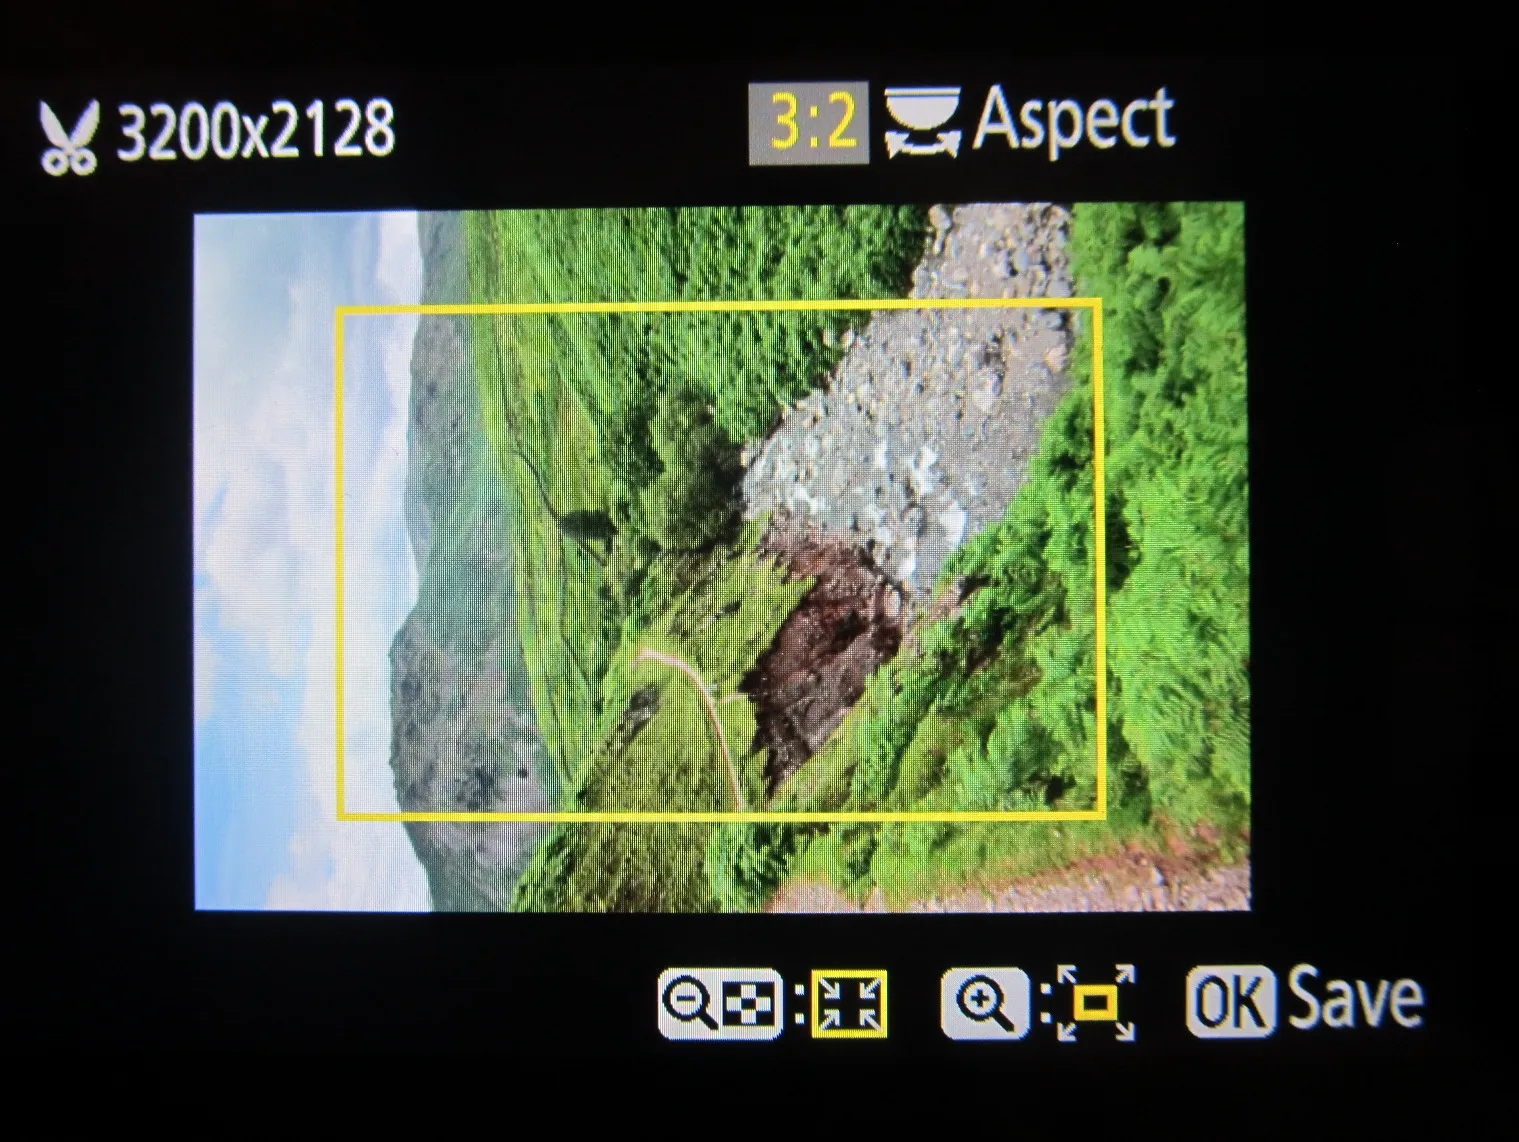
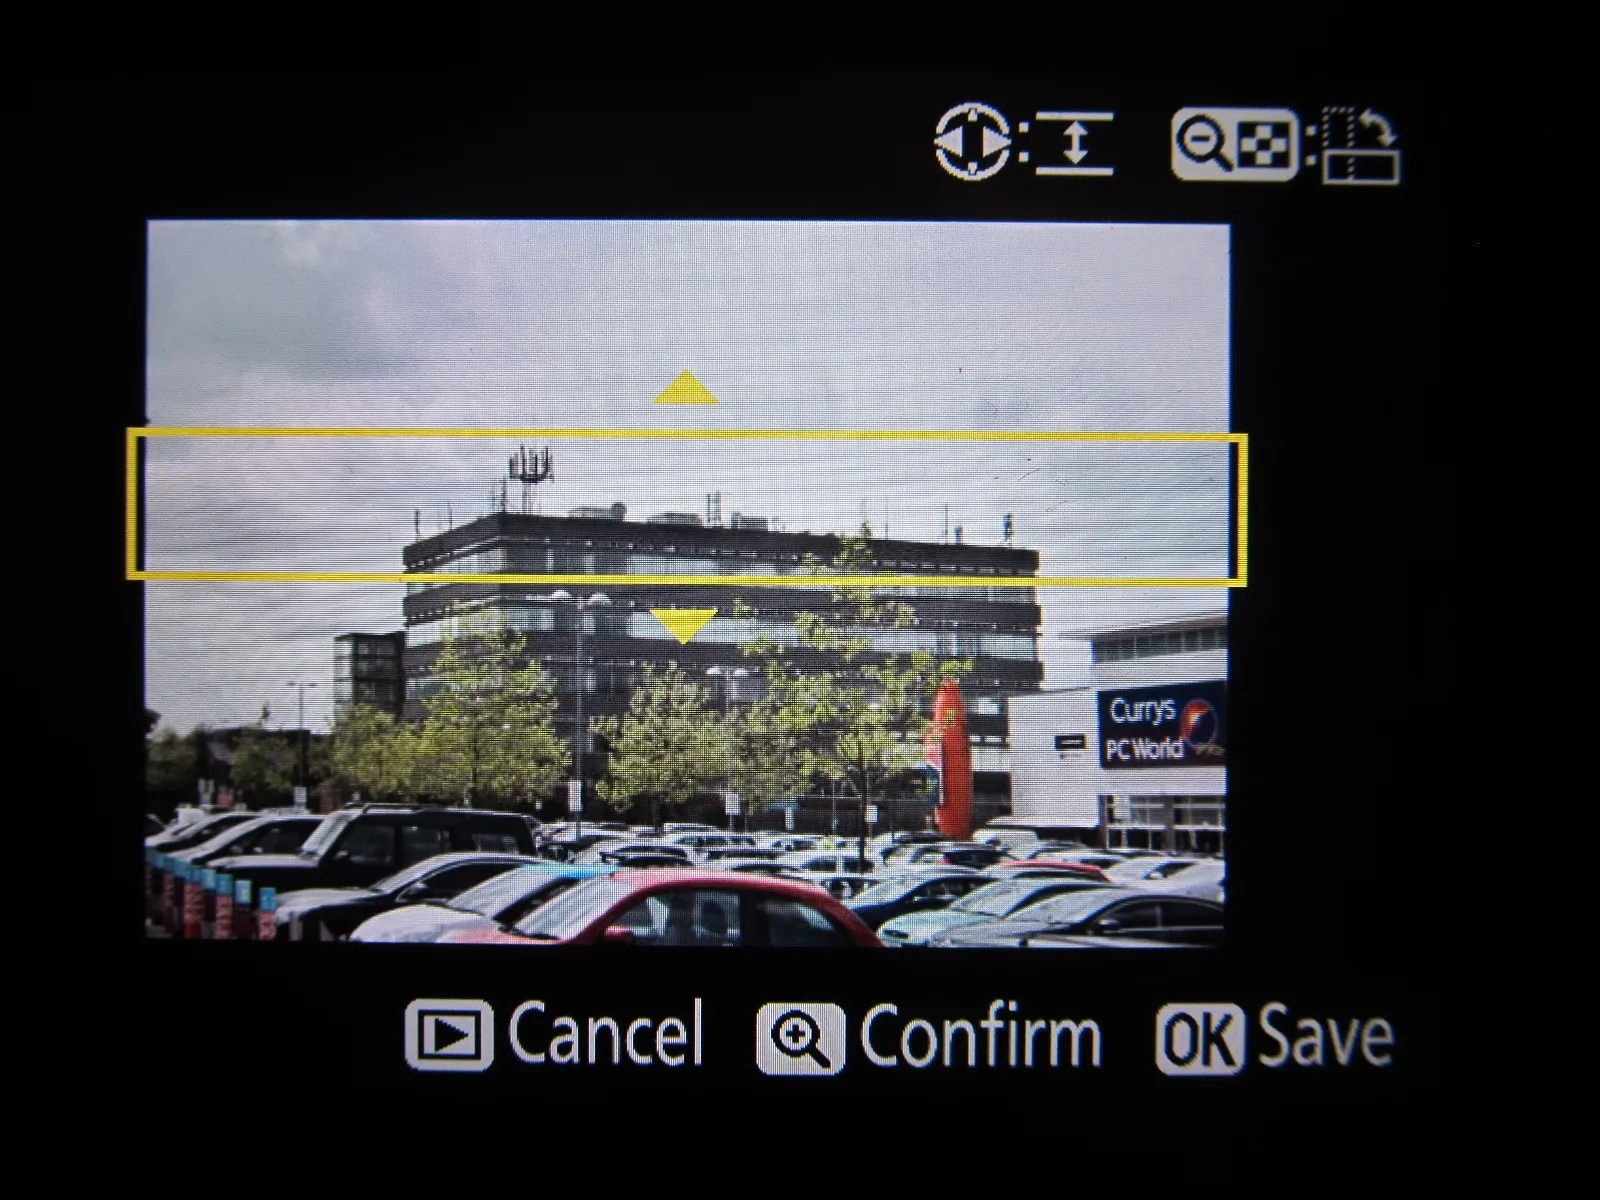
Nikon D5300 D-lightning options

Pic. 2 D-Lightning options.

Nikon D5300 D-lightning option examples

Pic. 3  D-Lightning effects: left – original, middle – low, right – high. Hemel Hempstead, Waterplay.

Trim

Once you guess that your photo hasn’t been taken properly and contains elements, which you want to get rid you can use this option and create a crop of the most important area (Pic. 4).

Nikon D5300 photo trim

Pic. 4 D5300 Photo trim.

Monochrome

Monochrome-making photos in Black-and-white, Sepia, and Cyanotype (Pic. 5). In any case, you can increase or decrease color saturation.

Nikon D5300 monochrome effect

Pic. 5 D5300 Monochrome options: 1 – Original photo, 2 – Black-and-White, 3 – Sepia, 4 – Cyanotype. Newcastle upon Tyne

Nikon D5300 monochrome effects 2 Odrzykoń - Zawodzie

Pic. 6 D5300 Monochrome options in daily light. Odrzykoń, Poland.

Red-Eye Correction

This option is used to correct “red-eye” caused by flash.

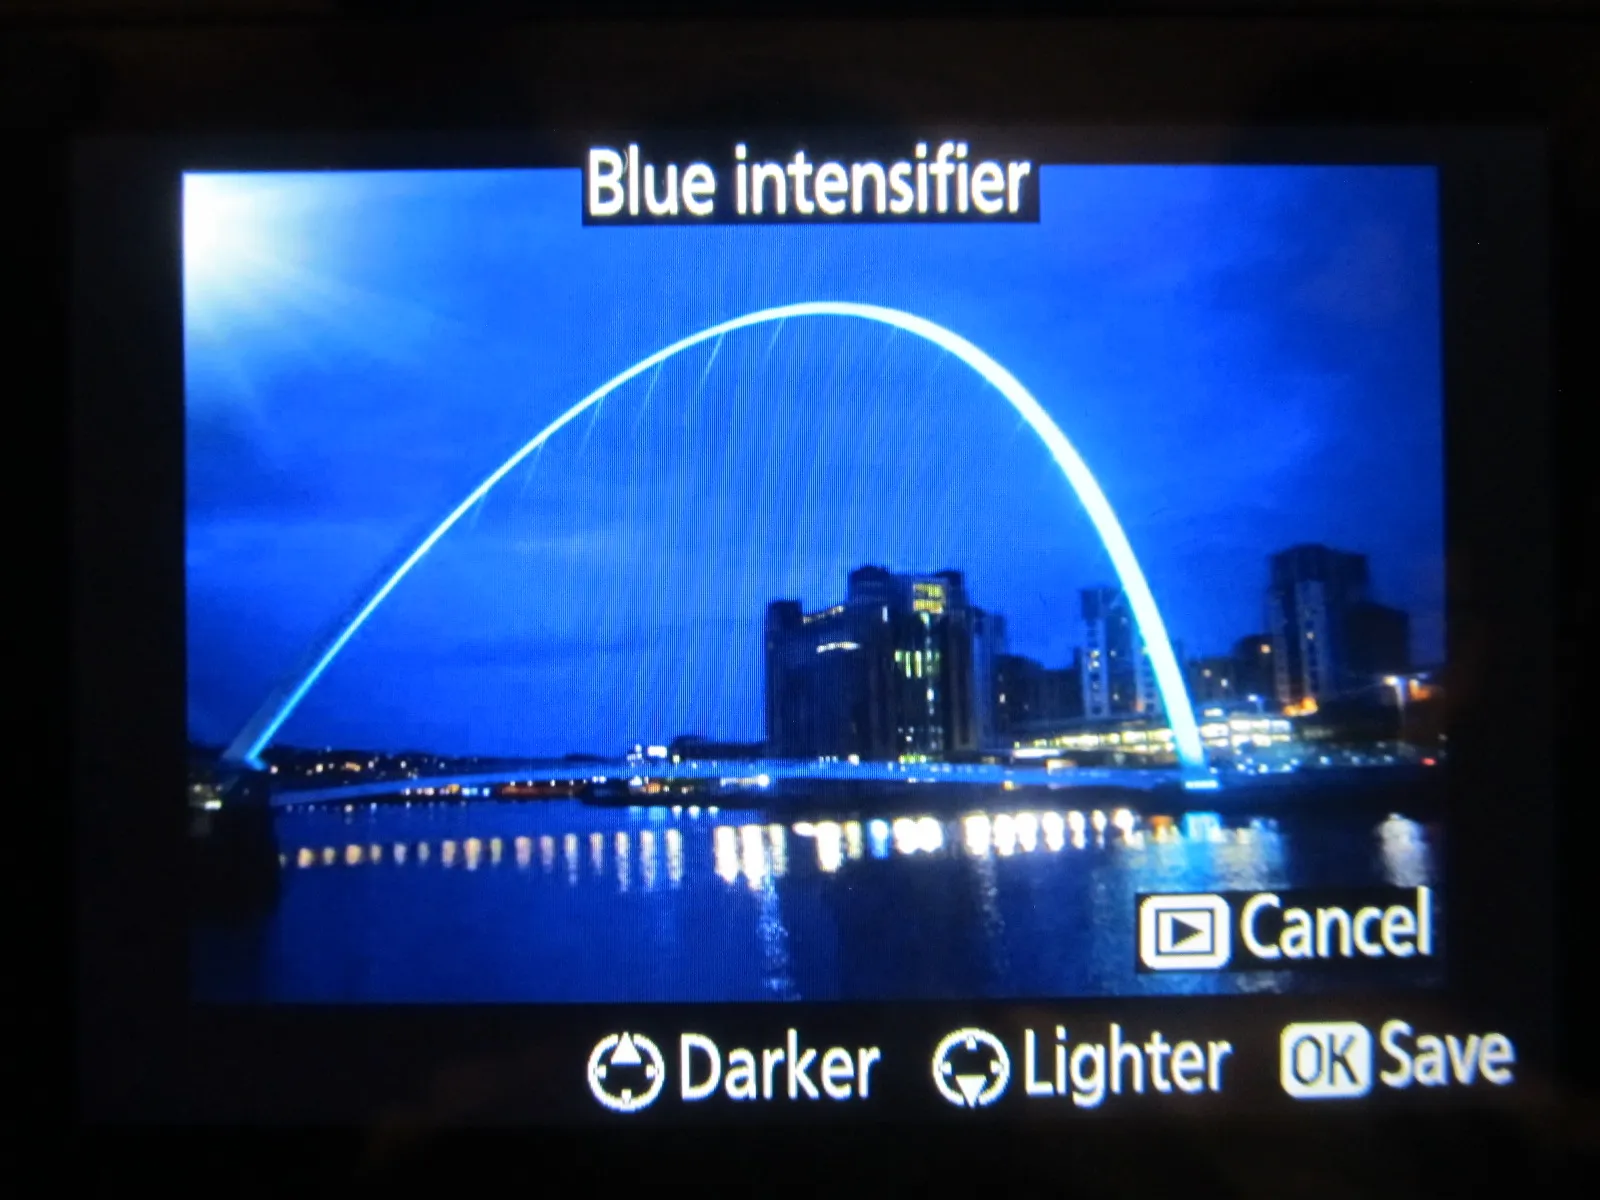
During your retouch you can adjust a lot of filter effects as per below:

Skylight – creates the effect of a skylight filter, making the picture less blue (Pic. 7).

Warm filter – Creates a copy with a warm tone with more red cast (Pic. 7).

Nikon D5300 filter effects, Hemel Hempstead Debenhams shop

Pic. 7 D5300 filter effects: 1 – Skylight, 2 – Original photo, 3 – Warm filter. Hemel Hempstead city centre

Intensifiers: red, green, blue

Nikon D5300 blue intensifier options

Pic. 8 D5300 Blue intensifier options.

Nikon D5300 colour intensifier modes, Newcastle upon Tyne, Millenium Bridge

Pic. 9 D5300 color intensifiers: 1 – Original photo, 2 – Blue, 3 – Red, 4 – Green. Newcastle upon Tyne, Gateshead Millenium Bridge.

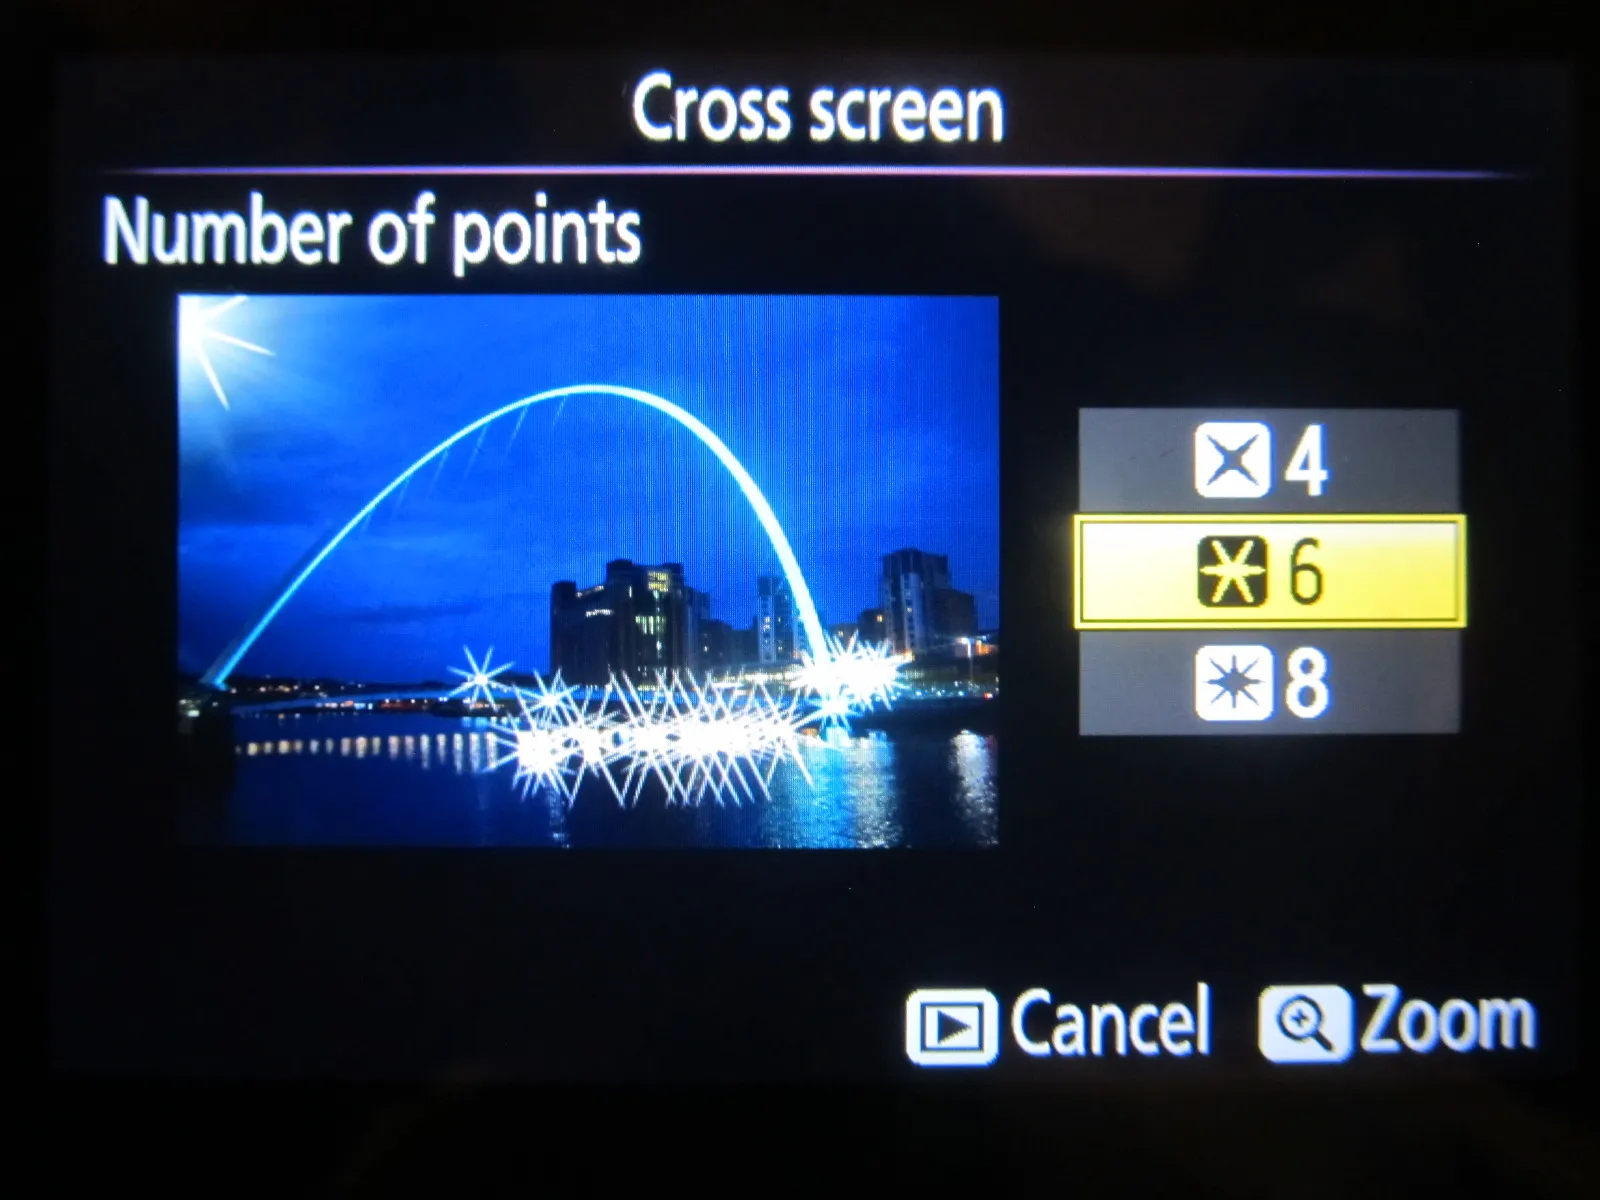
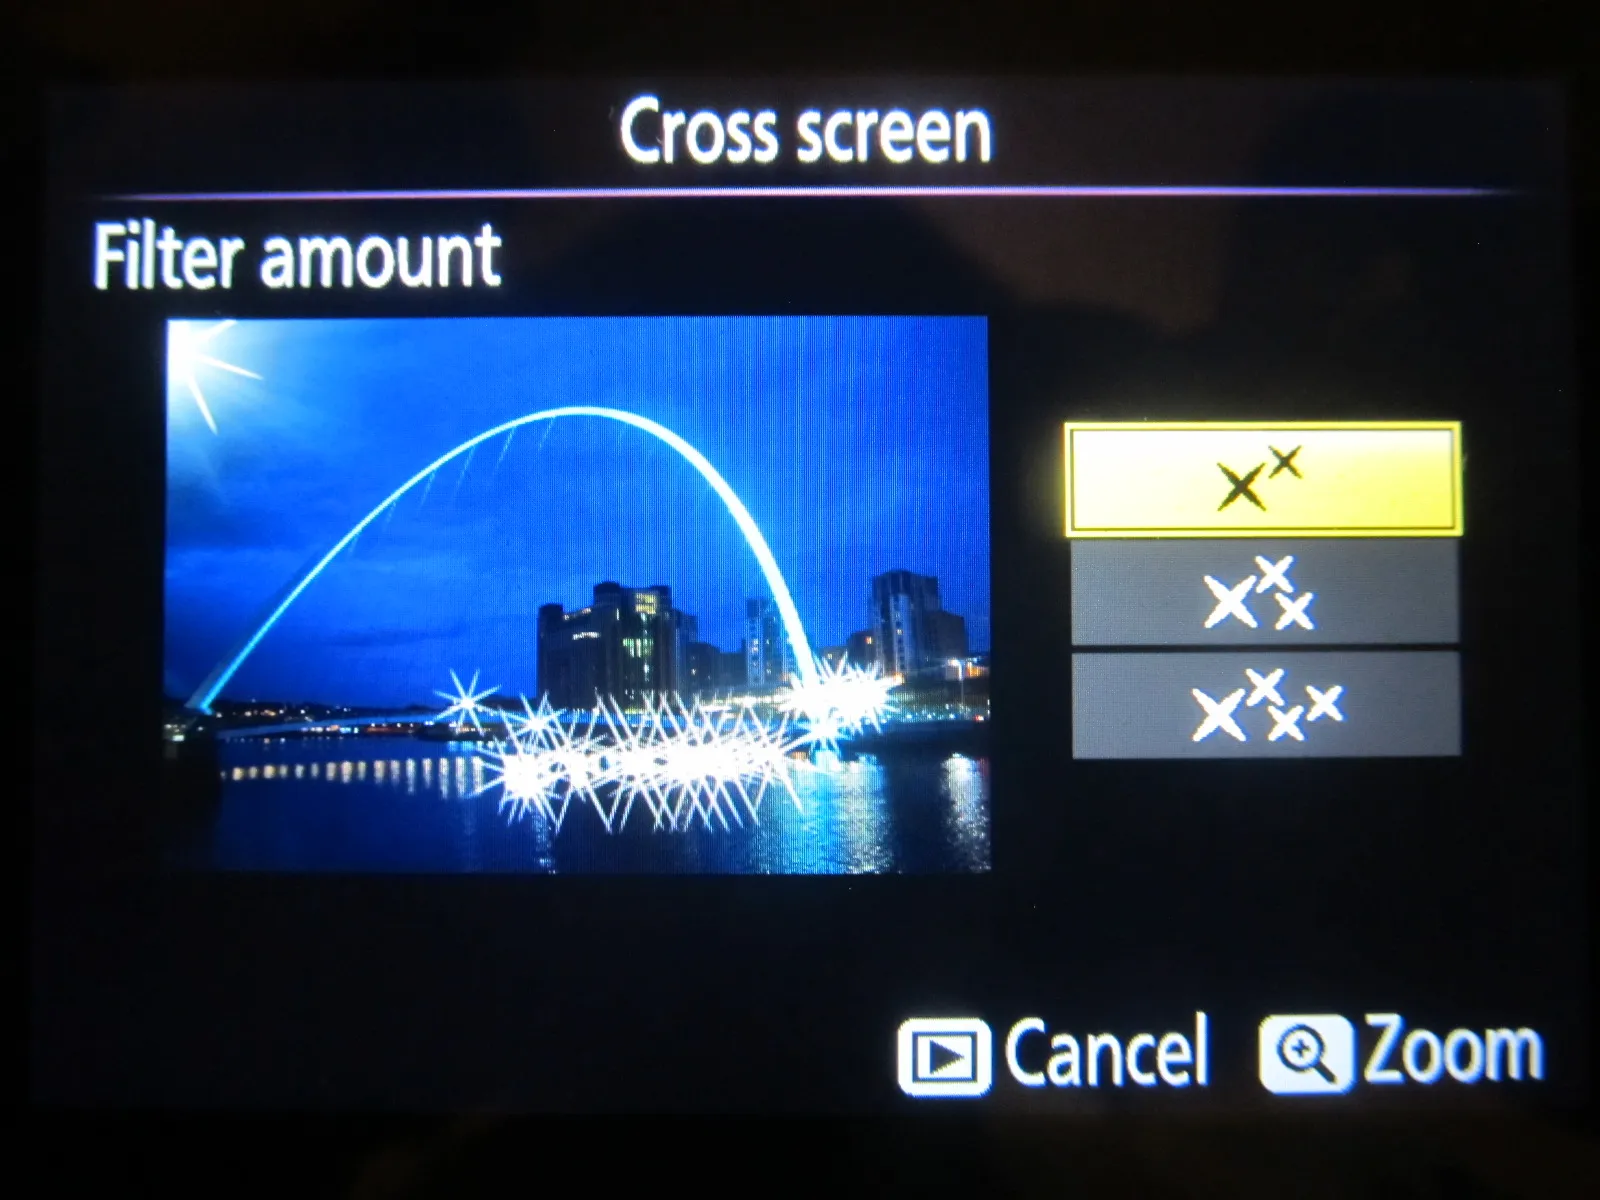
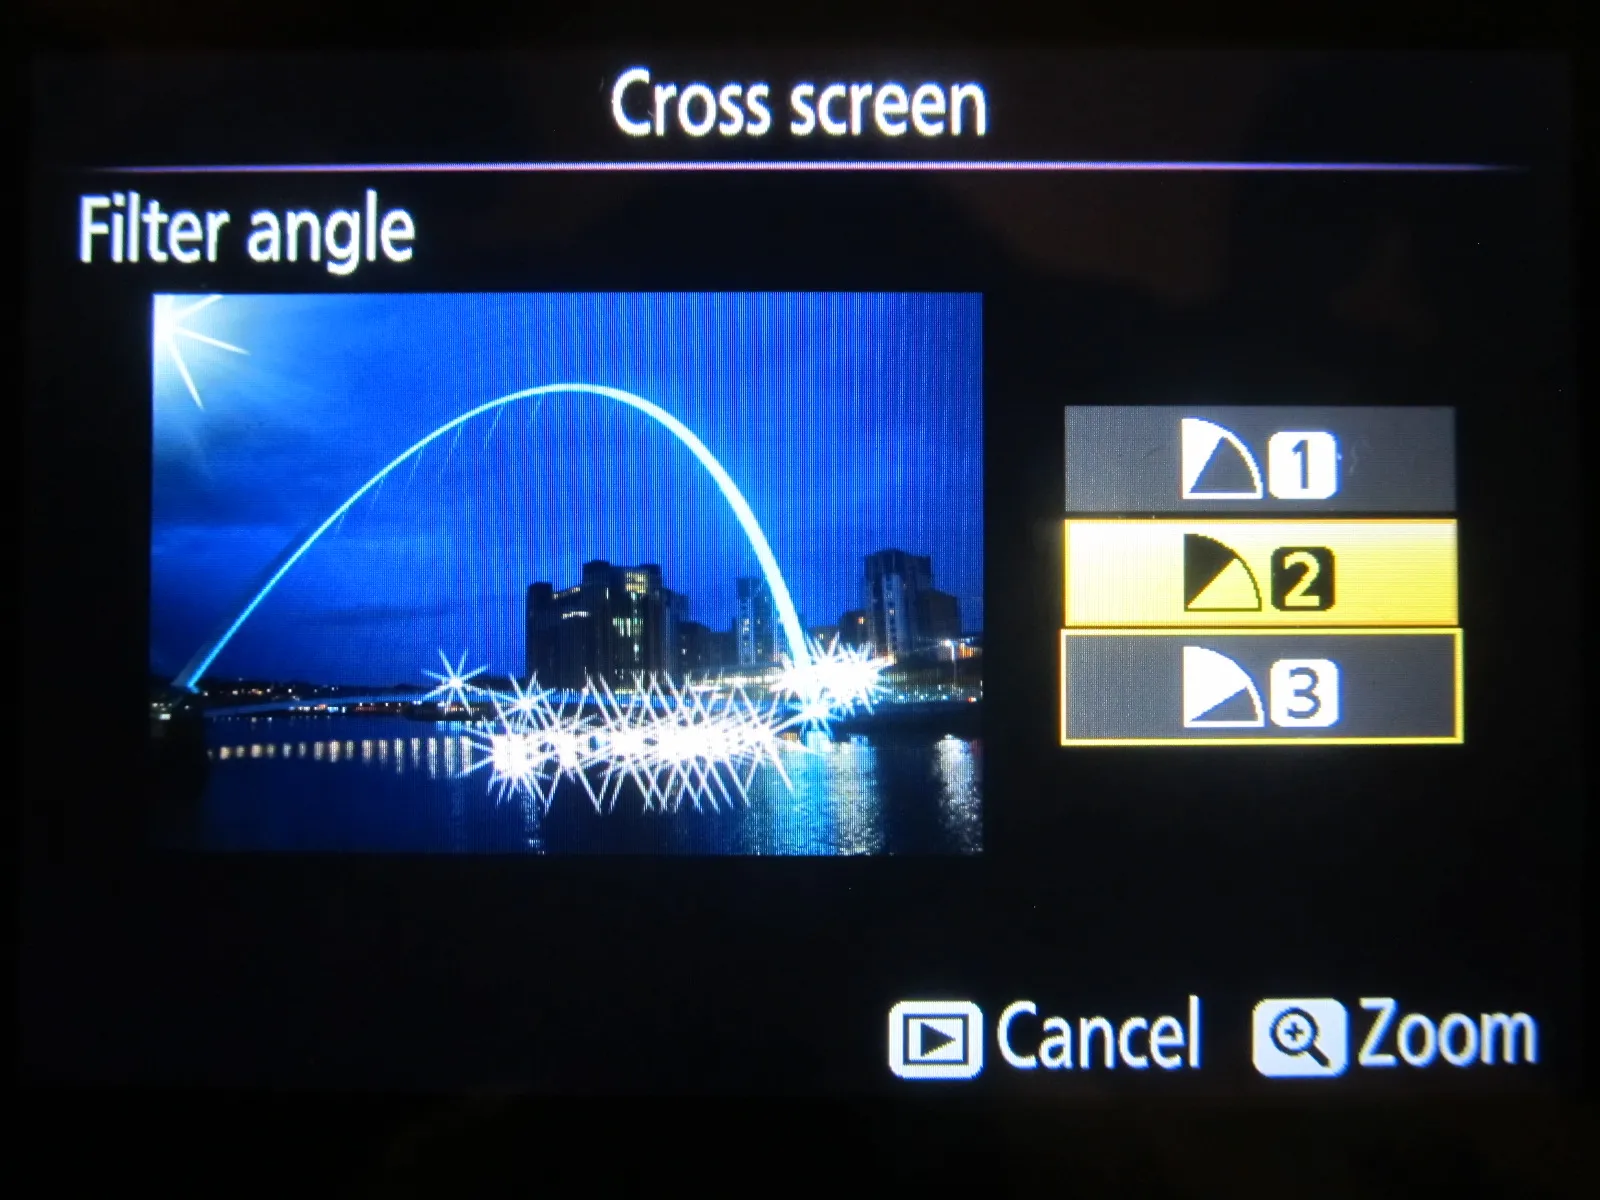
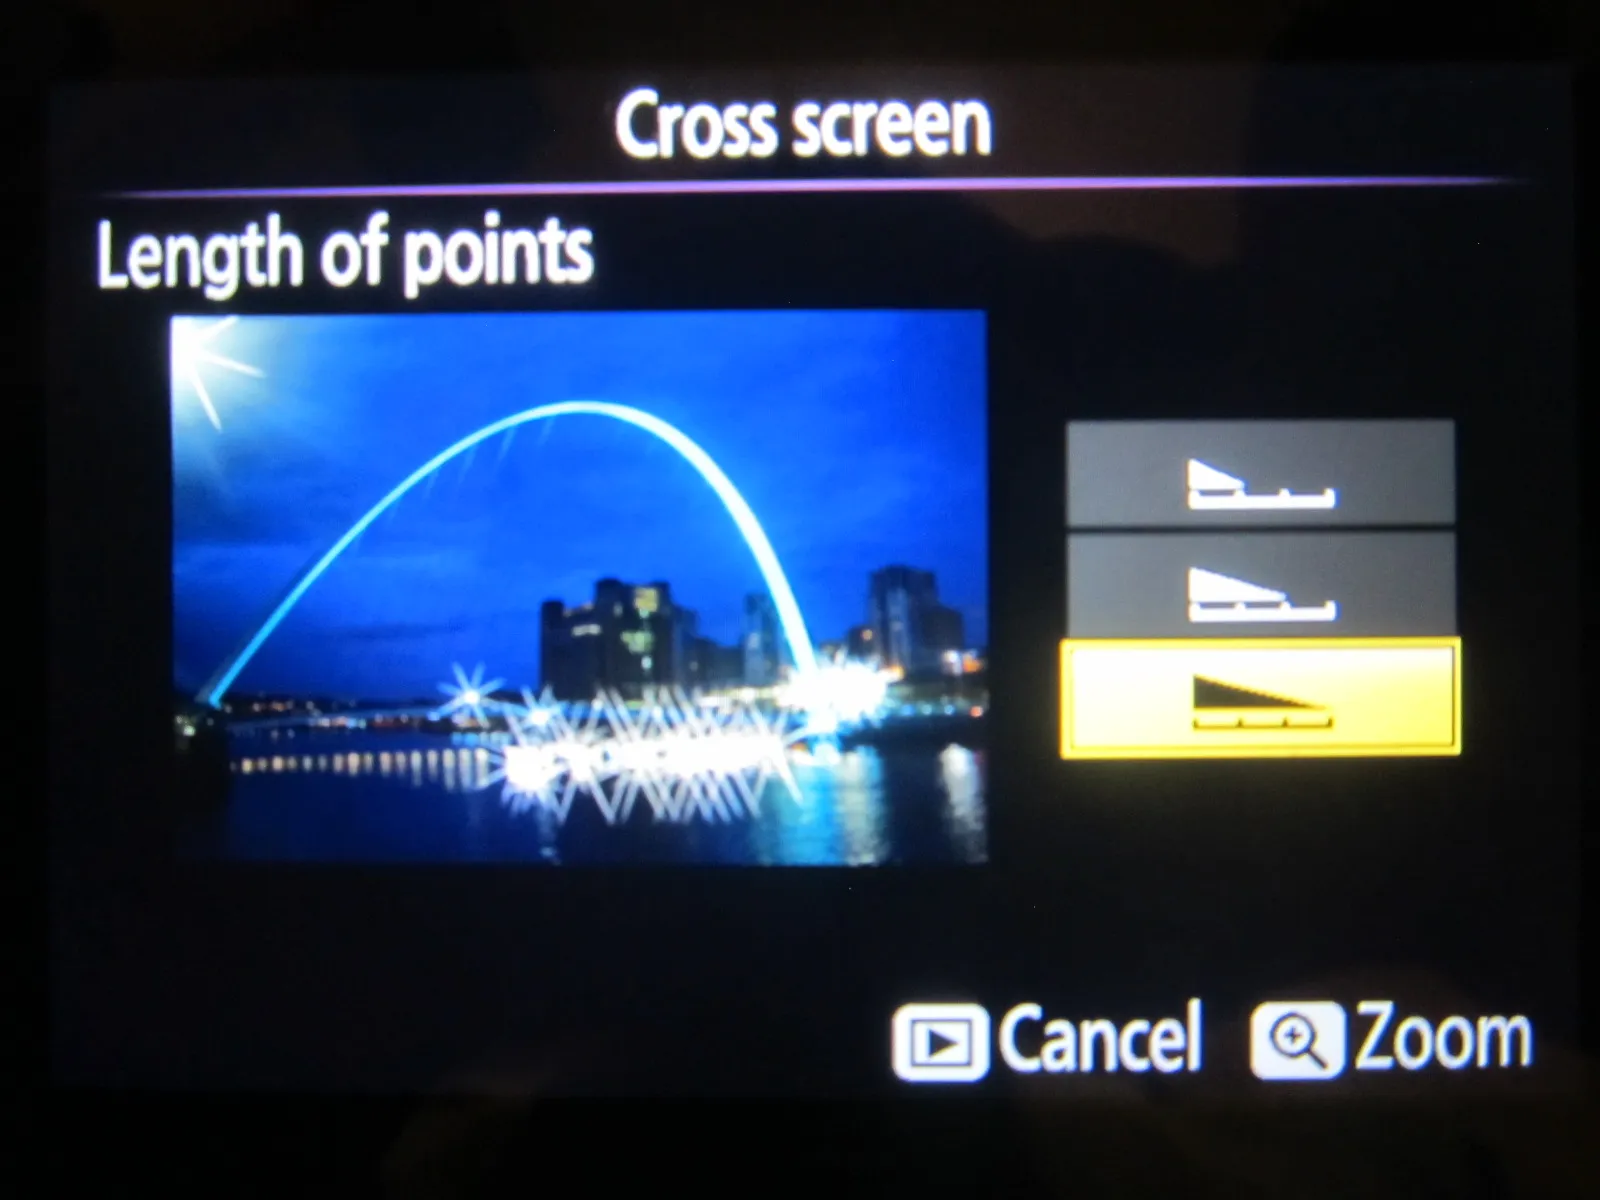
Cross screen – also known as a star filter, creates a star pattern, in which lines radiate outward from bright objects. There is quite a big number of Cross screen
options (Pic. 10,11,12,13,14,15).

Nikon D5300 cross screen and number of points

Nikon D5300 cross screen and number of points 2

Pic. 10,11 D5300 Cross screen – Number of points

Nikon D5300 cross screen and filter amount

Pic.12 D5300 Cross screen – filter amount

Nikon D5300 cross screen and filter angle

Pic.13 D5300 Cross screen – filter angle

Nikon D5300 cross screen and length of points

Pic. 14 D5300 Cross screen – Length of points

Nikon D5300 Cross screen example, Newcastle upon Tyne, Millenium Bridge

Pic.15 D5300 Cross screen example: Original photo on the top, Cross screen photo below. Newcastle upon Tyne, Gateshead Millenium Bridge.

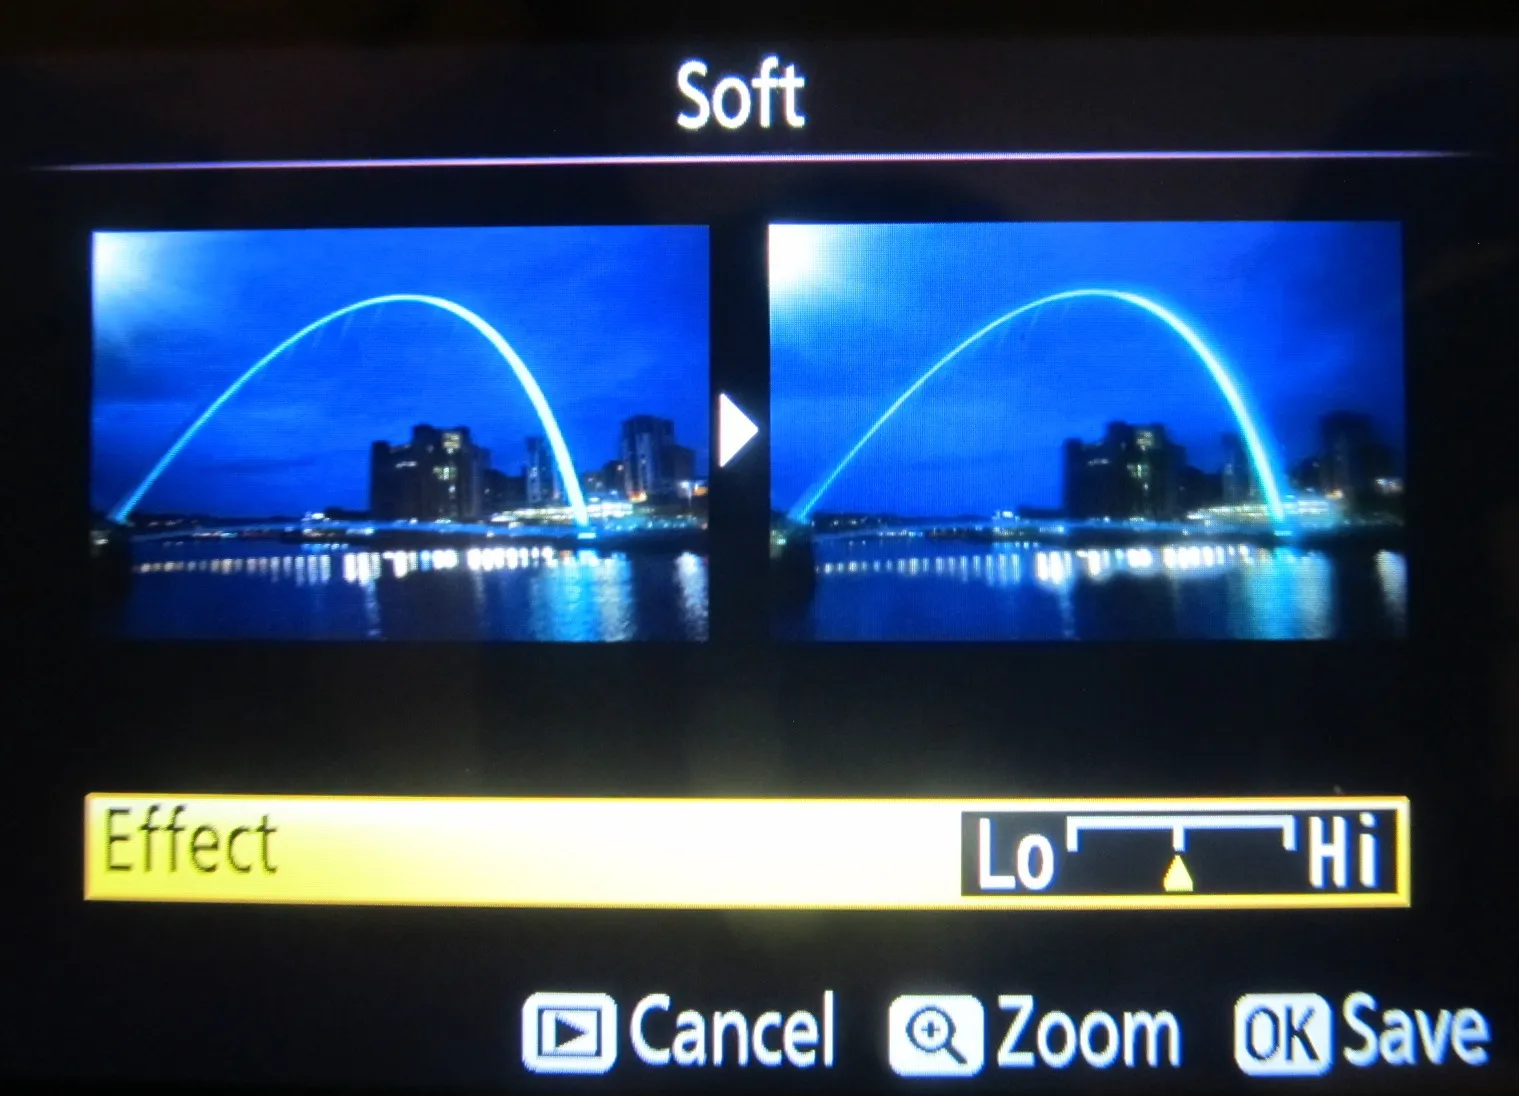
Soft – you can use this filter when you want to get rid of some blemishes or other unwanted small elements (Pic. 16,17). You see the landscape through dirty glass.

Nikon D5300 soft filter options

Pic.16 D5300 Soft filter options

Nikon D5300 soft filter options, Newcastle upon Tyne, Millenium Bridge

Pic. 17 D5300 Soft filter effects: 1 – Original photo, 2 – Low filter effect, 3 – High filter effect. Newcastle upon Tyne, Gateshead Millenium Bridge.

Color balance

You can use the multi-selector to create a copy with a modified color balance (Pic. 18,19). There are many combinations to adjust your image to the conditions, under which it has been taken.
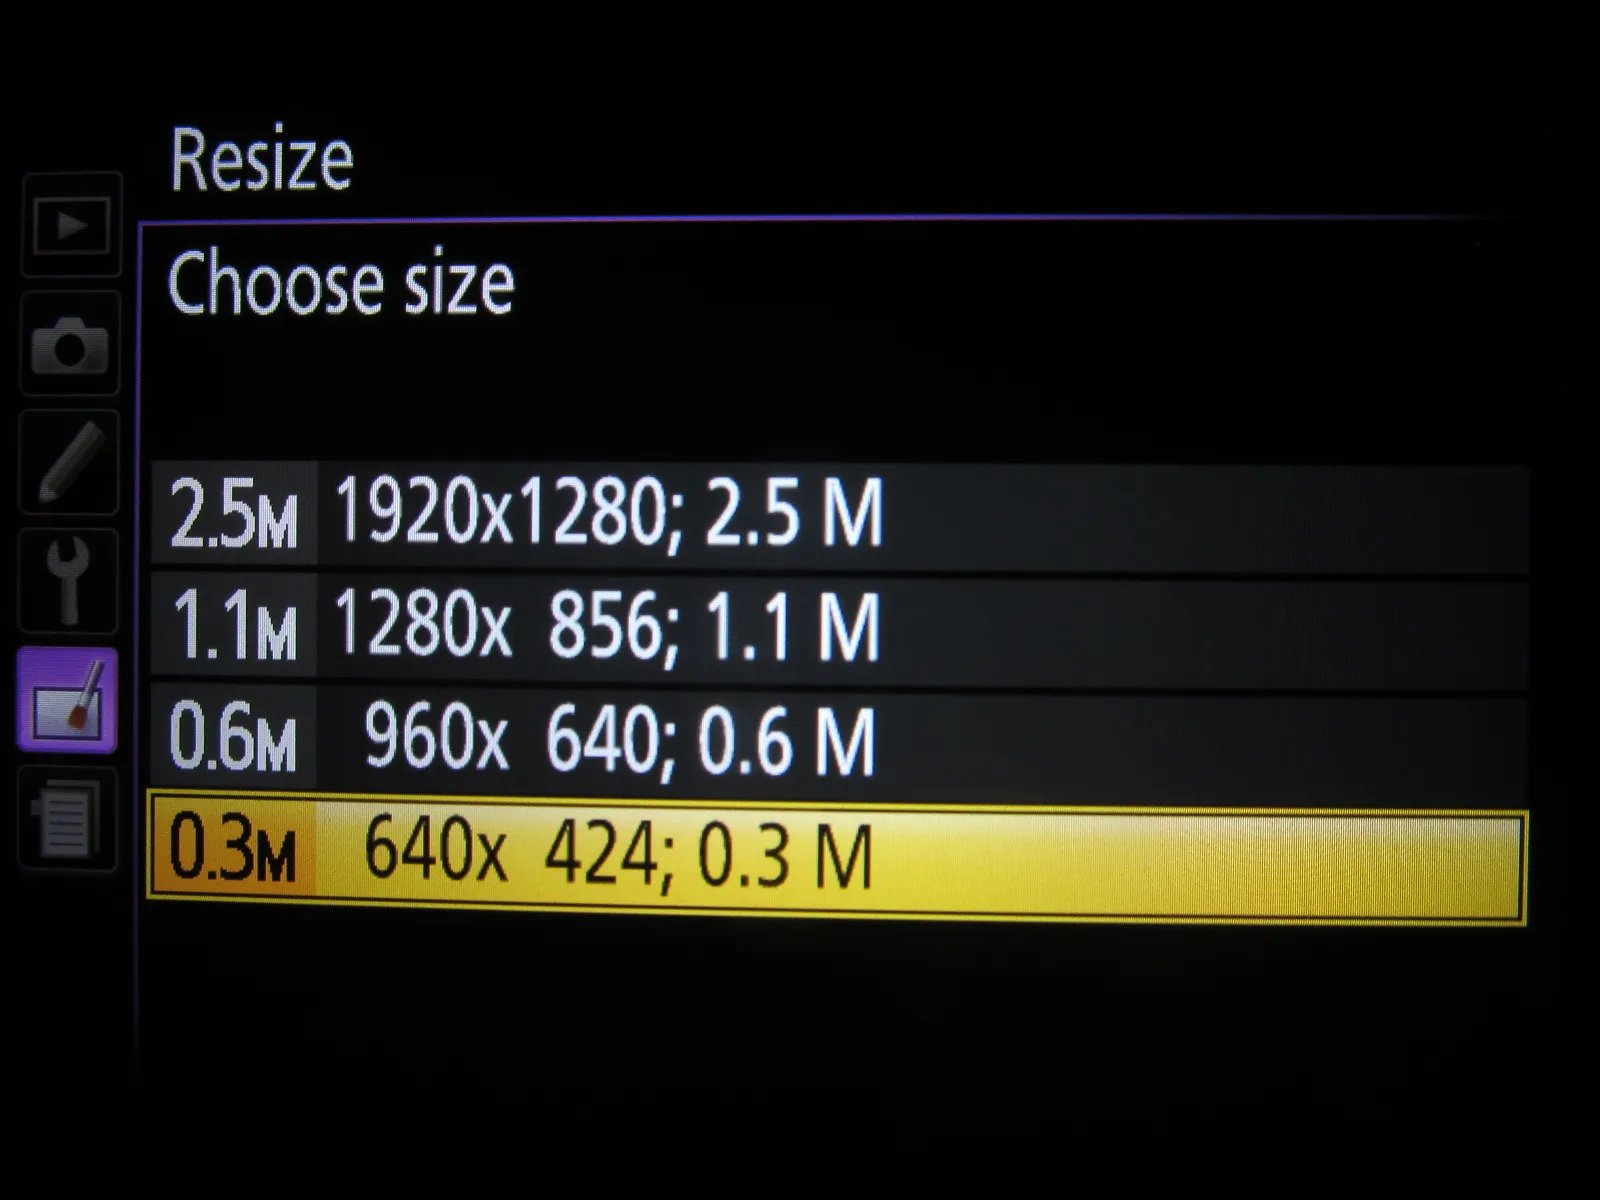
Nikon D5300 color balance options

Pic. 18 D5300 Color Balance options.

Nikon D5300 Color balance options example, Aylesbury Coronation Villas residential area

Pic. 19 D5300 Color balance in practice: 1 – Original photo, 2 – Slightly modified, evening colors, yellow and orange balance, 3 – Max green balance, 4 – Max cyan balance, 5 – Max blue balance, 6 – Max purple balance, 7 – Max pink balance, 8 – Max red balance, 9 – Max orange balance, 10 – Max yellow balance, 11 – Max celadon balance, 12 – Original photo. Aylesbury, Coronation Villas path.

Resize image

You can modify your image size as per below (Pic. 20).

Nikon D5300 image resize

Pic. 20 D5300 Resize image options.

Quick retouch

You can create copies with enhanced saturation and contrast (Pic. 21).
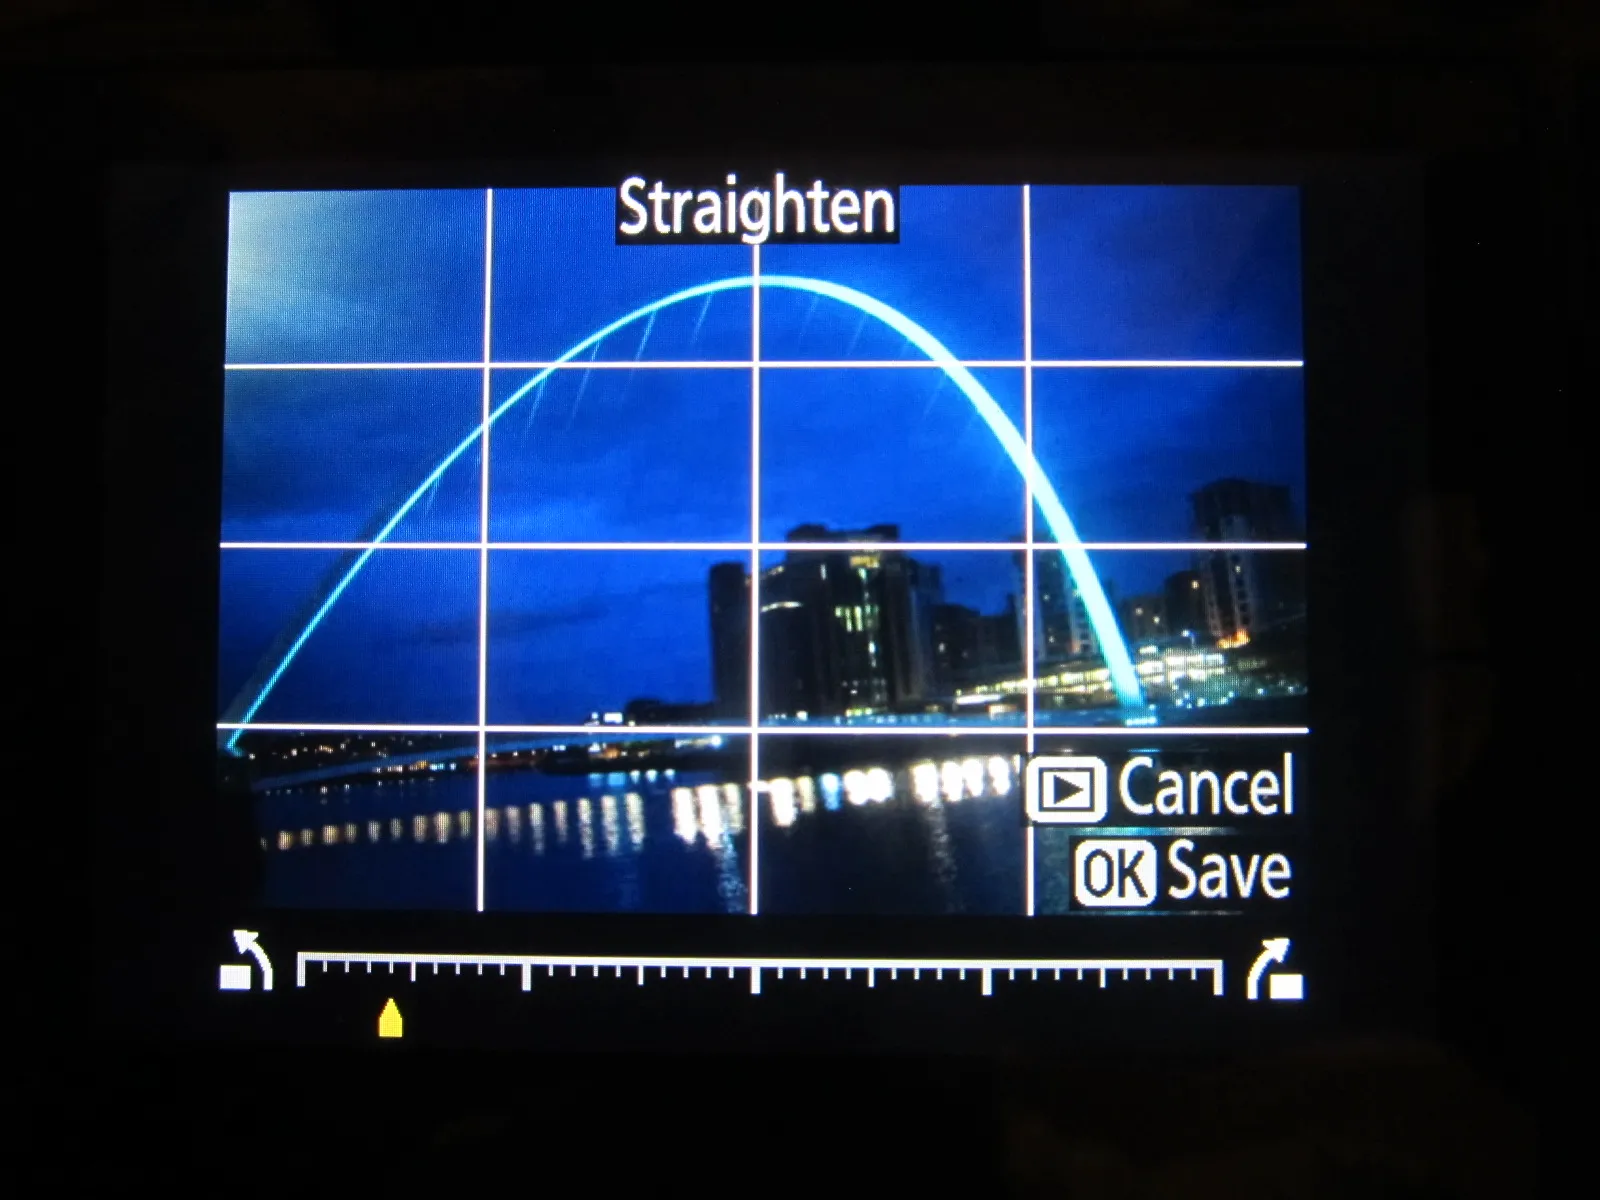
Nikon D5300 Quick retusch high parameter, Aylesbury Corontion Villas residential area

Pic. 21 Quick Retouch – high parameter. Aylesbury, Coronation Villas path.

Straighten

You can use this option to rotate your image. You must be aware, that the edges of the image will be trimmed to create a rectangular copy (Pic.22,23).

Nikon D5300 straighten option

Pic. 22 D5300 Straighten option.

Nikon D5300 straighten option in action, Newcastle upon Tyne Millenium Bridge

Pic. 23 D5300 Straighten option in practice. 1 – Before, 2 – After. Newcastle upon Tyne, Gateshead Millenium Bridge.

Distorsion Control

You can reduce peripheral distortion as per as images below (Pic. 24,25).

Nikon D5300 distorsion control

Nikon D5300 distorsion control in proctise, Aylesbury Coronation Villas residential area

Pic. 24, 25 D5300 Distorsion options in practice: 1 – Before, 2 – After. Aylesbury, Coronation Villas path

Fisheye

Create copies that appear to have been taken with a fisheye lens (Pic. 26,27).

Nikon D5300 fisheye example Odrzykoń - Zawodzie

Nikon D5300 fisheye example Newcastle Millenium Bridge

Pic. 27,28 Fisheye examples

Color Outline

You have a great opportunity to create an outline copy of a photograph to use as a base for painting (Pic. 28,29,30). This option doesn’t work in low contrast!

Nikon D5300 colour outline, Aylesbury

Pic. 28 The color outline option doesn’t work in the low contrast. You can’t mark some shadows and pale shapes.

Nikon D5300 colour outline, Riverside in Hemel Hempstead

Pic. 29 Color outline for Riverside building in Hemel Hempstead.

Nikon D5300 colour outline, BT Telephone Exchange in Aylesbury

Pic. 30 Color outline for BT Telephone Exchange building in Aylesbury.

Color Sketch

You can turn your photos into sketch effects with colored pencils. You can also set your colors to more saturated or washed out. It’s good to use a monochromatic effect also. Anyway, you will be able to make comic images (Pic. 31,32,33, etc.).

Nikon D5300 Colour sketch, BT Aylesbury Telephone Exchange

Pic. 31 Color sketch for BT Telephone Exchange in Aylesbury.

Nikon D5300 Colour sketch, Waterplay in Hemel Hempstead

Pic. 32 Color sketch for Waterplay in Hemel Hempstead: 1 – Original photo, 2 – Color sketch from original, 3 – Sepia, 4 – Color sketch from sepia.

See more examples of D5300 color Sketch below…

Nikon D5300 Colour sketch, Polish Community School in Ely

Nikon D5300 Colour sketch example

Nikon D5300 Colour sketch, Polish Community School in Ely 2

Pic. 33,34,35 Examples of the Color Sketch option

Perspective Control

Create copies that reduce the effects of perspective taken from the base of a tall object (Pic. 36). This option isn’t so useful in the case of small buildings (Pic.38).

Nikon D5300 reference manual perspective effect

Pic. 36 Perspective control in practice (Nikon D5300 Reference manual)

Nikon D5300 perspective control example

Pic. 37 Perspective control for low buildings. Hemel Hempstead, Riverside.

Miniature Effect

Thanks to this option you can create a copy that appears to be a photo of a diorama. Works best with photos taken from high vantage points however you can use it in every condition depending on your point of view (Pic. 38,39).
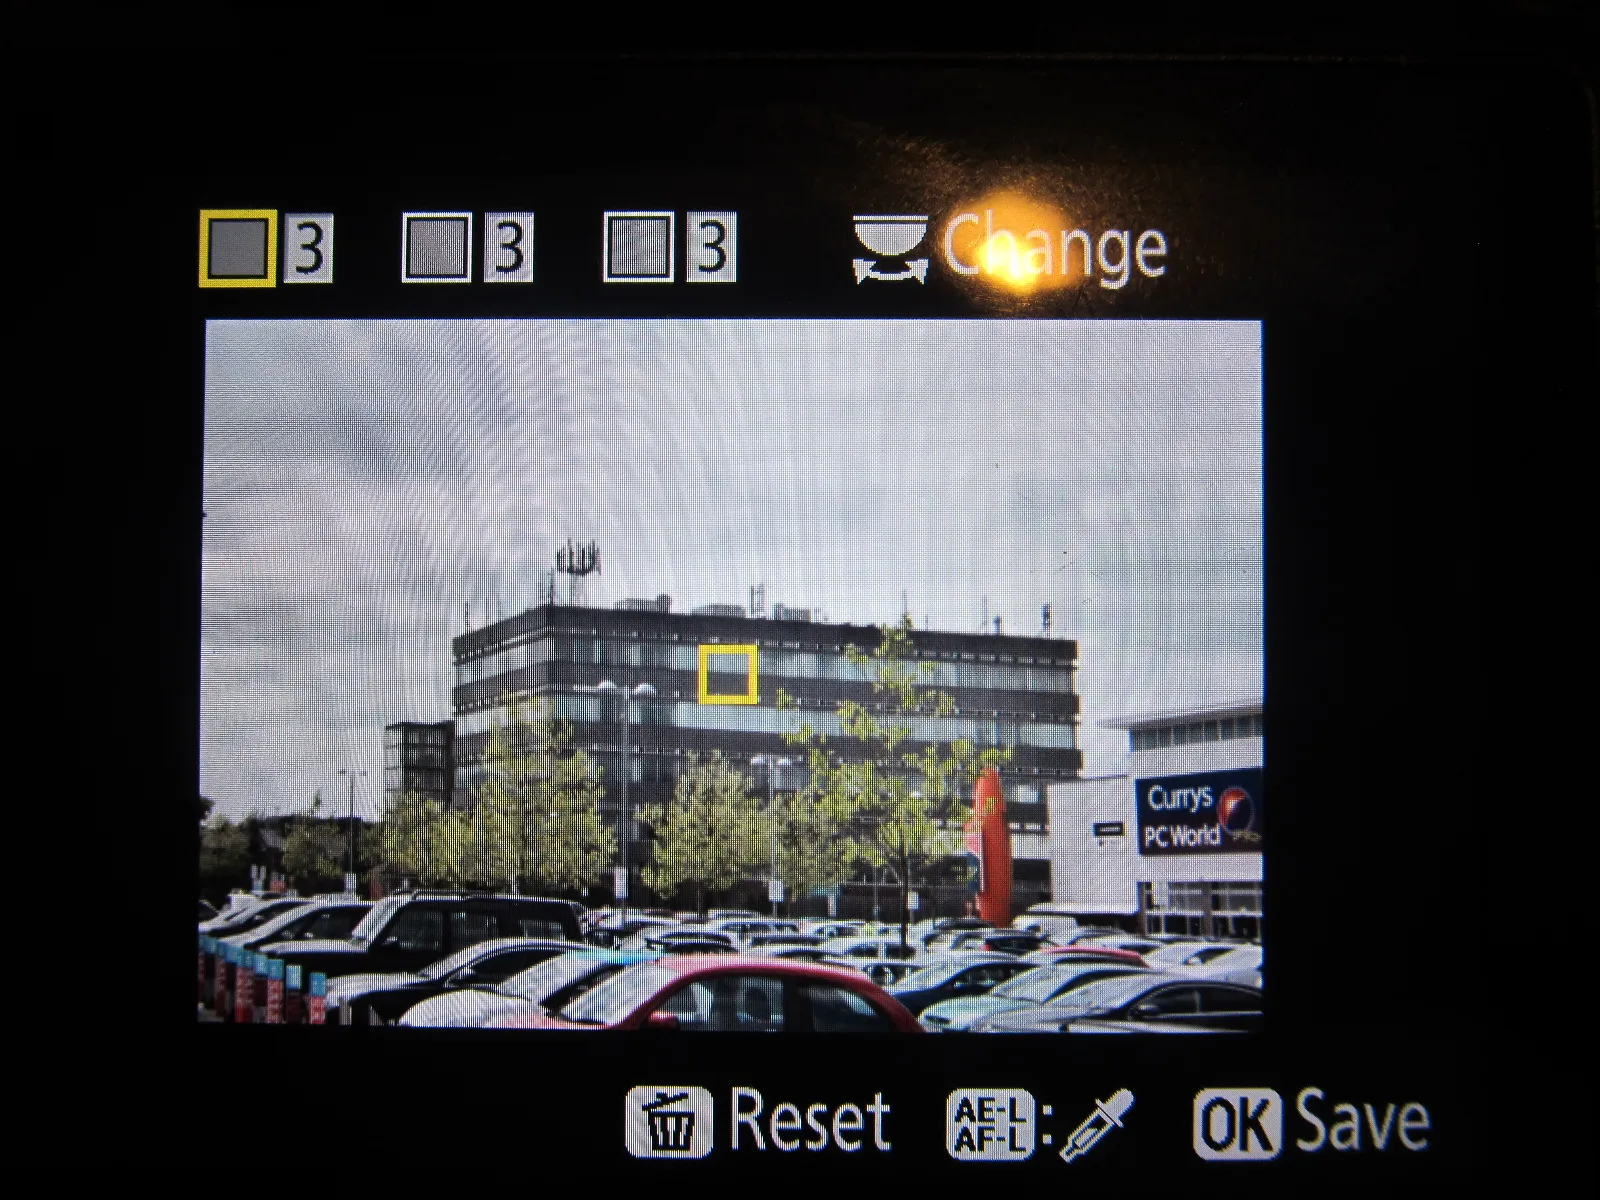
Nikon D5300 miniature effect

Pic. 38 Miniature effect option.

Nikon D5300 miniature effect example Aylesbury BT Telephone Exchange

Pic. 39 Miniature effects for BT Telephone Exchange building in Aylesbury.

Selective Color

Create a copy in which only selected hues appear in color. You can choose 3 hues (Pic. 40,41,42).

Nikon D5300 selective colour option

Pic. 40 D5300 Selective color options.

Nikon D5300 selective colour option Aylesbury BT Telephone Exchange

Nikon D5300 selective colour option, Aylesbury shopping centre

Pic. 41,42 Selective color for BT Telephone Exchange building and Aylesbury Shopping  Centre car park.

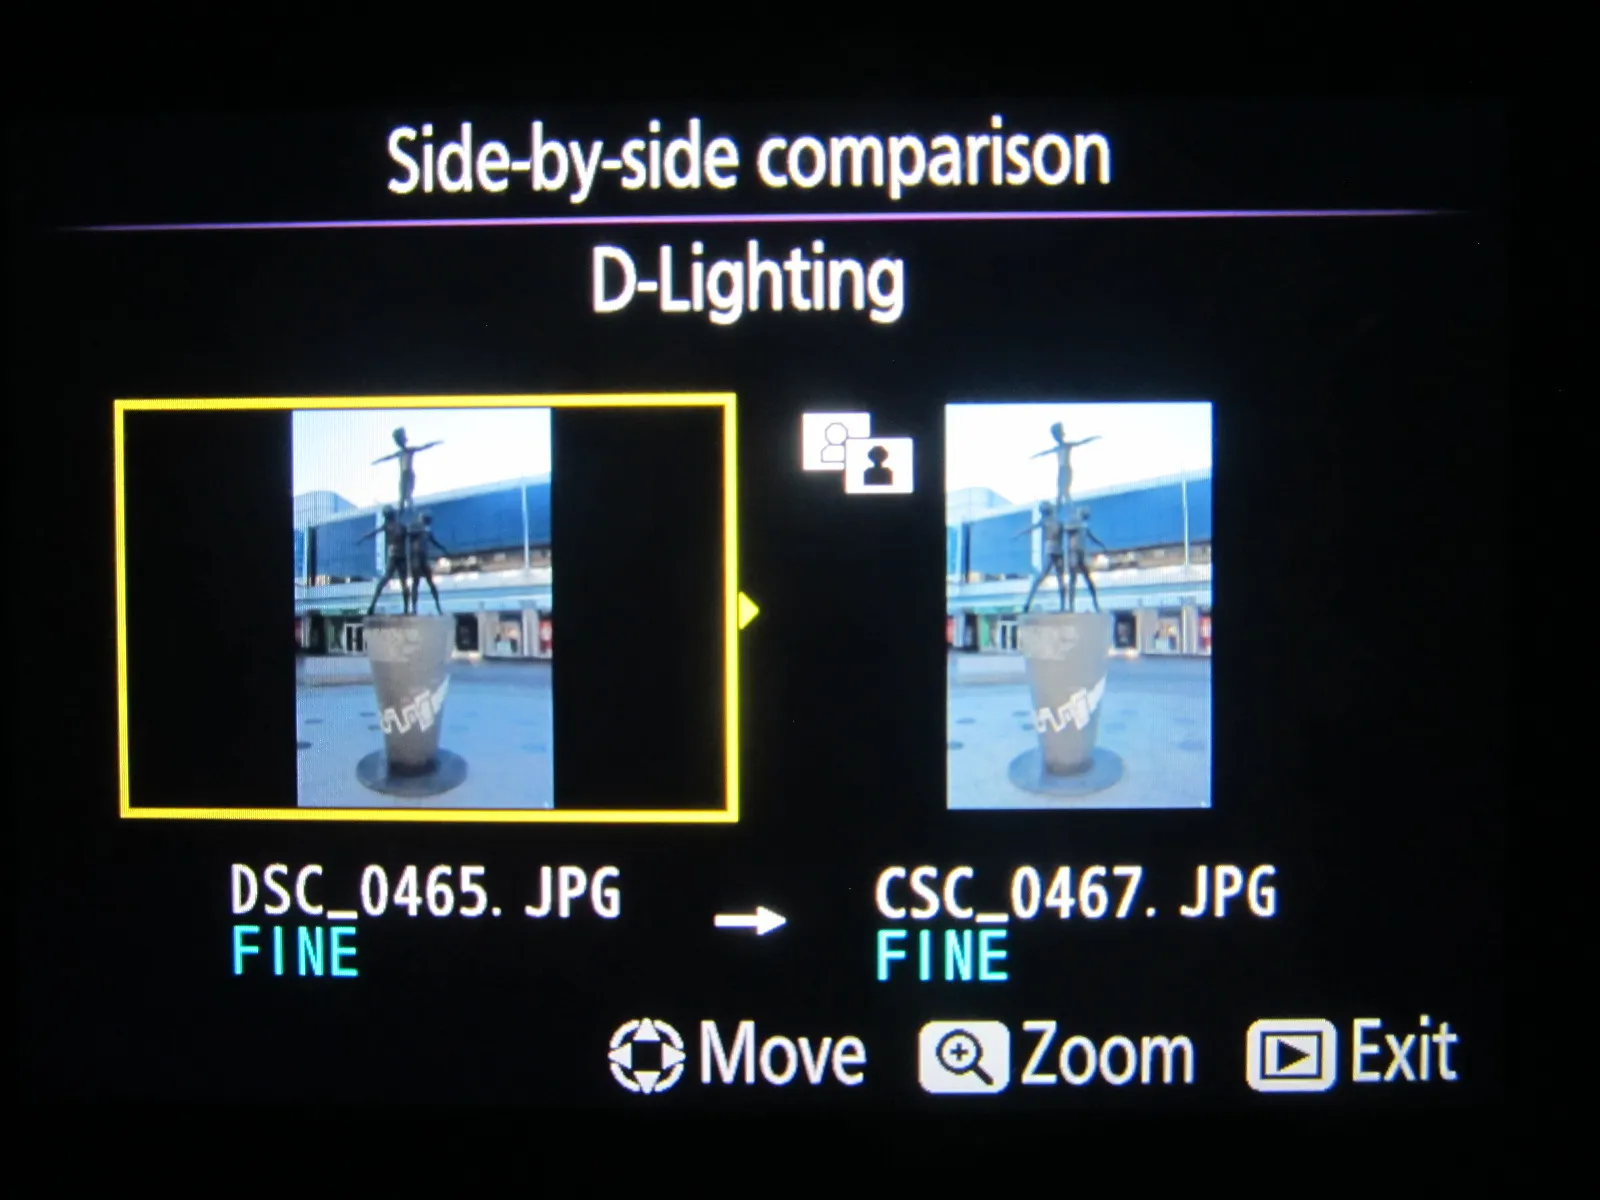
Side-by-side Comparison

You can compare retouched copies to the original photographs (Pic.44).

Nikon D5300 side by side comparison

Pic. 43 Side-by-side comparison example.

Mariusz Krukar

References:

2013, Nikon D5300 Reference Manual, Nikon Corporation

Links:

NIKON D5300 Menu review


You may also like...