
Nikon D5300 test 3 – HDR and photo quality
Canvas prints & photo tiles – wallpics
In the 3rd part of my test, I would like to show you a D5300 real photo quality and utilize High Dynamic Range in the pictures.
Photo quality
The most decisive thing about buying the right camera is its photo quality. There are many cameras that offer plenty of modes, options, and amenities but when they don’t make good photos then everything is bad. Basically, you can find some information about the photo quality from the producer’s website or forums. Main parameters, which may indicate which camera is able to make good photos are sensor size and resolution. However, you should have it in mind, that a big resolution isn’t enough to make good photos. The size of the sensor is the most important thing in every camera, even on phones. This part of the equipment decides your photo quality. You may have a smaller resolution and make much better pictures. Checking the parameters is not only a way to find out about the picture quality of the camera which you are going to buy. When you are going to buy new equipment you should browse deeply the internet and try to find sample photos of the model, which you are interested in. When you find the pictures of the camera model, which you would like to buy you will make your own conclusion about that. Every photographer has a different point of view. Basically, you are picking up the thing, which will make you happy not disappointed!
I prepared a couple of pictures, which I would like to share with you and indicate some details. Every picture has been done in a full resolution of 6000×4000 pixels. The smaller resolution wasn’t taken into account. As I wrote in previous articles Nikon D5300 gives you a choice to change the photo quality in 3 steps: Fine, Basic, and Normal (Pic.17). I would like to show you below what is the difference between the best and the worst quality of the D5300 photo.
Pictures 1 and 5 show the landscape made in the best quality. Picture 1 was made using manual focus and picture 5 used autofocus. Pictures 2 – 4 are detailed parts of picture 1, the same as pictures 6-8. There is a lot of stuff on the Web about autofocus mode in Nikon D5300, so I am not going to develop this topic here. However, everybody can see the difference between both of these pictures when seeing the detailed parts below. It s hard to adjust the focus manually when you are looking through the viewer. You can use a live view mode and make a little bit of zoom-in to see details of your view, but the live view option influences your battery endurance.

Pic. 1 Typical Jpeg photo with 24Mpx resolution and the highest quality without autofocus mode. The red squares indicate the most detailed parts of the photo. Odrzykoń, Poland.

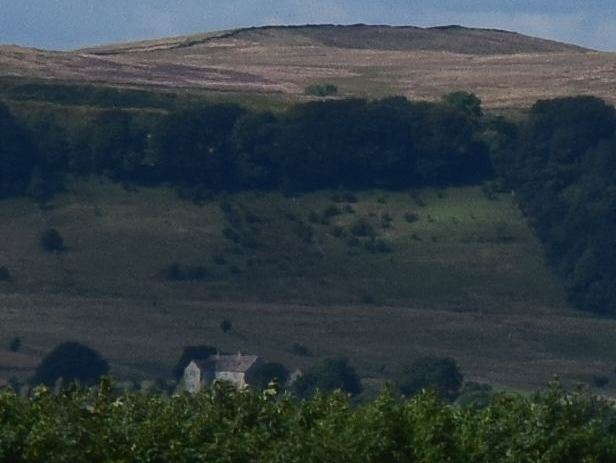
Pic. 2 Square no 1, view on the Odrzykoń Castle and Dynowskie Foothills with Sucha Góra TV tower beyond.
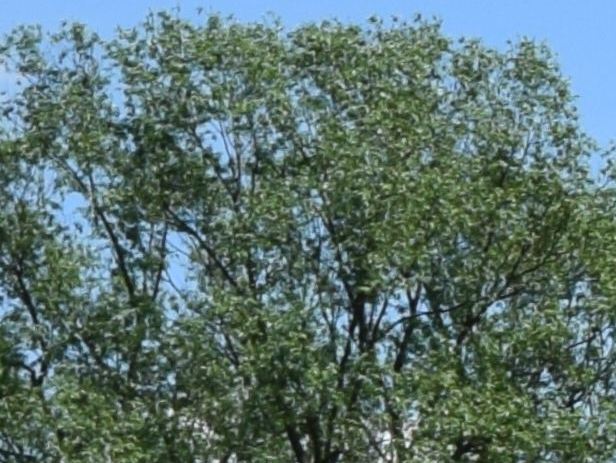
Pic. 3 Square 2 – willow treetops details, small chromatic aberration exists.
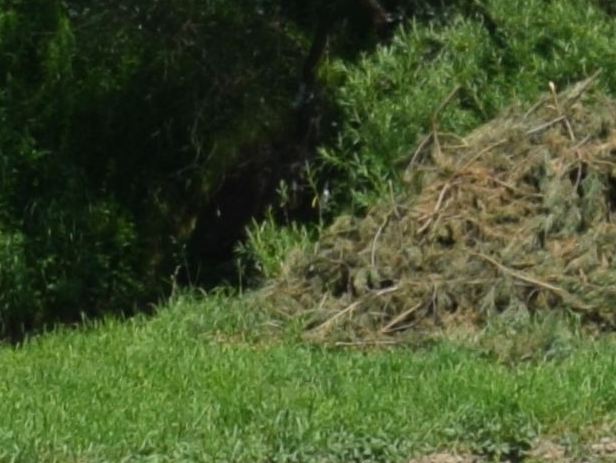
Pic. 4 Square 3 – grass, bushes, and dark, shaded places.

Pic. 5 Typical Jpeg photo with 24Mpx resolution and the highest quality with autofocus mode. The red squares indicate the most detailed parts of the photo. Castleton, Peak District National Park.
Pic. 6 Square 1 – view towards Lose Hill ridge.
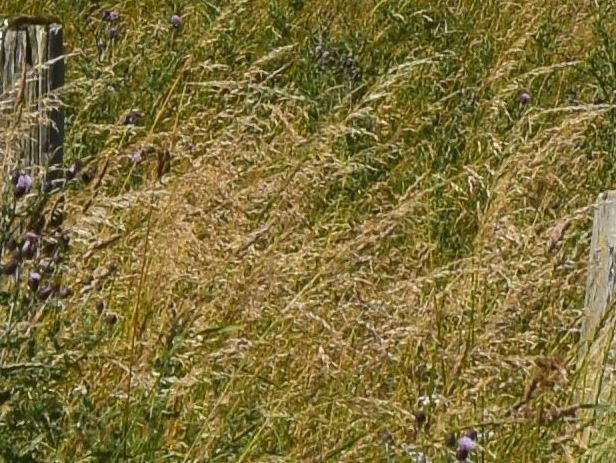
Pic. 7 Square 2 – meadow.
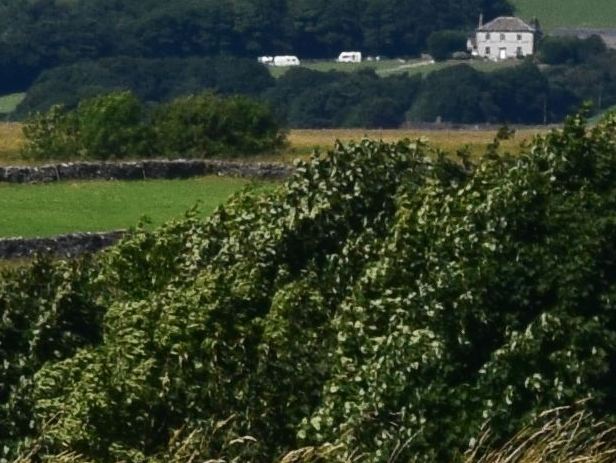
Pic. 8 Square 3 – trees and house beyond.
Picture 9 has been done in the lowest quality. I cut the image up to 2/3 and delimited details on the treetop, where you can see many branches and twigs (Pic.10). As you can see a dark arrow shows the branch (dark) and some yellow line, which is parallel to the branch. Those lines are everywhere. In my opinion, this is a kind of chromatic aberration, which may be also called chromatic distortion. The branch may be here as our dark highlight with the blue sky beyond. Those colored fringing around the branches and twigs may be due to the receptors for different colors having different sensitivities, therefore preserving detail in one or two color channels. This is noticeable, especially in the lowest-quality pictures. When you take a photo with better quality this effect is going to be reduced.

Pic. 9 Typical Jpeg photo with 24Mpx resolution and the lowest quality with autofocus mode. The red square indicates the most detailed part of the photo. Odrzykoń, Poland.
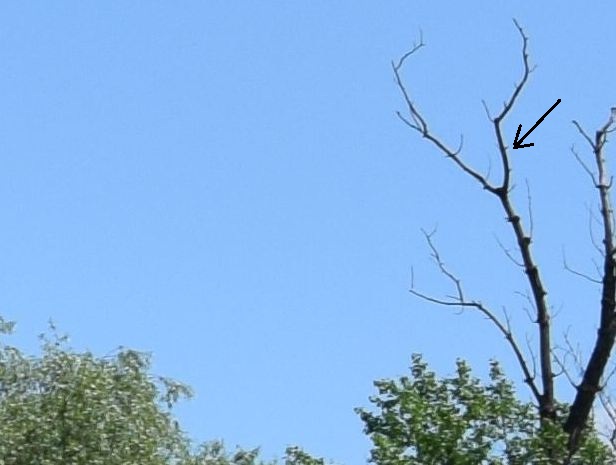
Pic.10 Zoom in the twigs and branches. The black arrow indicates a chromatic aberration place.
Picture 11 has been made in medium detail and shows a hair from a 30cm distance.

Pic. 11 Typical Jpeg photo with 24Mpx resolution and medium quality with manual focus mode. Ryanair FR2136.
High Dynamic Range (HDR)
High dynamic range is a technique used in imaging and photography to reproduce a greater dynamic range of luminosity. The aim is to present a similar range of luminance to that experienced through the human visual system. The human eye adjusts constantly for the broad range of luminance present in the environment. The brain continuously interprets this information so that a viewer can see in a wide range of light conditions.
You must know, that basically, every picture contains two areas of different sensitivity. The first area is our object, which we are capturing like a building, landscape, etc. The second area is the sky, which may contain a sun, clouds, or some remote barely visible objects like mountains, etc. In typical, compact cameras like Canon SX130 IS (my previous model) you can enjoy the object, unfortunately with a white sky, especially during the day, when the sky is covered by high-level or mid-level clouds (Pic.12 -15). In another case, you will have a beautiful sky, but your object will have shown as a dark contour without many details. A basic role of HDR is to put those areas together and make your photo readable and tidy.

Pic. 12 The “white sky effect” during the sunny evening, 1/80sec, ISO 80, f/3.4. Les Calanques National Park, France.

Pic. 13 The “white sky effect” during the rainy evening with some small sunny spells; 1/30s, ISO 200, f/3.4. The Hague, Netherlands.

Pic. 14 A photo with adjustment of a luminance to the sky. The main object and surroundings are too dark; 1/200s, ISO 80, f/3.4. Blicking Estate.

Pic. 15 A photo with adjustment of luminance to the sky and hills beyond. The main object remains too dark or barely visible; 1/1250s, ISO 125, f/5. Lake Czorsztyn, Poland.
The D5300 offers a feature, that provides automated HDR photography. When you enable this option, the camera records two images, each at different exposure settings, and then produces a single HDR image. When you enable the HDR option you have the choice of the following (Pic. 16,17). If you select the automatic mode, the camera will choose what it considers the best adjustment. I didn’t use this option during my test. I focused on experimenting with HDR to find out the behavior of this feature in different conditions.
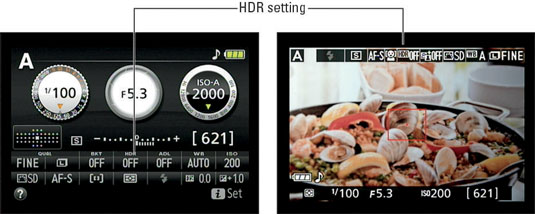
Pic.16 The HDR position in the D5300 main toolbar (dummies.com).
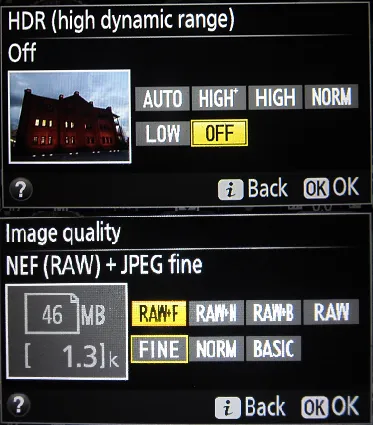
Pic. 17 D5300 HDR and photo quality options.
As you can notice below I used HDR during a few situations:
– late dusk in the town (strong light pollution) (Pic.18-21)
– a front of direct sunlight (Pic.22,23)
– an opposite to the direct sunlight, a typical daily picture (Pic.24)
– a big sensitive difference between a fair sky and a dark surface (Pic.25)
In the captions, you can find information about photo details. Each image contains a photograph from the same place multiplied by every D5300 HDR option. Red text shows the optional and the most realistic effect created by the HDR tool.
Other examples, especially those with extreme limits show something of a graphic-novel look. When you decide to use the HDR feature manually you will need to adjust it correctly. Otherwise, your effect won’t be noticeable or you will create something which has the look of a hand-tinted photo. When you exaggerate and put too high HDR value you will see some awful dark “border” between areas of different luminance. The yellow arrow shows this area in each picture. When you see this in your photo, it means, that your HDR value at this moment (day, sunlight, townscape, twilight, etc.) is too strong.

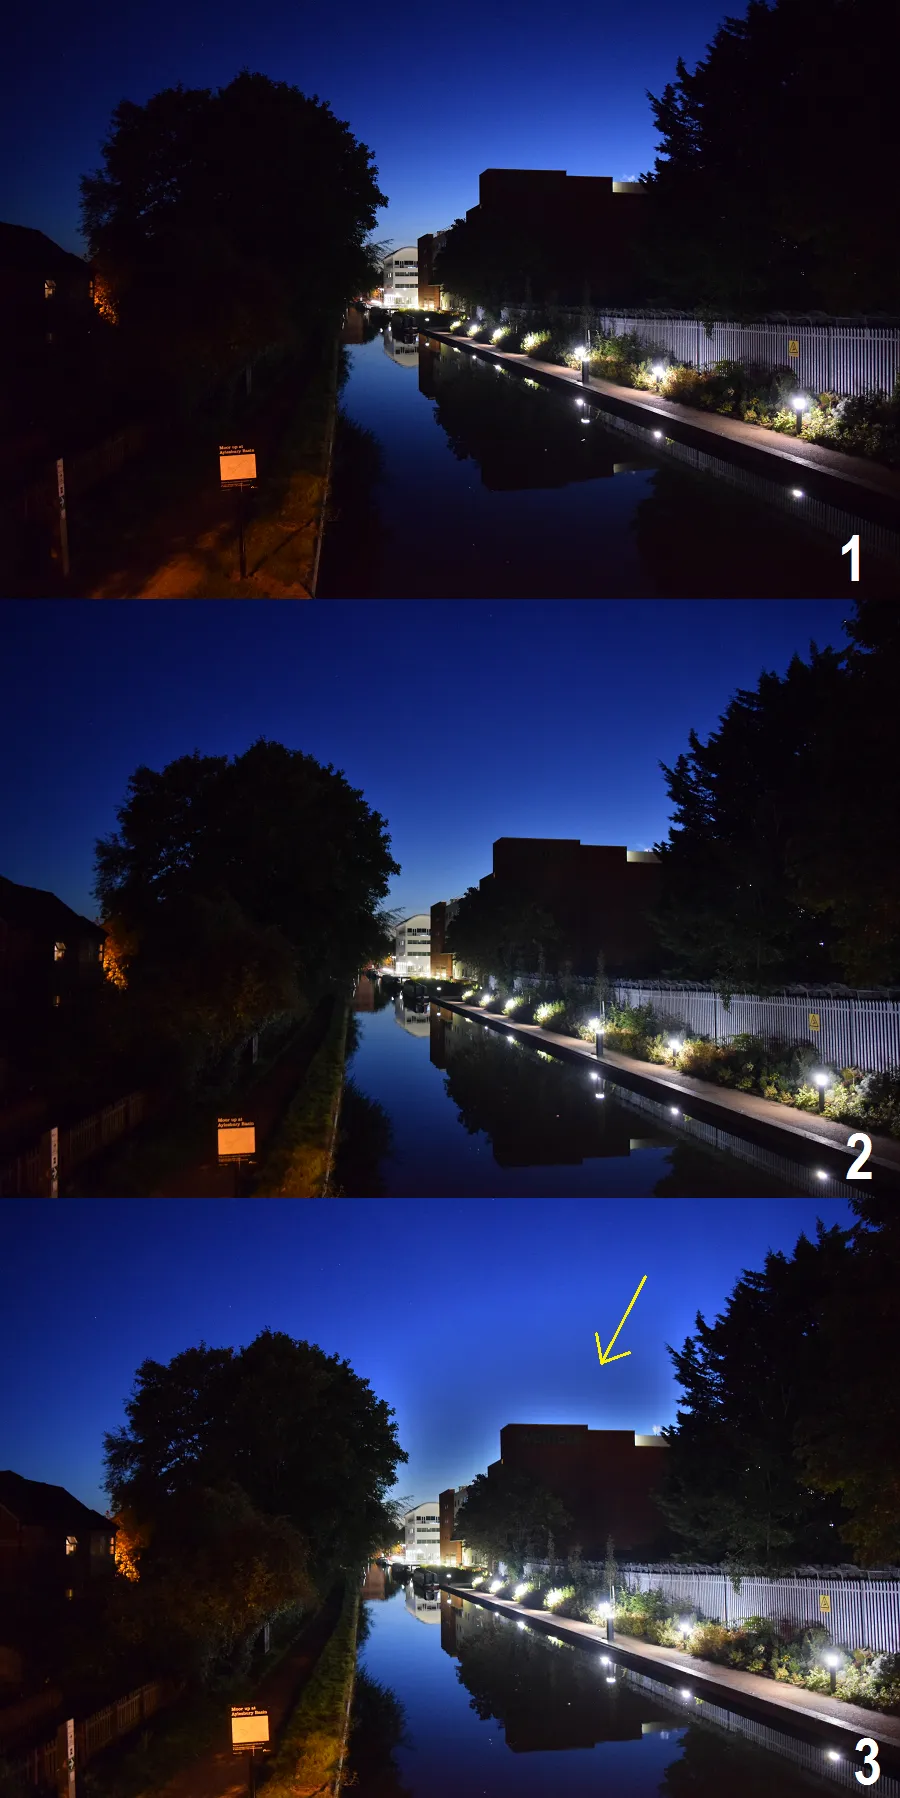
Pic. 18 A late dusk in the town: 1 – without HDR 1/20sec, f/3.5, ISO 1000, (2-6 1/10sec, f/3.5 ISO 1000, 18mm) 2 – without HDR, 3 – with low HDR level, 4 – with medium HDR level (optional), 5 – with high HDR level, 6 – with extra high HDR level. The yellow arrow indicates “dusty” areas. Aylesbury, BT Exchange.
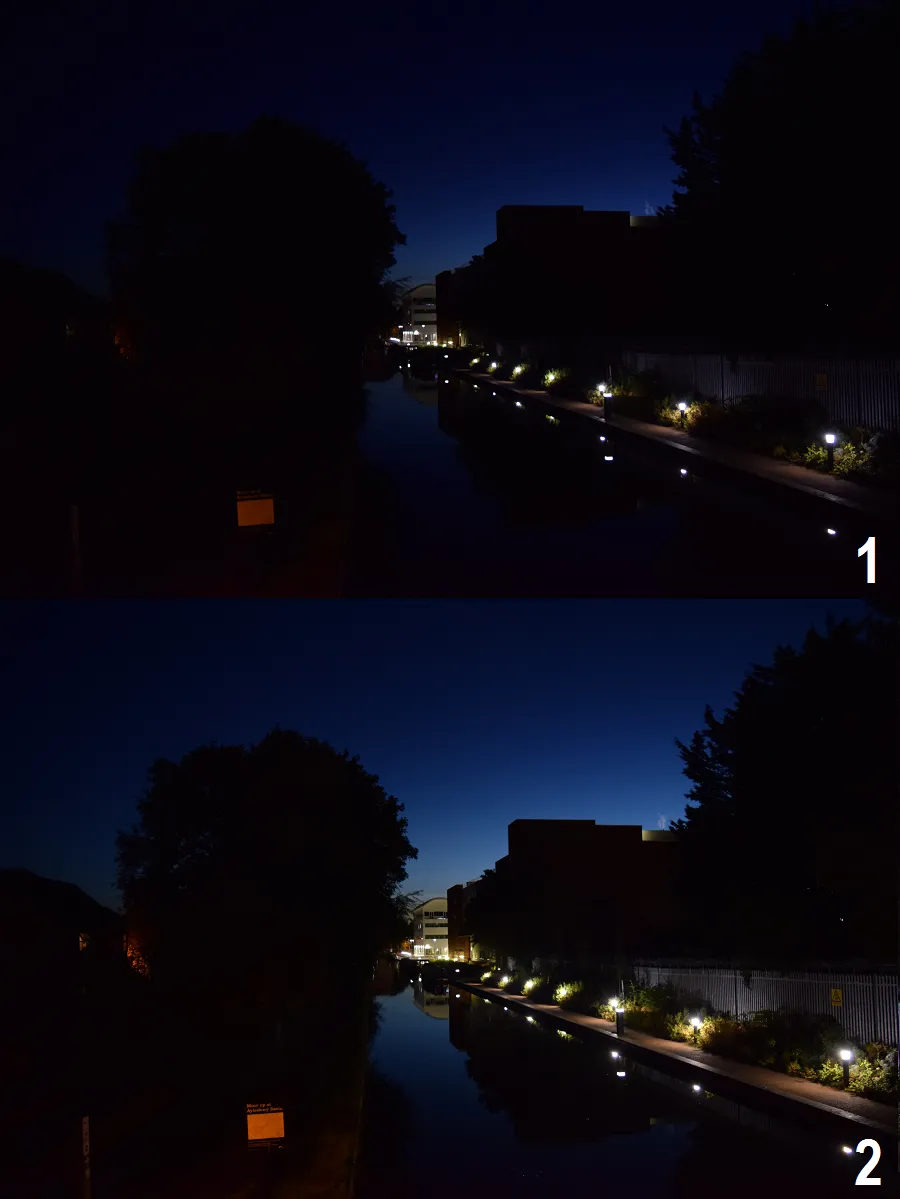
Pic. 19 Late dusk in the town; 1/10s, ISO 5000, f/3.5, 18mm: 1 – without HDR, 2 – with medium HDR level (optional), 3 – with extra high HDR level. The yellow arrow indicates “dusty” areas. Aylesbury, The Grand Union Canal.
Pic. 20 Late dusk in the town; 1/20sec, ISO 5000, f/3.5, 18mm: 1 – without HDR, 2 – with extra high hdr level (optional). Aylesbury, The Grand Union Canal.
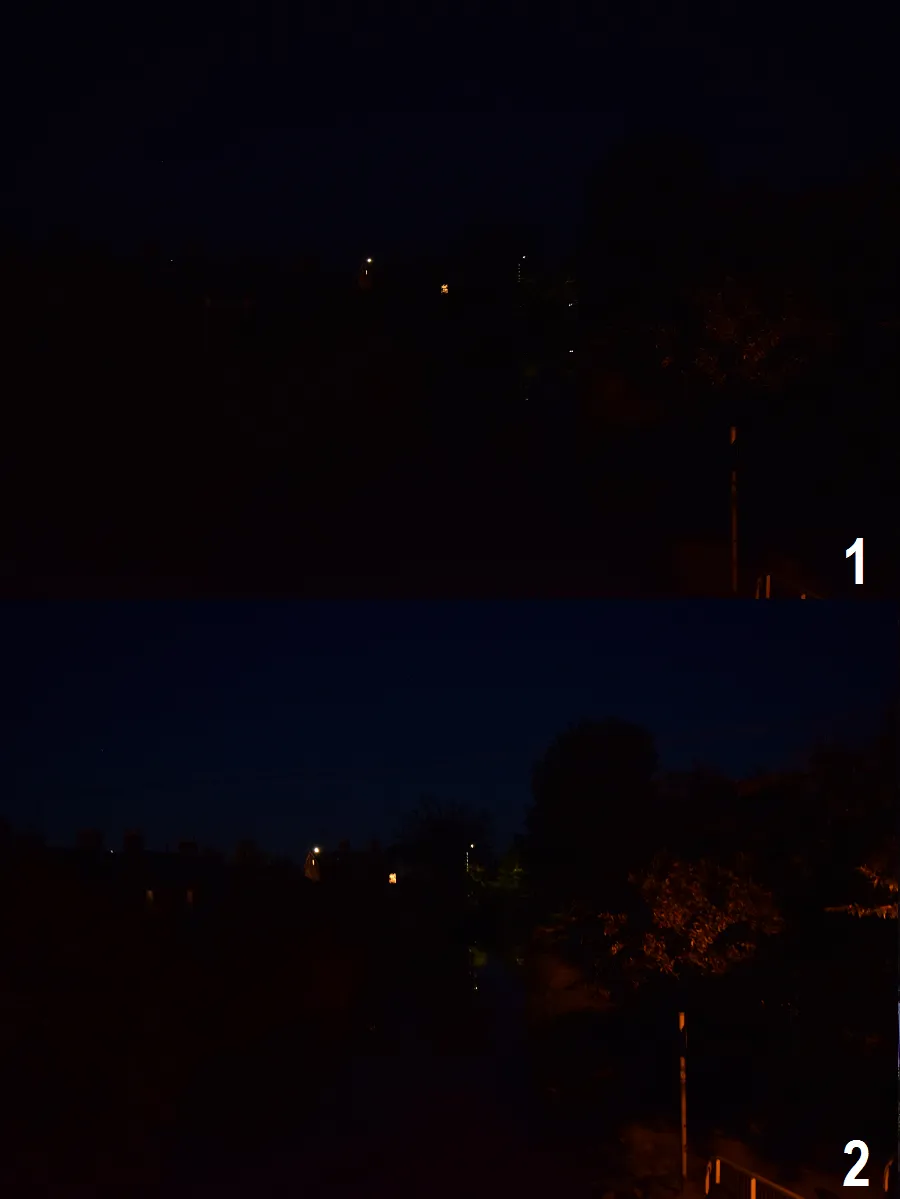
Pic. 21 Late dusk in the town, the opposite side; 1/20 sec, ISO 5000, f/3.5, 18mm: 1 – without HDR, 2 -with extra high HDR level (optional). Aylesbury, The Grand Union Canal.
In general, the HDR option during the twilight is useful when you don’t have a tripod and you need to take a photo with short exposure without a big ISO sensitivity.

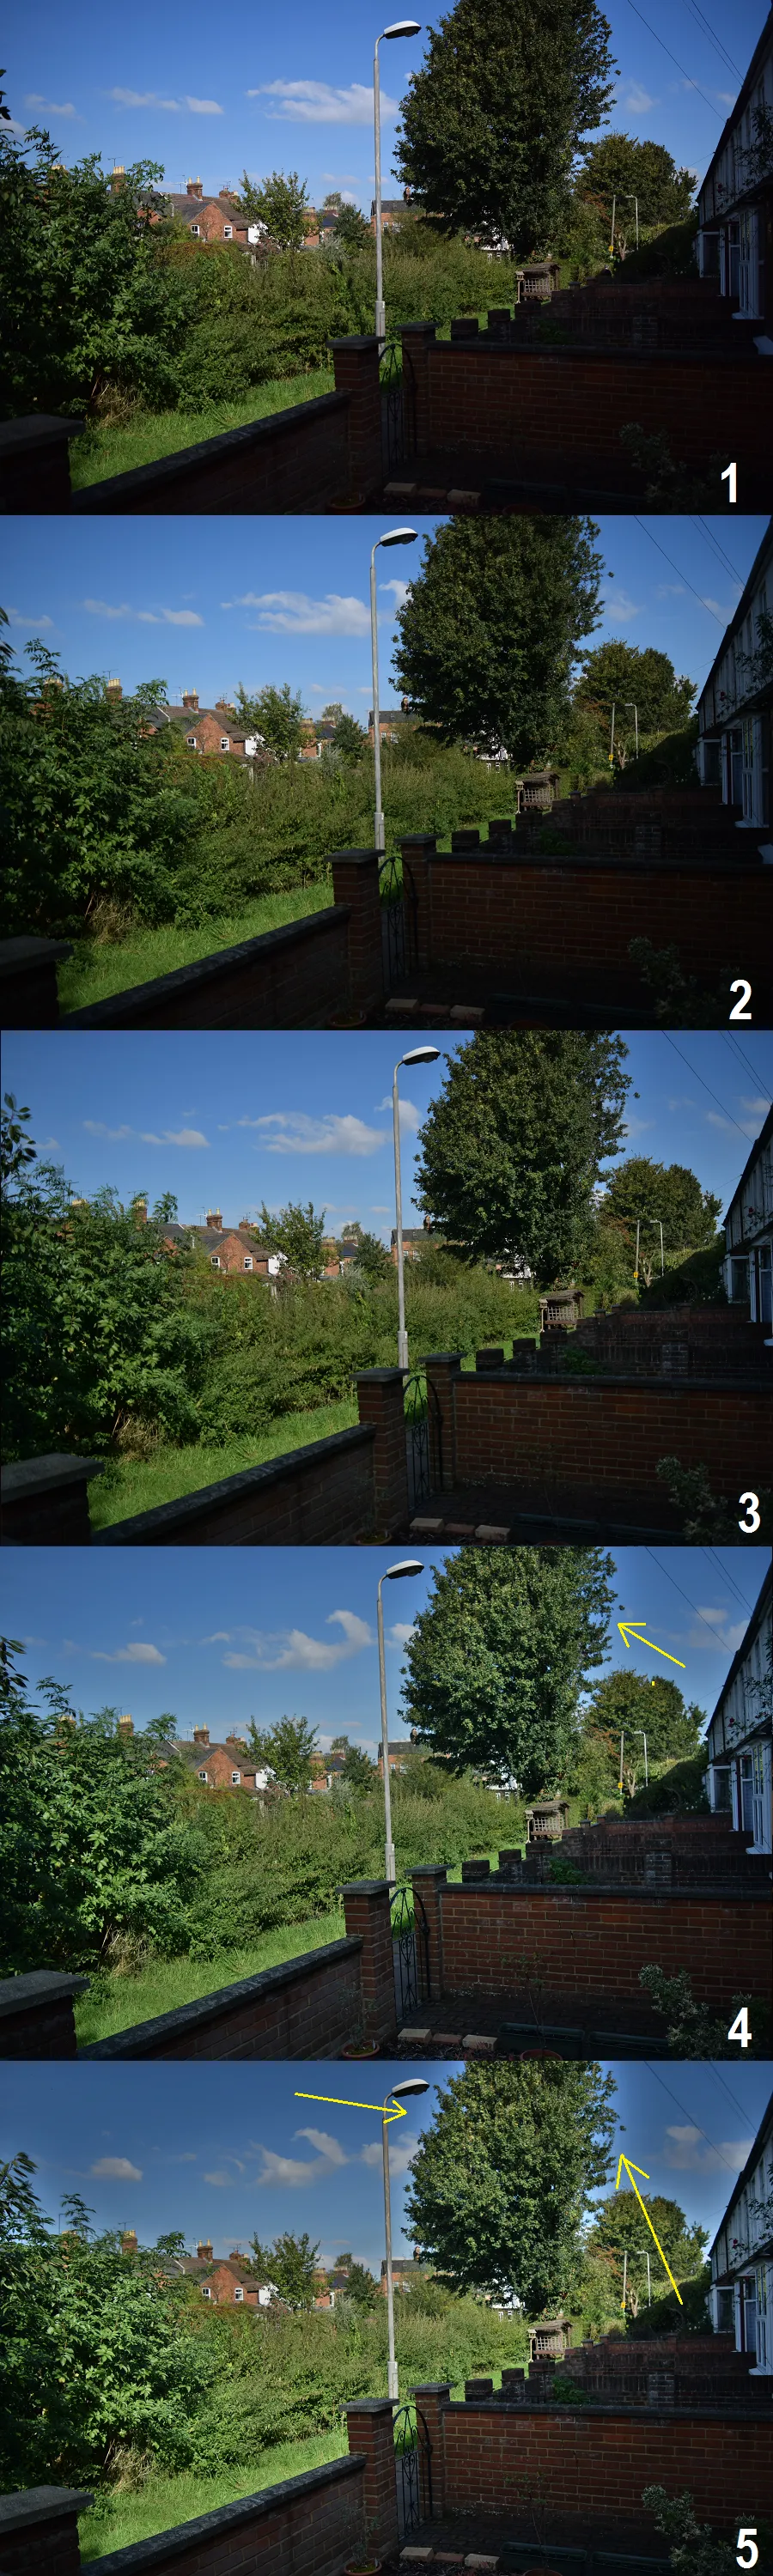
Pic. 22 A front of the direct sunlight; 1/2000sec; ISO 100, f/3.5, 18mm: 1 – without HDR, 2 – with low HDR level, 3 – with medium HDR level, 4 – with high HDR level (optional), 5 – with extra high HDR level. The yellow arrow indicates “dusty” areas. Aylesbury, Coronation Villas.
Sometimes the sunlight is too strong and we can’t make a good picture anyway (Pic.23) then you need to find a place outside direct sunlight. As you can see in the picture below even with an extra high HDR level the radiator below the window is barely visible.

Pic. 23 A front of the direct sunlight; 1/500s, ISO 500, f/3.5,18mm: 1 – without HDR, 2 – with extra high HDR level. Aylesbury, BT Telephone Exchange.
Pic. 24 Opposite of the direct sunlight; 1/2000s, ISO 100, f/3.5, 18mm: 1 – without HDR, 2 – with low HDR level, 3 – with medium HDR level (optional), 4 – with high HDR level, 5 – with extra high HDR level. The yellow arrow indicates “dusty” areas. Aylesbury, Coronation Villas.
Some images from picture 25 show the best example to make HDR photos quickly, but unfortunately not properly. HDR tool needs to make 2 photos, so you need to be patient and try to keep your camera still. Otherwise, you may receive a noisy effect.

Pic. 25 A big sensitive difference between fair sky and dark surface; 1/200s, ISO 100, f/7.1, 55mm: 1 – without HDR, 2 – with low HDR level and moved, 3 – with medium HDR level, 4 – with high HDR level (optional), 5 – with extra high HDR level. The yellow arrow indicates “dusty” areas. Babraham, Cambridgeshire.
You can use HDR in RAW images too, but you can’t enable this option manually. The camera manages this tool automatically. When you will take a new photo you will see the results. The same as in D5300 modes, there in general HDR is not available, but you receiving quite real photos. See another HDR photo example below:

Pic. 26 Dusk in the north Norfolk; 1/125s, ISO 800, f/4.5 34mm. Holme Dunes National Nature Reserve.

Pic. 27 Dusk in the north Norfolk; 1/125s, ISO 800, f/3.4, 18mm. Holme Dunes National Nature Reserve.
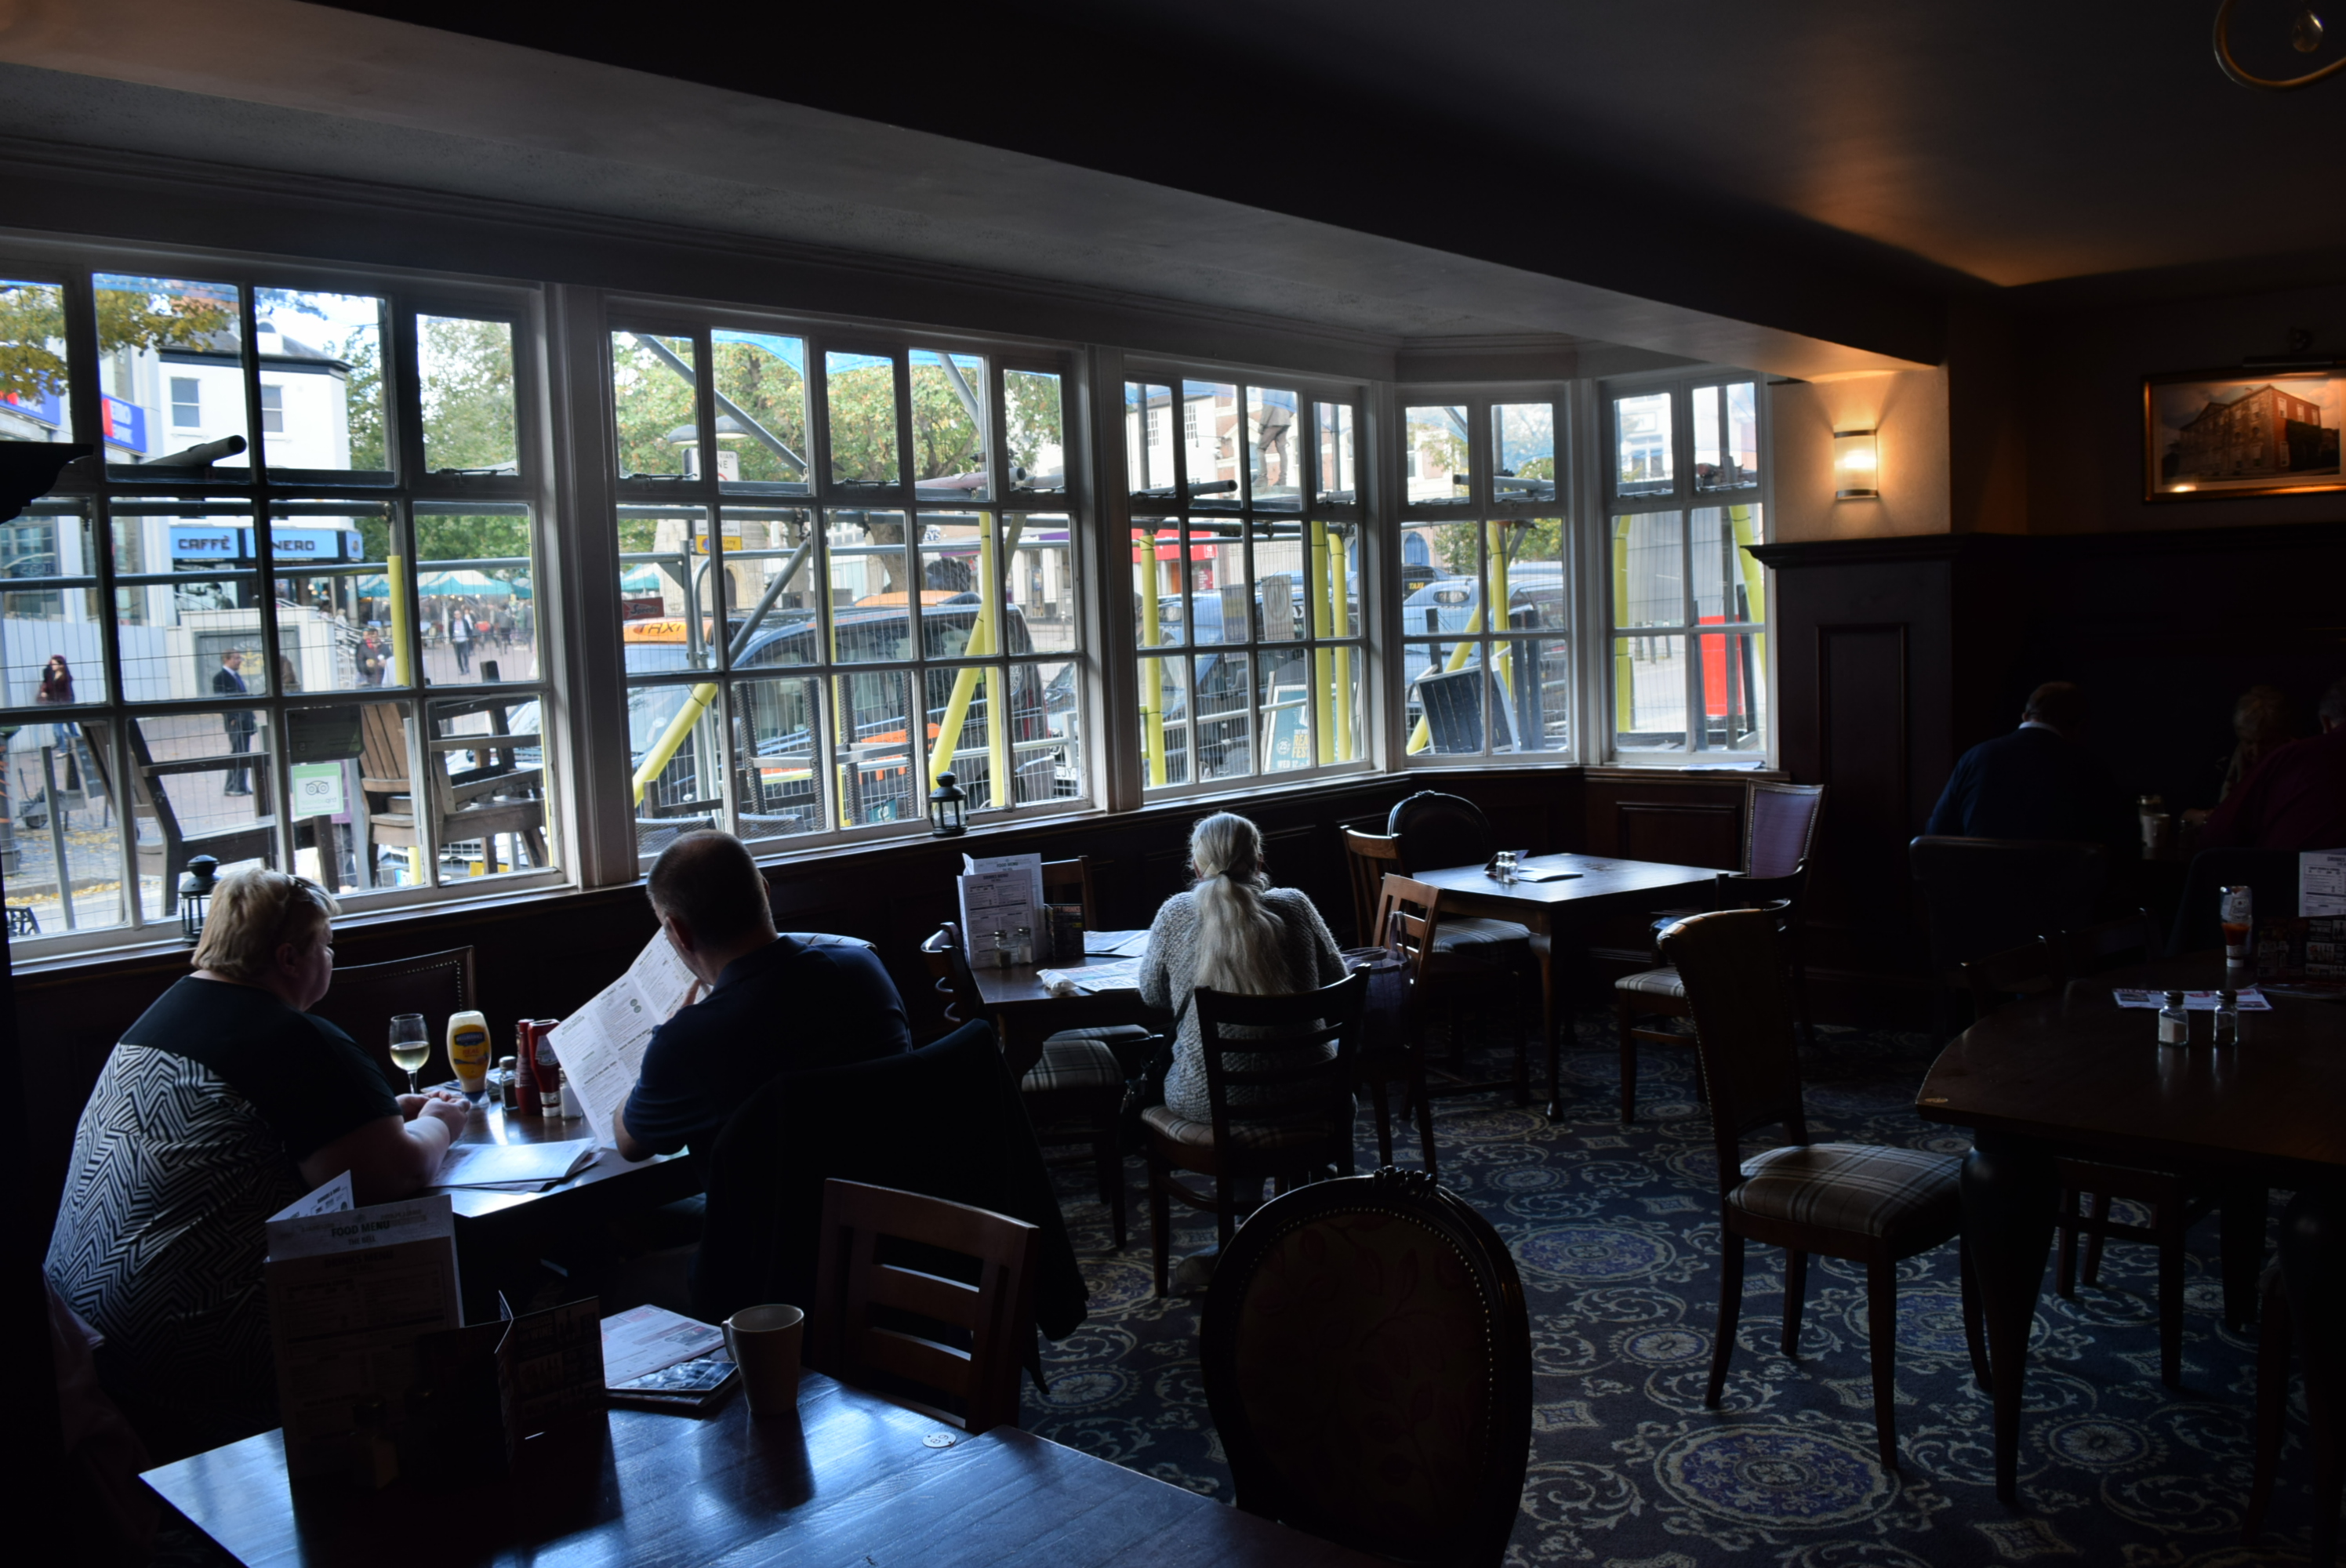
Pic. 28 Inside the pub; 1/100sec, ISO 500, f/5, 18mm. Aylesbury, The Bell.
Mariusz Krukar
References:
J.A.King,2014, Nikon D5300 for Dummies, Wiley, ISBN: 978-1-118-87214-7
Links:
D5300 – how to expand the tonal range with HDR
Canvas prints & photo tiles – wallpics