
Downloading OpenStreetMap vector datasets effectively
OpenStreetMap platform is a worldwide free geographic database, updated and maintained by free volunteers. The primary advantage of this platform is the availability of the data, which can be downloaded anytime by the user unlike Google Maps, which requires appropriate payments.
In fact, there are a few options for getting the GIS vector data from OpenStreetMap, but I couldn’t find the proper explanation of how to do it from the beginning to the end. Therefore, in this short article, I would like to stress what particular step you should take.
Before I jump into it, let’s list all the ways of downloading the data from OpenStreetMap.
– QGIS (Quick OSM plugin) – the convenient way of getting the OSM data straight to the desktop GIS application, which is QGIS. The biggest benefit of this plugin is downloading the data directly to our QGIS project.
– https://extract.bbbike.org/ – the free-of-charge service, which allows you to grab the OSM data by selecting the area polygon or choosing the random region proposed by them.
– https://download.geofabrik.de/ – The huge OSM database, which can be downloaded by any region of the world with division by counties and voivodships. The user receives the zipped file with all the OSM data.
– https://overpass-turbo.eu/ – The best service for downloading OSM data, because it includes the automatic query builder based on our requests.
However, we can find a few other ways of OSM data downloading, which are Osmosis and XAPI (formerly) as well as for example Naturalearthdata.com where you can get some OSM data.
The aim of this text is to find the most effective way of downloading the OSM data, that fits the desired administrative unit or territory name and requested type of data. For this reason, the best is to use the OSM plugin for QGIS.
The Quick OSM plugin includes some examples of keys and values (Pic. 1)
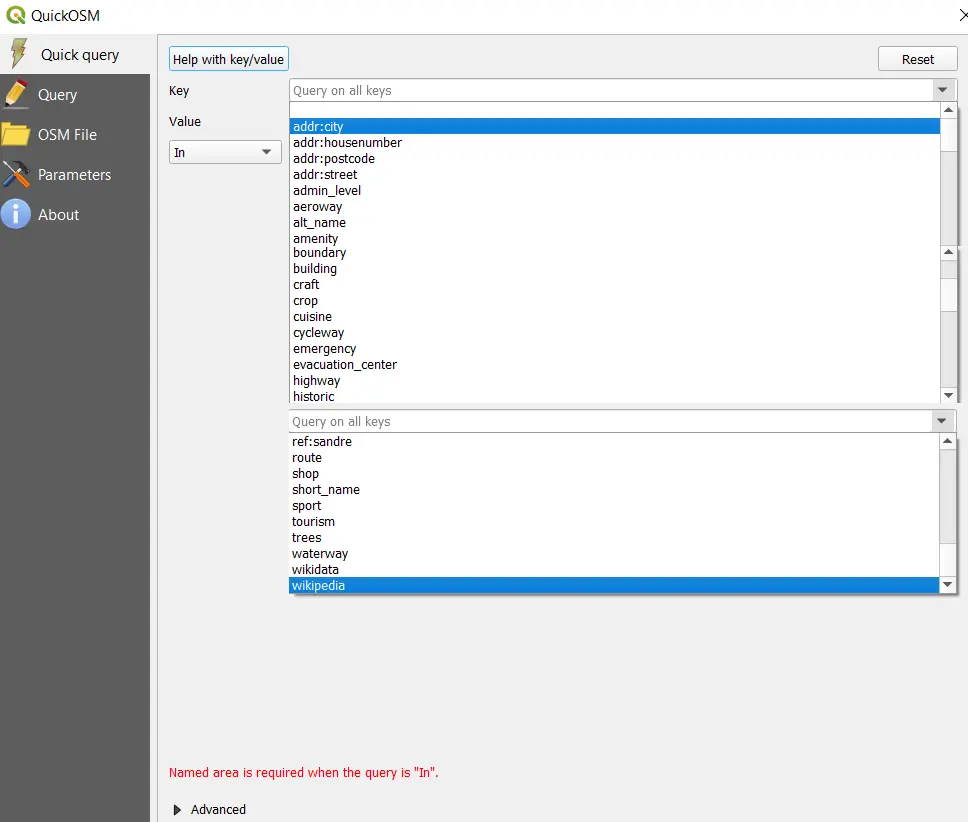
Pic. 1 The examples of Key values in the Quick OSM plugin when the “Quick Query” option is selected.
when the “Quick Query” option is selected. We can choose the Key object from the list and then select the proper value allocated into the given key in the Value dropdown below (Pic. 2).
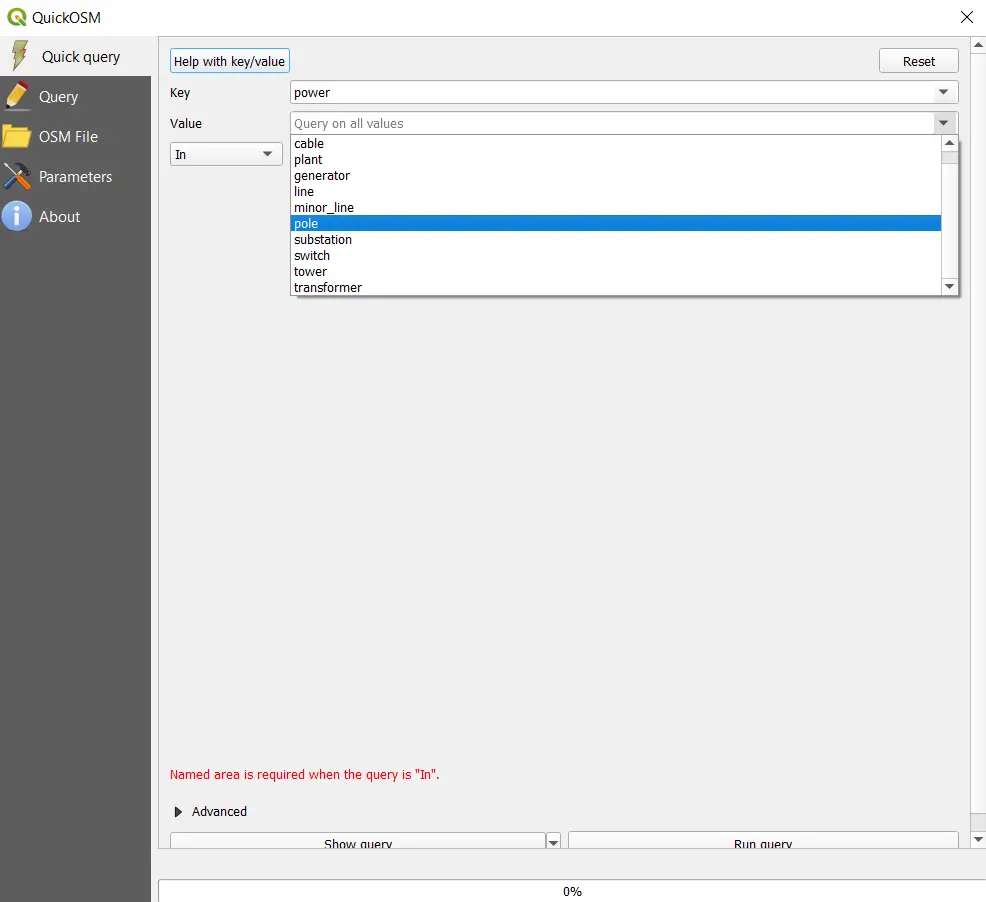
Pic. 2 The selection of values, which belong to the given key selected earlier.
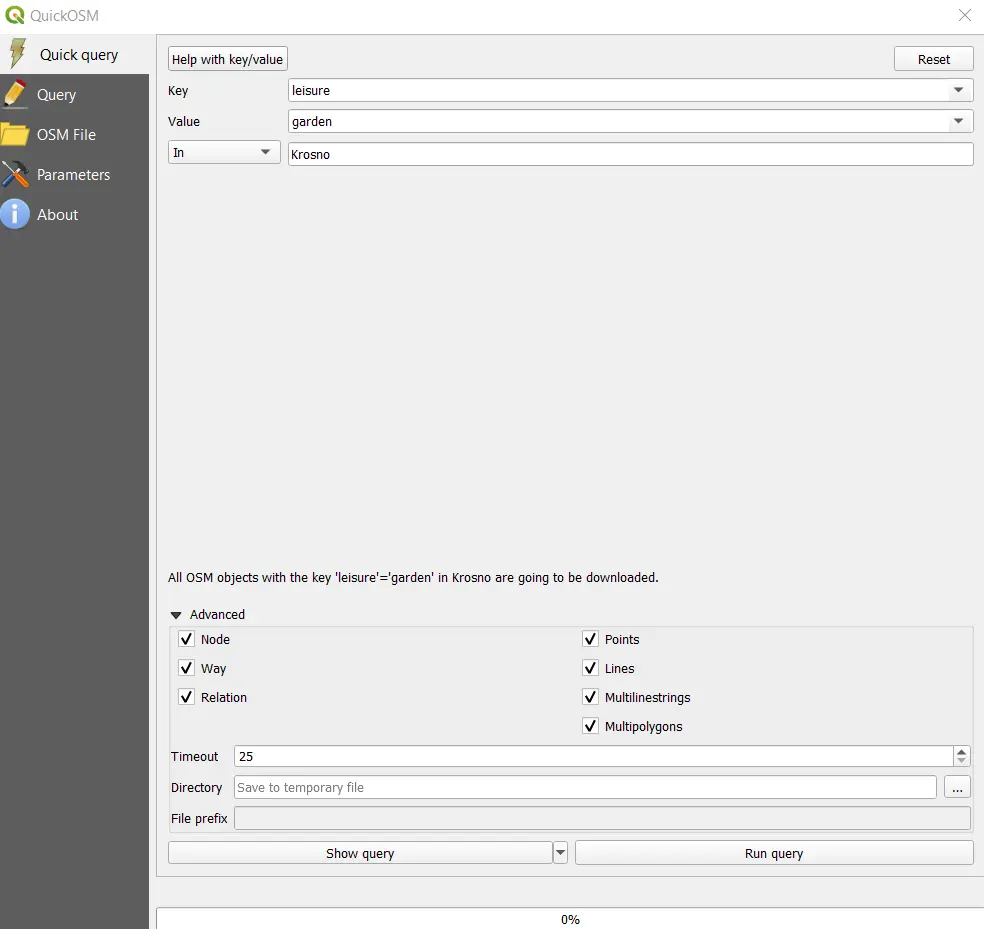
Finally, we can define the area of downloading our selected objects (based on the key and its value set earlier). We have a few options available here. Some of them are mandatory.
In – means that we are defining the certain area of our download (i.e. town, village, administrative unit, or country).
Around – means the same definition, but not inside of the given unit provided, but around it.
Canvas Extent – without a precise definition of the administrative unit, we can simply grab the data from our current map visible in the QGIS panel.
Layer Extent – download in an analog manner like from the map visible in the QGIS panel, but refers to the range of the selected layer.
Not spatial – it means, that all the objects with the certain query will be downloaded.
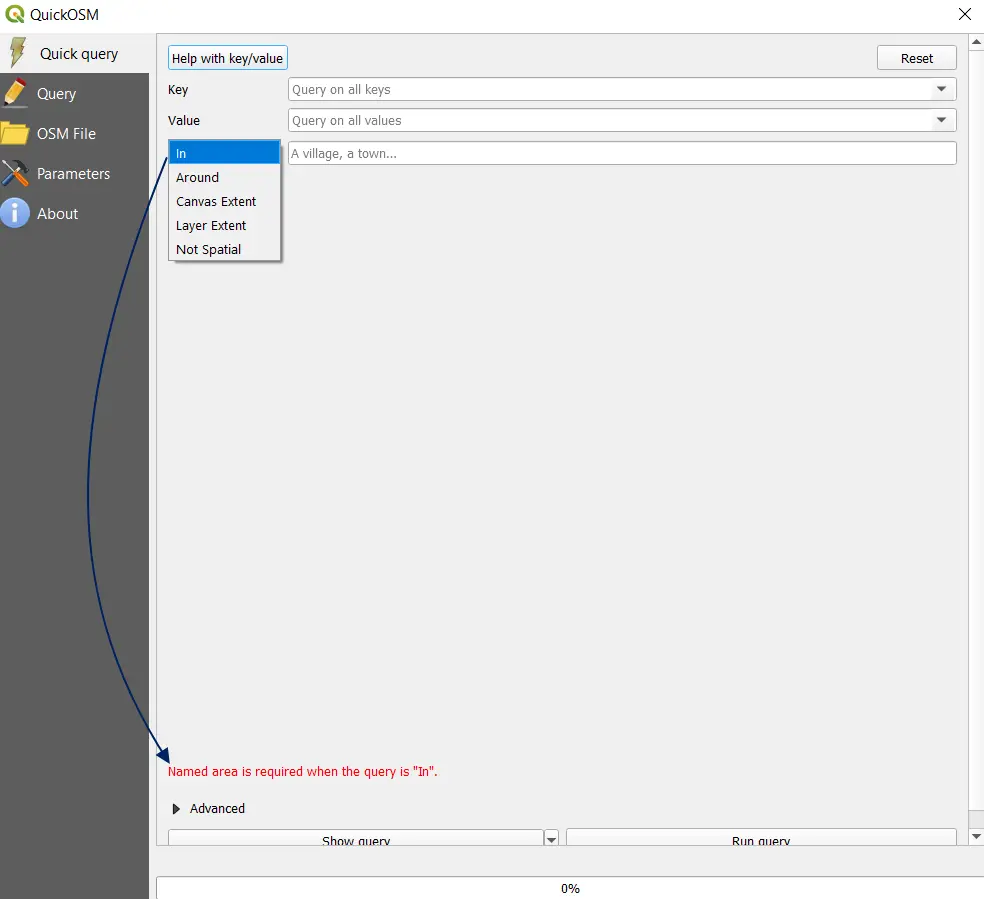
Pic. 3 The download OSM data area selection with the mandatory input for some of them.
When our Quick query is ready, we can see it by clicking the “Show query” button. It moves us to the “Query” section, where the user can see the query construction from the coding side (Pic. 4).
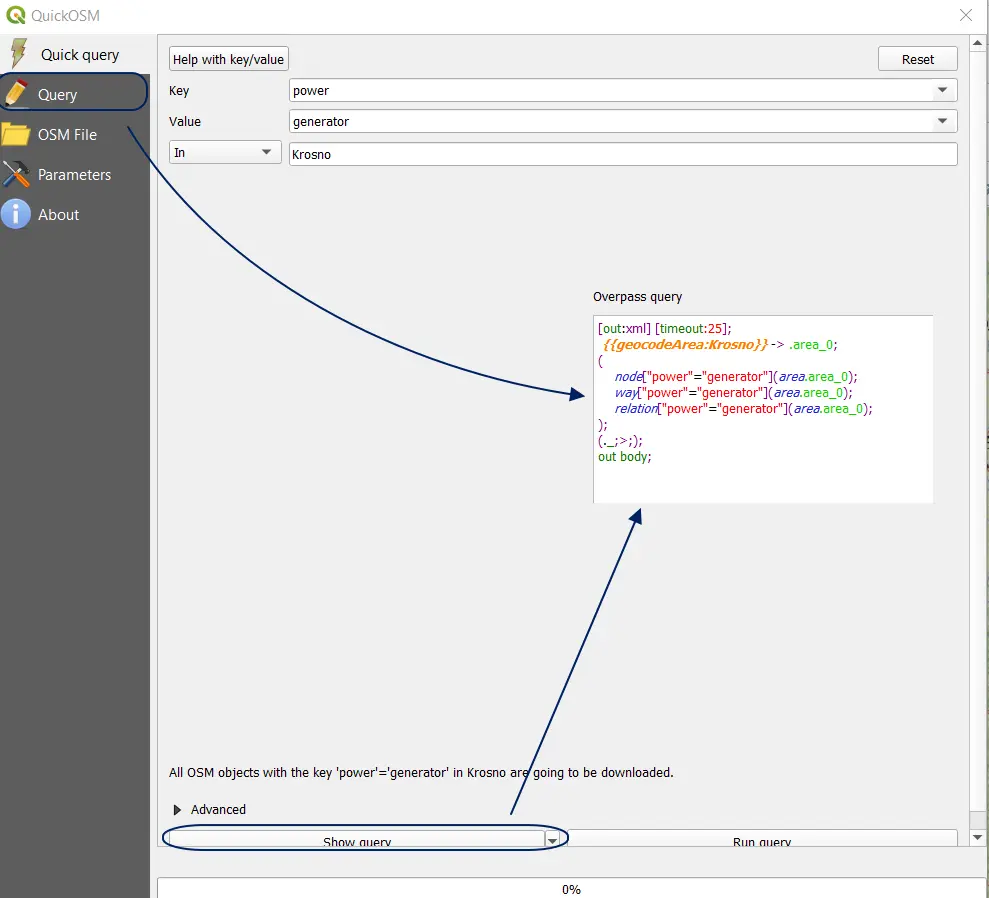
Pic. 4 The visual difference between the “Quick query” where the coding isn’t required and the standard Overpass “Query“, where at least basic coding knowledge is essential.
Sometimes it’s worth using the “Advanced” section where we can define further download conditions like the layer type & geometry and the target download directory (Pic. 5).
Pic. 5 The fully constructed Quick query with the Advanced options available.
Make sure, that your data cannot be too large. For this reason, you have to adjust the density of certain objects to the size of the area you want to download. If the number of objects is too big, you might have the error, that the download wasn’t possible. It looks pretty much as below (Pic. 6).
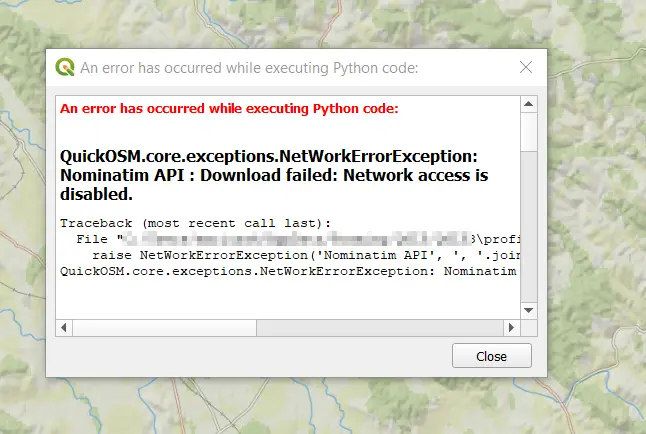
Pic. 6 The Quick OSM plugin throws this error, when the size of your data is too big.
In the other situation, we can get the following error: Bad request from OSM overpass API when the picked area is far too huge.
In the other case, when everything is fine, you are waiting a while and getting the new layer produced within the defined area (Pic. 7).
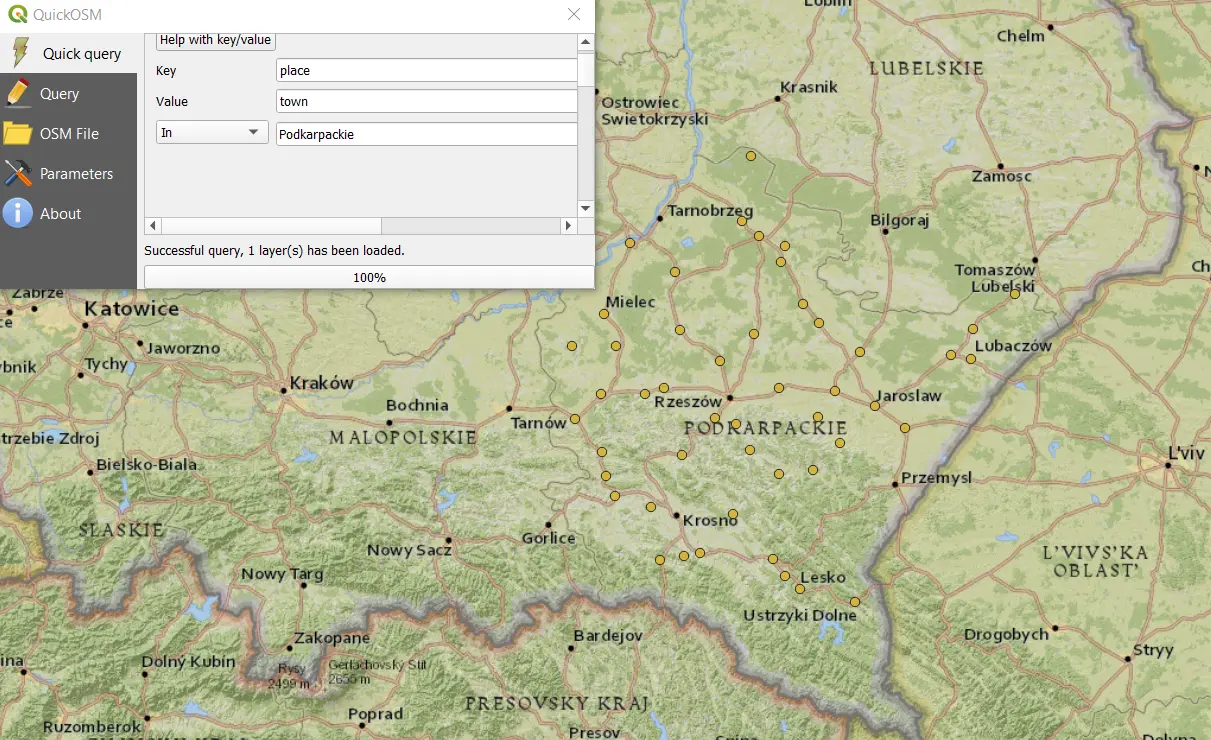
Pic. 7 The successful execution of the “Quick query” option based on the built-in Key and Value.
This is undeniably the most convenient way of getting the OpenStreetMap data exactly in the place or region we want. Unfortunately, the “Quick query” option doesn’t cover all the objects included in OpenStreetMap. This is just some part of them and if you want to have something different than proposed then you have to build your own query in the Query section.
The first thing here is finding the interesting map feature, which we would like to download for our project. When you enter the specified feature like the power generator available under the following Map features -> 1.20 Power (Key) -> generator (Value). Your Value is nothing else like the OSM tag power=generator. In one of the sections below you can find the How to Map chapter, which explains the possible ways of using the given tag. Let’s assume, that you are after the wind turbines. In this case, the power=generator tag will be definitely too general. Each tag includes similar ones, dedicated to the specific energy source we want. By seeking the energy source, we should be interested in the generator:source= tag instead. When entering inside this tag, we can see the robust list of proposed map features, which this tag hosts. Moreover, they are divided between groups and explained well in detail (description). The last column Count shows the total number of the given features around the world within various types of layers (point, line, and polygon). We must remember, that OpenStreetMap is self-contributed by various users worldwide, so this particular data might not be right.
In conclusion, it might be difficult for people, who aren’t familiar with the XML OSM API language to build the proper query from scratch, therefore I propose the most convenient way of building up the query you want.
1. Use the “Quick query” section in your QuickOSM plugin to build up the basic tag. It can be visible later in the “Query” section. You can access it by toggling between the “Quick query” and “Query” or simply press the “Show query” button.
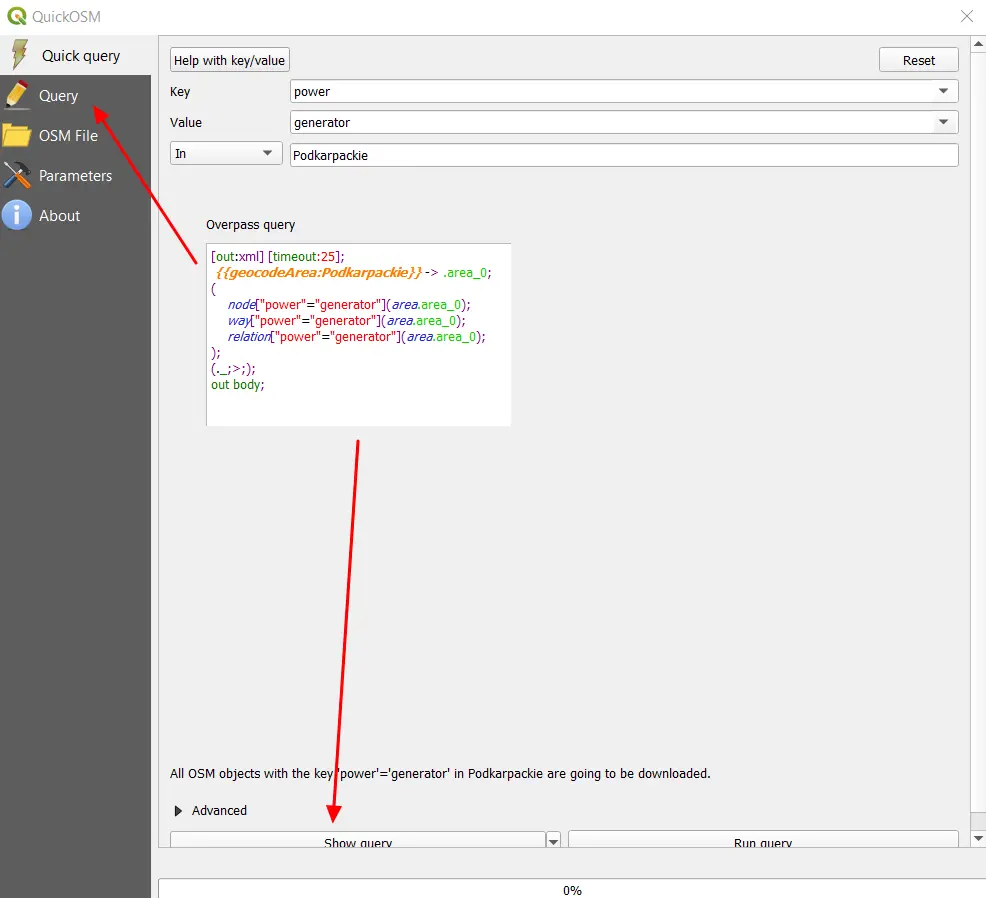
Pic. 8 Our basic query is formulated in the “Quick query” option, which next can be shown as the XML OSM API code in the “Query” section.
Our query looks as follows:
[out:xml] [timeout:25];
{{geocodeArea:Podkarpackie}} -> .area_0;

(
node["power"="generator"](area.area_0);
way["power"="generator"](area.area_0);
relation["power"="generator"](area.area_0);
);

(._;>;);

out body;
and states, that we want to download all Map items belonging to the power=generator tag in the Podkarpackie voivodship in Poland.
It has been told, that the power=generator tag is too general. When used for large areas it might result in crashing our QGIS or at least the error as shown earlier in this text (Pic. 6).
2. It has been already discussed, that for specific objects we need more precise tags. For our example, when dealing with wind farms we would need the following tag, as per the list here. Our general tag for the wind turbines could be as follows: generator:source=wind, although we must remember that it’s still the general tag. The other ones, related to this type of energy production can be found under the next link leading us to this tag options. Then we can find all the tags, which are used in the combination. If we want to have the tag specifically for other sources of wind power like offshore wind farms, we should use another one (discussed later in this text). We also should remember, that the generator:source is the general tag for the specific branch of energy production (in this particular example). If we wish to have our branch divided into specific sections, then instead of generator:source we should use the generator:method tag explained roughly here. In the case of the power produced by wind, we have no further division. By setting generator:method=wind_turbine you will receive just fewer records, but if for example, you want to download the objects of solar energy, then your general tag will be: generator:source=solar, under which two specific will fall: generator:method=thermal and generator:method=photovoltaic. It’s still not the end of the investigation, as we can choose a certain type of energy generator there. In this case, the generator:type tag determines it. In the case of solar thermal energy production, it will be accordingly: generator:type=steam_turbine and generator:type=solar_thermal_collector.
Let’s back to the general tag for wind power, which is the generator:source=wind for now and edit our code accordingly:
[out:xml] [timeout:25];
{{geocodeArea:Podkarpackie}} -> .area_0;

(
node["generator:source"="wind"](area.area_0);
way["generator:source"="wind"](area.area_0);
relation["generator:source"="wind"](area.area_0);
);

(._;>;);

out body;
3. Next, after the execution of our code (by pressing the “Run query” button) QGIS informs us how many layers have been downloaded (Pic. 9)
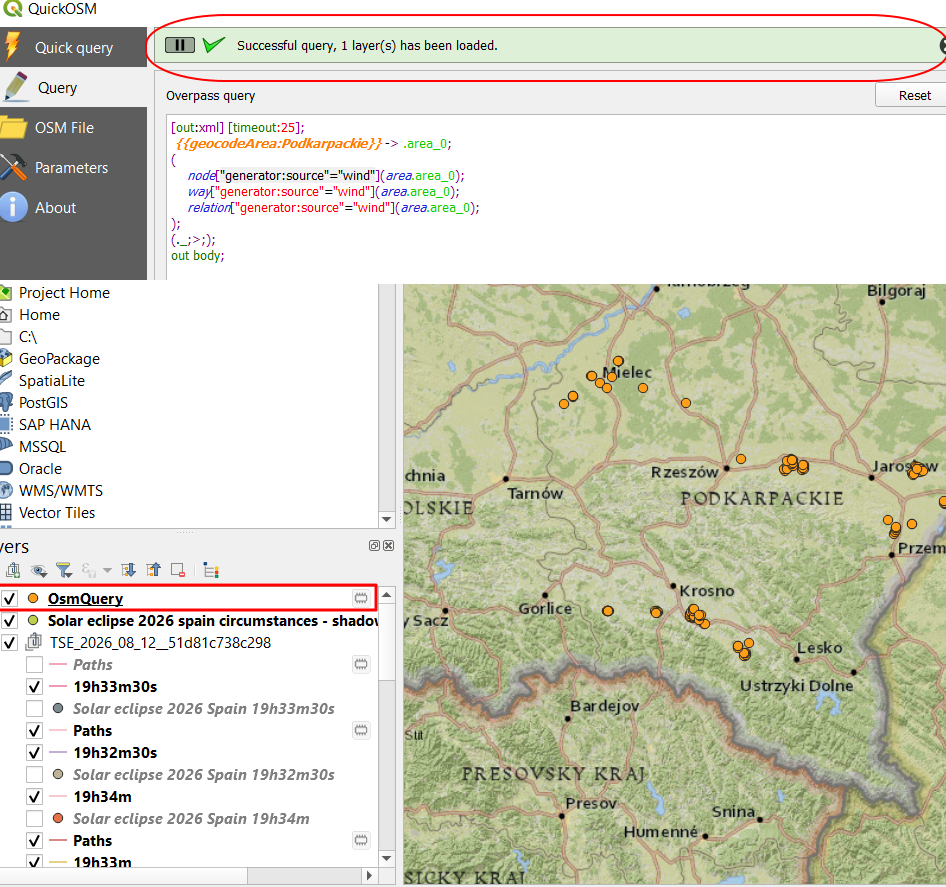
Pic. 9 Layer already downloaded by executing the query in the QuickOSM plugin.
The job is done, as far as the given area is concerned.
4. When you want to repeat this process in another area, the prepared code can stay as it is with just the geocodeArea alteration:
[out:xml] [timeout:25];
{{geocodeArea:Malopolskie}} -> .area_0;

(
node["generator:source"="wind"](area.area_0); way["generator:source"="wind"](area.area_0); relation["generator:source"="wind"](area.area_0);
);

(._;>;);

out body;
and hit the “Run query” button again. Finally, you have the results for 2 administrative units now (Pic. 9).
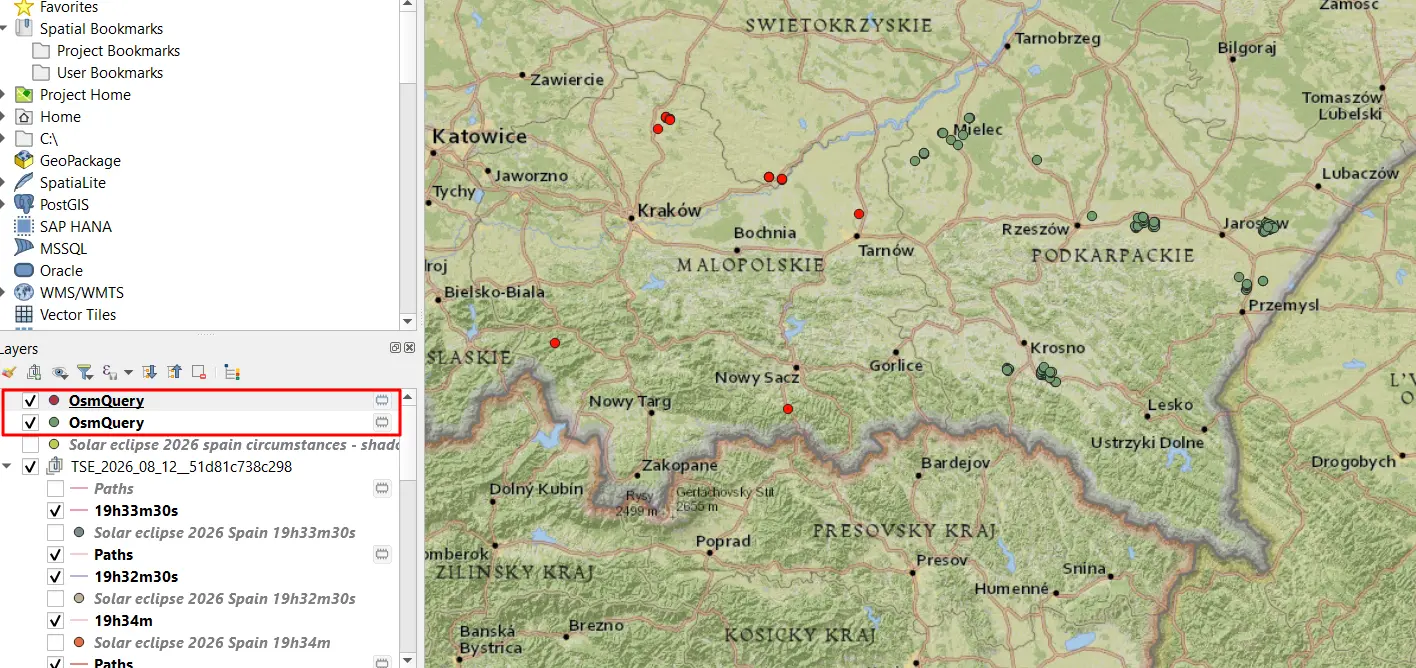
Pic. 9 Another layer was downloaded by executing the query in the QuickOSM plugin.
Now let’s consider other energy sources like the solar one. For the general tag, the area must be more restricted, we cannot set the whole voivodship or province, because it’s too big. We can try using the county or city instead.
Let’s amend our code upon the specific energy generator, like below:
[out:xml] [timeout:25];
{{geocodeArea:Rzeszow}} -> .area_0;
(

node["generator:type"="solar_photovoltaic_panel"](area.area_0);
way["generator:type"="solar_photovoltaic_panel"](area.area_0);
relation["generator:type"="solar_photovoltaic_panel"](area.area_0);

);

(._;>;); out body;
next, see the results in the map (Pic. 10)
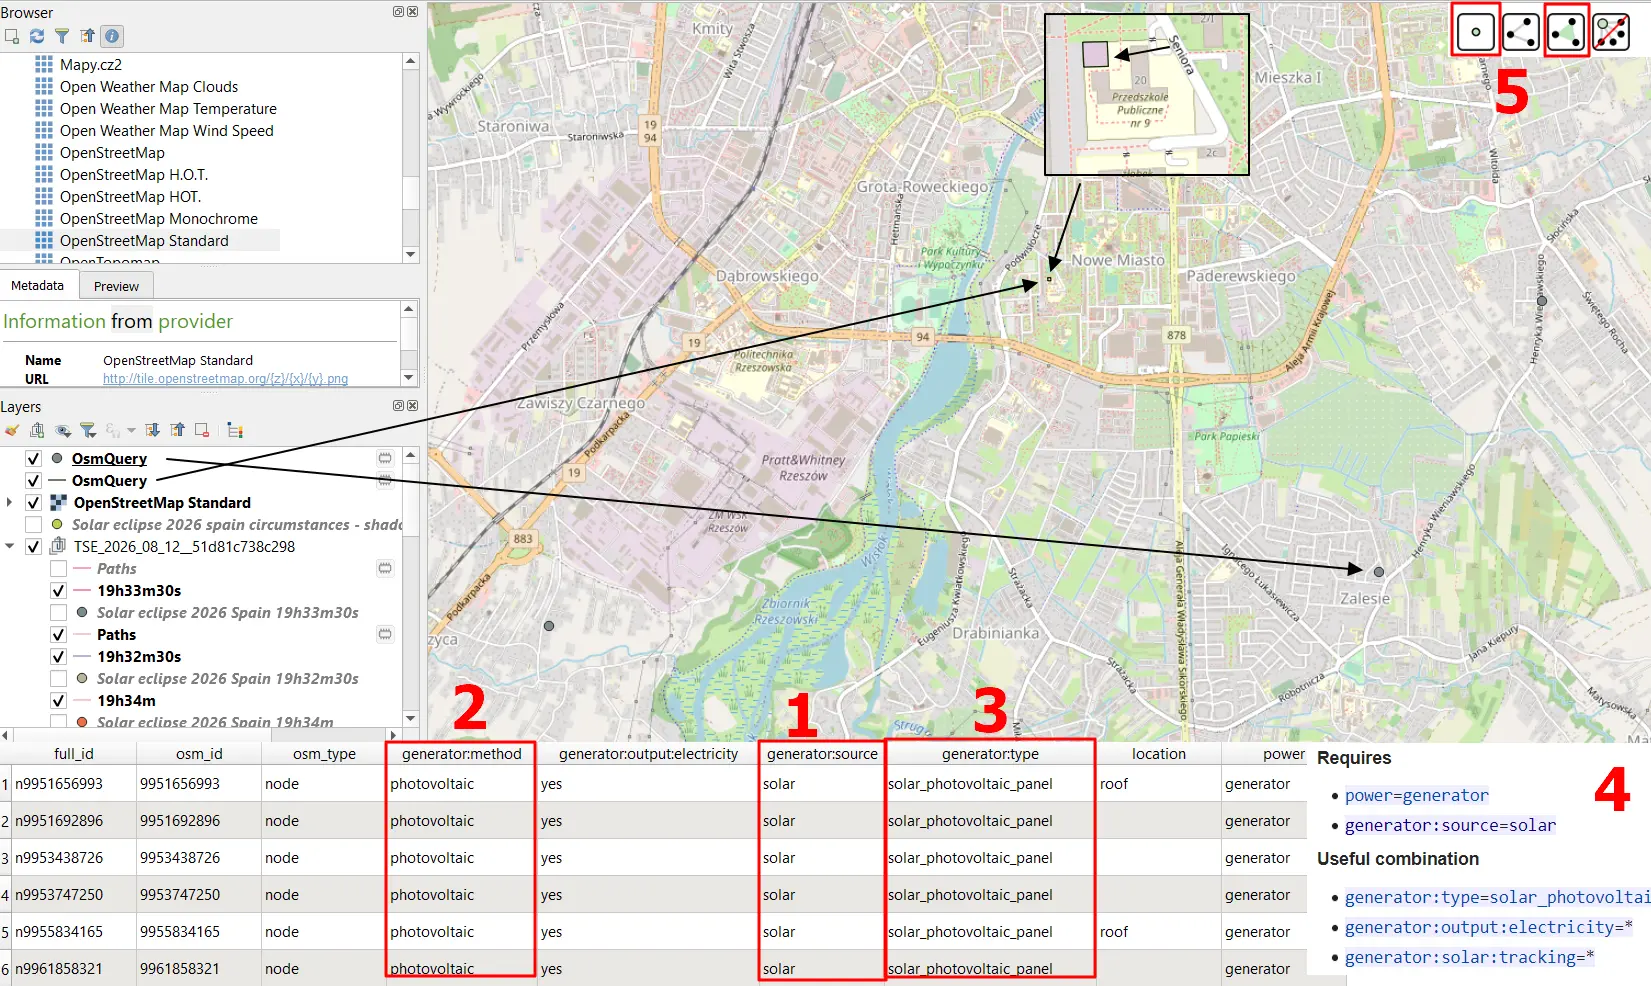
Pic. 10 The map of solar_photovoltaic_panel objects generated by the Quick OSM query, which apart from the results includes also the attribute table of the objects as well as the output data type. Worth looking at the attribute table as we can see all the tags discussed earlier: 1 – generator:source; 2 – generator:method; 3 – generator:type; 4 – the description always says how the given tag can be combined with others related to; 5 – the data type (geometry) in which the data are downloaded.
It’s worth seeing also how it looks in the attribute table. There are columns represented by the tags explained above. The manner is exactly the same, which means even if we use the general tag further division is possible by categorizing other tags later in QGIS. I would take a look at the requirements and combinations (4) where certain tags are shown. What is required is usually provided in our code, although if we need further selection, then the proposed combinations can be used.
[out:xml] [timeout:25];
{{geocodeArea:Rzeszow}} -> .area_0;
(

node["generator:solar:tracking"="horizontal"](area.area_0);
way["generator:solar:tracking"="horizontal"](area.area_0);
relation["generator:solar:tracking"="horizontal"](area.area_0);

);

(._;>;); out body;
although it will give nothing for the given area (Pic. 10).
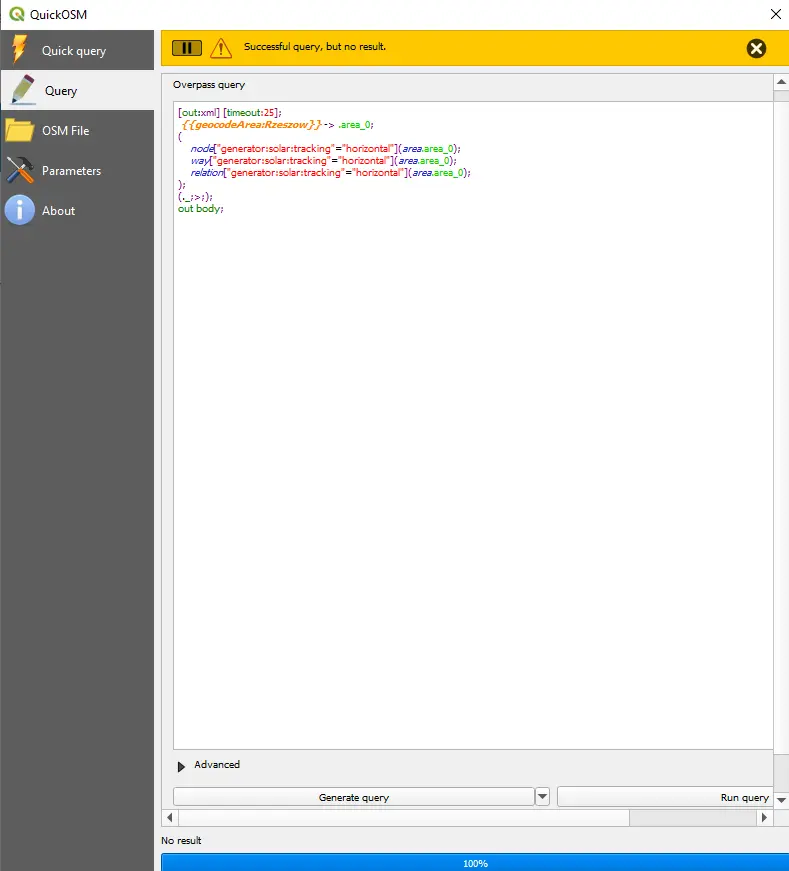
Pic. 11 Quick OSM – query successful but no result.
Good advice for using any combination is to check if it appears across the attribute table. I assume, that you probably used the general tag earlier, and now can see what the columns are. If not, please do, so because it will give you a hint of what type of combination can be used within the given query (Pic. 12).

Pic. 12 The attribute table, which refers to the situation described earlier (Pic. 10). Apart from the major tags (generator:method, generator:source, generator:type) we can see only one possible combination, which is: generator:output:electricity. It means, that only one combination will give the results when the query is executed. Using another combination like the above (generator:solar:tracking) will throw no values.
On the website, we can find, that the tag generator:solar:tracking=horizontal doesn’t appear in the OSM database. It means, that in any case, the query will return no results because this kind of value simply doesn’t exist. The TagInfo column informs us about the total number of features around the world with the breakdown of the data type (point, line, or polygon).
After further amendments to our code:
[out:xml] [timeout:25];
{{geocodeArea:Germany}} -> .area_0;
(

node["generator:solar:tracking"="single_axis"](area.area_0); way["generator:solar:tracking"="single_axis"](area.area_0); relation["generator:solar:tracking"="single_axis"](area.area_0);
);

(._;>;); out body;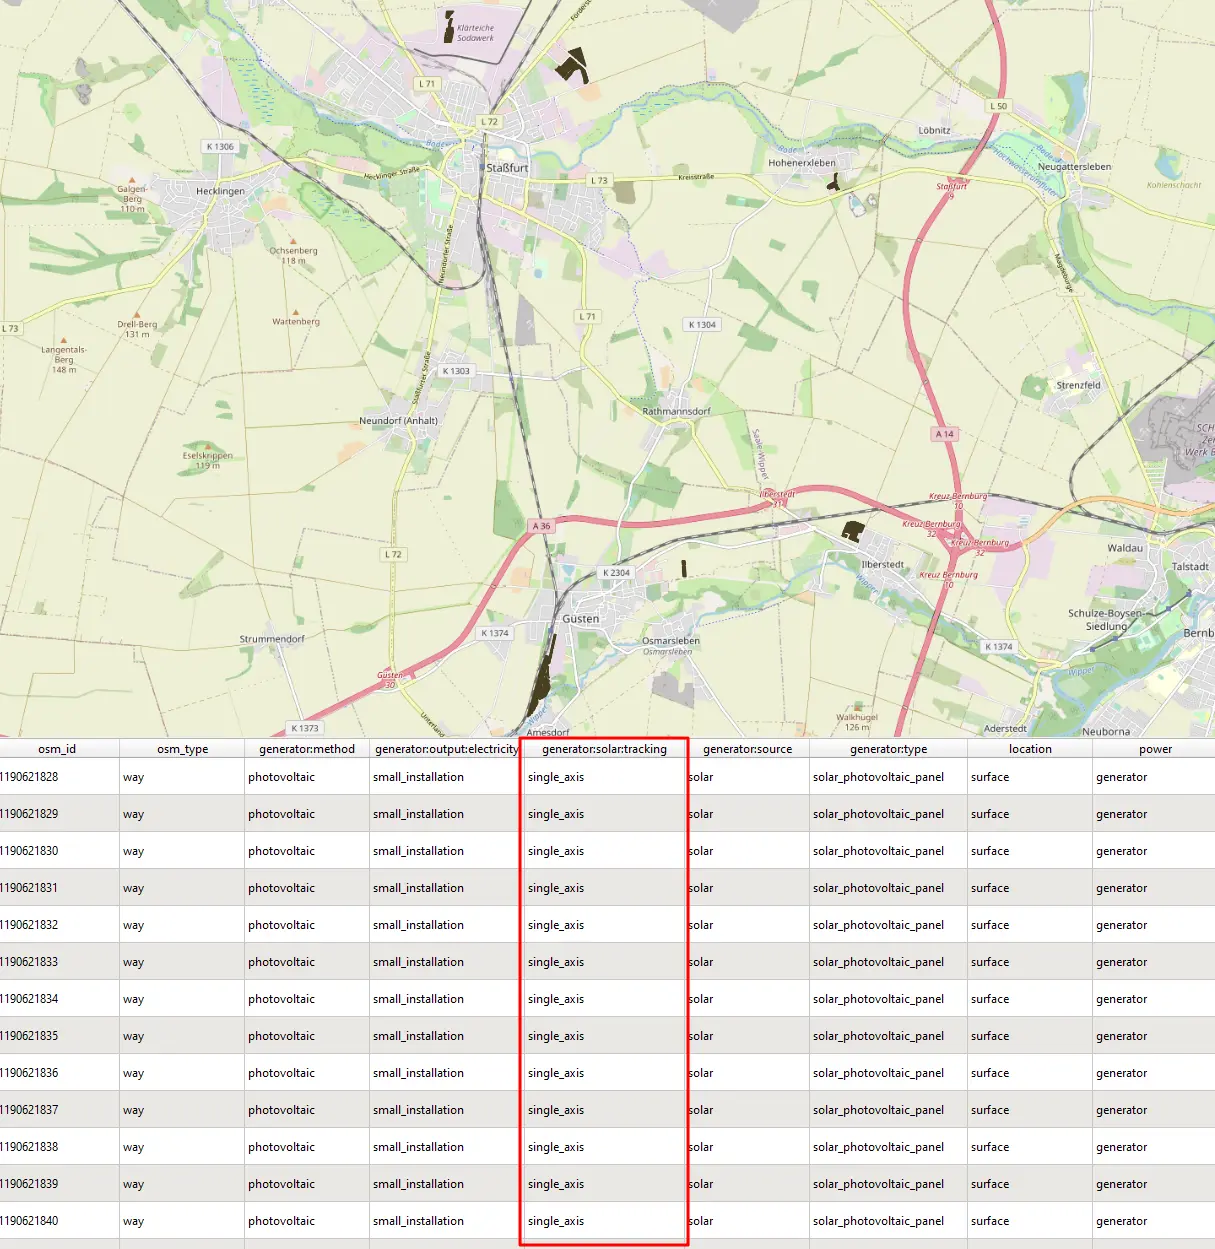
Pic. 13 After changing the type of object and area in the API code, the query returns values, which are represented later by one of the attribute-table columns.
This method shows the best and most convenient approach as far as all the OSM objects are concerned. There are more approaches, which require a wider knowledge of XML OSM API language for the object collections and they will be undertaken here in the future. In fact, all the examples presented here should be enough for you to download any kind of data from OpenStreetMap. You need to know, that every signature visible on the OSM standard map is downloadable and this text presents a comprehensive solution for everyone.
As an alternative, I could recommend you use the Overpass-Turbo website, where you can generate the desired query by using the Wizard option. This is admittedly also a good alternative to alteration of your query prepared in the Quick OSM plugin.
Mariusz Krukar
Links:
- Gisgeography.com: OSM Plugins for QGIS
- https://gisgeography.com/openstreetmap-download-osm-data/
- https://github.com/3liz/QuickOSM
- https://extract.bbbike.org/
- https://overpass-turbo.eu/
- https://www.giscourse.com/how-to-download-osm-data-using-quickosm-plugin-in-qgis/
- https://www.naturalearthdata.com/downloads/
- https://mapperz.blogspot.com/2009/11/openstreetmap-data-on-demand-with.html
Forums:
- https://gis.stackexchange.com/questions/200088/download-osm-data-with-quickosm-and-qgis-modeler
- https://gis.stackexchange.com/questions/319348/getting-just-land-and-water-layers-in-qgis-with-quickosm
- https://gis.stackexchange.com/questions/388783/defining-area-for-quickosm-query-in-qgis-modeler
- https://gis.stackexchange.com/questions/156285/quickosm-returns-no-result
- https://gis.stackexchange.com/questions/203192/downloading-openstreetmap-data-by-osmosis
- https://gis.stackexchange.com/questions/82776/how-to-extract-data-from-osm-within-a-polygon
- https://gis.stackexchange.com/questions/152191/osm-download-with-overpass-fails-network-request-time-out
- https://help.openstreetmap.org/questions/24422/what-programming-languages-does-the-openstreetmap-api-support
- Github.com: Bad request overpass API
- https://gis.stackexchange.com/questions/413264/quick-osm-is-giving-bad-request
- https://stackoverflow.com/questions/77191156/how-to-extract-an-area-from-osm
- https://osm-queries.ldodds.com/misc/geocode-area.osm.html
Wiki:
Youtube:
Attractive section of content I just stumbled upon your blog and in accession capital to assert that I get actually enjoyed account your blog posts Anyway I will be subscribing to your augment and even I achievement you access consistently fast
Its like you read my mind You appear to know a lot about this like you wrote the book in it or something I think that you could do with some pics to drive the message home a little bit but instead of that this is fantastic blog An excellent read I will certainly be back