RAW image noise removal with the OpenSource image processing tools
Noise is a ubiquitous feature for all images, which we take. It’s expressed by random speckles present on our image, which we can compare to the film grain for analog cameras. Unfortunately, noise can seriously deteriorate the quality of our image. It is only one side, where the noise can play a positive role – this is the image sharpness. In this quite long article, I would like to tackle some noise reduction exercises with the utilization of a few open-source image processing tools.
In my work, I would like to split between 3 images with different ISO sensitivities.
1. GENERAL VIEW AFTER IMPORT
Firstly I would like to pay attention to the initial denoise process. Basically, it is to be done by our camera, when saving the photo in .jpeg format. The RAW ones aren’t denoised since they are like digital negatives and contain unprocessed (or minimally processed) data from a digital camera sensor. There is a lot of information in the description of the difference between these 2 formats. The RAW format gives us many more possibilities, than .jpeg. Nevertheless, we must come through the awkward step at the early stage of our image processing, which is noise reduction. Below I presented the 3 images with different ISO, which have been imported to the 4 image processing applications. 3 of them are 3rd party open-source image processing tools and the last one comes originally from the Nikon branch – Nikon Capture NX-D. I also used GIMP, which is mostly tailored for photo edit rather than processing from the raw state but only in exceptions.
The RAW images look quite similar in each software, except Nikon Capture NX-D, where it looks initially denoised, as denoise parameters have been set in default at 50% (Pic. 1 – 3). It can be noticed in coloration, which looks quite faint.
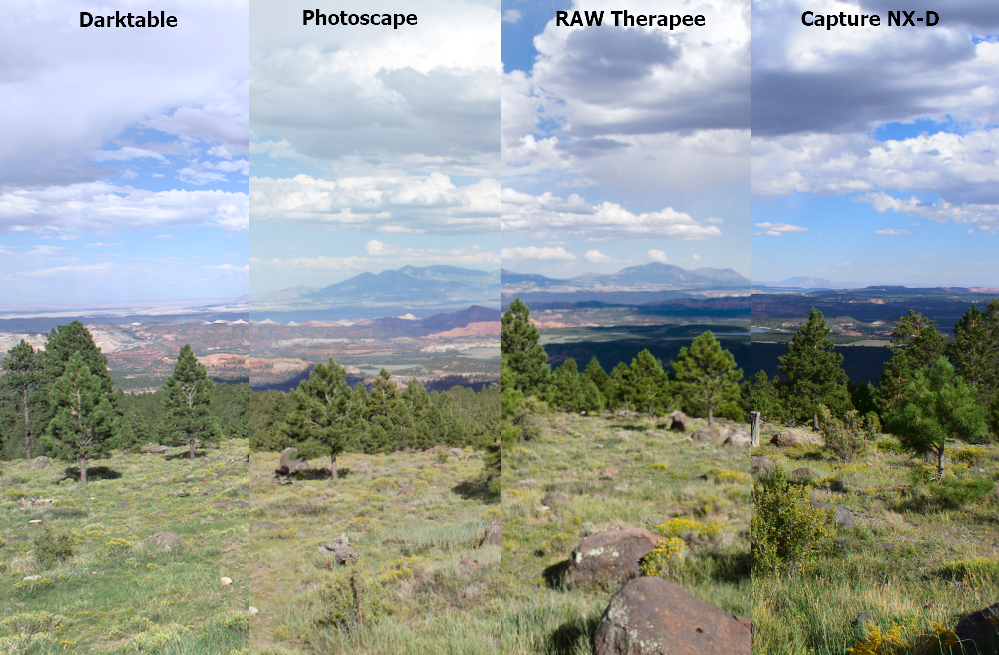
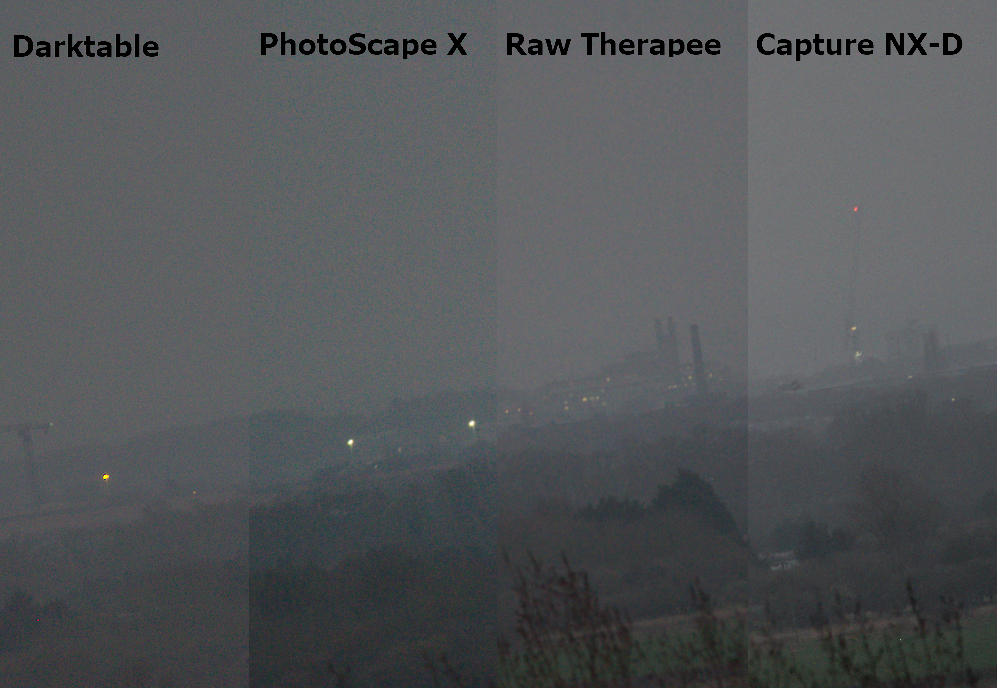
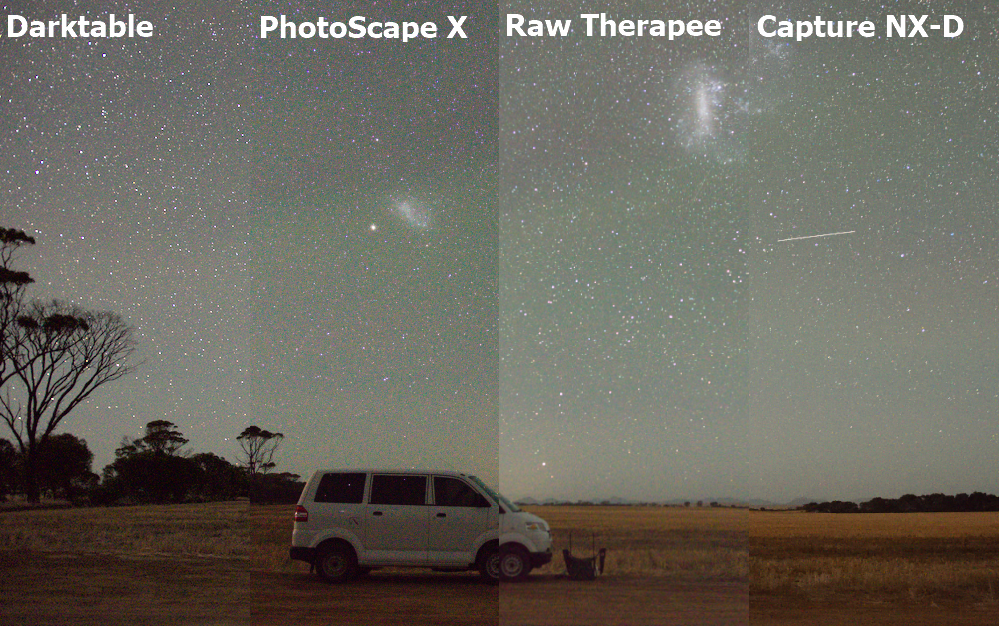
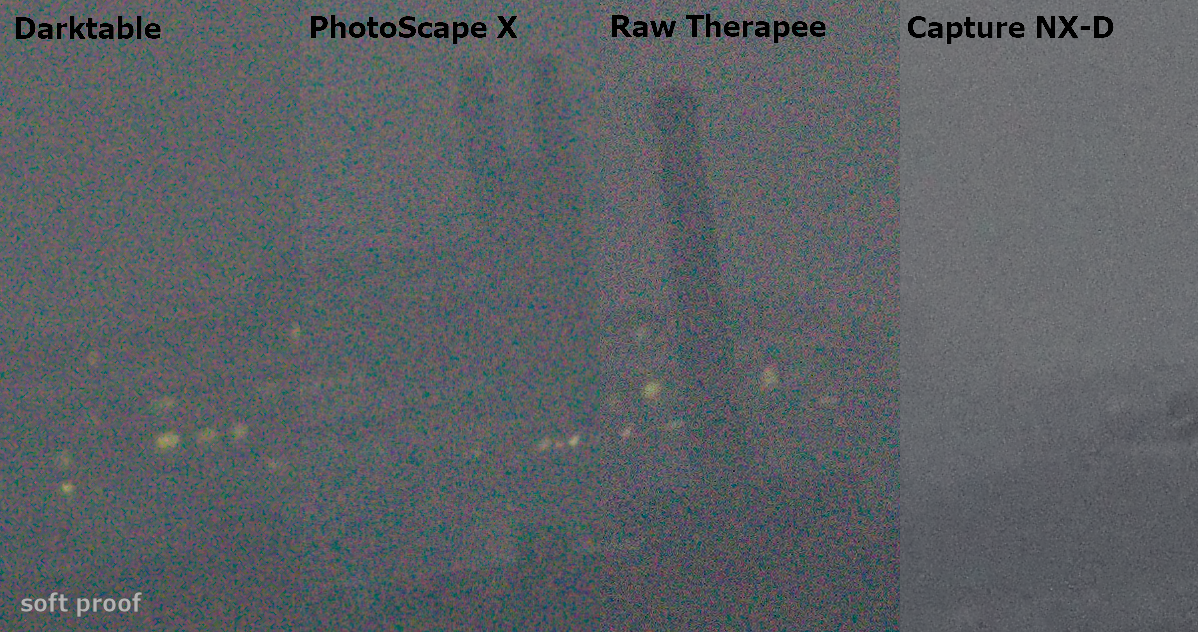
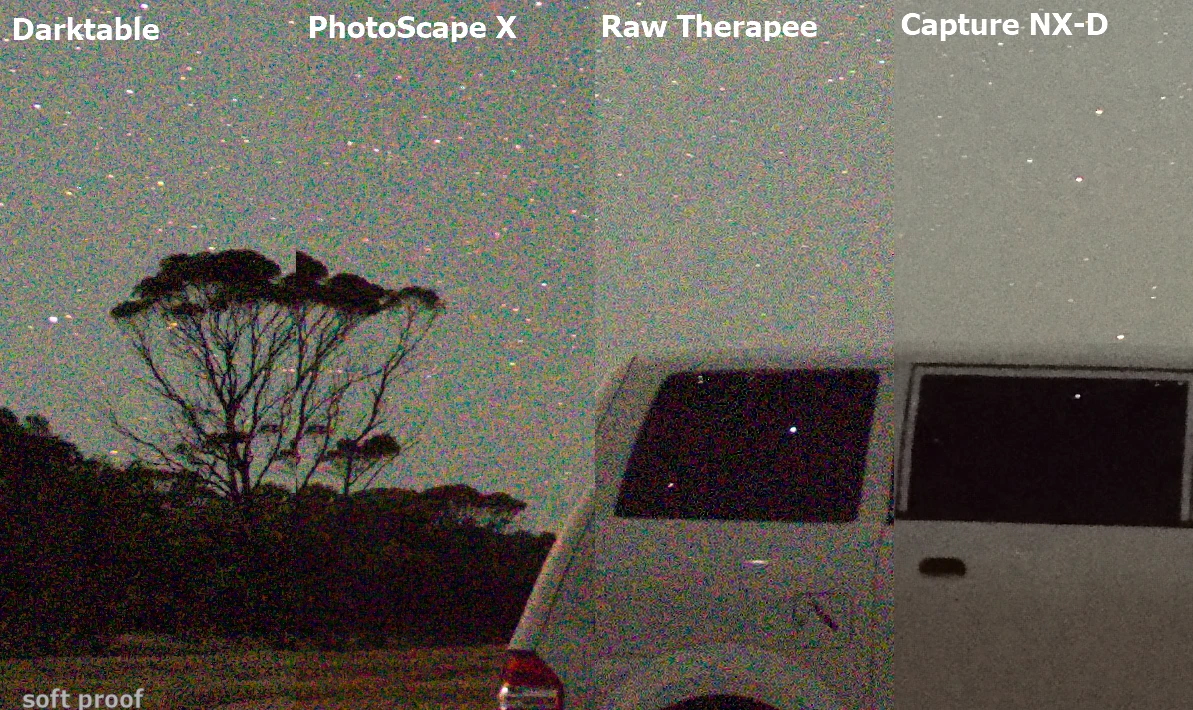
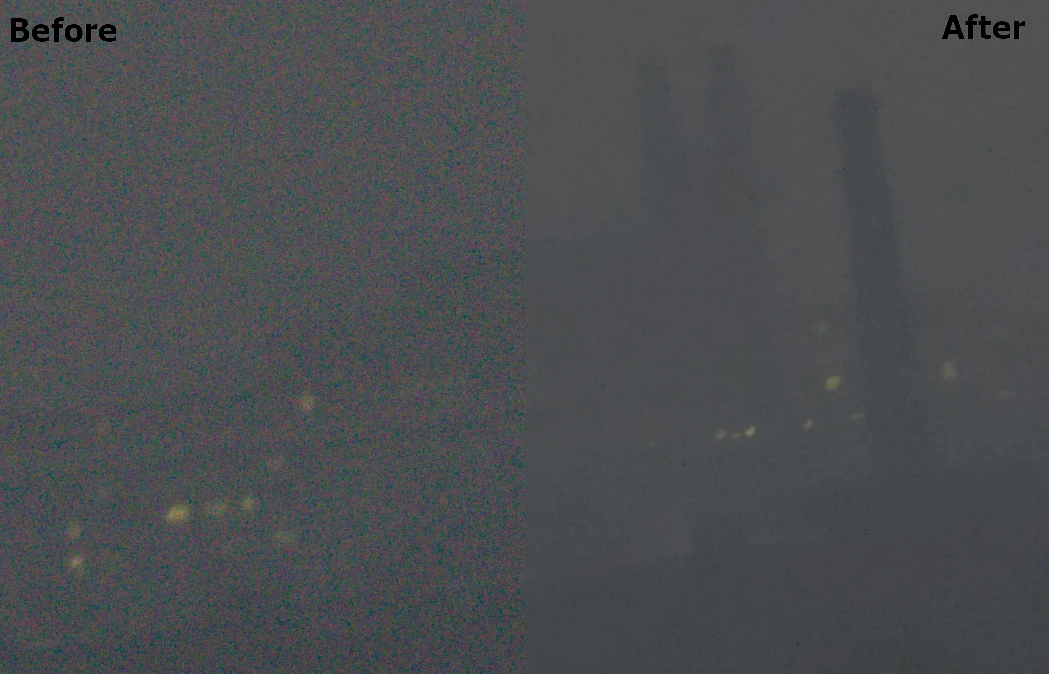
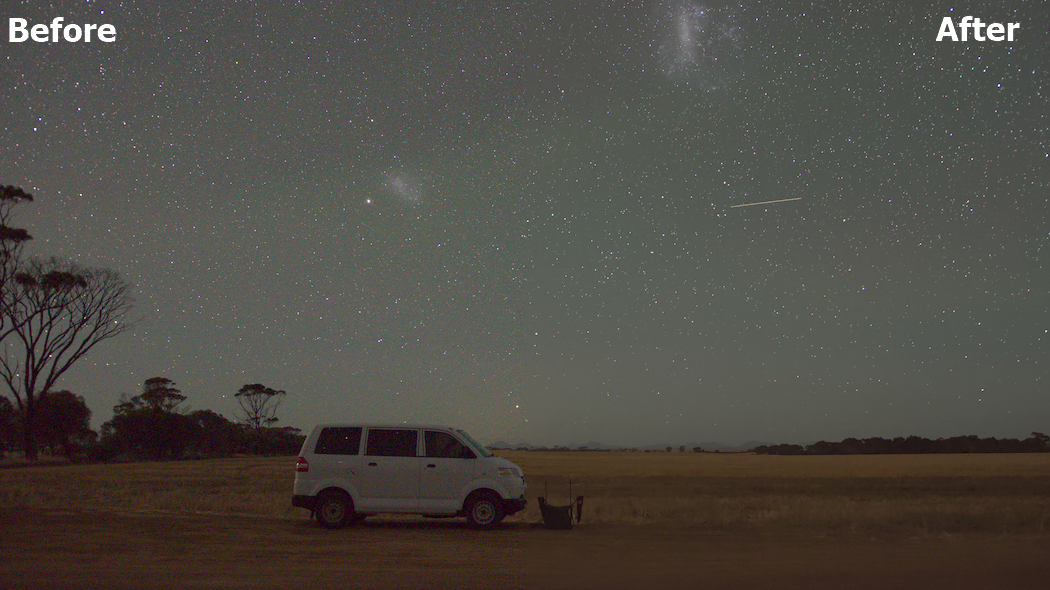
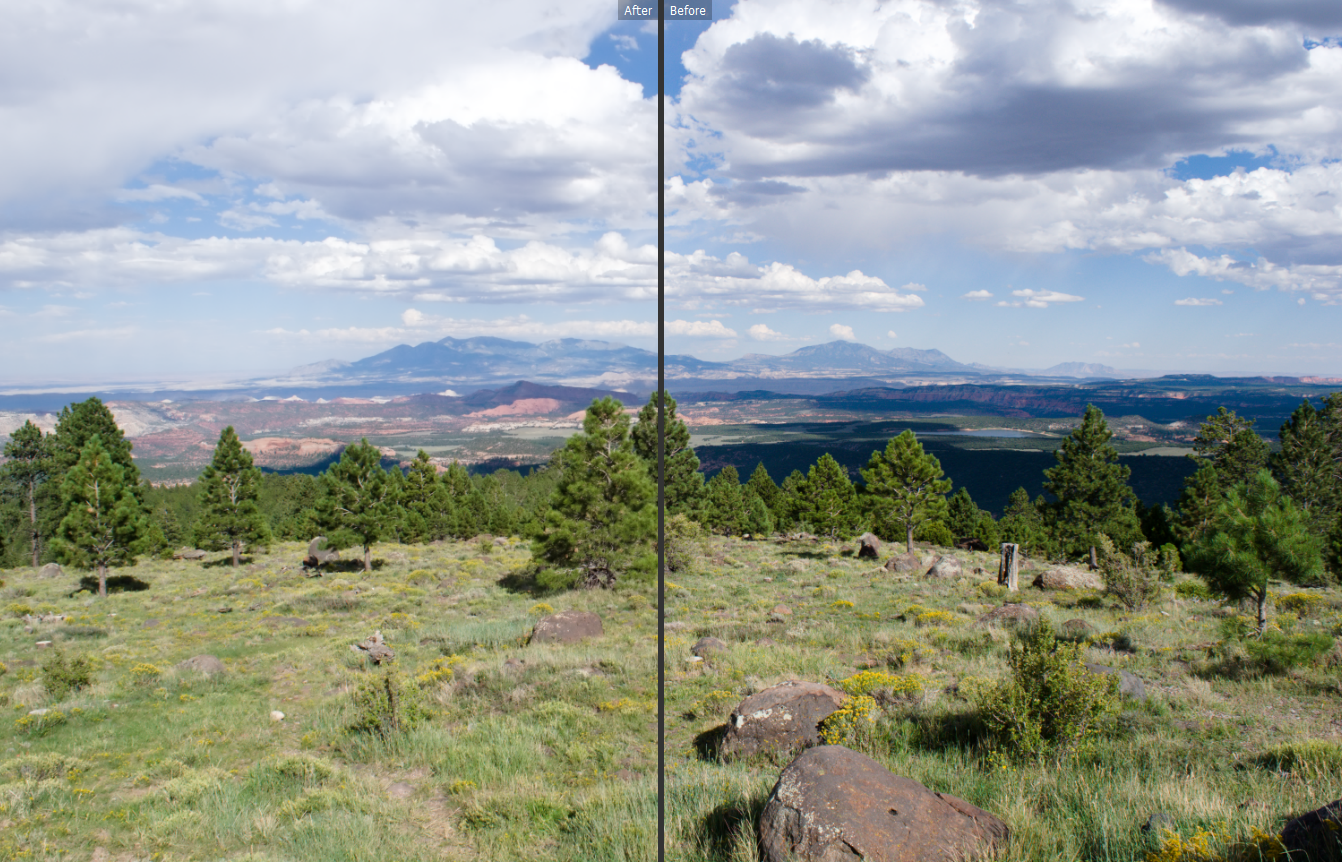
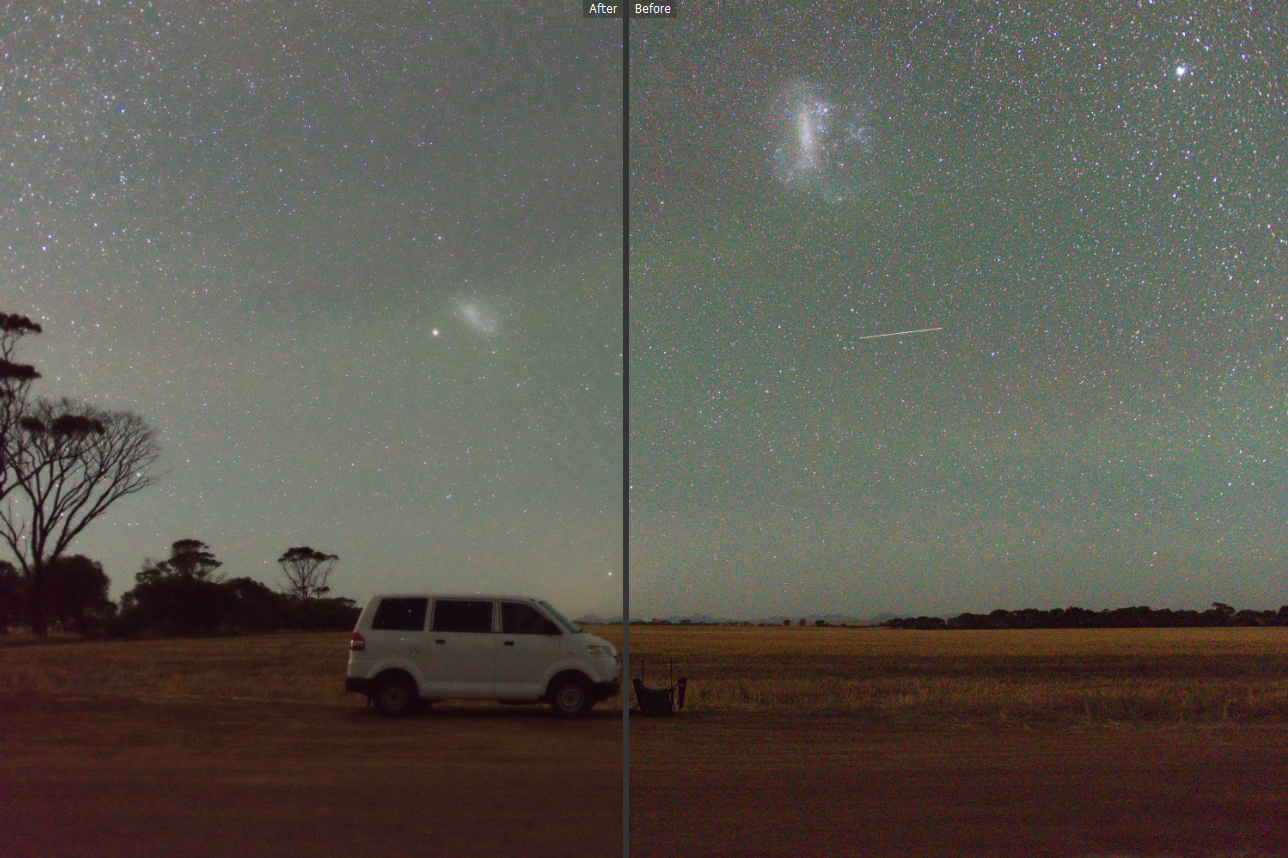
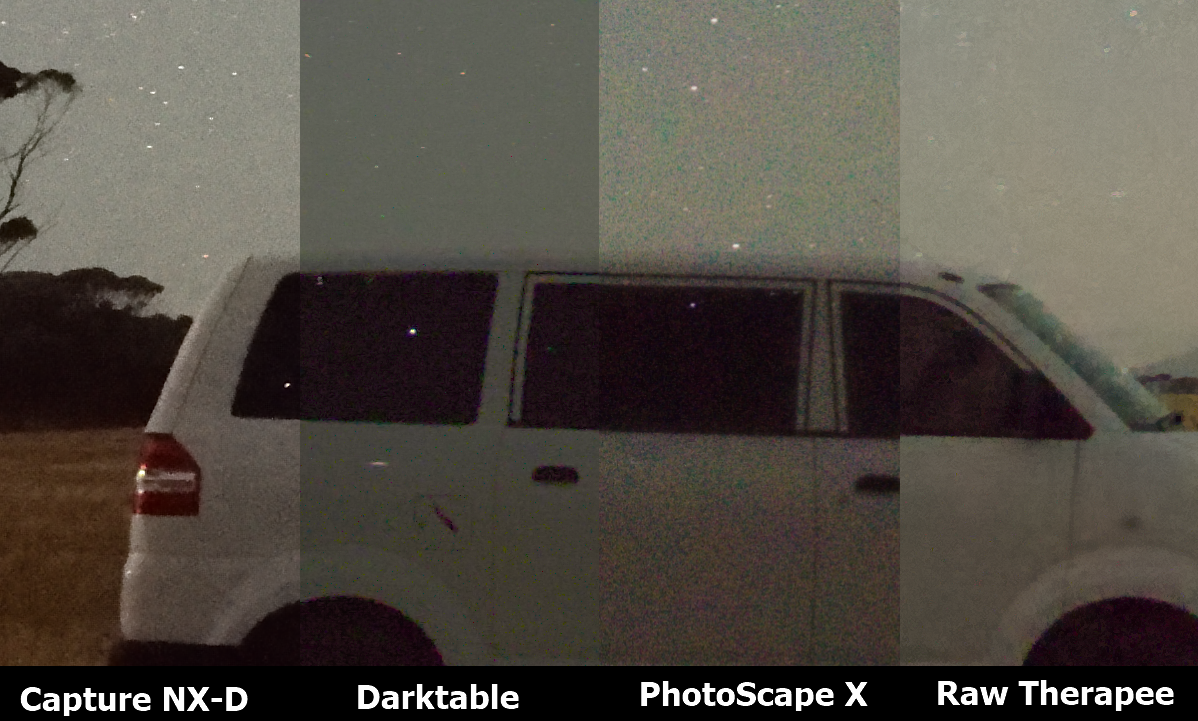
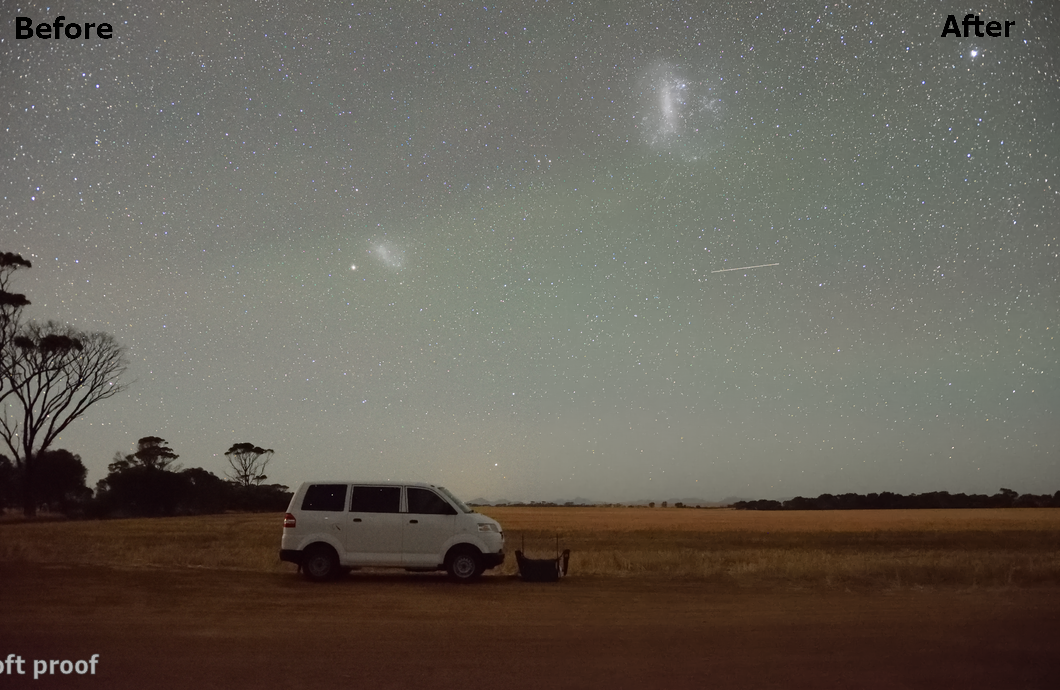
Pic. 1 – 3 Initial image appearance in all the opensource image processing software taken into account, where: 1 – ISO 250, Larb Hollow Overlook, UT, USA; 2 – ISO 2500, Addenbrookes Hospital as seen from Haddenham, UK; 3 – TISO 10000, The Magellan Clouds seen near Gnowangerup, WA, Australia.
Looking at these images, we can easily spot the different levels of noise, which come straight from the RAW file. The rightmost, Capture NX-D example is the best and shows how the clear image should look like. Now is the time to take a detailed insight into cropped pieces in the same order (Pic. 4 – 6).
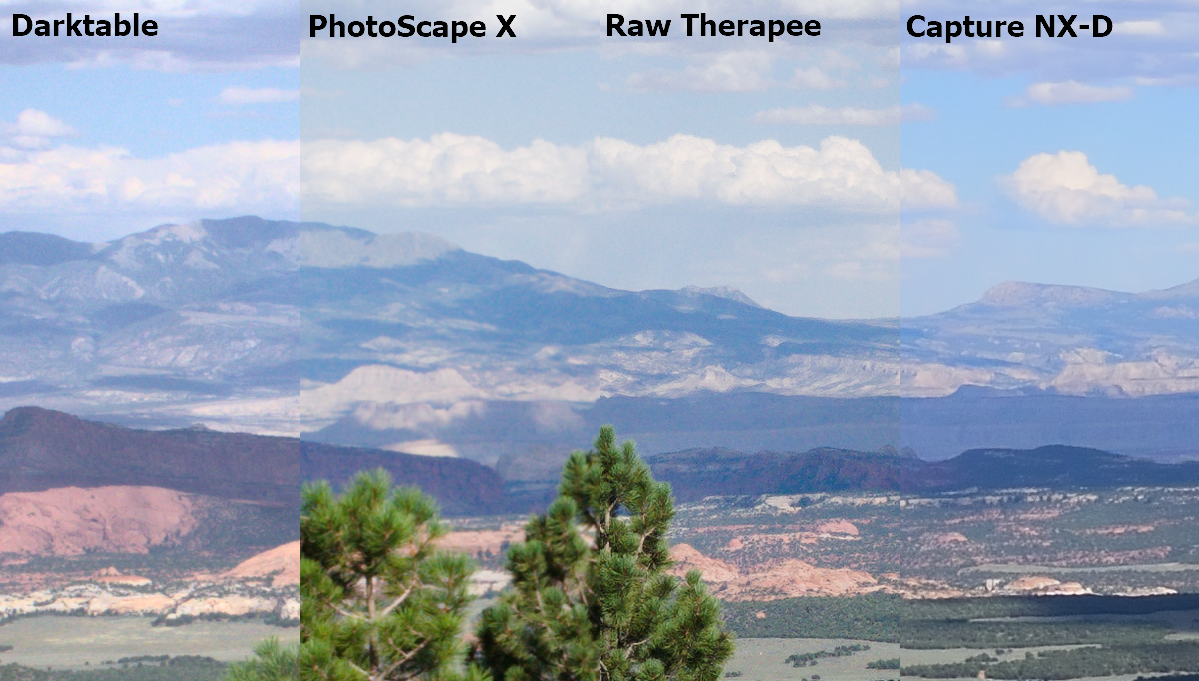
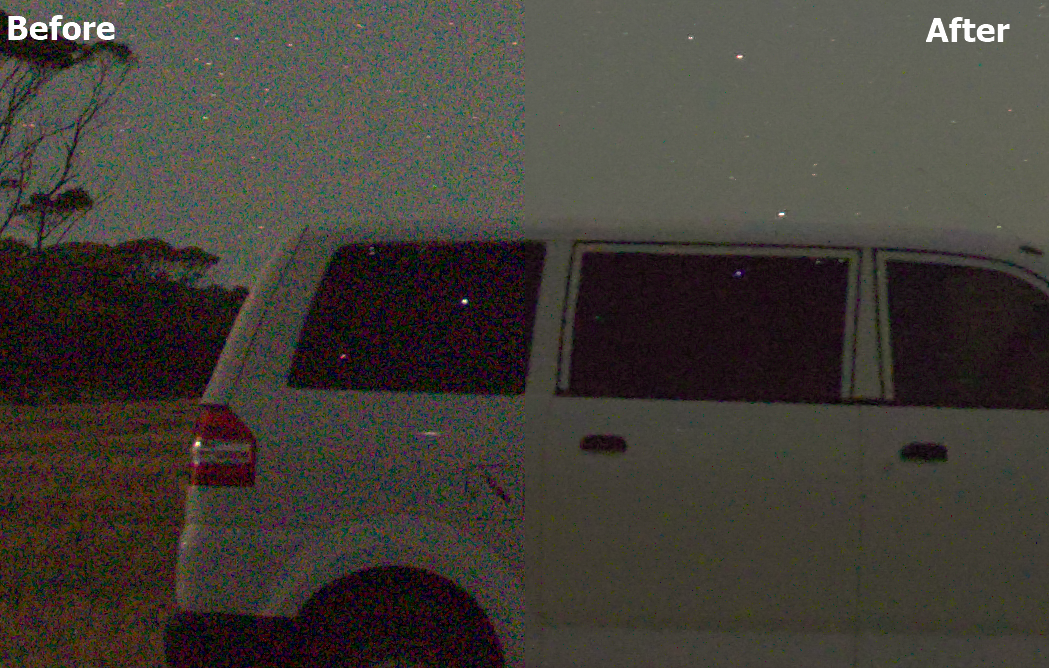
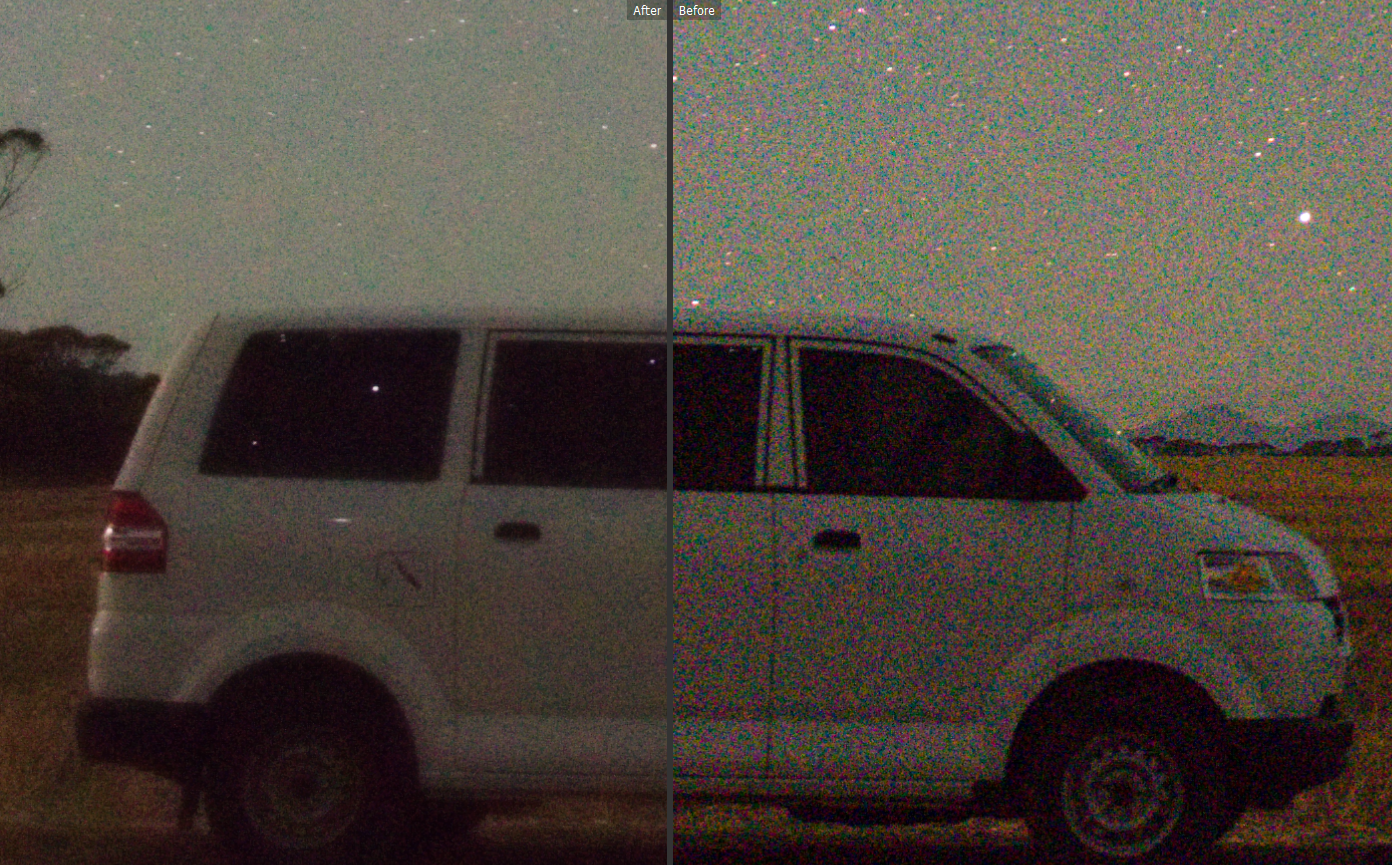
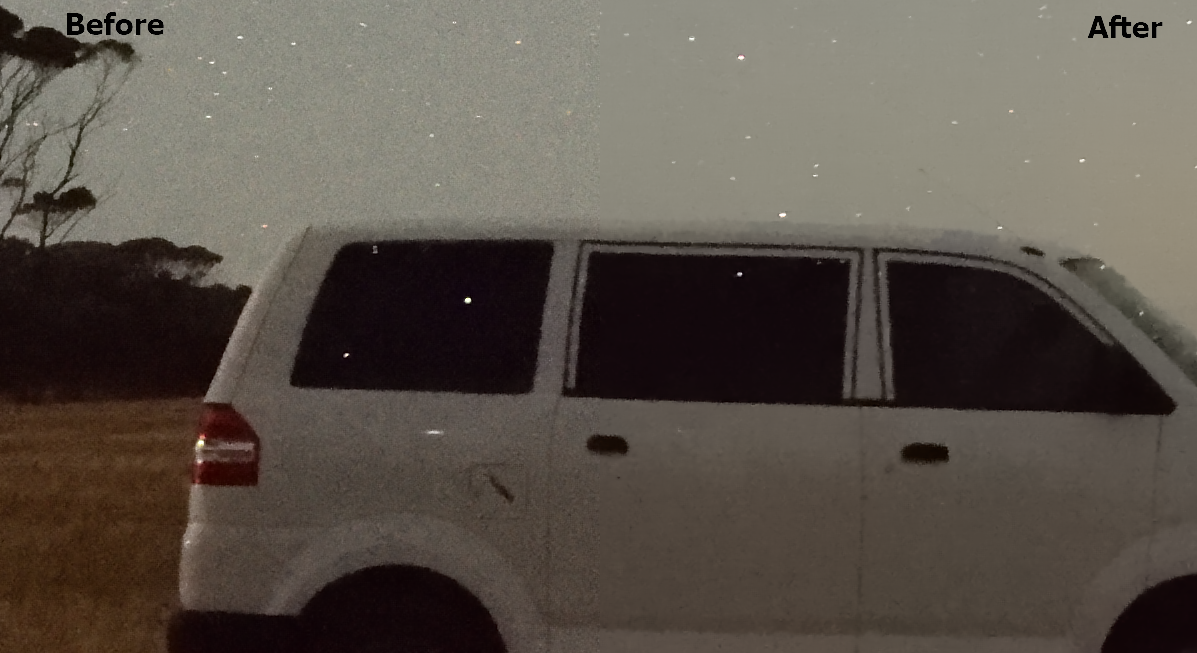
Pic. 4 – 6 Initial image appearance in all the opensource image processing software taken into account, where: 4 – ISO 250, Larb Hollow Overlook, UT, USA; 5 – ISO 2500, Addenbrookes Hospital as seen from Haddenham, UK; 6 – ISO 10000, The Magellan Clouds seen near Gnowangerup, WA, Australia. Cropped.
Now, the difference between Capture NX-D and the OpenSource software spectrum is striking. The color and light noise, which comes from RAW is terrible, making the image quality strongly deteriorate. It’s really far from our approach.
The Nikon Capture NX-D software gives us in default 50% denoised image, so we don’t see the awful color grains anymore.
2. THE BEST STANDARD WAYS OF RAW IMAGE DENOISE
To bring this view back to the one, seen on our camera screen we must spend our precious time denoising, which can be shorter or longer depending on the software. Nonetheless, the time is not as important as the output quality is, so let me run you through all major denoise solutions offered by the following OpenSource software.
Darktable
The Darktable has a few ways of noise reduction, which have been listed and perfectly described on this page. I came across all of them, following the YouTube tutorial attached below, and used the best (or the most effective) one in my images. This is the denoise profiled option, which must be doubled in terms of the distinction between lightness and color (Pic. 7 – 12).

Pic. 7, 8 Noise reduction in Darktable for ISO 250. Larb Hollow Overlook, UT USA: 7 – normal; 8 – cropped.
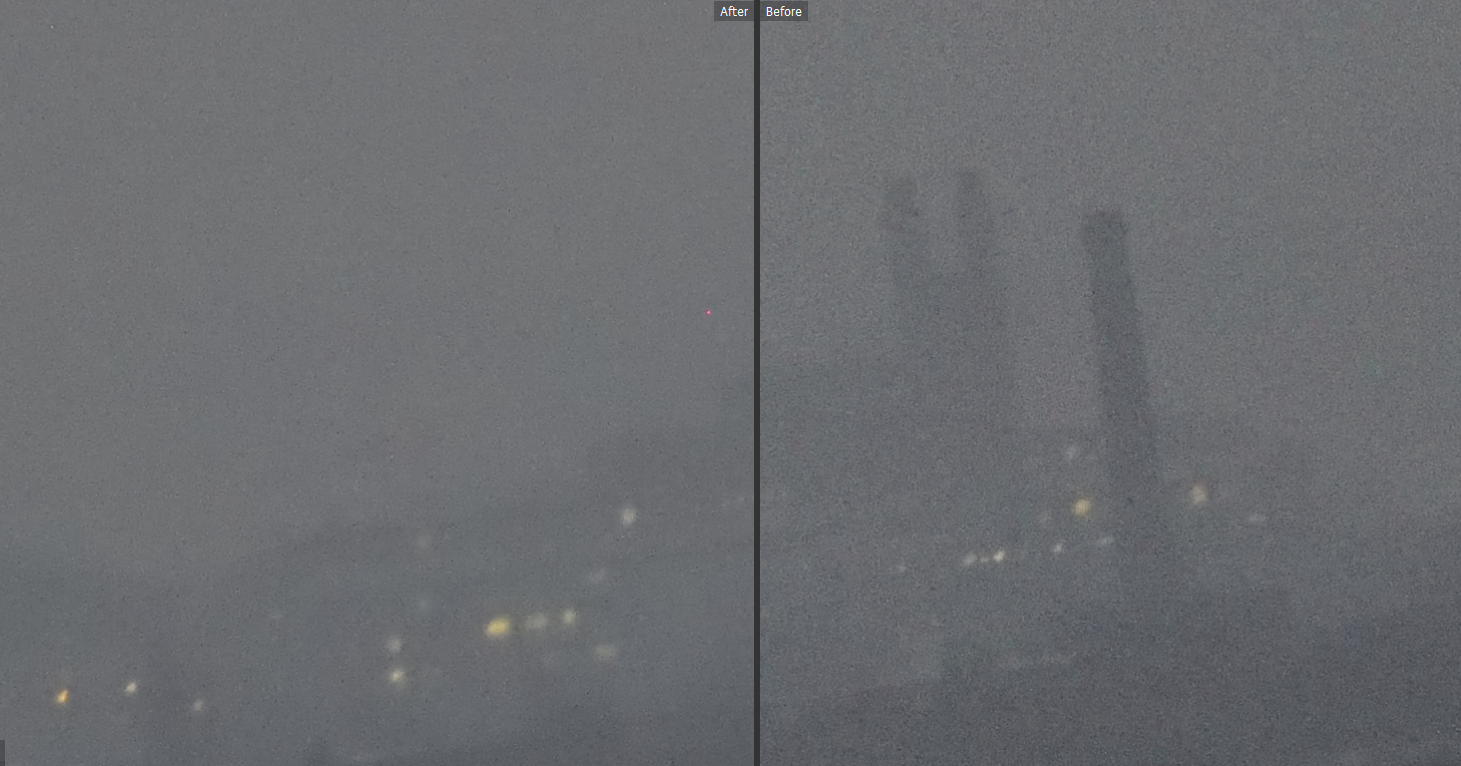
Pic. 9, 10 Noise reduction in Darktable for ISO 2500. Addenbrookes Hospital as seen from Haddenham, United Kingdom: 9 – normal; 10 – cropped.
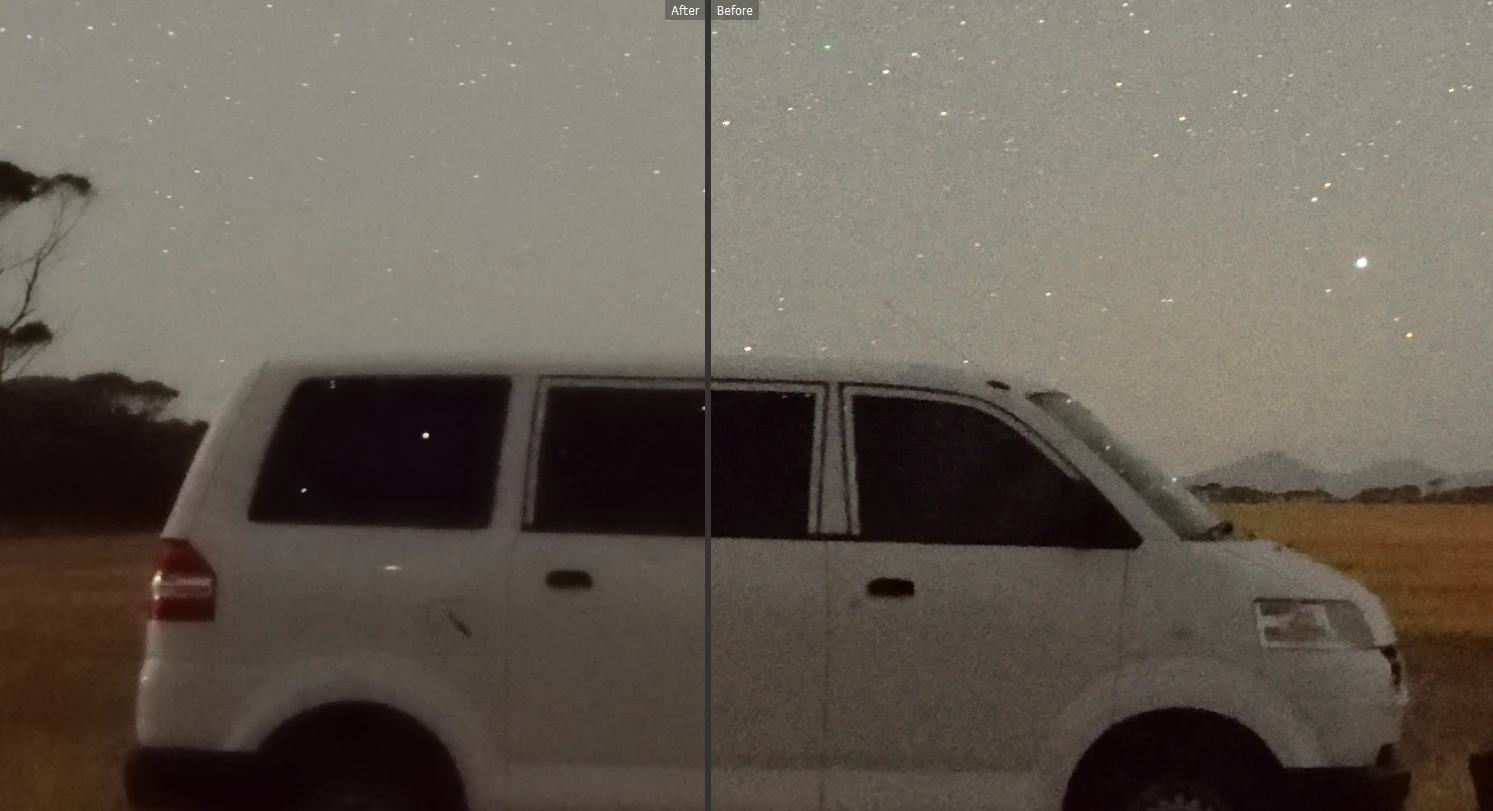
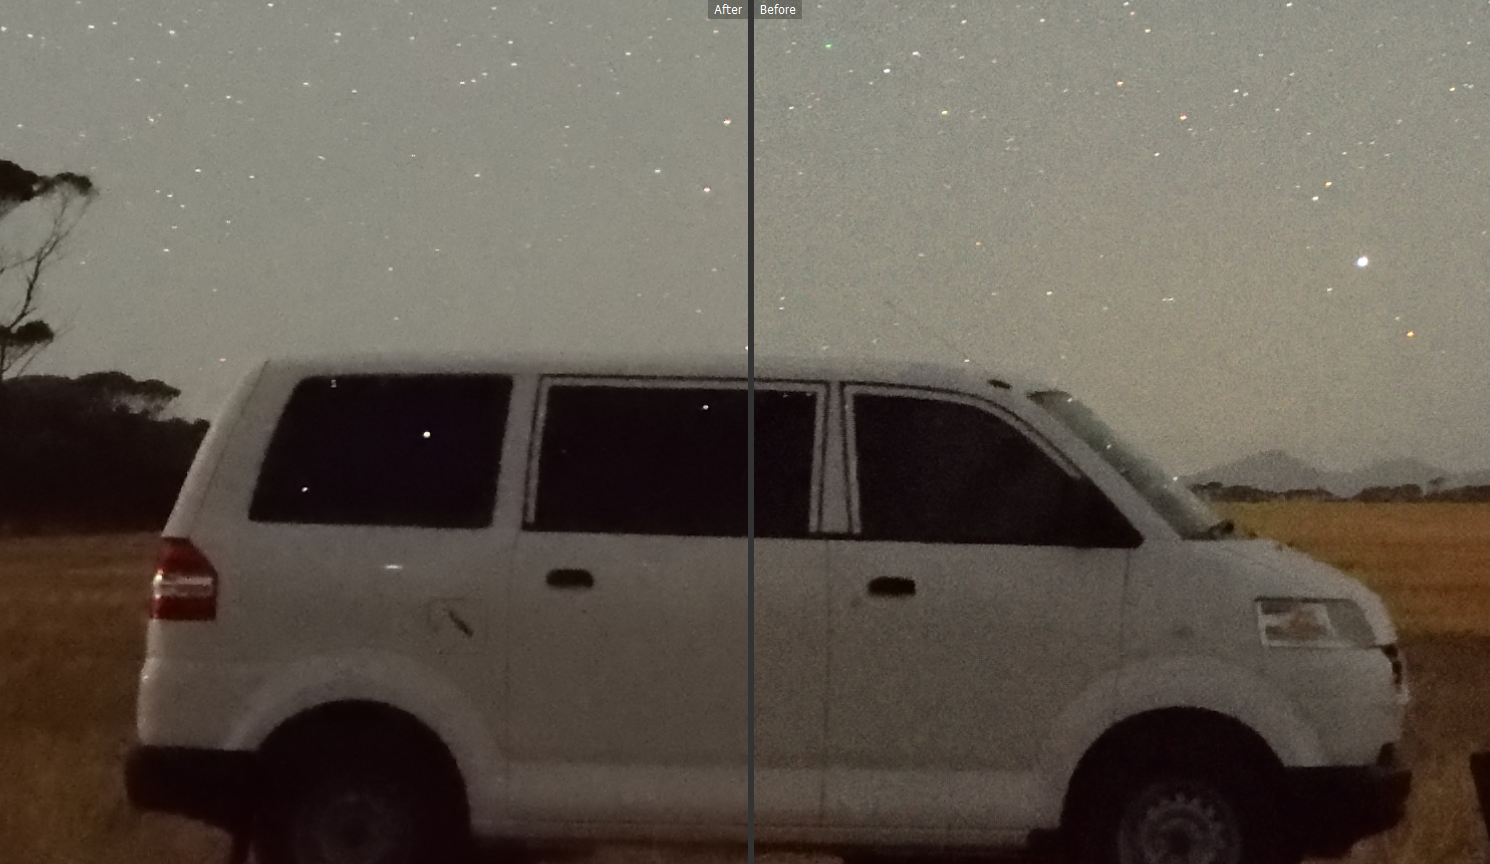
Pic. 11, 12 Noise reduction in Darktable for ISO 10000. Near Gnowangerup, WA, Australia: 11 – normal; 12 – cropped.
PhotoScape X
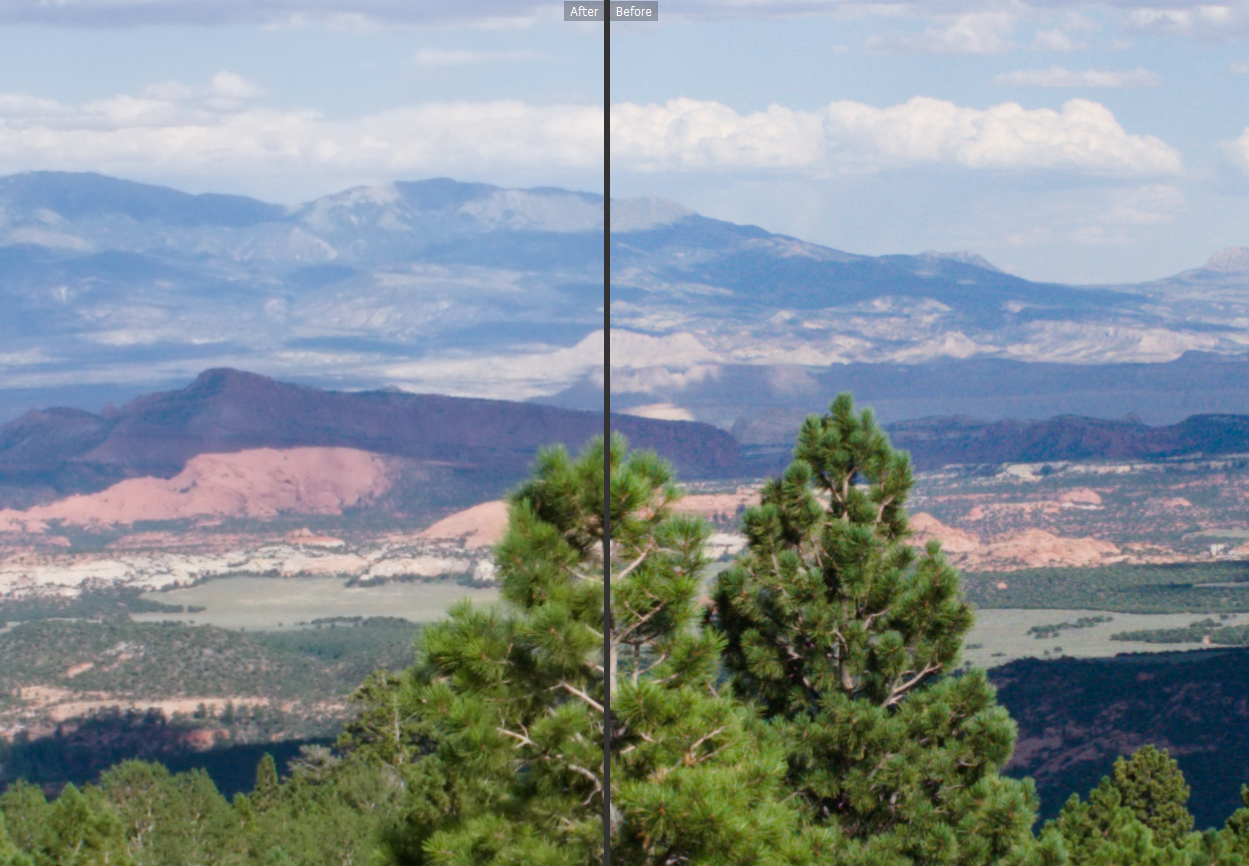
In PhotoScape X the noise reduction is simple. We are confined to two sliders only: luminance noise and color noise. It’s very simple to use them both, which you can watch in the YouTube tutorial at the very bottom. The result it’s not the best I think, what we can see even in the low ISO images (Pic. 13 – 14).

Pic. 13, 14 – The noise reduction example was done with PhotoScape X, where 13 – is normal; 14 – is cropped. Larb Hollow Overlook, UT, USA. Click to enlarge.
There is no difficulty to spot, that the post-processed part of our photo tends to be blurry. I put only 25% in both values, which looks like too much. When I reduce the denoise amount by half, my picture looks better (Pic. 15).
Pic. 15 The low ISO image denoise with PhotoScape X after the reduction of the values. Larb Hollow Overlook, UT, USA.
The character of noise reduction in PhotoScape X is the flexible amount of both values, as you can put it. Technically you can do exactly the same in Darktable, but there despite the ISO level, your result is going to be the same. In PhotoScape X the strength of this denoising should depend on the ISO level. If, for example, your image has ISO 250, like above, then a low amount is required. Otherwise, you will get too blurry stuff. It works the other way around too. The best example to check is the picture below, taken with ISO 2500 conditions. I used two separate circumstances to check this out: 100% and about 18-50% (Pic. 16 – 19).
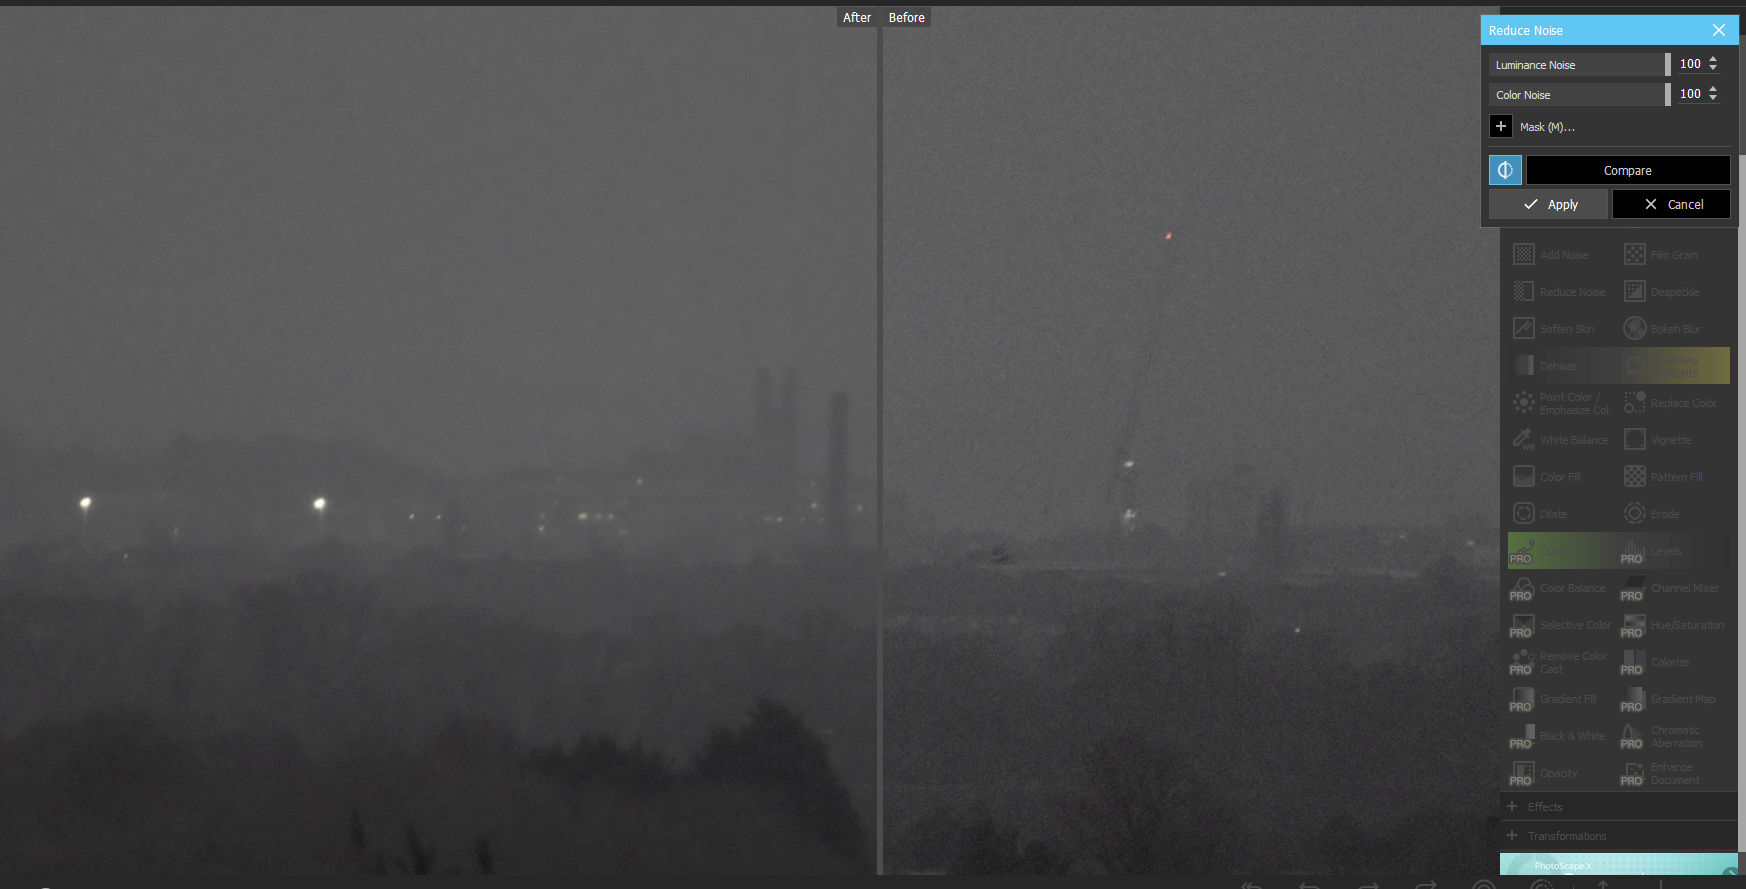
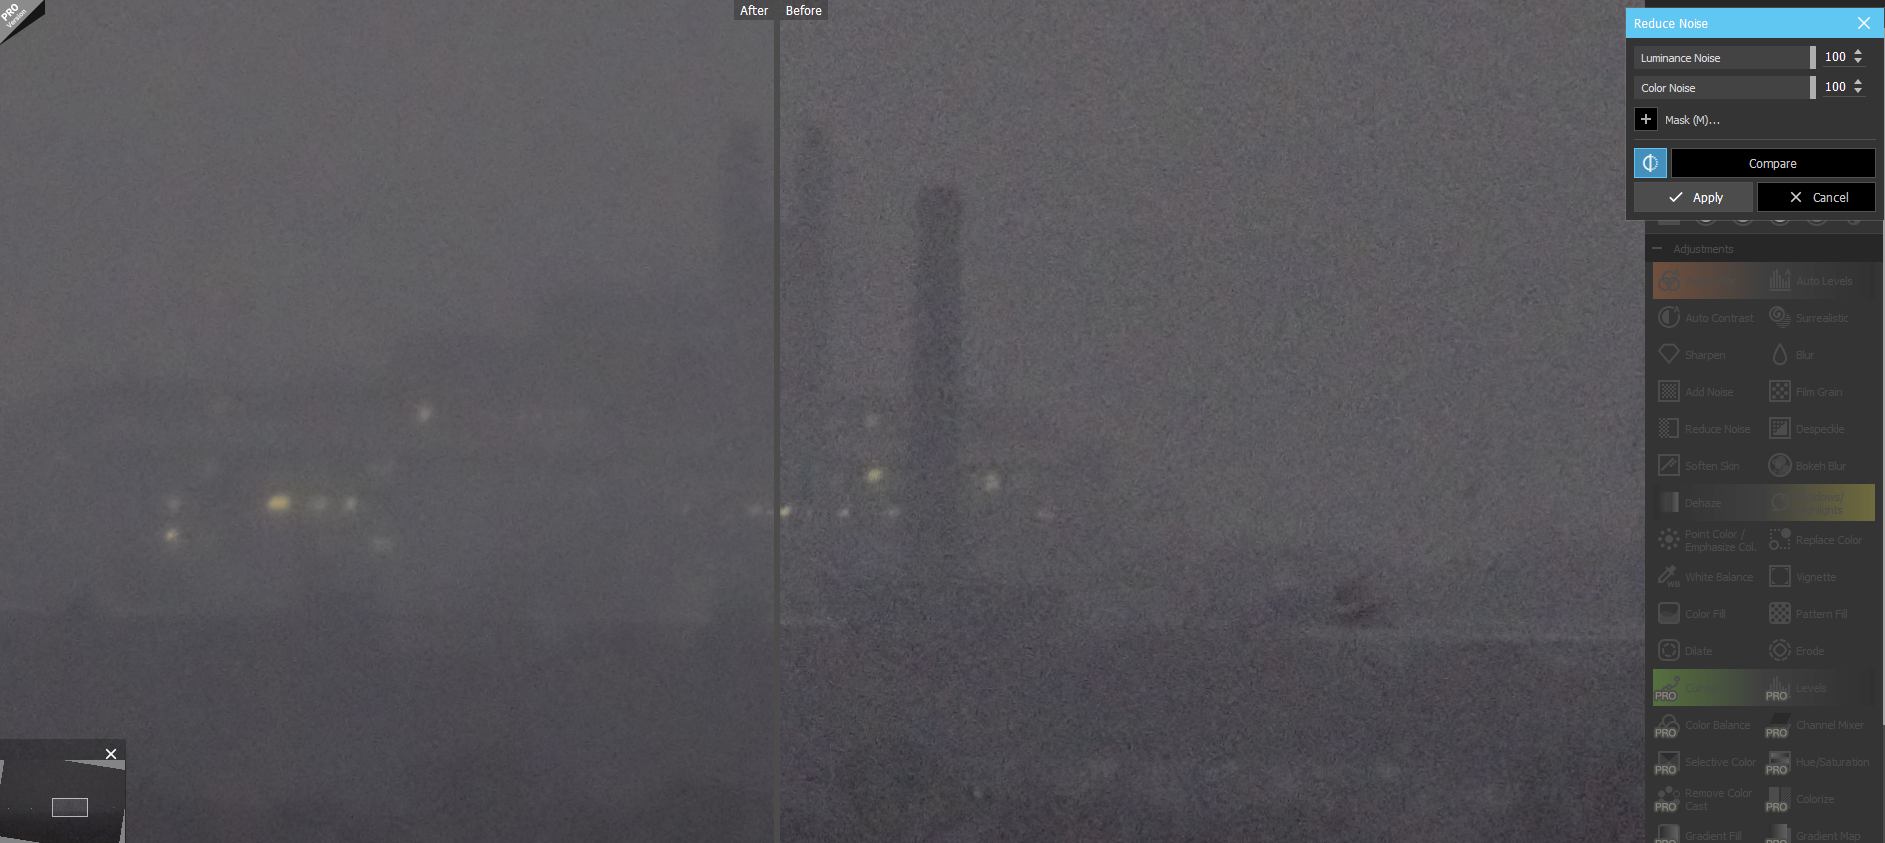
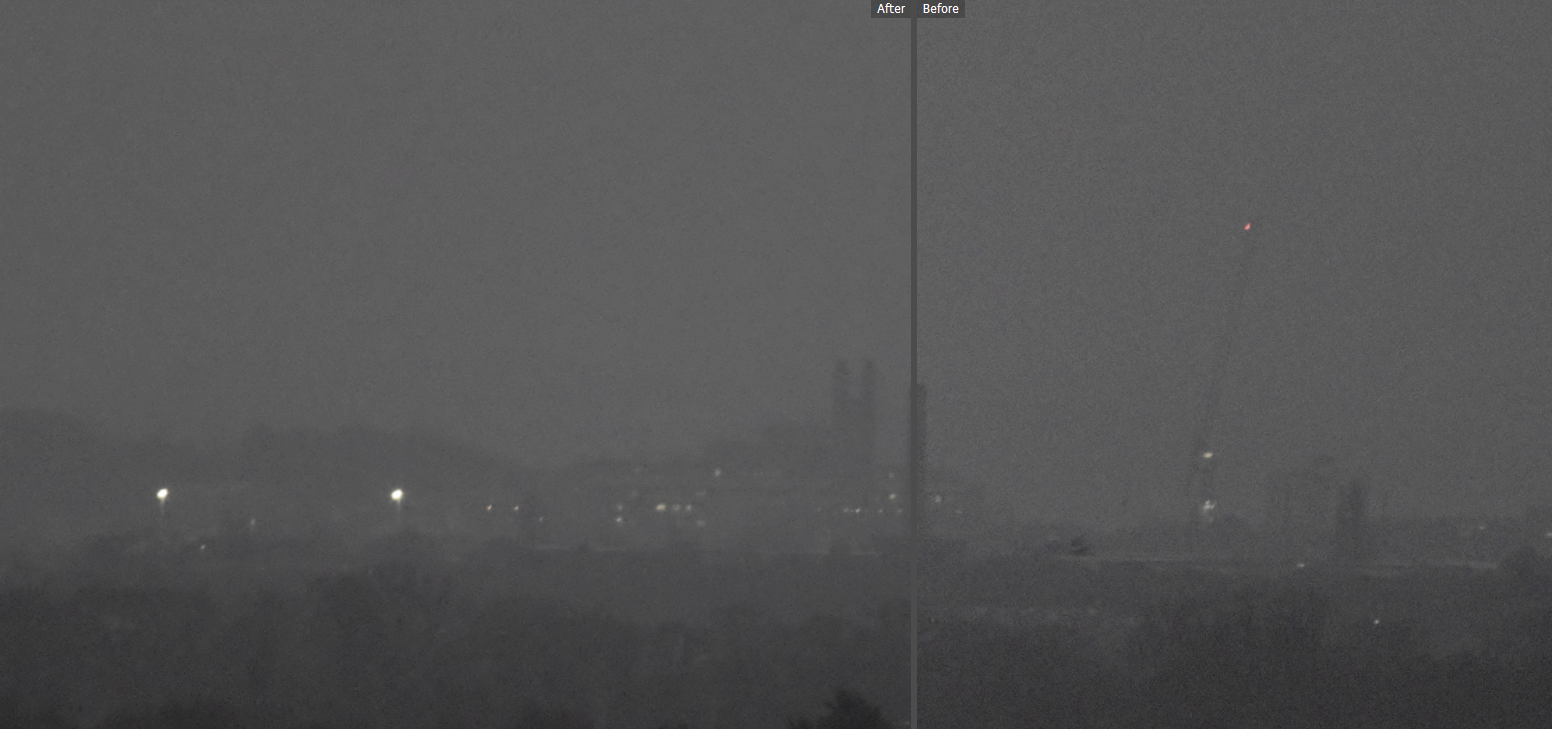
Pic. 16, 17 – Noise reduction in PhotoScape for ISO 2500 image, when 100% of the process has been applied. 16 – normal; 17 – cropped. Addenbrooke’s Hospital as seen from Haddenham, UK. Click to enlarge.
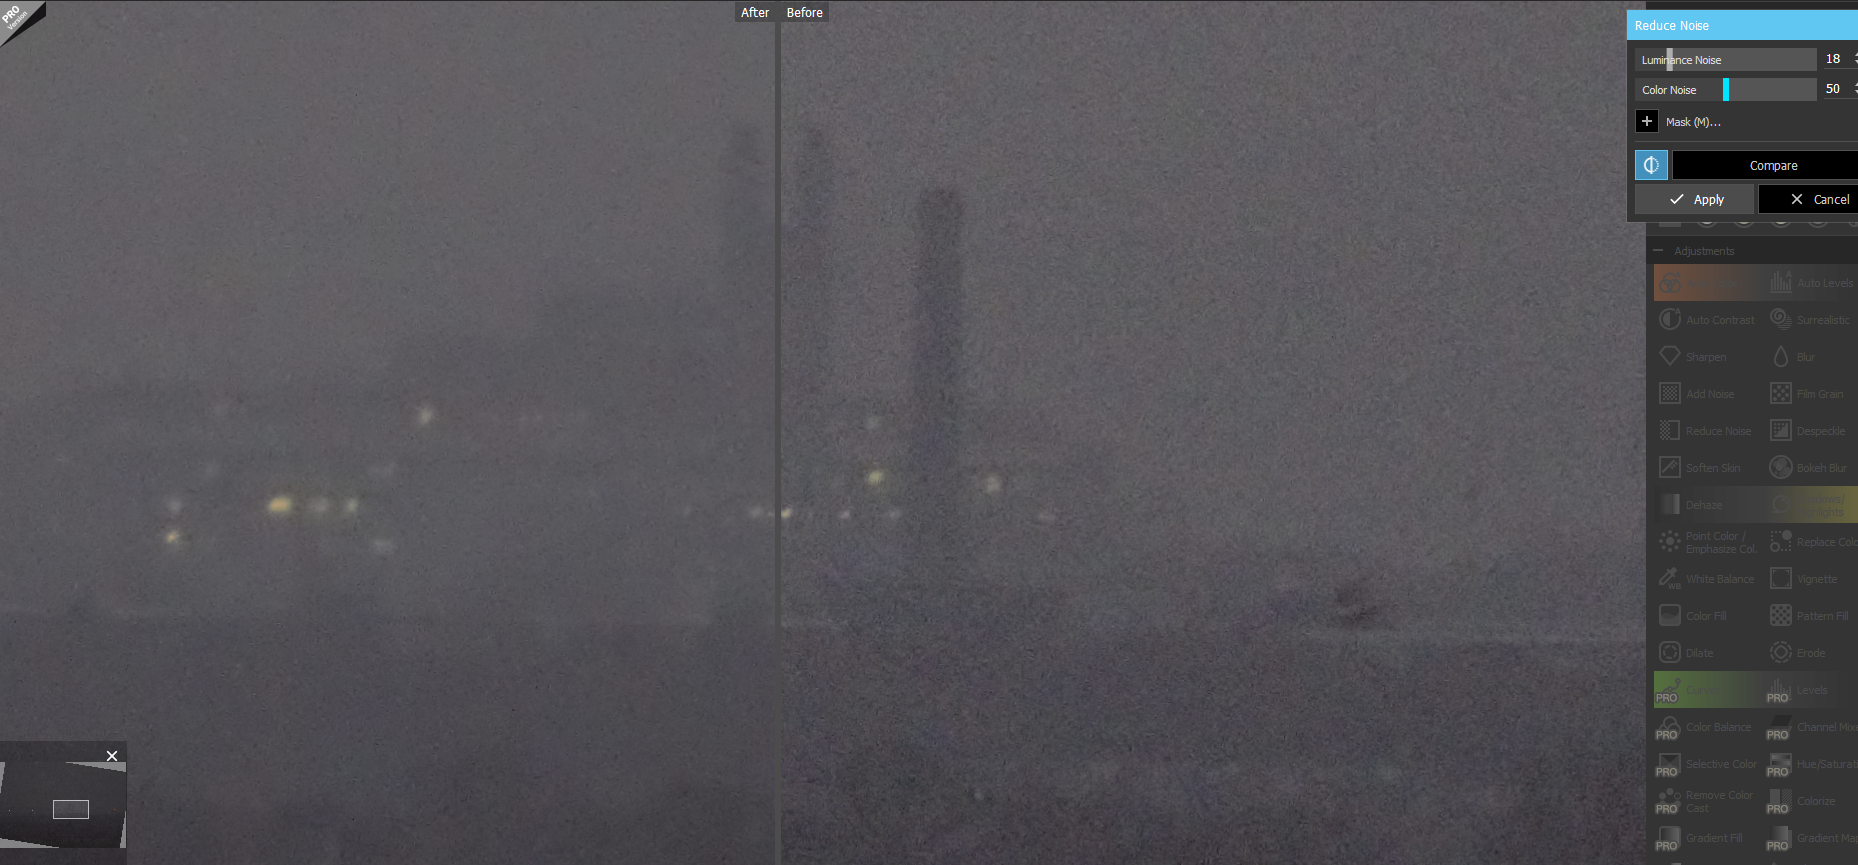
Pic. 18, 19 – Noise reduction in PhotoScape for ISO 2500 image, when 18-50% of the process has been applied. 18 – normal; 19 – cropped. Addenbrooke’s Hospital as seen from Haddenham, UK. Click to enlarge.
The difference between these 2 outputs is huge. The first one above shows quite a fuzzy image as a result. The second, lower one looks better and can be competitive against the Darktable.
In the case of the last picture, taken with ISO 10000 I showed the best result only (Pic. 20, 21).
Pic. 20, 21 – Noise reduction in PhotoScape for ISO 10000 image, when 100% of the process has been applied. 20 – normal; 21 – cropped. Gnowangerup, WA, Australia.
Unfortunately, the denoise scale offered by PhotoScape X wasn’t enough to proceed with this photo correctly. In the outcome, we still see quite a lot of hot pixels. It puts our work far behind the Darktable shown above.
Raw Therapee
The Raw Therapee is the last one, which I took into account with this process. This application is specific because you cannot see the denoise result unless you zoom in on the real image size. The 1:1 scale is not always comfortable, as we prefer to take a general look at our image and see how the noise behaves under potentially smaller sizes. You can obviously save each of your post-processed images, but it takes longer, and we don’t want that.
Anyway, coming across this process we can quickly notice, that the outcome is really poor. It’s not visible enough when you deal with low ISO images (Pic. 22), but is greatly expressed in high ISO photos (Pic. 23, 24).
Pic. 22 The denoise effect in Raw Therapee for low ISO images (ISO 250). Larb Hollow Overlook, UT, USA.
The program doesn’t manage correctly with color denoising I think. Despite the light noise reduction, which looks quite good, we can spot a multitude of garish-reddish blobs…
Pic. 23 Poor noise reduction effect for high ISO images done by Raw Therapee. Reddish blobs appear quite often across the post-processed image. Addenbrookes Hospital, Cambridge, United Kingdom.
…even if you change the quality from moderate to high, they still appear, although are weaker. Unfortunately as a totality, the image looks blurry and poorly.
Pic. 24 The poor denoise effect in Raw Therapee for the image with ISO 10000. Gnowangerup, WA, Australia.
General comparison
Here I combined altogether the images denoised above with the Capture NX-D product. Let’s see then, which one is the most effective in this process. All images are on a 1:1 scale, where the difference is shown the best (Pic. 25-27).
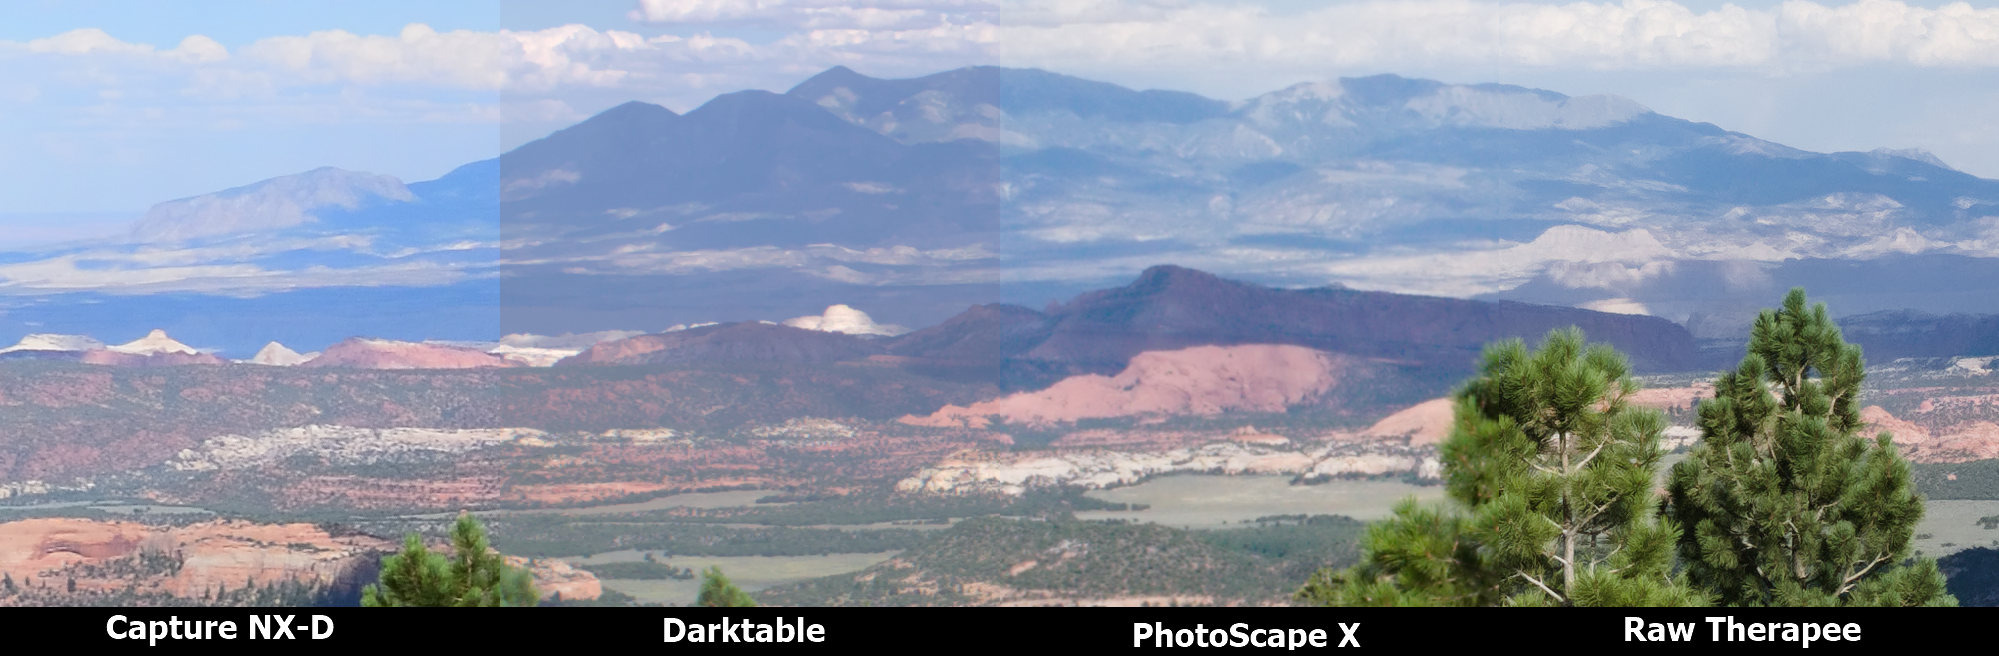
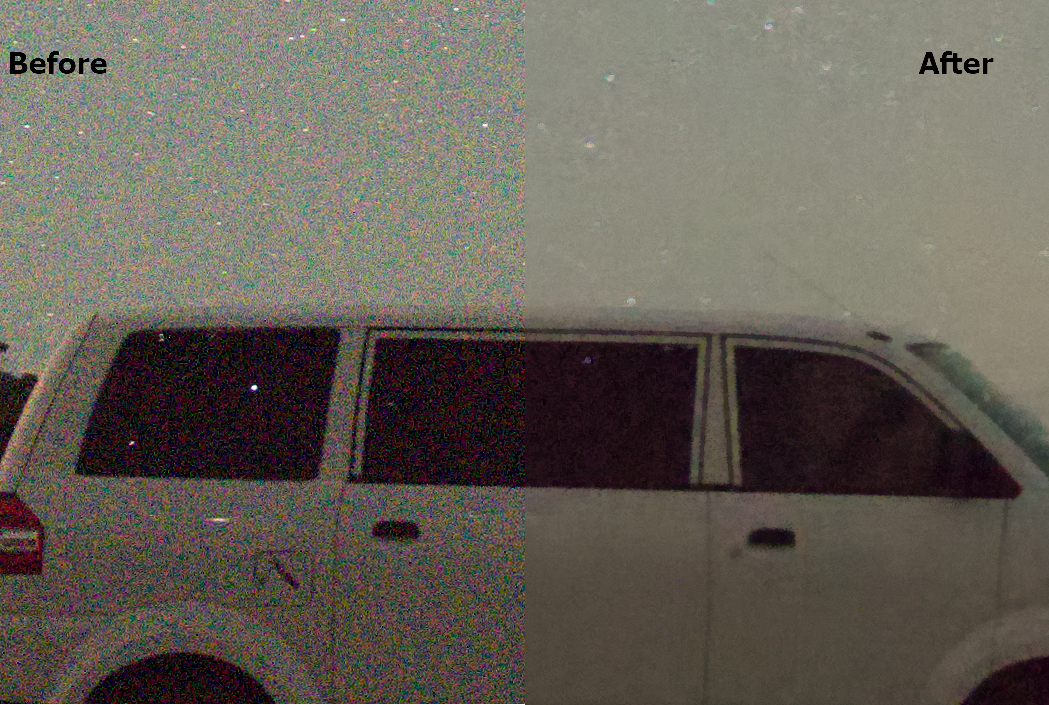
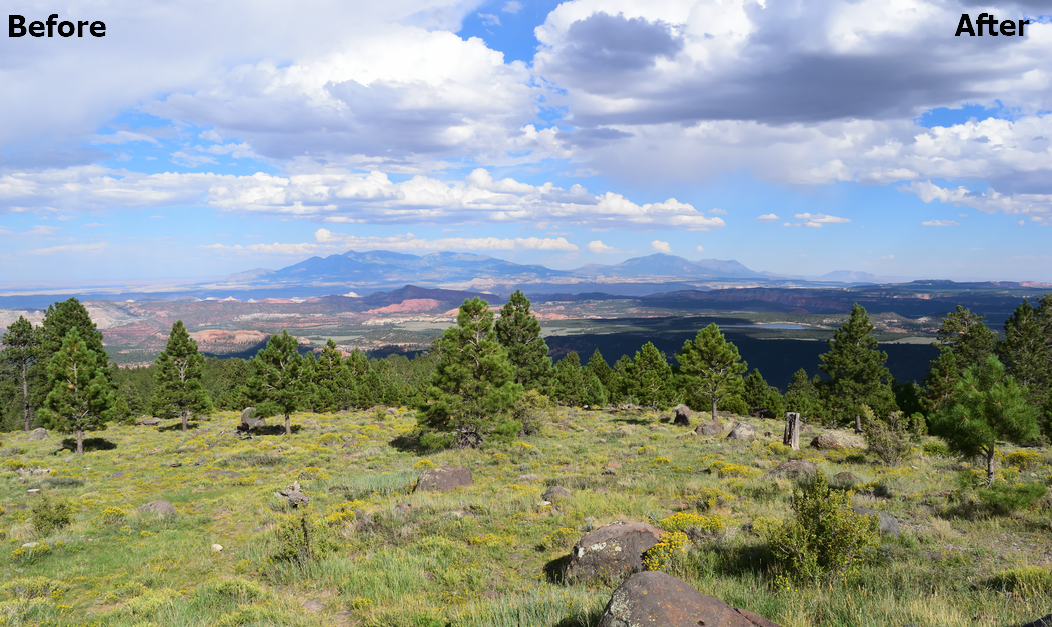
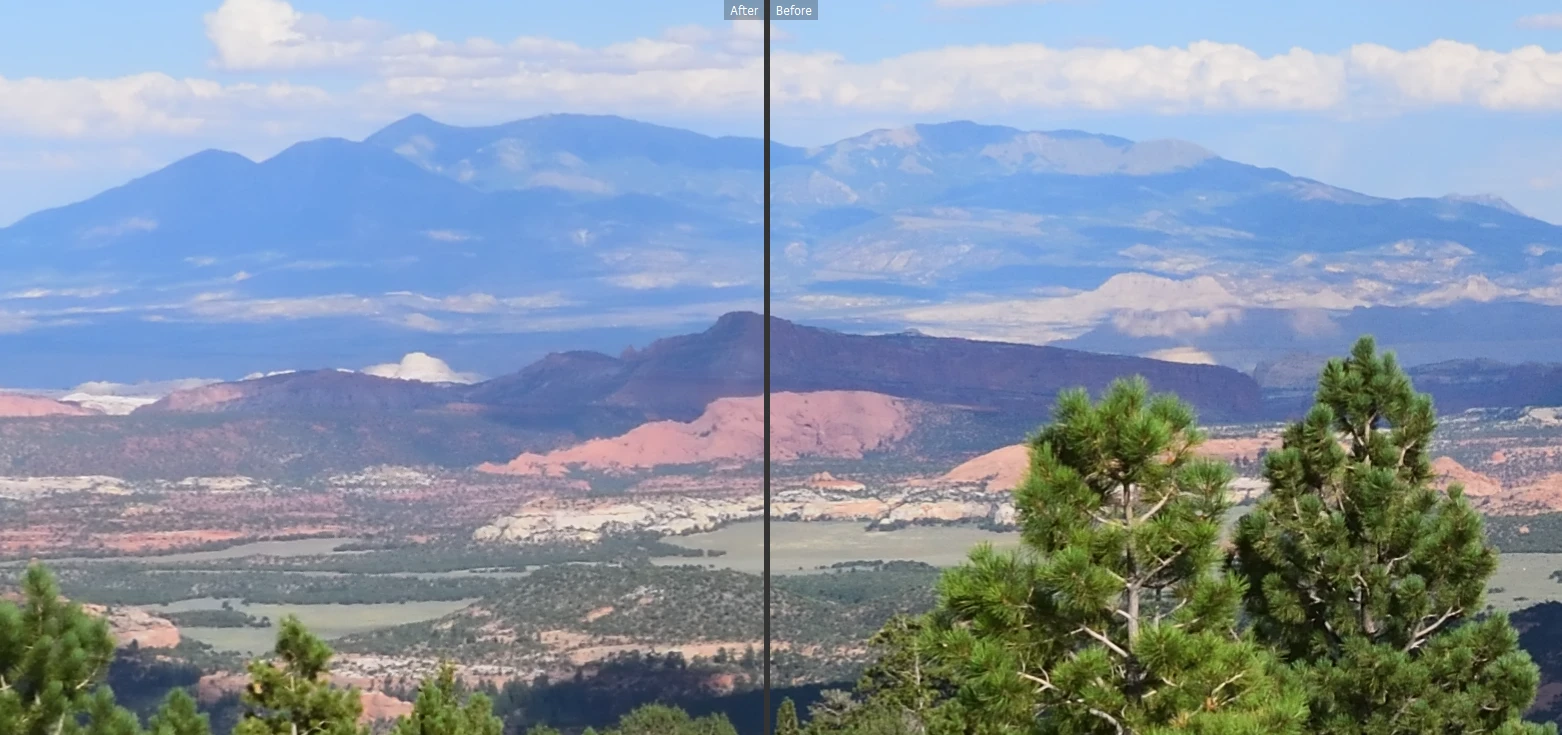
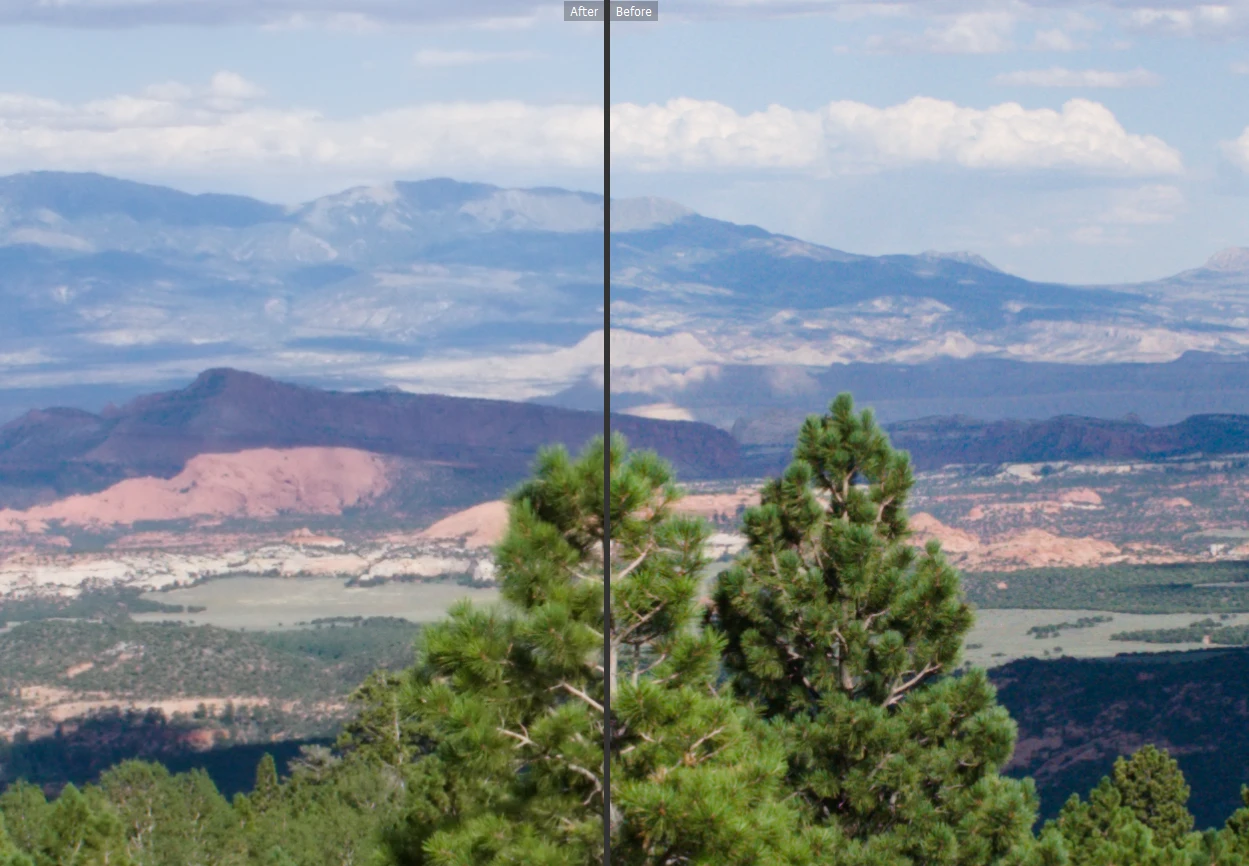
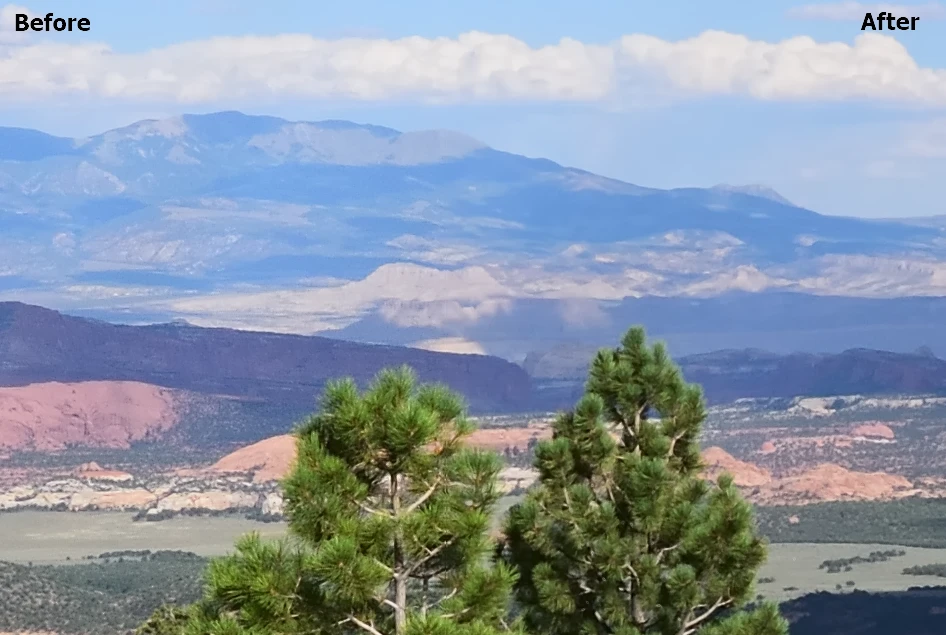
Pic. 25 General noise reduction summary for ISO 250 photo. Larb Hollow Overlook, UT, USA. Click to enlarge.
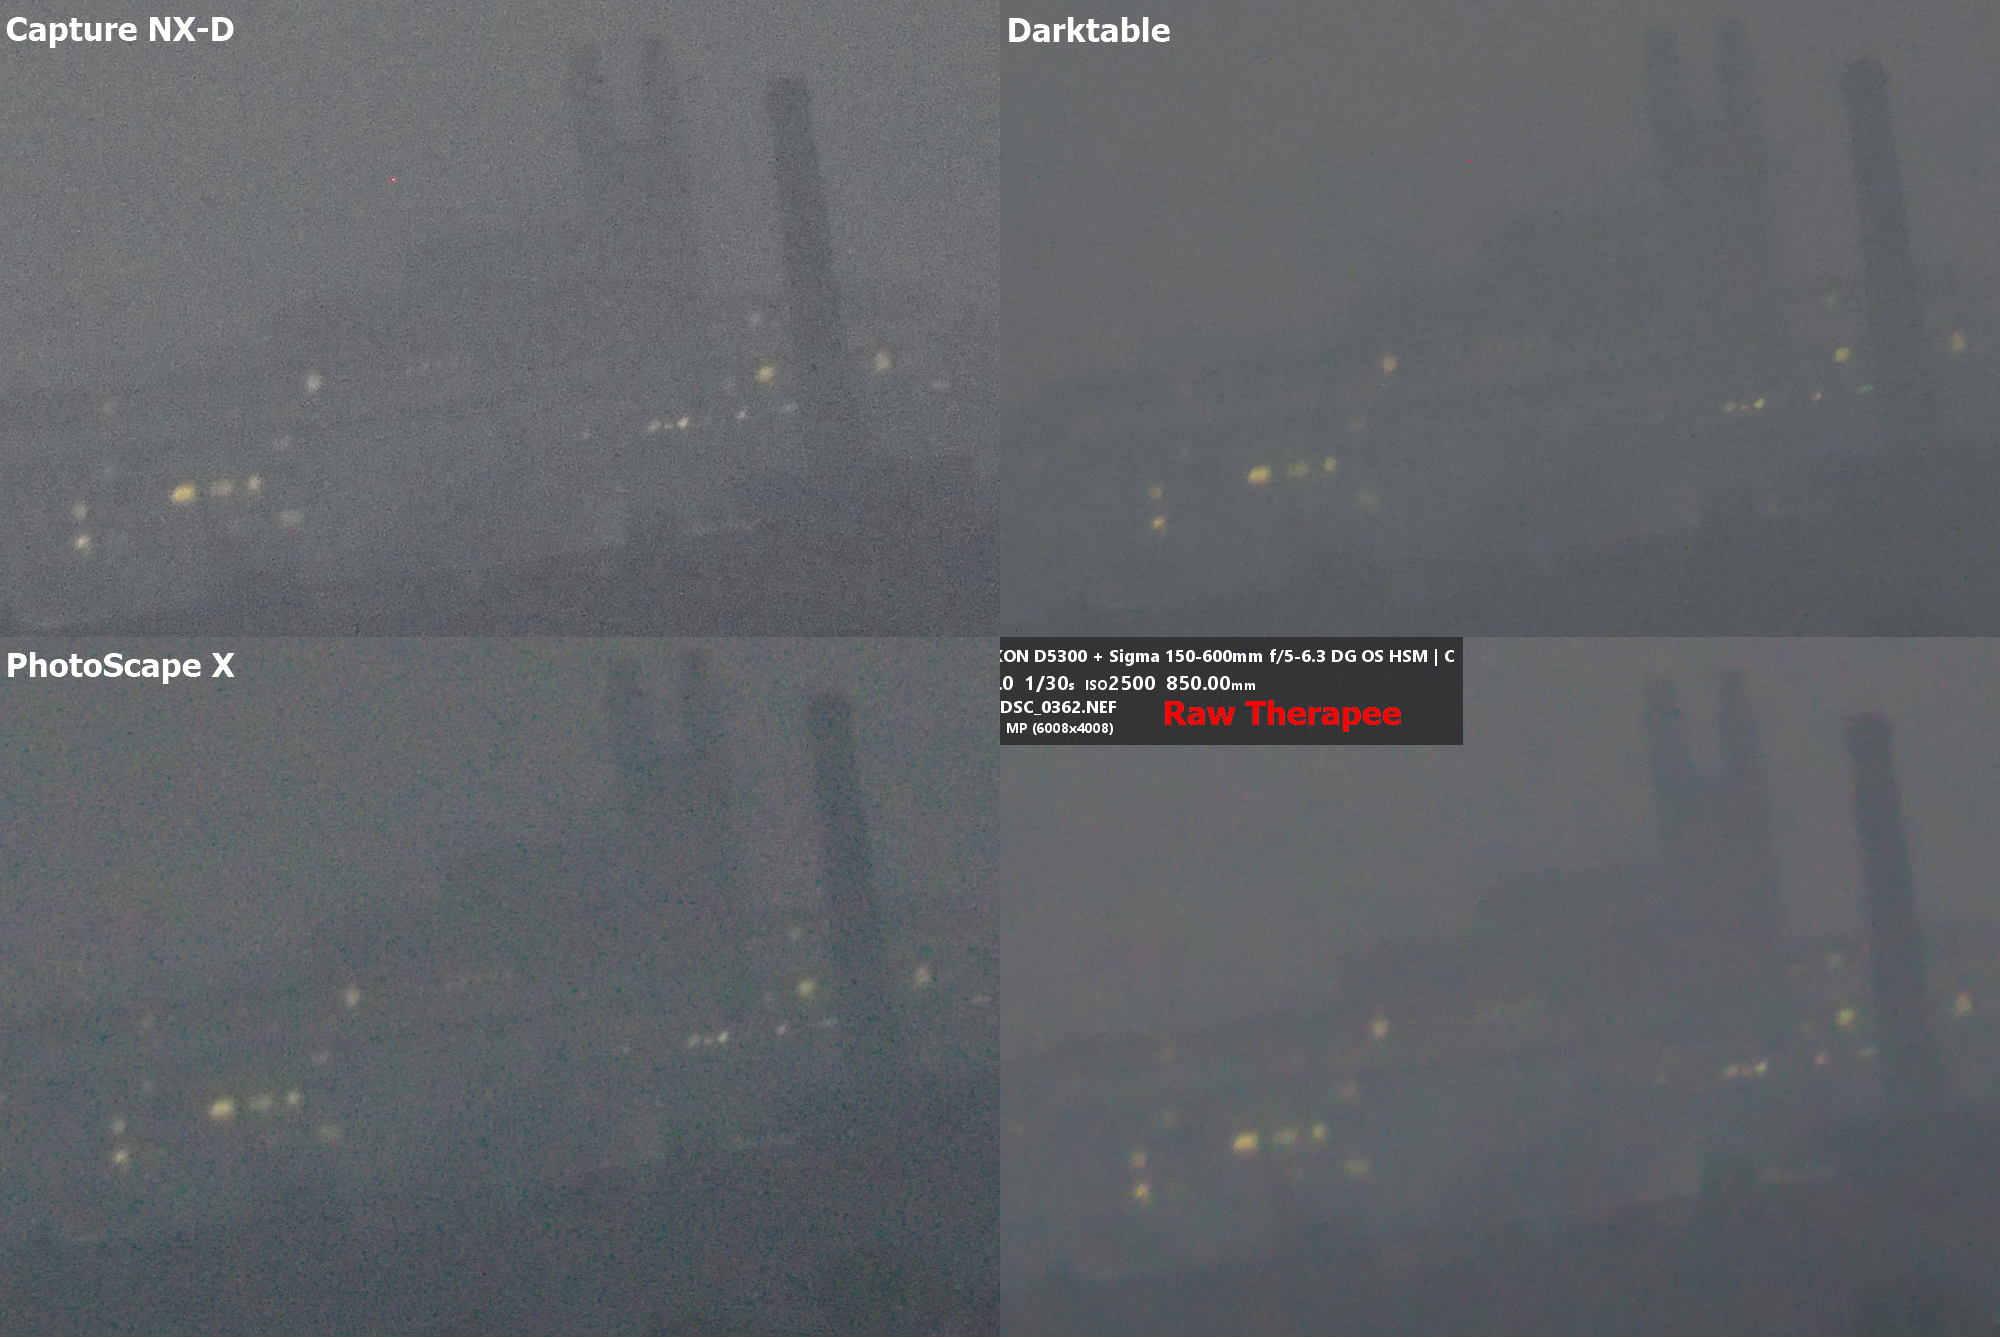
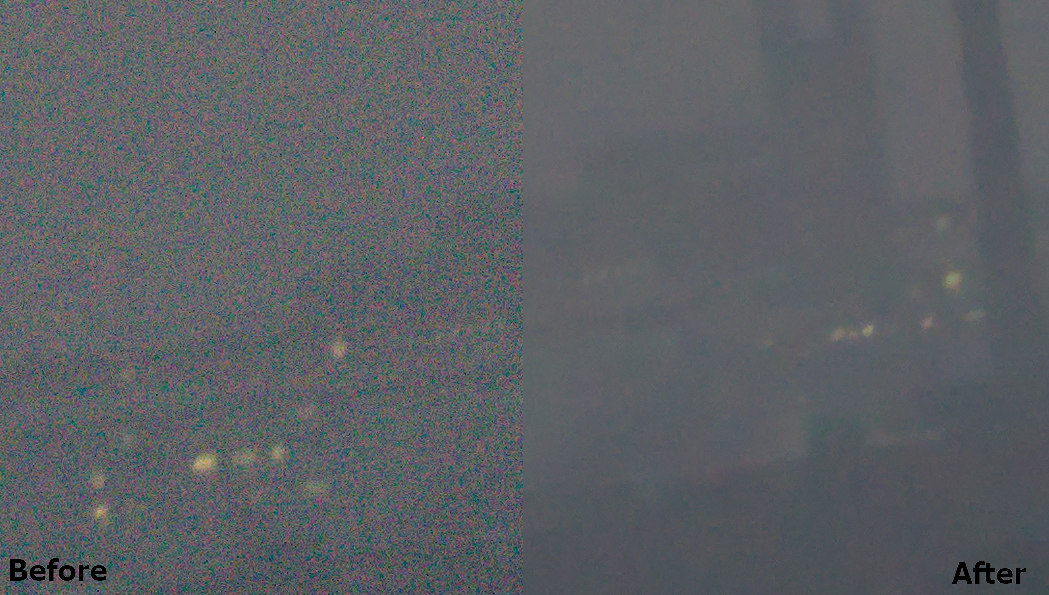
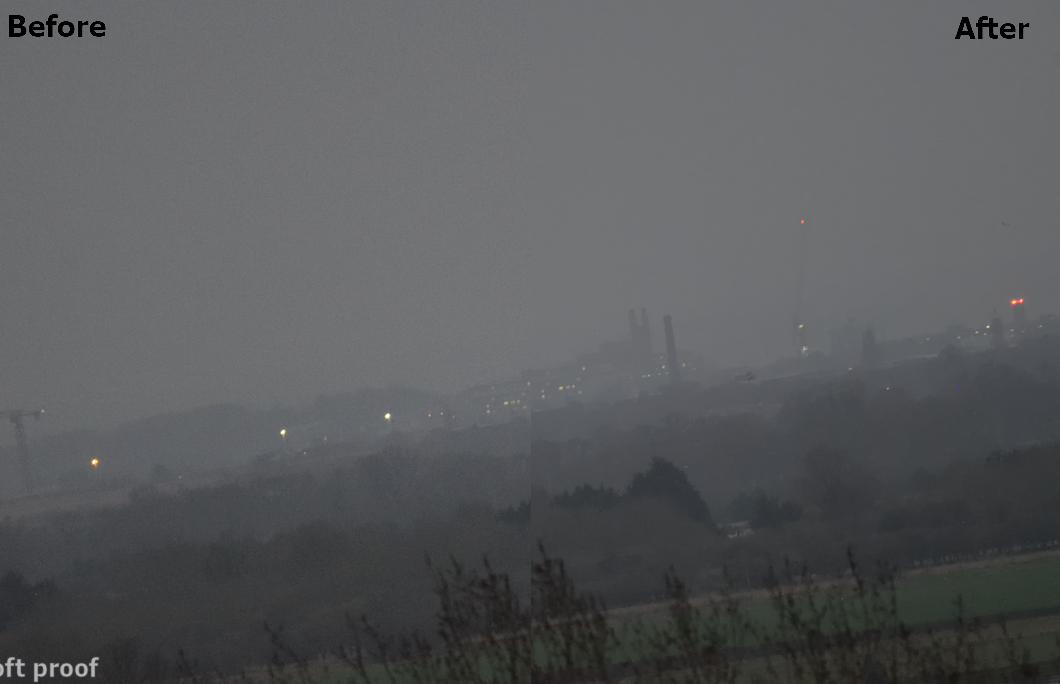
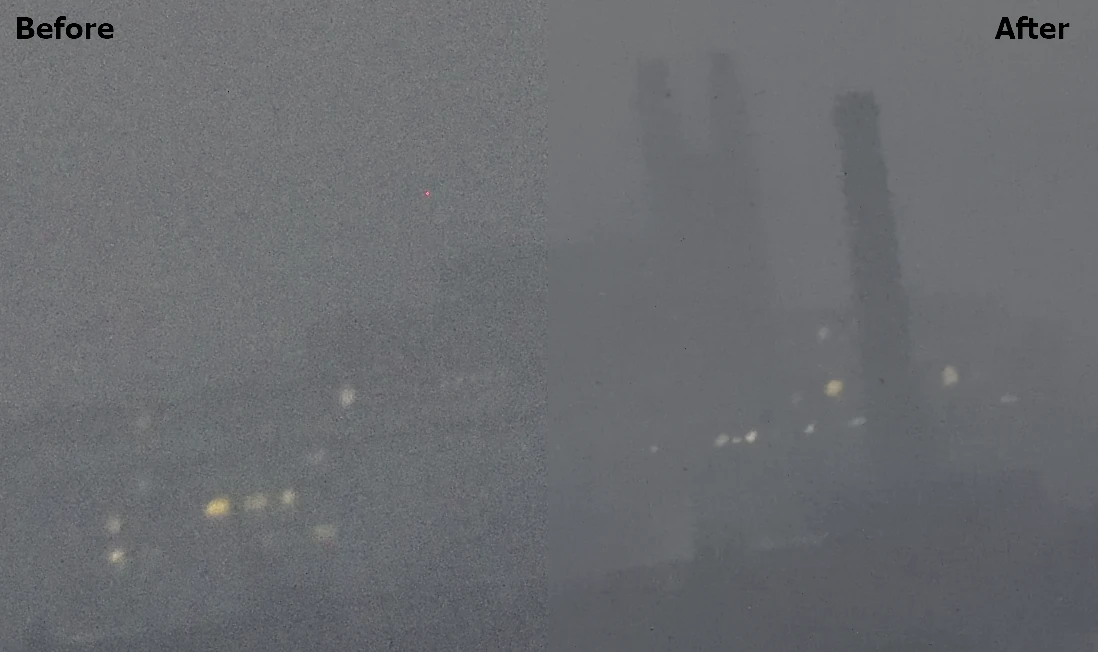
Pic. 26 The noise reduction comparison for ISO 2500 image. Addenbrookes Hospital, Cambridge, United Kingdom. Click to enlarge.
Pic. 27 The noise reduction comparison for ISO 10000 picture. Gnowangerup, WA, Australia.
The variance in the result is big. The worst managed PhotoScapeX, where the noise level is even worse than in Capture NX-D (without any alteration!). The Darktable and RawTherapee bring similar results, however, Darktable changes the colors in general. On top of that, some garish pixels can appear sparkly across the image in some crucial places. The Raw Therapee looks quite fuzzy with some faint reddish blobs seen in the image.
3. IMAGE DENOISE WITH TIFF IMAGE
First of all, let’s answer the most common question. Which format is better: RAW or TIFF? It’s hard to say because it depends on the purpose of your image processing. The basic attitude of the .raw file, as the name of the extension, says is the crude file, which comes straight from our DSLR negative. In the outcome, we can do everything with our picture, having the extended sensor dynamic range and 256 intensity levels for every single pixel. the .raw image is unscathed when saved in our camera. If we have the necessary software, we can process this image as we want to change a lot of parameters like white balance, contrast, colors, etc. keeping our image with all details. Unfortunately, this format is tailored more for professional photographers, who know how to deal with all the details.
The .tiff format is not as versatile as the .raw format is, so the options for editing are fixed. On the plus side, this format is quality lossless, which is good. The .tiff format is designated for photographers, who don’t really want to work much during post-processing. The .tiff files are inferior to .raw files in terms of tonal gradation. The .tiff file can be executed from the .raw file, but we can lose some demosaicing algorithms (which control i.e. noise reduction), whilst the colors and exposure manipulation are unaffected. Bear in mind, that because the .tiff format doesn’t lose the image details, it requires a lot of space on your disk, even 7x more, than the .raw file.
Having in mind the changes in demosaicing algorithms I noticed, that exporting the .raw image to .tiff format brings completely different results with denoising. In general, the outcome is better for high-ISO images. On the contrary to high ISO, the low ISO picture performance is worse than straight from .raw format processing.
Darktable
There is a significant difference between .raw and .tiff in Darktable. It doesn’t mean, that all the cases look better. The daylight images usually perform worst and are blurry unlike the low light ones (Pic. 28-33).

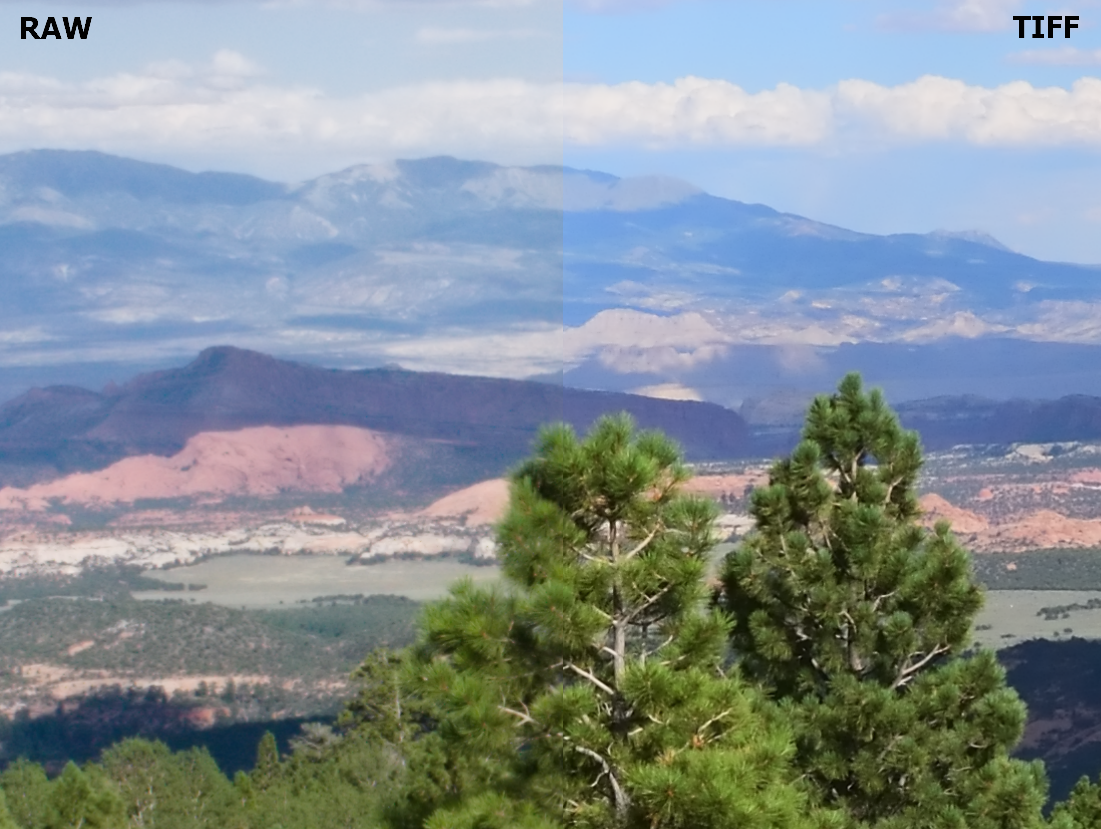
Pic. 28, 29 – The denoise effect for .tiff image in Darktable. 28 – normal; 29 – cropped. Larb Hollow Overlook, UT, USA. Click to enlarge.
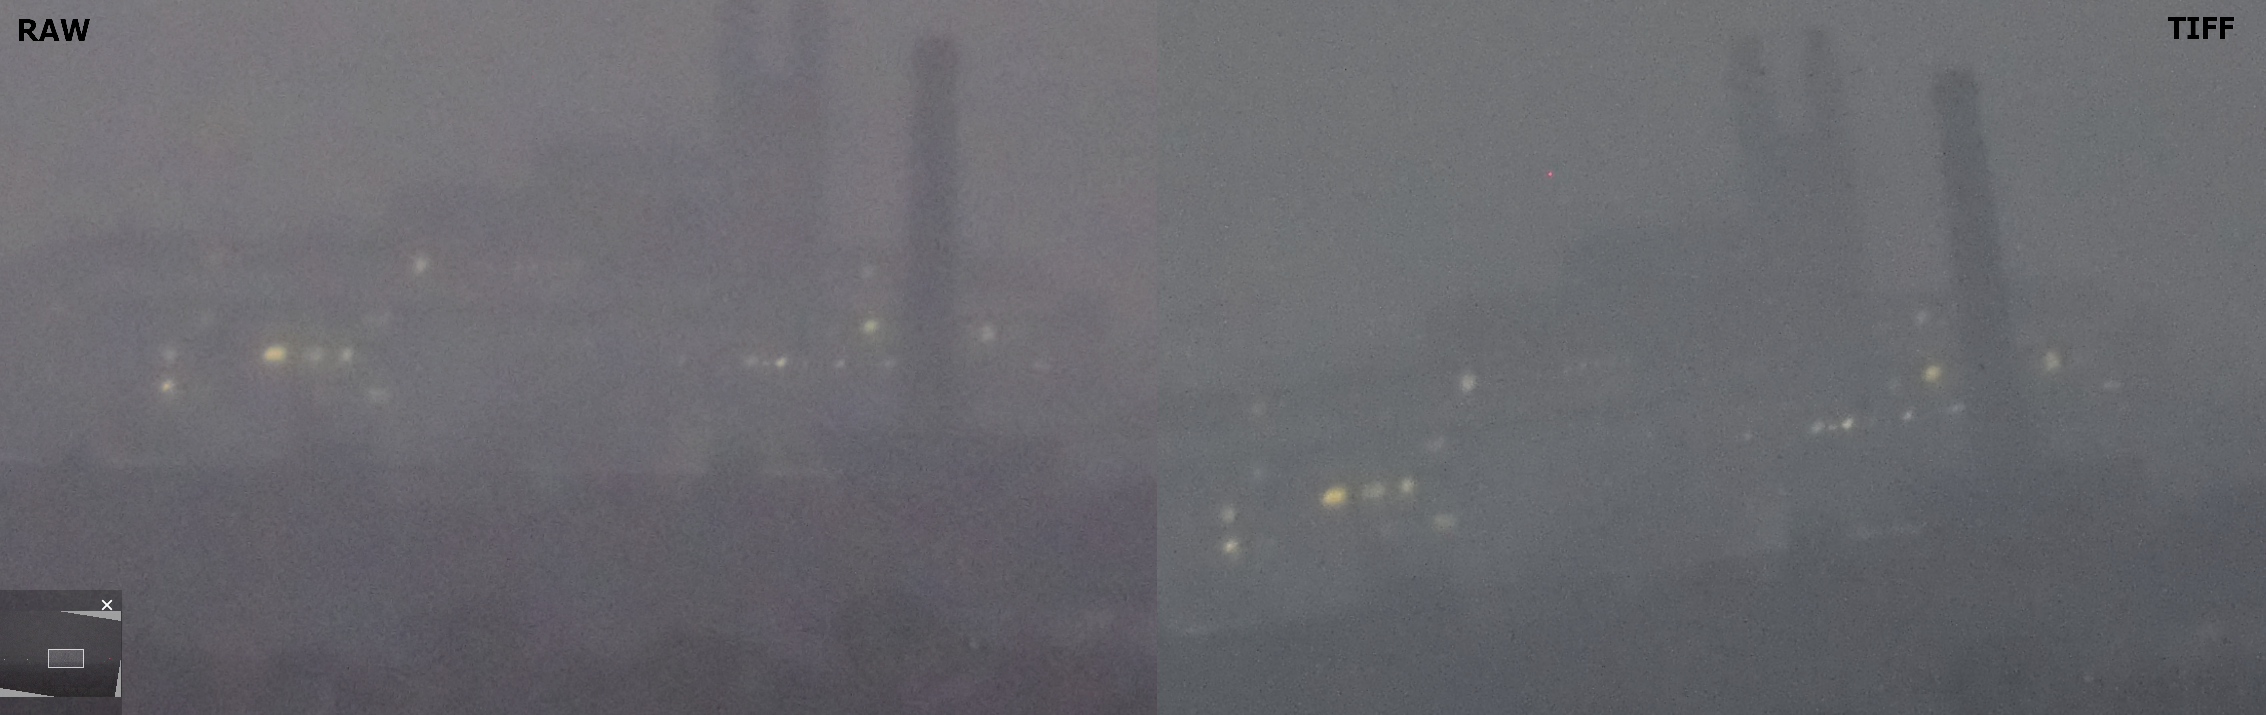
Pic. 30, 31 – The denoise effect for .tiff image in Darktable: 30 – normal; 31 – cropped. Addenbrookes Hospital as seen from Haddenham, United Kingdom. Click to enlarge.
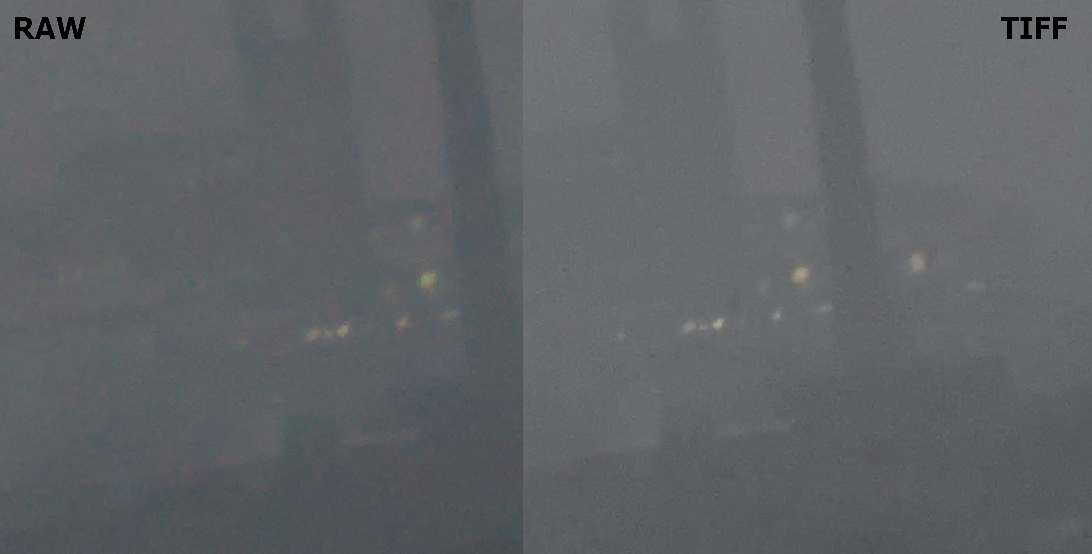
Pic. 32, 33 – The denoise effect for .tiff image in Darktable: 32 – normal; 33 – cropped. Gnowangerup, WA, Australia. Click to enlarge.
Seeing the images above you can convince, me that noise reduction with .tiff image, being extracted from .raw already in 50% denoised by Nikon Capture NX-D pack looks far better for high ISO pictures. In the 1:1 scale, a slight sharpness failure is to be noticed, but it’s not a big issue.
PhotoScape X
In PhotoScape X situation changes, as our parameters must be adjusted to the existing noise level in every single picture provided. It’s not possible to keep the same settings used with .raw image denoising. Otherwise, the image becomes blurry (Pic. 39). The overall result is much better than previously (Pic. 13-14, 16 – 21, 34-38, 40).
Pic. 34, 35 – The denoise effect for .tiff image in PhotoScape X, where parameters are both 12% for color and luminance denoise: 34 – normal, 35 – cropped. Larb Hollow Overlook, UT, USA. Click to enlarge.

Pic. 36, 37 – The denoise effect for .tiff image (ISO 2500) in PhotoScape X, where parameters are: 18% for lightness denoise and 50% for color denoise: 36 – normal; 37 – cropped. Addenbrookes Hospital, Cambridge, United Kingdom. Click to enlarge.
Now the best example, in which the parameters working for .raw denoise weren’t viable for .tiff image (Pic. 38). In turn, I kept the same settings as for the image above (Pic. 36, 37): 18% for lightness denoise and 50% for color denoise (Pic. 39, 40).
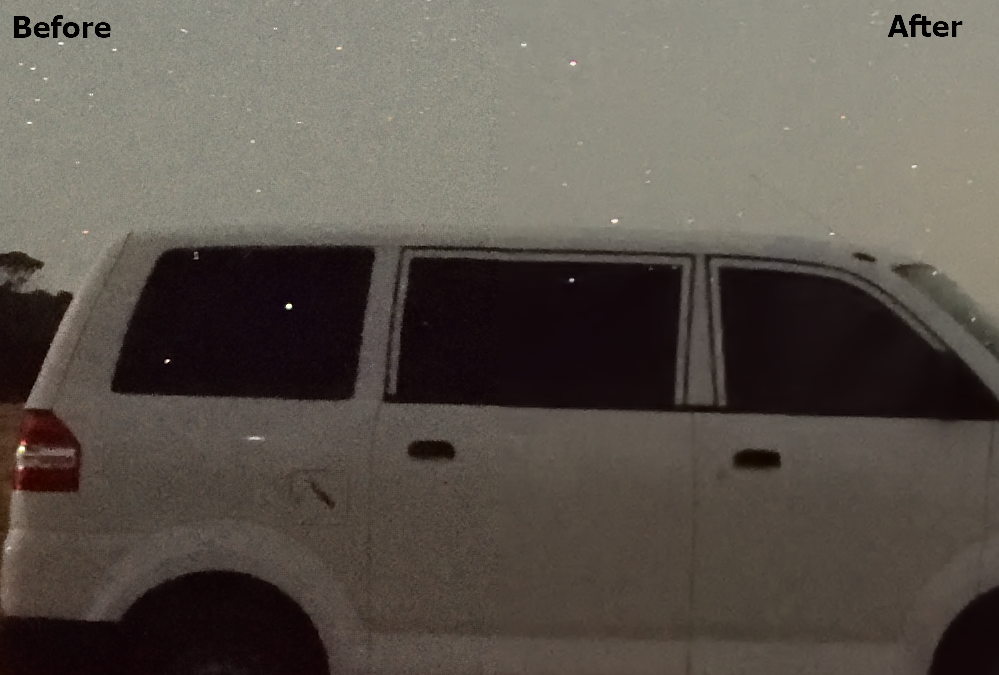
Pic. 38 An example of exaggeration is the noise reduction parameters, where both lightness and color denoise have been set at 100%. In effect, we have a too-blurry appearance.

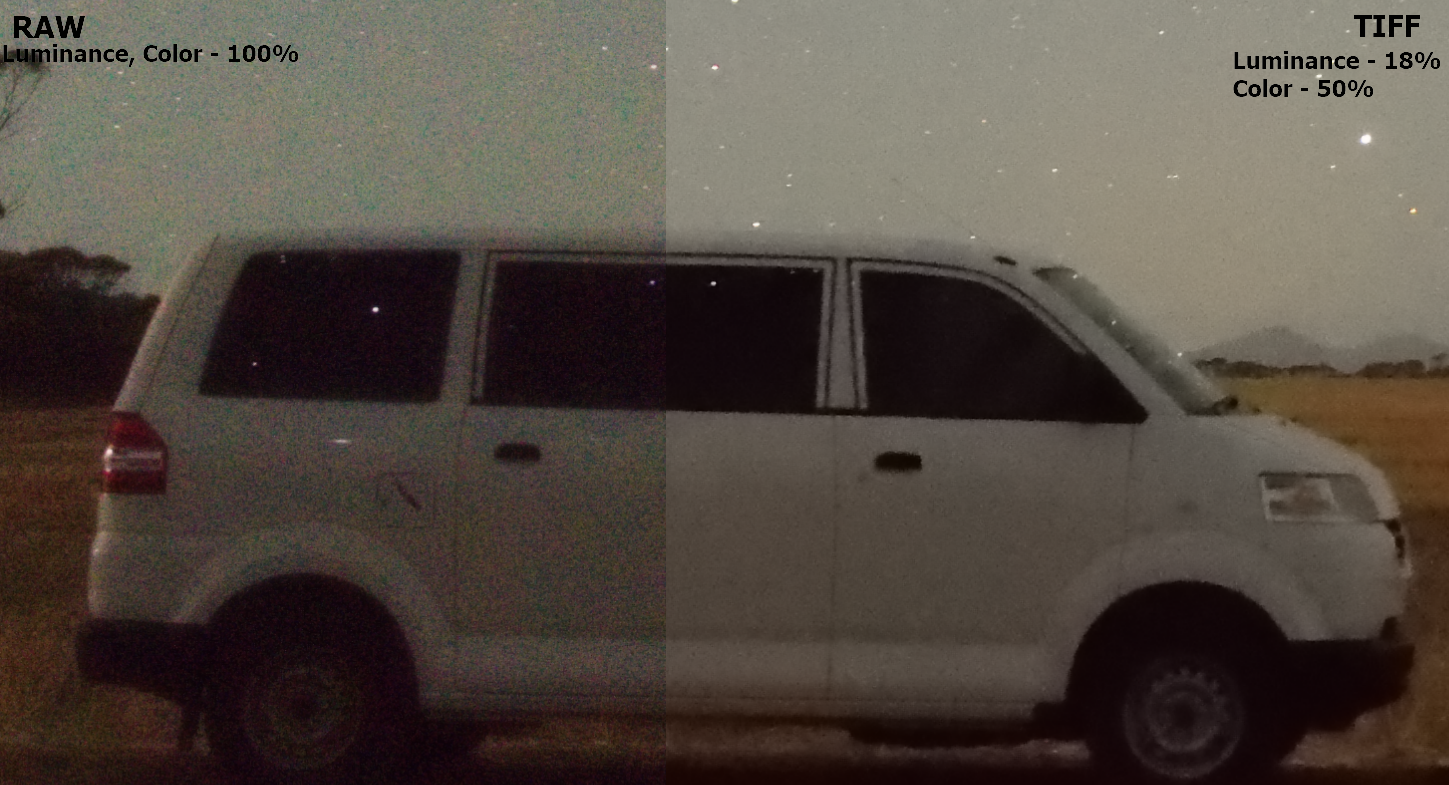
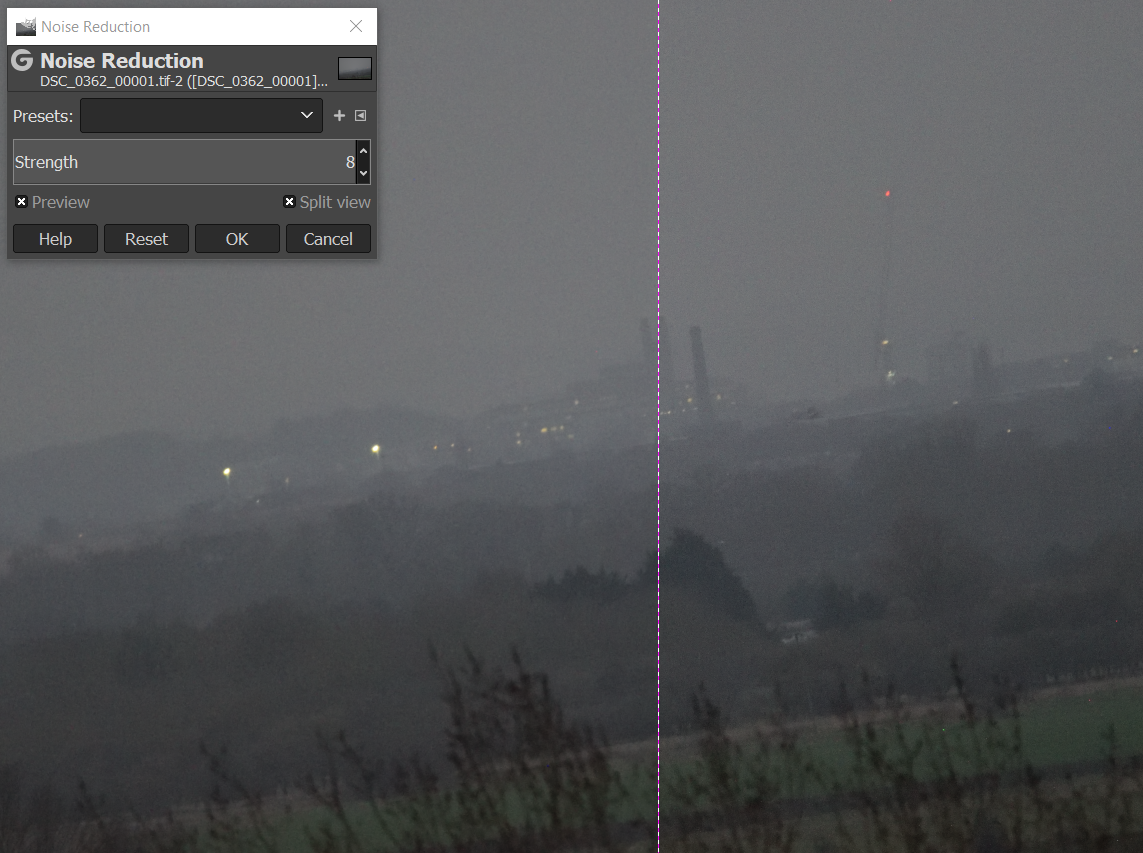
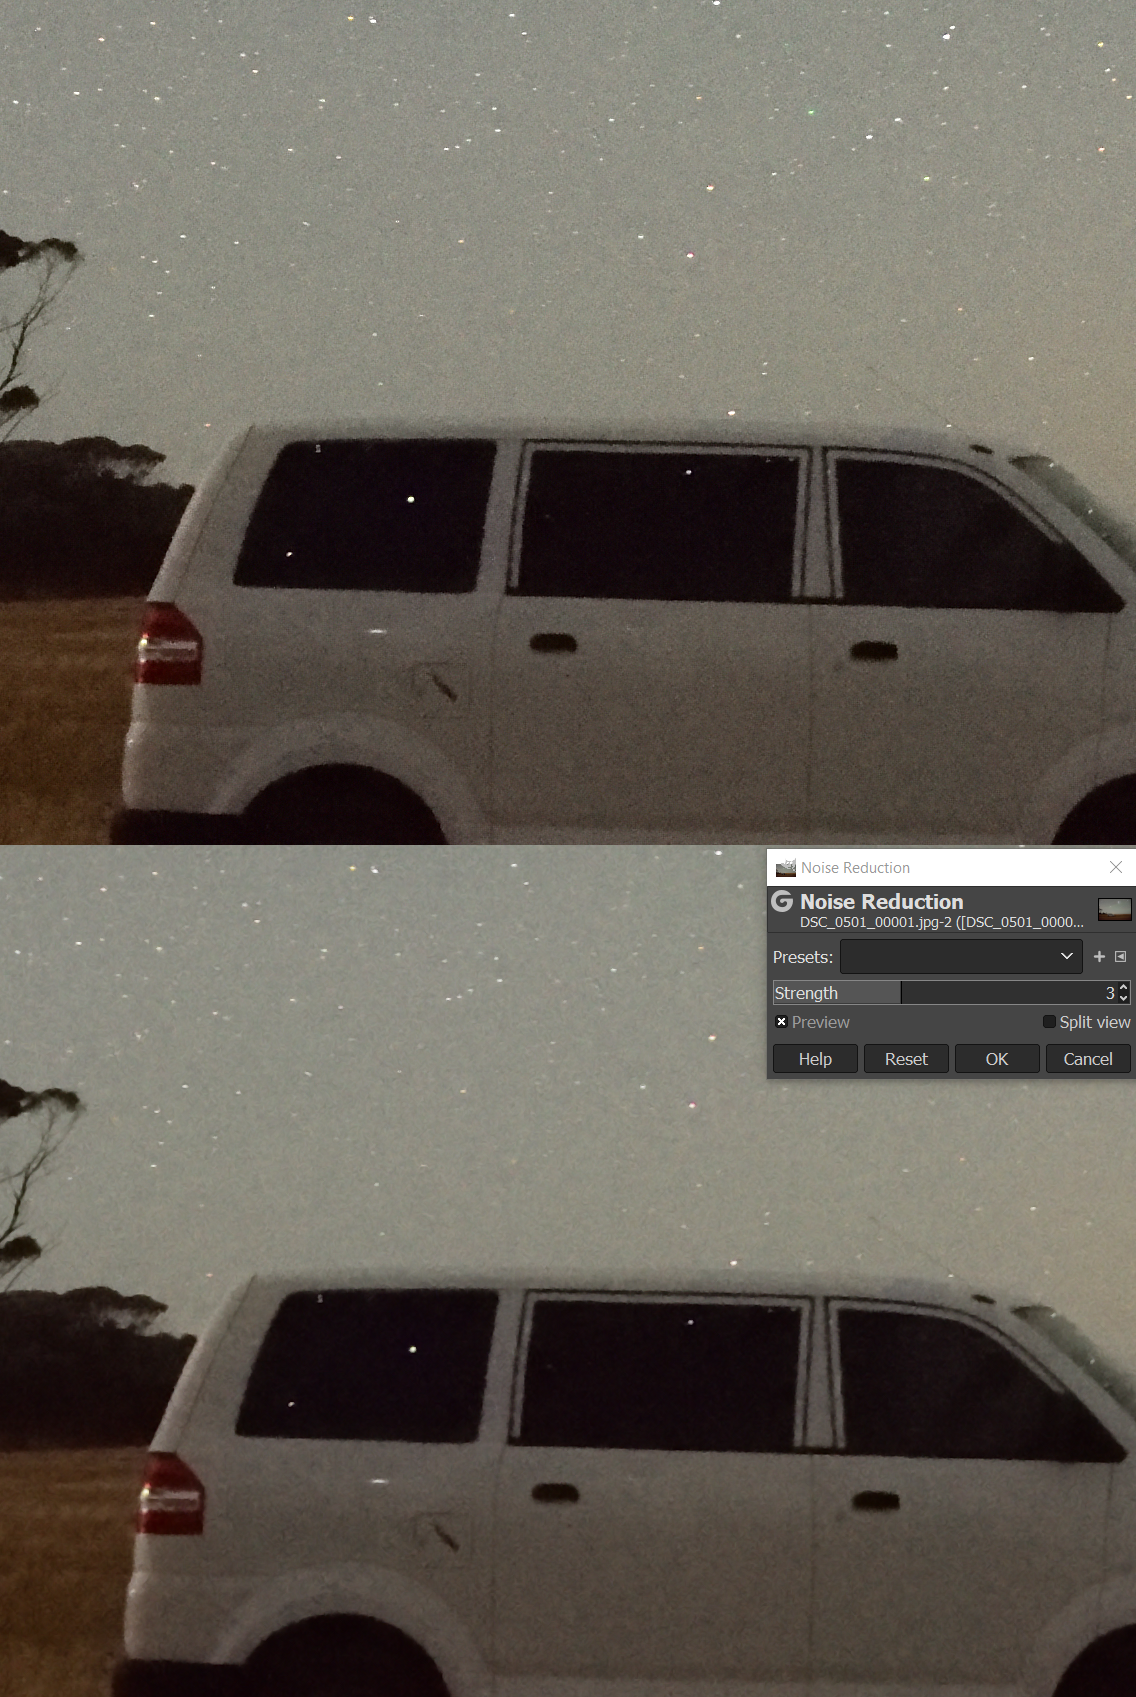
Pic. 39, 40 The denoise effect for .tiff image (ISO 10000) in PhotoScape X, where parameters are: 18% for lightness and 50% for color denoise: 39 – normal; 40 – cropped. Gnowangerup,WA, Australia.
The .tiff denoise in PhotoScape X looks good, but not as good as from Darktable. On the other hand, the image doesn’t lose its sharpness.
Raw Therapee
In my opinion, the Raw Therapee gives the same result with .tiff image denoise as Raw Therapee. The difference, in general, is not really big. The denoise result is slightly worse, but Raw Therapee gives a bit better sharpness afterward, which is best seen for low ISO images (Pic. 41 – 43).
Pic. 41 The .tiff image (ISO 250) denoise effect done by Raw Therapee. Larb Hollow Overlook, UT, USA. Click to enlarge.

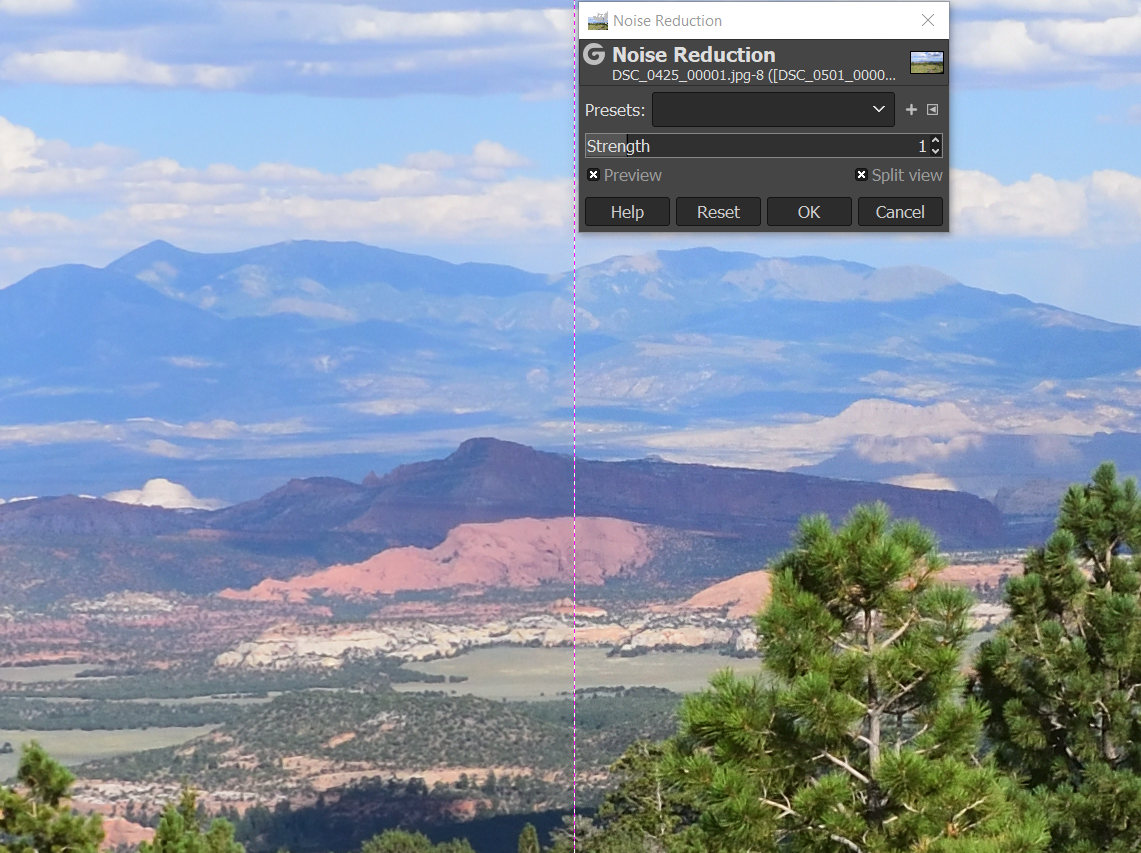
Pic. 42 The .tiff image denoise (ISO 2500) done by Raw Therapee. Addenbrookes Hospital, as seen from Haddenham, United Kingdom.
Pic. 43 The .tiff image denoise (ISO 10000) done by Raw Therapee. Near Gnowangerup, WA, Australia.
4. RAW – TIFF RESULT COMPARISON
Before I have shown the .tiff denoise effect, where the basis was an image extracted from Capture NX-D software. Now I would like to present the overall output difference between the .raw and .tiff noise reduction. Bear in mind, that the .tiff denoise process has been somewhat doubled, as the Capture NX-D gives it for the first time in 50%. Moreover, it looks like the color denoise wasn’t really needed in all the .tiff image cases. At least the images kept their natural colors, as seen on the DSLR screen.
The difference between .raw denoise and .tiff denoise is significant for all software used here.
Darktable
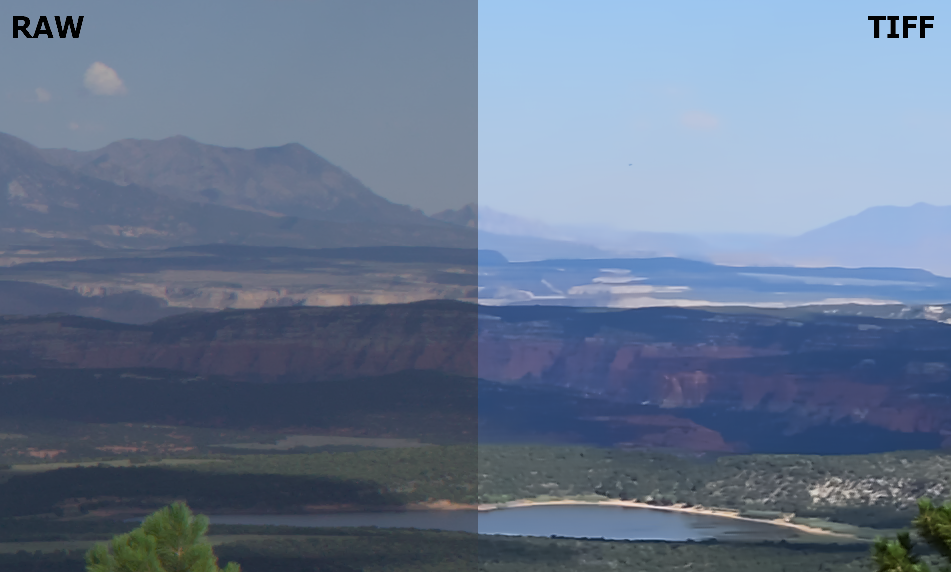
Pic. 44-46 The image denoise effect difference between .raw and .tiff image, when .tiff has been extracted from .raw before 44 – for ISO 250; 45 – for ISO 2500; 46 – for ISO 10000. Click to enlarge.
PhotoScape X
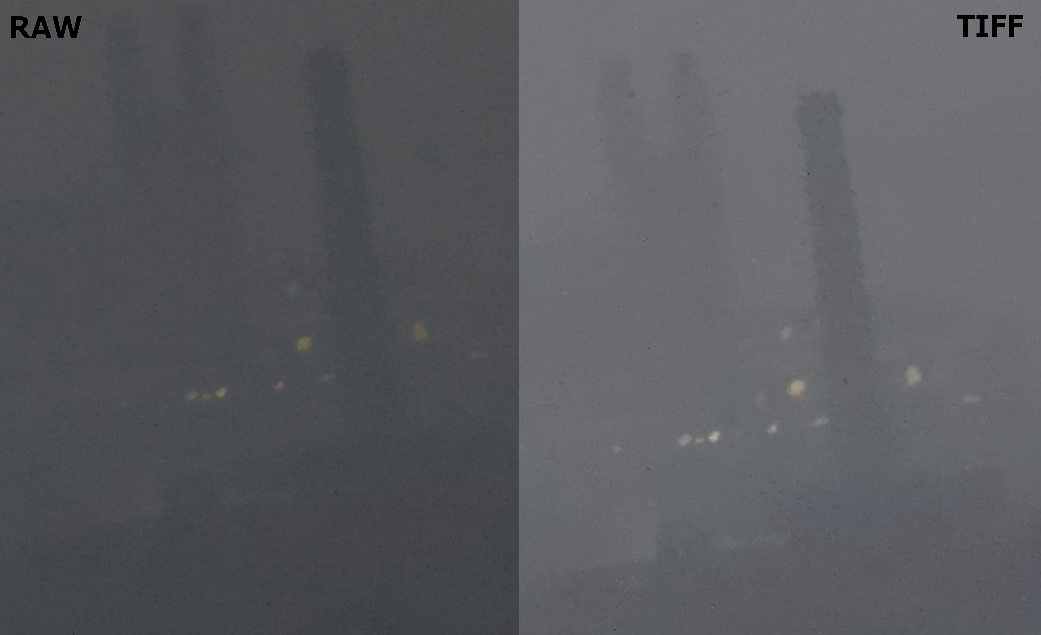
Pic. 47-49 The image denoise effect difference between .raw and .tiff image, when .tiff has been extracted from .raw before 47 – for ISO 250; 48 – for ISO 2500; 49 – for ISO 10000. Click to enlarge.
Raw Therapee

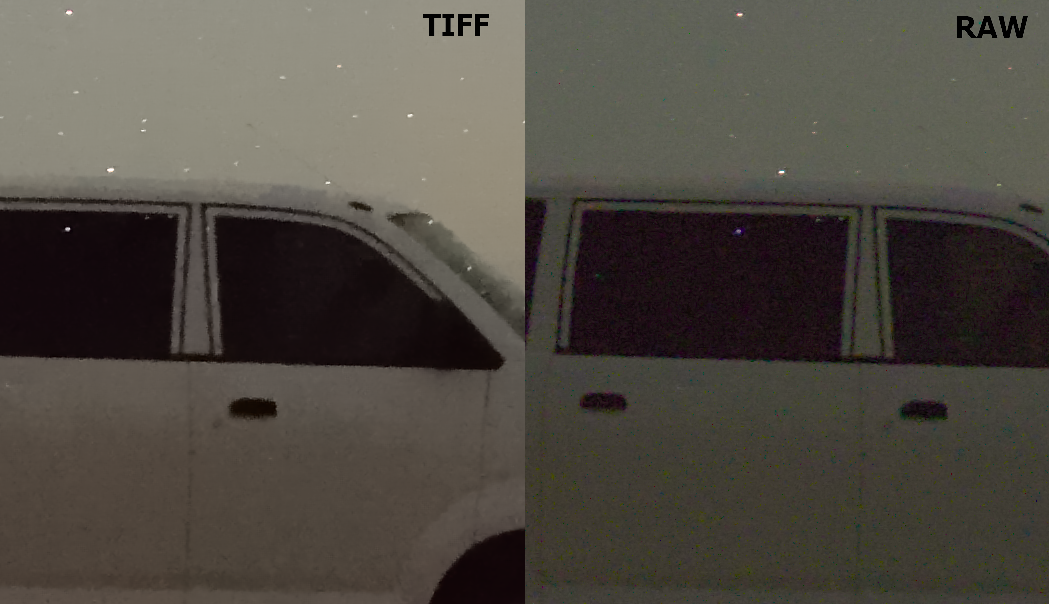
Pic. 50-52 The image denoise effect difference between .raw and .tiff image, when .tiff has been extracted from .raw before 50 – for ISO 250; 51 – for ISO 2500; 52 – for ISO 10000. Click to enlarge.
5. JPEG IMAGE DENOISE
The basic feature of the .jpeg image is the loss of details. You cannot do as much post-process as in .raw or even .tiff formats. Hence your result never is good enough. It applies also to the noise reduction effect, which unfortunately is too mechanical here. Instead of reducing lightness and color noise, as per in .raw or at least lightness noise in .tiff format, the .jpeg noise reduction is restricted to the blur effect only. The result will never be good, what you can convince about using the GIMP tool (Pic. 53 – 55). There is no big difference between low and high ISO images here, even if you change your slider value a bit.
Pic. 53 – 55 The .jpeg image denoise done with GIMP, where a lot of details and sharpness have been lost. The denoise effect strength has been adjusted to the ISO circumstances: 53 – ISO 250; 54 – ISO 2500; 55 – ISO 10000. Click to enlarge.
I used both the general look and the 1:1 scale close-up view. Despite the denoise effect strength set on the slider, the effect is the same. You can get a weak, barely noticeable noise reduction or blurry result when emphasizing too much.
6. TOTAL COMPARISON OF NOISE REDUCTION EFFECT
Approaching the end, let’s summarize our work. Here you can take a look at all the noise reduction effects applied in this article, for .raw, .tiff, and .jpeg images. I put them all together in one, in order to easy comparison each other. The initial Nikon Capture NX-D picture has been paired with GIMP denoised image (Pic. 56-58).

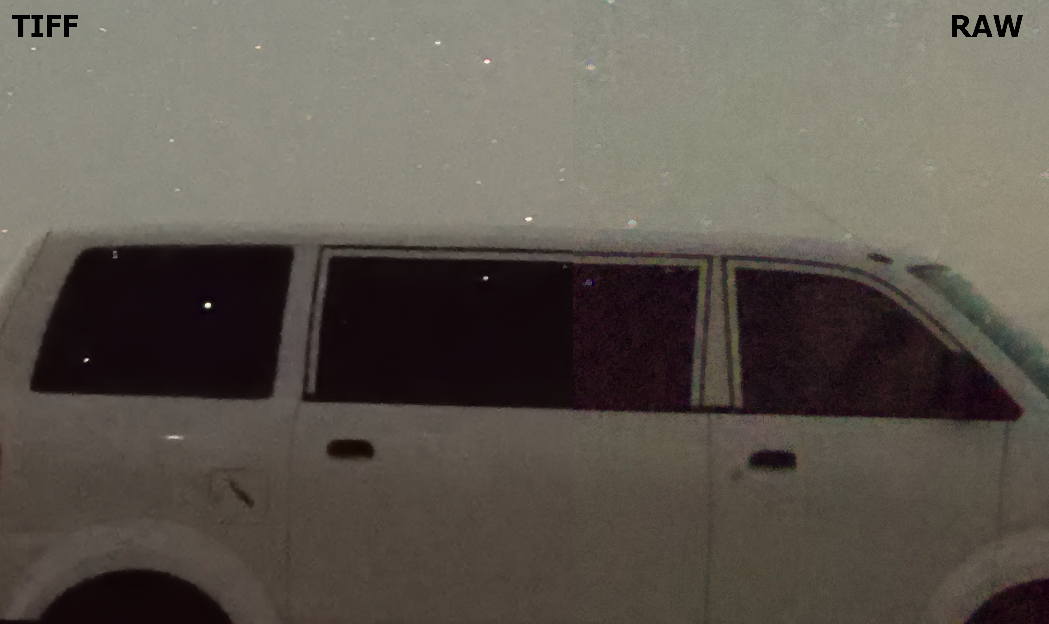
Pic. 56 The overall image (ISO 250) denoise comparison, where the upper part applies to .raw format, and the lower part applies to .tiff format. Larb Hollow Overlook, UT, USA.
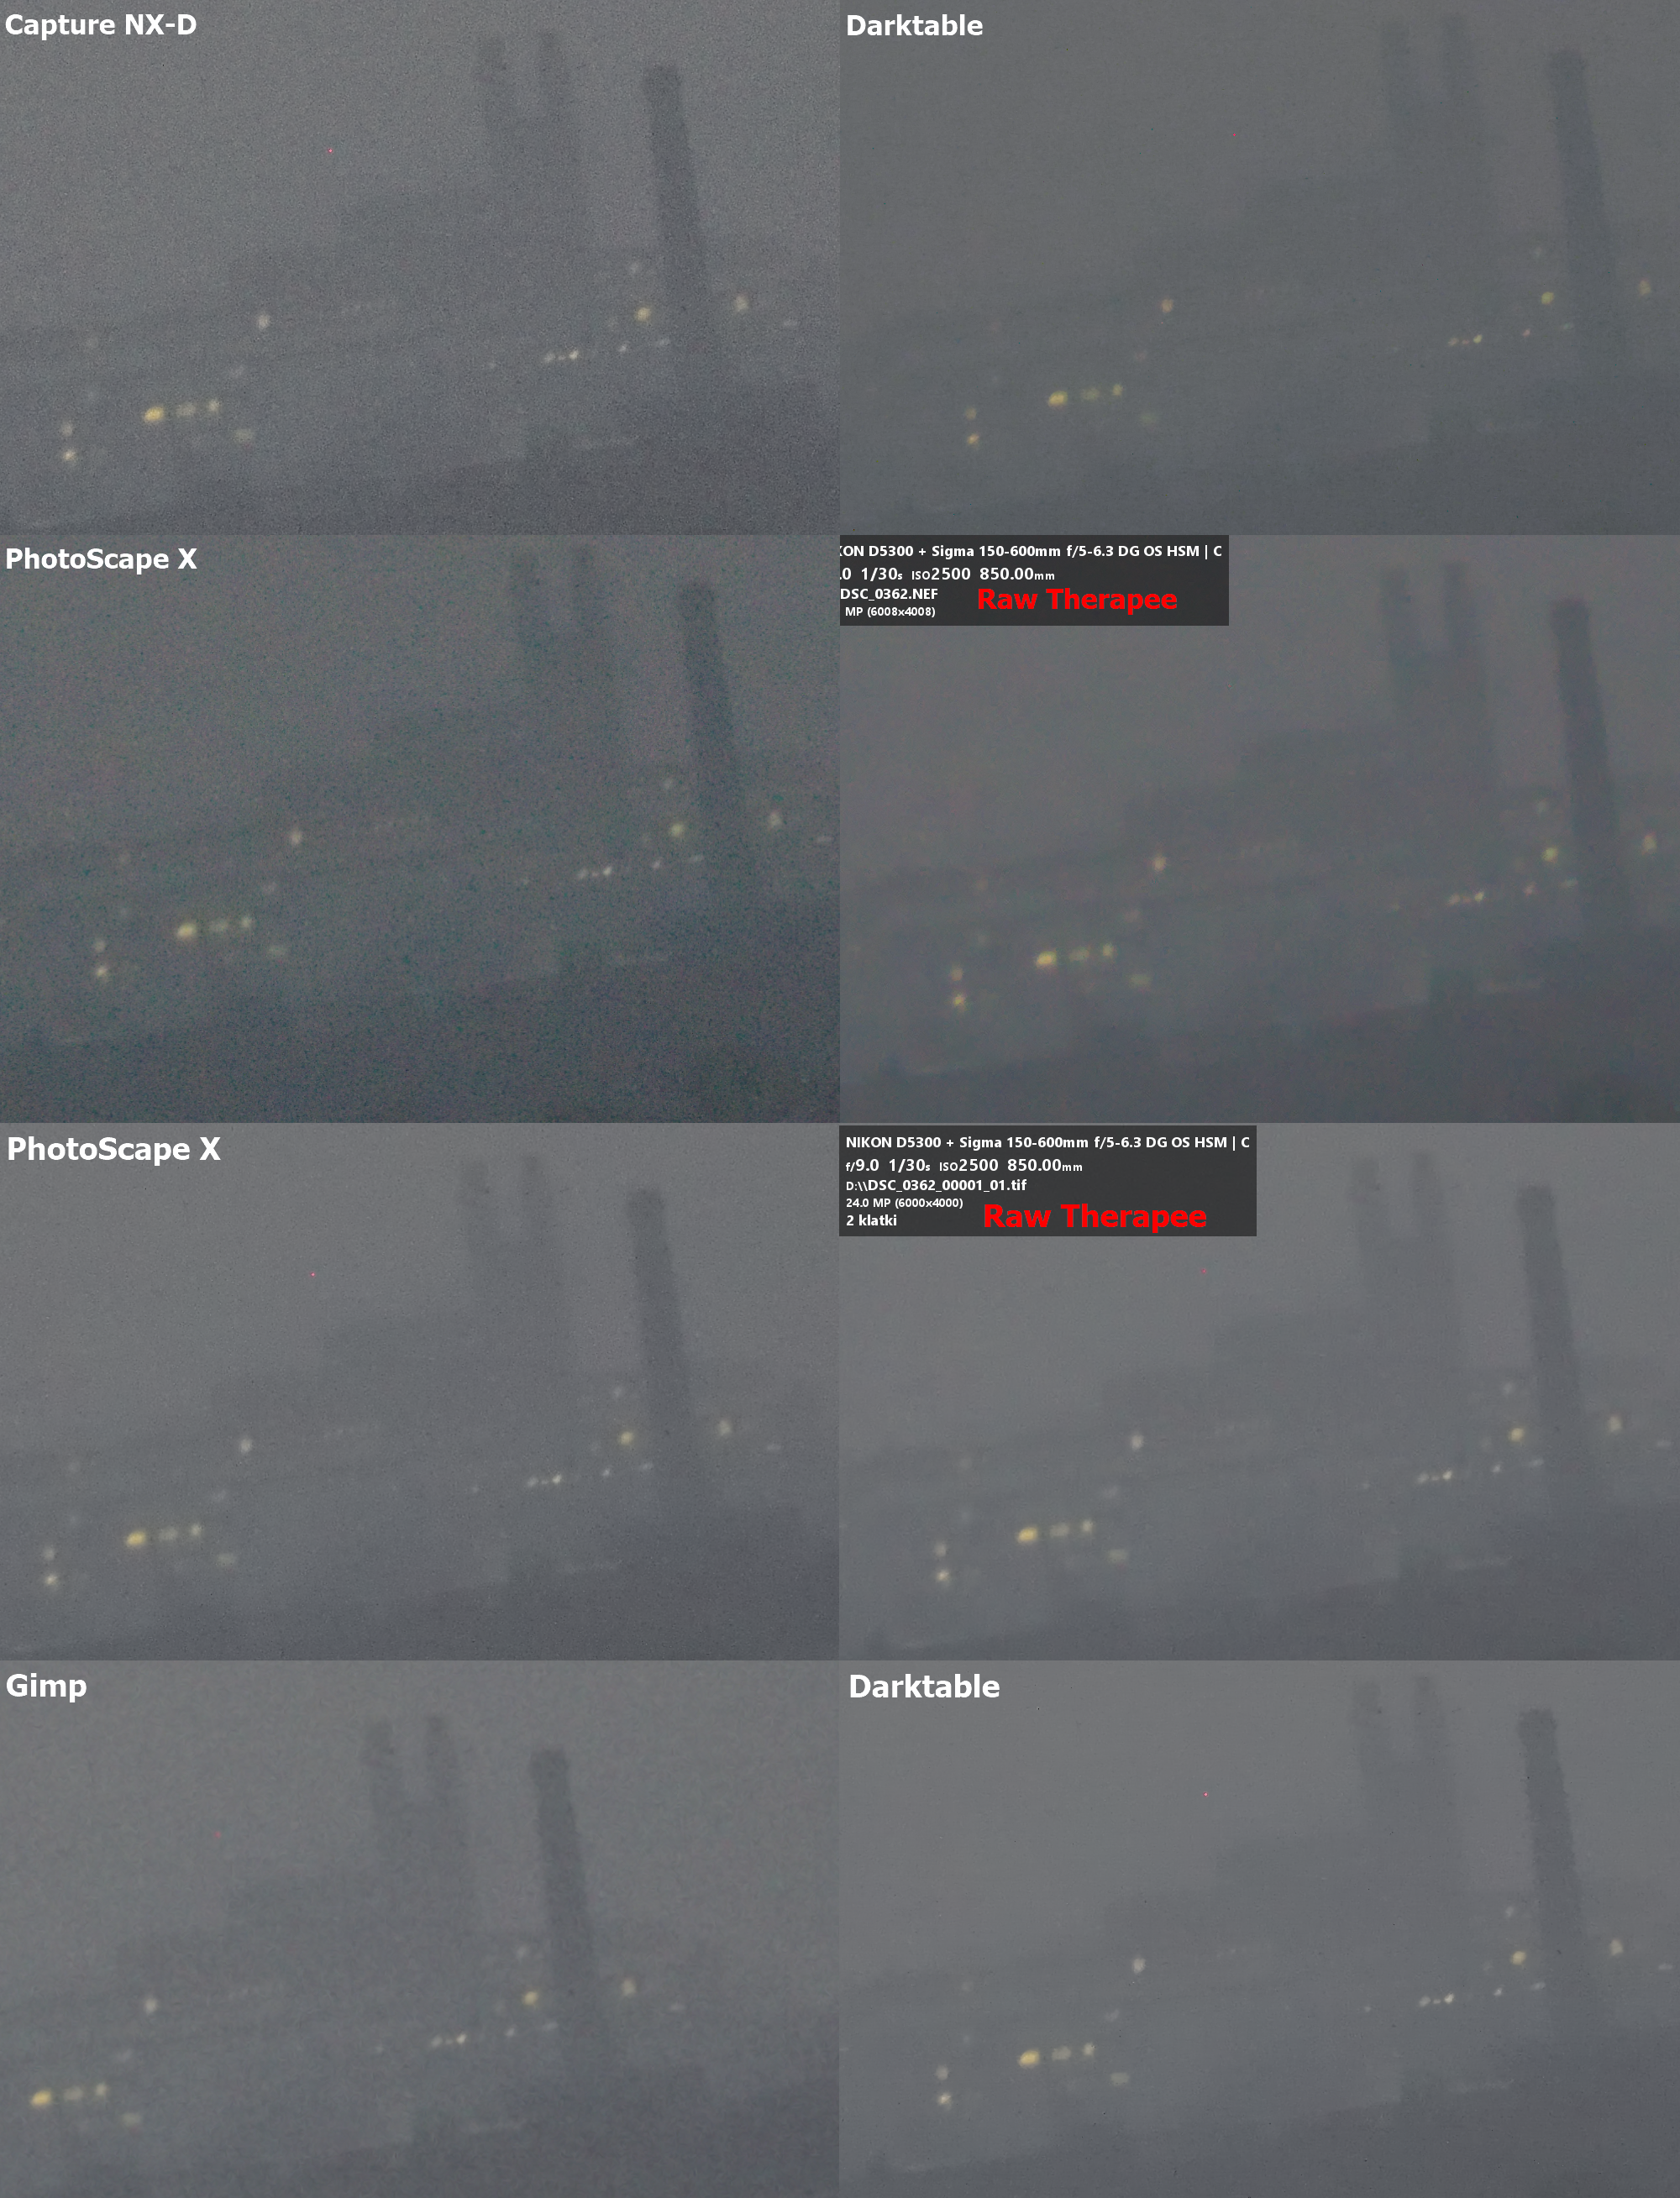
Pic. 57 The overall image (ISO 2500) denoise comparison, where the first 4 upper pictures apply to .raw format, and the last 4 lower pictures apply to .tiff format. Addenbrookes Hospital, Cambridge, United Kingdom.
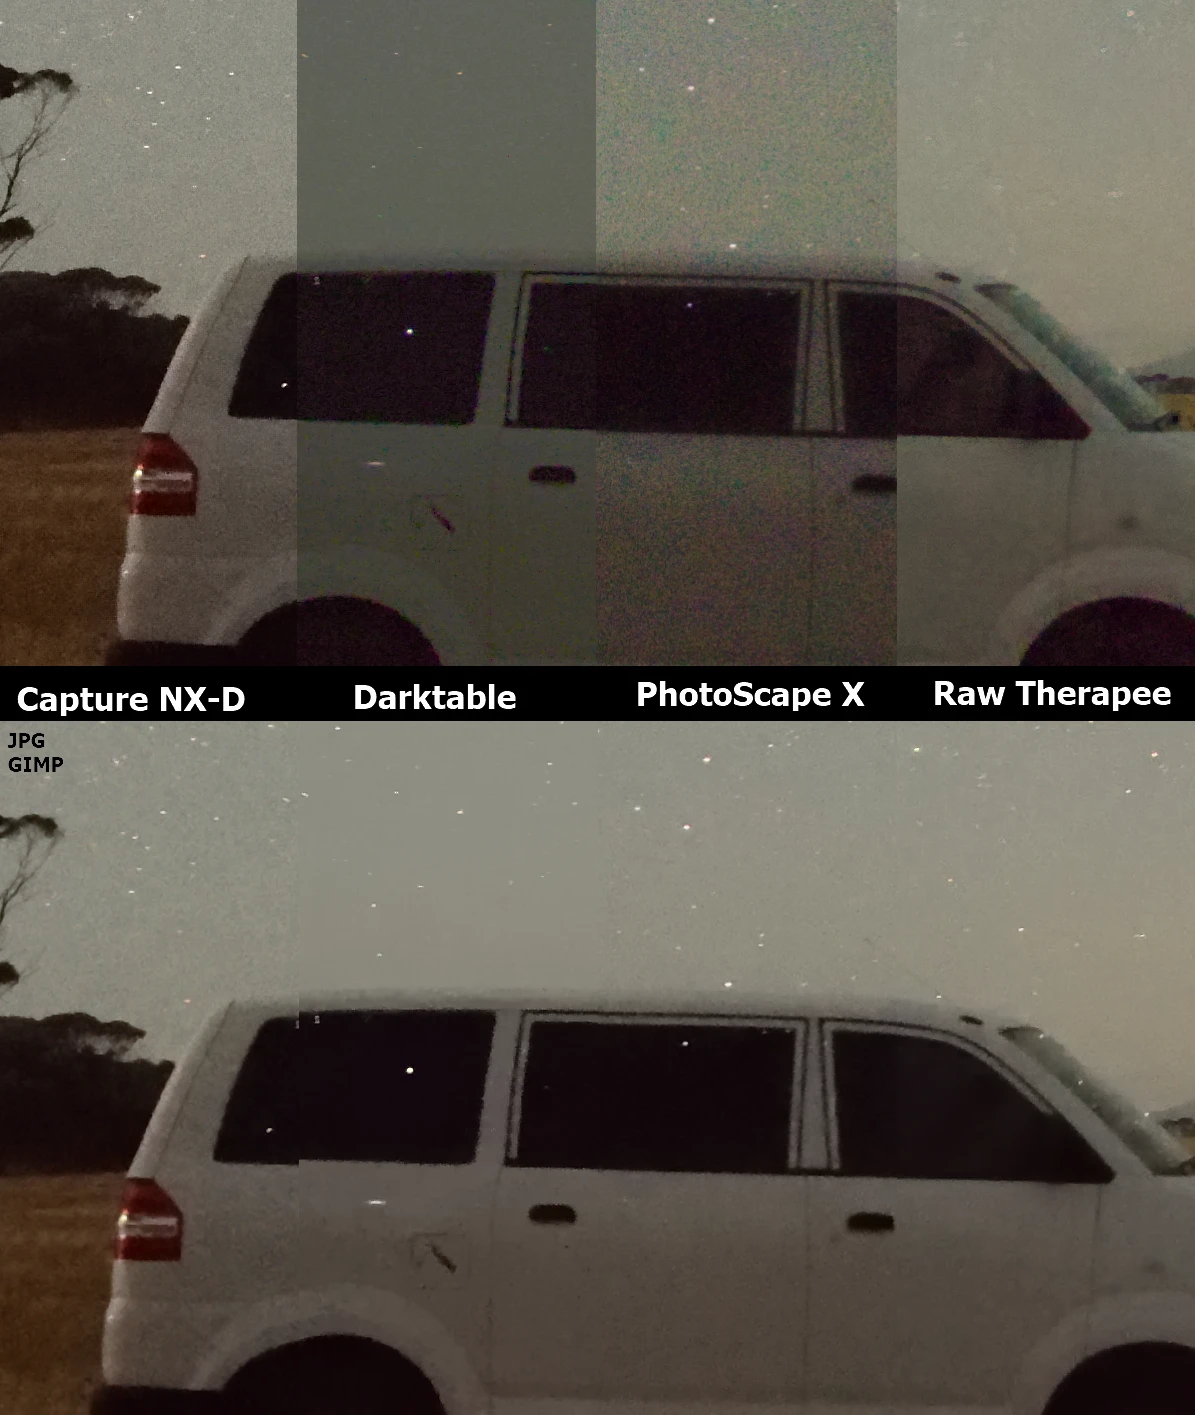
Pic. 58 The overall image (ISO 10000) denoise comparison, where the upper part applies to .raw format, and the lower part applies to .tiff format. Near Gnowangerup, WA, Australia.
These summary images clearly show the difference in the noise reduction effect between the .raw and .tiff images. In all of the applications, I used the best methods of denoising, as shown in the specified websites or YouTube channels.
7. CONCLUSIONS
The noise reduction effect is desired in every image with ISO exceeding 1200 -1600 in my opinion. There are a lot of DSLR cameras, which handle the noise upon this value. In my case, the Nikon D5300 has the functional low light ISO 1338 and lower, which means, that above this value we might struggle with unwanted grains. In this issue, the noise reduction feature can be essential in order to keep our image nice and tidy. Because the .raw format isn’t initially denoised by most of the tools, even in high-light ISO images we still get significant color noise, which degrades our image quality. Everything comes down to the fact, that noise reduction of the .raw pictures is always required, as you can see in this article.
I used the newest editions of the open-source image processing applications available on the market: Darktable 2.6.3, PhotoScape X 3.7, Raw Therapee 5.8, and GIMP 2.10.18. All these programs delivered different results both in .raw and .tiff format, except for GIMP, where the .jpeg image post-processing took place. I found that for high-light ISO images, the best result of noise reduction in .raw format can be accomplished with Raw Therapee, where the image is sharp enough and coloration is not damaged significantly. The worst result, because of strong changes in colors gives us the Darktable unfortunately, which is deemed as the prior alternative to Adobe Lightroom software. It, fortunately, changes as our ISO level increases. In the case of ISO 2500 the Darktable performed really well unlike Raw Therapee, in which despite a similar effect, the faint reddish blobs are to be spotted across the image. The last picture, featuring the lowest light ISO 10000 was also the best processed with Darktable, but regrettably, color changes were still serious.
In all the cases the worst denoise performance applied PhotoScape X, where in the last image, the noise level was simply out of scale. Apart from all these programs mentioned, the best noise reduction effect brings the Nikon D5300 mother software, which is Capture NX-D. It had been led to extract the .tiff images, based on the initial denoise effect served by this application. Any further operation somewhat doubled the denoise process, which brought much better effects in general.
Following the noise reduction in .tiff format, the results are pretty much similar to each other, which is especially seen in low ISO images. As the ISO increases, the differences increase too, but the variance still remains much smaller than within .raw formats. The Darktable brings the worst effect for low ISO images but is the best for low light ISO pictures to do so. The Raw Therapee is the best for high-light ISO images and slightly yields in the range of low-light ISO pictures, where the noise effect is marginally worse towards the sharpness level. The PhotoScape X performance in .tiff format is also much better, but still far away from Darktable and Raw Therapee.
The .jpeg denoise with GIMP is basically not useful. Due to the high compression of the file, the image grains tend to be blurred rather than fainted.
If I would pick up the best method of image denoise I think it would be definitely the Capture NX-D, which is certainly aimed at Nikon DSLR camera users. None of the software used here served a better effect. I know, that in the market there is many more .raw image processing tools or even denoise tools, although I doubt, that they’re better. So far Darktable and alternatively Raw Therapee are the best raw processing applications available in the OpenSource environment.
Taking into account, that we are interested in the noise reduction of our image only, the best combination will be Capture NX-D with Darktable, where we can proceed with the .tiff format.
Mariusz Krukar
Links:
- Understanding image noise
- RAW vs JPEG
- Nikon Capture Nx-D
- Reducing noise in Darktable
- Best free photo noise reduction software
- PhotoScape X – noise reduction
- Noise reduction with Raw Therapee
- RAW or TIFF which one is better?
- JPEG & RAW & TIFF difference
- https://www.thephoblographer.com/2011/09/26/are-tiffs-and-raws-really-the-same-thing/
Forums:
- Nikon Capture Nx-D vs opensource
- https://forum.nikonrumors.com/discussion/4204/best-raw-converter/p2
- https://photo.stackexchange.com/questions/87452/why-doesnt-noise-reduction-have-any-effect-in-rawtherapee
- https://www.dpreview.com/forums/thread/373799 edit RAW or TIFF
- https://photo.stackexchange.com/questions/24046/what-is-lost-when-raw-is-exported-to-tiff-for-editing
My questions:
Wiki:
Demosaicing
Image_noise
Noise_reduction
Youtube:
Read also:
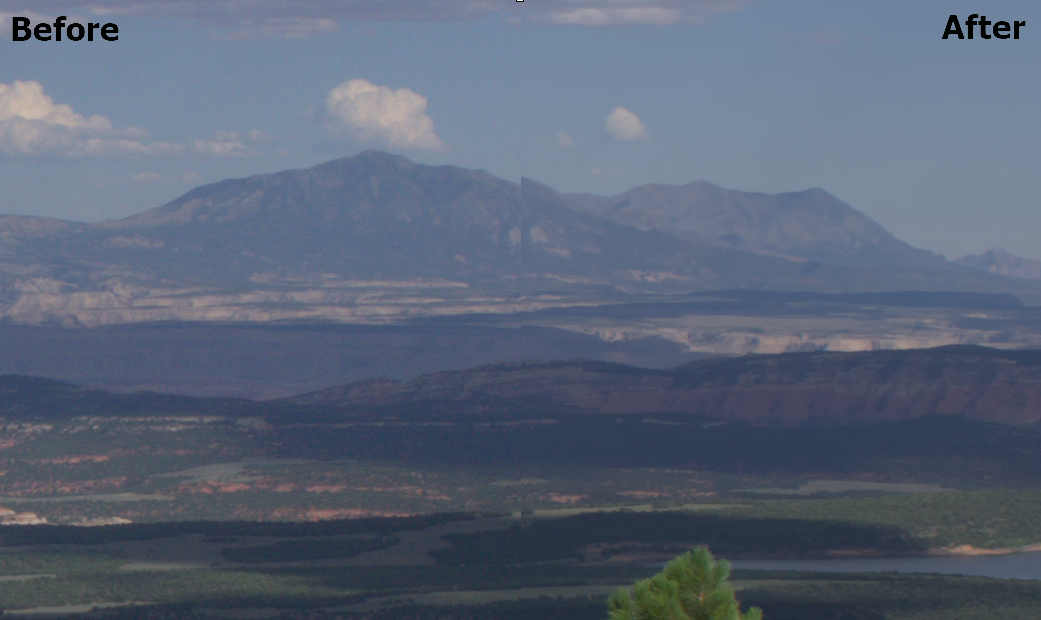
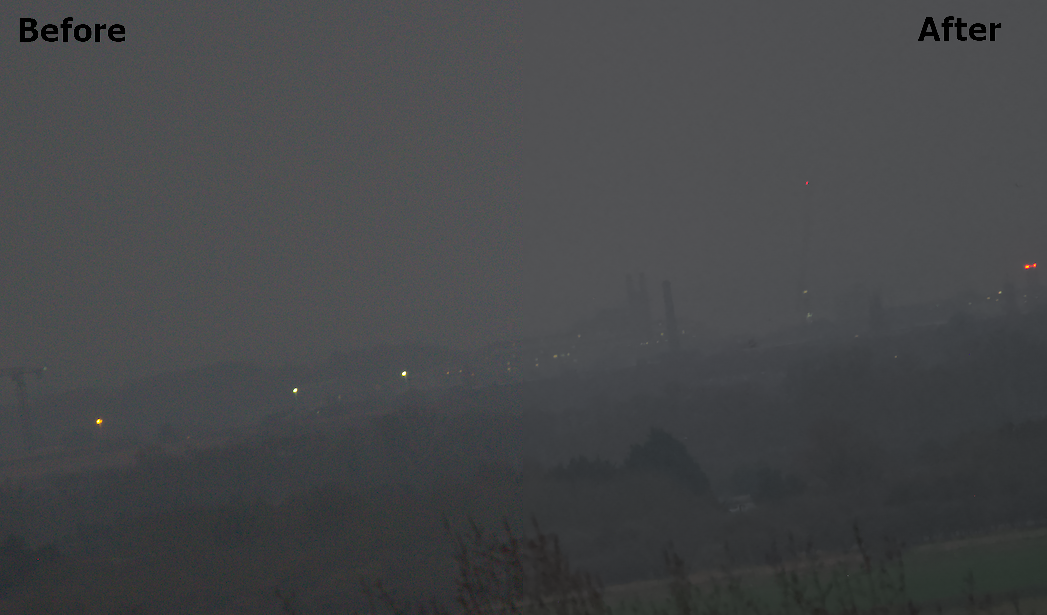
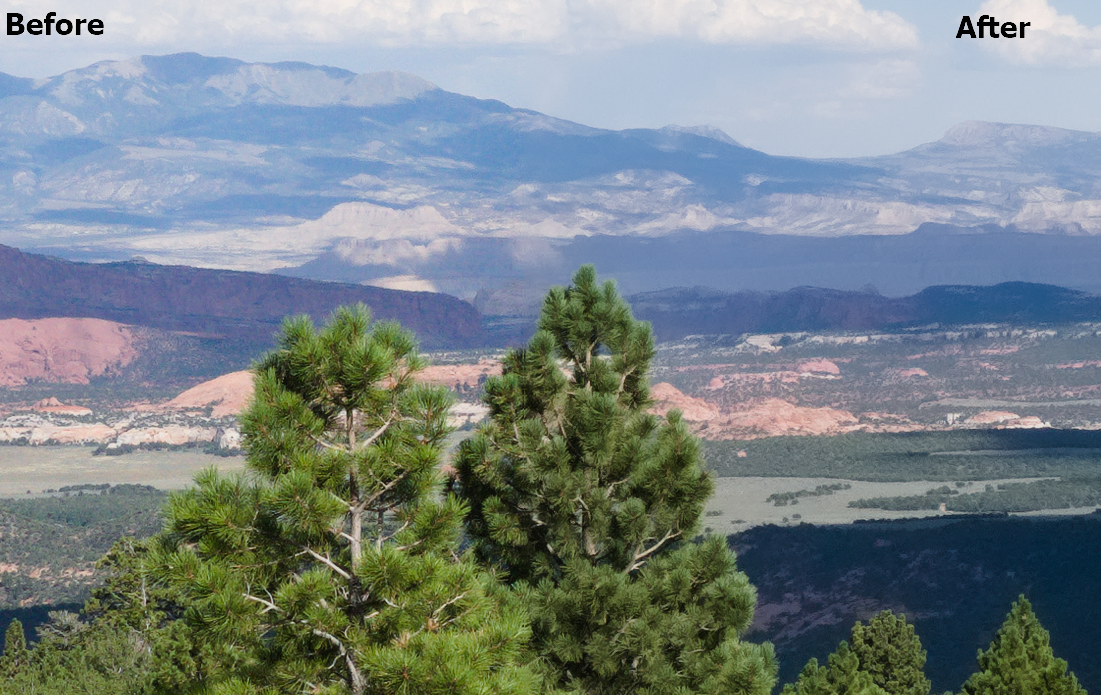
1. The quickest way to dehaze your photo for long distance observation purposes