
This article presents a nice feature in Google Earth, which lets on getting a telephoto view rendered from any location around the globe. Because the option is to be considered in the aspect of the long-distance observations, it’s indeed a continuation of the thread about the estimation of visibility between two artificial objects. That’s exactly the case raised here, although other configurations will be also discussed.
- FIELD OF VIEW IN GOOGLE EARTH
The FOV feature has been introduced to Google Earth along with version 6.1. In fact, it applies just to the tour mode but eventually can be also translated to the standard view, and indeed it will be also discussed in this paper. the <gx:horizFov> value is added automatically when the tour is recorded, but it can be also added manually to the .kml file The field of view is explained as “the extent of the observable world that is seen at any given moment”. In the case of astronomy or photography, we should treat the field of view as the angular area viewed by the instrument, which represents a part of the sky or the world visible at a particular position and orientation in space. However, in the case of Google Earth and similar applications, the field of view issue should be considered also as the field of vision applied in the gaming world, where a user can see the scene displayed at a given moment. Continuing this way of thinking, there are important elements comprising the field of vision such as aspect ratio and especially rendering resolution. The field of view varies slightly between Google Earth and Google Maps due to different default values set. The horizontal field of view (HFOV) in Google Earth of about 60º is said to be used whereas the same HFOV for Google Maps utilizes 35º for its Earth View. It’s just a digression, which could imply to any user the potential flexibility of FOV value in Google Earth without any knowledge. Along with the application of the FOV angle in Google, it’s advisable to turn on the photorealistic atmosphere mode in order to get the view as similar as possible to real outdoor conditions.
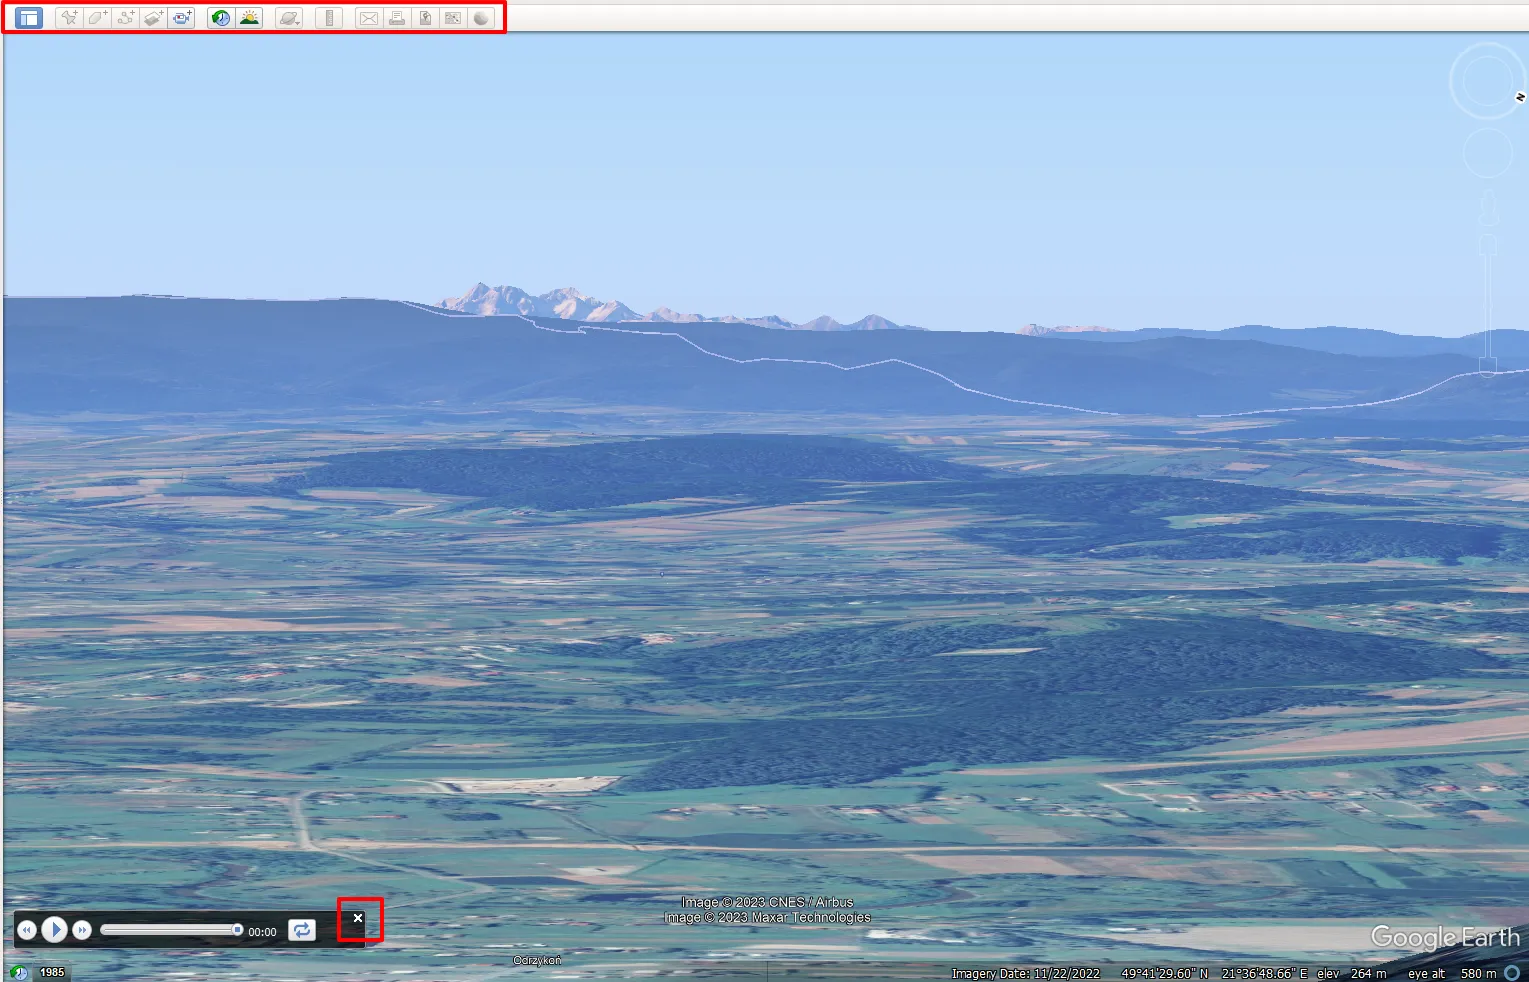
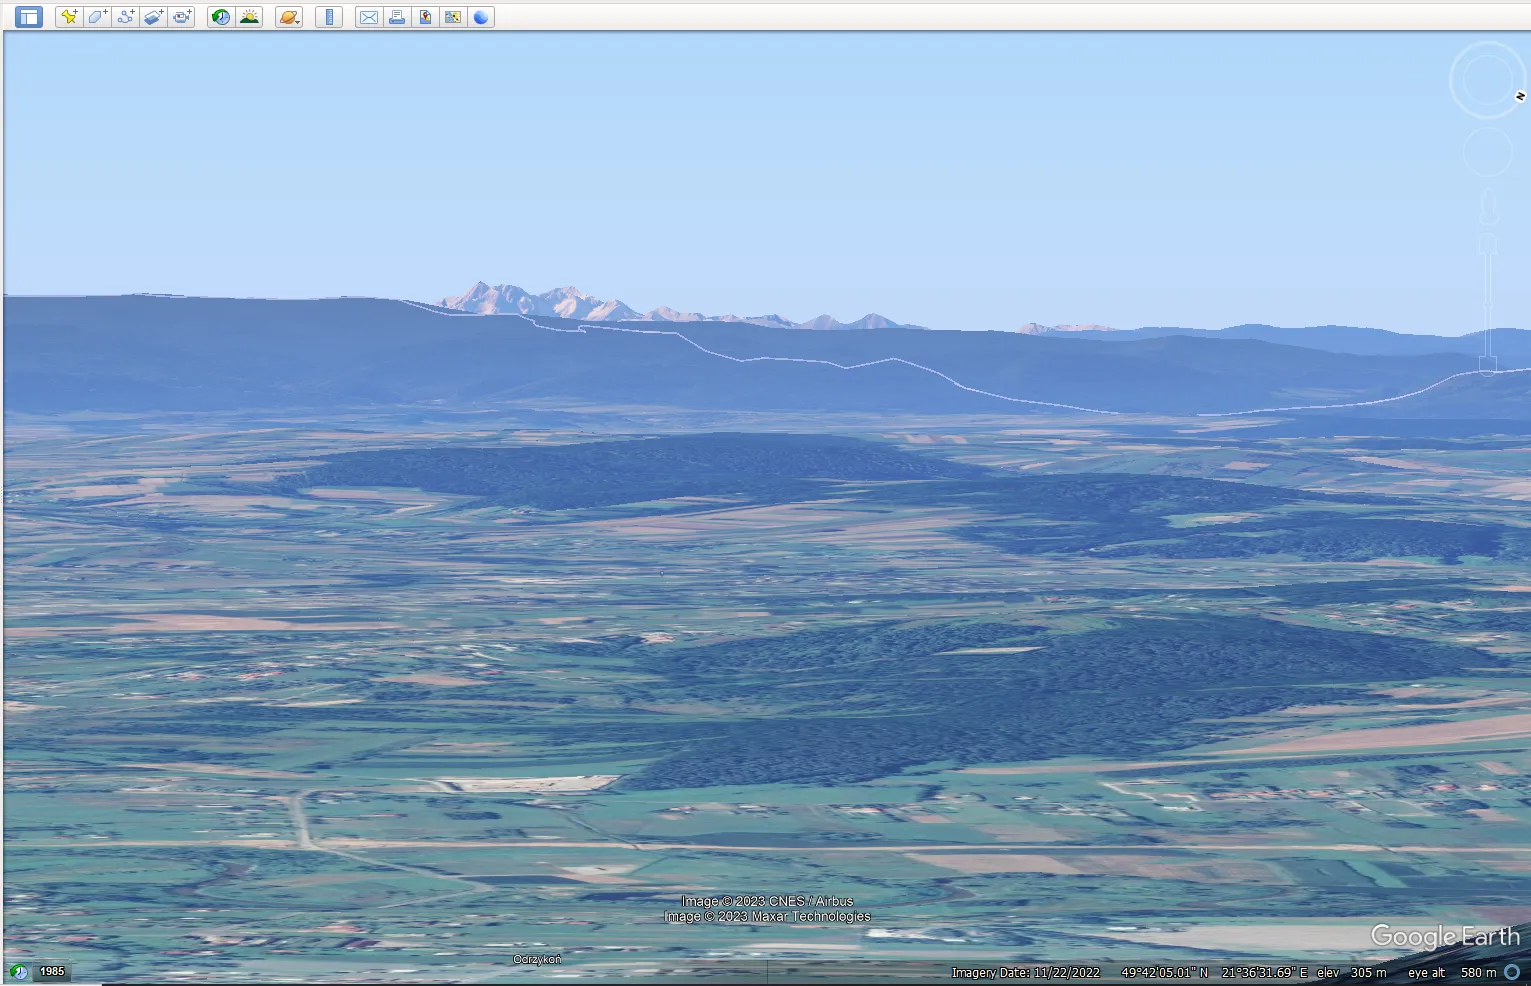
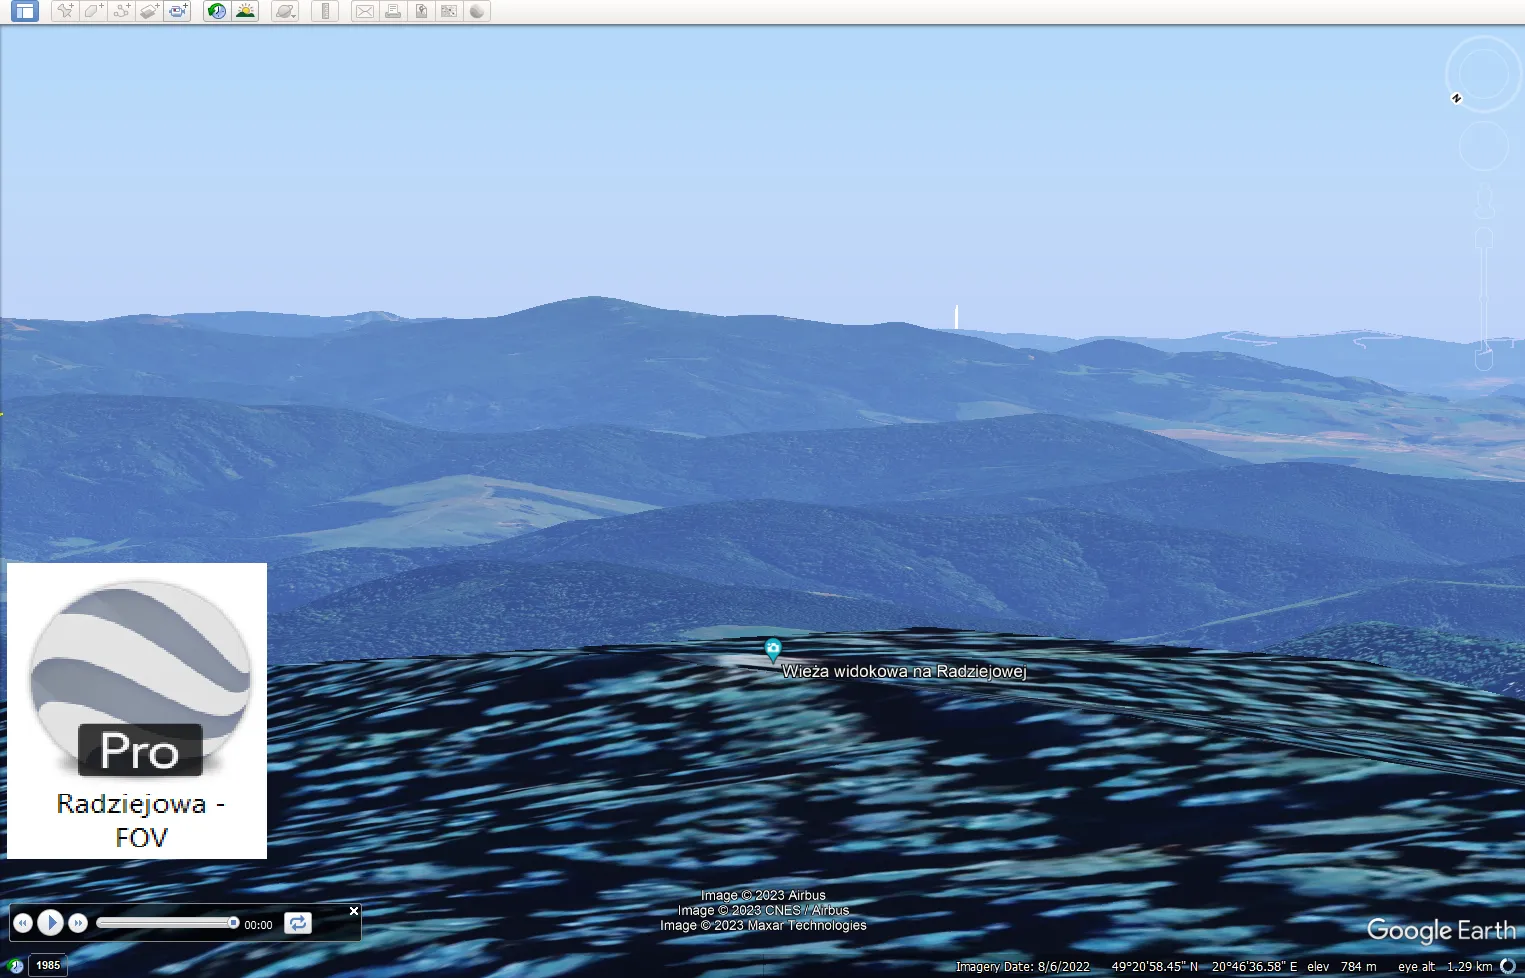
The field of view changes in Google Earth is limited to the range between 10º and 300º. The primary difference between them is the angular size of the view we can get around the targeted object (Pic. 1, 2).
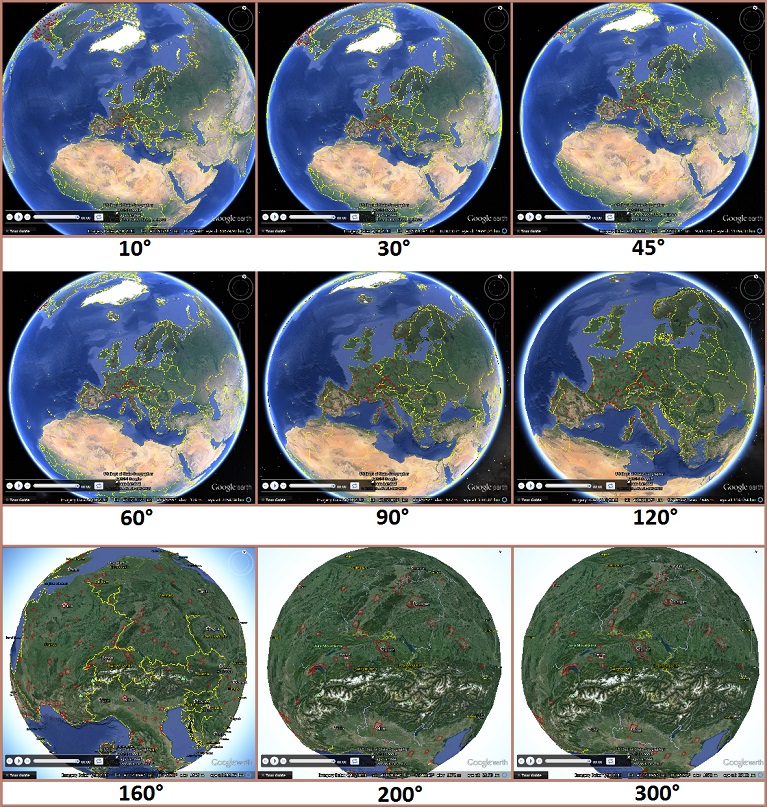
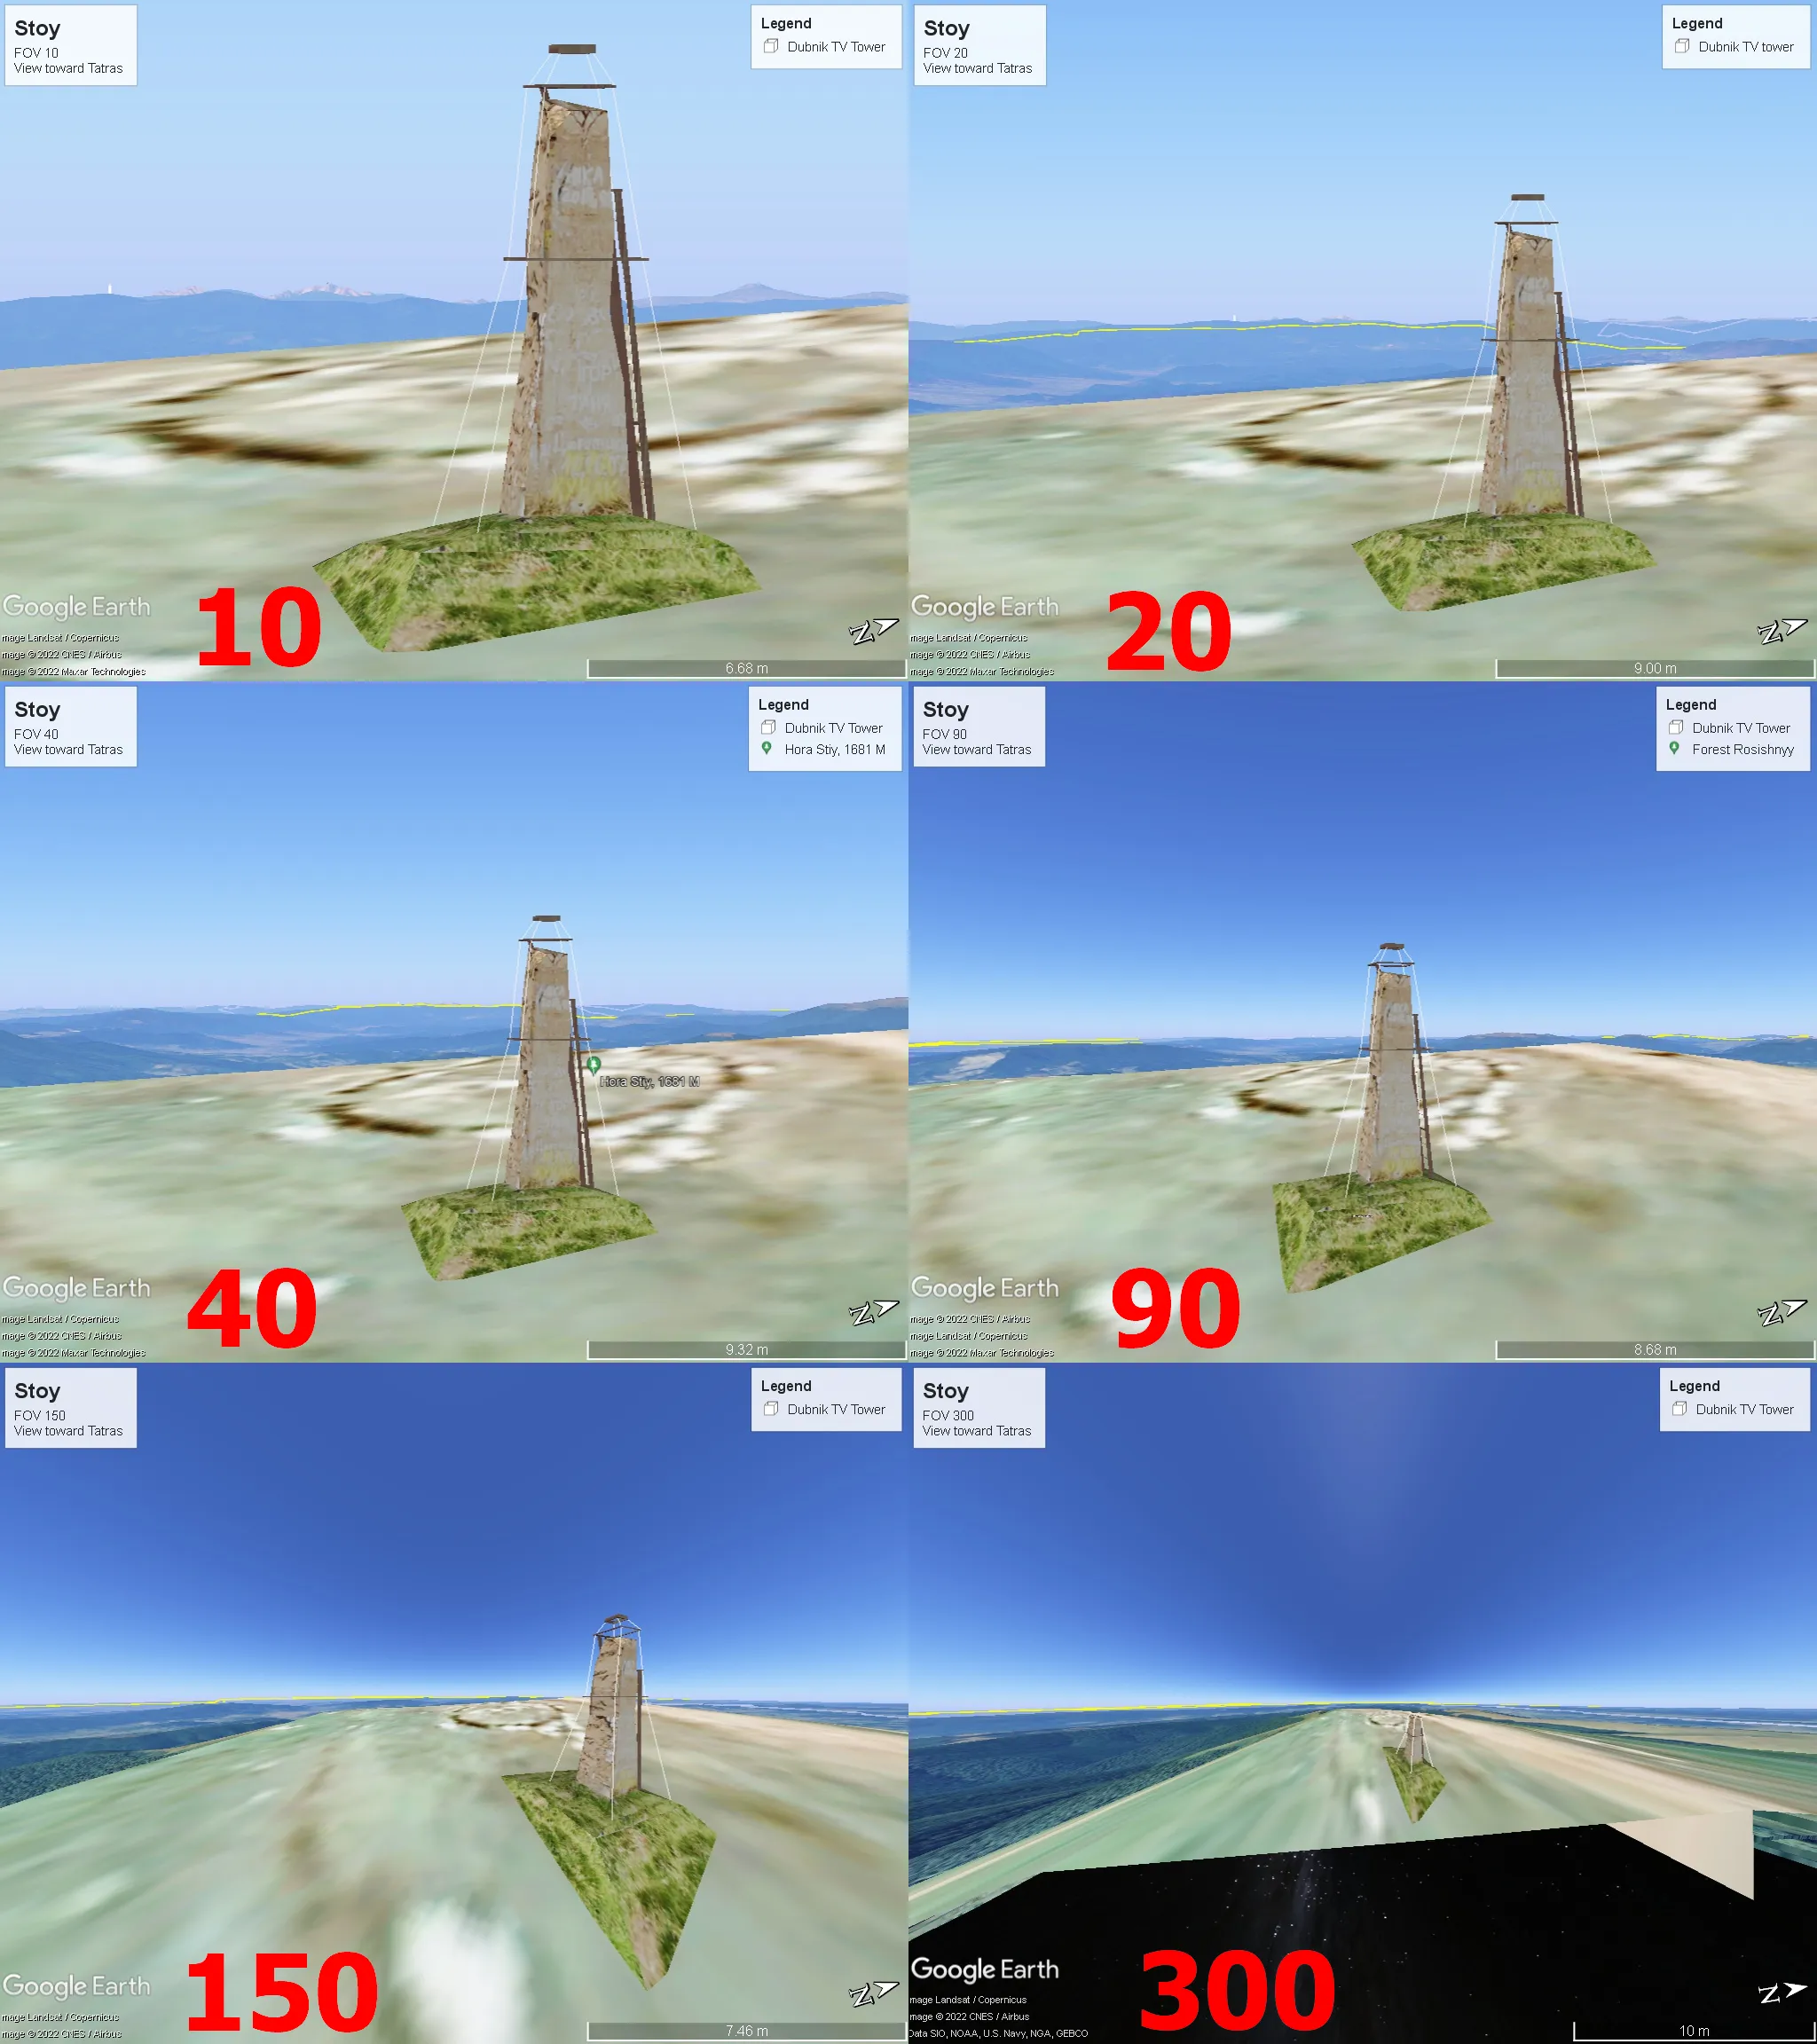
The feature is used mainly for simulating plane or drone flights. By using the tour animation we can visualize the drone view presets or simply use Google Earth as an alternative to Microsoft Flight Simulator. In other cases, the FOV feature can be used simply for planning impressive photography locations or even fish-eye projections (Middel, Lukaszczyk, Maciejewski, 2018).
2. RELATION THE FIELD OF VIEW TO THE VISUAL ABILITY OF CAMERA LENSES
The brief table below represents the FOV values appropriate to the particular lenses.
[ninja_tables id=”76038″]
This data is far simplified because only the horizontal FOV has been taken into account. Moreover, it refers to the FX Full frame format sensor (36x24mm). Apart from that, we could specify the field of view also with horizontal and diagonal sense as well as the DX sensor, which is smaller. The table also doesn’t include the fish-eye image circumstances.
Calculation of the FOV by using the lens with a fixed magnification is an easy thing. We just need to know the angle of view, focal length, and camera-to-subject distance. The problem becomes when we are going to use the lens combination. Then we can use the following formula:
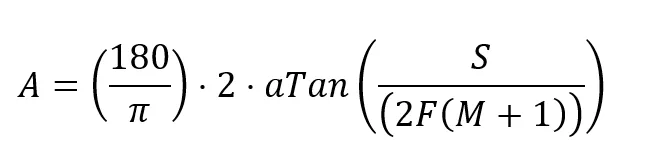
where:
A - Angle of view (in degrees),
aTan(x) - Arc tangent as an inverse of the tan trigonometric function,
S - Image size,
F - Focal length,
M - Magnification
although just for the linear view considered in our case (as per the table above) we can use the simplified form of the aforementioned approach:
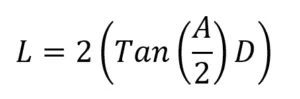
where:
L - Linear Field of view,
A - Angle of view,
D - Distance to subject
This formula can be applied only in the case when we know the distance to our subject.
The following formulas can be stated rather as an outreach to this topic because the aim of a whole chapter is to bring you a general orientation about the relation between the field of view and visual abilities of the given camera lenses. We have quite a lot field of view calculators available on the web, but basic knowledge about units and parameters is required to use them. The more detailed stuff will be explained in future articles.
3. APPLICATION FOR LONG-DISTANCE OBSERVATIONS
A. ARTIFICIAL OBJECTS & 3D COVERAGE
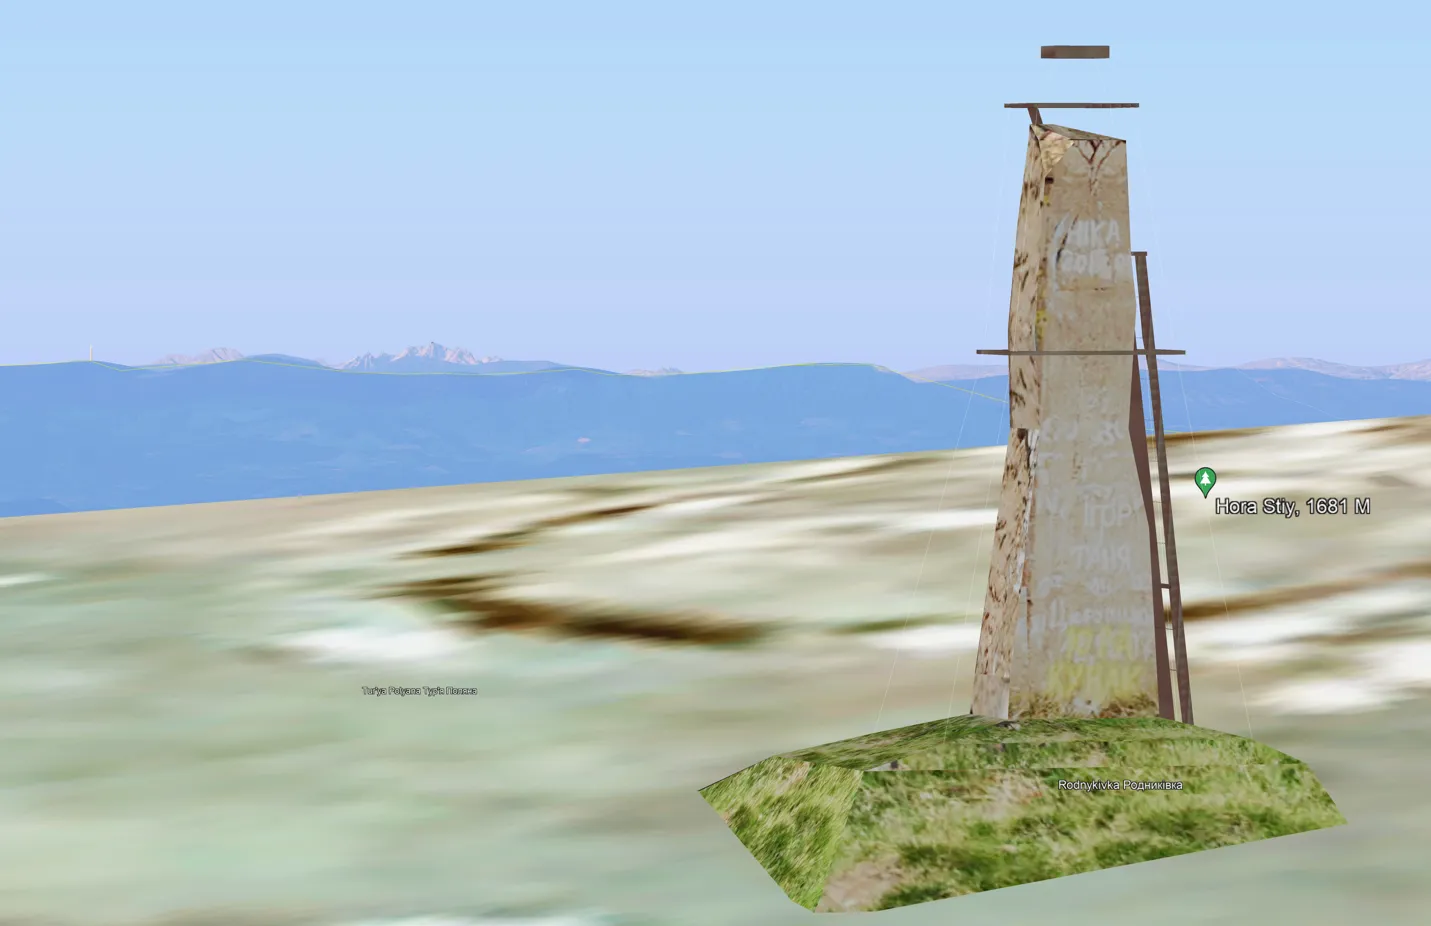
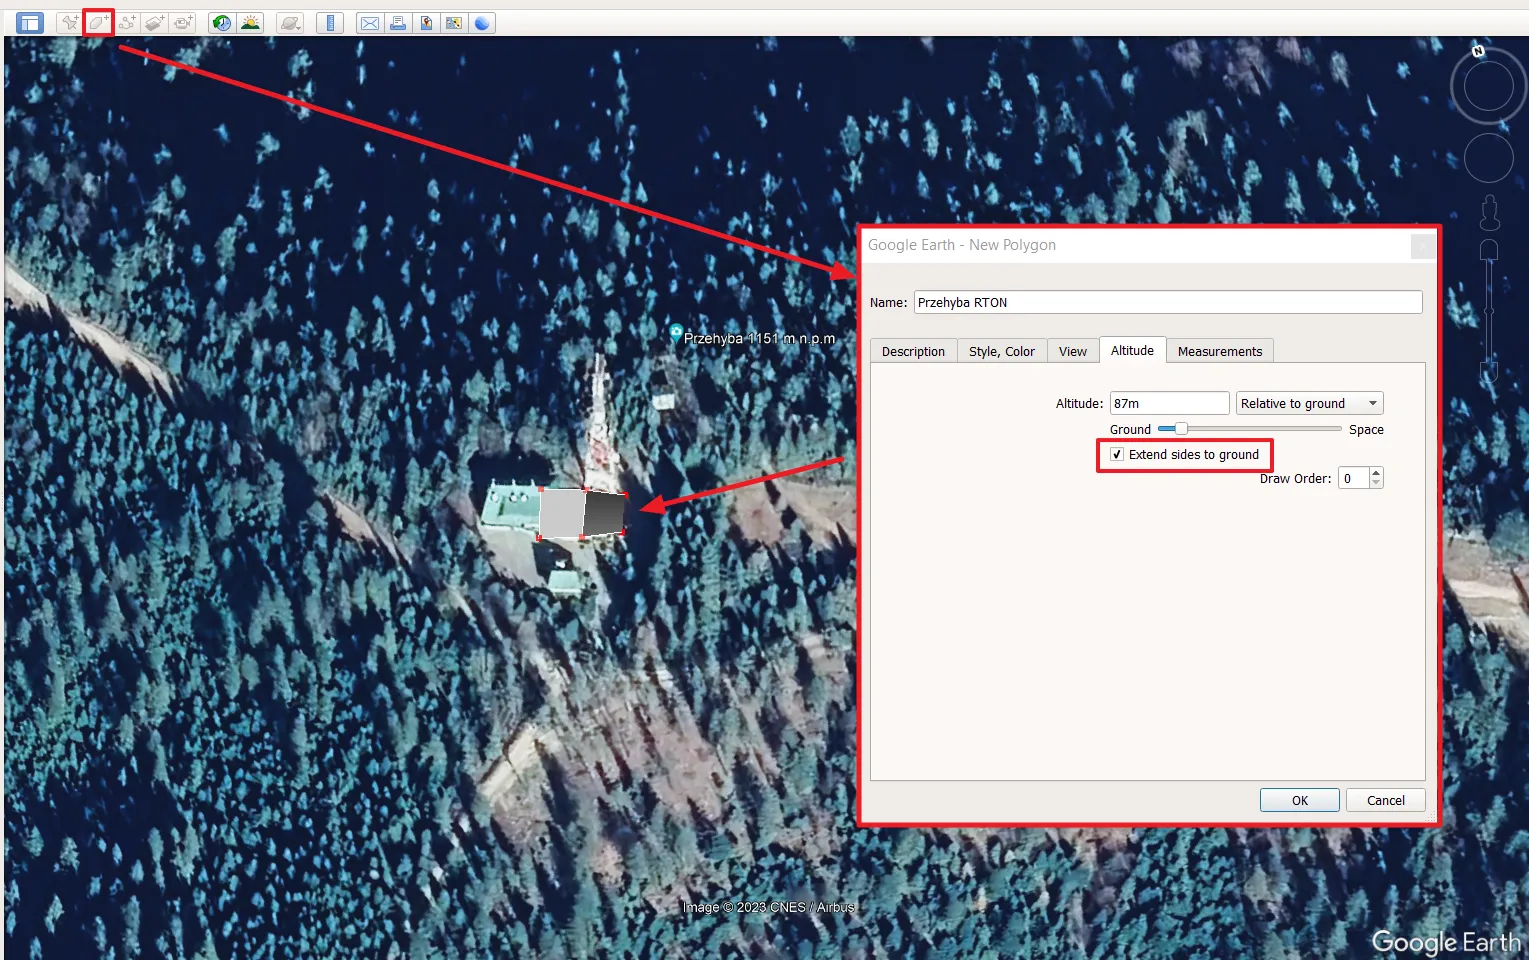
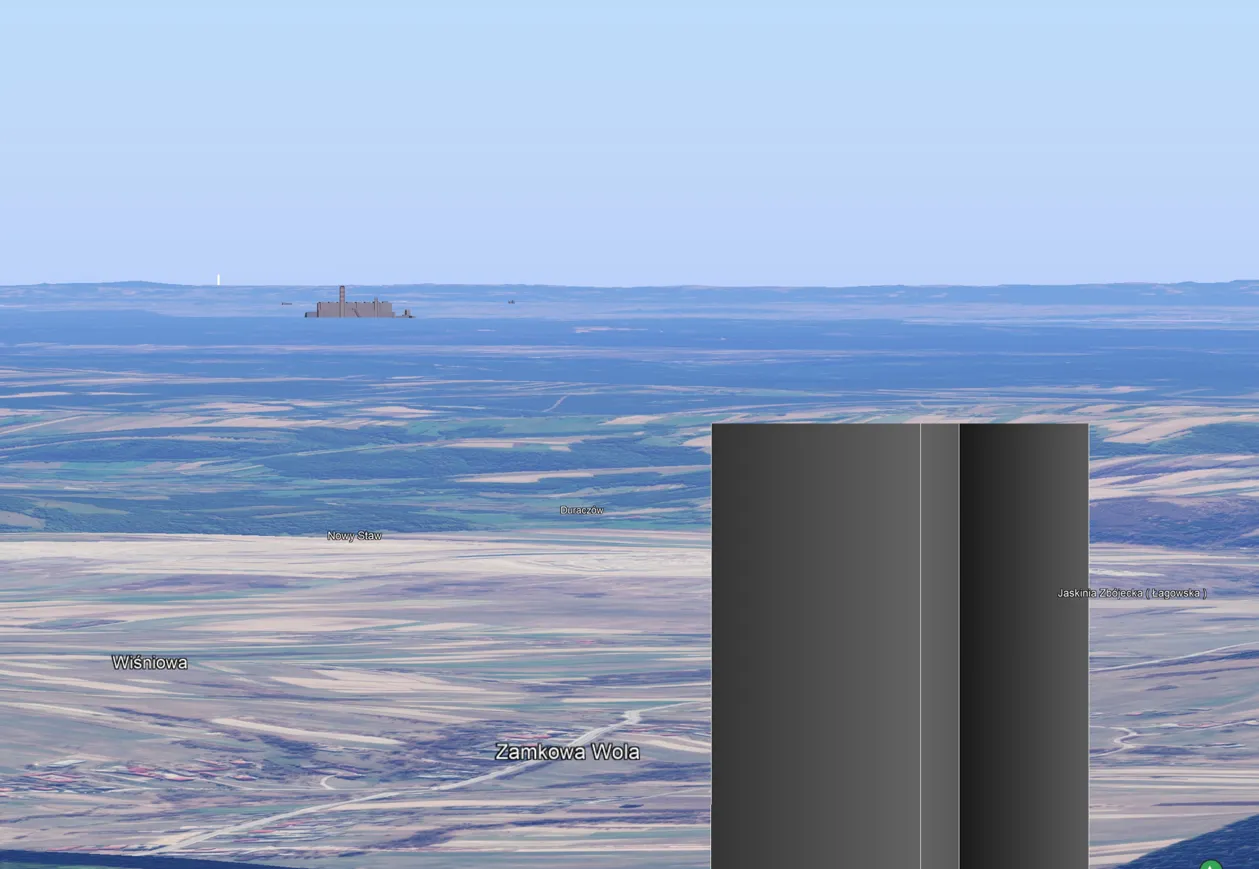
This section is a grateful continuation of the thread about the potential visibility of artificial objects from other artificial objects standing on the ground. For example, this article explains the following matter by analysis of the potential line of sight between two man-made tall constructions. Now, Google Earth seems to give us a more clarified way of doing estimations such as these. This is because of the 3D view, which can be visualized by this application and finally brings a user close to the outdoor reality from the specified location. The way of doing it is really straightforward. The only prerequisites we need to know are the location of the object and its altitude above ground. Next, in the main toolbar, we can select Add Polygon and simply draw some small polygon in the location, where the man-made object stands. Remember to type the correct object’s altitude, which can be found easily on the web, and, switch the Relative to ground option what is extremely important – make the Extend sides to ground option active (Pic. 3).
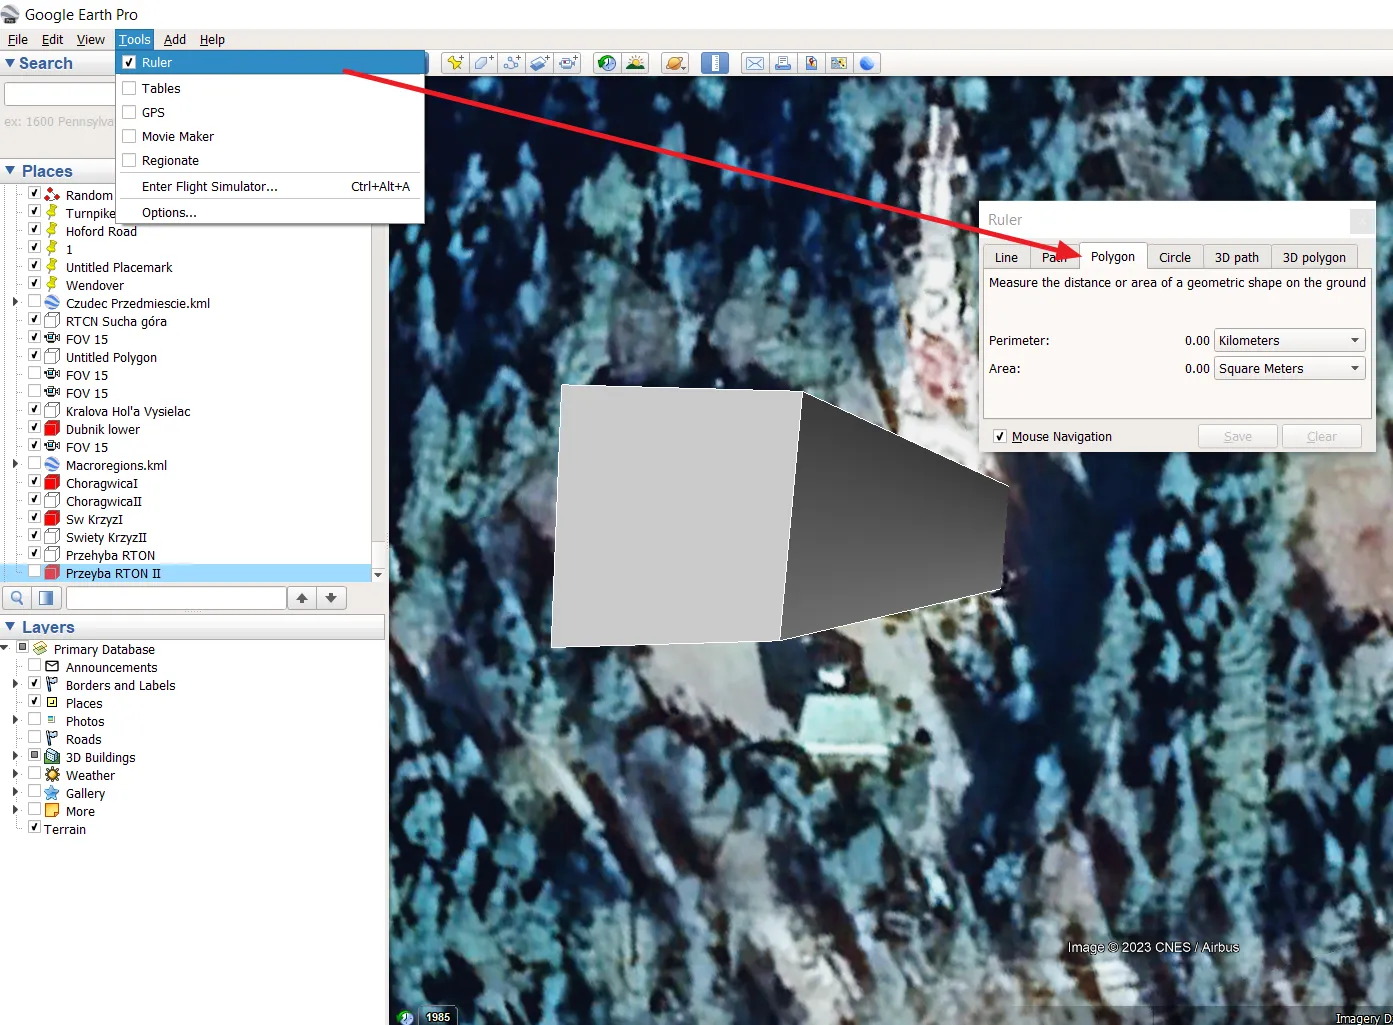
The cube will appear immediately. Another way of creating the polygon is by using the Ruler option from Tools, where with drawing the shape the same window will be opened (Pic. 4).
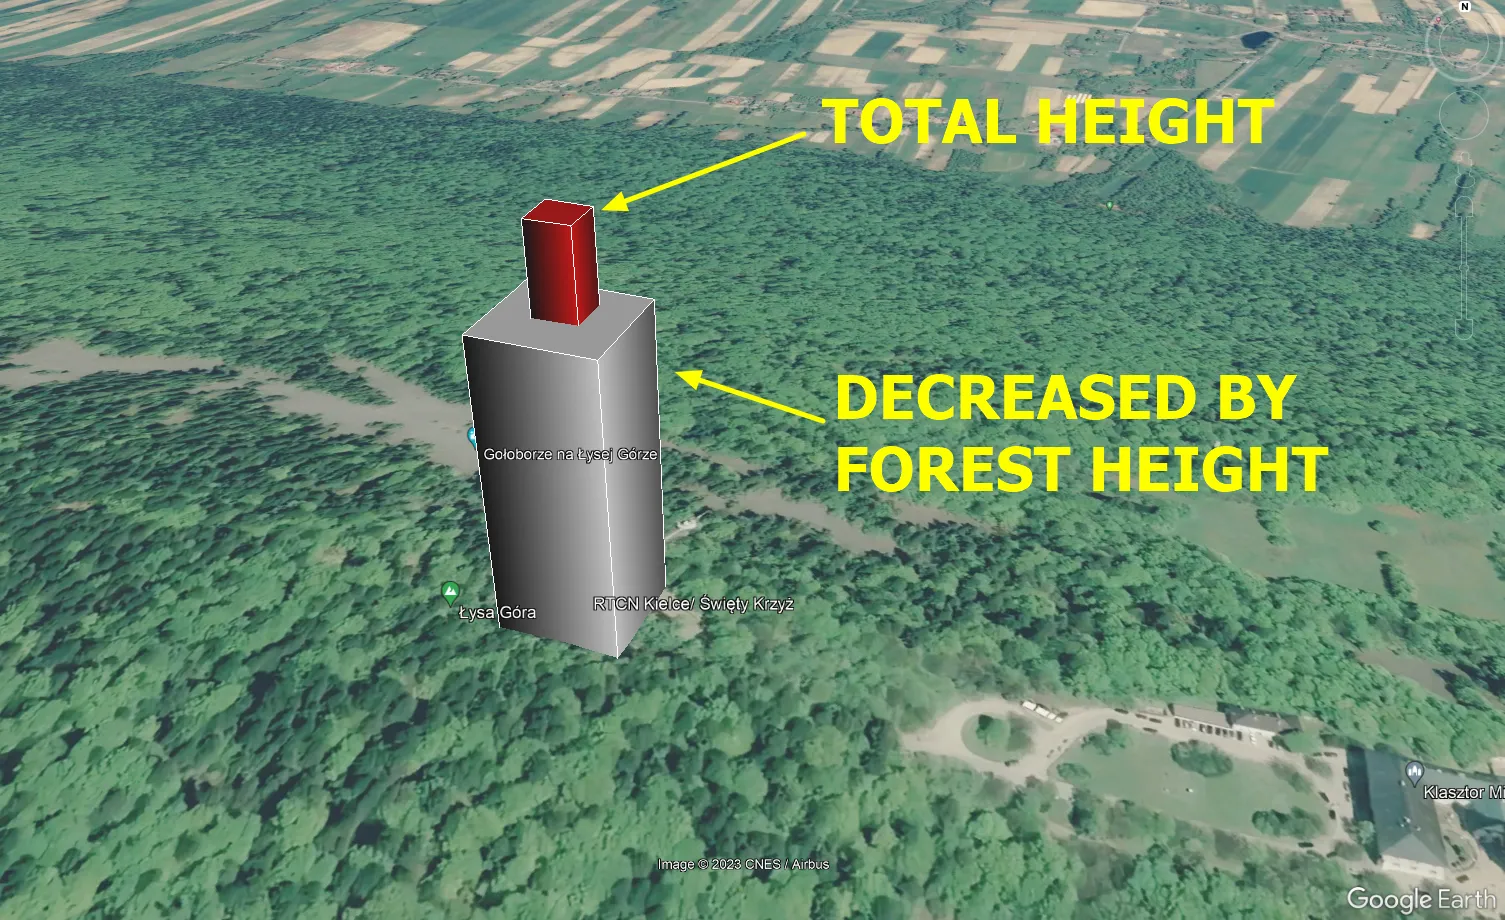
Another task, which we could do here is to make another polygon exactly in the same place and with a different color. Why is it for? Unfortunately, there is no forest coverage included in most of the areas except for the cities covered by a 3D layer. Therefore the other shape should roughly indicate the potential visibility of the object in the case when the forest is taken into consideration. The standard altitude of a tree, at least in the zone of deciduous forests in Europe is something over 30m. The altitude of the second cube should be decreased accordingly then (Pic. 5).
This is the quickest method of pointing out some artificial object. In many places, they already exist based on Google Sketchup models provided. When creating a missing object inside of 3D coverage you just need to provide the total height. It’s not necessary to create the auxiliary box, as the 3D view resembles quite true outside circumstances.
These assumptions might still differ from reality as shown in the comparison below (Pic. 8,9), where the primary reason can be the wrong height of the forest considered in the simulation.
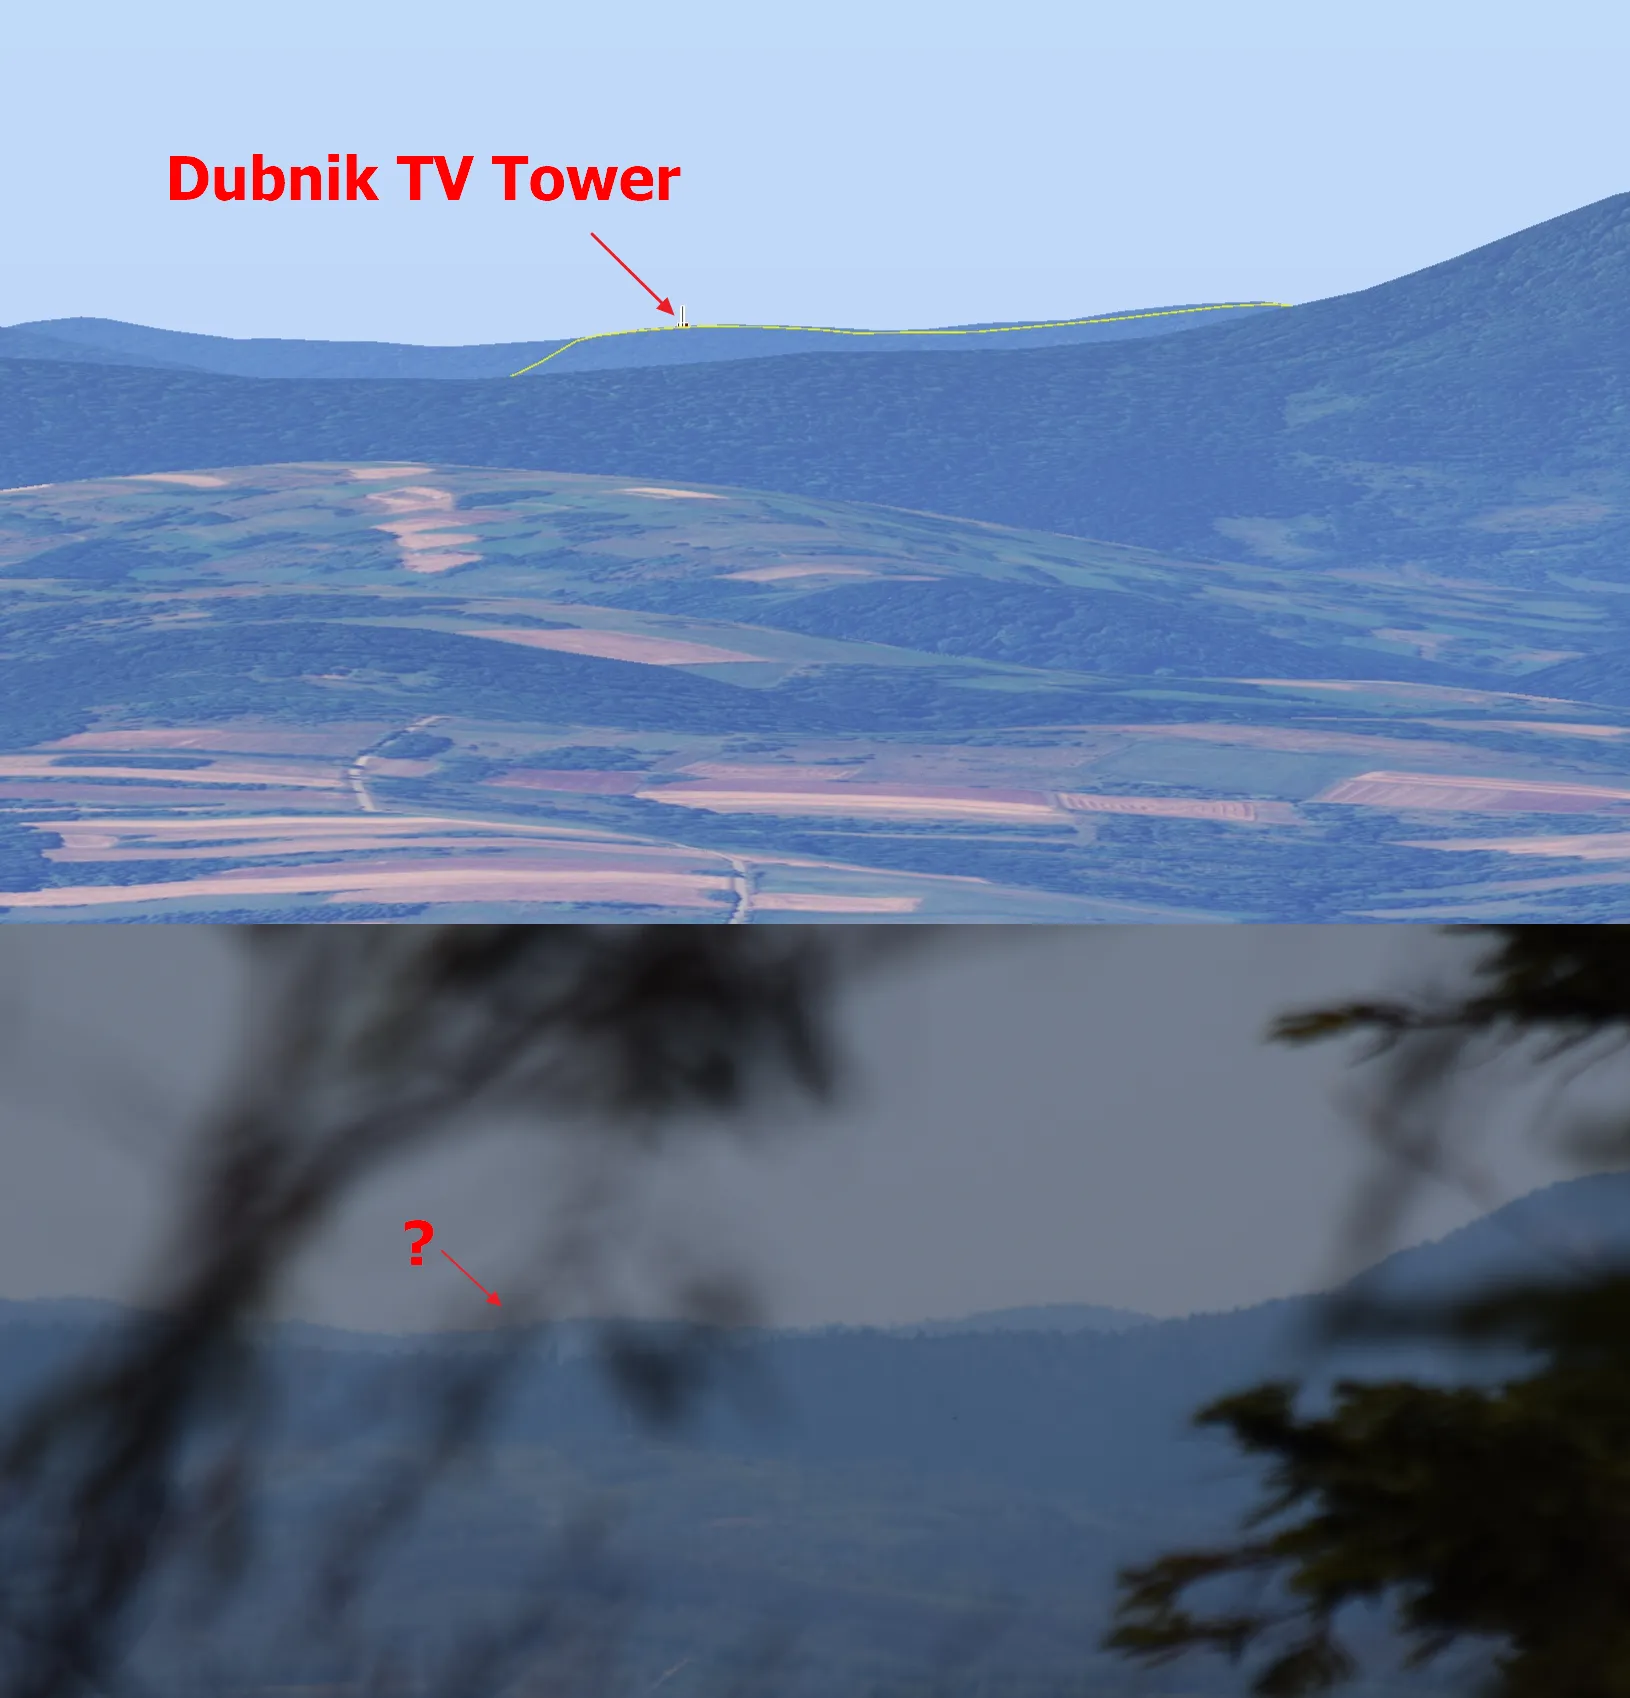
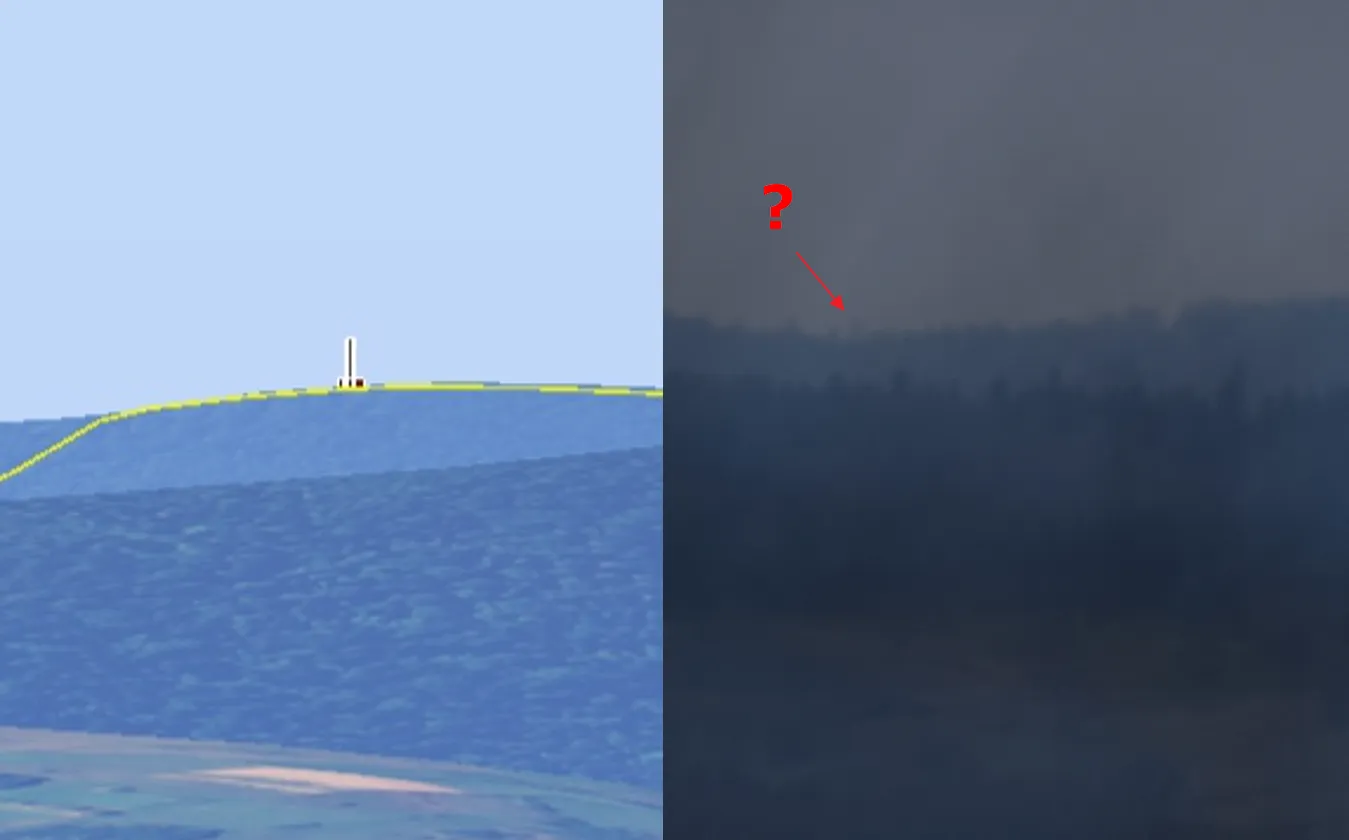
For these such as “borderline situations” the observer might be slightly disappointed, especially when the Heywhatsthat.com tool confirms the visibility of the object from the considered place (Pic. 10).
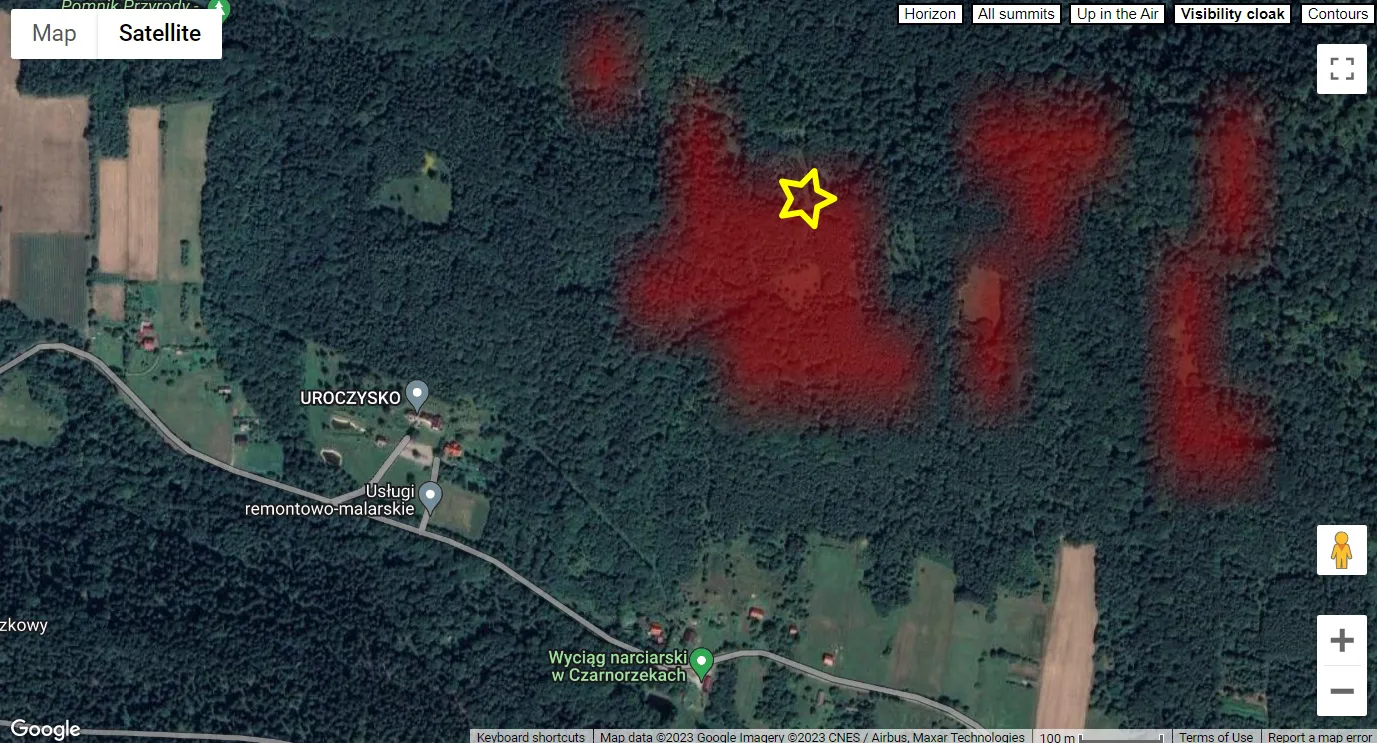
The situation above clearly indicates the necessity of advanced investigation of the “borderline” visibility cloak ranges produced by Heywhatsthat.com. This portal uses the SRTM-3 terrain model, which is less detailed. Moreover, the particular “dots” the generator produces the Visibility coak based on the nearest-neighbor interpolation. This method just determines the “nearest” adjacent pixel and assumes its intensity value.
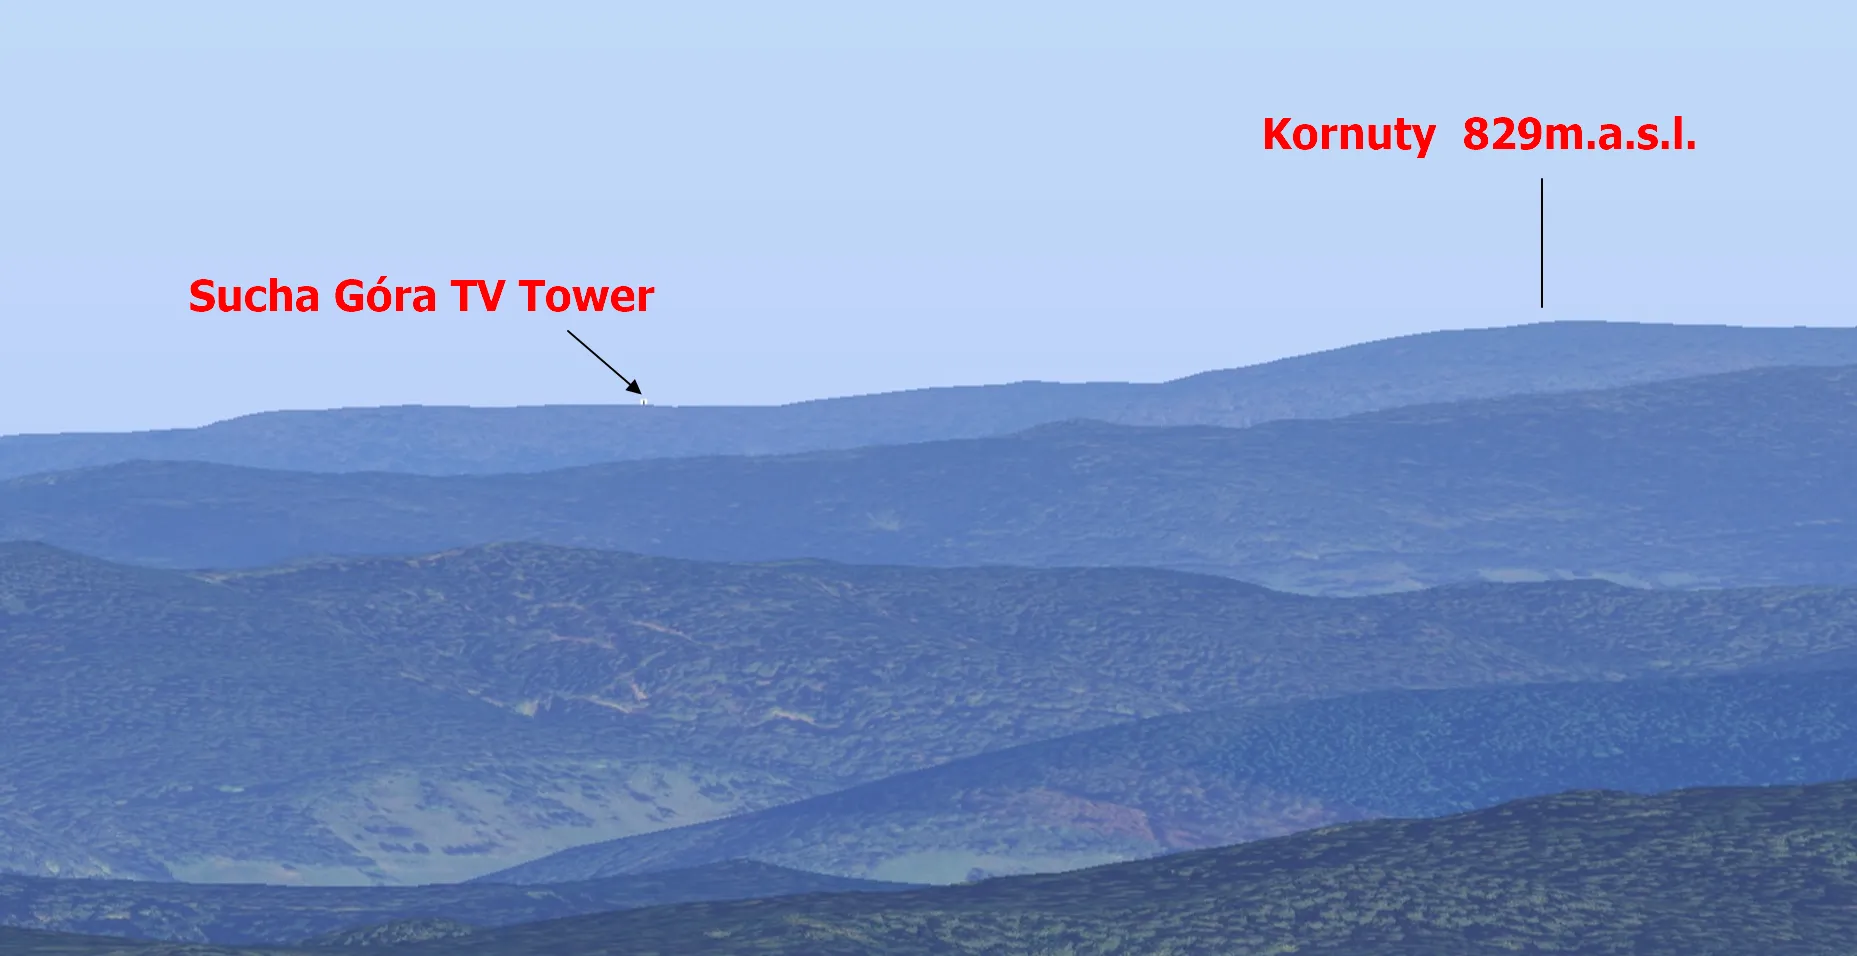
The 3D coverage comes out at the horizon but is not rendered correctly from a distance (Pic. 11).
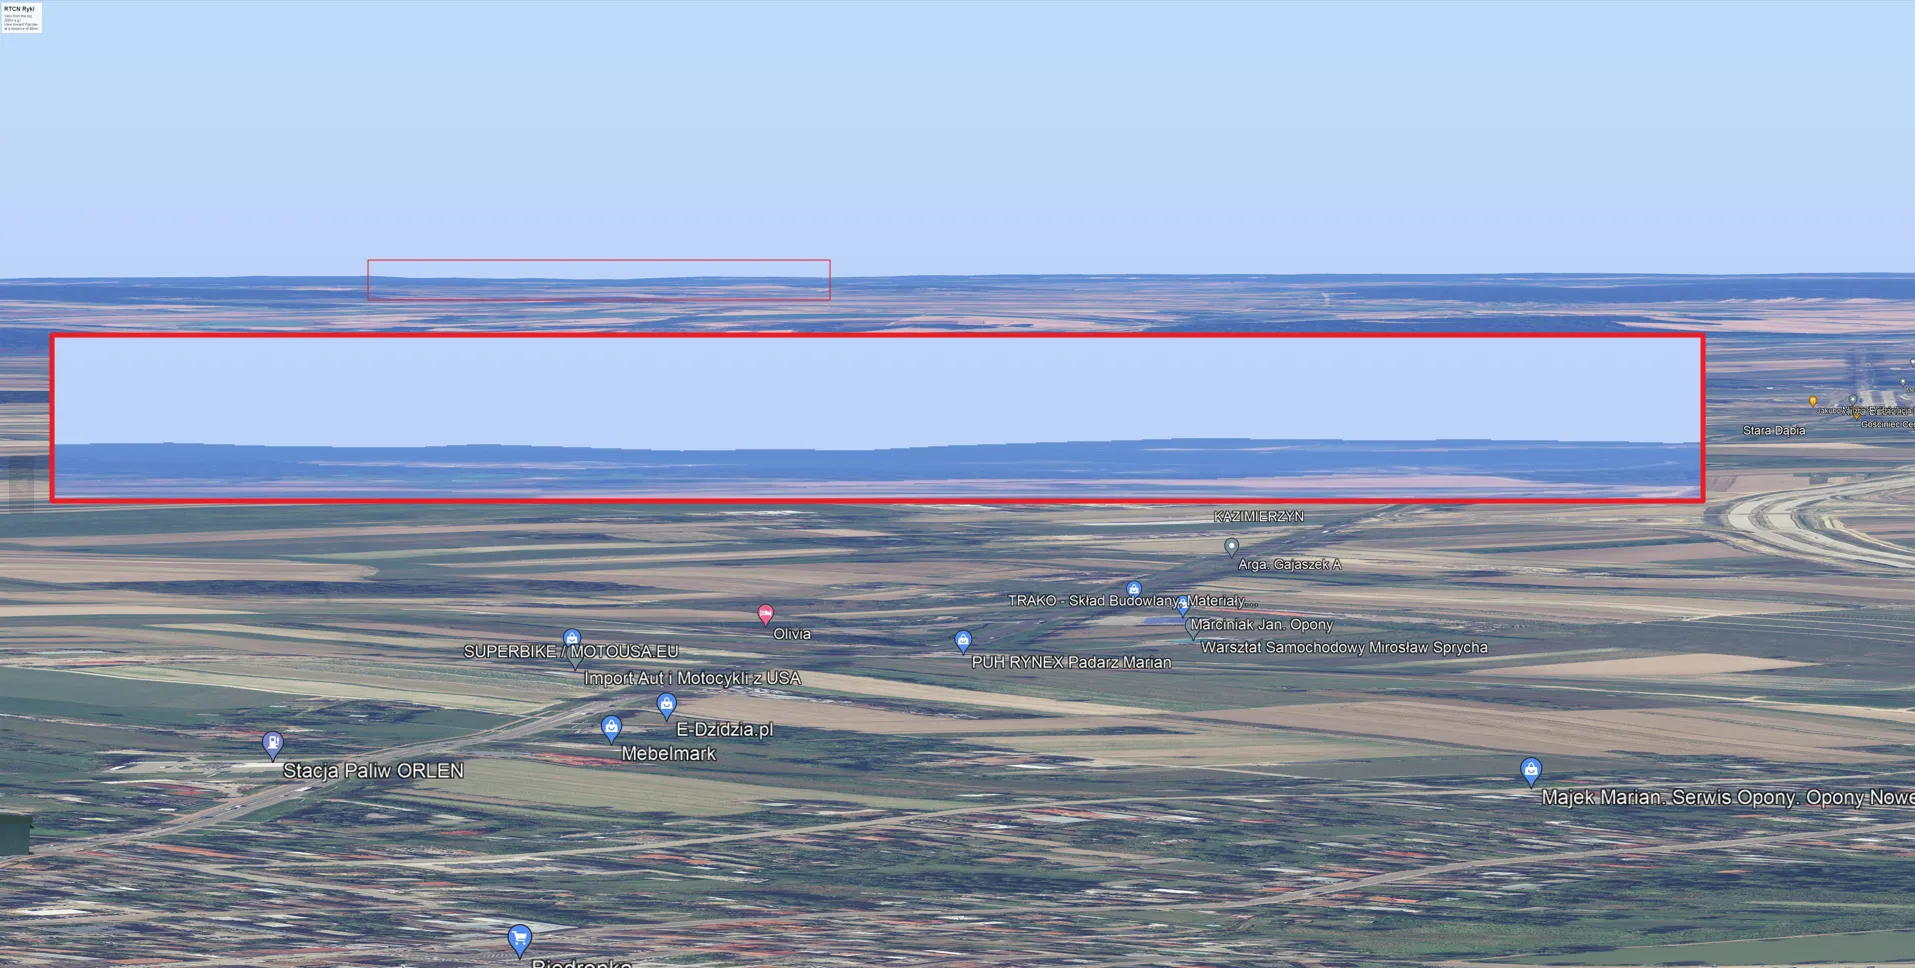
It might be the reason for certain computer parameters, especially the graphics card. When the resources are poor, the render won’t be successful enough. Unlike the ground rendering, the created cubes, which imitate the TV towers are visible from a distance of up to 300-350km.
B. TERRAIN FEATURES
Google Earth for the elevation uses SRTM1, which has a spatial resolution of 30m. These Shuttle Radar Topography Mission elevation datasets can be affected in mountainous and desert areas Usually these areas represent data voids. Moreover, NASA SRTM declares about 80% of world coverage, which includes all regions except for polar latitudes, whilst many of them have been mapped more than once. Due to inaccuracy, Google Earth uses interpolation algorithms mixing and meshing SRTM data with other data in order to derive accurate results for particular areas. The accuracy of the SRTM area usually varies between 5 to 10 meters unless we have the area covered in a 3D layer, then is more detailed. The vertical error of DEM is reported to be less than 16m. Besides DEM, which utilizes satellite data, there is another method – LiDAR. This optical remote sensing technology collects a wide range of topographic data with a vertical accuracy between 5 and 25m all the more so that LiDAR is able to capture ground elevation data even for forested areas. Having in mind this high level of accuracy used for rendering the relief in Google Earth we might be quite surprised to see some missing landscape features on a distant horizon when the small FOV is applied. I found, that for target objects located at a distance of more than 100km, Google Earth tends to lower the horizon. The best examples can be seen below (Pic. 12, 13) where the Google Earth FOV 10 view is compared with the Urlich Deuschle panorama generator.
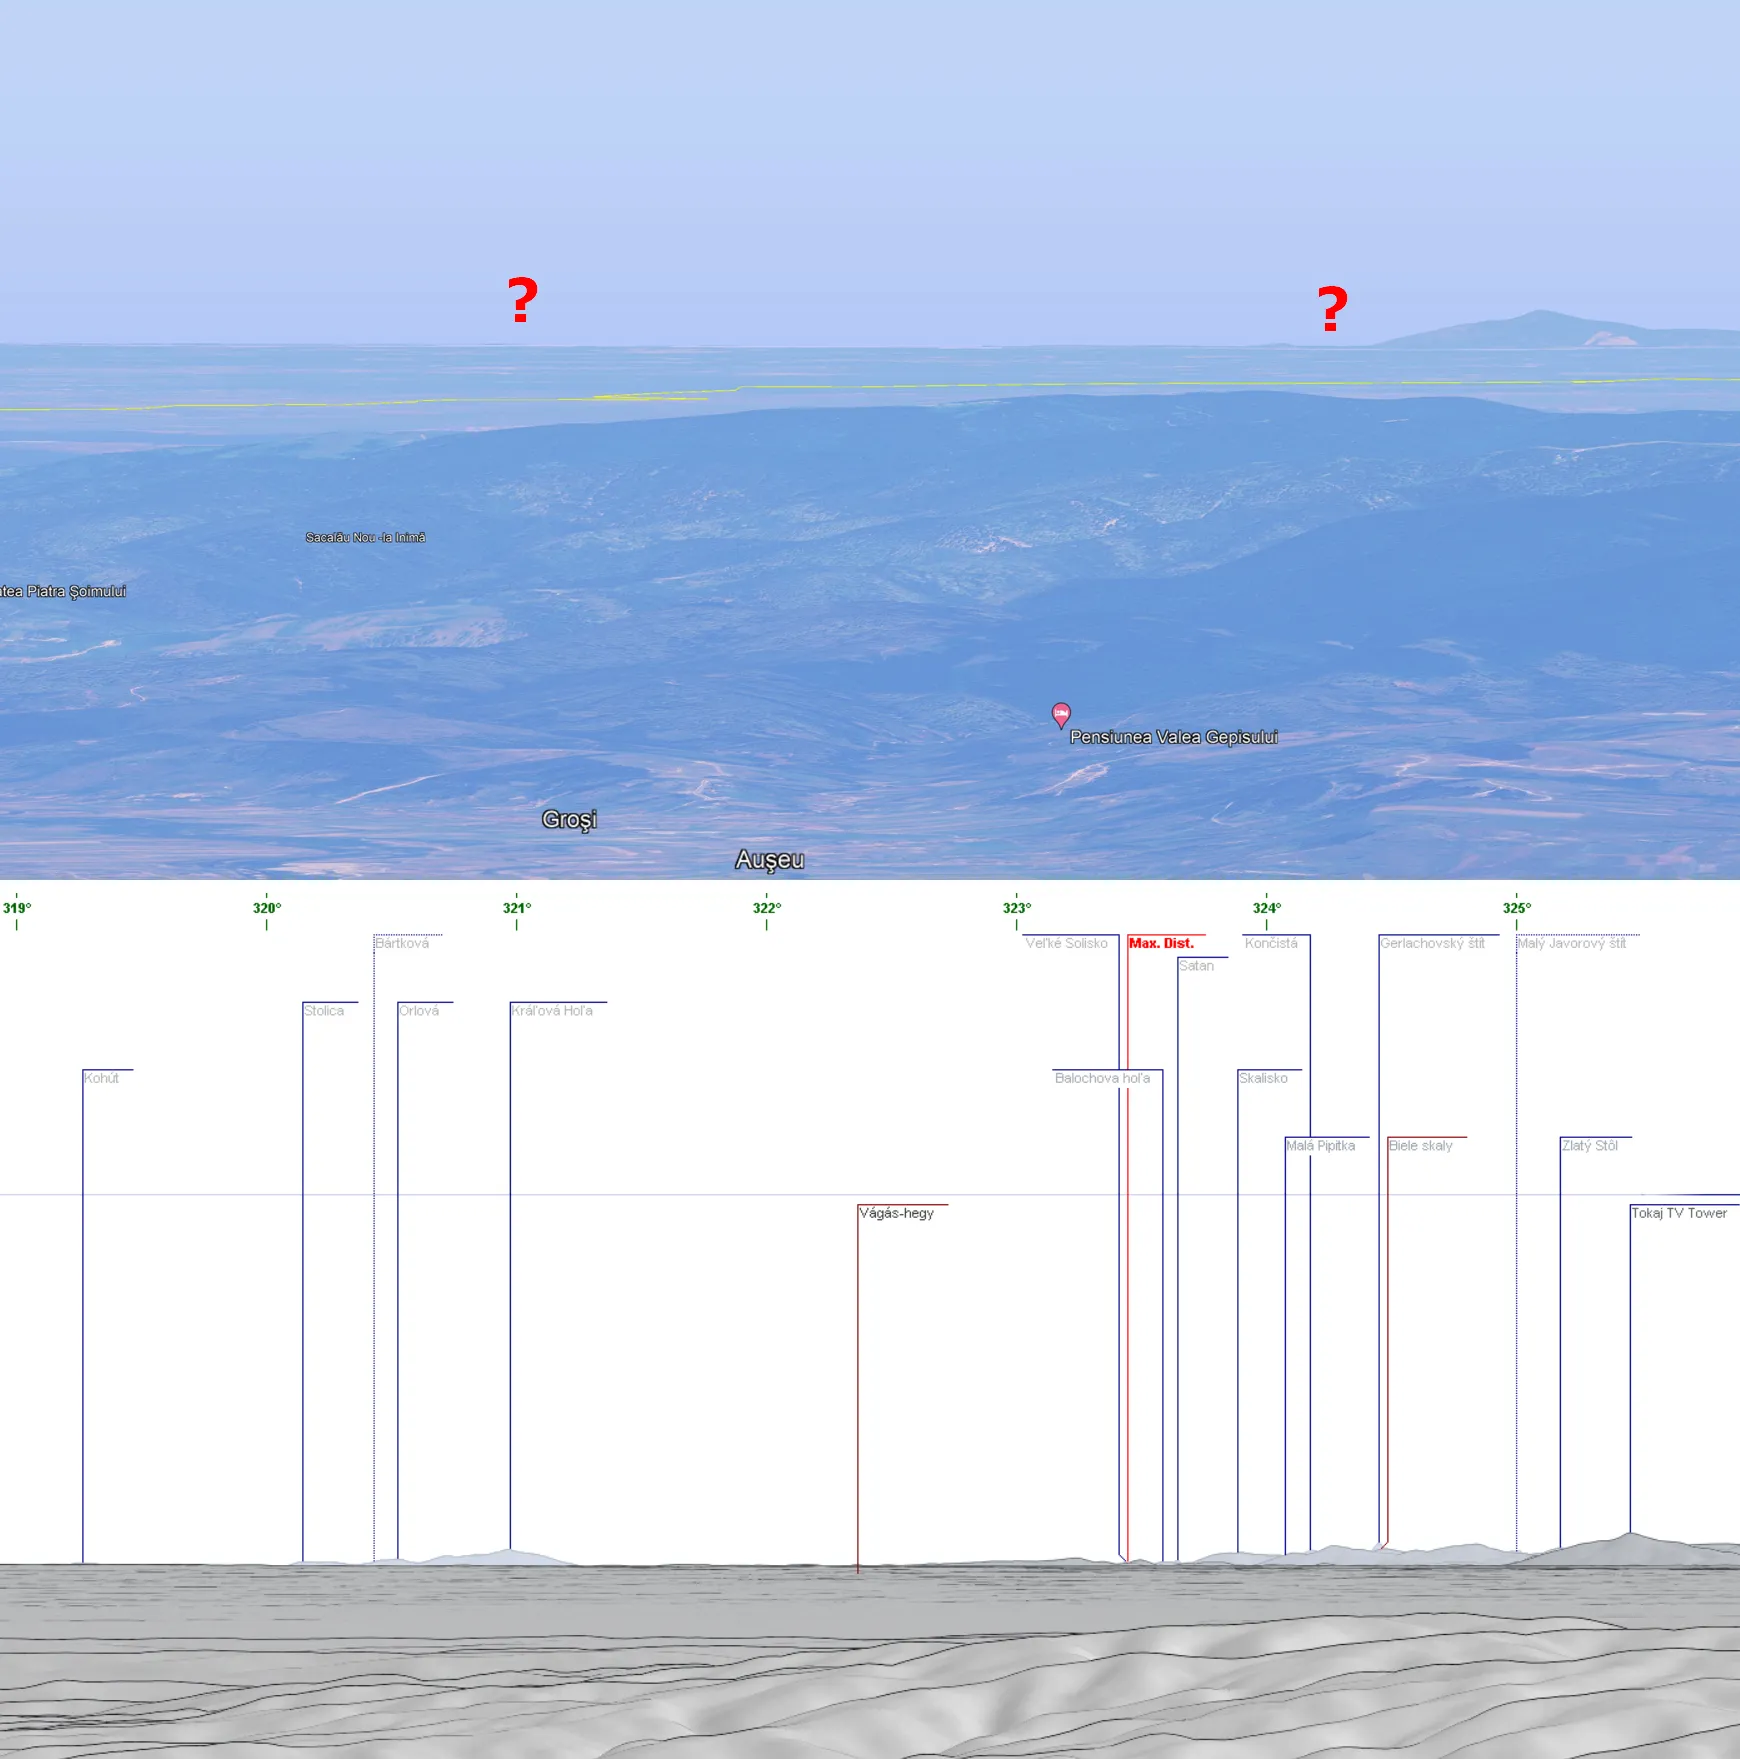
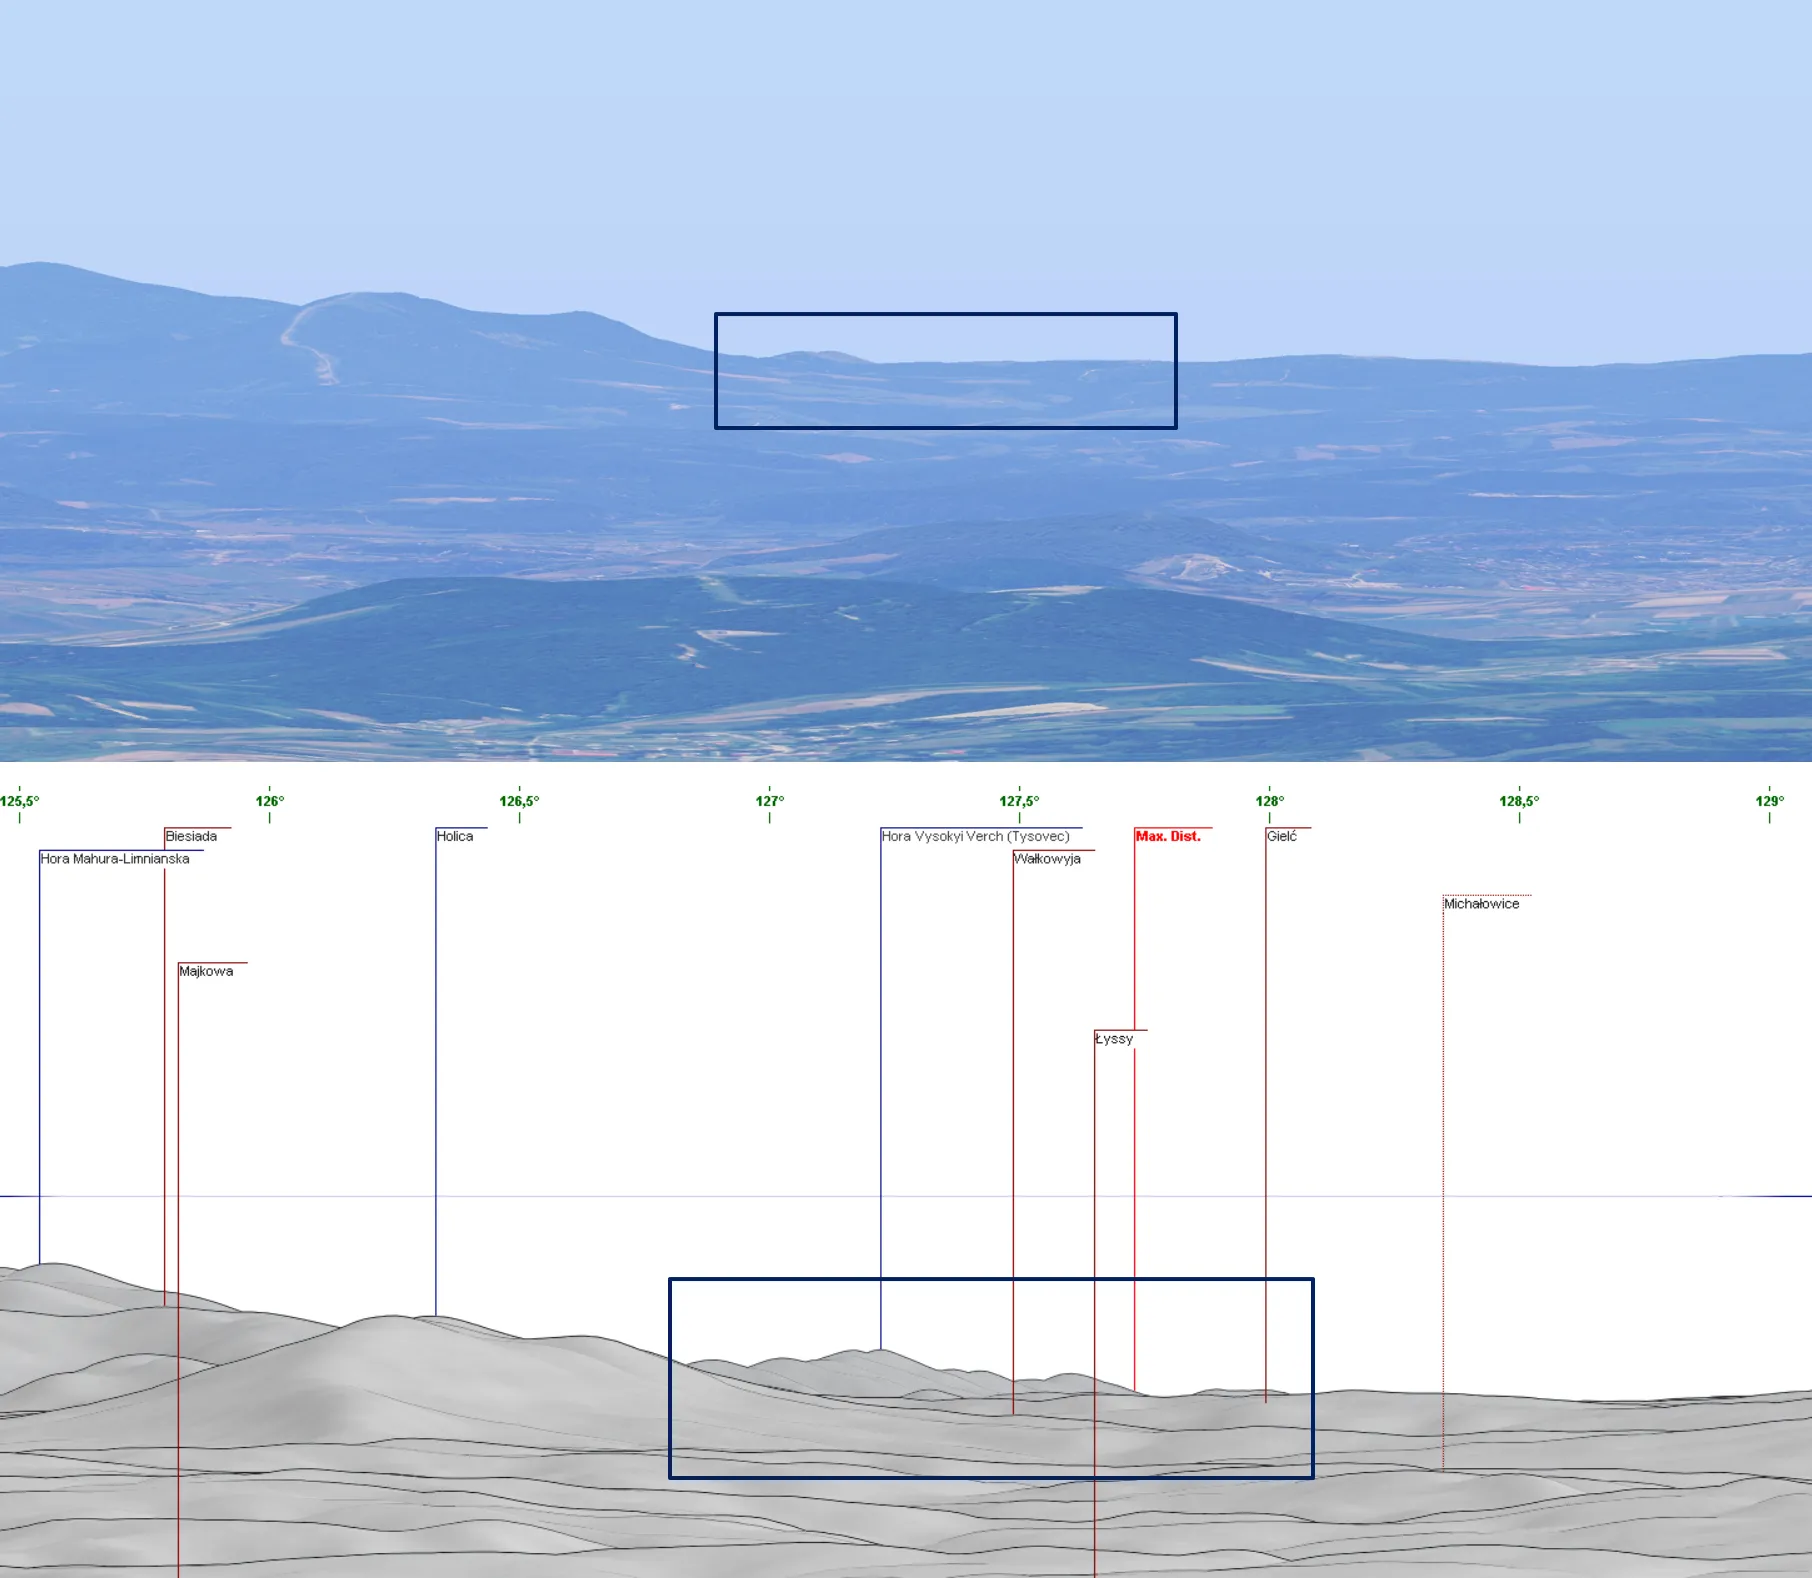
Again, the reason behind it might be the system requirements, which for tasks such as these should be rather high-end. The integrated graphics card doesn’t help at this moment. If this argument is wrong, probably we should wait for newer Google Earth upgrades. The list of initial conclusions here is open.
4. SWITCHING TO THE NORMAL VIEW
By default way, the FOV feature is available in Google Earth just for tours. In fact, this is not the only way we can use this particular option. For instance, by closing down the Tour option, the user goes back to standard mode retaining the FOV defined previously (Pic. 14, 15).
In addition, always when we open some ready-prepared .kml tour file it appears in the Temporary Places folder. We can remove it quickly, as it won’t impact our browsing in both cases. Closing down the Tour mode is a nice shortcut for using the previously defined FOV value for normal work in Google Earth, as the option isn’t available directly.
5. VISUALIZING PHOTOGRAPHY IMAGES
For successfully visualizing the images, which potentially could be taken on the field we need to take a look at the relevant options. This is a mandatory thing before we start for example saving the images of our visualization (Pic. 16).
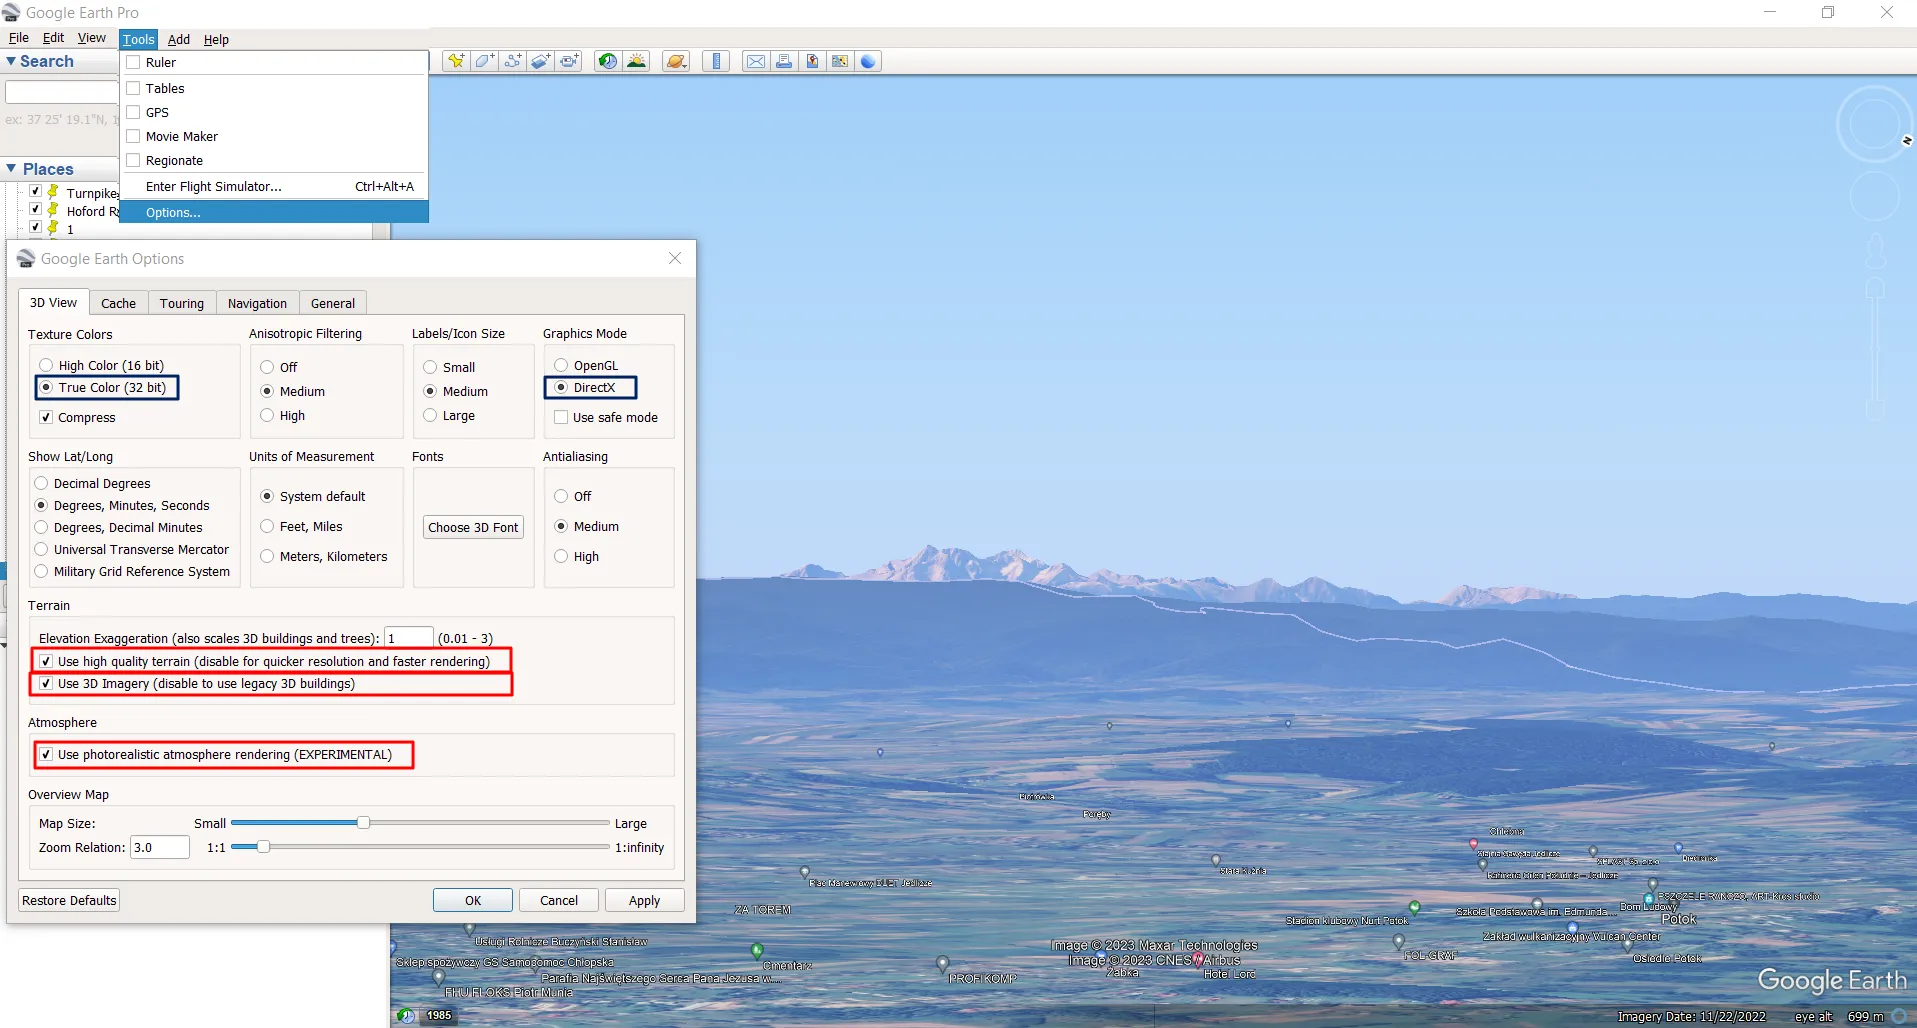
We cannot forget about keeping Use high quality terrain option switched on. If you want to have your visualized view similar to outdoor conditions on a clear day the other option below – Use photorealistic atmosphere rendering (EXPERIMENTAL) can be also essential.
Obviously, settings like Texture Colors with True Color (32bit) should be selected automatically as the most optimal with respect to your device parameters. Make sure, that the True Color (32bit) option is selected the same as DirectX graphic mode.
The last thing is to make sure, that our view won’t be turned to the ground mode every time when getting closer to the given place. Autoswitch to the ground view is annoying because a user loses the FOV settings completely. This feature can be disabled by turning on the Use 3D Imagery (disable to use legacy 3D buildings) option.
When we are fine with all the settings, the most interesting option can be downloading the image from Google Earth. The images can be saved in the maximum resolution of 8K. Because the FOV 10 corresponds to the 200mm telephoto zoom, a user should have the cropped view as presented below:
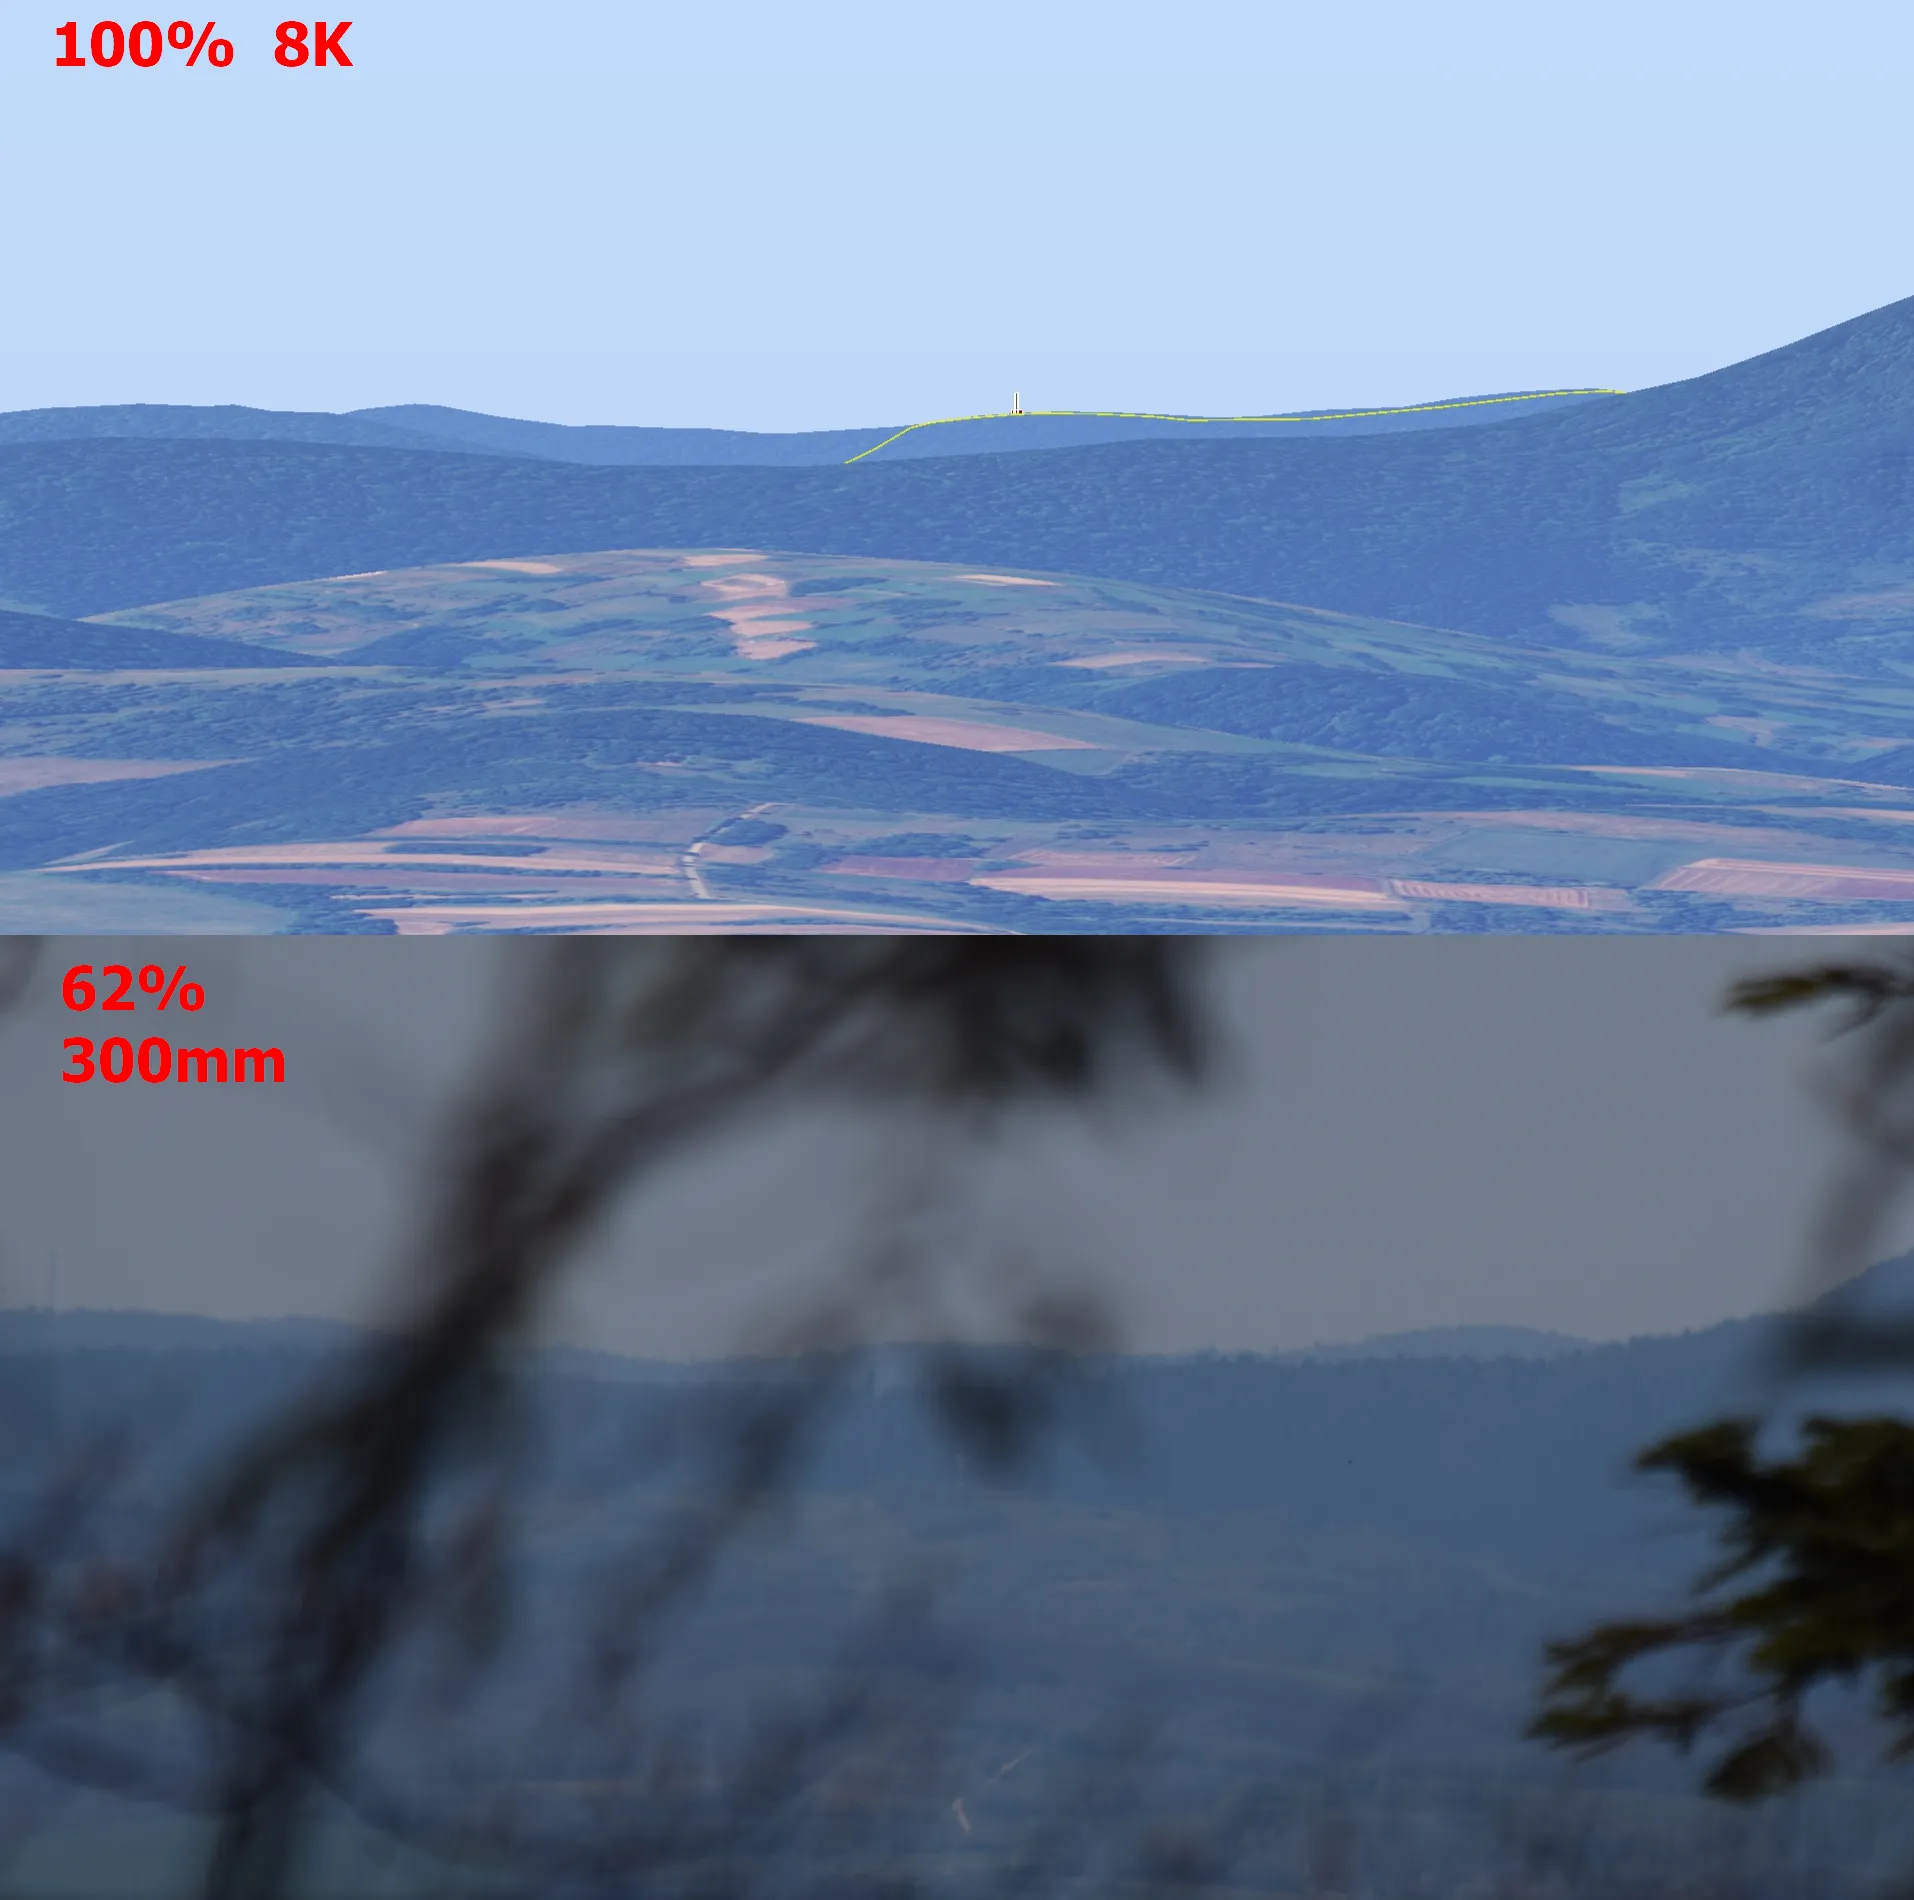
The 8K view, although saves quite a long on your drive can resemble a nice telephoto zoom level. This resolution is about 33,2Mpx whereas the DSLR APS-C camera usually takes images on 24Mpx. The final telephoto view can be “enlarged” slightly more beyond 200mm then. Considering the full-frame cameras, we have a very similar resolution between the Google Earth 8K image and the picture produced by this type of camera.
Below, you can have the links to other 8K views rendered in Google Earth for the purpose of this text:
- Vladeasa – view toward Tatras (Romania)
- Varso Tower – view toward Sw Krzyz TV Tower (Poland)
- Ryki TV Tower – view toward Warsaw (Poland)
- Havran – view at Sucha Góra TV Tower (Slovakia)
- Sucha Góra TV Tower – view at Beskid Wyskowy (Poland)
- Sucha Góra TV Tower – view toward Ukraine (Poland)
- Sucha Góra TV Tower – the panorama of Tatra Mts (Poland)
- Sucha Góra ridge – view toward Dubnik TV transmitter (Poland)
When you save the Google Earth image in 8K resolution, you definitely won’t have issues with identifying landscape features, unless they won’t render properly at maximum distances, as discussed earlier in this post. Even 4K images will be fine. The Google Earth images with user-defined FOV can be used elsewhere the panoramic views with descriptions are considered for example tourist viewpoints, etc.
6. GOOGLE EARTH PANORAMIC VIEW GENERATOR
With respect to the following task, the smallish Python tool has been created, which is dedicated especially to this purpose. This is a Google Earth FOV Generator, in which a user can define the local circumstances of the potential observation when the telephoto lens is going to be used.
Important is to get the coordinates properly. Any deviations and differences in decimals will result in falling your point away from the intended place. The coordinates provided define the elevation automatically! Users can provide just the elevation above ground level, whereas 2m is set as default. It corresponds to human height. The output file is named as provided in the tool with the FOV suffix.
7. SUMMARY
The Field of View feature available in Google Earth can be useful for various purposes. In this text, just the usage within long-distance photography has been considered. The tests were provided on the laptop with the following parameters:
Processor: Intel(R) Core(TM) i7-8565U
RAM: 32GB
Graphic card: Intel(R) UHD Graphics 620
therefore further tests are required with better parameters. Unfortunately, Google Earth tends to not render the horizon completely, which loses some distant features. It depends on their presence. When they aren’t outstanding enough from surrounding areas, Google Earth cannot “see” them. It’s a big problem for someone, who wants to render a complete panorama from a particular place. It’s possible only when dealing with closer features. Despite this inconvenience, the visualization of the horizon views this way can be useful for preparing mountain panoramas in tourist places. Any viewpoint needs to have the visualization of the panoramic view and this tool seems to be a perfect fit, especially since closer features come up nicely. Another way of applying this kind of visualization is the estimation of the view between two artificial objects, which seems to be easier than the method presented previously. Indeed, users cannot forget about the forest coverage, which lifts the altitude of any mountain up by about 30 meters or so. I hope, that this method will become more useful when the 3D layer covers most places and mountains worldwide. Then the problem with forest coverage will disappear completely. So far it’s still the best method for a visual rendering of the potential panoramic view from one high-rise construction to another.
Mariusz Krukar
References:
- Middel A., Lukaszczyk J., Maciejewski R., et al., 2018, Sky View Factor footprints for urban climate modeling, (in:) Urban Climate, vol.25, p.120-134
Links:
- https://www.nikonians.org/reviews/fov-tables
- http://www.acapixus.dk/photography/angle_of_view.htm
- https://shuttermuse.com/calculate-field-of-view-camera-lens/
- https://www.omnicalculator.com/other/focal-length
- https://www.cuemath.com/trigonometry/inverse-tan/
- https://developers.google.com/kml/documentation/kmlreference?csw=1#gxhorizfov
- https://mapsplatform.googleblog.com/2011/09/new-kml-features-in-earth-61.html
- https://www.gearthblog.com/blog/archives/2014/10/using-kml-change-field-view-google-earth.html
- https://www.flightsimulator.com/
- http://mygmap.net/?tag=field-of-view
- https://www.gearthblog.com/blog/archives/2015/03/google-maps-earth-view-fov.html
- http://christophergrant.com/blog/2017/5/20/plan-your-next-photoshoot-or-drone-trip-with-google-earth
- https://mes100.com/docs/how-accurate-is-google-earth-elevation/
- https://srtm.csi.cgiar.org/
- NASA SRTM Mission
Forums:
- https://gis.stackexchange.com/questions/312284/importing-kml-file-into-google-earth-pro-says-junk-after-document-element
- https://stackoverflow.com/questions/42844948/trying-to-make-a-kml-file-in-python
- https://support.dronelink.com/hc/en-us/community/posts/1500000469402-Export-to-Google-Earth-change-the-Camera-Settings
- https://phantompilots.com/threads/flight-log-converter-analyze-your-flights-in-google-earth.99097/page-2
- Is it possible to change the field of view for the google earth plugin?
- https://www.reddit.com/r/GoogleMaps/comments/d9qba4/want_to_change_the_fov_on_google_earth_for_phone/
- https://superuser.com/questions/123066/google-earth-zoom-like-with-a-scope-rotate-the-camera
- How do I turn off automated features in navigation?
- What’s the difference between SRTM 3sec and SRTM 1sec HG digital elevation models when applying image pair coregisteration?
Tools:
Wiki:
Youtube: