
The data attribute table in QGIS can be updated in different ways. We can use the “Default value” option, provide the formula to our column, and replace some content, and so forth. In this text, I will focus on the last option – replacing the content. In addition, I would like to show you the method, which would allow you to update the attribute table from other layers, even several layers at once. This is, in fact, a manual method, but it should be still beneficial in the case when we want to apply some bulk changes at once.
We have the layer, which is a result of merging another 2 layers. Admittedly, this text is somewhat a continuation of my previous article describing the preparation of the Fttx schematics in QGIS. The current example will be based on the data attribute table produced by the steps described there. In the screenshot below we can see the example of merged layers, which comprise the current layer (Pic. 1).
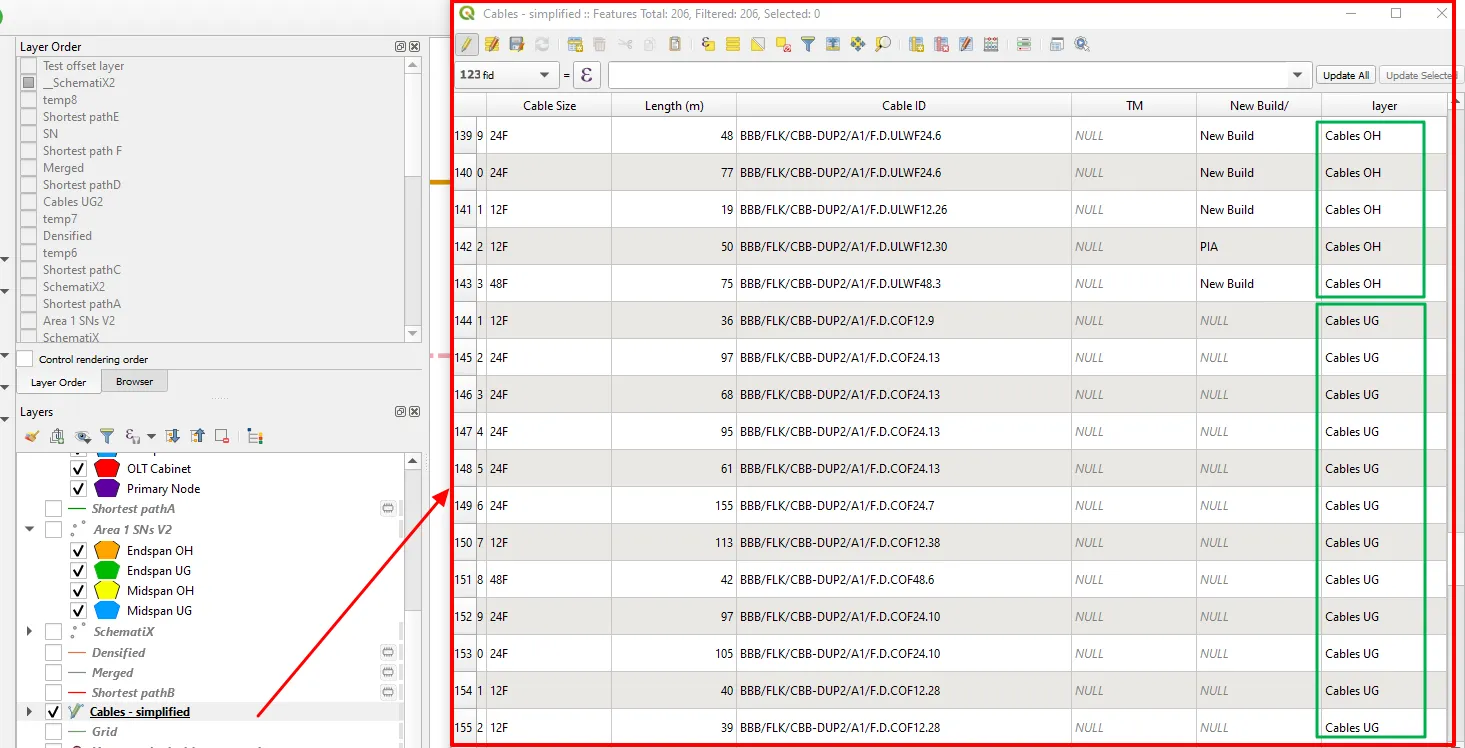
As you can see, green bounds are mother layers, which now build up the current one. This is the key to understanding how we are going to update our data attribute table.
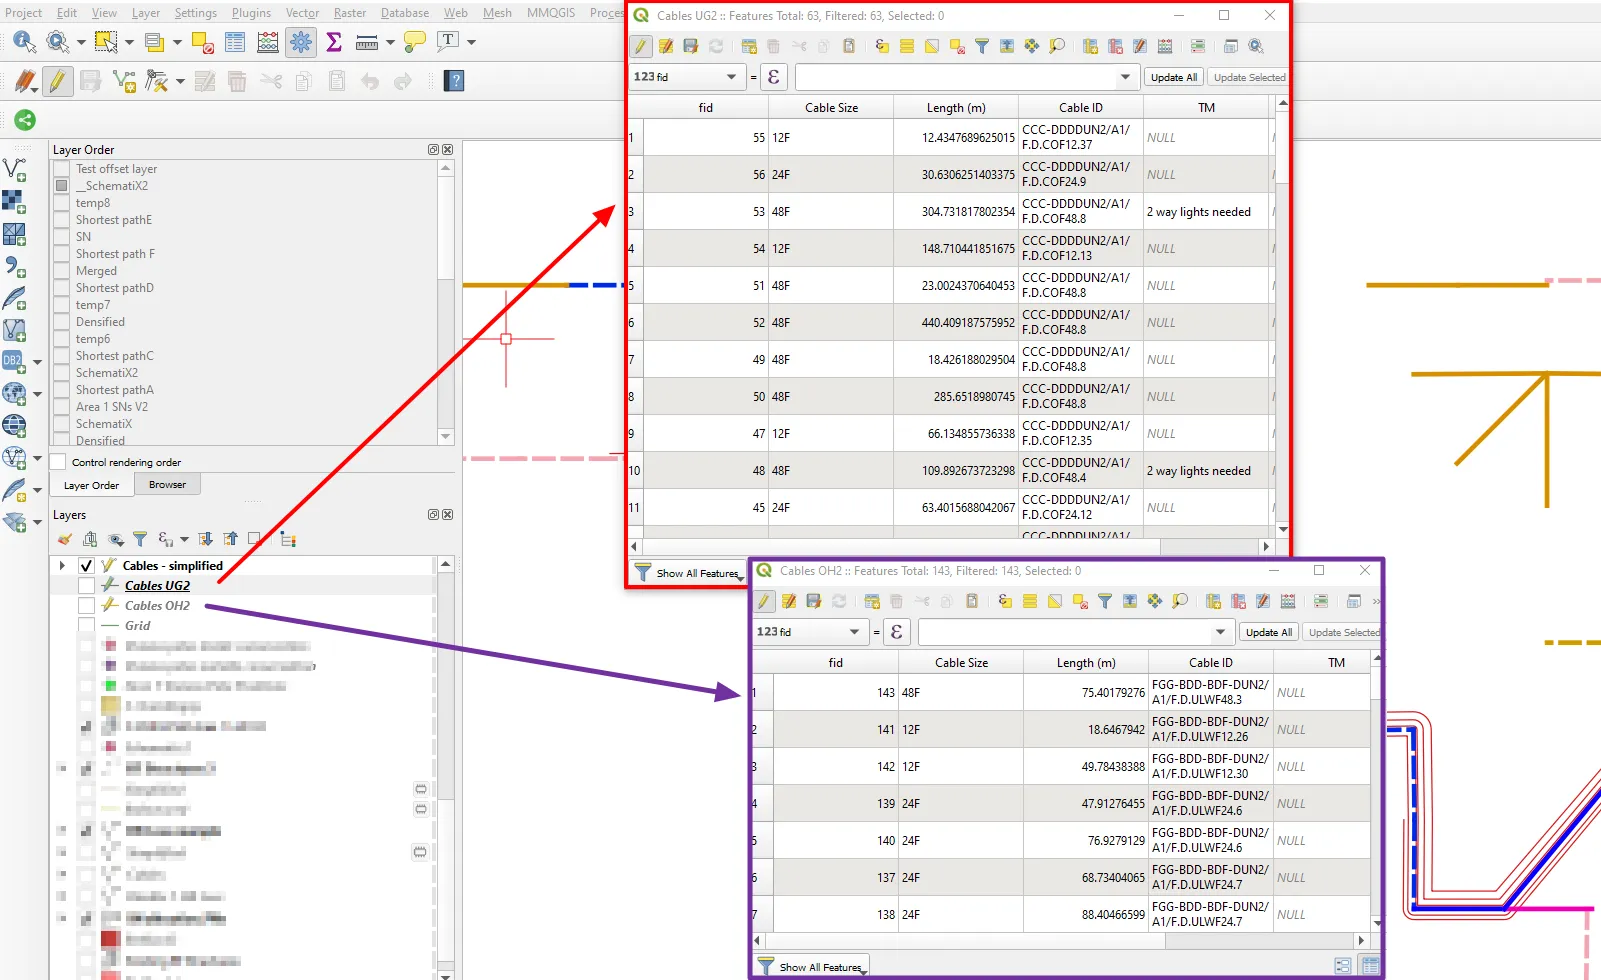
The image above shows two “mother layers” from which the main layer (Pic. 1) has been produced. The issue now is, that these 2 layers are going to be updated. The update can cover a whole column as well as just random inputs. Anyhow, the core thing will be to implement an update from several columns, not just one.
For the purpose of our exercise, we will use the Attribute joins tool, which can be found in Properties -> Joins. The primary conditions for making this tool work are:
– both the join field and target field must be the same, although it doesn’t need to be the crucial rule since we have two tables with data equal to each other,
– the data in the join field, as well as the target field, must be unique. If not, the join won’t work well leaving false results in the following inputs, which were repeated across the column
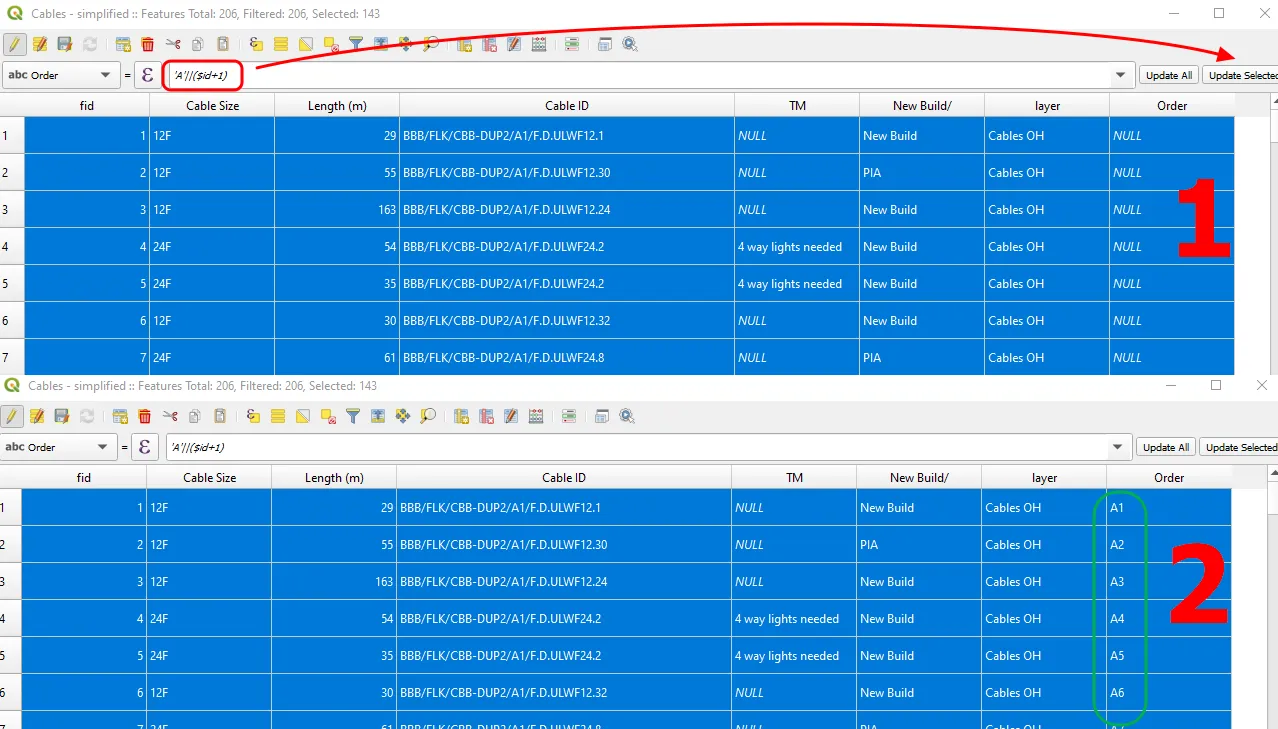
The first element of our work will be finding the column, which is both in two mother layers as well as a merged layer from them that includes unique values. At first glance, it can be the column “Cable ID”, where all inputs vary from each other. However, sometimes we might have two of the same IDs provided even by mistake. For this case, the best option will be to create a new column in each of the layers, which optionally could be called “Order”. The content of this column will be the unique ID for every element. Because we have more than 1 “mother layer” we can’t simply add just an ID number, because eventually it will be repeated after merging or provide the wrong correspondence when applied to the already merged layer. We can find a nice way to solve it. Every layer will be equipped with the specified prefix, which will prevent them from merging with each other. In this event, by creating the new column we have to choose the Text (string) type instead of Integer!
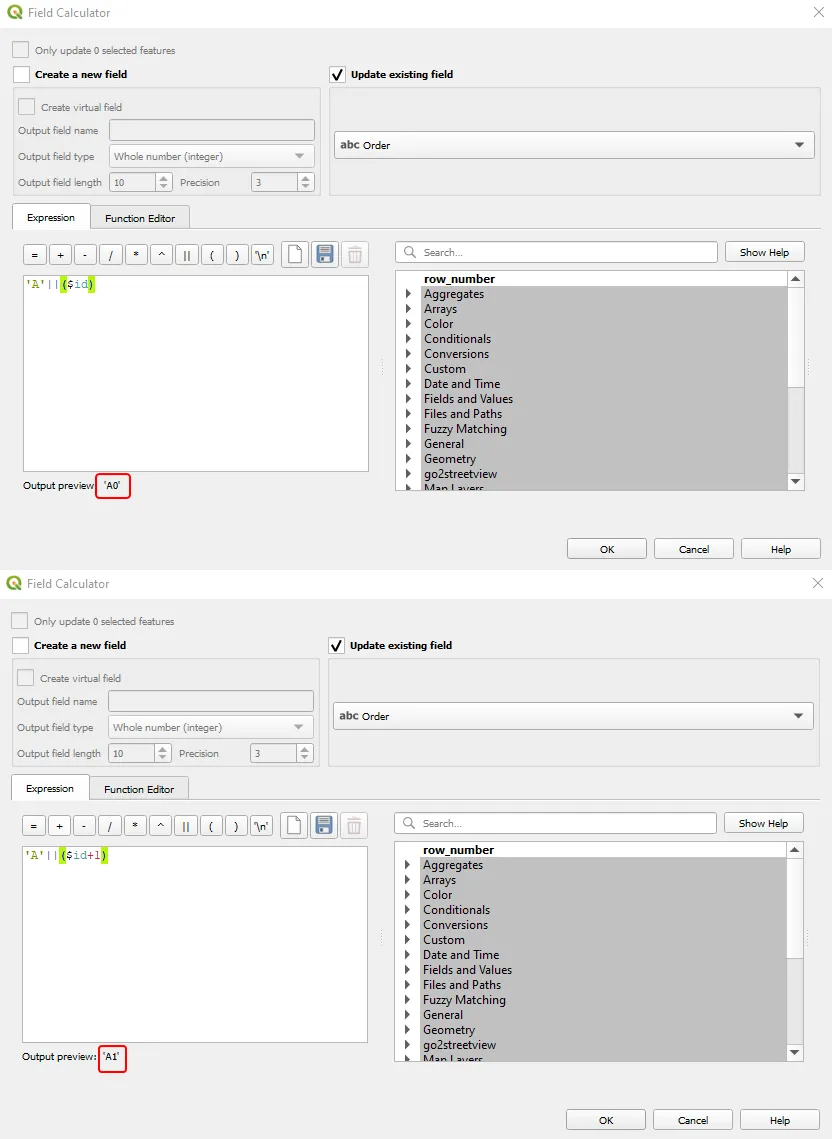
The formula in our order layer should look as follows:
'A'||($id+1)
assuming, that your input starts from 0 as the default (Pic. 3).
Accordingly, for our first mother layer, we can add the prefix “A”, for the second one prefix “B” and so forth. The result should look like the one below (Pic. 4).

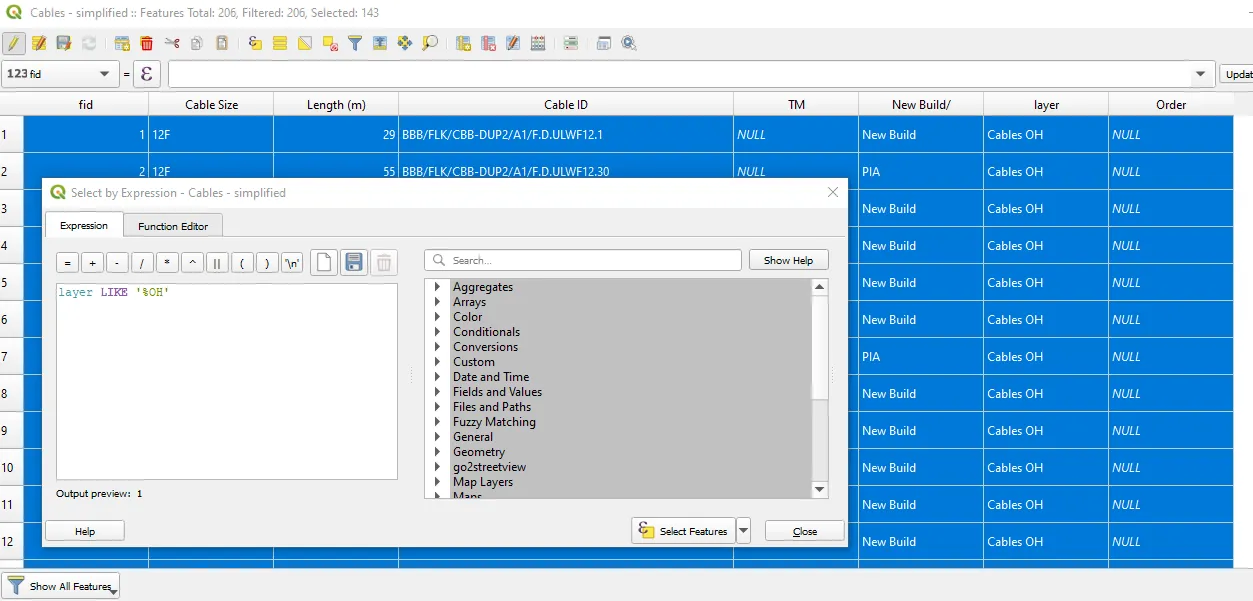
Having this we can attend to make a similar thing with our new layer, which has been merged with 2 initial layers (Pic. 4). We will use exactly the same formula as below, however, there is an important thing, which must be applied here. Namely, we must select the values, which have their roots in the first layer and provide the prefix accordingly. The selection can be done easily by using the “Select by expression” option, where we can use the wildcard in order to simplify our search query.
layer LIKE '%part_of_the_layer_name'

Since our layer name is known well, we can use the wildcard instead of typing the whole layer name. It should prevent us from potential misspells, etc. When the proper items have been selected, we can quickly provide the ID formula discussed earlier. The smart approach is to use the top function bar, where you can make an input. Remember to click the “Update selected” option, otherwise, the whole column will get the result of your formula (Pic. 6).
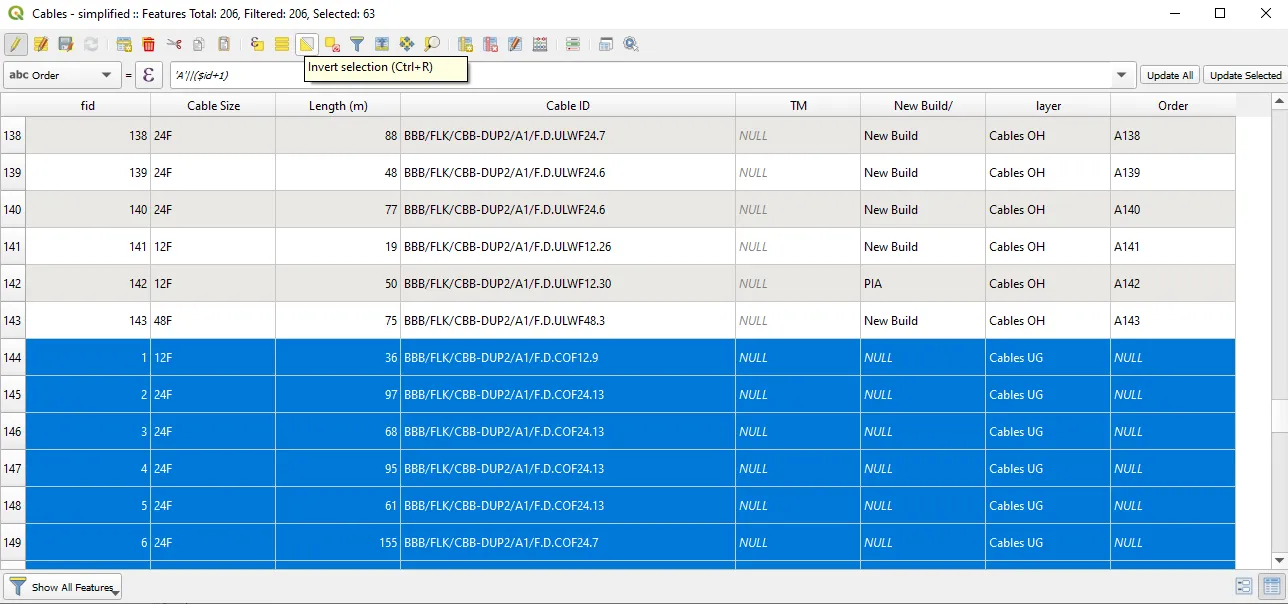
Situation changes, when we are attending to set the unique ID for the items from another layer. Before I get to this point, just want to stress, that if you have just 2 mother layers, you don’t need to use “Select by expression” anymore. It’s just “Invert selection” needed, which will flip-flop our selection (Pic. 7).
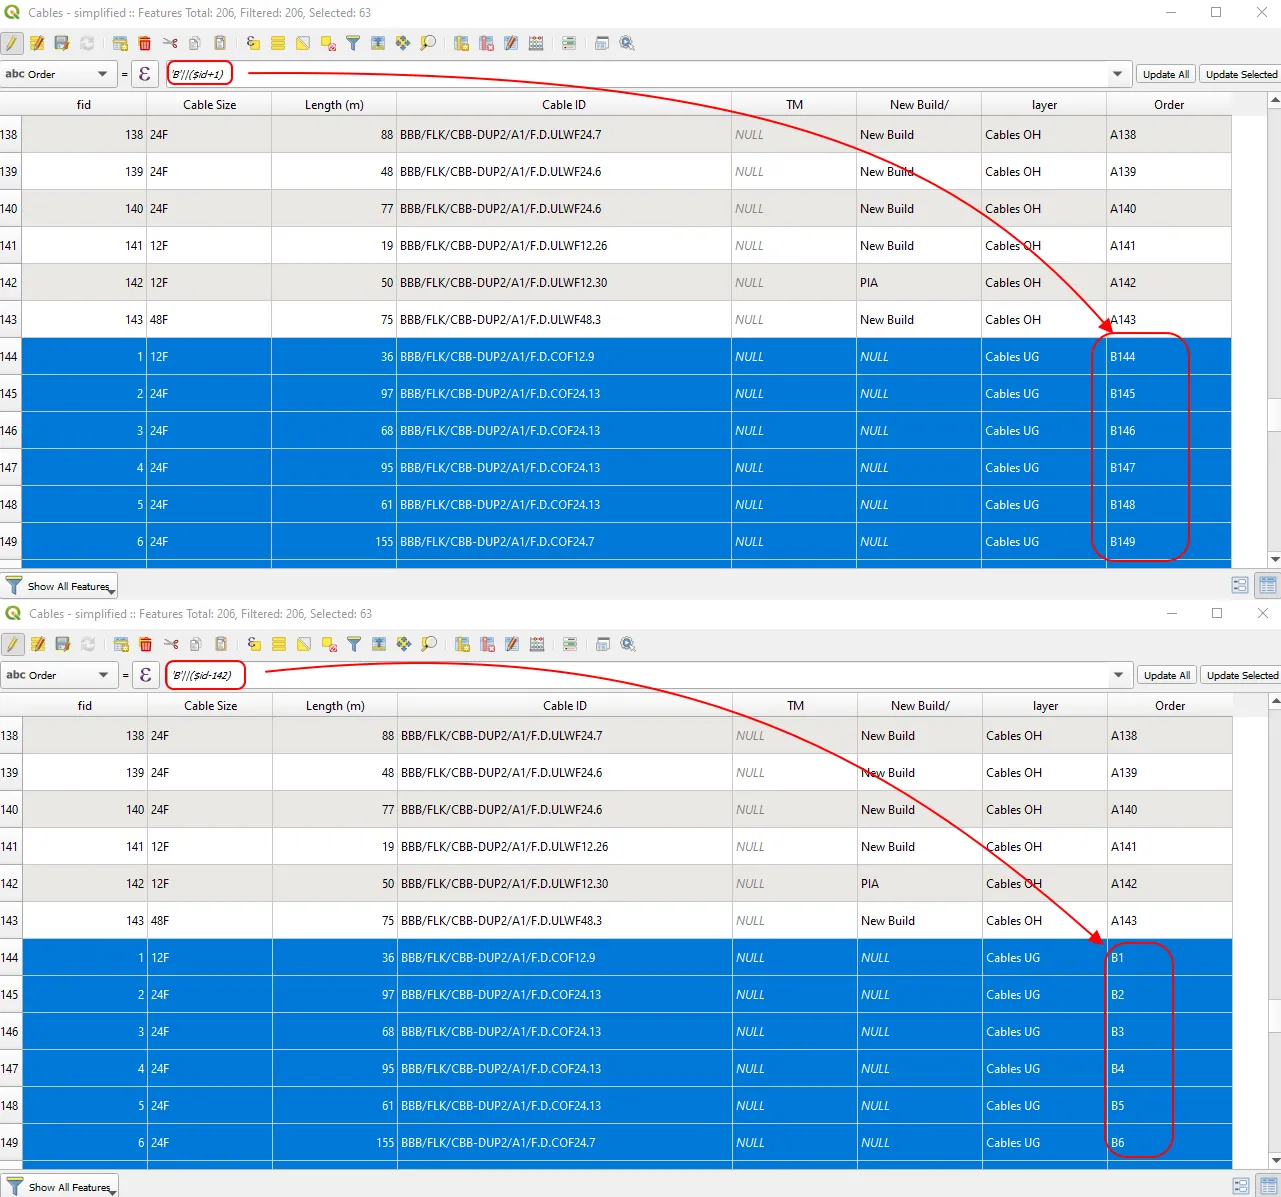
Now it’s the time for the most tricky step, to be honest. In fact, providing the ID formula discussed earlier is not rocket science anymore. However, we must be aware, that the formula (even just for selected features) will count the ID number from the beginning to the end of the column. It means, that even prefixes won’t be helpful here that much (if you wish to have ID from 1). In this case, we should figure out manually how many items are left. Since the whole layer includes 206 features and the last ID with prefix A stops at 143, then we should have another 63 items. Important is the number, where our last prefix stops. It’s 143 in our example. So the ID formula must change then. If we use id-143, then it will be 143-143, which gives us 0. Our formula should look like this:
'B'||($id-142)
which will guarantee the start ID of another layer input from 1 again (Pic. 8).
When everything is fine, we can use the Join attributes tool right now. The Joins tool can be found by right-clicking on our layer and selecting “Properties” (Pic. 9).
We must add a new join in order to link the data from another layer to our current one. The green “+” symbol is for this purpose. We need to add as many join as layers comprised in our final layer (Pic. 11). The image below shows how to apply the Vector Join correctly. We are selecting the join layer, in which both the Join field as well as Target field must be the same or at least have common content. The next important section shows what columns certainly we want to merge. The final step is simplifying our field name prefix as shown below (Pic. 10).
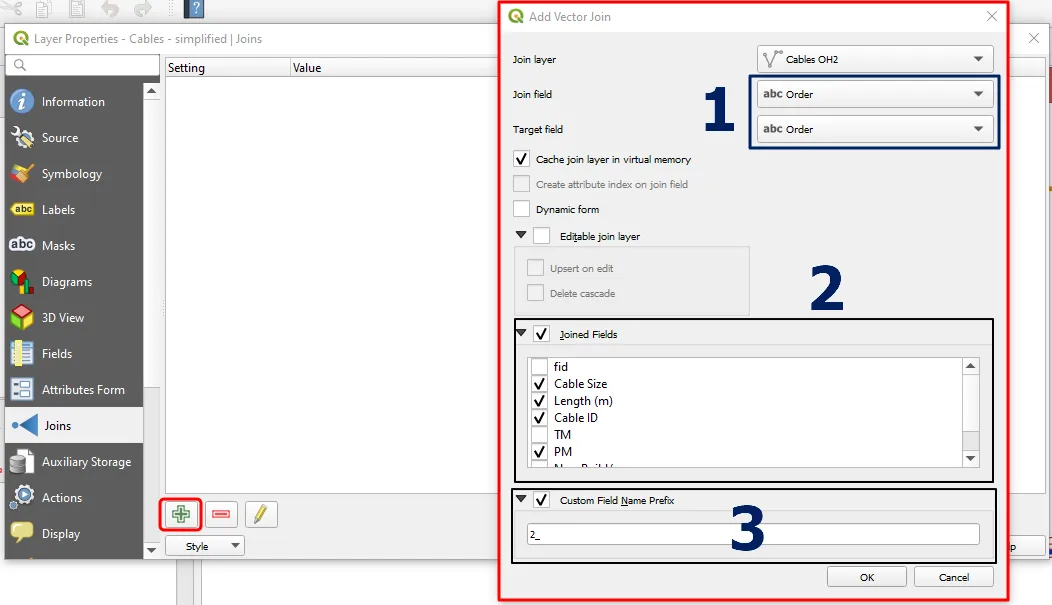
When everything is ready, just hit the OK button. By the next selection, you won’t see this layer anymore in the Join layer list, because it has been already used.
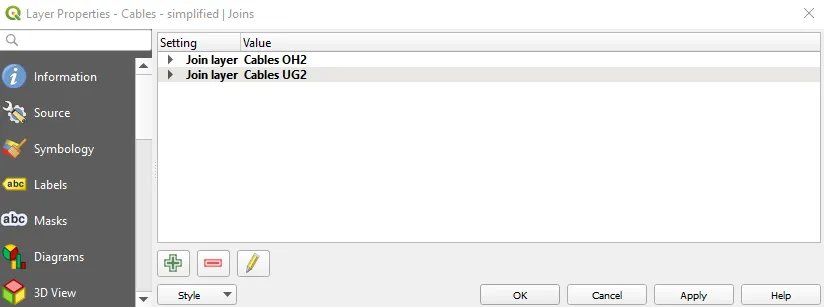
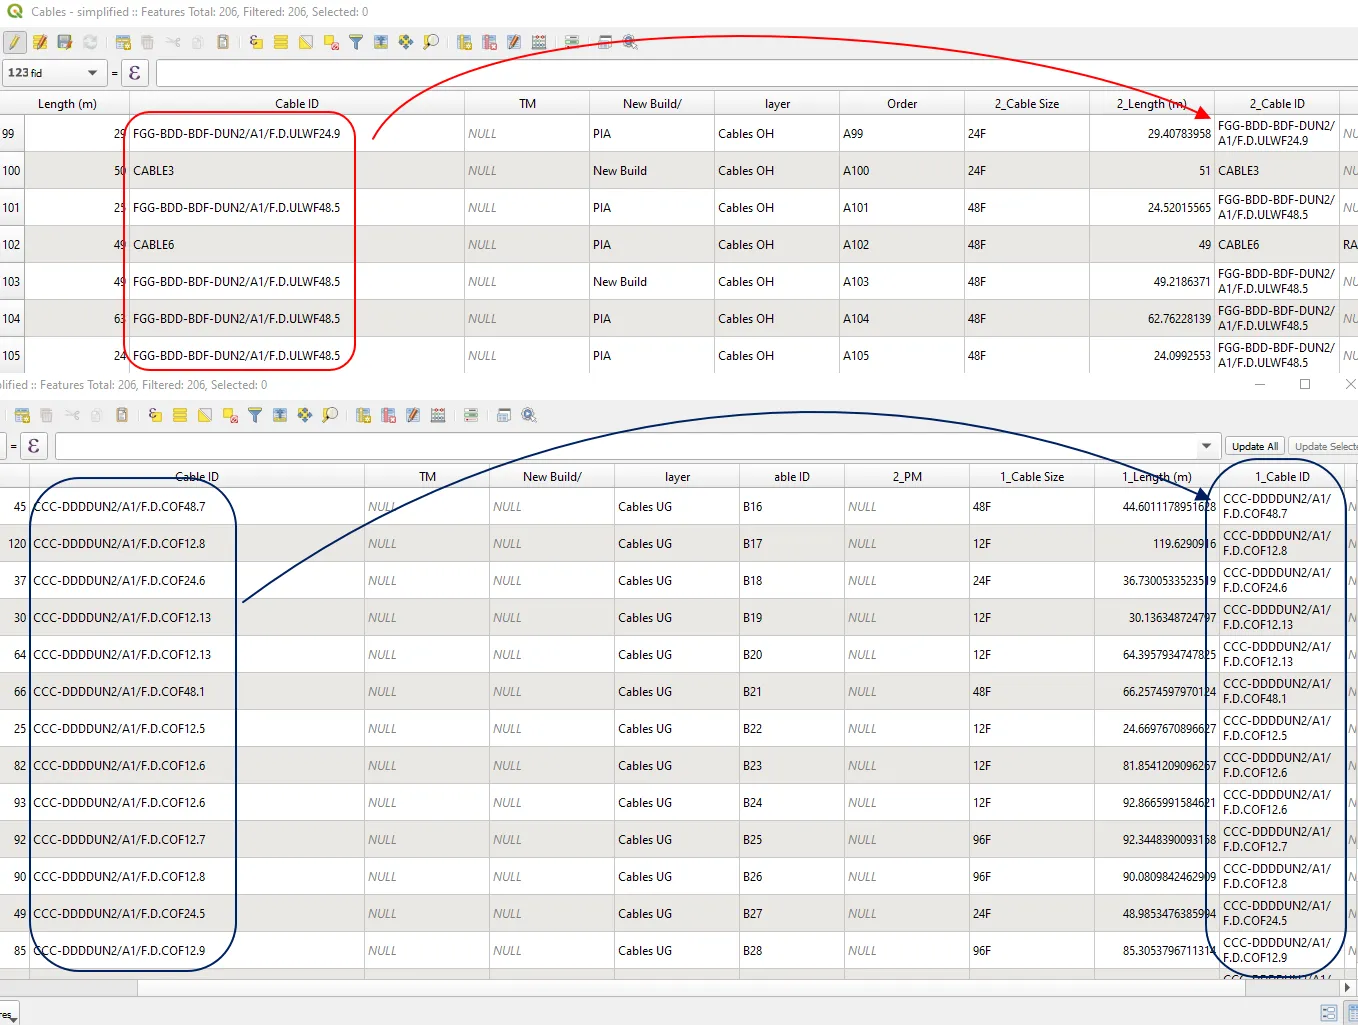
At the end important is to hit the “Apply” button in order to bring these changes into the effort. Finally, we can click OK. The attribute table of our final layer should include additional columns picked up by the joining of two layers. When one group includes some data another one is empty, which is understandable (Pic. 12).
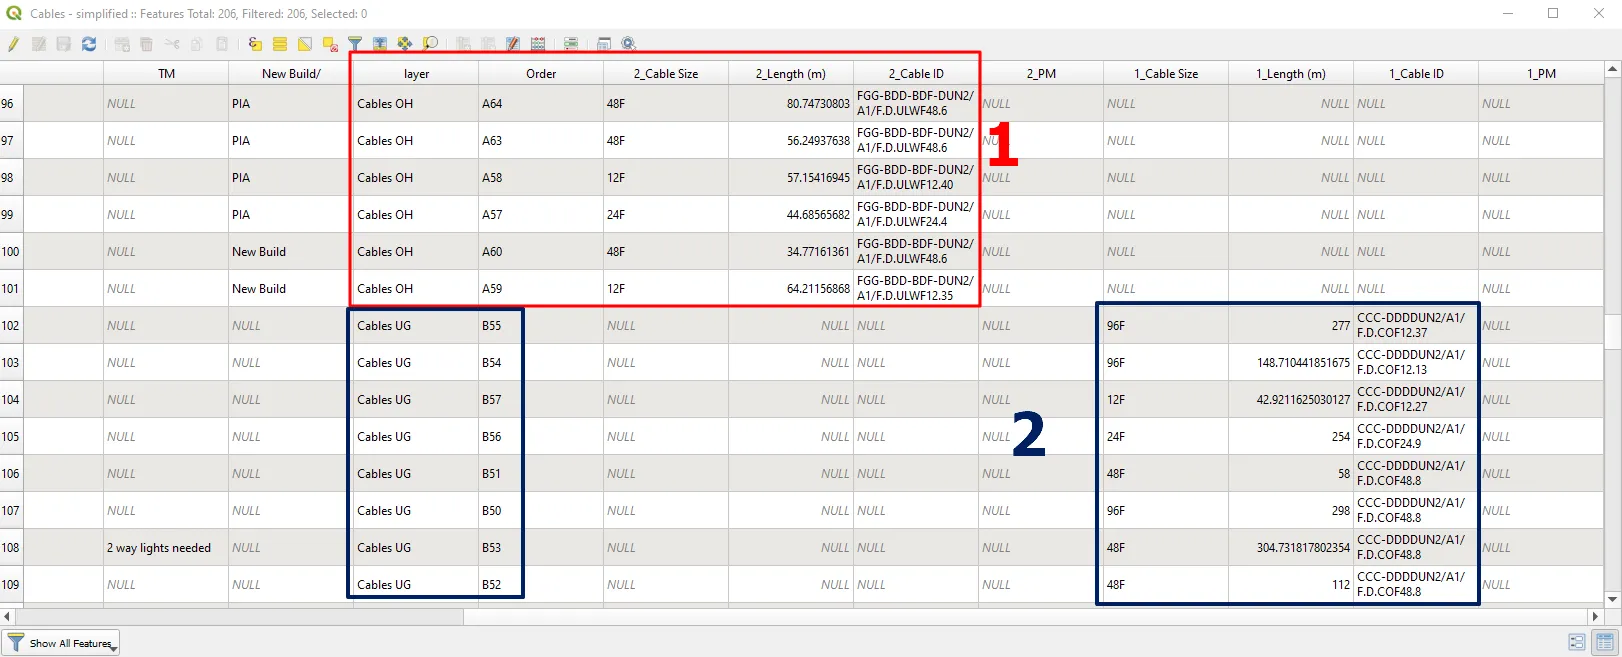
As you can see above, the effect of joined tables must leave some empty inputs behind. One group belongs to one layer and another one to another layer. See also the changes made in our mother layers (Pic. 13), which should be expected later in our main layer.
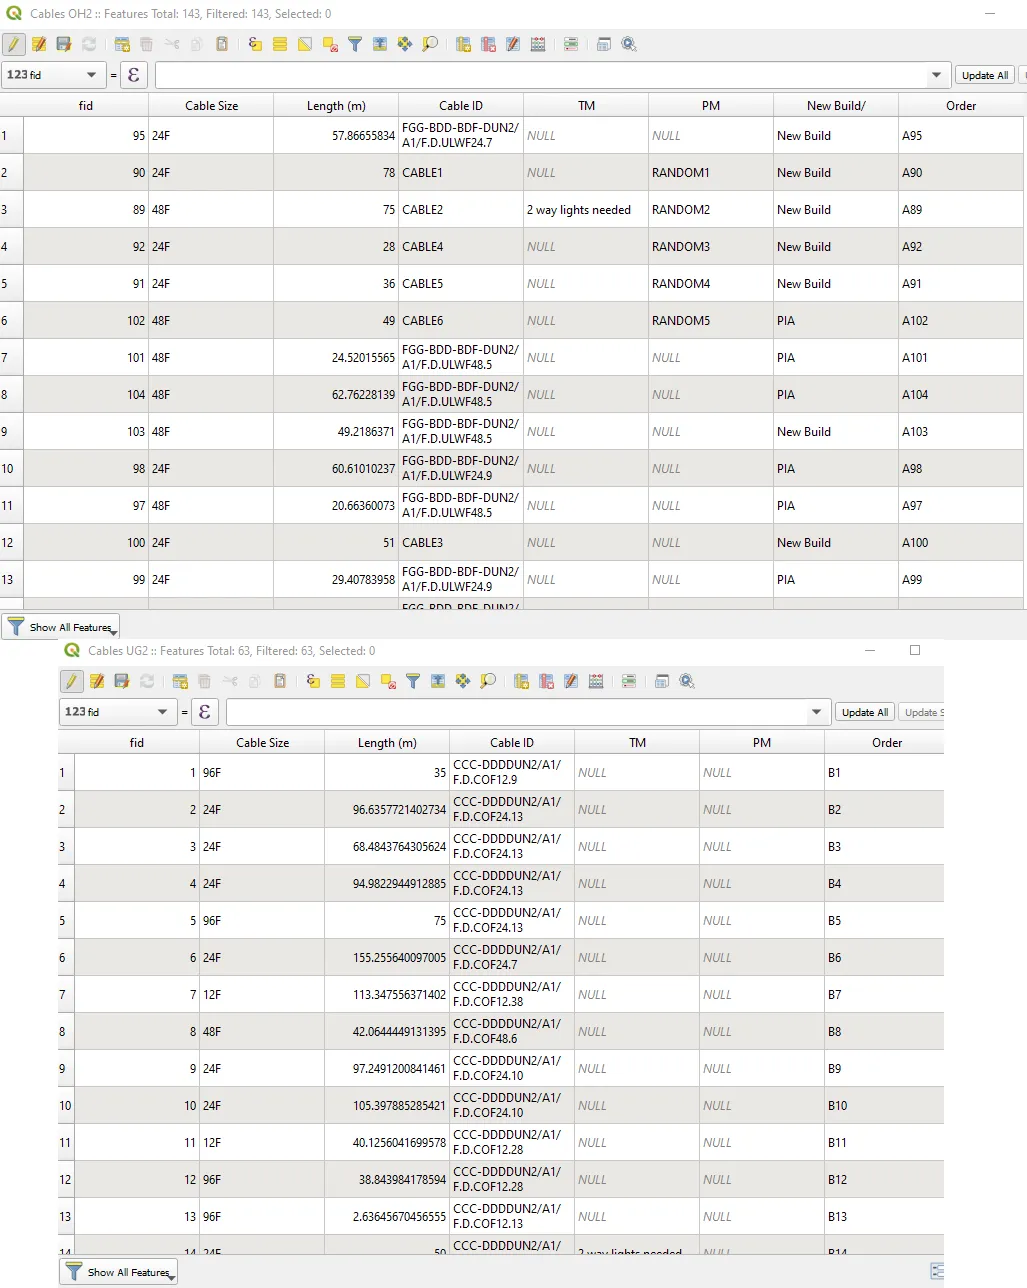
Above you can see some noticeable changes within the initial layers, which the final layer has been built from. They correspond to columns included in the joining process.
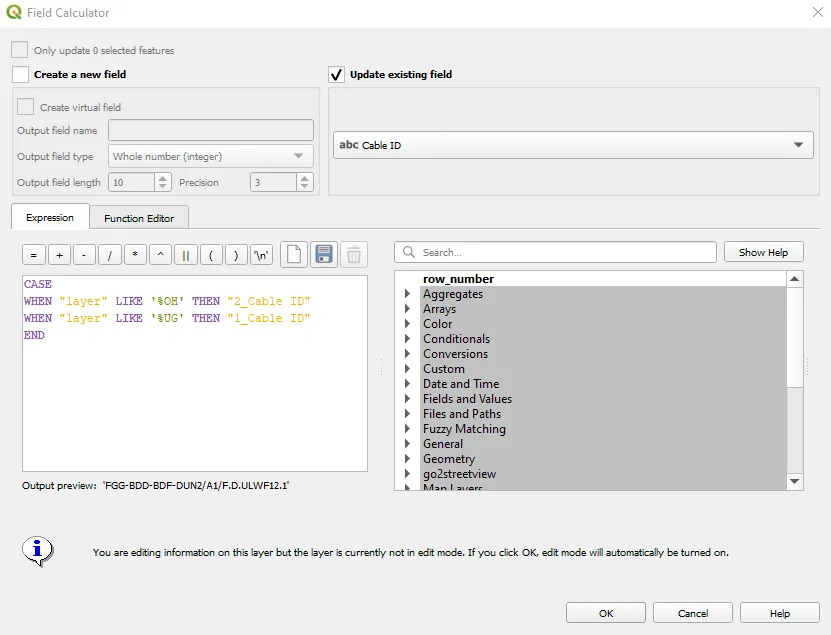
Our key task, for now, is the implementation of joined content into the main columns, which have been considered at the joining step. We need the formula for it and surely it will be the multiple CASE WHEN statement. From the attribute table after joins (Pic. 12) we can clearly see the conditions on which we can base our statement. One layer finishes with “OH” and another one with “UG”. We can use wildcard again and our final expression could look like this:
CASE
WHEN "layer" LIKE '%OH' THEN "2_Cable ID"
WHEN "layer" LIKE '%UG' THEN "1_Cable ID"
END
where we are picking up content from the joined column to our current column. The joined column is marked by the prefix set in the “Custom Field Name Prefix” box. The following rule must be applied in the column we want to have changed (Pic. 14).
After all, our major column should be updated correctly (Pic. 15).
We must repeat the process for all the columns considered. For other columns the CASE WHEN statement will include accordingly:
“2_Length (m)”, “2_Cable Size”, “2_PM” and so on. For our other condition will be everything the same, just with the “1_” prefix.
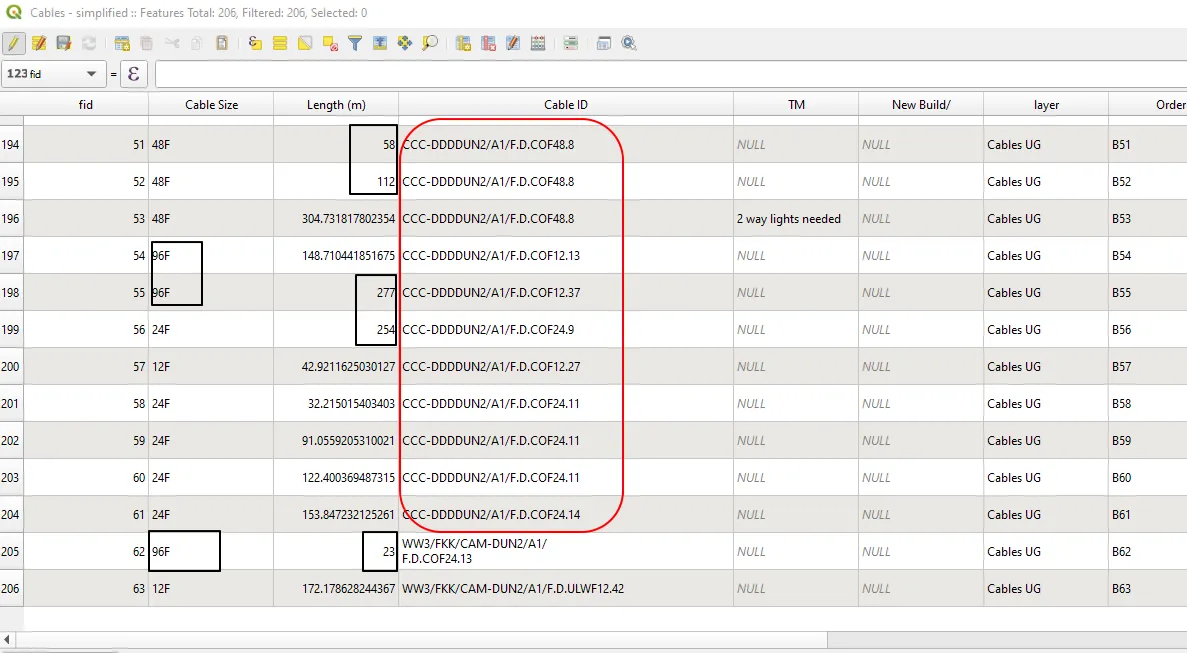
Finally, we should see our table updated (Pic. 16).

These updated records should remain even after removing the join layers (Pic. 17).
Because our issue plays just within 2 layers the example is pretty much easy. However, if you have layers merged from 3,4,5, or even 6 layers they must be treated separately, which means that all the steps described here must be repeated by the number of layers. An exception can apply just for the CASE WHEN statement, which can include all conditions at once.
Mariusz Krukar
Links:
- https://www.qgistutorials.com/en/docs/performing_table_joins.html
- https://www.gislounge.com/working-with-tables-mastering-qgis/
- https://opensource.com/article/19/2/spatial-joins-qgis
Forums:
- https://gis.stackexchange.com/questions/398215/automatically-updating-the-attribute-table
- https://stackoverflow.com/questions/53307141/how-to-modify-attribute-table-in-qgis
- https://gis.stackexchange.com/questions/201024/updating-text-column-of-selected-features-in-qgis
- https://gis.stackexchange.com/questions/365861/update-attribute-table-by-values-from-other-layer
- Is it possible to automatically update an attribute table field?
- Automatically updating QGIS attribute table to show newly added field
- https://gis.stackexchange.com/questions/53351/how-do-join-field-and-target-field-work
- https://gis.stackexchange.com/questions/310267/what-is-the-wildcard-character-that-represents-one-or-more-characters-in-qgis
- https://gis.stackexchange.com/questions/162297/qgis-multiple-case-when-then-statements-for-expression-based-labels
Youtube:
Thanks for sharing. I read many of your blog posts, cool, your blog is very good.