
Transfer AutoCAD drawing to ArcGIS Online – part I
This is the two-piece article, which aims to show you how to successfully add the AutoCAD LT drawing to the ArcGIS Online platform. In part 1 the superficial layer will be chosen, whereas the second bit will be more advanced.
There is an instruction on how to load any GIS layer correctly to your ArcGIS Online map prepared by ESRI. In my point of view, this source is too robust, therefore I came to the conclusion, that it could be good to prepare something which would compact some steps and make them more assimilable for you.
Firstly, let’s explain what exactly ArcGIS Online (AGOL) is. This is the ESRI’s cloud-based mapping and analysis platform, which allows users to make maps, share them, and collaborate with analyzed data with others. The product requires account settings and it’s not for free if we wish to have more options, although on the web you can find good guidelines on how to set up your account. One of them is for example here.
Amidst a few solutions found on the web, I would like to propose my own one, which hopefully will work for you. It will require QGIS and the exercise can be done effectively in 3 steps. widely described below.
I. PREPARING CAD DRAWINGS
I assume, that you have a large map drawing in your AutoCAD software, which potentially could look like below (Pic. 1).
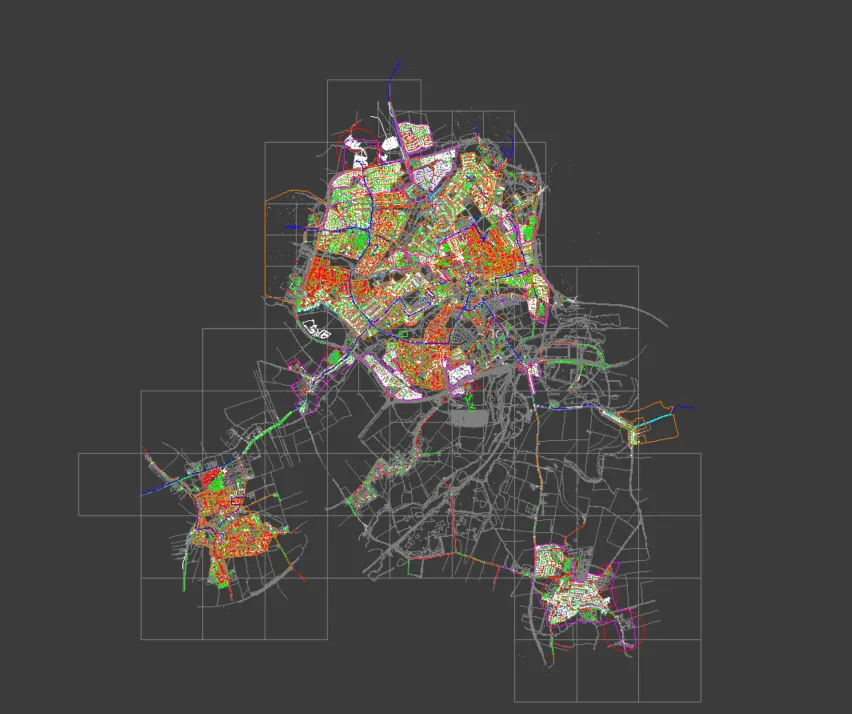
Pic. 1 An example of a large map drawing in AutoCAD LT including a dozen or so robust layers.
You are planning to export just one layer from this robust drawing to the ArcGIS Online platform. In this article, a simple example is shown.
1. Isolate the layer you want to transfer. Firstly, select at least one object from the layer you want to export. Next, in the AutoCAD environment, you can use the LAYISO command or click the Isolate icon in the Layers section (Pic. 2).
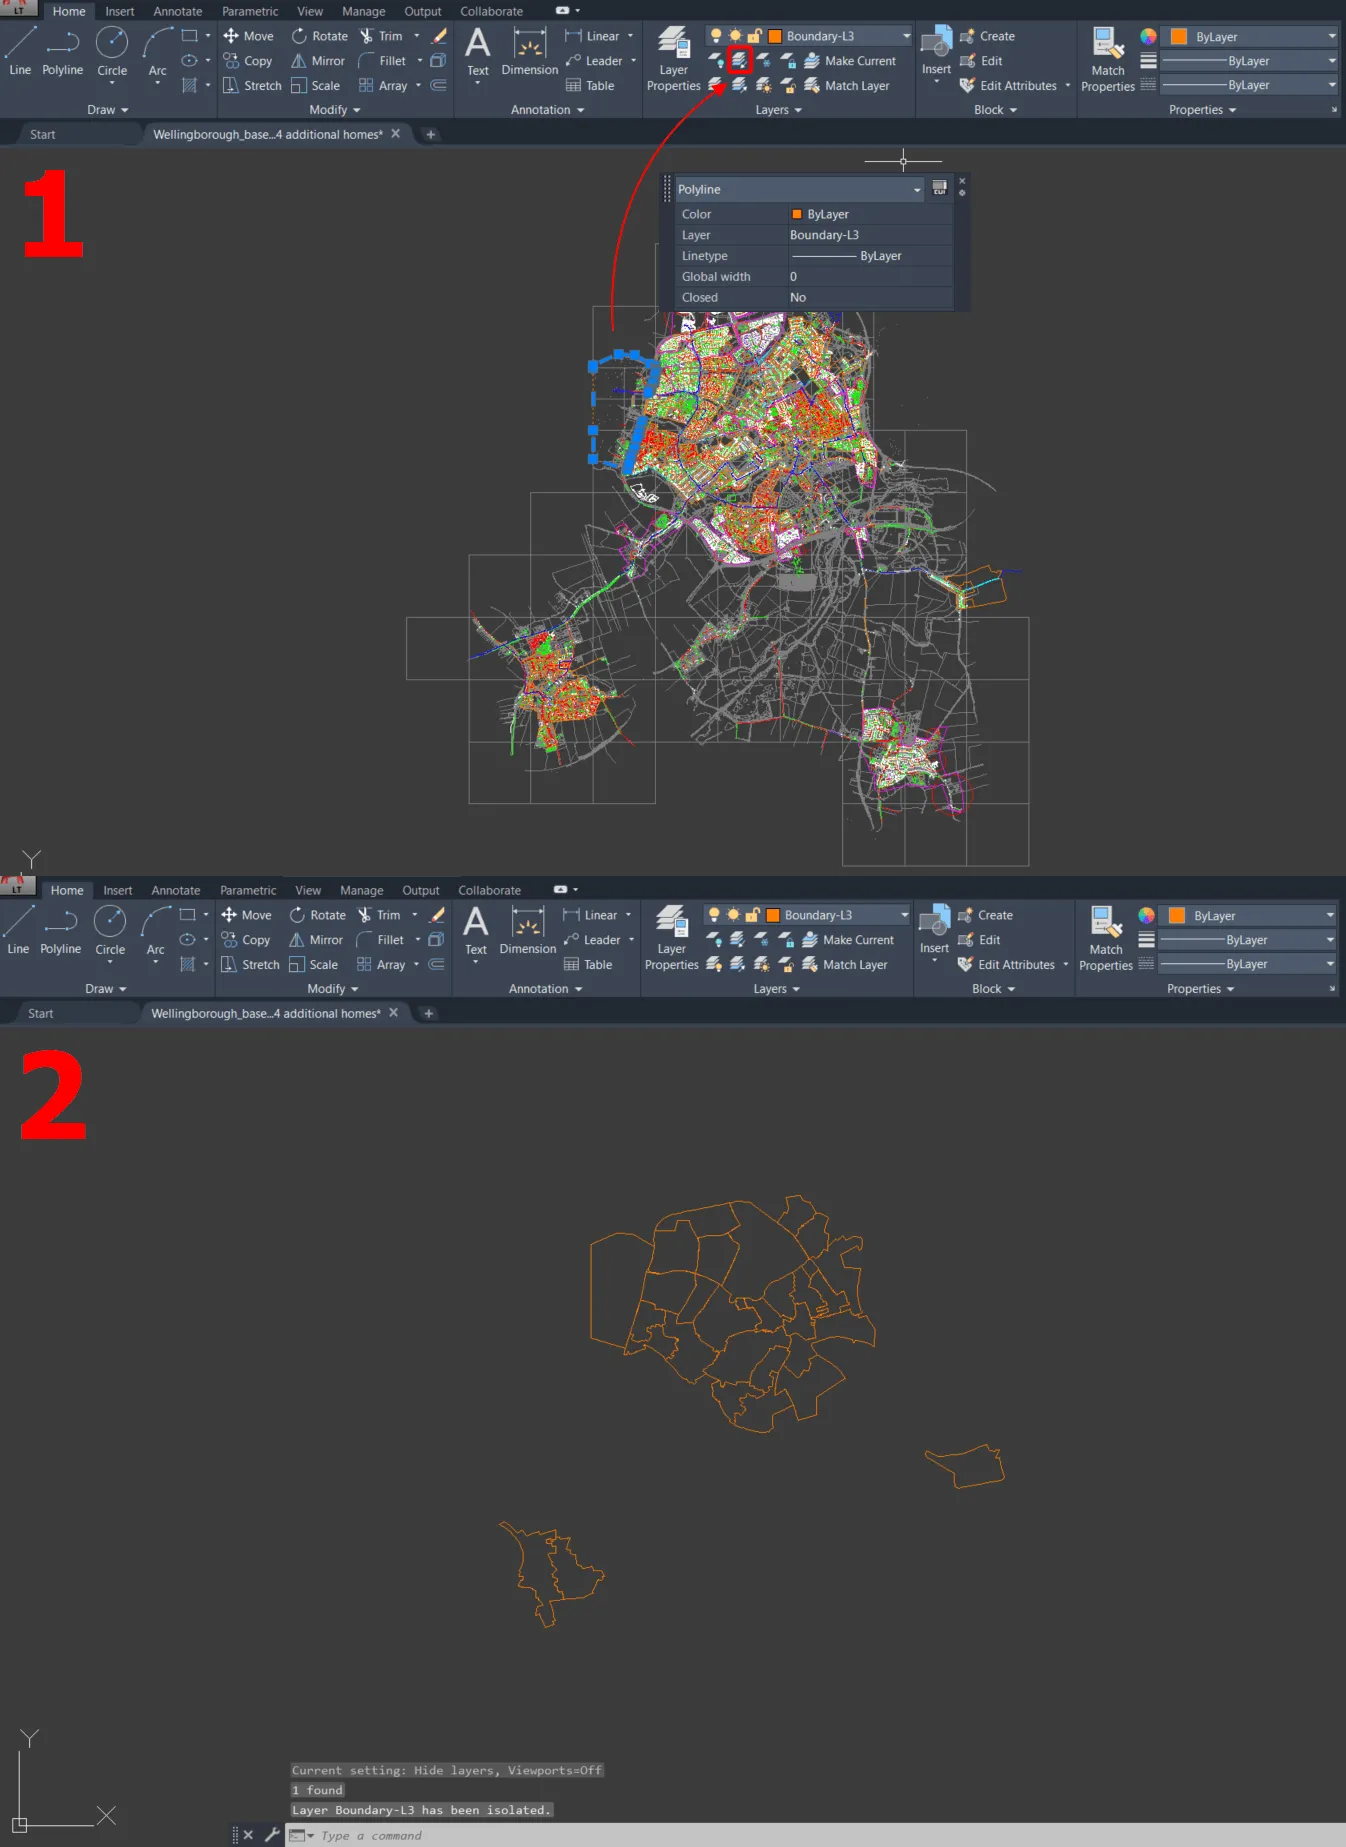
Pic. 2 Isolating layers in AutoCAD LT, where: 1 – Selecting the layer we want to isolate and clicking the Isolate icon in the Layers section; 2 – Only the isolated layer is visible in our AutoCAD LT drawing.
2. Select the whole layer by creating the selection box as shown below (Pic. 3). Next copy it by typing the COPYCLIP command or simply by using Ctrl + C hotkey.
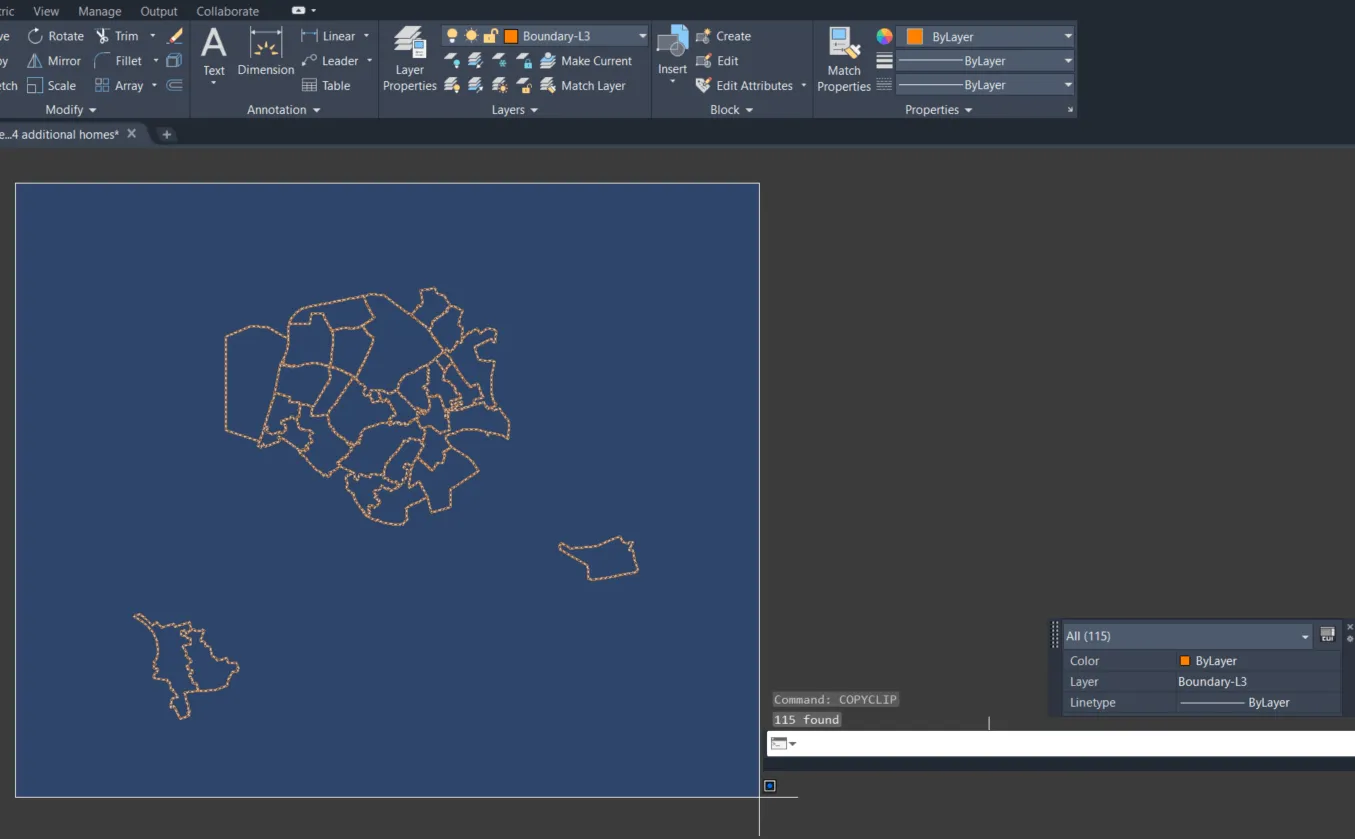
Pic. 3 Selection of the whole layer, which has been isolated, and copy to the clipboard by using the COPYCLIP command.
3. Create the new drawing and paste your layer there. You can do it by right-clicking -> Clipboard -> Paste with original coordinates or simply typing the PASTEORIG command. You won’t be able to see the layer on your drawing, so another step is required. You need to type ZOOM and next type E as the Extents or select Extents from the list. In this case, the AutoCAD will zoom to the extent of your layer. You will make sure, that everything works correctly (Pic. 4).
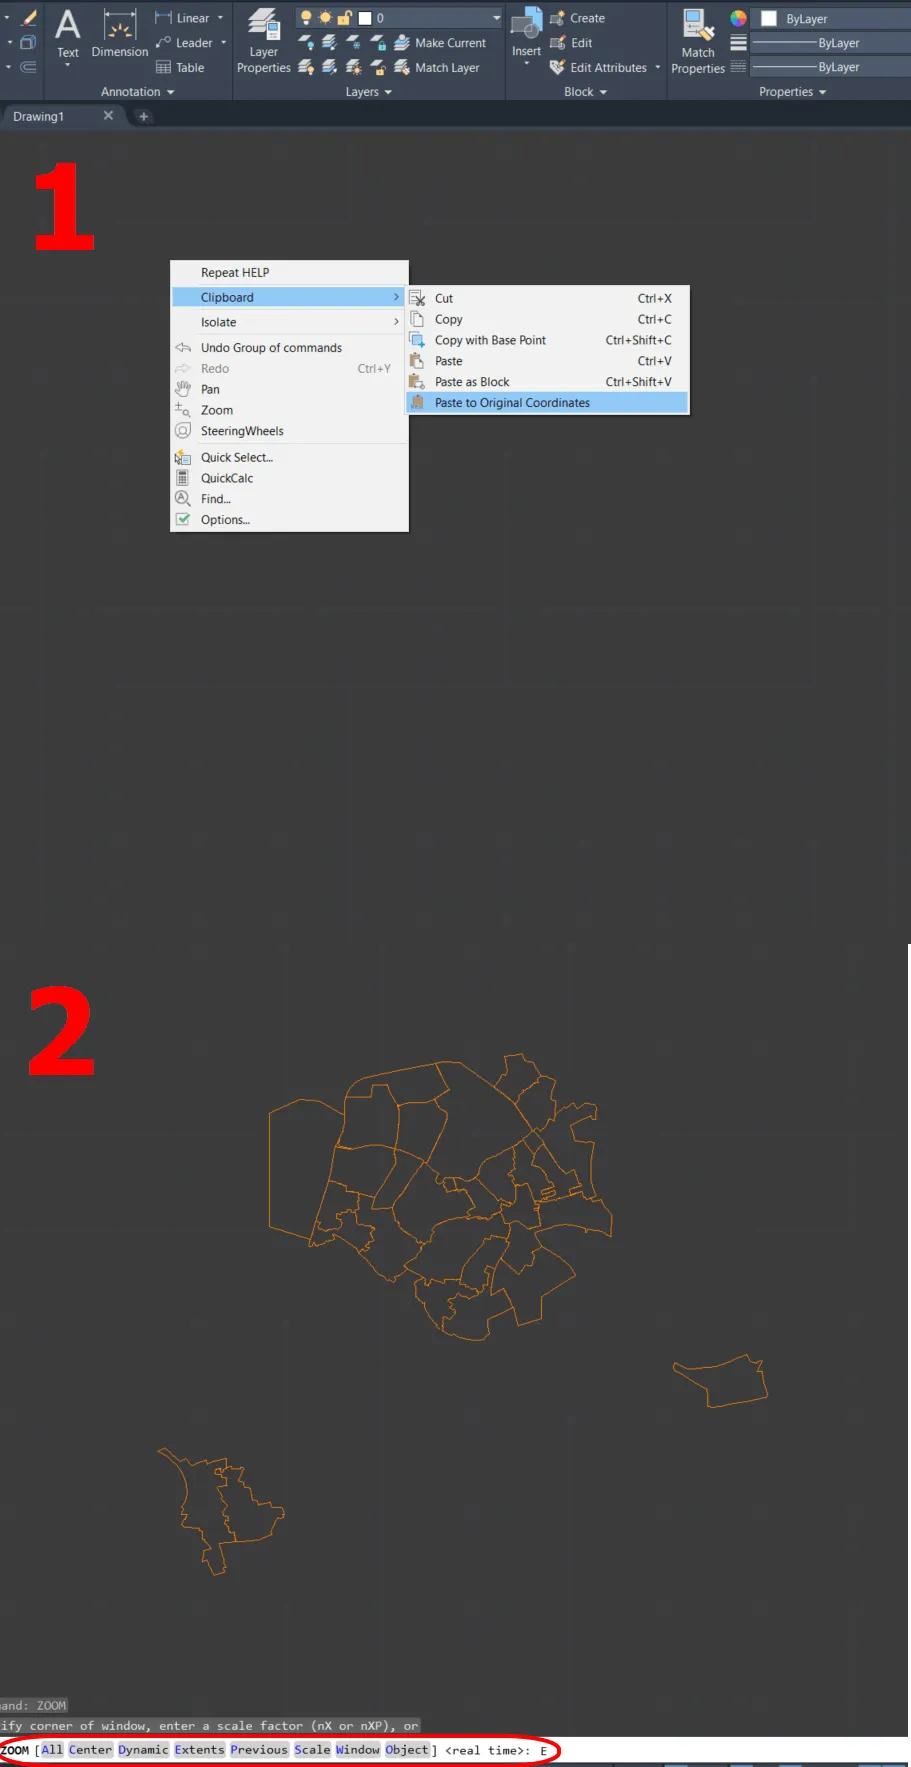
Pic. 4 Pasting the isolated layer to the new drawing and using the ZOOM Extents command to bring the layer view to the user.
4. When you are sure, that everything has been copied correctly, save your layer as the .dxf file, which can be imported further to QGIS (Pic. 5).
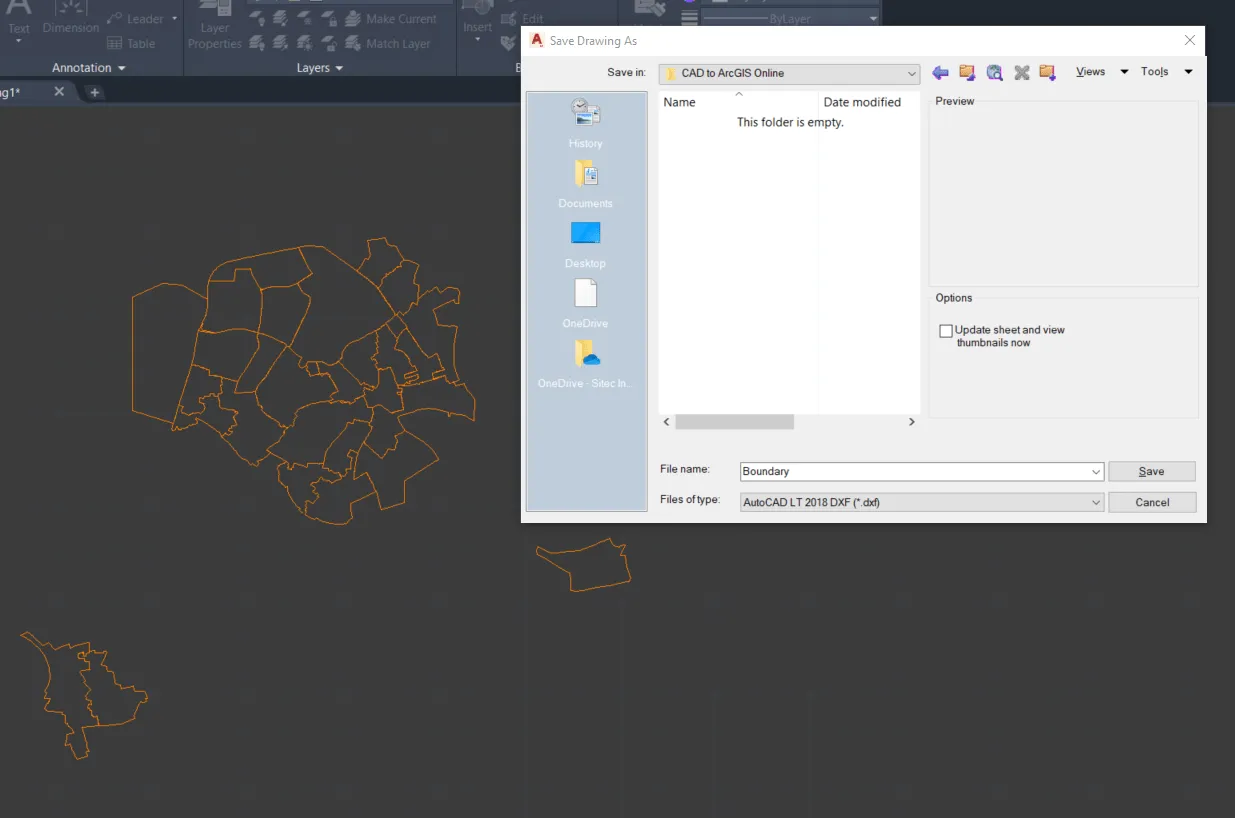
Pic. 5 Saving the layer as the .dxf file.
II. IMPORT DXF FILE TO QGIS
5. Now it’s time to import our .dxf file to QGIS (Pic. 6). We can do it by going to the Project -> Import/Export -> Import Layers from DWG/DXF. Next, we should define our Target package (1) and pick up the Source drawing (3). The CRS (2) as default remains the last used in the project. Is indeed advisable to provide the CRS system adequate to the AutoCAD layer. It can be always reprojected later. The last input is the Group name (4).
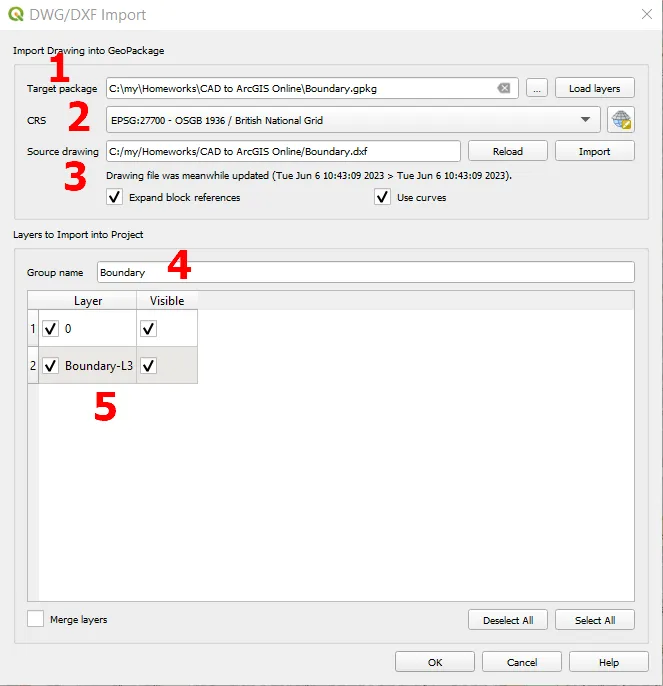
Pic. 6 Importing DXF file into QGIS project, where: 1 – defining Target package; 2 – Setting the CRS of our drawing; 3 – Defining Source drawing; 4 – Providing the group name; 5 – The loaded list of layers.
Afterward, we need to wait a while until the list of layers (5) will appear in the box. It might take longer if your layer is large. Sometimes our AutoCAD drawing contains blocks. By having the “Expand block references” option switched on, it will transfer the potentially existing blocks into normal elements. The “Use curves” promote the output layer geometry type to a curved one.
Basically, the following example applies to the .dxf file, although we must be aware, that importing the .dwg file is also possible. Regrettably, it might not work correctly when dealing with the newest .dwg type (2018), and saving your CAD drawing in an older .dwg extension (preferably 2010) will be necessary.
6. When the .gpkg layer appears in the Layers panel, drag it over the map canvas in order to make it visible (Pic. 7).
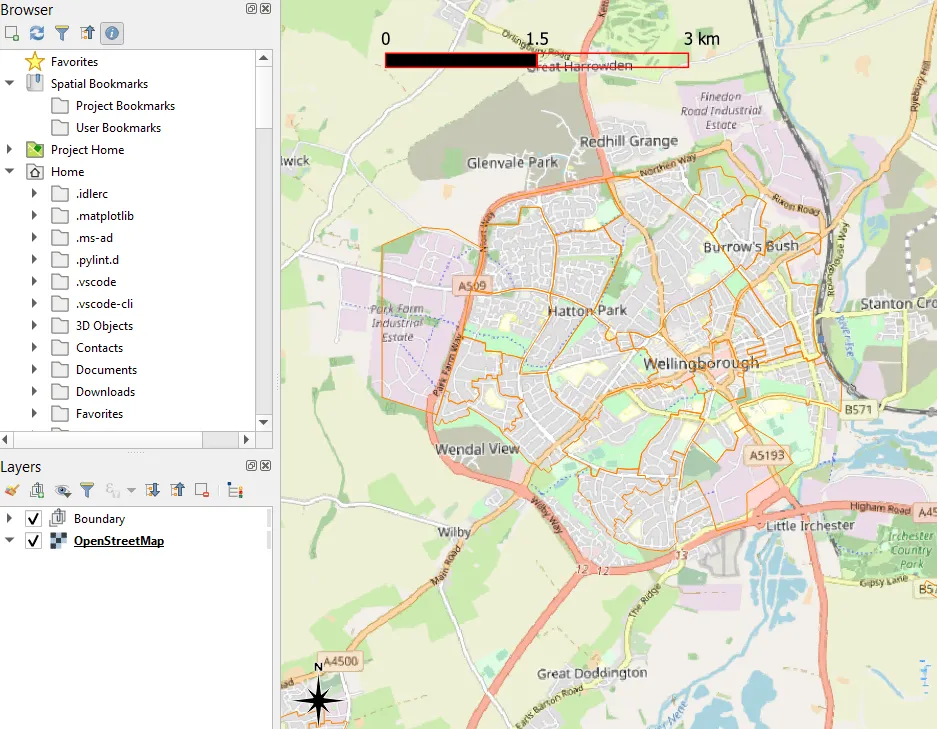
Pic. 7 our AutoCAD .dxf file is already visible in the QGIS project.
7. Unfortunately, it’s not exactly what we might need. When browsing the details of our .gpkg file produced by importing the AutoCAD drawing, we can see, that the whole layer has been split between lines and polylines. It’s essential to merge them together, but since they represent the same geometry, there shouldn’t be an issue (Pic. 8).
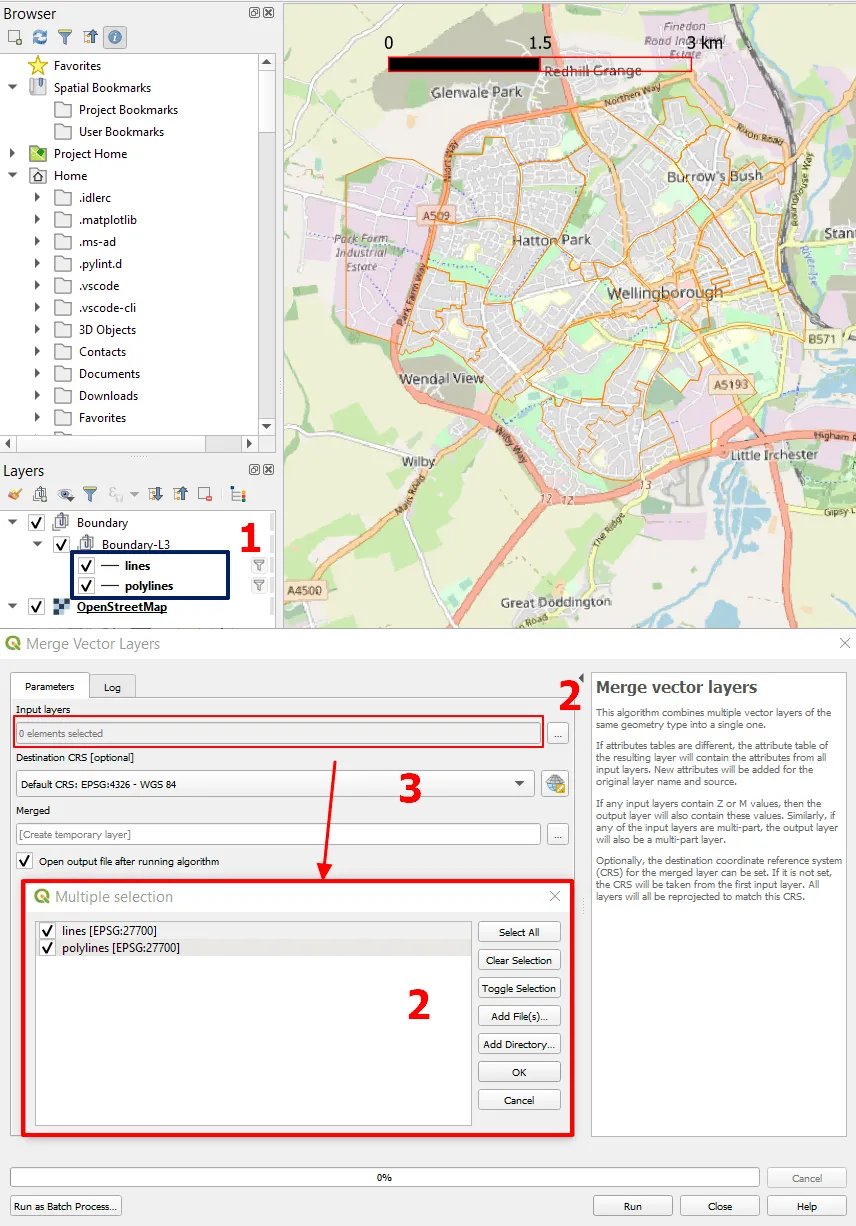
Pic. 8 Preparing the layer importing from AutoCAD for further usage, where: 1 – The layers between which the AutoCAD drawing has been split; 2 – Selecting the layers for merging; 3 – Redefining the CRS of the merged layer.
You can do it easily by navigating to the Main bar -> Vector -> Data Management Tools -> Merge Vector Layers. Next, when the dialog window opens, choose the layers, which comprise our former AutoCAD drawing (1,2). By the way, you can change the CRS of the merged layer, which means, that it will be reprojected at once.
8. When your final layer has been merged, you can optionally switch off the imported Geopackage group, as it’s not needed anymore. Next, we can finally export the merged layer to the final file, which will be used in the ArcGIS Online platform (Pic. 9).
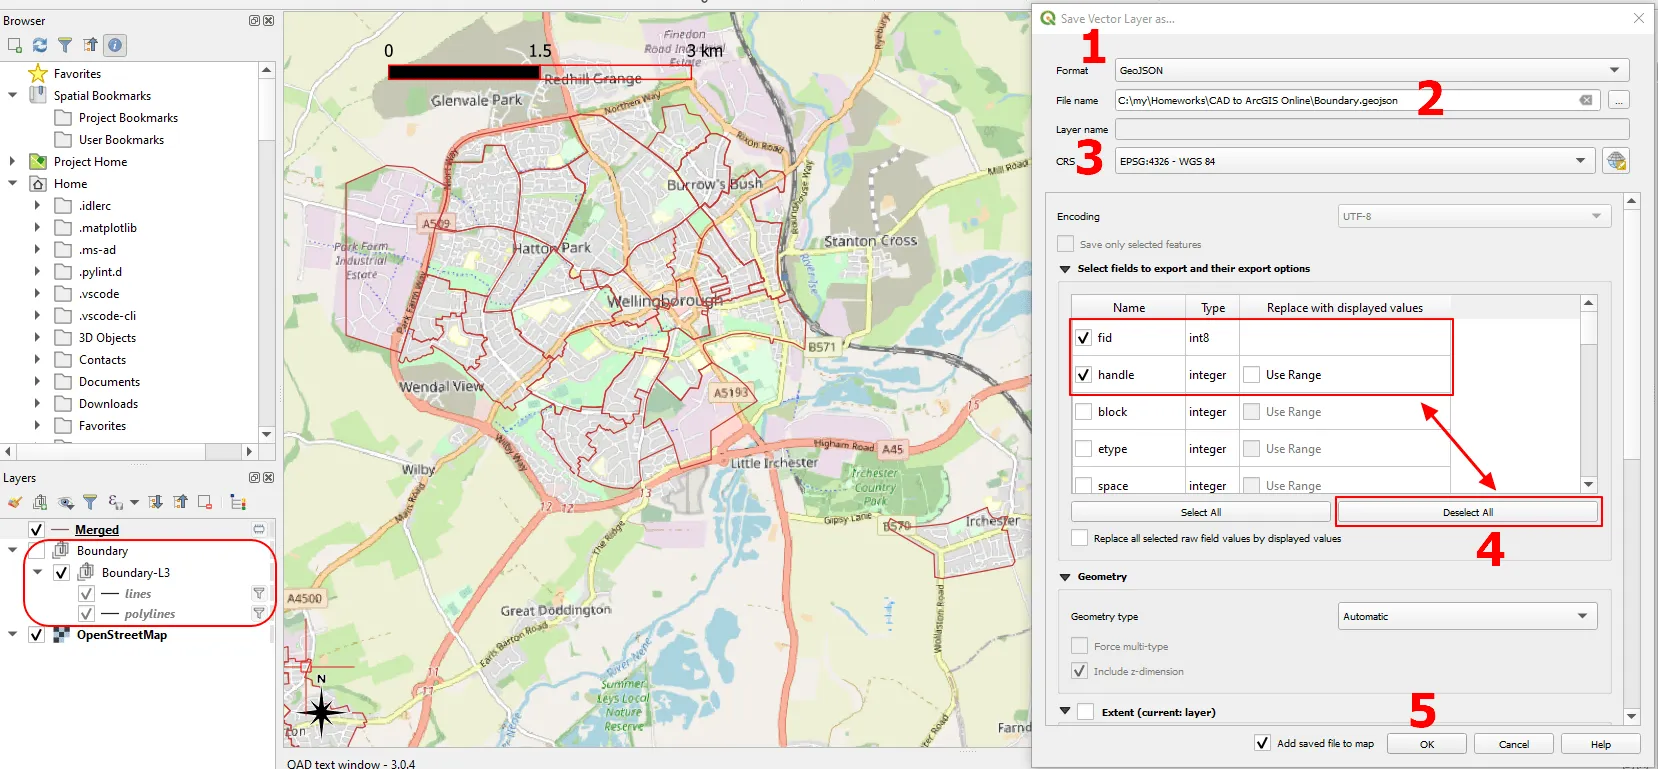
Pic. 9 Export of the merged layer to the GIS format, where: 1 – selecting the format (.geojson) in this case; 2 – Defining the file name and target directory; 3 – Setting up the CRS system; 4 – Selecting the fields; 5 – Confirming by clicking the “OK” button.
The export can be done by right-clicking on the layer (Merged in our case), next: Export -> Save Features As…, and the following window should come up (Pic. 9). Firstly, you can select the format of your final file (1), let’s save it as the .geojson format this time. In the box below – define the file name and its target directory (2), the CRS system (3) would remain the same, as it has been changed at the merging stage. Anyhow, this is also the moment, when you can reproject your layer. The last step is the list of fields available in the box below (4). Usually, all of them are included for export, but you can simply click the “Deselect All” button and choose only the most necessary unless most of them are needed, then you can just untick the redundant ones. When everything is fine, click the “OK” button (5) and the final file will be exported.
III. LOADING THE FILE INTO ARCGIS ONLINE
9. Log in to your ArcGIS Online account and navigate to the Map in the main bar. Next hit the “Add” button and pick up the “Add layer from file” option (Pic. 10).
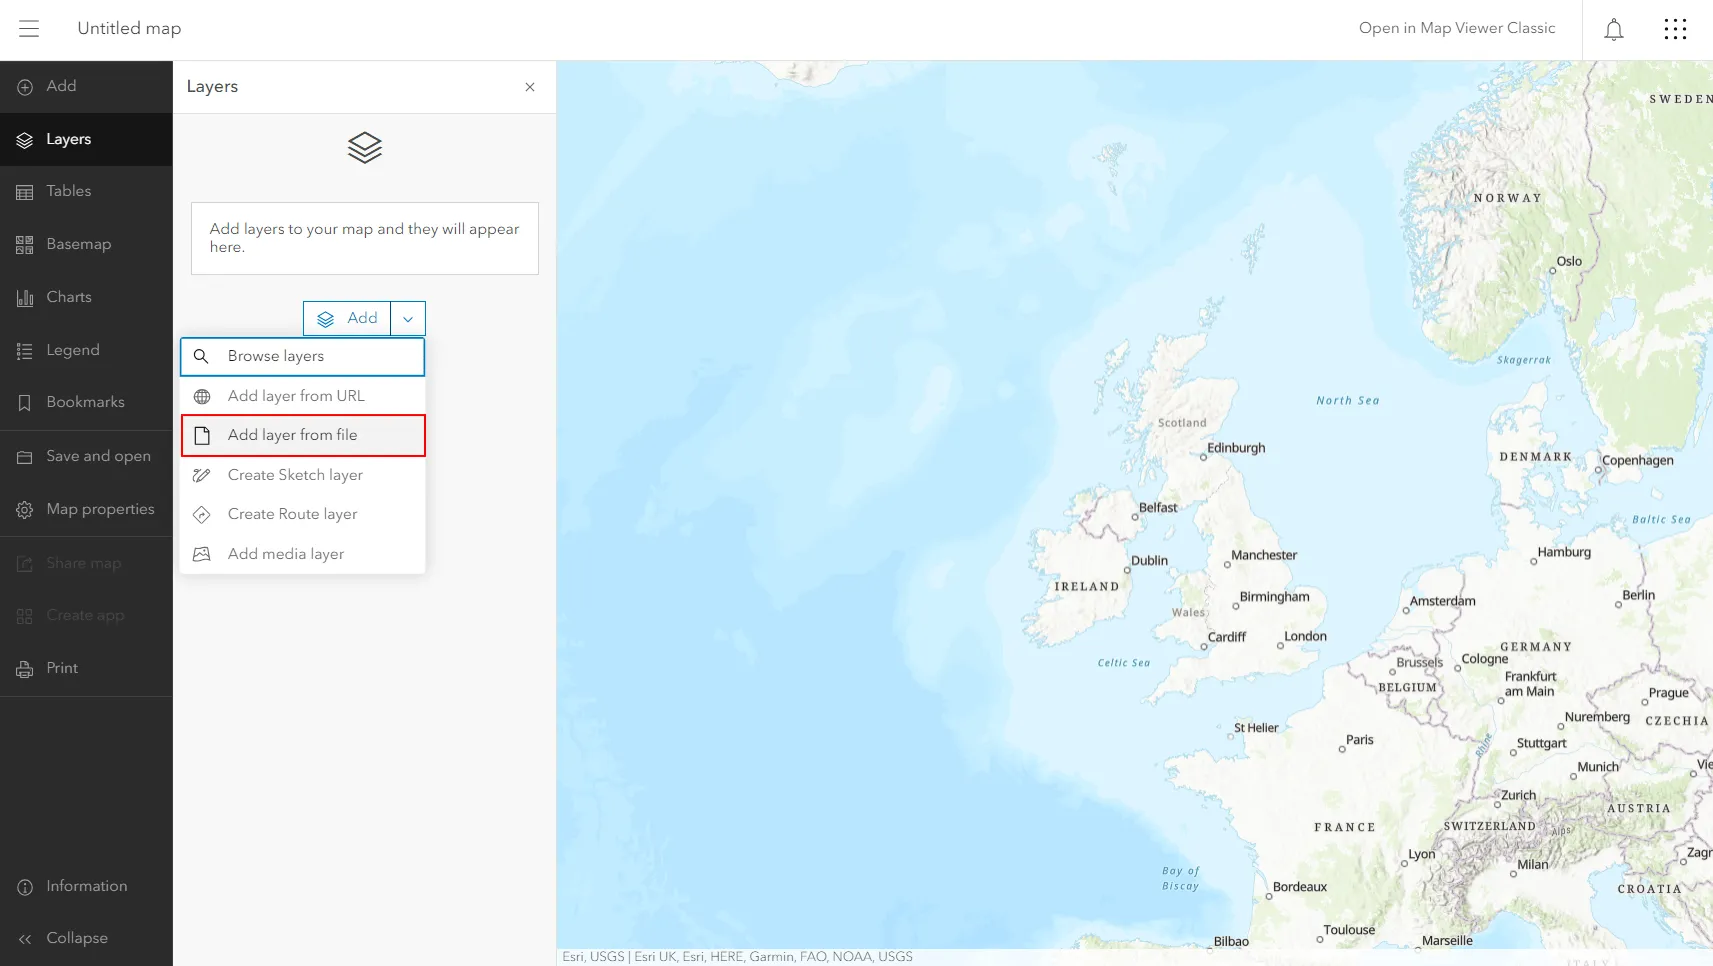
Pic. 10 Adding layer from file to the new map in ArcGIS Online.
Next, we have another choice of options, from where our file could come (Pic. 11). Your device is the option you should have to choose because you saved your file to the directory on your drive.
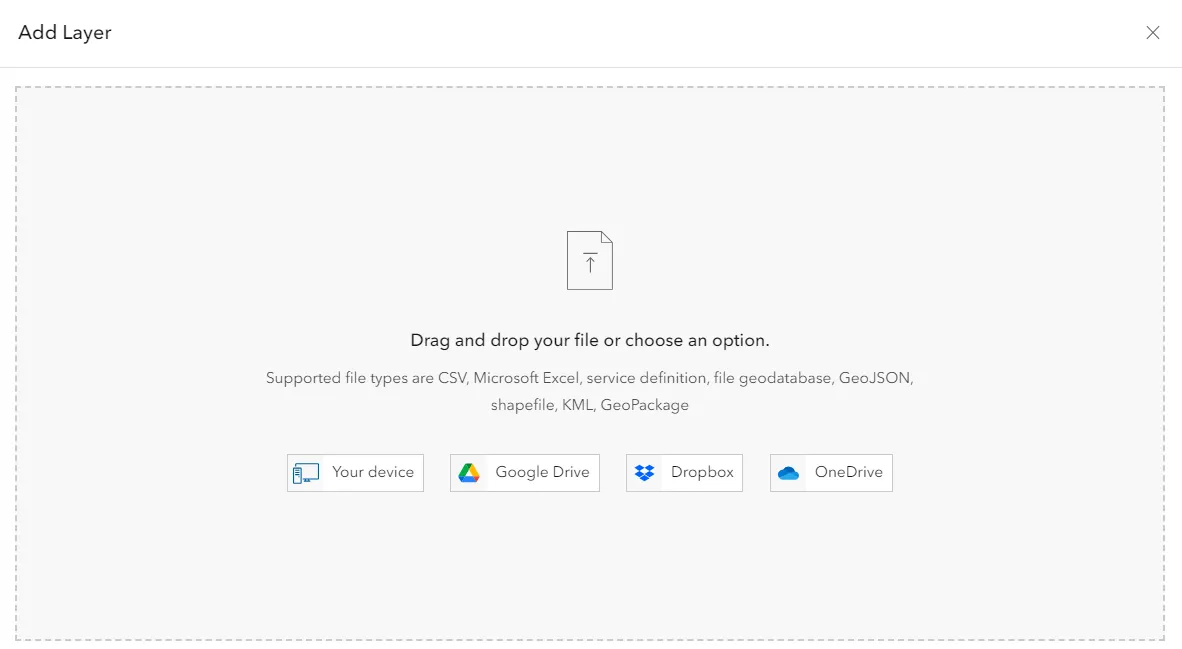
Pic. 11 Selection of our layer file source.
10. Once our layer is selected, we have two options for loading it (Pic. 12). For the simple purpose of this exercise, the second option will be selected. I will back to the first option in the second part of this article.

Pic. 12 ArcGIS Online – Add Layer options.
By selecting the second option, we just upload our .geojson layer as an item, which is going to play the static role in our map. You can use this approach for all the layers, which will act as the background layer and won’t be used in any actions.
At last, you can confirm the layer title, which always comes as your filename. Choose the correct folder in order to avoid the mess. You can create the folder earlier for this purpose. Provide the tag and summary optionally and hit the “Create and add to map” button (Pic. 13).

Pic. 13 Add layer to ArcGIS Online map – further options.
Finally, your layer has been added successfully to the map. Now you can style it, provide labels, etc. However, the most important thing could be saving the map, which is indicated by the blue dot next to this option (Pic. 14).
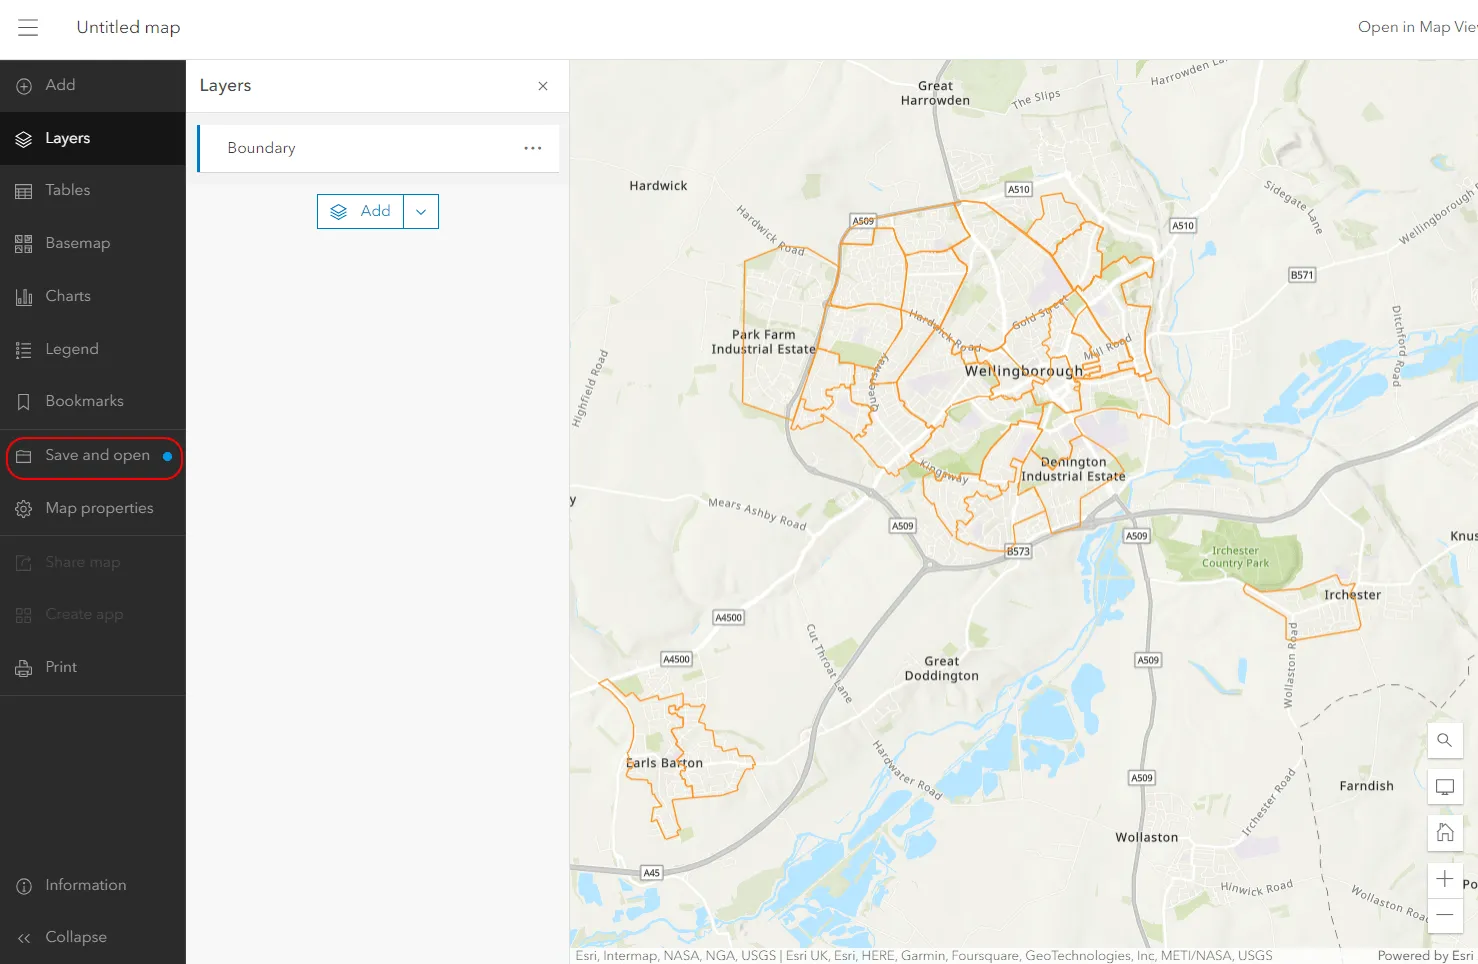
Pic. 14 New layer added to ArcGIS Online map.
Mariusz Krukar
Links:
- https://doc.arcgis.com/en/arcgis-online/get-started/what-is-agol.htm
- https://gisgeography.com/esri-arcgis-online-agol/
- https://desktop.arcgis.com/en/arcmap/latest/manage-data/cad/adding-cad-data-to-a-map.htm
- https://engage.safe.com/convert/dwg/arcgis-online-feature-service/
- https://desktop.arcgis.com/en/arcmap/latest/manage-data/cad/adding-cad-data-to-a-map.htm
- https://doc.arcgis.com/en/arcgis-online/reference/supported-items.htm
- https://doc.arcgis.com/en/cityengine/latest/help/help-import-dxf.htm
- https://www.telematica.com.pe/la-integracion-de-autocad-y-arcgis-online/ (Spanish)
- https://www.sigterritoires.fr/index.php/en/how-to-integrate-dwg-data-in-qgis/
- https://docs.qgis.org/2.18/de/docs/user_manual/managing_data_source/opening_data.html
Forums:
- https://community.esri.com/t5/arcgis-online-ideas/add-dwg-file-as-layer-into-arcgis-online/idi-p/970095
- https://www.reddit.com/r/gis/comments/120j6qh/cad_to_arcgis_online_via_pro_best_practices/
- https://gis.stackexchange.com/questions/384327/error-when-trying-to-import-dwg-file-in-qgis-3-10-9
- https://www.reddit.com/r/QGIS/comments/c1zu2o/import_layers_from_dwgdxf_fail/
- https://gis.stackexchange.com/questions/441298/i-am-importing-layers-from-a-dwg-file-into-qgis-and-they-are-visible-in-the-la
- https://gis.stackexchange.com/questions/32730/importing-dwg-into-qgis-project
Youtube:
you are in reality a just right webmaster The site loading velocity is incredible It seems that you are doing any unique trick In addition The contents are masterwork you have performed a wonderful task on this topic
obviously like your website but you need to test the spelling on quite a few of your posts Several of them are rife with spelling problems and I to find it very troublesome to inform the reality on the other hand Ill certainly come back again
helloI really like your writing so a lot share we keep up a correspondence extra approximately your post on AOL I need an expert in this house to unravel my problem May be that is you Taking a look ahead to see you
you are in reality a good webmaster The website loading velocity is amazing It sort of feels that youre doing any distinctive trick Also The contents are masterwork you have done a fantastic job in this topic
Thank you! I upgraded my website just recently.
I was recommended this website by my cousin I am not sure whether this post is written by him as nobody else know such detailed about my difficulty You are wonderful Thanks